- Overview
- Configuring Switch-Based Authentication
- Configuring IEEE 802.1x Port-Based Authentication
- Configuring Web-Based Authentication
- Configuring DHCP Features and IP Source Guard
- Configuring Dynamic ARP Inspection
- Configuring Network Security with ACLs
- Configuring IPv6 ACLs
- Configuring Control-Plane Security
Cisco Connected Grid Switches Security Software Configuration Guide
Bias-Free Language
The documentation set for this product strives to use bias-free language. For the purposes of this documentation set, bias-free is defined as language that does not imply discrimination based on age, disability, gender, racial identity, ethnic identity, sexual orientation, socioeconomic status, and intersectionality. Exceptions may be present in the documentation due to language that is hardcoded in the user interfaces of the product software, language used based on RFP documentation, or language that is used by a referenced third-party product. Learn more about how Cisco is using Inclusive Language.
- Updated:
- August 27, 2014
Chapter: Configuring Web-Based Authentication
- Configuring the Authentication Rule and Interfaces
- Configuring AAA Authentication
- Configuring Switch-to-RADIUS Server Communication
- Configuring the HTTP Server
- Customizing the Authentication Proxy Web Pages
- Specifying a Redirection URL for Successful Login
- Configuring an AAA Fail Policy
- Configuring the Web-Based Authentication Parameters
- Configuring a Web Authentication Local Banner
- Removing Web-Based Authentication Cache Entries
Configuring Web-Based Authentication
This chapter describes how to configure web-based authentication on the Cisco Industrial Ethernet 2000U Series (IE 2000U) and Connected Grid Switches. This document includes the following sections:
- Information About Web-Based Authentication
- Prerequisites
- Guidelines and Limitations
- Default Settings
- Configuring Web-Based Authentication
- Verifying Configuration
- Configuration Example
- Related Documents
- Feature History

Note For complete syntax and usage information for the switch commands used in this chapter, refer to the documents listed in the“Related Documents” section.
Information About Web-Based Authentication
Use the web-based authentication feature, known as web authentication proxy , to authenticate end users on host systems that do not run the IEEE 802.1x supplicant.
NoteYou can configure web-based authentication on Layer 2 and Layer 3 interfaces.
When you initiate an HTTP session, web-based authentication intercepts ingress HTTP packets from the host and sends an HTML login page to the users. The users enter their credentials, which the web-based authentication feature sends to the authentication, authorization, and accounting (AAA) server for authentication.
If authentication succeeds, web-based authentication sends a Login-Successful HTML page to the host and applies the access policies returned by the AAA server.
If authentication fails, web-based authentication forwards a Login-Fail HTML page to the user, prompting the user to retry the login. If the user exceeds the maximum number of attempts, web-based authentication forwards a Login-Expired HTML page to the host, and the user is placed on a watch list for a waiting period.
These sections describe the role of web-based authentication as part of AAA:
- Device Roles
- Host Detection
- Session Creation
- Authentication Process
- Web-Based Authentication Customizable Web Pages
- Local Web-Based Authentication Banner
Device Roles
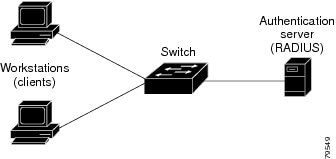
With web-based authentication, the devices in the network have these specific roles:
- Client —The device (workstation) that requests access to the LAN and the services and responds to requests from the switch. The workstation must be running an HTML browser with Java Script enabled.
- Authentication server —Authenticates the client. The authentication server validates the identity of the client and notifies the switch that the client is authorized to access the LAN and the switch services or that the client is denied.
- Switch —Controls the physical access to the network based on the authentication status of the client. The switch acts as an intermediary (proxy) between the client and the authentication server, requesting identity information from the client, verifying that information with the authentication server, and relaying a response to the client.
Figure 4-1 shows the roles of these devices in a network:
Figure 4-1 Web-Based Authentication Device Roles
Host Detection
The switch maintains an IP device tracking table to store information about detected hosts.
NoteBy default, the IP device tracking feature is disabled on a switch. You must enable the IP device tracking feature to use web-based authentication.
For Layer 2 interfaces, web-based authentication detects IP hosts by using these mechanisms:
Session Creation
When web-based authentication detects a new host, it creates a session as follows:
If the host IP is included in the exception list, the policy from the exception list entry is applied, and the session is established.
If the host IP is not on the exception list, web-based authentication sends a nonresponsive-host (NRH) request to the server.
If the server response is access accepted , authorization is bypassed for this host. The session is established.
If the server response to the NRH request is access rejected , the HTTP intercept ACL is activated, and the session waits for HTTP traffic from the host.
Authentication Process
When you enable web-based authentication, these events occur:
- The user initiates an HTTP session.
- The HTTP traffic is intercepted, and authorization is initiated. The switch sends the login page to the user. The user enters a username and password, and the switch sends the entries to the authentication server.
- If the authentication succeeds, the switch downloads and activates the user’s access policy from the authentication server. The login success page is sent to the user.
- If the authentication fails, the switch sends the login fail page. The user retries the login. If the number of failed attempts reaches the maximum, the switch sends the login expired page, and the host is placed in a watch list. After the watch list times out, the user can retry the authentication process.
- If the authentication server does not respond to the switch, and if an AAA fail policy is configured, the switch applies the failure access policy to the host. The login success page is sent to the user. (See the “Local Web-Based Authentication Banner” section.)
- The switch reauthenticates a client when the host does not respond to an ARP probe on a Layer 2 interface, or when the host does not send any traffic within the idle timeout on a Layer 3 interface.
- The feature applies the downloaded timeout or the locally configured session timeout.
- If the terminate action is RADIUS, the feature sends a nonresponsive host (NRH) request to the server. The terminate action is included in the response from the server.
- If the terminate action is default, the session is dismantled, and the applied policy is removed.
Web-Based Authentication Customizable Web Pages
During the web-based authentication process, the switch internal HTTP server hosts four HTML pages to deliver to an authenticating client. The server uses these pages to notify you of these four authentication-process states:
- Login—Your credentials are requested.
- Success—The login was successful.
- Fail—The login failed.
- Expire—The login session has expired because of excessive login failures.
You can substitute your HTML pages, as shown in Figure 4-2, for the default internal HTML pages. You can also specify a URL to which users are redirected after authentication occurs, which replaces the internal Success page.
Figure 4-2 Customizeable Authentication Page
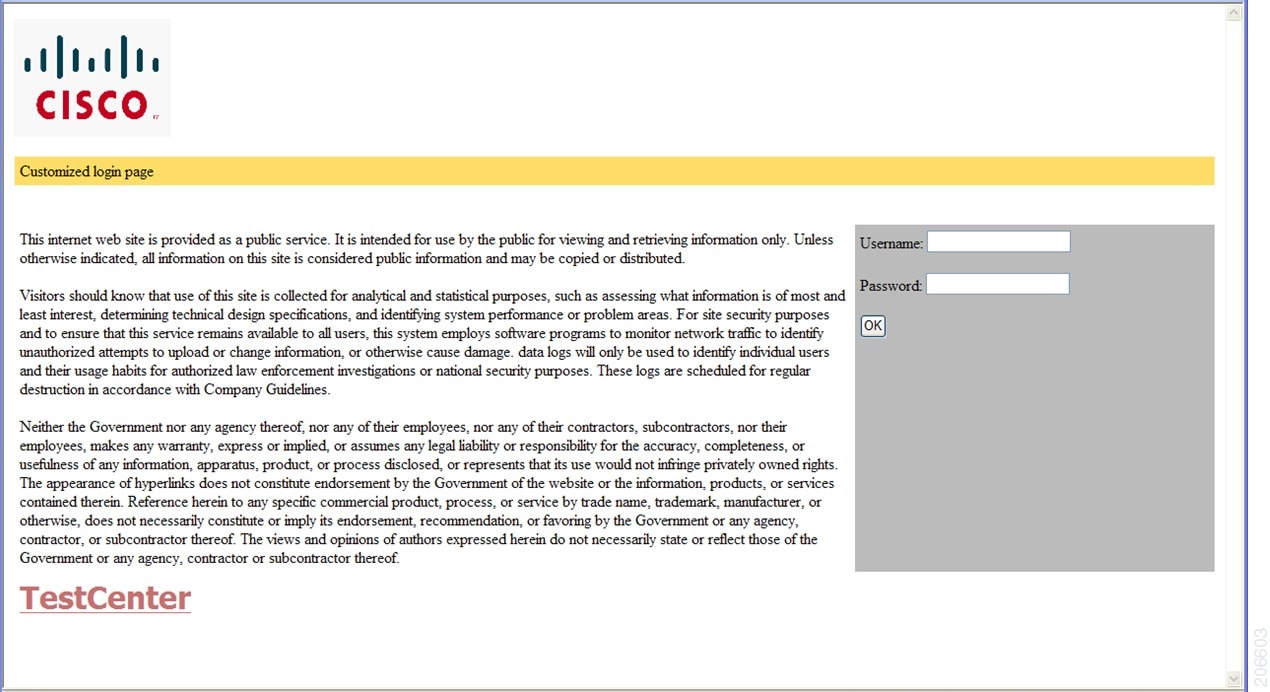
For more information, see the “Customizing the Authentication Proxy Web Pages” section.
Local Web-Based Authentication Banner
You can create a banner that will appear when you log in to a switch by using web-based authentication.
The banner appears on both the login page and the authentication-result pop-up pages.
You create a banner by using the ip admission auth-proxy-banner http global configuration command. The default banner Cisco Systems and Switch host-name Authentication appear on the login page. Cisco Systems appears on the authentication result pop-up page, as shown in Figure 4-3.
Figure 4-3 Authentication Successful Banner
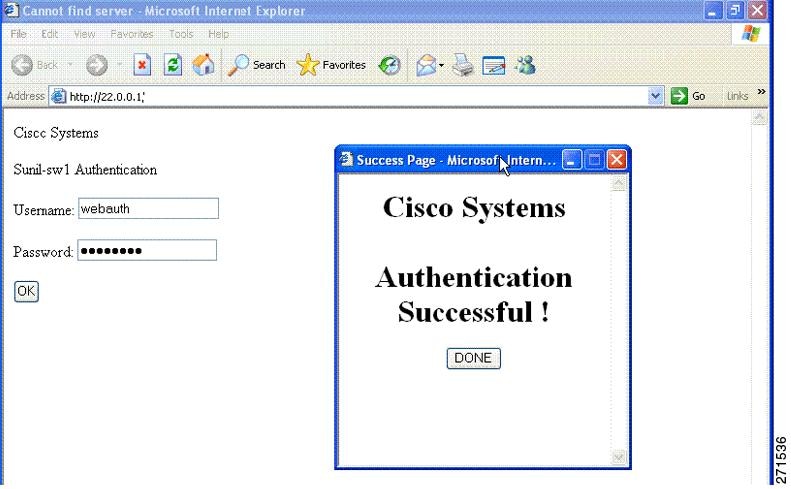
You can also customize the banner, as shown in Figure 4-4.
- Add a switch, router, or company name to the banner by using the ip admission auth-proxy-banner http banner-text global configuration command.
- Add a logo or text file to the banner by using the ip admission auth-proxy-banner http file-path global configuration command.
Figure 4-4 Customized Web Banner
If you do not enable a banner, only the username and password dialog boxes appear in the web authentication login page, and no banner appears when you log in to the switch, as shown in Login Page With No Banner.
Figure 4-5 Login Page With No Banner
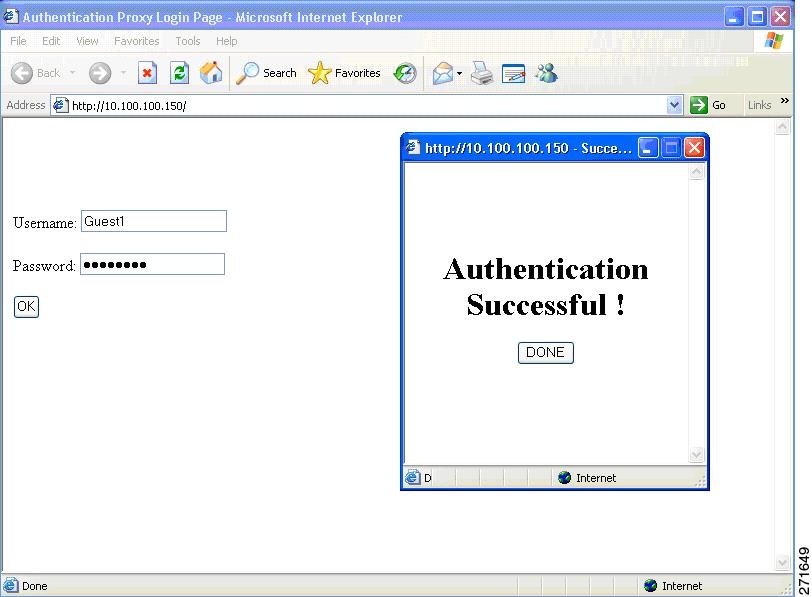
For more information, see the Cisco IOS Security Command Reference and the “Configuring a Web Authentication Local Banner” section.
Prerequisites
Be sure to review the Guidelines and Limitations section and the Before You Begin section within each configuration section before configuring a feature.
Guidelines and Limitations
- Web-Based Authentication
- Customized Web Pages and Redirection URL
- Web-based Authentication Interactions with Other Features
Web-Based Authentication
- Web-based authentication is an ingress-only feature.
- You can configure web-based authentication only on access ports. Web-based authentication is not supported on trunk ports, EtherChannel member ports, or dynamic trunk ports.
- You must configure the default ACL on the interface before configuring web-based authentication. Configure a port ACL for a Layer 2 interface or a Cisco IOS ACL for a Layer 3 interface.
- You cannot authenticate hosts on Layer 2 interfaces with static ARP cache assignment. These hosts are not detected by the web-based authentication feature because they do not send ARP messages.
- By default, the IP device tracking feature is disabled on a switch. You must enable the IP device tracking feature to use web-based authentication.
- You must configure at least one IP address to run the switch HTTP server. You must also configure routes to reach each host IP address. The HTTP server sends the HTTP login page to the host.
- Hosts that are more than one hop away might experience traffic disruption if an STP topology change results in the host traffic arriving on a different port. This occurs because the ARP and DHCP updates might not be sent after a Layer 2 (STP) topology change.
- Web-based authentication does not support VLAN assignment as a downloadable-host policy.
- Web-based authentication is not supported for IPv6 traffic.
Customized Web Pages and Redirection URL
Follow these guidelines for customizing the authentication proxy web pages and specifying a redirection URL:
- You can use a logo or specify text in the login , success , failure , and expire web pages.
- On the banner page, you can specify text in the login page.
- The pages are in HTML.
- You must include an HTML redirect command in the success page to access a specific URL.
- The URL string must be a valid URL (for example, http://www.cisco.com). An incomplete URL might cause page not found or similar errors on a web browser.
- The login form must accept user entries for the username and password and must show them as uname and pwd .
- The custom login page should follow best practices for a web form, such as page timeout, hidden password, and prevention of redundant submissions.
- If the custom authentication proxy web pages feature is enabled, the redirection URL feature is disabled and is not available in the CLI. You can perform redirection in the custom-login success page.
- If the CLI command redirecting users to specific URL after authentication occurs is entered and then the command configuring web pages is entered, the CLI command redirecting users to a specific URL does not take effect.
- If the custom web pages feature is enabled, a configured auth-proxy-banner is not used.
- If the redirection URL feature is enabled, a configured auth-proxy-banner is not used.
- The four custom HTML files must be present on the flash memory of the switch. The maximum size of each HTML file is 8 KB.
- Configured web pages can be copied to the switch boot flash or flash.
- Configured pages can be accessed from the flash on the stack master or members.
- The login page can be on one flash, and the success and failure pages can be another flash (for example, the flash on the stack master or a member).
- You must configure all four pages. If you specify fewer than four files, the internal default HTML pages are used.
- All of the logo files (image, flash, audio, video, and so on) that are stored in the system directory (for example, flash, disk0, or disk) and that must be displayed on the login page must use web_auth_<filename> as the file name.
- The configured authentication proxy feature supports both HTTP and SSL.
- Any images on the custom pages must be on an accessible HTTP server. Configure an intercept ACL within the admission rule.
- Any external link from a custom page requires configuration of an intercept ACL within the admission rule.
- To access a valid DNS server, any name resolution required for external links or images requires configuration of an intercept ACL within the admission rule.
Web-based Authentication Interactions with Other Features
Port Security
You can configure web-based authentication and port security on the same port. Web-based authentication authenticates the port, and port security manages network access for all MAC addresses, including that of the client. You can then limit the number or group of clients that can access the network through the port.
For more information about enabling port security, see the “Configuring Port Security” section in the System Management Software Configuration Guide for Cisco IE 2000U and Connected Grid Switches .
LAN Port IP
You can configure LAN port IP (LPIP) and Layer 2 web-based authentication on the same port. The host is authenticated by using web-based authentication first, followed by LPIP posture validation. The LPIP host policy overrides the web-based authentication host policy.
If the web-based authentication idle timer expires, the NAC policy is removed. The host is authenticated, and posture is validated again.
Gateway IP
You cannot configure Gateway IP (GWIP) on a Layer 3 VLAN interface if web-based authentication is configured on any of the switch ports in the VLAN.
You can configure web-based authentication on the same Layer 3 interface as Gateway IP. The host policies for both features are applied in software. The GWIP policy overrides the web-based authentication host policy.
ACLs
If you configure a VLAN ACL or a Cisco IOS ACL on an interface, the ACL is applied to the host traffic only after the web-based authentication host policy is applied.
For Layer 2 web-based authentication, you must configure a port ACL (PACL) as the default access policy for ingress traffic from hosts connected to the port. After authentication, the web-based authentication host policy overrides the PACL.
You cannot configure a MAC ACL and web-based authentication on the same interface.
You cannot configure web-based authentication on a port whose access VLAN is configured for VACL capture.
Context-Based Access Control
Web-based authentication cannot be configured on a Layer 2 port if context-based access control (CBAC) is configured on the Layer 3 VLAN interface of the port VLAN.
802.1x Authentication
You cannot configure web-based authentication on the same port as 802.1x authentication except as a fallback authentication method.
EtherChannel
You can configure web-based authentication on a Layer 2 EtherChannel interface. The web-based authentication configuration applies to all member channels.
Default Settings
|
|
|
|---|---|
Configuring Web-Based Authentication
- Configuring the Authentication Rule and Interfaces
- Configuring AAA Authentication
- Configuring Switch-to-RADIUS Server Communication
- Configuring the HTTP Server
- Customizing the Authentication Proxy Web Pages
- Specifying a Redirection URL for Successful Login
- Configuring an AAA Fail Policy
- Configuring the Web-Based Authentication Parameters
- Removing Web-Based Authentication Cache Entries
Configuring the Authentication Rule and Interfaces
BEFORE YOU BEGIN
Review the Guidelines and Limitations for this feature.
DETAILED STEPS
EXAMPLE
This example shows how to enable web-based authentication on Fast Ethernet port 5/1:
This example shows how to verify the configuration:
Configuring AAA Authentication
BEFORE YOU BEGIN
Review the Guidelines and Limitations for this feature.
DETAILED STEPS
|
|
|
|
|---|---|---|
| aaa authorization auth-proxy default group { tacacs+ | radius } |
Create an authorization method list for web-based authorization. |
|
Specify an AAA server. For RADIUS servers, see the “Configuring Switch-to-RADIUS Server Communication” section. |
||
Configure the authorization and encryption key used between the switch and the TACACS server. |
||
EXAMPLE
This example shows how to enable AAA:
Configuring Switch-to-RADIUS Server Communication
RADIUS security servers identification includes:
- Host name
- Host IP address
- Host name and specific UDP port numbers
- IP address and specific UDP port numbers
The combination of the IP address and UDP port number creates a unique identifier that enables RADIUS requests to be sent to multiple UDP ports on a server at the same IP address. If two different host entries on the same RADIUS server are configured for the same service (for example, authentication) the second host entry that is configured functions as the failover backup to the first one. The RADIUS host entries are chosen in the order that they were configured.
BEFORE YOU BEGIN
When you configure the RADIUS server parameters:
- Specify the key string on a separate command line.
- For key string , specify the authentication and encryption key used between the switch and the RADIUS daemon running on the RADIUS server. The key is a text string that must match the encryption key used on the RADIUS server.
- When you specify the key string , use spaces within and at the end of the key. If you use spaces in the key, do not enclose the key in quotation marks unless the quotation marks are part of the key. This key must match the encryption used on the RADIUS daemon.
- You can globally configure the timeout, retransmission, and encryption key values for all RADIUS servers by using the radius-server host global configuration command. If you want to configure these options on a per-server basis, use the radius-server timeout , radius-server retransmit , and the radius-server key global configuration commands. For more information, see the RADIUS Configuration Guide, Cisco IOS Release 15M&T and the Cisco IOS Security Command Reference .
NoteYou need to configure some settings on the RADIUS server, including the switch IP address, the key string to be shared by both the server and the switch, and the downloadable ACL (DACL). For more information, see the RADIUS server documentation.
DETAILED STEPS
EXAMPLE
This example shows how to configure the RADIUS server parameters on a switch:
Configuring the HTTP Server
To use web-based authentication, you must enable the HTTP server within the switch. You can enable the server for either HTTP or HTTPS.
NoteTo ensure secure authentication when you enter theip http secure-server command, the login page is always in HTTPS (secure HTTP) even if the user sends an HTTP request.
BEFORE YOU BEGIN
Review the Guidelines and Limitations for this feature.
DETAILED STEPS
|
|
|
|
|---|---|---|
| Enable the HTTP server. The web-based authentication feature uses the HTTP server to communicate with the hosts for user authentication. |
||
EXAMPLE
This example shows how to enable HTTPS:
Customizing the Authentication Proxy Web Pages
You can configure web authentication to display four substitute HTML pages to the user in place of the switch default HTML pages during web-based authentication.
BEFORE YOU BEGIN
- To specify the use of your custom authentication proxy web pages, first store your custom HTML files on the switch flash memory.
- Be familiar with the guidelines listed in the “Customized Web Pages and Redirection URL” section.
DETAILED STEPS
To remove the specification of a custom file, use the no form of the command.
EXAMPLE
This example shows how to configure custom authentication proxy web pages:
This example shows how to verify the configuration of custom authentication proxy web pages:
Specifying a Redirection URL for Successful Login
You can specify a URL to which the user is redirected after authentication, effectively replacing the internal Success HTML page.
BEFORE YOU BEGIN
Be familiar with the guidelines listed in the “Customized Web Pages and Redirection URL” section.
DETAILED STEPS
|
|
|
|---|---|
Specify a URL for redirection of the user in place of the default login success page. |
To remove the specification of a redirection URL, use the no form of the command.
EXAMPLE
This example shows how to configure a redirection URL for successful login:
This example shows how to verify the redirection URL for successful login:
Configuring an AAA Fail Policy
BEFORE YOU BEGIN
Review the Guidelines and Limitations for this feature.
DETAILED STEPS
EXAMPLE
This example shows how to apply an AAA failure policy:
This example shows how to determine whether any connected hosts are in the AAA Down state:
This example shows how to view detailed information about a particular session based on the host IP address:
Configuring the Web-Based Authentication Parameters
You can configure the maximum number of failed login attempts before the client is placed in a watch list for a waiting period.
BEFORE YOU BEGIN
Review the Guidelines and Limitations for this feature.
DETAILED STEPS
|
|
|
|
|---|---|---|
Set the maximum number of failed login attempts. The range is 1 to 2147483647 attempts. The default is 5. |
||
EXAMPLE
This example shows how to set the maximum number of failed login attempts to 10:
Configuring a Web Authentication Local Banner
BEFORE YOU BEGIN
Review the Guidelines and Limitations for this feature.
DETAILED STEPS
EXAMPLE
This example shows how to configure a local banner with the custom message My Switch :
Removing Web-Based Authentication Cache Entries
BEFORE YOU BEGIN
Review the Guidelines and Limitations for this feature.
DETAILED STEPS
EXAMPLE
This example shows how to remove the web-based authentication session for the client at the IP address 209.165.201.1:
Verifying Configuration
Configuration Example
This example shows how to enable web-based authentication on Fast Ethernet port 5/1:
This example shows how to verify the configuration:
This example shows how to enable AAA:
This example shows how to configure the RADIUS server parameters on a switch:
This example shows how to enable HTTPS:
This example shows how to configure custom authentication proxy web pages:
This example shows how to verify the configuration of custom authentication proxy web pages:
This example shows how to configure a redirection URL for successful login:
This example shows how to verify the redirection URL for successful login:
This example shows how to apply an AAA failure policy:
This example shows how to determine whether any connected hosts are in the AAA Down state:
This example shows how to view detailed information about a particular session based on the host IP address:
This example shows how to set the maximum number of failed login attempts to 10:
This example shows how to configure a local banner with the custom message My Switch :
This example shows how to remove the web-based authentication session for the client at the IP address 209.165.201.1:
Related Documents
Feature History
|
|
|
|---|---|
 Feedback