-
null
Bias-Free Language
The documentation set for this product strives to use bias-free language. For the purposes of this documentation set, bias-free is defined as language that does not imply discrimination based on age, disability, gender, racial identity, ethnic identity, sexual orientation, socioeconomic status, and intersectionality. Exceptions may be present in the documentation due to language that is hardcoded in the user interfaces of the product software, language used based on RFP documentation, or language that is used by a referenced third-party product. Learn more about how Cisco is using Inclusive Language.
- Updated:
- February 6, 2017
Chapter: Location Hierarchy in the CMX Engage
- Defining the Location Hierarchy
- Defining the Location Hierarchy
- Creating Zones and Adding Access Points
- Creating Groups
- Adding Floors to the Location
- Searching for a Location
- Searching for an Access Point
- Defining Metadata for a Location Element
- Defining or Changing the Time Zone for Locations
- CMX Engage Synchronization with the Meraki
Location Hierarchy in the CMX Engage
This chapter describes the structure of the location hierarchy in the CMX Engage, and how to define the location hierarchy in the CMX Engage.
Defining the Location Hierarchy
Each CMX Engage customer is provided with a default customer name and this customer name acts as the top element of the CMX Engage location hierarchy.You can add Meraki Organization to the location hierarchy under this customer name. You can then import Meraki networks. When you import a Meraki network, its floors, and access points are also imported. You can group the access points and create zones at network or floor level. You can group the location elements at customer name, or organization level. You can also rename the customer name.
The Location Hierarchy for the CMX Engage dashboard is as shown in Figure 3-1.
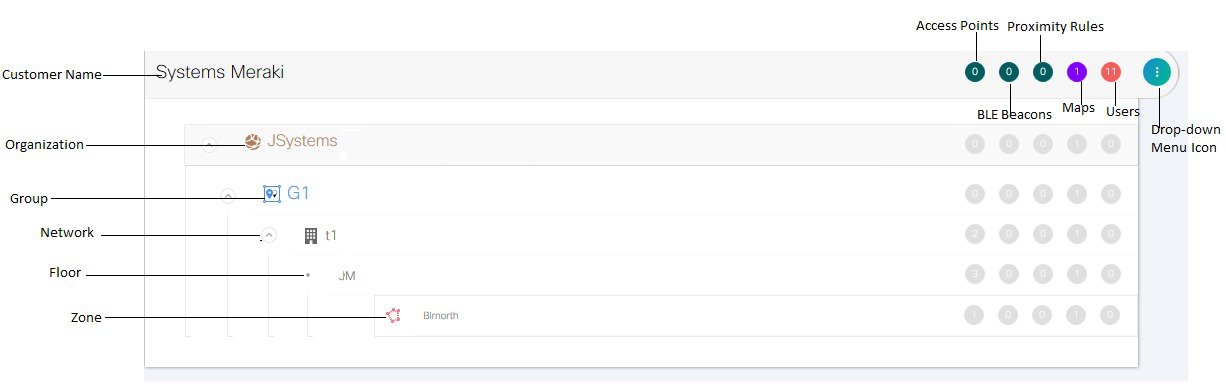
You can create proximity rules such as captive portal rule, engagement rule, and profile rule, and view maps, and users at customer name, organization, group, network, floor, or zone level. The number of proximity rules, maps, and users for each element in the location hierarchy are displayed against that particular element. For example, the number of proximity rules, maps, and users for a group are shown against that group in the location hierarchy.

Note For a CMX Engage account with existing experience zones, you can view and edit the experience zones for each location element from the location hierarchy.
- Defining the Location Hierarchy
- Creating Zones and Adding Access Points
- Creating Groups
- Adding Floors to the Location
- Searching for a Location
- Searching for an Access Point
- Defining Metadata for a Location Element
- Defining or Changing the Time Zone for Locations
- CMX Engage Synchronization with the Meraki
Defining the Location Hierarchy
To create the location hierarchy for your organization, perform the following steps:
2. Connecting to the Meraki Network
Accessing the CMX Engage
Cisco provides the user credentials to each customer of the CMX Engage.
To access the CMX Engage, perform the following steps:
Step 1 Go to emsp.cisco.com/cmxengage .
Step 2 In the Sign in window, enter the user credentials provided for your CMX Engage account, and click the arrow button to sign in.
Step 3 Click the CMX Engage icon.
Step 4 From the Select Customer drop-down list, choose the customer name corresponding to the Meraki, and click Proceed .
The CMX Engage dashboard appears.
Connecting to the Meraki Network
You need a connection to the Meraki network to define the location hierarchy. In addition, you need to connect to the Meraki, to create proximity rules and edit the experience zones for a Meraki SSID.
To connect to the Meraki, perform the following steps:
Step 1 In the CMX Engage dashboard, click the Wi-Fi icon that appears in the left pane.
The Meraki Settings dialog box appears.
Step 2 Click Connect account .
Step 3 Enter the username and password for your Meraki account, and click Connect account .
Step 4 In the Connect Account screen that appears, click Continue .
Now, the CMX Engage is connected to the Meraki network specified.
Note You can disconnect from a Meraki account and connect to a different Meraki account using the Wi-Fi icon. For more information check the “Connecting to a Different Meraki Account” section.
Adding a Meraki Organization
To create the location hierarchy in the CMX Engage, first you must add the Meraki organization of which you want to import the location elements to the location hierarchy.
Note The CMX Engage enables you to add multiple Meraki organization to the location hierarchy so that you can connect to the multiple Meraki organizations simultaneously.
To add a Meraki organization to the location hierarchy, perform the following steps:
Step 1 In the Location screen, click More Actions at the far right of the customer name.
The Add Meraki screen appears.
Step 3 From the Select Organization drop-down list, choose the Meraki organization that you want to add to the location hierarchy.
Note The Add Meraki screen appears only if you are connected to a Meraki account. For more information on connecting to the Meraki account, see “Connecting to the Meraki Network” section.
Adding a Network to the Meraki organization
The CMX Engage enables you to maintain the network, and floor structure followed for the location hierarchy in the Meraki. After adding a Meraki organization to the location hierarchy, you can import its networks, and the associated floors.
To import a network and its associated floors to the location hierarchy, perform the following steps:
Step 1 In the CMX Engage dashboard, click Manage Locations .
Step 2 In the Locations page, click the drop- down menu icon at the far right of the Meraki organization for which you want to add the network.
Step 4 In the Add Location window that appears, select the networks that you want to add to the location hierarchy.
The Add Network window appears with all the available networks for that Meraki organization. If you select a network, its floors appears to the right of the network.
Note If you do not want to add a network or floor to the location hierarchy, you can remove it by unselecting the corresponding check box. If required, you can add it to the location hierarchy any time later. For more information on adding a floor, see the “Adding Floors to the Location” section.
The networks added gets listed in the location hierarchy along with its associated floors.
Note In the Meraki, ensure that the network name is not duplicated.
Creating Zones and Adding Access Points
You can group the access points of a network or floor using zones. You can create the zones at network or floor level.
Note You cannot modify the access points for a floor.
To create a zone for a network or floor, perform the following steps:
Step 1 In the CMX Engage dashboard, choose Manage Locations .
Step 2 In the Locations page, click the drop- down menu icon at the far right of the network or floor under which you want to create the zone.
Step 3 In the Add Zone window that appears, perform the following steps:
a. In the Enter Zone Name Here text field, enter a name for the zone.
b. In the Select Access Points area, select the check box for the access points that you want to add to the zone.
Note When you add an access point of a network or floor to a zone, that access point will not be available for that network or floor. The access points added to a zone will not be available for other zones.
Creating Groups
You can group the Meraki organizations or networks in the location hierarchy. You can create a group even at the customer name level. You can also create sub groups under these groups. For example, you can group the Network 1 and Network 2 under one group and Network 3 and Network 4 under another group.
Grouping enables you to create proximity rules specific to that group.
To create a group for a location element, perform the following steps:
Step 1 In the CMX Engage dashboard, click Manage Locations .
Step 2 In the Locations page, click More Actions at the far right of the customer name or Meraki organization under which you want to add the group.
Step 4 In the window that appears, perform the following steps:
a. Enter a name for the group.
b. Select the locations elements that you want to add under this group.
Note The location elements available for selection depends upon where you are adding the group in the location hierarchy. For example, when you add a group under the customer name, all the Meraki organizations are available for selection. Similarly, when you add a group under a Meraki organization, the networks are available for selection.

Tip If you want to have a parent group without any location element (organization, network, and so on), and sub groups with location element, then you first create the parent group with all the required location elements that must become the part of its sub groups. Then you create a sub group under the parent group. The location elements added to the parent group are available for selection. Select the location elements that you want to add under the sub group. Similarly, you can create more sub groups under the parent group.
Note You can add more location elements to a group at any time. You can add only those location elements that are defined in the Meraki.
Adding Floors to the Location
To add a floor to a location, perform the following steps:
Step 1 In the CMX Engage dashboard, choose Manage Locations .
Step 2 In the Locations page, click More Actions at the far right of the network under which you want to create the floor.
Step 3 In the Add Floor window that appears, select the floor that you want to add under the network.
The floor gets added to the network.
Searching for a Location
You can search for a location in the location using its name. To search for a location in the location hierarchy, perform the following steps:
Step 1 In the CMX Engage dashboard, choose Manage Locations.
Step 2 In the Search text field, enter the name of the location that you want to search.
The location gets highlighted in the location hierarchy.
Searching for an Access Point
You can search for an access point using its name or Mac address.
To search for an access point in the location hierarchy, perform the following steps:
Step 1 In the CMX Engage dashboard, choose Manage Locations.
Step 2 In the Search text field, enter the name or Mac address of the access point that you want to search.
The access point gets highlighted.
Defining Metadata for a Location Element
The CMX Engage enables you to define metadata for a location element using variables. You can define the metadata at any level in the location hierarchy. You can use this metadata for filtering the locations when creating the proximity rules. For example, if you want to categorize your locations as corporate branch, division branch, and local branch, then you can define a location metadata with key as Branch and values as CB, DB, and LB, respectively. Then, you can use this metadata to filter the locations when creating the proximity rules.
To define a metadata for a location element, perform the following steps:
Step 1 In the CMX Engage dashboard, click Manage Locations .
Step 2 In the Locations page, click More Actions at the far right of the location element (organization, location, and so on) for which you want to add the location metadata.
Step 4 In the Add Metadata window that appears, perform the following steps:
a. Click the Add Metadata button.
b. In the Key text field, enter a name for the variable key.
c. In the Value text field, enter a value for the variable key.
Note You can delete a location metadata by clicking the Delete button for that metadata.
Defining or Changing the Time Zone for Locations
You can define the time zone for various locations in th location hierarchy. To define the time zone for a location, perform the following steps:
Step 1 In the CMX Engage dashboard, click More Actions for the location for which you want to define the time zone.
The Change TimeZone window appears. In the Current Time Zone field, the time zone configured for the location appears. For a location for which the time zone is not yet defined, No Time Zone appears in the Current Time Zone field.
Step 3 From the Time Zone drop-down list, choose the time zone that you want to configure for this location.
The time zone is defined for the location.
Note The notifications are sent for the locations based on the configured time zones.
CMX Engage Synchronization with the Meraki
The CMX Engage synchronizes with the Meraki at frequent intervals. If there is any synchronization issue, you can view them by clicking the Sync icon in the Locations page. Whenever you log in to the CMX Engage, the CMX Engage displays the latest synchronization status.
 Feedback