-
null
Bias-Free Language
The documentation set for this product strives to use bias-free language. For the purposes of this documentation set, bias-free is defined as language that does not imply discrimination based on age, disability, gender, racial identity, ethnic identity, sexual orientation, socioeconomic status, and intersectionality. Exceptions may be present in the documentation due to language that is hardcoded in the user interfaces of the product software, language used based on RFP documentation, or language that is used by a referenced third-party product. Learn more about how Cisco is using Inclusive Language.
- Updated:
- February 3, 2017
Chapter: Creating and Managing Portals
- Portal Modules
- Portal Management
- Selecting a Language for the Portal
- Configuring Authentication for a Portal
- Adding a Data Capture Module to a Portal
- Defining a Brand Name for a Portal
- Adding a Notice to a Portal
- Adding a Welcome Message to a Portal
- Providing the Venue Details in a Portal
- Uploading Videos to a Portal
- Providing a Feedback Section in a Portal
- Adding a Help Option to a Portal
- Adding Apps to a Portal
- Providing Access to the Internet from a Portal
- Adding Customized Menu Items to a Portal
- Adding Promotions and Offers to a Portal
- Exporting a Portal
- Editing the Portal Style Sheet
- Searching for a Portal
- Importing a Portal
- Deleting a Portal
- Editing a Portal
- E-mailing a Portal Preview URL
- Previewing the Portal Using QR Code
- Previewing a Portal for an Experience Zone
- Previewing the Portal for Various Devices
- Managing the Portals
- Configuring an SMS Gateway in the CMX Engage
Creating and Managing Portals
This chapter provides an overview of the various portal modules and how to enhance the portals using the portal modules. This chapter also describes how to configure the SMS gateways, and social authentication. The certified device list for portals, captive portal behavior, and authentication steps for the customers are also described in this chapter.
Portal Modules
The following are the portal modules of the CMX Engage:
- Authentication—Set the authentication mode for your portal using this module. You can provide access to a portal without authentication or with authentication through SMS, e-mail, and Social Sign In.
- Data Capture—Add a Data Capture form to the portal using this module. You can capture the customer details using the Data Capture form when the customer accesses the internet using the captive portal. This module is available only if you choose the authentication type as "Hard SMS with Verification Code” or “Email”.
- Brand Name—Define the brand name for your portal using this module. You can add the brand name as text or a logo image.
- Notice—Add a notice in the portal using this module. This helps you display notices to the portal users whenever required. You can set to provide the notice in the thicker text, text, or text with an image format.
- Welcome Message—Add a welcome message in the portal using this module.
- Venue Map— Add a label and icon for the Venue Map using this module. The venue map is uploaded in the portal from the MSE based on the location.
- Videos—Add videos in the portal using this module. You can also add an appropriate caption and icon for the video section in the portal. You can also view the preview of the video when uploading.
- Feedback—Add the feedback questions in the portal using this module. You can add multiple-choice and rating questions. This module also lets you customize the labels for the Submit button, Thank You message, and Post Submission button. It has an option to set whether the users are provided a text box to add the comments. It also lets you specify the e-mail addresses and subject for feedback.
- Help—Add a help line number that the user can contact for assistance using this module. You can customize the caption and icon for Help.
- Get Apps—Add apps to the portal using this module. You can add appropriate caption and icon for each app using this module.
- Get Internet—Add the external URL to which user can navigate from the Get Internet section in the portal. To navigate to this URL, the user has to accept the terms and conditions provided.
- Add Menu Item—Add customized menu items to the portal using this module. All the modules mentioned earlier are the default modules provided by the CMX Engage. You can add additional items to a portal based on your requirements using the Add Menu Item module.
- Promos & Offers—Add the promotions and offers to display through the portal using this module. You can modify the title of the promotion. For each module you can add appropriate captions and images, and specify the URL to the promotion details. Promos are displayed as carousels.
- Advertisement—Manage the advertisements to display in the portal using this module. You can divide the advertisement space in the portal among different advertisers and can set an account and space ID for each advertiser.
Portal Management
To know how to create portals, see the “Creating the Portals” section. This section describes the following functionalities of the portal modules:
- Selecting a Language for the Portal
- Configuring Authentication for a Portal
- Adding a Data Capture Module to a Portal
- Defining a Brand Name for a Portal
- Adding a Notice to a Portal
- Adding a Welcome Message to a Portal
- Providing the Venue Details in a Portal
- Providing a Feedback Section in a Portal
- Uploading Videos to a Portal
- Adding a Help Option to a Portal
- Adding Apps to a Portal
- Providing Access to the Internet from a Portal
- Adding Customized Menu Items to a Portal
- Adding Promotions and Offers to a Portal
- Exporting a Portal
- Editing the Portal Style Sheet
- Searching for a Portal
- Importing a Portal
- Deleting a Portal
- E-mailing a Portal Preview URL
- Previewing the Portal Using QR Code
- Previewing a Portal for an Experience Zone
- Previewing the Portal for Various Devices
- Managing the Portals
- Configuring an SMS Gateway in the CMX Engage
Selecting a Language for the Portal
In the CMX Engage, you can configure the language in which the module captions and static content in the portal are to display. To display the static content in any language other than English, you must upload the corresponding text to the CMX Engage. The CMX Engage does not support to enter the content in any language other than English. The default language is set to English. You can change the default language.

Note You cannot translate the content prepared in one language to another using the CMX Engage.
Configuring a Language for the Portal
To configure a language in which the portal content is to display, perform the following steps:
Step 1 Open the portal for which you want to configure the language.
Step 2 Click the Language Support icon.
The Language Support window appears.
Step 4 In the search field that appears, enter the name of the language.
If this language is supported by the CMX Engage, then the language name appears in the drop-down list.
Step 5 Click the Add button that appears adjacent to the language name.
The language gets added to the Added Languages list.
In the portal, the language added gets displayed in the drop-down list adjacent to the Language Support icon.
Step 7 From the drop-down list adjacent to the Language Support icon, choose the language in which the portal content is to display.
The captions of the modules are displayed in the chosen language.
Step 8 To display the static content such as messages, country names, and so on, upload the key values in that language. For more information on uploading the key values for a language, see the Uploading Static Content Key Values for a Language.
Setting a Default Language
To set a default language, do the following:
Step 1 In the portal, click the Language Support icon.
Step 2 In the Language Support window, choose the default language from the Set Default Language drop-down list.
Uploading Static Content Key Values for a Language
To set to display the static content in any language other than English, perform the following steps:
Step 1 In the Language Support window, click Download to download and save the template.
The template contains keys for various static messages and the message that appears if your language is English. The column for English has “en” as first row.
Step 3 In the column adjacent to the English column, enter the language identifier for the language in which you want to display the static content.
For example, if you want to display the content in Arabic, enter “AR” in the first row.
Step 4 In the remaining rows, enter the text that must appear for the corresponding key.
Step 6 In the Language Support window, use the Upload button to upload the window.
To know how to display the static content in a language, see the Configuring a Language for the Portal.
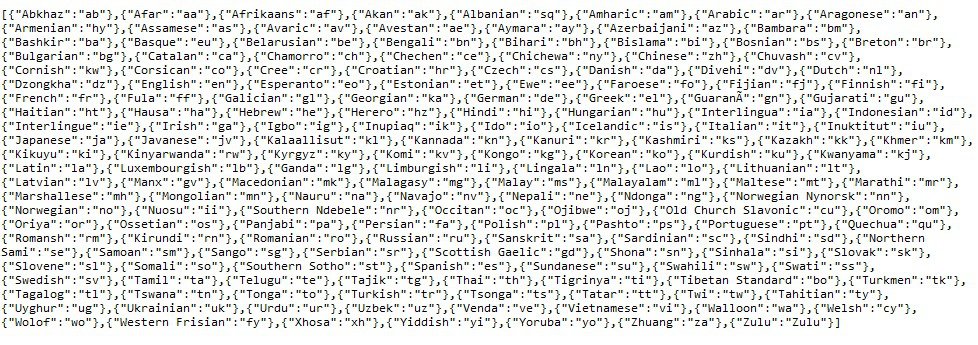
The language code for various languages are shown in Figure 7-1.
Configuring Authentication for a Portal
To secure your portal from hacking or misuse, you can configure various authentication options for your portal. The user is provided access only if the authentication is success.
You can authenticate the internet provisioning through SMS, e-mail, or social networks such as Facebook, Twitter, and so on. You can configure to provide authentication through Hard SMS or Soft SMS.The CMX Engage supports the SMS gateway of the third-party vendors for SMS verification. For Hard SMS, you can define a custom verification code for a portal or you can configure to auto-generate the verification code.
The “Hard SMS with Verification Code” and “Email” options enable you to add a Data Capture module to a captive portal that enables customer registration to the CMX Engage. These modules also provides a Opted In option that enables the customers to opt in or opt out the subscriptions.
During customer acquisition, the authentication process is initiated when the customer click any menu item in the portal. However, you can configure for inline authentication also, so that the Authentication module will be shown in the captive portal. For more information on inline authentication, see the “Inline Authentication” section.
Configuring Authentication for a Portal
To configure authentication for a portal, perform the following steps:
Step 1 Open the portal for which you need to configure the authentication.
Step 2 Click the Authentication module.
The Authentication window appears.
Step 3 Choose the authentication type that you want to apply to the portal.
The CMX Engage supports the following authentication types:
– Hard SMS with Verification Code — The customer has to enter a valid mobile number to access the internet. Then, an SMS is sent to that mobile number which contains a link and verification code. The customer can access the internet by providing the verification code in the SMS. Then, if configured, a Data Capture screen appears, where the customer can register to the CMX Engage. For more information on using the Hard SMS with Verification Code, see the “Configuring a Portal for Hard SMS with Verification Code” section.
– Social Sign In — The internet access is provided only if the customer is logged in to a social site configured for authentication. You must configure at least one social site to use this option. For more information on configuring social sign in verification, see the “Configuring a Portal for Social Sign In Authentication” section.
– Soft SMS —The user has to provide a valid mobile number to access the internet. Then, an SMS is sent to that mobile number. The user can access the internet only if the mobile number is valid. For more information, see the “Configuring a Portal for Soft SMS Verification” section.
– Email — The user has to provide a valid e-mail ID to access the internet. Then, if configured, a Data Capture screen appears, where the users can register to the CMX Engage. For more information on configuring e-mail authentication, see the “Configuring a Portal for E-mail Authentication” section.
– No Authentication — The internet access is provided without any authentication verification.
Note The Opt In feature and Data Capture module are available only for “Hard SMS with Verification Code” and “Email” authentication types. For more information on configuring the Data Capture module, see the “Adding a Data Capture Module to a Portal” section. For more information on Opt In feature, see “Opted In Users” section.
Step 4 If you want the user to accept any terms and conditions before providing the access to the portal, select the WiFi Policy Terms and Conditions check box, and enter the terms and conditions in the text field.
Note If you are modifying a portal that is already associated with a published captive portal or experience zone, click the Save & Publish button to immediately publish the changes. The Save and Publish button appears only if the portal is associated with a captive portal rule or experience zone. For more information on creating a captive portal rule, see the “Creating a Captive Portal Rule” section.
Configuring a Portal for Soft SMS Verification
To configure a portal for Soft SMS verification, do the following:
Step 1 In the Authentication window for the portal, choose Soft SMS .
Step 2 From the SMS Gateway drop-down list, choose the SMS gateway.
The SMS Gateways configured in the Tools option are available for selection. You can also use the Demo Gateway provided by Cisco that is chargeable.
Note To configure a gateway, choose the ADD SMS Gateway option from the SMS Gateway drop-down list. The SMS Gateway window appears where you can configure the required SMS gateway. For more information on configuring the SMS gateway, see the “Configuring an SMS Gateway in the CMX Engage” section. The configured SMS gateways are available here for selection. You can also use the Default Gateway provided by Cisco, which is chargeable.
Step 3 From the Default Country drop-down list, choose the country for which this setting is applicable.
Step 4 In the SMS text field, enter the text message that must appear in the SMS sent to the user.
Note To display the link through which the customer can access the captive portal, ensure that “{Link}” is not removed when editing the text message.
Configuring a Portal for Hard SMS with Verification Code
To configure a portal for Hard SMS with Verification Code, perform the following steps:
Step 1 In the Authentication window for the portal, choose Hard SMS with Verification Code .
Step 2 If you want the customers to provide an option to opt for receiving notifications, select the “Allow users to Opt in to receive message” check box.
Note When accessing the internet by connecting to your SSID, a “Opt In to receive notification” check box appears as selected for the customer. If the customer opts out by unselecting the check box, the notifications are not sent to the customer.
Step 3 From the SMS Gateway drop-down list, choose the SMS Gateway.
The SMS Gateways configured in the Tools option are available for selection. You can also use the Demo Gateway provided by Cisco that is chargeable.
Note To configure a gateway, click the Add SMS Gateway button. The SMS Gateway window appears where you can configure the required SMS gateway. For more information on configuring the SMS gateway, see the “Configuring an SMS Gateway in the CMX Engage” section. The configured SMS gateways are available here for selection.
Step 4 From the Default Country drop-down list, choose the country for which this setting is applicable.
Step 5 Choose the Password Type.
– Auto generated— To auto-generate the verification code for each authentication request. The autogenerated verification codes are sent to the user.
– Fixed— To define a verification code for authentication. For all of the users, this verification code is sent whenever there is an authentication request. In the Verification Code text field that appears when you choose the Fixed option, enter the verification code that is to send to the user.
a. In the SMS text field, enter the text that must appear in the SMS that is sent to the user.
Note To display the link through which the customer can access the captive portal, ensure that “{Link}” is not removed when editing the text message. Similarly, to display the verification code in the message, ensure that the “{Password}” is not removed.
Configuring a Portal for Social Sign In Authentication
The CMX Engage supports the authentication through the following social networks:
Note To authenticate the access to the internet through a social network, you must configure the app for that social network in the CMX Engage. You can configure the social app in the CMX Engage through the Tools option. For more information, see the “Adding Social Apps for Social Authentication” section. For information on the configurations required in the app for social-authentication, see the “Configuring the Apps for Social Authentication” section.
To authenticate the access to a portal through social sign in, perform the following steps:
Step 1 In the Authentication window for the portal, choose Social Sign In .
The social networks that are supported by the CMX Engage for authentication appear along with the configured custom apps.
Step 2 Select the check box adjacent to the social network through which you want to authenticate access to the internet.
Note The +Add button takes you to the Social Apps window where you can configure the customized apps.
Configuring a Portal for E-mail Authentication
To configure a portal for e-mail authentication, do the following:
Step 1 In the Authentication window for the portal, choose Email .
Step 2 If you want to provide the user an option to opt for receiving notifications, select the “Allow users to Opt in to receive message” check box.
Note When accessing the internet by connecting to your SSID, a “Opt In to receive notification” check box appears as selected for the user. If the user opts out by unselecting the check box, the notifications are not sent to the user.
Inline Authentication
In the Captive Portal, you can add authentication as an inline module along with other modules. That is, the authentication option is displayed before you click any link in the captive portal, thus reducing the number of clicks required to initiate the authentication process.You cannot do this configuration directly from the CMX Engage dashboard. You must contact the CMX Engage support team to do this configuration.
For Soft SMS and Hard SMS, the authentication section will have a field to enter the mobile number, along with a Connect button. For Email authentication, the authentication section will have a field to enter the email ID. For social authentication, the authentication section will have relevant buttons for each social network configured for the portal, using which the customer can complete the authentication through that social network. The Terms and Conditions will be displayed as a link above the Connect button.
Adding a Data Capture Module to a Portal
If you choose “Hard SMS with Verification Code” or “E-mail” in the Authentication module, you can add a Data Capture module in the captive portal. The customers can register themselves to the CMX Engage using this module. This module enables the customers to specify their personal details such as first name, last name, mobile number, and so on. You can also add business tags based on which you can filter your customers.
Note The business tags defined in the Data Capture module are available in the Choose Tags window.
To configure a Data Capture module in a captive portal, perform the following steps:
Step 1 Open the portal in which you want to configure a Data Capture module.
Step 3 Choose Hard SMS with Verification Code or Email .
The Data Capture module appears in the module list.
Step 4 Click the Data Capture module.
Step 5 Click Add Field Element .
You can add the following field elements to the module:
- Title- To specify how to address the customer. For example, Mr, Ms. If your configure this field, during customer acquisition (run time), the titles, Mr and Ms will be available for selection in the Data Capture form for the customer.
- Email- To specify the e-mail ID of the customer.
- Mobile Number- To specify the mobile number of the customer. You can specify a default country for the mobile number so that during customer acquisition, the code for the default country is displayed in the data capture form.
- First Name- To specify the first name of the customer.
- Last Name - To specify the last name of the customer.
- Gender- To specify the gender of the customer.
- Business Tags- To provide an answer of customer’s choice for the business tag question. This business tag helps you in categorizing the customers.
Note The Email field element is not available for Email authentication as the e-mail information is already collected during authentication. The Mobile Number field element is not available for the Hard SMS with Verification Code as the customer has to provide the mobile number during authentication.
Note You cannot add the Data Capture module in the portals created using CMX Engage 2.3 or earlier.
Step 6 Click the corresponding option to add the fields.
Step 7 In the Place Holder field, enter the text that must appear as place holder for the field.
Step 8 Select the “Make this field mandatory” check box to make the field mandatory.
Step 9 For the mobile number field element, choose the default country so that the country code for this country appears in the data capture form during customer acquisition.
Step 10 For Business Tag field element, you must configure the following additional fields:
a. In the Name field, enter a name for the business tag.
b. In the Place Holder, enter the question that you want to ask the customer.
d. In the text field that appears, enter an answer that you want to provide to the customers to opt.
e. Similarly, add the remaining answer choices also using the + Add Option .
Note You can delete an added option using the corresponding Delete icon.
Note When the customers access the Data Capture screen during authentication process, the answers you specify are available in a drop-down list. They can choose the required value. You can use this value for filtering the customers, in the proximity rules.
Note The Data Capture module is available only when creating new portals. You cannot add this module to the existing portals creating using CMX Engage 2.3 or earlier.
Defining a Brand Name for a Portal
The CMX Engage enables you to add a brand name for your portal using the Brand Name module. You can add the brand name as text or image. For example, you can use your company logo as a brand name.
To define a brand name for a portal, perform the following steps:
Step 1 Open the portal for which you want to define the brand name.
Step 2 Click the Brand Name module.
The brand name window appears.
Step 3 Choose the type of brand.
a. If you choose Text only, in the Brand Name field that appears, enter the brand name.
b. If you choose Logo, click the Upload button that appears, and upload the logo image.
The brand name for the portal is successfully defined.
Note If you are modifying a portal that is already associated with a published captive portal or experience zone, click the Save & Publish button to immediately publish the changes. The Save and Publish button appears only if the portal is associated with a captive portal rule or experience zone. For more information on creating a captive portal rule, see the “Creating a Captive Portal Rule” section.
Adding a Notice to a Portal
The Notice module enables you to provide notices in your portal. This module is useful when you want to pass any important information to your customers. You can add ticker and text notices. You can also add images along with text notices.
You can configure the date up to which the notice is to be displayed in the portal.
Note By default, the notice is set to configure using the Experience zone manager app. If you want to configure the notice using the CMX Engage dashboard, you must make the required changes in the “Configure in” drop-down list.
To add notices in a portal from the dashboard, do the following:
Step 1 Open the portal in which you want to add notice.
Step 2 Click the Notice module.
Step 3 From the Configure in drop-down list, choose Dashboard .
The notice features appear in the page.
Step 4 Select the type of notice. The following options are available:
a. For Ticker text Only, in the Notice text field that appears, enter the notice text.
b. For Text Only, in the Notice text field that appears, enter the notice text.
c. For Text with Image, do the following:
– In the Notice text field, enter the notice text.
– In the Notice image area, click the Upload button, and upload the image that must appear with the notice.
Step 5 In the Hide After field, choose the date upto which the notice is to display in the portal.
The notice is successfully added to the portal.
Note If you are modifying a portal that is already associated with a published captive portal or experience zone, click the Save & Publish button to immediately publish the changes. The Save and Publish button appears only if the portal is associated with a captive portal rule or experience zone. For more information on creating a captive portal rule, see the “Creating a Captive Portal Rule” section.
Adding a Welcome Message to a Portal
You can add a welcome message to a portal using the Welcome module. The welcome message added is displayed when a user accesses your portal.
To add a welcome message to a portal, perform the following steps:
Step 1 Open the portal in which you need to add the welcome message.
Step 2 Click the Welcome Message module.
The Welcome Message page appears.
Step 3 From the Configure in drop-down list, choose Dashboard .
Step 4 In the "First time visitor welcome text” message box, enter the welcome message that must appear when a user accesses your portal for the first time. You can include the location details using the smart link variables. You can add the variables “location” and “location metadata” in the first time welcome message. For more information on smart link, see the “Smart Link” section.
Step 5 If you want to display a different welcome message for the repeat users, ensure that the Add a custom message for Repeat Visitors check box is selected, and in the adjacent message box, enter the welcome message for the repeat user. You can include the name and location details using the smart link variables. You can add the variables “firstName”, lastName”, “location” and “location metadata” in the repeat user welcome message. The variables “firstName” and “lastName” will be available for selection only if you have configured a Data Capture module in the portal with the fields, First Name and Last Name. So, the variables “firstName”, and “lastName” will be available only for the authentication types, “Hard SMS with Verification Code” and “Email”. For more information on smart link, see the “Smart Link” section.
The welcome message is successfully defined for the portal.
Note If you are modifying a portal that is already associated with a published captive portal or experience zone, click the Save & Publish button to immediately publish the changes. The Save and Publish button appears only if the portal is associated with a captive portal rule or experience zone. For more information on creating a captive portal rule, see the “Creating a Captive Portal Rule” section.
Providing the Venue Details in a Portal
You can provide the venue details in a portal using the Venue Map module. You can define a label name, upload an icon image, and display a map for the venue using this module.
The default name of the module is Venue Map. The module name changes based on the changes you make in the Label field.
To add the venue details for a portal, perform the following steps:
Step 1 Open the portal in which you want to add the venue details.
Step 2 Click the Venue Map module.
Step 3 In the Label field, enter the venue map label name that must appear in the portal.
Note The Venue Map module name gets changed to the name you specify in the Label field.
Step 4 In the Icon area, upload the map icon that must appear adjacent to the map label using the Upload button.
Note You can delete the icon using the Delete icon.
Step 5 In the Store Map area, the map for this venue as in the MSE appears.
Note The map appears only if the portal is associated with a location for which the map is defined in the MSE. The map is associated with a location through a captive portal rule. The map of the location where the customer is currently present is shown.
The venue map is configured for the portal.
Note If you are modifying a portal that is already associated with a published captive portal or experience zone, click the Save & Publish button to immediately publish the changes. The Save and Publish button appears only if the portal is associated with a captive portal rule or experience zone. For more information on creating a captive portal rule, see the “Creating a Captive Portal Rule” section.
Uploading Videos to a Portal
You can upload the videos to the CMX Engage portals using the Videos module. In this module, you can add a label and image for the area where the video appears in the portal, and specify the Youtube URL of the video.
The default name of the module is Videos. The module name changes based on the changes you make in the Label field.
Note You can show only the YouTube videos in your portal.
To upload videos to a portal, perform the following steps:
Step 1 Open the portal in which you want to upload the video.
Step 2 Click the Videos module.
Step 3 From the Configure in drop-down list, choose Dashboard .
Step 4 In the Label field, enter the label that must appear for the area where the video appears in the portal.
Note The Videos module name gets changed to the name you specify in the Label field.
Step 5 In the Icon area, upload the video icon that must appear adjacent to the video label using the Upload button.
Note You can delete the icon using the Delete icon.
Step 7 In the YouTube URL field that appears, enter the YouTube URL of the video that you want to display in the portal.
The video is successfully uploaded to the portal.
Note If you are modifying a portal that is already associated with a published captive portal or experience zone, click the Save & Publish button to immediately publish the changes. The Save and Publish button appears only if the portal is associated with a captive portal rule or experience zone. For more information on creating a captive portal rule, see the “Creating a Captive Portal Rule” section.
Providing a Feedback Section in a Portal
The Feedback module in the CMX Engage enables you to collect the feedback from the customers of your portals. This module enables you to add multiple questions in the feedback section. These questions can be with multiple choice answers or rating-based answers. You can also provide a text box where the customers can add their comments regarding the portal.
To add a feedback section in a portal, perform the following steps:
Step 1 Open the portal in which you need to upload the video.
Step 2 Click the Feedback module.
Step 3 In the Label field, enter a name that must appear for the feedback section.
Step 4 In the Icon area, upload the icon image that must appear adjacent to the feedback label using the Upload button.
Step 5 In the Question Text field, enter a question for which you want the answer from the customer.
Step 6 In the Question Image area, upload an image that must appear adjacent to the question using the Upload button.
Step 7 In the Question Type area, choose any of the following:
- Rating— The customer can answer the question through rating.
- Multiple Choice— The customer can answer from the multiple choices provided. If you have chosen this option, enter the multiple choice of answers in the Option 1 and Option 2 fields. If you want to provide more choices, add the choice options using the Add option button.
Note You can add more questions to the feedback section using the Add Question button.
Step 8 In the Submit Button Label field, enter the name for the submit button, using which the customer must submit the answer.
Step 9 In the Thank You/ Success message field, enter the message that must appear to the customer after the customer submits the answer.
Step 10 In the Post Submission button label field, enter the name for the button that appears once the customer’s answer is submitted. This button leads the customer to the CMX Engage dashboard.
Step 11 If you want to provide a text box for the customer to enter the comments, select the Add a text box for additional comments from end user? check box.
Step 12 In the Email to field, enter the e-mail address to which the feedback is to be e-mailed.
Step 13 In the Email from field, enter the from e-mail address to display to the receiver of the e-mail for the feedback e-mails.
Step 14 In the Email Subject field, enter the subject for the e-mails with the feedback.
The feedback section is successfully created in the portal.
Note If you are modifying a portal that is already associated with a published captive portal or experience zone, click the Save & Publish button to immediately publish the changes. The Save and Publish button appears only if the portal is associated with a captive portal rule or experience zone. For more information on creating a captive portal rule, see the “Creating a Captive Portal Rule” section.
Adding a Help Option to a Portal
You can add a help line in your CMX Engage portal using the Help module. The customers can use this help line to contact you, if they need any assistance. In this module, you can add a label and image for the area where the Help line appears in the portal, and you can specify the number to contact if the customer needs any assistance.
The default name of the module is Help. The module name changes based on the changes you make in the Label field.
To add a Help option to a portal, perform the following steps:
Step 1 Open the portal in which you need to add a help option.
Step 3 From the Configure in drop-down list, choose Dashboard .
Step 4 In the Button label field, enter the label that must appear for the area where the help line appears in the portal.
Note The Help module name gets changed to the name you specify in the Button label field.
Step 5 In the Icon area, upload the help icon that must appear adjacent to the help label using the Upload button.
Note You can delete the icon using the Delete icon.
Step 6 In the Contact field, enter the help line number.
The help option is successfully defined for the portal.
Note If you are modifying a portal that is already associated with a published captive portal or experience zone, click the Save & Publish button to immediately publish the changes. The Save and Publish button appears only if the portal is associated with a captive portal rule or experience zone. For more information on creating a captive portal rule, see the “Creating a Captive Portal Rule” section.
Adding Apps to a Portal
You can add apps to your CMX Engage portal using the Apps module. You can add apps from both iTunes and Play Store. In this module, you can add a label and image for the area where the apps appear in the portal.
The default name of the module is Get Apps. The module name changes based on the changes you make in the Button Label field.
To add an app to a portal, perform the following steps:
Step 1 Open the portal in which you need to add an app.
Step 2 Click the Get Apps module.
Step 3 In the Button Label field, enter the label that must appear for the area where the app appears in the portal.
Note The Get Apps module name gets changed to the name you specify in the Button Label field.
Step 4 In the Icon area, upload the app icon that must appear adjacent to the app label using the Upload button.
Note You can delete the icon using the Delete icon.
Step 6 In the Add App area, do the following:
a. From the Platform drop-down list, choose the app platform.
b. In the App Store URL field, enter the URL of the app store from which you need to add app.
c. In the App URL Scheme field, enter the URL scheme for your app that you receive when you install an app on your device.
d. To provide a different URL for the desktops and laptops, select the Show this URL for Desktops and Laptops check box.
e. If you have selected the Show this URL for Desktops and Laptops check box , enter the URL for desktops and laptops.
Note To add more apps, use the Add an App button.
The app is successfully added to the portal.
Note If you are modifying a portal that is already associated with a published captive portal or experience zone, click the Save & Publish button to immediately publish the changes. The Save and Publish button appears only if the portal is associated with a captive portal rule or experience zone. For more information on creating a captive portal rule, see the “Creating a Captive Portal Rule” section.
Providing Access to the Internet from a Portal
You can provide access to the internet from a portal using the Get Internet module. You can add external URLs to a portal using the Get Internet module. In this module, you can add a label and image for the area where the internet link appears in the portal.
The default name of the module is Get Internet. The module name changes based on the changes you make in the Button Label field.
To provide access to the internet from a portal, perform the following steps:
Step 1 Open the portal in which you need to provide a link to the internet.
Step 2 Click the Get Internet module.
The GET INTERNET page appears.
Step 3 In the Button Label field, enter the label that must appear for the area where the internet link appears in the portal.
Note The Get Internet module name gets changed to the name you specify in the Button Label field.
Step 4 In the Button Icon area, upload the icon that must appear adjacent to the internet link using the Upload button.
Note You can delete the icon using the Delete icon.
Step 5 In the Launch Page field, enter the URL to connect to the internet from the portal.
Step 6 In the Interstitial Message field, enter the message that must appear in the portal when the user click the internet link.
Step 7 To display the interstitial message to the customer, select the Interstitial check box.
An option to access the internet is successfully configured in the portal.
Note If you are modifying a portal that is already associated with a published captive portal or experience zone, click the Save & Publish button to immediately publish the changes. The Save and Publish button appears only if the portal is associated with a captive portal rule or experience zone. For more information on creating a captive portal rule, see the “Creating a Captive Portal Rule” section.
Adding Customized Menu Items to a Portal
The Add Menu Item module enables you to add customized menu items in your portal according to your requirements. You can add various menu items in your portal that can be linked to different web pages. The module enables you add a label, icon, and web URL for each menu item. You can also enable a Back button, if the web page linked to is compatible.
To add customized menu item to a portal, perform the following steps:
Step 1 Open the portal in which you need to add custom menu item.
Step 2 Click the Add Menu Item module.
The Menu Item module gets added to the portal module list and opens the page for it.
Step 3 In the Label field, enter the label that must appear for the custom menu.
Note The Menu Item module name gets changed to the name you specify in the Label field.
Step 4 In the Icon area, upload the icon that must appear adjacent to the menu item using the Upload button.
Note You can delete the icon using the Delete icon.
Step 5 In the Link to URL field, enter the URL to which the menu link to connect.
Note You can enhance your URL using the smart link option. Enter”$” or click the Add Variable drop-down list to view the variables that you can add. For more information on creating a smart link, see the“Smart Link” section
Step 6 To enable a back button in the linked web page, select the Enable back button check box.
The customized menu item is successfully added to the portal.
Note The menu items added appear as text in the preview of the portal, but appear as links in the run-time.
Note If you are modifying a portal that is already associated with a published captive portal or experience zone, click the Save & Publish button to immediately publish the changes. The Save and Publish button appears only if the portal is associated with a captive portal rule or experience zone. For more information on creating a captive portal rule, see the “Creating a Captive Portal Rule” section.
Adding Promotions and Offers to a Portal
The Promos and Offers module enables you add promotions and offers that you want to provide to the customers in your portal. You can add various promotion items in your portal that can be linked to different promotion URLs. The module enables you add a label, icon, and web URL for each promotion.
Note The promotions are displayed as carousels.
To add promotions and offers to a portal, perform the following steps:
Step 1 Open the portal in which you need to add the promotions and offers module.
Step 2 Click the Promos and Offers module.
The PROMOS and OFFERS page appears.
Step 3 In the Title field, enter the label that must appear for the area in which the promotions and offers appear.
Step 4 In the Promo Name field, enter a name for the promotion link.
Step 5 In the Promo Image area, upload the icon that must appear adjacent to the promotion link using the Upload button.
Step 6 In the Link Promo to URL field, enter the URL that links to the promotion web page.
The promotions and offers link is successfully added to the portal.
Note You can add more than one promotion to your portal using the Add a Promotion button.
Note If you are modifying a portal that is already associated with a published captive portal or experience zone, click the Save & Publish button to immediately publish the changes. The Save and Publish button appears only if the portal is associated with a captive portal rule or experience zone. For more information on creating a captive portal rule, see the “Creating a Captive Portal Rule” section.
Deleting a Promotion for the Portal
The CMX Engage enables you to remove a promotion from a portal after the required time line.
To delete a promotion from your portal, perform the following steps.
Step 1 Open the portal from which you want to delete the promotion.
Step 2 Click the Promos and Offers module.
The PROMOS and OFFERS page appears with the promotions added to that portal.
Step 3 Click the Delete icon that appears at the far right top of the promotion that you want to delete.
Exporting a Portal
The CMX Engage enables you to export a portal created using the portal modules.
To export a portal, perform the following steps:
Step 1 Open the portal that you want to export.
Step 2 Click the Export Portal icon.
The Export Portal dialog box appears.
Step 4 In the window that appears, do any of the following:
a. To open the exported file directly, choose Open .
b. To save the portal file on your computer, choose Save .
The portal zip file is saved in the Downloads folder on your computer.
Note The portal is exported in the zip format.
Editing the Portal Style Sheet
The Style Sheet Editor option in the CMX Engage enables you to update the style sheet of a portal. This helps you to change the font properties and outlook of your portal.
To edit a portal style sheet, perform the following steps:
Step 1 Open the portal of which you want to edit the style sheet.
Step 2 Click the Style sheet Editor icon.
Step 3 In the CSS Editor tab, make necessary changes in the style sheet.
You can upload the style sheet from an external source. For example, the css designed for another portal.
You can also download the portal to make necessary updates and upload the edited style sheet. For example, if you want a css designer to edit the portal, you can download the style sheet using the Download button. After making the necessary changes to the style sheet, you can upload it to the CMX Engage using the Upload button.
Adding Assets to the Style Sheet
To improve the outlook of your portal, you can add assets such as images and fonts to the Style Sheet Editor of your portal. You can add image files such as jpeg, png, and tif. Edit your style sheet to incorporate these assets in the portal.
To add assets to a portal style sheet, perform the following steps:
Step 1 Open the portal of which you want to edit the style sheet.
Step 2 Click the Style sheet Editor icon.
Step 3 Click the Upload Assets tab.
Step 4 Click Upload file and upload the asset file.
The file gets added to the assets list.
You can copy the URL of an asset using the Copy Asset Url button displayed for an asset in the assets list. To add this asset in your portal, add the URL in the style sheet in the appropriate location.
You can delete an asset using the delete icon displayed for the asset in the assets list.
Searching for a Portal
The CMX Engage provides a search option to search the existing portals. You can search for a portal by its name.
To search for a portal, perform the following steps:
Step 1 In the CMX Engage dashboard, choose Portal .
Step 2 In the Search field, enter the portal name.
The portal with that name gets listed.
Importing a Portal
The CMX Engage enables you import a portal from an external path. For example, if you want to enhance a portal using an external application, you can export the portal using the Export Portal icon, make necessary enhancements, and import the portal file to the CMX Engage using the Import Portal option.
To import a portal, perform the following steps:
Step 1 In the CMX Engage dashboard, choose Portal .
Step 3 In the Import Portal window that appears, do the following:
a. In the Please Provide Portal Name and Select the Zip File to Import field, enter a file name for the portal.
b. Click the Choose File button and choose the file that you want to import.
Note The portal is uploaded in the zip format.
Deleting a Portal
To delete a portal, perform the following steps:
Step 1 In the CMX Engage dashboard, choose Portal .
The portal page appears with all the list of available portals in the CMX Engage.
Step 2 Select the check box adjacent to the portal that you want to delete.
Step 4 In the Delete Portals window that appears, click Yes .
The portal gets deleted from the CMX Engage.
Note You can delete multiple portals simultaneously by selecting the check boxes adjacent to the portals that you want to delete.
Note You cannot delete a portal that is associated with a captive portal rule or an experience zone.
Editing a Portal
To edit a portal, perform the following steps:
Step 1 In the CMX Engage dashboard, choose Portal .
The portal window for the selected port appears.
Step 2 In the Portals window that appears, click the portal that you want to edit.
Step 3 Make necessary changes and save the changes made for each module.
Step 4 To publish the changes, in the Portals window, click the Publish button for the portal.
E-mailing a Portal Preview URL
You can e-mail the preview URL of a portal, so that the receiver can use this URL to access the portal.
To e-mail the preview URL of a portal, perform the following steps:
Step 1 In the CMX Engage dashboard, choose Portal .
The portal page appears with all the list of available portals in the CMX Engage.
Step 2 Click the portal of which you want to e-mail the preview URL.
Step 3 In the Email Portal URL field, enter the e-mail ID to which you want to e-mail the portal preview URL.
A message appears stating the URL is sent to the e-mail address specified.
Previewing the Portal Using QR Code
The CMX Engage enables you to preview the portal using the QR code for a portal.To use this feature, you need to have a QR code reader app installed on your mobile.
To scan the QR code of a portal, perform the following steps:
Step 1 Open the portal of which you want to scan the QR Code.
Step 2 Open the QR code reader app on your mobile.
Step 3 In the portal, focus the mobile on the area labeled “Scan with QR code reader on your mobile device”.
Th mobile scans the QR code and displays the message whether to open the URL.
The portal is opened in your mobile screen.
Previewing a Portal for an Experience Zone
The CMX Engage enables you to display the same portal with different content for different experience zones. You can view how the portal will be for each experience zone, using the CMX Engage dashboard. To view a portal for an experience zone, perform the following steps:
Step 1 Open the portal of which you want to view the preview.
Step 2 In the Preview area, choose the experience zone for which you want to view the portal preview.
The portal preview for that experience zone appears.
Previewing the Portal for Various Devices
The CMX Engage enables you to view the outlook of portal in various devices. You can preview the portals for mobile, tablets, and laptops.
To preview a portal for a device, perform the following steps:
Step 1 Open the portal of which you want to view the preview.
The images of various devices are displayed in the right side of the portal.
Step 2 Do any of the following:
a. To view the preview of the portal for mobile, click the image of the mobile.
b. To view the preview of the portal for tablet, click the image of the tablet.
c. To view the preview of the portal for laptop, click the image of the laptop.
The preview of the portal for the selected device appears.
Note In the preview window, to view the preview of other devices, click the corresponding tabs. You can also view the CSS Editor, upload the assets, scan the QR code, e-mail the portal URL, and change the orientation from the preview window.
Managing the Portals
The portal administrators can display or hide a module added to a portal by switching the ON/OFF button in that module.
- To reorder the modules, drag and drop the modules to the required location. The preview section reflects the changes.
- You cannot rearrange the position of the following modules in a portal.However, you can rearrange these modules during customer acquisition.
Configuring an SMS Gateway in the CMX Engage
To control the portal authentication through SMS, the CMX Engage enables you to use the SMS Gateways of third-party vendors. To configure an SMS gateway in the CMX Engage, perform the following steps:
Step 1 In the CMX Engage dashboard, choose the Tools icon in the left pane.
Step 2 Click the SMS Gateway tab.
Step 3 Click the Add SMS Gateway button.
Step 4 From the SMS Gateway Type drop-down list, choose the SMS Gateway type that you want to use.Additional fields appears based on the SMS Gateway type selected.
The CMX Engage supports the following SMS Gateway types:
Step 5 In the additional fields that appear based on the SMS Gateway type selected, specify the required values.
Step 7 In the SMS Gateway window, in the Max. number of character length text field, enter the maximum number of characters that can be included in the SMS send as notifications using an engagement rule.
Note The Max.number of character length text field is visible only after adding an SMS Gateway.
Note The SMS Gateways created appears for selection in the SMS Gateway drop-down list for Hard SMS and Soft SMS authentication options in the portal. These SMS gateways also are available for selection when configuring the SMS notifications in the engagement rule.
Modifying the SMS Gateway
To modify an SMS gateway, perform the following steps:
Step 1 In the CMX Engage dashboard, choose the Tools icon in the left pane.
Step 2 Click the SMS Gateway tab.
Step 3 Click the Edit button for the SMS Gateway that you want to modify.
The SMS Gateway dialog box appears.
Step 4 Make the necessary changes.
Social Authentication for the Portals
To enable social authentication for the portals, perform the following steps:
1. Configuring the CUWN for Social-Authentication
2. Adding Social Apps for Social Authentication
3. Configuring a Portal for Social Sign In Authentication
4. Configuring the Apps for Social Authentication
Configuring the CUWN for Social-Authentication
For social authentication with the CUWN, you must do some configurations in the Wireless LAN Controller.
To configure the CUWN for social-authentication, perform the following steps:
Step 1 Log in to Wireless LAN Controller using your credentials.
Step 2 Choose SECURITY> Access Control Lists > Access Control Lists .
Step 3 In the Access Control List page that appears, click the Access Control List configured for the CMX Engage.
Click Add New Rule and add additional two rules with following information..
Adding Social Apps for Social Authentication
To provide authentication to the portals through the social network sites, you need to configure the corresponding social app in the CMX Engage. For example, if you need to authenticate access to a portal for users that are signed in to Facebook, you need to configure the Facebook app in the CMX Engage. You can add the apps of the following social network sites to the CMX Engage:
For more information on configuring an app for social-authentication of the portals, see the “Configuring the Apps for Social Authentication” section.
To configure the social apps in the CMX Engage, perform the following steps:
Step 1 In the CMX Engage dashboard, choose the Tools icon in the left pane.
Step 2 Click the Social Apps tab.
Step 3 Click the Add button corresponding to the social networking site for which you want to configure the app.
The fields for configuring the app appear.
Step 4 Enter the app name, app ID, and app secret key in the respective fields.
Configuring the Apps for Social Authentication
The configuration required in the apps for the various social-authentication through various networking sites is described in this section.
To configure the Facebook app for the social-authentication, perform the following steps:
Step 1 Go to developers.facebook.com.
Step 2 From the My Apps drop-down list, choose the app that you want configure in the CMX Engage for social-authentication.
Step 4 In the App Domains text field, enter cisco.wifi-mx.com .
Note The domain changes based on the CMX Engage setup (live, beta, and so on) where the portal is created.
To configure the Twitter app for the social-authentication, perform the following steps:
Step 1 Log in to apps.twitter.com .
Step 2 Click the app that you want to configure in the CMX Engage for social-authentication.
Step 3 Click the Settings tab.
Step 4 In the Callback URL text field, enter http://cisco.wifi-mx.com/socialAuth .
Step 5 Unselect the Enable Callback Locking check box.
Step 6 Select the Allow this application to be used to Sign in with Twitter check box.
Note The domain changes based on the CMX Engage setup (live, beta, and so on) where the portal is created.
LinkedIn App
Step 1 Log in to developer.linkedin.com .
Step 3 Click the app that you want to configure for the social-authentication.
Step 5 In the Default Application Permissions area, select the r_basicprofile and r-emailaddress check boxes.
Step 6 In the Authorized Redirect URLs text field, enter httpp://cisco.wifi-mx.com/p/linkedin_auth , and click Add .
Use http://cisco.wifi-mx.com/socialAuth for the portals created using the CMX Engage Studio.
Note The domain changes based on the CMX Engage setup (live, beta and so on) where the portal is created.
Certified Device List for Portals
The following table lists the devices and operating systems that are tested and certified for the portals.
CMX Engage Captive Portal Behavior
The captive portal behavior for various devices is as follows:
- iOS 7.x, 8.x, 9.x
- Android 5.x or Later - Using CNA
- Android 4.x or Earlier
- Windows Phone
- Windows PCs/Laptops
- Macbook
iOS 7.x, 8.x, 9.x
When the customer connects to an SSID configured with the captive portal URL, the Captive Network Assistant (CNA) window appears. The CNA loads and displays the content for the portal.
When the customer click any menu or link in the portal, a Log In screen appears with the content based on the authentication module configuration. For more information on configuring the authentication for portal, see the “Configuring Authentication for a Portal” section. The customer must follow the authentication steps which can be just accepting terms and conditions, an SMS verification, an e-mail verification, or social-authentication. For more information on the authentication steps for various authentication types, see the “Authentication Steps for the Customer” section. After completing the required authentication steps, the CMX Engage sends a request to the CUWN to provision internet for that particular device. After successful provisioning of the internet, the CNA window is dismissed, and the Mobile Safari is opened. The web page for the menu or link that customer clicked earlier appears in the Mobile Safari.
Alternatively, if CNA is bypassed, and the customer access any URL that is not white-listed (not in Access Control List) using the Mobile Safari or Chrome browser, then the customer is redirected to the configured captive portal URL. The browser loads and displays the content for the captive portal. When the customer click any menu or link in the portal, the Log In screen appears where the customer has to complete the authentication steps as described earlier to provision the internet.
Note After the internet is provisioned, the customer can navigate through any of the menus or links in the portal without any more authentications.
Note If any error occurs during the internet provisioning, the captive portal re-appears.
Note If you configure the authentication module as an inline module in th captive portal, you can initiate the authentication process without clicking any link in the portal. For more information on configuring the Authentication module as an inline module, see the “Inline Authentication” section.
Android 5.x or Later - Using CNA
When the customer connects to an SSID configured with a captive portal URL, an option to 'Sign in to {SSID name}' appears in the notification area. On clicking the notification, devices with Android 5.x or later launches the CNA window. The CNA loads the content from the portal URL and displays the portal. When the customer click any menu or link in the portal, a Log In screen appears with the content based on the authentication module configuration. For more information on configuring the authentication for portal, see the “Configuring Authentication for a Portal” section. The customer must follow the authentication steps which can be just accepting terms and conditions, an SMS verification, an e-mail verification, or social-authentication. For more information on the authentication steps for various authentication types, see the “Authentication Steps for the Customer” section. After completing the required authentication steps, the CMX Engage sends a request to the CUWN to provision internet for that particular device. After successful provisioning of the Internet, the CNA window is dismissed.
Alternatively, the customer can ignore the notification and go ahead using the native or Chrome browser. When the customer access any URL that is not white-listed (not in Access Control List), the customer is redirected to the configured captive portal URL. The browser loads and displays the content for the captive portal. When the customer click any menu or link in the portal, the Log In screen appears where the customer has to complete the authentication steps as described earlier to provision the internet. After successful provisioning of the internet, the web page for the menu or link that customer clicked earlier appears.
Note After the internet is provisioned, the customer can navigate through any of the menus or links in the portal without any more authentications.
Note If any error occurs during the internet provisioning, the captive portal re-appears.
Note If you configure the authentication module as an inline module in th captive portal, you can initiate the authentication process without clicking any link in the portal. For more information on configuring the Authentication module as an inline module, see the “Inline Authentication” section.
Android 4.x or Earlier
When the customer connects to an SSID configured with a captive portal URL, an option to 'Sign in to {SSID name}' appears in the notification area. On clicking the notification, devices with Android 4.x or earlier launches the default browser. The browser tries to load a URL that is generated by the device. As this URL is not white-listed in the WLC, the customer is redirected to the captive portal. When the customer click any menu or link in the portal, a Log In screen appears with the content based on the authentication module configuration. For more information on configuring the authentication for portal, see the “Configuring Authentication for a Portal” section. The customer must follow the authentication steps which can be just accepting terms and conditions, an SMS verification, an e-mail verification, or social-authentication. For more information on the authentication steps for various authentication types, see the “Authentication Steps for the Customer” section. After completing the required authentication steps, the CMX Engage sends a request to the CUWN to provision internet for that particular device. After successful provisioning of the internet, the web page for the menu or link that customer clicked earlier appears in the same browser.
Note After the internet is provisioned, the customer can navigate through any of the menus or links in the portal without any more authentications.
Note If any error occurs during the internet provisioning, the captive portal re-appears.
Note If you configure the authentication module as an inline module in th captive portal, you can initiate the authentication process without clicking any link in the portal. For more information on configuring the Authentication module as an inline module, see the “Inline Authentication” section.
Windows Phone
When the customer connects to an SSID configured with a captive portal URL, the Captive Network Assistant (CNA) appears. The CNA loads and displays the content for the captive portal URL. When the customer click any menu or link in the portal, a Log In screen appears with the content based on the authentication module configuration. For more information on configuring the authentication for portal, see the “Configuring Authentication for a Portal” section. The customer must follow the authentication steps which can be just accepting terms and conditions, an SMS verification, an e-mail verification, or social-authentication. For more information on the authentication steps for various authentication types, see the “Authentication Steps for the Customer” section. After completing the required authentication steps, the CMX Engage sends a request to the CUWN to provision internet for that particular device. After successful provisioning of the Internet, the CNA window is dismissed.
Note If any error occurs during the internet provisioning, the captive portal re-appears.
Note If you configure the authentication module as an inline module in th captive portal, you can initiate the authentication process without clicking any link in the portal. For more information on configuring the Authentication module as an inline module, see the “Inline Authentication” section.
Windows PCs/Laptops
After successfully connecting to an SSID configured with a captive portal URL, when the customer browses any URL that is not white-listed, the customer is redirected to the captive portal page configured for that SSID. When the customer click any menu or link in the portal, a Log In screen appears with the content based on the authentication module configuration. For more information on configuring the authentication for portal, see the “Configuring Authentication for a Portal” section. The customer must follow the authentication steps which can be just accepting terms and conditions, an SMS verification, an e-mail verification, or social-authentication. For more information on the authentication steps for various authentication types, see the “Authentication Steps for the Customer” section. After completing the required authentication steps, the CMX Engage sends a request to the CUWN to provision internet for that particular device. After successful provisioning of the internet, the web page for the menu or link that customer clicked earlier appears in the same browser.
For windows 10, when the customer connects to an SSID configured with a captive portal URL, the Captive Network Assistant (CNA) appears. The CNA loads and displays the content for the captive portal URL. When the customer click any menu or link in the portal, a Log In screen appears with the content based on the authentication module configuration. For more information on configuring the authentication for portal, see the “Configuring Authentication for a Portal” section. The customer must follow the authentication steps which can be just accepting terms and conditions, an SMS verification, an e-mail verification, or social-authentication. For more information on the authentication steps for various authentication types, see the “Authentication Steps for the Customer” section. After completing the required authentication steps, the CMX Engage sends a request to the CUWN to provision internet for that particular device. After successful provisioning of the Internet, the CNA window is dismissed.
Note After the internet is provisioned, the customer can navigate through any of the menus or links in the portal without any more authentications.
Note If any error occurs during the internet provisioning, the captive portal re-appears.
Note If you configure the authentication module as an inline module in th captive portal, you can initiate the authentication process without clicking any link in the portal. For more information on configuring the Authentication module as an inline module, see the “Inline Authentication” section.
Macbook
When the customer connects to an SSID configured with a captive portal URL, the Captive Network Assistant (CNA) window appears. The CNA loads and displays the content for the captive portal.When the customer click any menu or link in the portal, a Log In screen appears with the content based on the authentication module configuration. For more information on configuring the authentication for portal, see the “Configuring Authentication for a Portal” section. The customer must follow the authentication steps which can be just accepting terms and conditions, an SMS verification, an e-mail verification, or social-authentication. For more information on the authentication steps for various authentication types, see the “Authentication Steps for the Customer” section. After completing the required authentication steps, the CMX Engage sends a request to the CUWN to provision the internet for that particular device. After successful provisioning of the internet, the web page for the menu or link that customer clicked earlier appears in the default browser of the customer. Apart from the link that the customer has clicked, the browser opens another tab with the home page that is in CNA.
Alternatively, the customer can dismiss the captive portal window and go ahead using the browser. When the customer accesses any URL that is not white-listed (not in Access Control List), the customer is redirected to the configured captive portal URL. The browser loads and displays the content for the captive portal URL. When the customer click any menu or link in the portal, the Log In screen appears where the customer has to complete the authentication steps as described earlier to provision the internet. After successful provisioning of the internet, the web page for the menu or link that customer clicked earlier appears in the same browser.
Note After the internet is provisioned, the customer can navigate through any of the menus or links in the portal without any more authentications.
Note If any error occurs during the internet provisioning, the captive portal re-appears.
Note If you configure the authentication module as an inline module in th captive portal, you can initiate the authentication process without clicking any link in the portal. For more information on configuring the Authentication module as an inline module, see the “Inline Authentication” section.
Authentication Steps for the Customer
The authentication steps the customer has to complete to provision the internet for various authentication types are as follows:
- Authentication with Terms and Conditions
- Authentication through Soft SMS
- Authentication through Hard SMS with Verification Code
- Authentication through E-mail
- Authentication Steps for Social Authentication
Authentication with Terms and Conditions
You can configure to provision the internet to the customers if they accept just the terms and conditions mentioned.
To complete the authentication that requires only the acceptance of the terms and conditions, perform the following steps:
Step 1 In the captive portal, click/tap any menu item.
Step 2 In the Log In screen that appears, press Accept Terms and Continue .
The internet provisioning process is initiated, and the internet is provisioned.
Authentication Steps for a Repeat User with Terms and Conditions Authentication
When the captive portal loads, and the customer click any menu item or link in the portal, the internet is provisioned.
Note If there is any change in the Terms and Conditions defined, the Terms and Conditions screen appears when the customer click any menu item or link in the portal. The customer must press the Accept Terms and Continue button to get access to the internet.
Authentication through Soft SMS
To complete the Soft SMS authentication, perform the following steps:
Step 1 In the captive portal, click/tap any menu item.
Step 2 In the Log In screen that appears, enter the mobile number.
Step 3 Press Accept Terms and Continue .
The internet is provisioned and a SMS with a link to access the portal is sent to the mobile number provided.
Note The Soft SMS authentication is supported by finger print verification. For more information on finger print verification, see the “Fingerprint Verification” section.
Authentication Steps for a Repeat User for Soft SMS Verification
When the captive portal loads, and the customer click any menu item or link in the portal, the internet is provisioned.
Note If there is any change in the Terms and Conditions defined, the Terms and Conditions screen appears when the customer click any menu item or link in the portal. The customer must press the Accept Terms and Continue button to get access to the internet.
Fingerprint Verification
When a customer provides the mobile number for the soft SMS authentication, a message with a link is sent to the mobile number provided, and the internet is provisioned. The Fingerprint verification happens when the customer click the link in the message. If the customer is not clicking the link within a pre-defined time, a temporary page with a “SKIP” option is shown to the customer. The customer can click the Skip option to access the internet without fingerprint verification.
The fingerprint verification status for various scenarios is as follows:
- When the customer click the link in the message, if fingerprint matches, then customer acquisition will happen and the customer will be redirected to the portal page. The customer will be considered as repeat user on next visit.
- When the customer click the link in the message, if the fingerprint verification fails (For example, if the customer opens the link in a different browser than the one used for initiating the SMS authentication, then the fingerprint verification fails.), a confirmation page appears for the customer. If the customer click “Confirm”, the customer acquisition will happen and the customer will be redirected to the portal page. The customer will be considered as repeat user on next visit.
- When the customer click the link in the message, if fingerprint verification fails, a confirmation page appears for the customer. If the customer click “Cancel”, the customer will considered as first time user on next visit, and the log in screen appears with the mobile number entered previously.
- If the customer click “Skip” in the temporary page displayed, the customer is considered as first time user on next visit, and the log in screen appears with the mobile number entered previously.
Authentication through Hard SMS with Verification Code
To complete the Hard SMS with Verification Code authentication, perform the following steps:
Step 1 In the captive portal, click/tap any menu item.
Step 2 In the Log In screen that appears, enter the mobile number.
Note If the customer wants to unsubscribe from receiving notifications, uncheck the “Opt In to Receive notification” check box.
Note The “Opt In to receive notification” check box appears in the Log In screen only if you have selected the “Allow users to Opt in to receive message” check box for Hard SMS with Verification Code when configuring the Authentication module for the portal.
Step 3 Press Accept Terms and Continue .
Step 4 In the screen that appears, enter the verification code received through the SMS.
After successful verification of the verification code, a registration form appears, if a Data Capture module is configured.
Step 6 Enter all the mandatory fields for registration, and press Connect .
Note If all the fields are optional, there will be two buttons Skip and Connect. The customer can click the Skip button to proceed without filling the data. If the customer click Skip, the registration form will appear for that customer only if there is any change in the Registration form.
After successful registration, the internet provisioning process is initiated, and the internet is provisioned.
Note If the Data Capture module is not configured, the internet is provisioned immediately after the verification code validation.
Authentication Steps for a Repeat User for Hard SMS with Verification Code
The authentication steps for a repeat user for various scenarios are as follows:
- The Data Capture module is not configured -When the captive portal loads, and the customer click any menu item or link in the portal, the internet is provisioned.
- The Data Capture module is configured and the customer completed the registration - When the captive portal loads, and the customer click any menu item or link in the portal, the internet is provisioned.
- The Data Capture module is configured, and the registration details are outdated- When the captive portal loads, and the customer click any menu item or link in the portal, the registration form appears with the previously filled data. The customer can update the form, and press the Connect button to get access to the internet.
The following are some of the scenarios when the registration details become outdated:
– Added new mandatory fields - Added a new mandatory field in the Data Capture module. For example, you configured the Data Capture module without a Gender field. The customer completes registration. Later on, you added the Gender field to the Data Capture module and marked it as mandatory.
– Optional field becomes mandatory- Modified the Data Capture module to make an optional field that the customer skipped during registration as a mandatory field. For example, you have configured a Data Capture module with the last name as optional. The customer connected to the SSID and completed the registration without mentioning the last name. Now, you modified the Data Capture module and made the last name mandatory for registration.
– Modified the choice options -Removed or replaced the choice options that was available for selection. For example, you have configured a mandatory business tag “Age Criteria” with choice options as “Child” and Adult”. The customer completes registration by selecting Age Criteria as “Child”. Later on, you modified to display the choices as “Kids”, and “Adult”.
– Entered invalid e-mail ID during previous log in- When the captive portal loads, and the customer click any menu item or link in the portal, the registration form appears with the invalid e-mail ID mentioned during previous login. The customer has to enter a valid e-mail ID to proceed further.
Note In all the above scenarios, if there is any change in the Terms and Conditions defined, the Terms and Conditions screen appears, when the customer click any menu item or link in the portal. The customer must press the Accept Terms and Continue button to get access to the internet or to move to the next authentication step.
Authentication through E-mail
To complete the e-mail authentication, perform the following steps:
Step 1 In the captive portal, click/tap any menu item.
Step 2 In the Log In screen that appears, enter the e-mail ID.
Step 3 If the customer wants to unsubscribe from receiving notifications, uncheck the “Opt In to Receive notification” check box.
Note The “Opt In to receive notification” check box appears in the Log In screen only if you have selected the “Allow users to Opt in to receive message” check box for the “Email” authentication type when configuring the Authentication module for the portal.
Step 4 Press Accept Terms and Continue .
If the e-mail ID entered is valid, the internet is provisioned.
Step 5 If a Data Capture module is configured for the e-mail authentication, a registration screen appears when the customer press Accept Terms and Continue .
Step 6 Enter all the mandatory fields for registration, and press Connect .
Note If all the fields are optional, there will be two buttons Skip and Connect. The customer can click the Skip button to proceed without filling the data. If the customer click Skip, the registration form will appear for the repeat user only if there is any change in the Registration form.
The internet provisioning process is initiated, and the internet is provisioned.
Authentication Steps for a Repeat User for Email Verification
The authentication steps for a repeat user for various scenarios are as follows:
- Entered invalid e-mail ID during previous log in- When the captive portal loads, and the customer click any menu item or link in the portal, the log in screen appears with the invalid e-mail ID mentioned during previous login. The customer has to enter a valid e-mail ID to proceed further.
- The Data Capture module is not configured -When the captive portal loads, and the customer click any menu item or link in the portal, the internet is provisioned.
- The Data Capture module is configured and the customer completed the registration - When the captive portal loads, and the customer click any menu item or link in the portal, the internet is provisioned.
- The Data Capture module is configured, and the registration details are outdated- When the captive portal loads, and the customer click any menu item or link in the portal, the registration form appears with the previously filled data. The customer can update the form, and press Connect to get access to the internet.
The following are some of the scenarios when the registration details become outdated:
– Added new mandatory fields - Added a new mandatory field in the Data Capture module. For example, you configured the Data Capture module without a Gender field. The customer completes registration. Later on, you added the Gender field to the Data Capture module and marked it as mandatory.
– Optional field becomes mandatory- Modified the Data Capture module to make an optional field that the customer skipped during registration as a mandatory field. For example, you have configured a Data Capture module with the last name as optional. The customer connected to the SSID and completed the registration without mentioning the last name. Now, you modified the Data Capture module and made the last name mandatory for registration.
– Modified the choice options - Removed or replaced a choice option that was available for selection. For example, you have configured a mandatory business tag “Age Criteria” with choice options as “Child” and Adult”. The customer completes registration by selecting Age Criteria as Child. Later on, you modified to display the choices as “Kids”, and “Adult”.
Note In all the above scenarios, if there is any change in the Terms and Conditions defined, the Terms and Conditions screen appears with the terms and conditions when the customer click any menu item or link in the portal. The customer must press the Accept Terms and Continue button to get access to the internet or to move to the next authentication step.
Authentication Steps for Social Authentication
To complete the social authentication for a portal, perform the following steps:
Step 1 When the customer click any menu item or link in the captive portal, a screen appears with all the social sign in options available for the portal.
Note The Sign in option appears only for those social networks that are configured for the portal. For more information on configuring the social app for a portal, see the “Configuring a Portal for Social Sign In Authentication” section.
Step 2 Click the sign in option for the social network through which you want to complete the authentication. The log in page for the social network appears.
For example, click the sign in option for Facebook, then the log in screen for Facebook appears.
Step 3 Enter the log in credentials for the social network, and press the log in button.
Step 4 In the screen that appears, press Allow .
The redirect URI gets loaded and the Terms and Conditions screen appears.
Step 5 Press Accept Terms and Continu e.
Note For Facebook and Twitter, it is not required to configure the redirect URI. The Redirect URI must be configured for Linked In. For more information on configuring the redirect URI for Linked In, see the “Configuring the Apps for Social Authentication” section.
Step 6 After provisioning the internet, a Continue screen appears.
Step 7 Press Continue to view the page for the link that you have clicked earlier.
Note For the portals created using the CMX Engage 2.3 or earlier, the pop up message appears throughout the authentication process instead of flat screens.
Authentication Steps for a Repeat User with Social Authentication
When the captive portal loads, and the customer click any menu item or link in the portal, the options to connect with all the configured social networks appear. The social networks the customer has used earlier for authentication will be labeled as “Continue with [social network]. For example, if the customer has used Facebook authentication earlier to access the internet through the captive portal, the option for Facebook will be labeled as “Continue with Facebook”. For the social networks that are not used earlier for authentication, a sign in option appears. For example, “Signin with Linkedin”.
- If the customer continues to use a social network that was used earlier for authentication, the internet is provisioned without any authentication process. However, if there is any change in the terms and conditions, the Terms and Conditions screen is shown. Then, the customer must press the Accept Terms and Continue button to get access to the internet.
- If the customer signs in using a social network that was not used earlier for authentication, the customer has to complete the entire authentication process for that social network. If the customer has accessed the internet using social authentication through any of the social network, the Terms and Conditions screen is not shown during the authentication process. However, if there is any change in the terms and conditions, the Terms and Conditions screen appears during the authentication process. Then, the customer must press the Accept Terms and Continue button to get access to the internet.
Smart Link
The Smart Link option enables you to do the following:
- Provide your customers personalized view of your web page. Using the Smart Link option, you can customize the URLs for the custom menu links in the captive portals and the engagement URLs in the notification messages, to provide a personalized view. You can personalize your site pages for each user or group of users.
For example, you can configure the parameter ""optedinstatus" for a custom menu item in your portal. Then you configure the web page for this custom menu item to display different content for "opted in" and "not opted in" users. When a customer who is an opted in user click the custom menu link in the captive portal, the content for the opted in user is shown. When a customer who is a not opted in user click the same custom menu link, the content for the not opted in user is shown.
Note To use these parameters to display the personalized view to the customers, you have to configure your web pages accordingly.
- Add personal details of the customers such as name, mobile number, gender, and so on in the notification messages sent to the customers and business users. By default, the notifications have first name and last name of the customer. You can add additional customer details using the smart link.
For example, assume that you have created an engagement rule to send sms notifications to the customers and configured the variables "mobile" and "gender" in the message text box for the sms notification. Now, when a customer receives a sms message based on this engagement rule, the mobile number and gender details of the customer are also shown in the message.
You can include the smart links in the following options:
- The links added in the custom menu items added to the portal.
- The engagement URLs in the SMS, e-mail, BLE, app, or API notifications.
- The notification message text sent to the customers and business users such as employees or API end point.
The CMX Engage captures the personal details of the users using the Data Capture module. That is, to include the personal details such as first name, last name, gender, and so on in the smart link, you must configure the Data Capture module in the portal.
Note The URL of the captive portal that is included in the Soft SMS and Hard SMS with Verification Code messages are not supported with the smart link feature.
The CMX Engage provides certain predefined variables. You must use these variables to provide personalized view for you web pages and to add customer details on the notification messages.
You can include static and dynamic variables in a smart link.
The static parameters that you can include in the smart link are as follows:
- macaddress-The mac address of the device.
- encryptedMacAddress-The encrypted mac address of the device.
- deviceSubscriberId-The subscriber ID for the device in the database.
- firstName- The first name of the customer.
- lastName- The last name of the customer.
- email- The e-mail ID of the customer.
- Mobile- The mobile number of the customer.
- gender- The gender of the customer.
- optinStatus- The opt in status for the customer.
Note You can use the "macaddress", "encryptedMacAddress", “deviceSubcriberId ", and optinStatus variables only for API notifications and the engagement URLs in the notifications.
You can include the following dynamic variables in a smart link:
- Business Tags- The business tag to which the customer belongs to. The business tags configured in the Data Capture module are listed as variables. For more information on creating a business tag, see the “Adding a Data Capture Module to a Portal” section.
- Location Metadata- The location metadata for the customer location. The location metadata keys defined are listed as variables.or more information on defining the location metadata, see the “Defining Metadata for a Location Element” section.
To include the smart link in a URL, perform the following steps:
Step 1 In the URL or Link field, enter "$" or click the corresponding Add Variable drop-down list.
The variables that you can include get listed.
Step 2 Choose the variables that you want to include.
To include the smart link in a notification message, perform the following steps:
Step 1 In the notification text box, enter "$" or click the corresponding Add Variable drop-down list.
The variables that you can include get listed.
Step 2 Choose the variables that you want to include.
 Feedback