Cisco Smart+Connected Spaces User Guide
Bias-Free Language
The documentation set for this product strives to use bias-free language. For the purposes of this documentation set, bias-free is defined as language that does not imply discrimination based on age, disability, gender, racial identity, ethnic identity, sexual orientation, socioeconomic status, and intersectionality. Exceptions may be present in the documentation due to language that is hardcoded in the user interfaces of the product software, language used based on RFP documentation, or language that is used by a referenced third-party product. Learn more about how Cisco is using Inclusive Language.
- Updated:
- February 5, 2015
Chapter: Collaborating by Using Meeting Spaces
- Overview
- Using the Spaces Portal
- About the Portal
- Understanding the User Interface
- Portal Tabs
- Creating a Quick Reservation
- Creating a New Reservation
- New Reservation Use Case
- Viewing Meetings
- Setup or Setup Removal and Services Requests
- Using Saved Drafts
- Editing Meeting Details
- Accepting or Declining Meetings
- Deleting Meetings
- Configuring Meeting Preferences
- Using Signage
- Using Kiosks
- Understanding the Kiosk Interface
- Viewing Recent Activities
- Booking Conference or TP Rooms
- Searching for Facilities
- Searching for People
- Searching for Conference or TP Rooms
- Viewing Your Cisco Jabber Contacts
- Viewing the Details of the People on a Floor
- Viewing Neighborhoods
- Viewing the Building Summary
- Changing the Kiosk PIN
- Resetting the Kiosk PIN
- Using Room Panels
- Installing and Using the Smart Spaces Outlook Plug-in
- Using Cisco IP Phones
Collaborating by Using Meeting Spaces
This chapter describes how to view the conference or Cisco TelePresence (TP) room details on the Spaces portal for room booking, signage, kiosks, room panels, and Cisco IP Phones, book rooms using these devices or interfaces, and manage the meeting spaces resources.
Overview
Apart from booking the conference or TP rooms using the traditional methods, the Smart+Connected Spaces solution allows use the touchscreen signage located in a building to view the room schedule and book the available conference or TP rooms in a building. You can also book the conference rooms using the Spaces portal for room booking, kiosks, room panels, and the Cisco IP Phones located in the conference rooms.
The Smart+Connected Spaces solution also helps you manage the resources in these meeting spaces by using Cisco IP Phones.
Using the Spaces Portal
- About the Portal
- Understanding the User Interface
- Portal Tabs
- Creating a Quick Reservation
- Creating a New Reservation
- New Reservation Use Case
- Viewing Meetings
- Setup or Setup Removal and Services Requests
- Using Saved Drafts
- Editing Meeting Details
- Deleting Meetings
- Configuring Meeting Preferences
About the Portal
The Spaces portal for room booking allows you to search for, book, and set up the conference or TP rooms for meetings, book resources for these rooms, send out invites to the attendees, and manage your meetings. You can apply your preferred settings to customize the booking experience, save the search results to use them for future bookings, and set certain conference rooms as your favorites so that they show up whenever you search for rooms.
The portal displays the daily, weekly, and monthly meeting calendar, which is up-to-date and synchronized with your enterprise calendaring system. You can use the calendar to quickly view all of the meetings that you are a part of, whether as the attendee or the organizer. You have the option of accepting, declining, or deleting the meetings from the calendar itself. The recurring meeting feature allows you to create a single reservation for multiple meetings that you have to repeatedly organize over a period of time. This saves you the inconvenience of creating separate reservations on a daily, weekly, or monthly basis. You can add the WebEx meeting option which allows the attendees to log in remotely over web if they cannot be physically present in the meeting room.
Logging In
You can log in to the Spaces portal for room booking by using any of the browsers certified for the application. The portal can be accessed using http: or or host-name : domain-port or calendar. You can log in using your enterprise login credentials.
To log in to the Spaces portal for room booking, perform the following steps:
Step 1![]() Enter the URL in the address field of the web browser, and click Enter.
Enter the URL in the address field of the web browser, and click Enter.
Step 2![]() Enter the username and password.
Enter the username and password.
The home page appears with the My Booking tab selected by default.
After logging in, if you do not use the portal for a while, your browsing session will time out. In such a situation, you must re-log in to the portal.
Logging Out
To log out of the portal, click the Logout option displayed in the top right corner of the page, next to your username.
Understanding the User Interface
Figure 2-1 shows the home page of the Spaces portal for room booking.
Figure 2-1 Home Page of the Spaces Portal

list the main areas of the home page.
Portal Tabs
My Booking
The My Booking tab allows you to book meetings rooms, and view, search for, edit, and accept or decline meetings.
You can change the calendar view of your meetings as per your preference using the three sub-tabs: Day View, Week View, and Month View. The meeting legend is displayed below the calendar and lists the meeting status that each of the colors in the calendar signify. You can click any meeting invite in the calendar and accept, tentatively accept, decline, or delete it depending on the existing status of the meeting. For the meetings that you have organized, you can click the meeting instance in the calendar and choose the Detailed Edit or Delete option. For the recurring meetings that you organize, you have the option of editing and deleting the entire series of meetings or any single occurrence. The icon displayed in the bottom right corner of a meeting instance indicates that it is a recurring meeting.

Note![]() The background color of the recurrence icon depends of the status of the meeting instance. For more information, see the “Meeting Legend” section.
The background color of the recurrence icon depends of the status of the meeting instance. For more information, see the “Meeting Legend” section.
The Quick Reservation and New Reservation buttons allow you to book meeting rooms instantly or opt for a detailed booking process where you can avail yourself of the various features that enhance the entire meeting experience.
Day View
The meeting calendar appears with the Day View tab selected by default. The current date is displayed on the top along with the left and right navigation buttons. Click these buttons to view the meetings scheduled for the other dates. Click the Today link to go back to the current date view.
The 24 hour slots in the day are displayed as a row each. Only a certain number of hours are seen at a time. Use the vertical scroll bar to move the view up and down and see the remaining time slots and meetings. The meetings, if any, for the time slots appear with various background colors depending on the meeting status. The subject and duration of each meeting is displayed. For more information, see the “Meeting Legend” section.
Note![]() When the meeting calendar is in the day or week view, you can click and hold down the mouse key and drag across the time slots to book a meeting for the selected time period. Click Yes in the New Reservation dialog box that appears asking you to confirm if you want to initiate a booking. This opens the booking wizard.
When the meeting calendar is in the day or week view, you can click and hold down the mouse key and drag across the time slots to book a meeting for the selected time period. Click Yes in the New Reservation dialog box that appears asking you to confirm if you want to initiate a booking. This opens the booking wizard.
Week View
Click the Week View tab to view the meeting schedule for entire week. The days of the week appear as separate columns with the current date column selected. The 24 hour slots for each day appear as rows and the meetings, if any, are displayed for these slots. Use the left and right navigation buttons to view the calendar for other weeks. Clicking the Today link takes you back to the current week. Only a certain number of hours are seen at a time. Use the vertical scroll bar to move the view up and down and see the remaining time slots and meetings.
Month View
The Month View has columns for the seven weekdays and lists all dates in the current month similar to a traditional calendar. The current date is highlighted. Use the left and right navigation buttons to view the calendar for the other months. Clicking the Today link takes you back to the current month. Click any meeting to accept, tentatively accept, decline, or delete it. Click any date to initiate a new booking for that day.
Meeting Legend
The meeting legend can be found below the calendar view. It conveys the meaning of the different colors used for the meetings shown in the calendar.
 Meetings to which you have been invited but have not yet begun.
 Meetings that you have organized and can edit or cancel.
 Meetings currently going on which you are a part of.
 Meetings that you are not sure about attending and have tentatively accepted.
Note![]() Past meetings appear with a brown background.
Past meetings appear with a brown background.
Quick Reservation
The Quick Reservation button is displayed in the top right corner. You can use this option to quickly book a conference room using a single screen interface. The process is simple and fast. It can come in handy when you want to book a room on a short notice and are hard pressed for time or when you simply want to book a meeting space without inviting any participants for the meeting. For more information, see the “Creating a Quick Reservation” section.
New Reservation
The New Reservation option allows you book conference rooms, send invites to attendees, request a change in room setup, book equipment for the room, and provides several other features such as adding WebEx, and so on. For more information, see the “Creating a New Reservation” section.
Saved Drafts
This pane lists the reservation drafts that you have saved as separate rows. Details such as the meeting date, meeting subject, duration, and venue, are shown. The edit  icon allows you to edit the draft. To discard the draft, click the delete
  icon.
icon.
Only a certain number of drafts appear at a time and the remaining drafts are listed on subsequent pages. Click the page number and the arrow buttons displayed below the drafts list to view the other drafts.
Preferences
The second main tab in the Smart+Connected Spaces web portal, the Preferences tab, allows you to specify your meeting preferences such as the time zone, your location, and favorite rooms. The application saves these details and customizes the settings to suit your requirements. For more information, see the “Configuring Meeting Preferences” section.
Creating a Quick Reservation
Quick Reservation is a method that assists you in quickly booking the conference rooms for impromptu meetings. It can come handy when you simply want to book a meeting space without using any extra features.
To create a quick reservation, perform the following steps:
Step 1![]() In the home page of the Spaces portal for room booking, click Quick Reservation.
In the home page of the Spaces portal for room booking, click Quick Reservation.
The Quick Booking page appears. The current date is displayed on the top.
Step 2![]() From the Meeting Type drop-down list, choose an option depending on the purpose of the meeting. If you choose TelePresence, the application will find rooms that have the Cisco TelePresence feature and display them in the search results.
From the Meeting Type drop-down list, choose an option depending on the purpose of the meeting. If you choose TelePresence, the application will find rooms that have the Cisco TelePresence feature and display them in the search results.
Step 3![]() From the Duration drop-down list, choose the meeting duration. The available options are divided into 15 minute slots with 1 hour being the maximum duration that you can specify.
From the Duration drop-down list, choose the meeting duration. The available options are divided into 15 minute slots with 1 hour being the maximum duration that you can specify.
Step 4![]() From the Location drop-down lists, choose the country, state, city, campus, and building where you want to book the room. (Optional) To further narrow the search, you can also choose the floor where you want to book the room. By default, the current location that you specify on the Preferences tab is displayed.
From the Location drop-down lists, choose the country, state, city, campus, and building where you want to book the room. (Optional) To further narrow the search, you can also choose the floor where you want to book the room. By default, the current location that you specify on the Preferences tab is displayed.
Step 5![]() In the No. of Participants field, enter the number of meeting attendees.
In the No. of Participants field, enter the number of meeting attendees.
The conference rooms that meet your criteria or closely match it are listed in the Resources pane with the following details:
- The room(s) you add as your favorite on the Preferences tab appears on the top of the list. A star icon is displayed next to the conference room name.
- A green icon is displayed before the name of rooms that meet your search criteria completely.
- An orange icon is displayed before the name of rooms that match closely with your search criteria but are not available for selection for the specified time.
- Miniature icons depicting the facilities available in the each room are also shown. For example, projector, signage, and so on.
- Seating capacity of each room is displayed next to the room name.
Only a certain number of results are displayed per view. Use the left and right navigation buttons to view the other available rooms.
The pane on the right shows the availability of each meeting room for all of the 24-hour slots in the day represented as a column each. The slots which are busy appear in blue. If the room is booked partially during any one-hour slot, the blue color appears only for that fraction of the slot indicating that the room is partially busy. The duration that you specify for your booking is highlighted for all rooms by a grey vertical bar. Only a certain number of slots are seen in the view and you can use the horizontal scroll bar to view the other time slots.
Step 7![]() Click the radio button for the room(s) that you want to book. The button turns blue indicating that the room is selected.
Click the radio button for the room(s) that you want to book. The button turns blue indicating that the room is selected.
You are taken to the home page where the new booking appears in the calendar view. A message appears at the top of the page informing you that the meeting reservation is completed successfully.
Creating a New Reservation
The New Reservation feature in the Spaces portal for room booking helps you to not only search for and book available conference rooms but offers other features that enhance the overall meeting experience. It allows you to filter the room search results, book equipment and other supplies that you require during the meeting, request for arranging the room layout as desired, invite members of your organization and external participants for the meeting, save your searches and the booking drafts, and review your booking summary before confirming a booking.
The New Reservation process is a detailed procedure that involves the following screens:
Reservation Details
Reservation Details is the first screen of the New Reservation wizard. To make a new booking and to specify the booking details, perform the following steps:
Step 1![]() In the home page of the Spaces portal for room booking click New Reservation.
In the home page of the Spaces portal for room booking click New Reservation.
The Reservation Details screen appears.
Step 2![]() Enter the subject of the meeting in the Subject field.
Enter the subject of the meeting in the Subject field.
This is the subject of the meeting invite sent to the participants over email. It is also displayed whenever the meeting appears in the calendar and as the subject of the saved draft.
Note![]() All of the fields marked with the star symbol are mandatory. If you proceed to the next page without completing all of the required fields, you will get an error message. The fields that you are required to complete are highlighted in red.
All of the fields marked with the star symbol are mandatory. If you proceed to the next page without completing all of the required fields, you will get an error message. The fields that you are required to complete are highlighted in red.
Step 3![]() From the Meeting Type drop-down list, choose the required option.
From the Meeting Type drop-down list, choose the required option.
Step 4![]() Enter the agenda of the meeting in the Meeting Agenda field.
Enter the agenda of the meeting in the Meeting Agenda field.
The text that you enter here will be sent as the message body of the meeting invite email.
Step 5![]() By default, the Date field is populated with the current date. To change the date, click inside the Date field. Choose a meeting date from the calendar that appears.
By default, the Date field is populated with the current date. To change the date, click inside the Date field. Choose a meeting date from the calendar that appears.
Step 6![]() By default, the next half-hour slot is taken as the meeting duration. To change the duration, click inside the Starts at and Ends at fields.
By default, the next half-hour slot is taken as the meeting duration. To change the duration, click inside the Starts at and Ends at fields.
The hour and minute selection dialog box appears for both these fields.
a.![]() Choose an hour slot from the AM or PM list in the Hour column.
Choose an hour slot from the AM or PM list in the Hour column.
b.![]() Choose any of the 5-minute intervals in the Minute column.
Choose any of the 5-minute intervals in the Minute column.
When you choose a meeting start time that exceeds the end time, the end time field gets automatically updated to show a time that is an hour more than the start time.
Step 7![]() Choose any or all of the following options by clicking the radio button for them:
Choose any or all of the following options by clicking the radio button for them:
- All day event (9 am to 5 pm)—For meetings that extend for the entire working day.
- Add WebEx Meeting—For hosting a meeting via WebEx.
Note![]() Enter the password, which the attendees will use to log in to the WebEx meeting, in the WebEx password field if you choose this option.
Enter the password, which the attendees will use to log in to the WebEx meeting, in the WebEx password field if you choose this option.
- Recurrence—For repeating the booking on a daily, weekly, or monthly basis. Recurring booking is useful when you need to organize a meeting with the same agenda, room setup, and attendees repeatedly. For example, daily status meetings or weekly team meetings.
Perform the following steps to make a recurring booking:
a.![]() From the Repeats drop-down list, choose Daily, Weekly, or Monthly based on the frequency of the meeting event.
From the Repeats drop-down list, choose Daily, Weekly, or Monthly based on the frequency of the meeting event.
b.![]() If you opt for the Daily recurrence, choose any option ranging from 1 to 10 from the Repeats every drop-down list. Proceed to Step e.
If you opt for the Daily recurrence, choose any option ranging from 1 to 10 from the Repeats every drop-down list. Proceed to Step e.
c.![]() (Alternatively) If you opt for the Weekly recurrence, choose any option ranging from 1 to 10 from the Repeats every drop-down list. For example, if you want the meeting to recur every alternate week, choose 2. You can also choose particular days of the week, all of the seven days, or only weekdays for the meeting to recur by clicking the radio button for any of these options. Proceed to Step e.
(Alternatively) If you opt for the Weekly recurrence, choose any option ranging from 1 to 10 from the Repeats every drop-down list. For example, if you want the meeting to recur every alternate week, choose 2. You can also choose particular days of the week, all of the seven days, or only weekdays for the meeting to recur by clicking the radio button for any of these options. Proceed to Step e.
d.![]() (Alternatively) If you opt for the Monthly recurrence, you can choose to repeat the meeting at any interval ranging from 1 to 12 months. To repeat the monthly booking on the selected date of the month, click the day of the month radio button and enter the date in the field that appears. To repeat the booking on a certain weekday of a particular week, click the day of the week radio button. From the first drop-down list, choose the week number and from the second drop-down list, choose the weekday.
(Alternatively) If you opt for the Monthly recurrence, you can choose to repeat the meeting at any interval ranging from 1 to 12 months. To repeat the monthly booking on the selected date of the month, click the day of the month radio button and enter the date in the field that appears. To repeat the booking on a certain weekday of a particular week, click the day of the week radio button. From the first drop-down list, choose the week number and from the second drop-down list, choose the weekday.
e.![]() Click inside the Starts On field. Select a date from the calendar that appears. This will be the start date of the meeting.
Click inside the Starts On field. Select a date from the calendar that appears. This will be the start date of the meeting.
f.![]() For specifying the end of the recurrence, enter the number of times that you want to repeat the meeting in the Ends After occurrence field. Alternatively, click the End By radio button and click inside the field. Click a date for ending the recurrence in the calendar that appears.
For specifying the end of the recurrence, enter the number of times that you want to repeat the meeting in the Ends After occurrence field. Alternatively, click the End By radio button and click inside the field. Click a date for ending the recurrence in the calendar that appears.
- Confidential—For hiding the subject of the meeting and the meeting organizer’s name on the signage or Cisco IP Phones whenever the schedule for the meeting room is displayed. The meeting will be displayed with the subject “Booked”.
To deselect the All day event, Add WebEx meeting, and Mark as Confidential options, click the selected radio button again. It will turn grey indicating that the option is deselected. To deselect the Recurrence option, click the radio button again and click Remove in the dialog that pops up.
Step 8![]() Click the edit
Click the edit  icon for the Primary Location field. Choose the country, state, city, campus, building, and floor from the location drop-down list for each of these options. By default, the current location that you specify on the Preferences tab is displayed.
Step 9![]() Enter the required seating capacity in the Room Size field.
Enter the required seating capacity in the Room Size field.
Step 10![]() (Optional) Click the edit
(Optional) Click the edit  icon for the Secondary Location field. From the location drop-down list for each of these options, choose the country, state, city, campus, building, and floor. Click the
  icon to add multiple secondary locations.
The Secondary Location details can be entered when attendees are expected to attend the meeting from different location or meeting rooms.
Step 11![]() Click a room layout style image in the Room Setup area to have the room arranged as desired.
Click a room layout style image in the Room Setup area to have the room arranged as desired.
The setup and setup removal time and the minimum notice period is displayed for the chosen setup.
Note![]() Rooms, which can be arranged in the type of setup that you request, will be displayed in the search results. Ensure that the duration before the meeting starts is equal to or more than the minimum notice period. For example, if the current time is 11 am and the auditorium type of setup requires 2 hours, you should choose the meeting start time as 1 pm or any slot after that.
Rooms, which can be arranged in the type of setup that you request, will be displayed in the search results. Ensure that the duration before the meeting starts is equal to or more than the minimum notice period. For example, if the current time is 11 am and the auditorium type of setup requires 2 hours, you should choose the meeting start time as 1 pm or any slot after that.
Step 12![]() Click Save and Proceed to go to the Room and Attendees screen.
Click Save and Proceed to go to the Room and Attendees screen.
Step 13![]() (Optional) Click Save Draft if you do not wish to book a conference room currently and want to use the information that you have specified at a later time. The draft can be retrieved from the Saved Drafts list that appears on the Reservation Details screen the next time that you make a new booking.
(Optional) Click Save Draft if you do not wish to book a conference room currently and want to use the information that you have specified at a later time. The draft can be retrieved from the Saved Drafts list that appears on the Reservation Details screen the next time that you make a new booking.
Step 14![]() (Optional) Click Cancel if you want to cancel the booking process.
(Optional) Click Cancel if you want to cancel the booking process.
Click Yes in the Confirm Cancel dialog box that opens. You are redirected to the home page.
Rooms and Participants
Rooms and Participants is the second screen of the New Reservation wizard. It displays the list of available rooms that meet the criteria that you specified in the Reservation Details page. This screen also lets you add the participants for the meeting.
To add rooms and participants, perform the following steps:
Step 1![]() The Resources pane on the left side of the Rooms and Attendees screen displays the search results for the location that you specified.
The Resources pane on the left side of the Rooms and Attendees screen displays the search results for the location that you specified.
The following details are displayed for the conference rooms:
- The room(s) that you add as your favorite on the Preferences tab appears on the top of the list. A star icon is displayed next to the conference room name.
- A green icon is displayed before the name of rooms that meet your search criteria completely.
- An orange icon is displayed before the name of rooms that match closely with your search criteria but are not available for selection for the specified time.
- Miniature icons depicting the facilities available in the each room are also shown. For example, projector, signage, and so on.
- The seating capacity of each room is displayed next to the room name.
Only a certain number of rooms are listed per view. To see the other rooms (if any) or to go back to the initial list of rooms, click the left and right navigation buttons.
The pane on the right shows the availability of each meeting room for the all of the 24-hour time slots in the day represented as a column each. The slots which are busy slots appear in blue. If the room is booked partially during any one-hour time slot, the blue color appears only for that fraction of the slot indicating that the room is partially busy. The duration that you specify for your booking is highlighted for all rooms by a grey vertical bar. Only a certain number of slots are seen in the view and you can use the horizontal scroll bar to view the other time slots.
Step 2![]() (Optional) Click the left and right navigation buttons next to the meeting date displayed above the Resources pane to view the meeting rooms available on the other dates. Once you know which rooms are available for the other times and dates, you can change the meeting date or time by clicking the edit
(Optional) Click the left and right navigation buttons next to the meeting date displayed above the Resources pane to view the meeting rooms available on the other dates. Once you know which rooms are available for the other times and dates, you can change the meeting date or time by clicking the edit  icons next to the date and time displayed in the top of the page. For recurring meetings, you can edit only the time from this page. The edit date icon is unavailable for recurring meetings and what you see is the
  icon indicating that it is a recurring meeting. After you change the date or time, click the Update Results link to get the search list updated based on the changed date and time.
For a more detailed edit and to change the date of a recurring meeting, click the Modify Search link provided in the top right side of the Rooms and Attendees screen. This takes you back to the Booking Details page, which is populated with all of the settings that you configured previously.
Step 3![]() Click the radio button for any available room(s) to choose it. It will turn blue indicating that the room is selected. To deselect any of the selected rooms, click the selected radio button again. It will turn grey indicating that the room is deselected.
Click the radio button for any available room(s) to choose it. It will turn blue indicating that the room is selected. To deselect any of the selected rooms, click the selected radio button again. It will turn grey indicating that the room is deselected.
If you choose a room which is smaller than the room size that you specified in the Booking Details page, and click the Skip to Summary or the Save and Proceed button, you get a message informing you of this that asks you if you want to choose another room.
Note![]() Choosing a room is not mandatory for booking a meeting. But if you want to proceed to the Services screen, choosing at least one room is mandatory.
Choosing a room is not mandatory for booking a meeting. But if you want to proceed to the Services screen, choosing at least one room is mandatory.
Step 4![]() Click the
Click the  icon to add the participants for the meeting.
The Select Participants dialog box appears.
Step 5![]() Enter the names of the attendees in the Required Participants field and Optional Participants field. You can choose any option from the list of names that appears when you type the first four alphabetic characters of a user’s name. It displays the names of all of the users in the database whose name starts with the alphabetic characters that you entered. The names of the various users that you select are separated by semicolons.
Enter the names of the attendees in the Required Participants field and Optional Participants field. You can choose any option from the list of names that appears when you type the first four alphabetic characters of a user’s name. It displays the names of all of the users in the database whose name starts with the alphabetic characters that you entered. The names of the various users that you select are separated by semicolons.
Step 6![]() Enter the email addresses of the people who are not a part of the company database, but that you want to invite for the meeting in the Visitors field.
Enter the email addresses of the people who are not a part of the company database, but that you want to invite for the meeting in the Visitors field.
Step 7![]() Click Done to close the Select Participants dialog box and return to the Room and Participants screen.
Click Done to close the Select Participants dialog box and return to the Room and Participants screen.
The names of the participants that you have chosen appear in the Resources pane along with their usernames. Your name is included by default in the Participants list as you are the organizer of the meeting. A green icon appears before their names if the users are available during the time that you have selected for the meeting. The red icon before an invitee’s name indicates that the person is busy during the time of the meeting.
Step 8![]() The right pane displays the availability or non-availability of each of the attendees, similar to the room availability pane mentioned in Step 1.
The right pane displays the availability or non-availability of each of the attendees, similar to the room availability pane mentioned in Step 1.
Step 9![]() Click the cancel
Click the cancel  icon next to any name to remove the person from the Participants list.
Step 10![]() (Optional) To filter your room search, do the following:
(Optional) To filter your room search, do the following:
a.![]() Click the
Click the  icon in the Resources pane.
b.![]() Enter the location for which you want to search the conference rooms in the Location Name field.
Enter the location for which you want to search the conference rooms in the Location Name field.
c.![]() Click the icon(s) for the features that you want in the conference rooms. The icons that you select appear dimmed.
Click the icon(s) for the features that you want in the conference rooms. The icons that you select appear dimmed.
The search result shows the rooms that meet the additional requirements.
Step 11![]() Once you have entered all of the details that you want in the Rooms and Participants screen, you can click any of the following buttons:
Once you have entered all of the details that you want in the Rooms and Participants screen, you can click any of the following buttons:
- Skip to Summary—The new booking process ends and you are taken to the Summary screen where you can confirm the reservation.
- Save and Proceed—This saves all of the settings and takes you to the Services screen where you can book resources for the conference room.
- Save Draft—The settings chosen in this screen and the previous screen are saved and appear in the Saved Drafts list on the Reservation Details screen and in the home page. Drafts are saved with the same name as the meeting subject. You can select any draft from the drafts list and proceed further or edit it any time that you want.
- Back—This takes you back to the Reservation Details screen where you can edit and modify the initial parameters based on which the Smart+Connected Spaces application searches for the conference rooms.
- Cancel—This c ancels the booking process and redirects you to the home page.
Services
This is the third screen of the New Reservation wizard. It is not a mandatory step in the booking process unless you want to book some additional things required for your meeting. This page does not appear if you click the Skip to Summary button after selecting the room and adding participants for the meeting.
To book resources for the meeting, perform the following steps:
Step 1![]() In the Resources pane, click the desired item.
In the Resources pane, click the desired item.
The equipment is added as a row to the table in the right pane which has the following columns:
- Resource Name—The name of the selected item.
- Notes—Any additional requirements or specifications can be added here. For example, if you order a projector and need a special connecting cable for your laptop, you can mention it in this field.
- Location—Enter the location for which you want the item to be supplied.
- Available Quantity—The number of units of the item that are in stock and ready for use.
- Required Quantity—Enter the number of the items that you want in this field. The number should not be more than the quantity available.
- Action—Shows a cancel
 icon that you can click to delete an individual item from the table. The entire row for the item is removed as a result of this action.
Step 2![]() Repeat the procedure in Step 1 for any additional resource(s) that you want. You can also choose an item already in the list if you want it for another location(s).
Repeat the procedure in Step 1 for any additional resource(s) that you want. You can also choose an item already in the list if you want it for another location(s).
Step 3![]() (Optional) To delete all of the resources from the list and start the selection afresh, click Delete All.
(Optional) To delete all of the resources from the list and start the selection afresh, click Delete All.
Step 4![]() Once you have entered all of the details that you want in the Services page, you can click any of the following buttons:
Once you have entered all of the details that you want in the Services page, you can click any of the following buttons:
- Save and Proceed—This saves all of the settings and takes you to the Summary screen.
- Back—This takes you back to the Rooms and Participants screen where you can change the conference rooms selection and modify the attendee list.
- Cancel—This cancels the booking process and redirects you to the home page.
Summary
This is the last screen of the New Reservation wizard. It appears when a user opts to finish the new booking process either from the Rooms and Participants screen or the Services screen. The Summary screen displays all of the meeting, room, equipment, and attendee details. Before the final confirmation screen is displayed, the entire booking summary is displayed. The booking takes place only after you verify the details from the summary and confirm.
To confirm the booking, perform the following steps:
Step 1![]() Verify that the following details displayed in the Summary screen are per your booking requirements:
Verify that the following details displayed in the Summary screen are per your booking requirements:
 icon appears if it is a WebEx meeting.
- Date—The date of the meeting. For recurring meetings, the date of the first meeting followed by dates of the other occurrences is displayed.
- Time—The start and the end time of the meeting.
- Organizer—Your username is displayed.
- Mark as Confidential—Shows Yes if you have chosen the Mark as Confidential option in the Reservation Details screen; otherwise the value shown is No.
- Meeting Type—Whether the meeting is a normal, team, presentation, or Cisco TelePresence meeting.
- Room Setup—The room setup type is shown if you have chosen to rearrange the room layout.
- Meeting Rooms—The names of the meeting rooms along with the detailed location including the floor, building, campus, city, state, and country. The icons for the features available in the rooms are also shown. For example, A/V controls, Cisco TelePresence, and so on.
- Participants—The names of the people that you have invited for the meeting.
- Resources—The name of the items, the location for which they are ordered, the quantity that you require during the meeting, and the meeting notes.
Step 2![]() Click Confirm Reservation.
Click Confirm Reservation.
This takes you to the page that confirms that the booking is completed and the participants will be notified through email. It displays the entire summary again.
Note![]() You also receive emails whenever the invitees accept, tentatively accept, or decline the meeting request that you send to them. For a telepresence meeting, a conference also get booked in the Cisco TelePresence Management Suite (TMS).
You also receive emails whenever the invitees accept, tentatively accept, or decline the meeting request that you send to them. For a telepresence meeting, a conference also get booked in the Cisco TelePresence Management Suite (TMS).
Step 3![]() Click Home to return to the home page.
Click Home to return to the home page.
New Reservation Use Case
User A is an entrepreneur who resides in Dallas, USA and the marketing team is based in New Delhi, India. The following example describes how User A and the team coordinate using the Spaces portal for room booking.
1.![]() User A logs in to the Spaces portal for room booking and uses the New Reservation option to organize a meeting for discussing the India strategy with the team. For more information about the New Reservation process, see the “Creating a New Reservation” section.
User A logs in to the Spaces portal for room booking and uses the New Reservation option to organize a meeting for discussing the India strategy with the team. For more information about the New Reservation process, see the “Creating a New Reservation” section.
2.![]() Because the team is overseas and a personalized and interactive approach is required, User A chooses the Cisco TelePresence type of meeting and specifies the pre-launch task outline and objectives in the Agenda field. User A adds the main points of discussion in the Meeting Notes. When the team gets the meeting invitation through email, the message body displays the plan outline, objectives, and points of discussion. The team members get a basic idea about the purpose of the meeting. For more information, see the “Reservation Details” section.
Because the team is overseas and a personalized and interactive approach is required, User A chooses the Cisco TelePresence type of meeting and specifies the pre-launch task outline and objectives in the Agenda field. User A adds the main points of discussion in the Meeting Notes. When the team gets the meeting invitation through email, the message body displays the plan outline, objectives, and points of discussion. The team members get a basic idea about the purpose of the meeting. For more information, see the “Reservation Details” section.
3.![]() To devise an effective plan and get regular inputs, User A schedules the meeting on Tuesday and Friday every two weeks for the critical 3-month period before the product launch using the Recurrence option.
To devise an effective plan and get regular inputs, User A schedules the meeting on Tuesday and Friday every two weeks for the critical 3-month period before the product launch using the Recurrence option.
4.![]() The sales staff conducting the door-to-door surveys has already conveyed the inability to report to the main office every week. User A uses the Add WebEx meeting option. These team members can join the meeting using the link and password provided in the email invite.
The sales staff conducting the door-to-door surveys has already conveyed the inability to report to the main office every week. User A uses the Add WebEx meeting option. These team members can join the meeting using the link and password provided in the email invite.
5.![]() Because the Cisco TelePresence facility is required for both the offices, User A enters the details of the Dallas campus in the Primary Location field and the details of the Bangalore campus in the Secondary Location field. If all of the members on the India team, including the field staff attend the meeting, the total strength would be 30. Therefore, User A specifies 30, as the room size for the secondary location.
Because the Cisco TelePresence facility is required for both the offices, User A enters the details of the Dallas campus in the Primary Location field and the details of the Bangalore campus in the Secondary Location field. If all of the members on the India team, including the field staff attend the meeting, the total strength would be 30. Therefore, User A specifies 30, as the room size for the secondary location.
6.![]() User A chooses the room from the search results and adds the participants by choosing their names from the automatic suggestions based on the list of company employees. For inviting an external member of the board and a marketing strategy expert whose names are not included in the database, the entrepreneur enters their email addresses in the Visitors field. For more information about choosing rooms and inviting participants, see the “Rooms and Participants” section.
User A chooses the room from the search results and adds the participants by choosing their names from the automatic suggestions based on the list of company employees. For inviting an external member of the board and a marketing strategy expert whose names are not included in the database, the entrepreneur enters their email addresses in the Visitors field. For more information about choosing rooms and inviting participants, see the “Rooms and Participants” section.
7.![]() The global sales head pops into the entrepreneur’s office and suggests aggressive planning and very regular discussions. User A clicks Modify Search. This redirects to the Booking Details page and the entrepreneur changes the frequency of the meeting to every one week.
The global sales head pops into the entrepreneur’s office and suggests aggressive planning and very regular discussions. User A clicks Modify Search. This redirects to the Booking Details page and the entrepreneur changes the frequency of the meeting to every one week.
8.![]() User A then proceeds to book the laptop chargers and optical mouses that the team may require during the meeting. This is delivered to the meeting room that is booked for India. For more information about booking resources, see the “Services” section.
User A then proceeds to book the laptop chargers and optical mouses that the team may require during the meeting. This is delivered to the meeting room that is booked for India. For more information about booking resources, see the “Services” section.
9.![]() After verifying all of the meeting details from the summary, User A confirms the booking. Invites are sent to all of the participants by email. User A is notified through email whenever any of the participants accept, tentatively accept, or decline the invite. For more information about the meeting summary, see the “Summary” section.
After verifying all of the meeting details from the summary, User A confirms the booking. Invites are sent to all of the participants by email. User A is notified through email whenever any of the participants accept, tentatively accept, or decline the invite. For more information about the meeting summary, see the “Summary” section.
10.![]() The marketing head in India, User B, wants to invite a few additional stakeholders for the first meeting. User B logs in to the Smart+Connected Spaces web portal, clicks the first meeting instance in the calendar and chooses the Edit Series option. User B adds another meeting room and a few more participants. For more information on editing meetings, see the “Editing Meeting Details” section.
The marketing head in India, User B, wants to invite a few additional stakeholders for the first meeting. User B logs in to the Smart+Connected Spaces web portal, clicks the first meeting instance in the calendar and chooses the Edit Series option. User B adds another meeting room and a few more participants. For more information on editing meetings, see the “Editing Meeting Details” section.
11.![]() The corporate communication manager, User C, leaves for India to close the deals with the media agencies there. User C goes to the Preferences page in the portal and changes the time zone to GMT+5.30. This ensures that the calendar is in sync with the local time, that is, all of the meeting invites are displayed in India time. For more information on changing your preferences, see the “Configuring Meeting Preferences” section.
The corporate communication manager, User C, leaves for India to close the deals with the media agencies there. User C goes to the Preferences page in the portal and changes the time zone to GMT+5.30. This ensures that the calendar is in sync with the local time, that is, all of the meeting invites are displayed in India time. For more information on changing your preferences, see the “Configuring Meeting Preferences” section.
12.![]() Once the initial meetings are conducted, work is assigned to all of the team members. A marketing executive, User D, realizes that all-day meetings are scheduled every Tuesday and Friday to supervise the market research activities and the executive would have to skip the meetings. User D logs in to the portal, clicks the meeting instance, and then clicks Decline. User A receives emails about the invite being declined and is therefore informed that User D would not attend the meetings. For more information on viewing meetings and accepting or declining meetings, see the “Viewing Meetings” section and “Accepting or Declining Meetings” section.
Once the initial meetings are conducted, work is assigned to all of the team members. A marketing executive, User D, realizes that all-day meetings are scheduled every Tuesday and Friday to supervise the market research activities and the executive would have to skip the meetings. User D logs in to the portal, clicks the meeting instance, and then clicks Decline. User A receives emails about the invite being declined and is therefore informed that User D would not attend the meetings. For more information on viewing meetings and accepting or declining meetings, see the “Viewing Meetings” section and “Accepting or Declining Meetings” section.
Viewing Meetings
You can view all of your meetings using the calendar in the home page of the Spaces portal for room booking. For more information, see the “Day View” section, “Week View” section, and “Month View” section.
The saved drafts are listed in the right side of the home page. For more information, see the “Saved Drafts” section.
Note![]() You can also view all of the meetings that you are a part of in your Microsoft Outlook calendar as the Smart+Connected Spaces meetings are synchronized with the Microsoft Exchange. You can accept, decline, join, edit, and delete the meetings from your mail client.
You can also view all of the meetings that you are a part of in your Microsoft Outlook calendar as the Smart+Connected Spaces meetings are synchronized with the Microsoft Exchange. You can accept, decline, join, edit, and delete the meetings from your mail client.
Setup or Setup Removal and Services Requests
If you are the facilities administrator, you will automatically get room setup and or or setup removal requests as email invites based on the time set by the Smart+Connected Spaces portal administrator. These service requests are similar to the other meeting invites and appear in the calendar when you log in to the Spaces portal for room booking. For the resource requests that the other portal users place while they book meetings, you receive emails similar to meeting invites informing you about the item and quantity required, and the time and place where the item is required.
Using Saved Drafts
During the process of booking a meeting, you can save the details that you have entered and use them to organize a meeting at a later time. The Save Draft option is available in the Booking Details, Rooms and Attendees, and Services screens. The changes that you make in any of these pages and the pages before them are saved as drafts. Once you organize a meeting using a draft, the draft is removed from the list of drafts.
To use a saved draft, perform the following steps:
Step 1![]() In the home page of Spaces portal for room booking, locate The Saved Drafts list displayed in the right corner.
In the home page of Spaces portal for room booking, locate The Saved Drafts list displayed in the right corner.
The list of saved drafts shows the most recently saved drafts on top followed by the previous ones. Only a certain number of drafts are shown per view. Click any of the page numbers to view the other drafts. To scroll through the drafts page list, click the following buttons:
 Scroll the page list to the next page.
 Scroll the page list to the last page.
 Scroll the page list to the previous page.
 Scroll the page list to the first page.
Note![]() You can also use a saved draft from the list displayed in the Reservation Details screen.
You can also use a saved draft from the list displayed in the Reservation Details screen.
Step 2![]() Click the edit
Click the edit  icon for the draft that you want to use.
The Reservation Details screen appears populated with all of the details that you entered earlier.
Step 3![]() Make the required changes in the Booking Details screen. Click Save and Proceed.
Make the required changes in the Booking Details screen. Click Save and Proceed.
The Rooms and Attendees screen appears.
Note![]() Instead of clicking Save and Proceed, you can click Save Draft in the Reservation Details or the Rooms and Participants screen. This replaces the existing draft with the current version, which you can use later.
Instead of clicking Save and Proceed, you can click Save Draft in the Reservation Details or the Rooms and Participants screen. This replaces the existing draft with the current version, which you can use later.
Step 4![]() Make the required changes or provide the additional details in the Rooms and Attendees screen. Click Save and Proceed.
Make the required changes or provide the additional details in the Rooms and Attendees screen. Click Save and Proceed.
Step 5![]() Enter the required details in the Services screen. Click Save and Proceed.
Enter the required details in the Services screen. Click Save and Proceed.
The Summary screen appears. You are informed that the booking is done. The draft is removed from the lists of drafts.
Editing Meeting Details
You can edit the meetings, which you have organized, from the meetings displayed in the calendar view in the home page. The invitees get an email informing them that the meeting has been edited. This email contains all of the updated details.
To edit a meeting, perform the following steps:
Step 1![]() On the home page of the Spaces portal for room booking, click the meeting that you want to edit in the calendar.
On the home page of the Spaces portal for room booking, click the meeting that you want to edit in the calendar.
The Edit Meeting dialog box appears.
Step 2![]() Click Detailed Edit. For recurring meetings, click Edit Occurrence to edit the single instance of the meeting, that is, the one that you have clicked. Click Edit Series to make changes that apply to all the meetings instances.
Click Detailed Edit. For recurring meetings, click Edit Occurrence to edit the single instance of the meeting, that is, the one that you have clicked. Click Edit Series to make changes that apply to all the meetings instances.
The Reservation Details screen opens.
Step 3![]() Make the required changes in the Reservation Details, Rooms and Participants, and or or the Services screen and proceed to the Summary page. Click Confirm Reservation.
Make the required changes in the Reservation Details, Rooms and Participants, and or or the Services screen and proceed to the Summary page. Click Confirm Reservation.
Accepting or Declining Meetings
You can accept, tentatively accept, or decline any meeting that you have received using the calendar view in the Smart+Connected Spaces user portal home page.
To accept or decline a meeting, perform the following steps:
Step 1![]() In the Spaces portal for room booking home page, click the required meeting instance in the calendar view.
In the Spaces portal for room booking home page, click the required meeting instance in the calendar view.
The Meeting Details dialog box appears.
Step 2![]() Review the meeting details, and click Accept, Decline, or Tentative based on your decision to attend the meeting.
Review the meeting details, and click Accept, Decline, or Tentative based on your decision to attend the meeting.
Clicking the Decline button removes the meeting from your calendar view. You can decline tentative or accepted meetings anytime later if you want. Alternatively, you can accept a meeting that you had marked earlier as tentative.
Note![]() For recurring meetings, the Accept or Decline or Tentative option will apply to the entire series and not just the occurrence that you clicked in the calendar.
For recurring meetings, the Accept or Decline or Tentative option will apply to the entire series and not just the occurrence that you clicked in the calendar.
Step 3![]() (Alternatively) If you do not want to make any of the choices mentioned in Step 2, click Done or click the cancel
(Alternatively) If you do not want to make any of the choices mentioned in Step 2, click Done or click the cancel  icon in the top right corner to close the Meeting Details dialog box.
Deleting Meetings
You can delete the meetings that you have organized from the calendar in the home page. The invitees get an email informing them that the meeting is canceled. The schedule of the room that you booked for the meeting is updated and the room is made available for booking again.
To delete a meeting, perform the following steps:
Step 1![]() In the Spaces portal for room booking home page, click the meeting that you want to delete in the calendar.
In the Spaces portal for room booking home page, click the meeting that you want to delete in the calendar.
The Meeting Details dialog box appears.
Step 2![]() Click Delete. For recurring meetings, click Delete Occurrence to delete the single instance of the meeting, that is, the one that you have clicked. Click Delete Series to delete all of the recurrences.
Click Delete. For recurring meetings, click Delete Occurrence to delete the single instance of the meeting, that is, the one that you have clicked. Click Delete Series to delete all of the recurrences.
The deleted meeting(s) is removed from the calendar.
Configuring Meeting Preferences
You can configure settings such as your preferred rooms, time zone, and location using the Preferences tab. This is the main tab in the portal along with the My Booking tab.
To configure your meeting settings, perform the following tasks:
Step 1![]() In the Spaces portal for room booking home page, click the Preferences tab.
In the Spaces portal for room booking home page, click the Preferences tab.
The My Preference page appears.
Step 2![]() From the Time Zone drop-down list, choose your preferred time zone.
From the Time Zone drop-down list, choose your preferred time zone.
All the meetings in the calendar view in the home page are displayed in your preferred time zone. The schedule of meeting rooms and participants while booking are also displayed in the preferred time zone. The meeting invites are visible to attendees based on the time zone that they choose.
Step 3![]() From the Locale drop-down list, choose the required option.
From the Locale drop-down list, choose the required option.
This determines the date format displayed to you in portal.
Step 4![]() Perform the following steps in the Location area:
Perform the following steps in the Location area:
 icon.
icon. b.![]() From the first drop-down list in the dialog box, choose the country. From the second drop-down list, choose the state.
From the first drop-down list in the dialog box, choose the country. From the second drop-down list, choose the state.
The chosen country and state are listed next to the Country and State text fields.
d.![]() Choose the city from the first drop-down list in the Location area.
Choose the city from the first drop-down list in the Location area.
Another drop-down list appears.
e.![]() Choose the campus from the second drop-down list. Repeat the procedure to choose the building, and floor from the drop-down lists that appear.
Choose the campus from the second drop-down list. Repeat the procedure to choose the building, and floor from the drop-down lists that appear.
The locations that you choose here will be automatically populated every time you try to create a booking using the New Reservation wizard or the Quick Reservation option.
Step 5![]() Perform the following steps in the Favorite Rooms area:
Perform the following steps in the Favorite Rooms area:
a.![]() Repeat the procedure mentioned in Step 4 to choose the country, state, campus, building, floor, and meeting room from the drop-down lists.
Repeat the procedure mentioned in Step 4 to choose the country, state, campus, building, floor, and meeting room from the drop-down lists.
b.![]() Click Add room as Favorite.
Click Add room as Favorite.
The room appears in the Favorite Rooms area.
c.![]() (Optional) Click the cancel
(Optional) Click the cancel  icon for any of the rooms, which appear in the Favorite Rooms area, to remove them from the list.
The rooms that you add as favorites appear with a star icon in the room search results and are displayed on the top of the list.
Using Signage
- Viewing Meeting Space Availability
- Features Available in Signage
- Booking the Conference or TP Rooms Using Signage
Viewing Meeting Space Availability
To book a conference or TP room, you first need to check the availability of the rooms. You can do this by viewing the display on the Smart+Connected Spaces solution-enabled signage. The three types of views on the signage are as follows:
- Building View—Displays the schedule for all of the conference or TP rooms in the building categorized at the floor level.
- Floor Level View—Displays the plan for the current floor with the location of the conference or TP rooms, the availability status, and the schedule. For touchscreen signage, you can book a room on the current floor or navigate to the other floors and book any room located there.
- Conference Room View—The conference room schedule is displayed on the signage as well as the room panels. A room panel is a small tablet-like device with an LCD screen, which is placed outside a conference or TP room. It is a touch-based interface that allows you to book or release the room and start meetings.
–![]() Signage—Displays the schedule of the primary conference or TP room and the other rooms associated to the signage. For touchscreen signage, you can use the signage to check the available meeting slots and book the room for those slots.
Signage—Displays the schedule of the primary conference or TP room and the other rooms associated to the signage. For touchscreen signage, you can use the signage to check the available meeting slots and book the room for those slots.
–![]() Room Panel—Displays the schedule of the conference or TP room outside of the room where it is placed. The room type, capacity, and features available are also shown. You can use the room panel to book and release the room.
Room Panel—Displays the schedule of the conference or TP room outside of the room where it is placed. The room type, capacity, and features available are also shown. You can use the room panel to book and release the room.
The view on the signage is displayed for a specific preset duration of time, after which the other content added to the signage, if any, appears in a sequence.
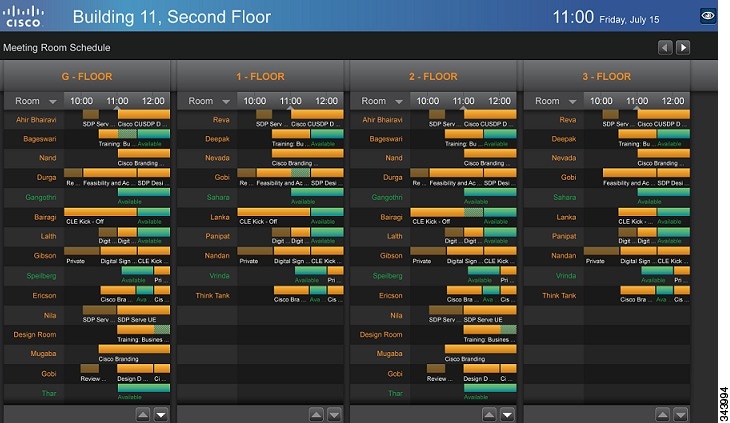
Building View
The building view displays the following information:
- Location, Time, and Date—These details are shown as the header on the signage screen. The location includes the building and floor name. The time and date are also displayed.
- Floors—The floors in the building are displayed as columns with the conference rooms on each floor listed as rows below the floor name. If there are several floors in the building, the screen displays a certain number of floors, and then the view changes to the next few floors. For touchscreen signage, you can also use the left and right arrow buttons to navigate to the required floor.
- Meeting Room Schedule—The schedule is available for three hours for all of the conference rooms on each of the floors. The rooms are listed in alphabetical order. The available rooms and time slots are shown in green and the unavailable rooms and time slots are shown in orange. If the number of rooms is more than what can be shown in the initial view, the remaining rooms will be shown in the next flip. For touchscreen signage, you can also use the up and down arrow buttons to navigate to the required conference room.
Figure 2-2 shows the building view displayed on the signage.
Figure 2-2 Building Level View
Understanding the Building View
Table 2-2 lists the main areas of the building view.
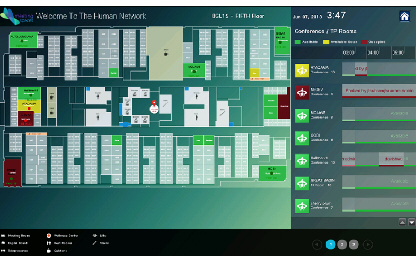
Floor Level View
The floor level view displays the following information:
- Location, Time, Date, and Logo—These details are shown as the header on the signage screen. The location includes the building and floor name. The time, date, and the Spaces logo are also displayed.
- Floor Plan—A map of the floor that appears in the top left corner, and occupies more than 75% of the signage display area. The conference room or Cisco TelePresence room names appear per the location on the floor map, and are indicated with a red dot to show a reserved status and a green dot to show an available status. There is a user location indicator titled “You Are Here”.
- Schedule—The meeting details for each conference room or Cisco TelePresence room on the floor are shown in the top right corner of the display. The schedule can list the details of 10 conference rooms at a time. If there are more than 10 rooms on the floor, the display cycles through the rooms every few seconds. The rooms are listed in alphabetical order, and the room details are available for three hours. The icons for the available rooms are shown in green, the icons for the unavailable rooms are shown in maroon, and the icons for the rooms that will be available soon are shown in yellow. There are scrolling bars for the different booking slots for each room. These bars also appear in green, maroon, and yellow indicating the meeting room status. Rose colored bars appear for the past time slots for concluded meetings. For touchscreen signage, you can select any of the available conference rooms, and make a booking for the required time slot by tapping it.
Note![]() You can book any room plotted in the floor plan, if it is available, by tapping it. The Booking Details pop-up dialog box opens.
You can book any room plotted in the floor plan, if it is available, by tapping it. The Booking Details pop-up dialog box opens.
- Legend—The legend is located in the bottom-left corner of the display. It displays the icons that are used in the floor plan. For example, Meeting Room.
- Floor Navigation—The floor navigation buttons appear in the right side of the footer section. There are numbered buttons for each floor in the building and only three buttons are displayed at a time. The left and right arrow buttons allow you to scroll to the numbered buttons for the other floors. The button for the floor for which the plan is currently displayed is highlighted. For touchscreen signage, you can tap any of the buttons and navigate to all of the floors in the building where the signage is located.
- News Content—At the bottom of the signage screen, there is a section for the news content that is associated to the location. The title of the news item is displayed.
- Home Icon—For touchscreen signage, you can click the home icon and select any of the other content that you want to view.
Figure 2-3 shows the floor view displayed on the signage.
Understanding the Floor View
Table 2-3 lists the main areas of the floor view.
Conference Room View
The conference room view displayed on the signage provides the following information:
- Date & Time—These details are shown as a header on the signage screen.
- Occupancy Status & Temperature—The status and temperature of the conference room is displayed in the top right corner of the view. The word “Occupied” appears next to the name of the conference room along with time slot of the booking, if the room is occupied. The subject of the meeting, room temperature, and information about whether the air conditioner is on or off is also displayed.
- Primary Room Schedule(s)—The detailed schedules of the one or two primary conference rooms with which the signage is associated are displayed as separate columns for each room. The schedule is displayed as a rolling 9-hour window, which is constantly updated to show the latest room schedule. The room name is displayed as the column header followed by rows depicting the room availability. The available and unavailable time slots are displayed in different colors. For booked slots, the subject of the meeting is also displayed. For touchscreen signage, you can book any of the primary room(s).
Note![]() If a conference room has been booked using the mail client, the subject of the meeting and the attendee list is displayed on the signage. These details are not displayed if the administrator enables the ‘Hide Subject’ and ‘Hide Attendees’ options for the conference room. When the ‘Hide Subject’ option is enabled, the subject of the meeting is displayed in the format “Booked by <name of the meeting organizer>”.
If a conference room has been booked using the mail client, the subject of the meeting and the attendee list is displayed on the signage. These details are not displayed if the administrator enables the ‘Hide Subject’ and ‘Hide Attendees’ options for the conference room. When the ‘Hide Subject’ option is enabled, the subject of the meeting is displayed in the format “Booked by <name of the meeting organizer>”.
- Conference Room Message—All the messages that are sent to the signage using the Cisco IP Phones in the conference rooms with which the signage is associated (primary conference rooms) are shown in the right side of the view. News content appears at the bottom of the display.
- Meeting Time Schedule—The schedule of other rooms in the zone where the signage is located is shown at the right side of the display. The names of the rooms are displayed in chronological meetings order. The available and unavailable rooms and slots are displayed in different colors. The meeting subject is also shown for each booked slot. For touchscreen signage, you can click the up and down arrow buttons to navigate to the desired conference room in case there are several rooms.
Figure 2-4 shows the conference room view displayed on the signage.
Figure 2-4 Conference Room View on the Signage
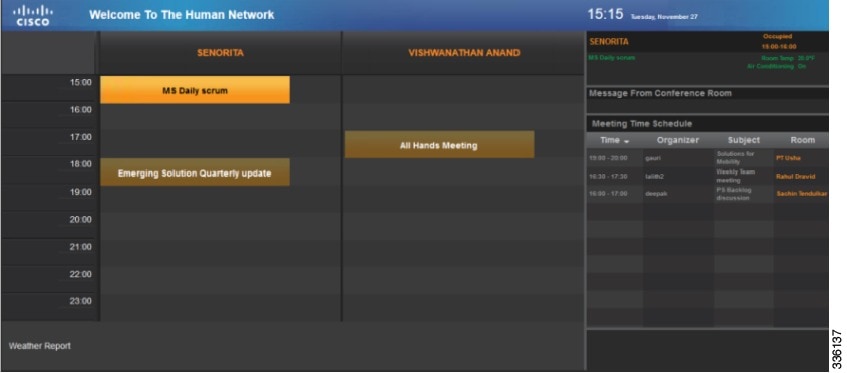
Understanding the Conference Room View on the Signage
Table 2-4 lists the main areas of the conference room view.
Features Available in Signage
Some of the signage within a premise can be without the touchscreen. Although you cannot use them to book the conference rooms, you can view the room availability as the display is similar to that on the touchscreen signage.
Table 2-5 lists the features that are available or can be accessed using the touchscreen signage and non touchscreen signage.
|
|
|
|
|---|---|---|
Booking the Conference or TP Rooms Using Signage
You are allowed to book a conference or TP room up to three hours in advance.
To book a conference or TP room using the touchscreen signage, perform the following steps:
Step 1![]() Tap the time slot for which you want to book the conference or TP room from the schedule that is displayed on the signage.
Tap the time slot for which you want to book the conference or TP room from the schedule that is displayed on the signage.
The Schedule a Meeting dialog box appears. The start time of the booking is automatically displayed in the From drop-down list depending on the slot that you have selected. You can change the time by choosing another option from the drop-down list.
Figure 2-5 shows how to book a room using the signage.
Figure 2-5 Booking Room Using Signage
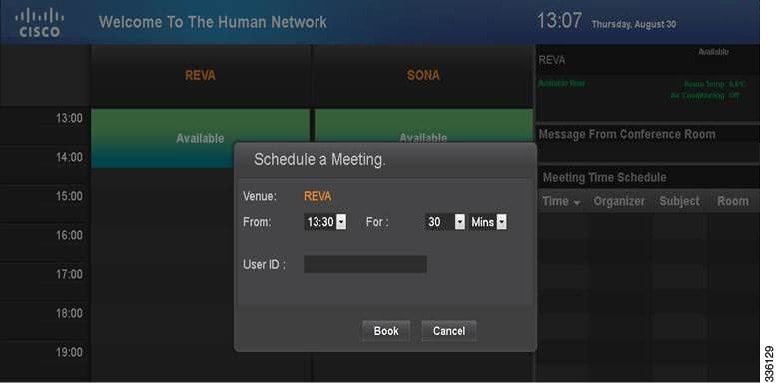
Step 2![]() Choose the duration for which you want to book the room from the first For drop-down list. Choose the Minutes option from the second For drop-down list. The time of the next meeting is displayed below the drop-down list, so that you can avoid selecting a time slot that clashes with it.
Choose the duration for which you want to book the room from the first For drop-down list. Choose the Minutes option from the second For drop-down list. The time of the next meeting is displayed below the drop-down list, so that you can avoid selecting a time slot that clashes with it.
Step 3![]() Enter your User ID with the help of the virtual keyboard that is displayed on the screen, and tap Accept. User ID is the ID that uniquely identifies a user in the corporate directory (LDAP).
Enter your User ID with the help of the virtual keyboard that is displayed on the screen, and tap Accept. User ID is the ID that uniquely identifies a user in the corporate directory (LDAP).
Step 4![]() Tap Book to book the conference room or tap Cancel to close the dialog box.
Tap Book to book the conference room or tap Cancel to close the dialog box.
If you tap Book, a dialog box appears informing you that the meeting schedule request has been received, and that you need to check your email to confirm the booking status.
A meeting is scheduled in Microsoft Exchange for the conference room, and an automatic acceptance mail is sent to you from the conference room stating that your meeting request has been accepted. The status of the conference room and the meeting details for the room are updated when the signage page is refreshed. The subject of the meeting will be displayed as: “Booked by <your name>”.
Using Kiosks
You can use the Smart+Connected Spaces kiosk interface to perform the following tasks:
- Book conference rooms or TP rooms.
- Check into any available workspace or office.
- View the availability and check-in status of your Cisco Jabber contacts.
- View the route to locate a person, workspace, office, or conference or TP room on a floor.
- View the overall conference or TP room, workspace, and office availability on all of the floors of all of the buildings in the organization and book or check into any of these spaces.
- View the neighborhoods or zones on a floor.
- View the building, floor, and name of the workspace or office that you have checked into.
- Access the floor plans for any building in the enterprise to view the locations and availability of the conference room or TP rooms, workspaces, and offices.
- Search for the available conference rooms and TP rooms and workspaces and offices based on your requirements such as the features available, seating capacity, location, time, and so on and book them.
- Search for the people within the enterprise.
Note![]() You can also perform all of these tasks by using the web portal.
You can also perform all of these tasks by using the web portal.
- Reset the PIN by using the Forgot PIN option. The new PIN will be sent to your email ID and get updated in the kiosk web portal.
The Smart+Connected Spaces kiosk web portal has an interface and functionality similar to the Smart+Connected Spaces kiosks. To access the portal, you need to log in using your employee ID or user ID, as configured by the administrator. The login password is your active directory or LDAP password.
The portal allows you to book conference or TP rooms, check into workspaces, use the search and filtering features, and so on, in a manner similar to the kiosks. In addition to these features, the following options are available in the kiosk web portal:
- Check-in Location—The building, floor, and name of the workspace or office you have checked into.
- Locate button—Loads the plan for the floor where you have checked in and displays the dialog box that indicates your location on the floor plan. The dialog box also provides information about you.
- PIN button—Displays the field which shows your current kiosk PIN and also allows you to change the PIN. For more information, see the “Changing the Kiosk PIN” section.
- Do not publish my location option—This option is available only if it is configured by the administrator. If you choose not to publish your details, the workspace you check into is shown as occupied but your details are not displayed. Also, your location is not shown:
–![]() When someone searches for you
When someone searches for you
–![]() In the Recent Activities list
In the Recent Activities list
- Check-out button—Allows you to check out, at any point in time, from the workspace that you are checked into.
- Log Out—Allows you to log out of the kiosk web portal.
Note![]() You can access these options from the drop-down list that appears when you click the arrow button located in the top right corner of the page, next to your name. Additionally, the check-in or check-out buttons are also available when you click a workspace on the floor plan.
You can access these options from the drop-down list that appears when you click the arrow button located in the top right corner of the page, next to your name. Additionally, the check-in or check-out buttons are also available when you click a workspace on the floor plan.
- Understanding the Kiosk Interface
- Viewing Recent Activities
- Booking Conference or TP Rooms
- Searching for Facilities
- Searching for People
- Searching for Conference or TP Rooms
- Viewing Your Cisco Jabber Contacts
- Viewing the Details of the People on a Floor
- Viewing Neighborhoods
- Viewing the Building Summary
- Changing the Kiosk PIN
- Resetting the Kiosk PIN
Understanding the Kiosk Interface
Figure 2-6 shows the interface displayed on the kiosk.
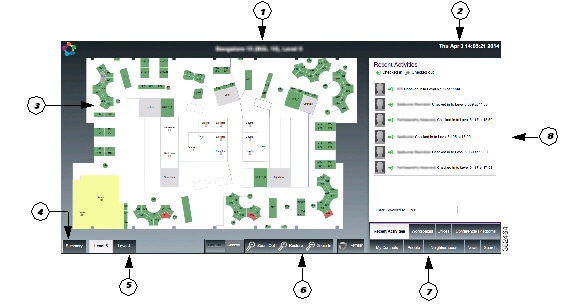
The kiosk interface displays the following information:
- Location—By default, the interface displays the name of the building and the floor where the kiosk is placed, as a header. This is the location for which the floor plan and other details are displayed unless changed. When you navigate to another building or floor using the floor plan view or the search feature, the location title gets updated accordingly.
- Day, Date, and Time—The day of the week and the current date and time at the location where the kiosk is placed are displayed in the top right corner of the kiosk interface.
- Floor Plan—All of the available workspaces, conference or TP rooms, and other facilities on the floor are displayed as a map or a graphical representation. This element takes up a major part of the kiosk screen. All of the available workspaces appear in green, while the unavailable workspaces appear in red. Tapping on a workspace opens a dialog box which shows the workspace name or ID, availability status and icon, and the check-in option if the workspace is available. For occupied workspaces, details of the person who has occupied it are displayed.
Note![]() The conference rooms on the floor are not highlighted and appear in grey on the floor plan that is shown by default, with the Recent Activities tab selected. Use the Conference or TP Rooms tab to view the details of these rooms and book them.
The conference rooms on the floor are not highlighted and appear in grey on the floor plan that is shown by default, with the Recent Activities tab selected. Use the Conference or TP Rooms tab to view the details of these rooms and book them.
- Summary—Tap this button to view the building summary. The building summary displays the following details:
–![]() Table depicting each floor in the building as a row and the conference or TP room and workspace availability status as columns. The number of available, not reservable, checked in, and booked conference or TP rooms, workspaces, and offices on every floor are listed and represented by different colors. Tap any resource number provided for any floor to load the floor plan with that resource highlighted.
Table depicting each floor in the building as a row and the conference or TP room and workspace availability status as columns. The number of available, not reservable, checked in, and booked conference or TP rooms, workspaces, and offices on every floor are listed and represented by different colors. Tap any resource number provided for any floor to load the floor plan with that resource highlighted.
–![]() Legend defining what the colors indicate is provided below the table. The date and time (along with the timezone) at which the Summary was last updated are also provided.
Legend defining what the colors indicate is provided below the table. The date and time (along with the timezone) at which the Summary was last updated are also provided.
To return to the floor plan view, tap the Close button.
- Floor Navigation Controls—Below the floor plan, controls are provided to navigate to the different floors in a building. Tap these controls to view the plan for a particular floor. Once the changed floor plan is displayed, you can perform the required tasks by using any of the function tabs and book a conference or TP room or check into a workspace on that floor.
- View Controls—The Access tab changes the default floor plan to a view where the different areas of the map are represented by patterns. This makes the floor plan view more accessible to users that might find it difficult while differentiating between colors. Figure 2-7 shows how a floor plan appears in the accessbility mode.
Figure 2-7 Floor Plan (Accessibility View)

The Default tab restores the default view where the various areas on the map are represented in different colors. The Zoom In and Zoom Out buttons allow you to adjust the magnification level of the floor plan. Tap restore to resize the floor plan to the default display size on the kiosk. The Refresh button updates the floor plan and changes the kiosk view to display the default function tab, that is, the Recent Activities tab. This tab is refreshed to show the updated data.
- Function Tabs—These tabs allow you to perform various tasks using the kiosk. When you tap a tab, the pane above the tab area displays the details for it and provides a filtering option.
Note![]() The filtering option is available for all of the tabs except Search.
The filtering option is available for all of the tabs except Search.
–![]() Recent Activities—Selected by default, it lists the people who have checked in and checked out on the floor during the last two hours.
Recent Activities—Selected by default, it lists the people who have checked in and checked out on the floor during the last two hours.
–![]() Workspaces—Highlights the available workspaces in the floor plan and lists the available, occupied, and available soon workspaces.
Workspaces—Highlights the available workspaces in the floor plan and lists the available, occupied, and available soon workspaces.
–![]() Offices—Highlights the available office spaces in the floor plan and lists the available, occupied, and available soon office spaces.
Offices—Highlights the available office spaces in the floor plan and lists the available, occupied, and available soon office spaces.
Note![]() For more information on managing workspaces and offices, see Chapter 3, “Flexible Working by Using Personalized Spaces”.
For more information on managing workspaces and offices, see Chapter 3, “Flexible Working by Using Personalized Spaces”.
–![]() Conference or TP Rooms—Highlights the available conference and TP rooms in the floor plan and lists the available and occupied rooms.
Conference or TP Rooms—Highlights the available conference and TP rooms in the floor plan and lists the available and occupied rooms.
–![]() My Contacts—Allows you to view the physical location and virtual presence of your Cisco Jabber contacts who have checked in on a floor.
My Contacts—Allows you to view the physical location and virtual presence of your Cisco Jabber contacts who have checked in on a floor.
–![]() People—Lists all of the people who have checked in on the current floor.
People—Lists all of the people who have checked in on the current floor.
–![]() Neighborhoods—Lists the different neighborhoods or zones of a floor. The workspaces in each zone are displayed in a different color in the floor plan.
Neighborhoods—Lists the different neighborhoods or zones of a floor. The workspaces in each zone are displayed in a different color in the floor plan.
–![]() News—Displays the latest news and top headlines that are relevant to the geographical region the user is located in. You can tap a headline listed to read the entire article, while remaining within the application.
News—Displays the latest news and top headlines that are relevant to the geographical region the user is located in. You can tap a headline listed to read the entire article, while remaining within the application.
–![]() Search—Allows you to search for buildings, people, workspaces, and conference or TP rooms anywhere in the enterprise.
Search—Allows you to search for buildings, people, workspaces, and conference or TP rooms anywhere in the enterprise.
Viewing Recent Activities
By default, the Recent Activities tab is displayed on the kiosk. This tab is also displayed whenever you tap Refresh. This tab displays all of the check in and check out data for the past two hours. This data is specific to the building where the kiosk is located.
To view the recent activities in the building, perform the following tasks:
Step 1![]() Tap the Recent Activities tab.
Tap the Recent Activities tab.
The tab details area shows the following details:
- Legend—Shows the icons that represent the checked in and checked out status of employees.
- List of Employees—Lists the employees who have checked in or out on any floor in the building within the last two hours. The details of the most recently checked in or checked out employees appear on top. The name of the employee, the floor name, workspace or office name, and the check in or out time is displayed.
Step 2![]() Tap and drag the list to scroll it and tap any name to load the floor plan. A dialog box appears indicating the employee’s location in the floor plan that displays the following details:
Tap and drag the list to scroll it and tap any name to load the floor plan. A dialog box appears indicating the employee’s location in the floor plan that displays the following details:
 icon and the status ‘Occupied’, if the employee has checked in. This indicates that the workspace or office is unavailable and cannot be booked. If the employee has checked out, a
 icon and the status ‘Available’ appear. This indicates that the workspace is available and can be booked. If the workspace or office reservation is about to end soon (within a time span of an hour or less), the
 icon and the status ‘Available Soon’ appear. This indicates that the workspace or office will be available shortly and can be booked soon.
Note![]() If no image is available for an employee(s), a generic icon is shown.
If no image is available for an employee(s), a generic icon is shown.
Note![]() Employee details are displayed only for those employees who are currently checked into a workspace or office. No details are shown in the dialog box for employees that have checked out.
Employee details are displayed only for those employees who are currently checked into a workspace or office. No details are shown in the dialog box for employees that have checked out.
–![]() The
The  icon—Opens the chat window that you can use to communicate with the employee.
–![]() Route—Displays a dotted line from the elevator lobby to the employee’s location.
Route—Displays a dotted line from the elevator lobby to the employee’s location.
–![]() Close—Allows you to close the dialog box.
Close—Allows you to close the dialog box.
Note![]() The Check-in or Check-out button is also available if you are viewing your own details.
The Check-in or Check-out button is also available if you are viewing your own details.
Filtering the Recent Activities List
You can filter the Recent Activities list by entering a few alphabetic characters of the employee(s) name.
To filter the list, perform the following steps:
Step 1![]() Tap inside the Enter Keyword to Filter field and enter a few alphabetic characters of the employee’s name using the onscreen keyboard. This field is provided below the Recent Activities list in the tab details area.
Tap inside the Enter Keyword to Filter field and enter a few alphabetic characters of the employee’s name using the onscreen keyboard. This field is provided below the Recent Activities list in the tab details area.
The list gets filtered to display the check in or out details of the employees whose names contain the alphabetic characters that you specified.
Step 2![]() Tap any name in the filtered list.
Tap any name in the filtered list.
The floor plan is loaded with a dialog box that indicates the employee’s location on the floor and provides the employee’s details.
Booking Conference or TP Rooms
You can book any available conference or TP room for a required time slot for the current day or any other day.
To book a conference or TP room, perform the following steps:
Step 1![]() Navigate to the floor where you want to book the conference or TP room and tap the Conference or TP Rooms tab.
Navigate to the floor where you want to book the conference or TP room and tap the Conference or TP Rooms tab.
(Alternatively) To book a conference or TP room in another building, navigate to the building using the Search tab and then tap the Conference or TP Rooms tab to book the required room. For more details, see the “Searching for Facilities” section.
The rooms on the floor are highlighted and appear in different colors that indicate the status:
Note![]() If you are viewing in the accessibility mode, that is, you have clicked the Access tab, the rooms are represented by a patterned background.
If you are viewing in the accessibility mode, that is, you have clicked the Access tab, the rooms are represented by a patterned background.
Note![]() The conference and the TP rooms are each represented by a different icon that indicates the room type. These icons appear in the room list and the dialog box that appears when you click the room name on the floor plan.
The conference and the TP rooms are each represented by a different icon that indicates the room type. These icons appear in the room list and the dialog box that appears when you click the room name on the floor plan.
Step 2![]() Tap and drag the list to scroll it and tap any room that is in the available, occupied, or available soon status. (Alternatively, tap a room in the floor plan.)
Tap and drag the list to scroll it and tap any room that is in the available, occupied, or available soon status. (Alternatively, tap a room in the floor plan.)
A dialog box appears on the floor plan indicating where the conference or TP room is located. It displays the room name, availability status, and seating capacity. The Book, Route, and Close buttons are also displayed.
Step 3![]() Tap Book in the dialog box.
Tap Book in the dialog box.
The three-screen booking wizard opens. The Time Info screen is the wizard first screen. It displays the following:
- Room type (conference or TP)
- Room name
- Current availability status
- Seating capacity
- Icons for the equipment in the room (if any) such as the projector, board, and so on.
- Date picker that shows the current date and opens the calendar.
- Time Table that displays the room schedule for the day as a horizontal bar divided into one-hour slots. Names of the employees who have booked the room for these slots are also displayed.
- Book and Close buttons
Step 4![]() To specify a time for the booking, perform the following steps:
To specify a time for the booking, perform the following steps:
b.![]() Tap the left and right arrows on the calendar to change the month and tap the required date. (Optional) Tap Today to pick the current date.
Tap the left and right arrows on the calendar to change the month and tap the required date. (Optional) Tap Today to pick the current date.
c.![]() Tap the
Tap the  icon to return to the Time Info screen. (Alternatively) Tap anywhere outside the calendar to close it.
The date picker displays the selected date.
Step 5![]() Tap any available slot(s) in the Time Table to select it. To unselect a chosen slot, tap it again.
Tap any available slot(s) in the Time Table to select it. To unselect a chosen slot, tap it again.
The User Info screen appears. It displays the conference room name, the building and floor it is located on, the User ID field, and the date and time for the booking. A message is displayed asking you to provide your credentials.
Step 7![]() Enter your employee ID or user ID (as enabled by the administrator for your authentication while using kiosks) and your kiosk PIN in the dialog that appears, using the onscreen keyboard. (Optional) You can swipe your badge.
Enter your employee ID or user ID (as enabled by the administrator for your authentication while using kiosks) and your kiosk PIN in the dialog that appears, using the onscreen keyboard. (Optional) You can swipe your badge.
Note![]() Either the badge swipe or the kiosk PIN option is available depending on what is configured by your administrator.
Either the badge swipe or the kiosk PIN option is available depending on what is configured by your administrator.
Step 8![]() Tap inside the User ID field and enter the data using the onscreen keyboard that appears.
Tap inside the User ID field and enter the data using the onscreen keyboard that appears.
The Complete screen appears informing you that booking is successful.
The kiosk view is refreshed and the Recent Activities tab is selected. You receive a booking confirmation mail in Outlook.
Step 11![]() (Optional) Tap Close on the Time Info and User Info screens to exit the wizard without booking a room.
(Optional) Tap Close on the Time Info and User Info screens to exit the wizard without booking a room.
Filtering by Keyword
You can filter the conference or TP rooms list by entering a few alphabetic characters of the conference or TP room name.
To filter the list, perform the following steps:
Step 1![]() Tap inside the Enter Keyword to Filter field and enter a few alphabetic characters of the conference or TP room name using the onscreen keyboard. This field is provided below the Conference or TP Room list in the tab details area.
Tap inside the Enter Keyword to Filter field and enter a few alphabetic characters of the conference or TP room name using the onscreen keyboard. This field is provided below the Conference or TP Room list in the tab details area.
You will get the list of conference room names, which contain the alphabetic characters that you specified in the selected building.
Step 2![]() Tap any name in the filtered list to view the conference or TP room location in the floor plan.
Tap any name in the filtered list to view the conference or TP room location in the floor plan.
Searching for Facilities
You can search for any building in the organization, load the floor maps for it, and view the building summary using the facilities search feature.
To search for facilities, perform the following steps:
The tab details area displays the Facilities, People, Workspaces, and Conference or Telepresence Rooms search panes.
Step 2![]() In the Facilities pane, tap inside the Building field.
In the Facilities pane, tap inside the Building field.
A drop-down list of all of the buildings in the organization appears. Tap the up and down arrows to scroll through the list.
Step 3![]() Tap the name of the building that you want to search for.
Tap the name of the building that you want to search for.
The floor drop-down list appears after you select the building.
Step 4![]() (Optional) Tap the
(Optional) Tap the  icon to remove the selection and reopen the list. Tap the name of another building in the list.
Step 5![]() Tap the floor for which you want to view the details and then tap Load Map.
Tap the floor for which you want to view the details and then tap Load Map.
The plan for the selected floor is displayed with all of the workspaces on the highlighted floor. The Recent Activities tab is selected by default.
Step 6![]() (Optional) Tap Building Summary to view the workspace and conference or TP room availability details for the building. Tap Close to return to the floor plan view.
(Optional) Tap Building Summary to view the workspace and conference or TP room availability details for the building. Tap Close to return to the floor plan view.
Step 7![]() (Optional) Tap any of the function tabs depending on the task that you want to perform.
(Optional) Tap any of the function tabs depending on the task that you want to perform.
Step 8![]() (Optional) Tap the
(Optional) Tap the  icon to return to the floor plan view for the default location (where the kiosk is located).
Searching for People
To search for the people in any location of the organization, perform the following steps:
The tab details area displays the Facilities, People, Workspaces, and Conference or TelePresence Rooms search panes.
Step 2![]() In the People pane, tap inside the Search for field and enter the employee name using the onscreen keyboard that appears. (Optional) Tap the
In the People pane, tap inside the Search for field and enter the employee name using the onscreen keyboard that appears. (Optional) Tap the  icon to remove the name and re-enter another name.
The floor plan view is replaced by the list of person(s) with the name that you searched for. Details such as the photograph (if available), check-in status icon (green for checked in and grey for not checked in), designation, and location are displayed.
Note![]() The people search is independent of the location selected in the Facilities pane. On the contrary, the location in the Facilities pane changes to the employee’s location if you view the plan for the floor where the person is.
The people search is independent of the location selected in the Facilities pane. On the contrary, the location in the Facilities pane changes to the employee’s location if you view the plan for the floor where the person is.
Step 4![]() (Optional) Tap Close in the list view if you do not want to view further details.
(Optional) Tap Close in the list view if you do not want to view further details.
Step 5![]() Tap the location detail provided for the employee in the list.
Tap the location detail provided for the employee in the list.
The plan for the floor where the person is located is displayed, with a dialog box showing the exact location. The dialog box displays details such as the photograph (if available), check-in status icon, designation, and team to which the employee belongs.
Step 6![]() Tap Cancel in the dialog box to close it.
Tap Cancel in the dialog box to close it.
Step 7![]() (Optional) Tap any of the function tabs if you want to perform other tasks for the location where the employee is located. For example, check into a workspace or office close to where the person is seated.
(Optional) Tap any of the function tabs if you want to perform other tasks for the location where the employee is located. For example, check into a workspace or office close to where the person is seated.
(Alternatively) Tap the  icon to change the kiosk view to display the details of the default location (where the kiosk is located).
Searching for Conference or TP Rooms
To search for conference or TP rooms, perform the following steps:
The tab details area displays the Facilities, People, Workspaces, and Conference or Telepresence Rooms search panes.
Step 2![]() In the Facilities pane, tap inside the Building field and choose a building. This is required because the conference or TP room is searched for only in the selected building.
In the Facilities pane, tap inside the Building field and choose a building. This is required because the conference or TP room is searched for only in the selected building.
Step 3![]() In the Conference or Telepresence Rooms pane, tap inside the Name field. Enter the name of the room that you want to search for using the onscreen keyboard that appears. (Optional) Tap the
In the Conference or Telepresence Rooms pane, tap inside the Name field. Enter the name of the room that you want to search for using the onscreen keyboard that appears. (Optional) Tap the  icon to remove the name and re-enter another name. Tap Search.
The search results appear in place of the floor plan and display the room icon, availability status icon, room name and type, floor where it is located, locate icon, seating capacity, features (if any), and the Book button.
Step 4![]() (Alternatively) Instead of searching for a conference or TP room by name, you can search for rooms using any or all of the following options:
(Alternatively) Instead of searching for a conference or TP room by name, you can search for rooms using any or all of the following options:
- Features—Tap the Projector, Audio, Screen, and or or Telepresence button depending on the features that you want in the room.
- Seats—Tap the Any button and choose the number of seats that you want in the room.
- Available On—Tap this button to choose a date for the booking.
- From—Tap this button to choose the booking start time.
- Till—Tap this button to choose the booking end time.
Tap Search. The search results display the rooms that meet the search conditions. If no room matches the search criteria, a message is displayed informing you that no results are found.
Step 5![]() Tap the locate
Tap the locate  icon for any room in the search result list.
The floor plan appears with a dialog box showing the exact location and the details of the conference or TP room. All other rooms on the floor are also highlighted in different colors indicating the availability status. Tap Book in the dialog box to open the booking wizard. For more information, see the “Booking Conference or TP Rooms” section.
Step 6![]() (Alternatively) Tap the Book button in the result view to directly book the room.
(Alternatively) Tap the Book button in the result view to directly book the room.
Step 7![]() (Optional) Tap Close in the list view if you do not want to view further details or book a room.
(Optional) Tap Close in the list view if you do not want to view further details or book a room.
Viewing Your Cisco Jabber Contacts
To view the availability and the check in status or the fixed location of your Cisco Jabber contacts on a particular floor, perform the following steps:
Step 1![]() Navigate to the floor for which you want to view the Cisco Jabber contacts and tap the My Contacts tab.
Navigate to the floor for which you want to view the Cisco Jabber contacts and tap the My Contacts tab.
Step 2![]() Enter your employee ID or user ID (as enabled by the administrator for checking in using kiosks) and your kiosk PIN in the dialog that appears, using the onscreen keyboard. (Optional) You can swipe your badge.
Enter your employee ID or user ID (as enabled by the administrator for checking in using kiosks) and your kiosk PIN in the dialog that appears, using the onscreen keyboard. (Optional) You can swipe your badge.
Note![]() Either the badge swipe or the kiosk PIN option is available depending on what is configured by your administrator. This user authentication is required every time that you want to access the list of your Cisco Jabber Contacts using a kiosk.
Either the badge swipe or the kiosk PIN option is available depending on what is configured by your administrator. This user authentication is required every time that you want to access the list of your Cisco Jabber Contacts using a kiosk.
The tab details area displays the list of your Cisco Jabber contacts who have checked in to the selected floor and the contacts who have been assigned fixed locations (non-reservable locations that are assigned to a particular user) on that particular floor. It displays the following details:
- Photograph of the employee—Shown if available. If no image is available for an employee, a generic icon is shown.
- Employee name and user ID—The name and user ID of your Cisco Jabber contact.
- Check-in status icon—A
 icon representing that the employee has checked in. A
 icon is shown for the fixed location users.
Note![]() If none of your Cisco Jabber contacts have checked in to the floor, a message appears informing you of this.
If none of your Cisco Jabber contacts have checked in to the floor, a message appears informing you of this.
Step 3![]() (Optional) Tap and drag the list to scroll it and tap any name.
(Optional) Tap and drag the list to scroll it and tap any name.
A dialog box appears indicating the employee’s location in the floor plan that displays the following details:
 icon and the status ‘Occupied’. This indicates that the workspace is unavailable and cannot be booked. The
 icon and the status ‘Not Reservable’ for fixed location users. The
 icon and the status ‘Available Soon’ appears if the workspace booking is about to end.
 or fixed
 status icon. These details are displayed only for the reservable workspaces or offices.
 icon.
icon.
Filtering the Cisco Jabber Contacts List
You can filter the Cisco Jabber Contacts list by entering a few alphabetic characters of the employee(s) name.
To filter the list, perform the following steps:
Step 1![]() Tap inside the Enter Keyword to Filter field and enter a few alphabetic characters of the employee’s name using the onscreen keyboard. This field is provided below the My Contacts list in the tab details area.
Tap inside the Enter Keyword to Filter field and enter a few alphabetic characters of the employee’s name using the onscreen keyboard. This field is provided below the My Contacts list in the tab details area.
The list gets filtered to display the details of the employees whose names contain the alphabetic characters that you specified.
Step 2![]() Tap any name in the filtered list.
Tap any name in the filtered list.
The floor plan is loaded with a dialog box that indicates the employee’s location on the floor and provides the employee’s details.
Viewing the Details of the People on a Floor
To view the details of the people occupying a floor, perform the following steps:
Step 1![]() Navigate to the floor for which you want to view the people and tap the People tab.
Navigate to the floor for which you want to view the people and tap the People tab.
All of the workspaces and offices in the floor plan are dimmed and the name and miniature images of the employees (if available) are overlaid on the workspace or office that they occupy. The tab details area lists the total number of checked in and fixed desk employees. Details such as the photograph (if available), status icon, name and employee ID, and location are also shown.
Step 2![]() Tap and drag the list to scroll it and tap the name of any employee in the list.
Tap and drag the list to scroll it and tap the name of any employee in the list.
A dialog box appears in the floor plan indicating the workspace or office that the employee occupies. It displays the following details:
- The status ‘Occupied’ or ‘Available Soon’ along with the status icons indicating non-availability of the workspace or office.
- Employee details such as the photograph (if available), availability icon, name and employee ID, designation, and the team to which the employee belongs.
- The
 icon—Opens the chat window that you can use to communicate with the employee.
Step 3![]() (Optional) Tap Zoom In to magnify the floor plan and view the name and images of the employees who occupy the workspaces or offices on the floor.
(Optional) Tap Zoom In to magnify the floor plan and view the name and images of the employees who occupy the workspaces or offices on the floor.
Filtering the List of People
You can filter the People list by entering a few alphabetic characters of the employee’s name.
To filter the list, perform the following steps:
Step 1![]() Tap inside the Enter Keyword to Filter field and enter a few alphabetic characters of the person’s name using the onscreen keyboard. This field is provided below the People list in the tab details area.
Tap inside the Enter Keyword to Filter field and enter a few alphabetic characters of the person’s name using the onscreen keyboard. This field is provided below the People list in the tab details area.
The list is filtered to display the names which contain the alphabetic characters that you specified.
Step 2![]() Tap any name in the filtered list to view the location of the person in the floor plan.
Tap any name in the filtered list to view the location of the person in the floor plan.
Viewing Neighborhoods
Neighborhoods are regions of a floor that are occupied by a specific team or business unit. All of the workspaces and offices occupied by a certain team are highlighted in a particular color in the floor plan.
To view neighborhoods, perform the following steps:
Step 1![]() Navigate to the floor for which you want to view the neighborhoods and tap the Neighborhoods tab.
Navigate to the floor for which you want to view the neighborhoods and tap the Neighborhoods tab.
The floor plan highlights the workspaces and offices occupied by different teams in the colors that represent them. The tab details area lists the various teams occupying the floor, the number of workspaces and offices allocated to each team, and the colors that represent each team.
Step 2![]() By default, the Select All tab is selected in the tab details area and all of the neighborhoods are highlighted in the floor plan. To view only a few neighborhoods, tap Select None and then tap the neighborhoods that you want to view. Only these neighborhoods are highlighted in the floor plan.
By default, the Select All tab is selected in the tab details area and all of the neighborhoods are highlighted in the floor plan. To view only a few neighborhoods, tap Select None and then tap the neighborhoods that you want to view. Only these neighborhoods are highlighted in the floor plan.
Step 3![]() Tap any workspace or office to open the dialog box which displays the name of the team that occupies it. Tap Close in the dialog box or tap anywhere outside it to close the dialog box.
Tap any workspace or office to open the dialog box which displays the name of the team that occupies it. Tap Close in the dialog box or tap anywhere outside it to close the dialog box.
Step 4![]() (Optional) Tap Zoom In to magnify the floor plan and view the location name or ID for the workspaces and offices occupied by the teams.
(Optional) Tap Zoom In to magnify the floor plan and view the location name or ID for the workspaces and offices occupied by the teams.
Filtering the Neighborhoods List
You can filter the Neighborhoods list by entering a few alphabetic characters of the team name.
To filter the list, perform the following steps:
Step 1![]() Tap inside the Enter Keyword to Filter field and enter a few alphabetic characters of the team name using the onscreen keyboard. This field is provided below the Neighborhoods list in the tab details area.
Tap inside the Enter Keyword to Filter field and enter a few alphabetic characters of the team name using the onscreen keyboard. This field is provided below the Neighborhoods list in the tab details area.
The list gets filtered to display the neighborhoods which contain the alphabetic characters that you specified and the number of workspaces and offices assigned to each of the filtered neighborhoods. The filtering will not affect the floor plan view where all of the neighborhoods are highlighted by default.
Step 2![]() Tap Select None. All the workspaces and offices are dimmed. Now, tap any neighborhood(s) in the filtered list.
Tap Select None. All the workspaces and offices are dimmed. Now, tap any neighborhood(s) in the filtered list.
This highlights only the workspaces and offices assigned to the particular group in the floor plan.
Viewing the Building Summary
The building summary lists the details of the building and the nature of resources available in it. The details include the number of conference or TP rooms, workspaces, and offices on each floor and the occupancy or availability, and reservation status of these spaces. These numbers are hyperlinks that you can tap to view the map of the floor with the resources highlighted.
To view the building summary, perform the following steps:
Step 1![]() Tap the Summary button below the floor plan that is currently displayed on the kiosk.
Tap the Summary button below the floor plan that is currently displayed on the kiosk.
The floor plan view changes to the building summary view. For more information on the building summary, see the “Understanding the Kiosk Interface” section.
Note![]() If you chose a building using the Search tab, you can tap the Building Summary button to view the summary for the building. Alternatively, after you specify a floor in the building and load the map for it, you can tap the Summary button that is displayed below the floor plan.
If you chose a building using the Search tab, you can tap the Building Summary button to view the summary for the building. Alternatively, after you specify a floor in the building and load the map for it, you can tap the Summary button that is displayed below the floor plan.
Step 2![]() View the number of conference or TP rooms, workspaces, offices on every floor and the availability status. Click conference or TP rooms, workspaces, or offices number for any floor to view the floor plan with that resource highlighted. (Alternatively) Tap Close to return to the floor plan view.
View the number of conference or TP rooms, workspaces, offices on every floor and the availability status. Click conference or TP rooms, workspaces, or offices number for any floor to view the floor plan with that resource highlighted. (Alternatively) Tap Close to return to the floor plan view.
Changing the Kiosk PIN
You can change your kiosk PIN or view the PIN if you have forgotten it by logging in to the kiosk web portal.
The kiosk PIN is used to authenticate your user ID for the following purposes:
To change your kiosk PIN, perform the following steps:
Step 1![]() Log in to the kiosk web portal.
Log in to the kiosk web portal.
Step 2![]() Click the arrow button located in the top right corner of the page, next to your name.
Click the arrow button located in the top right corner of the page, next to your name.
The PIN field (that displays your current PIN) and the Update button are displayed.
Step 4![]() Enter the new PIN and then click Update.
Enter the new PIN and then click Update.
The new PIN is saved and activated.
Resetting the Kiosk PIN
If you forget the kiosk PIN, you can reset it by pressing the Forgot PIN option that is displayed below the PIN field whenever you need to provide your authentication to check in, book a room, or access your Cisco Jabber contacts. The PIN is automatically reset and sent to your email ID. The new PIN is also displayed in the PIN field in the kiosk web portal.
Using Room Panels
You can use room panels to view the conference or TP room schedule, availability or occupancy status, confirm room occupancy, and book and release the rooms.
- Room Panel Interface
- Booking Rooms Using the Room Panel
- Releasing Conference or TP Rooms Using the Room Panels
- Automatic Room Release
Room Panel Interface
The conference room view displayed on the room panel provides the following information:
- Logo—The Meeting Spaces logo is displayed on the top left corner of the room panel screen.
- Day, Date, and Time—The current day, date, and time are displayed prominently on the room panel screen.
- Room Details—An icon is shown below the time indicating whether the room is a conference room or a TP room. The name of the room, the words “Conference Room” or “Telepresence Room”, and the seating capacity of the room are displayed next to the room type icon.
- Room Features—Icons representing the features that are available in the room, such as A/V controls, digital signage messaging, and so on, are provided below the room details.
- Day and Date—The current date and day of the week are displayed at the top right corner of the screen.
- Room Schedule—The schedule of the conference or TP room, outside where the room panel is placed, is displayed on the right side of the screen. The schedule is a rolling-hour window, which is constantly updated to show the latest room schedule. The time slots for which the room is booked are displayed in a background that is a few shades lighter than the screen background color. The name of the person who has booked the room for each of these slots is also displayed when a room is booked using the room panel, IP phone, or mobile phone. If the room is currently available, the screen has a green
 background. If the room cannot be booked currently, the screen background is deep red
 .
.
Note![]() The time slots are not enabled when a meeting is scheduled in the next 15 to 30 minutes.
The time slots are not enabled when a meeting is scheduled in the next 15 to 30 minutes.
–![]() Available—No meeting is scheduled or going on for the current time slot. The screen has a green background.
Available—No meeting is scheduled or going on for the current time slot. The screen has a green background.
Note![]() Just because a conference or TP room is currently available, it does not mean that you can book it. The Book Now button is shown only if the room is available for the next half-hour slot. For example, you see that the room is free at 9:45 am, but the booking button is not displayed. This is because the room is booked from 10 to 10:30 am. As there is no booking after 10:30 am, the Book Now button will be shown only after 10:30 am.
Just because a conference or TP room is currently available, it does not mean that you can book it. The Book Now button is shown only if the room is available for the next half-hour slot. For example, you see that the room is free at 9:45 am, but the booking button is not displayed. This is because the room is booked from 10 to 10:30 am. As there is no booking after 10:30 am, the Book Now button will be shown only after 10:30 am.
–![]() Meeting in progress—The room is unavailable as a meeting is in progress. The screen has a deep red background and the Release Room button is displayed.
Meeting in progress—The room is unavailable as a meeting is in progress. The screen has a deep red background and the Release Room button is displayed.
–![]() Booked—The room is unavailable as a meeting is scheduled for the time slot. The screen has a brown background and the Start Meeting button is displayed.
Booked—The room is unavailable as a meeting is scheduled for the time slot. The screen has a brown background and the Start Meeting button is displayed.
–![]() Room released—The room is not occupied and is released before the booking time ends. The screen has a brown background and no task button is displayed. The status changes to Available and the screen background turns green after the screen is refreshed. This means that the room is free and is available for use. If the room is available for the next half-hour slot, the Book Now button is also displayed.
Room released—The room is not occupied and is released before the booking time ends. The screen has a brown background and no task button is displayed. The status changes to Available and the screen background turns green after the screen is refreshed. This means that the room is free and is available for use. If the room is available for the next half-hour slot, the Book Now button is also displayed.
–![]() Book Now—Displayed only if the room is available for the next 15 minutes.
Book Now—Displayed only if the room is available for the next 15 minutes.
Note![]() The Book Now button does not appear when a meeting is scheduled in the next 15 to 30 minutes.
The Book Now button does not appear when a meeting is scheduled in the next 15 to 30 minutes.
–![]() Start Meeting—Displayed for the first ‘x’ minutes for each room booking, where, ‘x’ is the time interval configured by the administrator for the automatic release of the room due to non-occupancy. If the button is not tapped during this time period, the room is automatically released and the energy saving settings are applied to the devices in the room. When you tap the Start Meeting button, a message appears on the top of the screen informing you that the meeting has successfully started.
Start Meeting—Displayed for the first ‘x’ minutes for each room booking, where, ‘x’ is the time interval configured by the administrator for the automatic release of the room due to non-occupancy. If the button is not tapped during this time period, the room is automatically released and the energy saving settings are applied to the devices in the room. When you tap the Start Meeting button, a message appears on the top of the screen informing you that the meeting has successfully started.
Note![]() The Start Meeting button is displayed on a brown screen background indicating the unavailability of the conference or TP room.
The Start Meeting button is displayed on a brown screen background indicating the unavailability of the conference or TP room.
–![]() Release Room—Displayed after the Start Meeting button is tapped and appears till the booking end time. Tap this to manually release the room before the booking end time. When you tap the Release Room button, a message appears on the top of the screen informing you that the meeting room is successfully released.
Release Room—Displayed after the Start Meeting button is tapped and appears till the booking end time. Tap this to manually release the room before the booking end time. When you tap the Release Room button, a message appears on the top of the screen informing you that the meeting room is successfully released.
Note![]() If the room is released automatically or manually, the screen turns green after it is refreshed indicating the availability of the conference room. The status is displayed as Available. If the room is available for the next half-hour slot, the Book Now button is also displayed. For more information, see the “Releasing Conference or TP Rooms Using the Room Panels” section.
If the room is released automatically or manually, the screen turns green after it is refreshed indicating the availability of the conference room. The status is displayed as Available. If the room is available for the next half-hour slot, the Book Now button is also displayed. For more information, see the “Releasing Conference or TP Rooms Using the Room Panels” section.
–![]() Extend Meeting—Displayed only when a meeting is in progress and appears after the ‘x’ minutes of the meeting start time, where, ‘x’ is the time interval configured by the administrator. Tap this to extend a conference or TP room. When a room is successfully extended, a message appears on the top of the screen informing you that the extend room is initiated. For more information, see the “Extending Meetings Using the Room Panels” section
Extend Meeting—Displayed only when a meeting is in progress and appears after the ‘x’ minutes of the meeting start time, where, ‘x’ is the time interval configured by the administrator. Tap this to extend a conference or TP room. When a room is successfully extended, a message appears on the top of the screen informing you that the extend room is initiated. For more information, see the “Extending Meetings Using the Room Panels” section
Figure 2-8 shows the conference room view displayed on the room panel.
Figure 2-8 Conference Room View on Room Panel
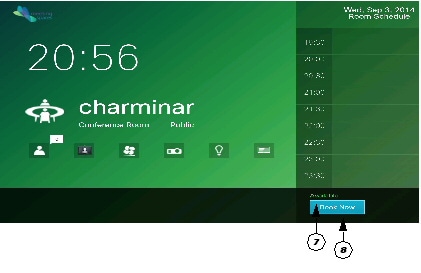
Understanding the Conference Room View on the Room Panel
Table 2-7 lists the main areas of the conference room view.
Booking Rooms Using the Room Panel
To book a conference or TP room using a room panel, perform the following steps:
A dialog box appears displaying all of the half-hour time slots that are available before the next booking for the room.
Step 2![]() (Optional) Only a certain number of half-hour time slots are displayed per view. Tap the left and right arrow buttons to scroll through the time slots.
(Optional) Only a certain number of half-hour time slots are displayed per view. Tap the left and right arrow buttons to scroll through the time slots.
Step 3![]() Tap the required time slot, and then tap Continue.
Tap the required time slot, and then tap Continue.
A dialog box appears displaying the Username and User PIN fields.
Step 4![]() Enter your user ID in the Username field and the PIN associated with it in the User PIN field by using the onscreen keyboard.
Enter your user ID in the Username field and the PIN associated with it in the User PIN field by using the onscreen keyboard.
A message appears at the top of the screen informing you that your request is being processed.
The room panel interface is refreshed to display the updated schedule. Your name is displayed for the booked time slot in the room schedule that appears on the room panel.
Step 6![]() Alternatively, tap the
Alternatively, tap the  icon in any of the two dialog boxes to return to the main room panel screen without booking the room.
Releasing Conference or TP Rooms Using the Room Panels
To release a conference or TP room using a room panel, tap the Release Room button. This button is available only when a meeting is started using the room panel, that is, after you tap the Start Meeting button. The button is available until the meeting time lapses. When you tap the Release Room button, the room status changes from ‘Meeting in progress’ to ‘Room Released’. The room can be used by other employees in the enterprise. Releasing a room results in energy savings, as the devices in the room are reverted to non-occupancy settings.
Automatic Room Release
When no occupancy is detected in a conference or TP room, or when the attendees fail to tap the Start Meeting button within ‘x’ minutes after the meeting start time, the conference or TP room is automatically released. Where, ‘x’ is the automatic room release interval configured by the administrator. The message “Room Released” is displayed on the room panel screen, and the room can be used by other employees in the enterprise.
Extending Meetings Using the Room Panels
You can extend a meeting by using the Extend Meeting button. This button is available after ‘x’ minutes of the meeting start time, and until the meeting time lapses, where, ‘x’ is the time interval configured by the administrator.
To extend a meeting using a room panel, perform the following steps:
A Extend Room Name until dialog box appears.
Step 2![]() Tap the required time slot, and then tap Submit.
Tap the required time slot, and then tap Submit.
The “Extend meeting has been initiated” message appears on the top of the screen.
Installing and Using the Smart Spaces Outlook Plug-in
The Smart Spaces Outlook plug-in is used for scheduling a meeting and reserving resources, such as conference rooms with A/V Control, Digital Signage, TelePresence, and WebEx for face-to-face or online meetings. The conference room list is filtered to display the rooms that match your search criteria, and you can reserve the rooms as required from the room list. You can also view the organizer, attendee, and room availability status in the right pane under the Resources tab.
- Installing the Smart Spaces Outlook Plug-in
- Scheduling and Sending a Meeting Request
- Updating a Meeting
- Responding to a Meeting Request
- Proposing a New Time
- Canceling a Meeting
- Setting Preferred Meeting Location
- Configuring the VMR Number and the Space Server IP Address
Installing the Smart Spaces Outlook Plug-in
To install the Smart Spaces Outlook plug-in, perform the following steps:
Step 1![]() Double-click the Smart Spaces Outlook plug-in MSI file.
Double-click the Smart Spaces Outlook plug-in MSI file.
The Smart Spaces Outlook Plug-in Welcome screen appears.
Note![]() For MS Outlook 2010, use SSOutlookPlugin_2k10_x86 MSI file and for MS Outlook 2007, use SSOutlookPlugin_2k7_x86 MSI file.
For MS Outlook 2010, use SSOutlookPlugin_2k10_x86 MSI file and for MS Outlook 2007, use SSOutlookPlugin_2k7_x86 MSI file.
Step 3![]() The License Agreement screen appears.
The License Agreement screen appears.
Step 4![]() Click the I accept the terms in the license agreement radio button, and click Next.
Click the I accept the terms in the license agreement radio button, and click Next.
The Ready to Install the Program screen appears.
Step 5![]() Click Only for me, and then click Install.
Click Only for me, and then click Install.
Once the installation is complete, the Installation Complete dialog box appears informing you that the application is successfully installed.
The Microsoft Office Customization Installer dialog box appears.
Step 9![]() Exit MS Outlook, and then re-open MS Outlook.
Exit MS Outlook, and then re-open MS Outlook.
Step 10![]() On the File menu, point to New, and then click Meeting Request or Appointment, OR expand New in the upper left corner of the window, and then click Meeting Request.
On the File menu, point to New, and then click Meeting Request or Appointment, OR expand New in the upper left corner of the window, and then click Meeting Request.
The installation is successful when you see the Smart Spaces icon on the Meeting tab, in the Show group.
Scheduling and Sending a Meeting Request
To schedule and send a meeting request, perform the following steps:
Step 1![]() On the File menu, point to New, and then click Meeting Request or Appointment, OR expand New in the upper left corner of the window, and then click Meeting Request.
On the File menu, point to New, and then click Meeting Request or Appointment, OR expand New in the upper left corner of the window, and then click Meeting Request.
Alternatively, press CTRL+SHIFT+Q to create a new meeting request or CTRL+SHIFT+A to create an appointment.
Step 2![]() On the Meeting tab, in the Show group, click Smart Spaces.
On the Meeting tab, in the Show group, click Smart Spaces.
Step 3![]() Click the To... button to choose the attendees from the Global Address List.
Click the To... button to choose the attendees from the Global Address List.
Step 4![]() To invite attendees, type the first alphabet character of a person's first name in the Search: text box at the top left corner of the Global Address List window. A list of people in your enterprise who match the search criteria appears.
To invite attendees, type the first alphabet character of a person's first name in the Search: text box at the top left corner of the Global Address List window. A list of people in your enterprise who match the search criteria appears.
Step 5![]() Choose the person name from the list, and then click the Required -> or the Optional -> button, as required.
Choose the person name from the list, and then click the Required -> or the Optional -> button, as required.
Step 6![]() Repeat Step 4 to Step 5 to invite multiple people to the meeting.
Repeat Step 4 to Step 5 to invite multiple people to the meeting.
Step 7![]() When you have all of the people added, click OK, and you return to the Meeting window.
When you have all of the people added, click OK, and you return to the Meeting window.
Alternatively, In the To... text box, type in the attendee’s name just like you would do for an email message.
Step 8![]() In the Subject text box, type a description of the meeting.
In the Subject text box, type a description of the meeting.
Step 9![]() In the Location text box, type a letter of the building to choose a desired building.
In the Location text box, type a letter of the building to choose a desired building.
Step 10![]() In the Start time and End time lists, choose the date and start and end time for the meeting. If this is an all day event, select the All day event check box.
In the Start time and End time lists, choose the date and start and end time for the meeting. If this is an all day event, select the All day event check box.
Note![]() An all day event is a full 24 hour event lasting from midnight to midnight, and the start and end time will be disabled for an all day event.
An all day event is a full 24 hour event lasting from midnight to midnight, and the start and end time will be disabled for an all day event.
Step 11![]() In the Message text box, type any information that you want to share with the recipients.
In the Message text box, type any information that you want to share with the recipients.
Step 12![]() Click the attach icon to attach any files.
Click the attach icon to attach any files.
Step 13![]() Choose the required Room space filters, such as, A/V Control, Telepresence, or Digital Signage Messages.
Choose the required Room space filters, such as, A/V Control, Telepresence, or Digital Signage Messages.
Step 14![]() Choose WebEx if you want to host a meeting through WebEx.
Choose WebEx if you want to host a meeting through WebEx.
Step 15![]() Enter the password, which the attendees will use to log in to the WebEx meeting, and then click Search.
Enter the password, which the attendees will use to log in to the WebEx meeting, and then click Search.
The list of attendees and suggested conference rooms based on the location preferences that are set by the organizer and the attendees are displayed in the right pane under the Resources tab. The seating capacity of each room is displayed next to the room name. The free or busy grid shows the availability of the attendees or rooms. A green vertical line represents the start of the meeting and a red vertical line represents the end of the meeting. Only a certain number of slots are seen in the view, so you can use the horizontal scroll bar to view the other time slots.
Note![]() You can also edit the number of attendees in each building. Modify the number of attendees as desired in the attendee count
You can also edit the number of attendees in each building. Modify the number of attendees as desired in the attendee count  text box, and then press Enter to view the updated room list.
Step 16![]() Choose the conference room(s), as required from the room list.
Choose the conference room(s), as required from the room list.
Step 17![]() To set up a recurring meeting, on the Meeting tab, in the Options group, click Recurrence. Choose the options for the recurrence pattern you want, and then click OK.
To set up a recurring meeting, on the Meeting tab, in the Options group, click Recurrence. Choose the options for the recurrence pattern you want, and then click OK.
If a conference room is not available for the entire series, then multiple rooms are selected and booked based on their availability. The rooms are selected based on your location preference, or the location that you have currently selected. Initially, a meeting invite is sent to all of the participants without the room details. Later, when the room combination scheduling is completed, the summary of rooms that are booked for the entire meeting series is sent to the organizer, and the meeting invite is automatically updated with the room details.
Updating a Meeting
To modify the meeting day, attendees, subject, location, time, room space filters, and to add or delete attachments and WebEx details, perform the following steps:
Step 1![]() In Calendar, open the meeting.
In Calendar, open the meeting.
Step 2![]() On the Meeting tab, in the Show group, click Smart Spaces.
On the Meeting tab, in the Show group, click Smart Spaces.
Step 3![]() Make changes to the meeting attendees, subject, date, location, time, and/or room space filters, as required. You can also add or remove the attachments and the WebEx details.
Make changes to the meeting attendees, subject, date, location, time, and/or room space filters, as required. You can also add or remove the attachments and the WebEx details.
Responding to a Meeting Request
When you receive a meeting request in your email, you can either accept, decline, or decide later (make the meeting tentative); if the meeting time does not suit your schedule, you can propose a new time.
To respond to a meeting request, perform the following steps:
Step 1![]() Open the meeting request.
Open the meeting request.
Step 2![]() Do one of the following:
Do one of the following:
For more information, see the “Accepting or Declining a Meeting Request” section.
For more information, see the “Proposing a New Time” section.
Accepting or Declining a Meeting Request
To accept or decline a meeting, perform the following steps:
Step 1![]() Open the meeting request, on the Meeting tab, in the Respond group, click Accept, Decline, or Tentative based on your decision to attend the meeting.
Open the meeting request, on the Meeting tab, in the Respond group, click Accept, Decline, or Tentative based on your decision to attend the meeting.
The Microsoft Office Outlook dialog box appears.
Step 2![]() Select Edit the response before sending, Send the response now, or Don’t send a response, and then click OK.
Select Edit the response before sending, Send the response now, or Don’t send a response, and then click OK.
You can decline tentative or accepted meetings anytime later if you want. Alternatively, you can accept a meeting that you had marked earlier as tentative. When you click Decline, the meeting is removed from your calendar view.
Note![]() For recurring meetings, the Accept, Decline, or Tentative options apply to the entire series and not just the occurrence that you clicked in the calendar.
For recurring meetings, the Accept, Decline, or Tentative options apply to the entire series and not just the occurrence that you clicked in the calendar.
Proposing a New Time
To propose a new time for a meeting request, perform the following steps:
Step 1![]() Open the meeting request, on the Meeting tab, in the Respond group, click Propose New Time.
Open the meeting request, on the Meeting tab, in the Respond group, click Propose New Time.
Step 2![]() Click either Tentative and Propose New Time or Decline and Propose New Time.
Click either Tentative and Propose New Time or Decline and Propose New Time.
A Propose New Time window appears.
Step 3![]() Select a time when all of the invites are available. You can also use AutoPick Next to find the next available free time for all of the invitees.
Select a time when all of the invites are available. You can also use AutoPick Next to find the next available free time for all of the invitees.
Note![]() You can only change the date and time; not the attendee list.
You can only change the date and time; not the attendee list.
Canceling a Meeting
You can cancel the meetings that you have organized from the calendar. The invitees get an email informing them that the meeting is canceled. The room schedule that you booked for the meeting is deleted, and the room is made available for booking again.
Note![]() If you are a meeting attendee, you can only decline the meeting, or if allowed by the organizer, propose a different meeting time.
If you are a meeting attendee, you can only decline the meeting, or if allowed by the organizer, propose a different meeting time.
Canceling a One-time Meeting
To cancel a one-time meeting, perform the following steps:
Step 1![]() In Calendar, open the meeting.
In Calendar, open the meeting.
Step 2![]() On the Meeting tab, in the Show group, click Smart Spaces.
On the Meeting tab, in the Show group, click Smart Spaces.
Step 3![]() On the Actions menu, click Cancel Meeting.
On the Actions menu, click Cancel Meeting.
Step 4![]() Click Send Cancellation.
Click Send Cancellation.
Canceling a Recurring Meeting
To cancel a recurring meeting, perform the following steps:
Step 1![]() In Calendar, open the meeting.
In Calendar, open the meeting.
Step 2![]() On the Meeting tab, in the Show group, click Smart Spaces.
On the Meeting tab, in the Show group, click Smart Spaces.
Step 3![]() In the Open Recurring Item dialog box, click Open the series, and then click OK.
In the Open Recurring Item dialog box, click Open the series, and then click OK.
Step 4![]() On the Actions menu, click Cancel Meeting.
On the Actions menu, click Cancel Meeting.
Step 5![]() Click Send Cancellation.
Click Send Cancellation.
Canceling an Instance of a Recurring Meeting
To cancel an instance of a recurring meeting, perform the following steps:
Step 1![]() In Calendar, open the instance of the recurring meeting.
In Calendar, open the instance of the recurring meeting.
Step 2![]() On the Meeting tab, in the Show group, click Smart Spaces.
On the Meeting tab, in the Show group, click Smart Spaces.
Step 3![]() In the Open Recurring Item dialog box, click Open this occurrence, and then click OK.
In the Open Recurring Item dialog box, click Open this occurrence, and then click OK.
Step 4![]() On the Recurring Meeting tab, in the Show group, click Smart Spaces.
On the Recurring Meeting tab, in the Show group, click Smart Spaces.
Step 5![]() On the Actions menu, click Cancel Meeting.
On the Actions menu, click Cancel Meeting.
Step 6![]() In the Confirm Delete dialog box, click Delete this occurrence, and then click OK.
In the Confirm Delete dialog box, click Delete this occurrence, and then click OK.
Step 7![]() Click Send Cancellation.
Click Send Cancellation.
Setting Preferred Meeting Location
You can set your preferred meeting location through the Preferences tab that is available in the right pane.
To set a preferred meeting location, perform the following steps:
Step 1![]() Click the Preferences tab.
Click the Preferences tab.
Step 2![]() Expand the Locations hierarchy, and then choose the desired building and floor.
Expand the Locations hierarchy, and then choose the desired building and floor.
Your default location is set, and the available conference rooms in your preferred location is displayed automatically when you are searching for a conference room. It will also help others to automatically find the best conference room(s) at your preferred location.
Note![]() You can update your default location anytime, as required.
You can update your default location anytime, as required.
Configuring the VMR Number and the Space Server IP Address
To configure the VMR number and the Spaces server IP address for the Outlook plug-in, perform the following steps:
Step 1![]() Click the Preferences tab.
Click the Preferences tab.
Step 2![]() In the VMR Number field, enter your VMR Number.
In the VMR Number field, enter your VMR Number.
Step 3![]() In the Spaces URL field, enter the following URL:
In the Spaces URL field, enter the following URL:
http://<host>:<port> or services, and then click Test Connection to verify that a successful connection to the server is established.
Step 4![]() Click Save to save the settings.
Click Save to save the settings.
Using Cisco IP Phones
- Touchscreen Cisco IP Phones
- Non-Touchscreen Cisco IP Phones
- Features Available in Cisco IP Phones
- Using Cisco Touchscreen IP Phones to Book a Conference Room
Touchscreen Cisco IP Phones
Figure 2-9 displays sample output from a touchscreen Cisco IP Phone located in a conference room.
Figure 2-9 Touchscreen Cisco IP Phone
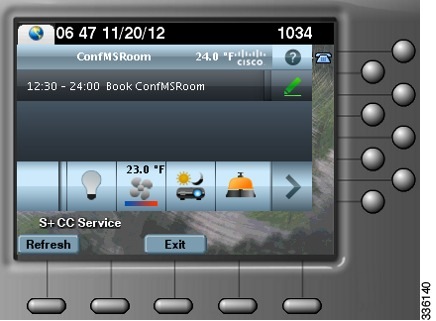
Figure 2-9 displays details, such as the temperature of the room where the Cisco IP Phone is located, the current date and time, and the meeting room schedule. Tap any of the icons displayed at the bottom of the screen to control the various devices in that room. In Figure 2-9, the icons for the lights, air conditioner, room mode, and reporting faults are visible. You can tap the left and right arrow icons to scroll to the other options. You can also press the keys located on the phone to navigate up and down in a list, or to choose and activate an option.
Non-Touchscreen Cisco IP Phones
Figure 2-10 displays sample output from a non-touchscreen Cisco IP Phone that is located in a conference room.
Figure 2-10 Non-Touchscreen Cisco IP Phone
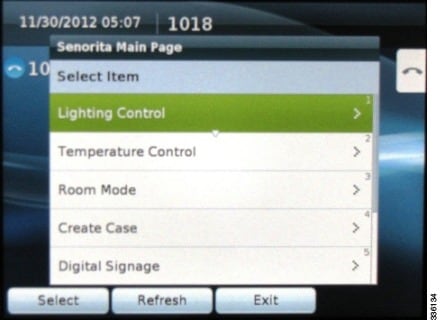
Figure 2-10 displays the name of the conference room, ‘Senorita’, at the top of the screen followed by the list of options that help you control the conference room devices. You can choose the required option from the list by pressing the number displayed next to the menu item using the number pad of the phone. Alternately, you can use the phone navigation keys to navigate up and down in the list to choose a specific item.
Features Available in Cisco IP Phones
Table 2-8 lists the features that are available or can be accessed using the following devices:
|
|
|
|
|---|---|---|
Using Cisco Touchscreen IP Phones to Book a Conference Room
You can book a conference or TP room using a touchscreen Cisco IP Phone in the room only if the status of the room is “Available” at that time. If the room is occupied or a meeting is in progress, the option for booking the room is unavailable. After the booking is done, the schedule of the conference room is updated on the signage display.
To book a conference or TP room using a Cisco IP Phone, perform the following steps:
Step 1![]() On the Cisco IP phone, press the Services button.
On the Cisco IP phone, press the Services button.
The list of available services appears.
Step 2![]() Tap the service that has been created for the Smart+Connected Spaces in Cisco Unified Communications Manager (CUCM).
Tap the service that has been created for the Smart+Connected Spaces in Cisco Unified Communications Manager (CUCM).
The Smart+Connected Spaces service screen appears.
Note![]() For this guide, it is assumed that the name of the Smart+Connected Spaces service configured in CUCM is ‘S+CC Service’.
For this guide, it is assumed that the name of the Smart+Connected Spaces service configured in CUCM is ‘S+CC Service’.
Step 3![]() Tap the book room
Tap the book room  icon. Choose the duration for which you want to book the room from the drop-down list that appears.
Note![]() This room booking feature will be available only if the “Room Booking” feature is added to the configuration that is associated to the location.
This room booking feature will be available only if the “Room Booking” feature is added to the configuration that is associated to the location.
Step 4![]() Enter your user ID to book the room. The room is reserved for the selected time slot. The following room reservation details are displayed on the Cisco IP Phone:
Enter your user ID to book the room. The room is reserved for the selected time slot. The following room reservation details are displayed on the Cisco IP Phone:
Note![]() The booking of conference or TP rooms feature is not available in non-touchscreen Cisco IP Phones.
The booking of conference or TP rooms feature is not available in non-touchscreen Cisco IP Phones.
Releasing the Conference Rooms
If you do not want to use the room for the entire duration of the reservation, you can release the room on completion of the meeting using the Cisco IP Phone in the conference room. The room is shown in a different color on the Cisco IP Phone and signage display so that other users know that it is available. They cannot reserve the conference room till the duration of your booking ends but can use the room without actually booking it. After a room is manually released, the following settings are automatically applied:
Using the Touchscreen Cisco IP Phone
To release a room early using a touchscreen Cisco IP Phone, perform the following steps:
Step 1![]() On the Cisco IP Phone, press the Services button.
On the Cisco IP Phone, press the Services button.
The list of services that are available for the Cisco IP Phone appears.
The S+CC Service screen appears.
Step 3![]() Tap the release room
Tap the release room  icon that is displayed next to the meeting details.
The “Please confirm that your meeting has ended and you are releasing the room” message appears.
Step 4![]() Tap Confirm to release the room, or tap Cancel to go back to the S+CC Service screen.
Tap Confirm to release the room, or tap Cancel to go back to the S+CC Service screen.
Note![]() The release room icon is displayed only after the meeting time starts.
The release room icon is displayed only after the meeting time starts.
Note![]() This feature is not available in non-touchscreen Cisco IP Phones.
This feature is not available in non-touchscreen Cisco IP Phones.
Controlling Room Resources Using Cisco IP Phones
You can use the touchscreen and non-touchscreen Cisco IP Phones that are located in a conference or TP room to control the resources that are available in that room, to report faults in the devices, and to send messages to the signage. You can change the settings of lights, window blinds, air conditioner, and audio and visual equipment. Multiple devices can be simultaneously controlled using the room mode options. You can use the Cisco IP Phone to report the problems that occur in the conference room, so that a case is created in the trouble ticketing system.
- Controlling the Lights
- Controlling the Window Blinds
- Controlling the Air Conditioner Settings
- Controlling the Audio & Video Equipment
- Reporting Faults for the Location
- Activating the Room Modes
- Sending Messages to the Signage Using the Cisco IP Phones
Controlling the Lights
The Light Control feature allows you to control the lights and or or the dimmer at a particular location through the Cisco IP Phone that is available at that location. You can control the lights by switching them on or off, and by adjusting the brightness using a predefined list of brightness options that are available.
The light dimmer option will be available only if a dimmer is added to the configuration for the location.
Note![]() If the Light Control feature is not available for a location, the “Light controls are not available for this location” message appears.
If the Light Control feature is not available for a location, the “Light controls are not available for this location” message appears.
The following default light control options are available:
The following dimmer control options are available:
- 3% Brightness—Adjusts the brightness to 3%.
- 30% Brightness—Adjusts the brightness to 30%.
- 50% Brightness—Adjusts the brightness to 50%.
- 75% Brightness—Adjusts the brightness to 75%.
- 100% Brightness—Adjusts the brightness to 100%.
Note![]() The icons displayed on the touchscreen Cisco IP Phones represent the actual state of the device. For example, when a light is on, you see the light icon as yellow. When you turn off a light or it is already off, the light icon appears grey.
The icons displayed on the touchscreen Cisco IP Phones represent the actual state of the device. For example, when a light is on, you see the light icon as yellow. When you turn off a light or it is already off, the light icon appears grey.
Controlling Lights Using the Touchscreen Cisco IP Phone
To control the lights using a touchscreen Cisco IP Phone, perform the following steps:
Step 1![]() On the Cisco IP Phone, press the Services button.
On the Cisco IP Phone, press the Services button.
The list of services that are available for the Cisco IP Phone appears.
The S+CC Service screen appears.
Note![]() For this guide, it is assumed that the name of the Smart+Connected Spaces service configured in CUCM is ‘S+CC Service’.
For this guide, it is assumed that the name of the Smart+Connected Spaces service configured in CUCM is ‘S+CC Service’.
 icon.
icon.Multiple light icons with numbers, such as 1, 2, and so on appear. You also have an icon to control all of the lights together.
Note![]() Similar text-based options appear for the non-touchscreen Cisco IP Phones.
Similar text-based options appear for the non-touchscreen Cisco IP Phones.
Step 4![]() Tap the icon for the required light.
Tap the icon for the required light.
The various light control icons appear.
Step 5![]() Tap the required light control icon to activate it.
Tap the required light control icon to activate it.
Step 6![]() Tap Back to go back to the previous screen.
Tap Back to go back to the previous screen.
Controlling Lights Using the Non-Touchscreen Cisco IP Phone
To control lights using a non-touchscreen Cisco IP Phone, perform the following steps:
Step 1![]() On the Cisco IP Phone, press the Services button.
On the Cisco IP Phone, press the Services button.
The list of services that are available for the Cisco IP Phone appears.
The S+CC Service screen appears.
Step 3![]() Choose Lights Control from the list using the navigation keys on the Cisco IP Phone.
Choose Lights Control from the list using the navigation keys on the Cisco IP Phone.
The list of available lights, such Light1, Light2, and so on appears. You also have the Lights All option to control all the lights at a time.
Step 4![]() Select the required light option.
Select the required light option.
The list of light control options appears.
Step 5![]() Navigate to the desired light option using the navigation keys.
Navigate to the desired light option using the navigation keys.
Step 6![]() Press the Select button to activate the light control option.
Press the Select button to activate the light control option.
Step 7![]() Press the Back button to go back to the previous screen, or press Exit to return to the S+CC Service screen.
Press the Back button to go back to the previous screen, or press Exit to return to the S+CC Service screen.
Controlling the Window Blinds
The Blinds Control feature allows you to control the window blinds in a conference room. You can select either one blind or all of the blinds to open or close them.
If there is more than one blind, additional options, such as Blind1, Blind2, and so on appear. You also have the option to control all of the blinds at a time.
Controlling Window Blinds Using the Touchscreen Cisco IP Phone
To control the window blinds using a touchscreen Cisco IP Phone, perform the following steps:
Step 1![]() On the Cisco IP Phone, press the Services button.
On the Cisco IP Phone, press the Services button.
The list of services that are available for the Cisco IP Phone appears.
The S+CC Service screen appears.
 icon.
icon.Multiple blind icons with numbers, such as 1, 2, and so on appear. You also have an icon to control all of the blinds together.
Step 4![]() Tap the icon for the required blind.
Tap the icon for the required blind.
The various blind control icons appear.
Step 5![]() Tap the required blind control icon to activate it.
Tap the required blind control icon to activate it.
The blind is set to the selected state.
Step 6![]() Tap Back to go back to the previous screen.
Tap Back to go back to the previous screen.
Controlling Window Blinds Using the Non-Touchscreen Cisco IP Phone
To control blinds using a non-touchscreen Cisco IP Phone, perform the following steps:
Step 1![]() On the Cisco IP Phone, press the Services button.
On the Cisco IP Phone, press the Services button.
The list of services that are available for the Cisco IP Phone appears.
The S+CC Service screen appears.
Step 3![]() Choose Blinds Control from the list using the navigation keys on the Cisco IP Phone.
Choose Blinds Control from the list using the navigation keys on the Cisco IP Phone.
The list of available blinds, such as Blind1, Blind2, and so on appears. You also have the Blinds All option to control all of the blinds together.
Step 4![]() Choose the required blind.
Choose the required blind.
The list of blind control options appears.
Step 5![]() Navigate to the required blind control option using the navigation key.
Navigate to the required blind control option using the navigation key.
Step 6![]() Press the Select button to activate the selected blind control option.
Press the Select button to activate the selected blind control option.
Step 7![]() Press the Back button to go back to the previous screen, or press Exit to return to the S+CC Service screen.
Press the Back button to go back to the previous screen, or press Exit to return to the S+CC Service screen.
Controlling the Air Conditioner Settings
The airconditioner control feature allows you to set the temperature of the conference room per your preference.
Note![]() If a thermostat is not associated to the location, a warning message appears informing you that the thermostat control (set points) is not available for the location.
If a thermostat is not associated to the location, a warning message appears informing you that the thermostat control (set points) is not available for the location.
The default temperature control options are as follows:
- Air-con On—Changes air conditioner settings to the Occupied mode.
- Air-con Off—Changes air conditioner settings to the Energy Savings mode.
- Temperature Range—The list of temperature set options that are available for the location.
The temperature set options are based on the minimum and maximum values that are entered when associating the VAV device for the location.
For example, if the minimum temperature value is 21 and the maximum temperature is 25, the temperature set points will be in increments of 1, that is from 21 to 25. The unit of temperature may be Fahrenheit (°F) or Celsius (°C) depending on the unit that is selected when associating the VAV or VRV device for the location.
Controlling Air Conditioner Using the Touchscreen Cisco IP Phone
To control the temperature using a touchscreen Cisco IP Phone, perform the following steps:
Step 1![]() On the Cisco IP Phone, press the Services button.
On the Cisco IP Phone, press the Services button.
The list of services that are available for the Cisco IP Phone appears.
The S+CC Service screen appears.
Step 3![]() Tap the air conditioner
Tap the air conditioner  icon.
icon.
The various temperature control  icons appear.
Step 4![]() Tap the required temperature control icon.
Tap the required temperature control icon.
Note![]() The value that you provide here will be used to set the temperature set point value. Once this is done, the occupancy status of the conference room will be set as “Occupied”.
The value that you provide here will be used to set the temperature set point value. Once this is done, the occupancy status of the conference room will be set as “Occupied”.
Step 5![]() Tap Back to go back to the previous screen.
Tap Back to go back to the previous screen.
Controlling Air Conditioner Using the Non-Touchscreen Cisco IP Phone
To control the temperature using a non-touchscreen Cisco IP phone, perform the following steps:
Step 1![]() On the Cisco IP Phone, press the Services button.
On the Cisco IP Phone, press the Services button.
The list of services that are available for the Cisco IP Phone appears.
The S+CC Service screen appears.
Step 3![]() Choose Aircon from the list using the navigation keys on the Cisco IP Phone.
Choose Aircon from the list using the navigation keys on the Cisco IP Phone.
The list of temperature control options that are available for the location appears. For example: 16 degrees, 20 degrees, and so on.
Step 4![]() Choose the required temperature control feature.
Choose the required temperature control feature.
Step 5![]() Press the Back button to go back to the previous screen, or press Exit to return to the S+CC Service screen.
Press the Back button to go back to the previous screen, or press Exit to return to the S+CC Service screen.
Controlling the Audio & Video Equipment
The A/V Control feature allows you to control the projector equipment using the Cisco IP Phone at the location. You can configure a room for a personal computer presentation or a meeting using the Cisco IP Phone.
If the A/V Control feature is enabled for a location and the A/V devices are not added or configured correctly, the “Controls are not available for this location” warning message appears.
Controlling A/V Equipment Using the Touchscreen Cisco IP Phone
To control the audio and video equipment using a touchscreen Cisco IP Phone, perform the following steps:
Step 1![]() On the Cisco IP Phone, press the Services button.
On the Cisco IP Phone, press the Services button.
The list of services that are available for the Cisco IP Phone appears.
The S+CC Service screen appears.
Step 3![]() Tap the A/V controls
Tap the A/V controls  icon.
icon.
The icons for switching on  and switching off
  the projector appear. Tap the required icon.
Step 4![]() Tap Back to go back to the previous screen.
Tap Back to go back to the previous screen.
Controlling A/V Equipment Using the Non-Touchscreen Cisco IP Phone
To control the audio and video equipment using a non-touchscreen Cisco IP Phone, perform the following steps:
Step 1![]() On the Cisco IP Phone, press the Services button.
On the Cisco IP Phone, press the Services button.
The list of services that are available for the Cisco IP Phone appears.
The S+CC Service screen appears.
Step 3![]() Choose A/V Control from the list using the navigation keys.
Choose A/V Control from the list using the navigation keys.
The projector on and off controls are listed.
Step 4![]() Navigate to the required A/V control option.
Navigate to the required A/V control option.
Step 5![]() Press the Select button to activate the selected option.
Press the Select button to activate the selected option.
Step 6![]() Press the Back button to go back to the previous screen, or press Exit to return to the S+CC Service screen.
Press the Back button to go back to the previous screen, or press Exit to return to the S+CC Service screen.
Reporting Faults for the Location
The Fault Reporting feature allows you to report the faults at the location to the case management system. You can select a fault from a predefined list for the meeting room. After you select a fault and enter your employee ID, a case is created in the case management system. After you report a fault, you receive a confirmation message with a unique case number. The case is routed to the appropriate team for resolution in the case management system.
In the absence of a case management system like Remedy, the Smart+Connected Spaces solution can be configured to use email as a mechanism to raise the cases. In this scenario, when a case is raised from the Cisco IP Phone, an email will be sent to the configured email ID with the fault item details.
Reporting Faults Using the Touchscreen Cisco IP Phone
To report a fault using a touchscreen Cisco IP Phone, perform the following steps:
Step 1![]() On the Cisco IP Phone, press the Services button.
On the Cisco IP Phone, press the Services button.
The list of services that are available for the Cisco IP Phone appears.
The S+CC Service screen appears.
Step 3![]() Tap the create case
Tap the create case  icon.
icon.
The list of available faults appears.
Step 5![]() Enter your User ID using the keypad.
Enter your User ID using the keypad.
Step 6![]() Tap Submit. A case is created in the case management system
Tap Submit. A case is created in the case management system![]() for the selected fault and:
for the selected fault and:
- A confirmation message is displayed on the Cisco IP Phone with the case ID, in case the Remedy case management tool is used.
- A confirmation email is sent, in case the an email-based case management option is used.
Step 7![]() Tap Back to go back to the previous screen.
Tap Back to go back to the previous screen.
Reporting Faults Using the Non-Touchscreen Cisco IP Phone
To report a fault using a non-touchscreen Cisco IP Phone, perform the following steps:
Step 1![]() On the Cisco IP Phone, press the Services button.
On the Cisco IP Phone, press the Services button.
The list of services that are available for the Cisco IP Phone appears.
The S+CC Service screen appears.
Step 3![]() Choose Create Case from the list using the navigation keys on the Cisco IP Phone.
Choose Create Case from the list using the navigation keys on the Cisco IP Phone.
The list of available faults appears.
The Fault Reporting screen appears.
Step 5![]() Enter your User ID using the keypad.
Enter your User ID using the keypad.
Step 6![]() Press the Submit button. A case is created in the case management system
Press the Submit button. A case is created in the case management system![]() for the selected fault and:
for the selected fault and:
- A confirmation message is displayed on the Cisco IP Phone with the case ID if the Remedy case management tool is used.
- A confirmation email is sent if an email based case management tool is used.
Step 7![]() Press the Back button to go back to the previous screen, or press Exit to return to the S+CC Service screen.
Press the Back button to go back to the previous screen, or press Exit to return to the S+CC Service screen.
Note![]() The case is not created if the Product Category1, Product Category2, and Facilities do not match the categories that are specified in the case management system.
The case is not created if the Product Category1, Product Category2, and Facilities do not match the categories that are specified in the case management system.
Activating the Room Modes
The Room Mode feature allows you to configure various devices in a conference room for presentations and meetings by choosing a single option from the Cisco IP Phone. This feature controls the lights, blinds, projector, and projector screen at the location of the Cisco IP Phone. There are three different room modes with predefined settings for the devices. You can choose either a presentation mode for the night or a presentation mode for the day. After the presentation is over, you can opt for the normal mode to return the devices to the non-presentation state.
After a Room Mode is applied, you can change the status of any device by going back to the S+CC Service screen. The change made does not affect the status of other equipment.
Activating the Room Modes Using the Touchscreen Cisco IP Phone
To activate room modes for a conference room using a touchscreen Cisco IP Phone, perform the following steps:
Step 1![]() On the Cisco IP Phone, press the Services button.
On the Cisco IP Phone, press the Services button.
The list of services that are available for the Cisco IP Phone appears.
The S+CC Service screen appears.
Step 3![]() Tap the room modes
Tap the room modes  icon.
icon.
The room mode icons that appear are as follows:
a.![]() Presentation Mode–Day: Lights 3%, blinds closed, projector on, and the projector screen is lowered.
Presentation Mode–Day: Lights 3%, blinds closed, projector on, and the projector screen is lowered.
b.![]() Presentation Mode–Night: Lights dimmed to 3% if they are on (or not turned on if they are already off), projector on, and the projector screen is lowered.
Presentation Mode–Night: Lights dimmed to 3% if they are on (or not turned on if they are already off), projector on, and the projector screen is lowered.
The Normal Mode is available as a toggle option on the touchscreen Cisco IP Phones. You can tap the icon for the selected mode to change the settings to Normal Mode (Lights off, projector off, and the projector screen is raised).
Step 5![]() Tap Back to return to the previous screen.
Tap Back to return to the previous screen.
Activating the Room Modes Using the Non-Touchscreen Cisco IP Phone
To activate the room modes for a conference room using a non-touchscreen Cisco IP Phone, perform the following steps:
Step 1![]() On the Cisco IP Phone, press the Services button.
On the Cisco IP Phone, press the Services button.
The list of services that are available for the Cisco IP Phone appears.
The S+CC Service screen appears.
Step 3![]() Choose the Room Modes option from the list by using the navigation keys on the Cisco IP Phone.
Choose the Room Modes option from the list by using the navigation keys on the Cisco IP Phone.
The room mode options that appear are as follows:
a.![]() Presentation Mode–Day: Lights 3%, projector on, and the projector screen is lowered
Presentation Mode–Day: Lights 3%, projector on, and the projector screen is lowered
b.![]() Presentation Mode–Night: Lights dimmed to 3% if they are on (or not turned on if they are already off), projector on, and the projector screen is lowered
Presentation Mode–Night: Lights dimmed to 3% if they are on (or not turned on if they are already off), projector on, and the projector screen is lowered
c.![]() Normal Mode–Lights Off, projector off, and the projector screen is raised
Normal Mode–Lights Off, projector off, and the projector screen is raised
Step 4![]() Navigate to the required room mode option, and press Select to activate it.
Navigate to the required room mode option, and press Select to activate it.
Step 5![]() Press the Back button to return to the previous screen, or press Exit to return to the S+CC Service screen.
Press the Back button to return to the previous screen, or press Exit to return to the S+CC Service screen.
Sending Messages to the Signage Using the Cisco IP Phones
The Signage Message feature allows you to send messages to the signage that is associated to a room.
The messages that are added to the location using the Smart+Connected Spaces solution are displayed on the Cisco IP Phone.

Sending Messages to the Signage Using the Touchscreen Cisco IP Phone
To send a message using a touchscreen Cisco IP Phone, perform the following steps:
Step 1![]() On the Cisco IP Phone, press the Services button.
On the Cisco IP Phone, press the Services button.
The list of services that are available for the Cisco IP Phone appears.
The S+CC Services screen appears.
 icon.
icon.The list of messages that are available for the location appears.
Step 4![]() Tap the required message.
Tap the required message.
The selected message is displayed on the signage associated to the room.
Step 5![]() Tap Back to return to the home page.
Tap Back to return to the home page.
Sending Messages to the Signage Using the Non-Touchscreen Cisco IP Phone
To send a message using a non-touchscreen Cisco IP Phone, perform the following steps:
Step 1![]() On the Cisco IP Phone, press the Services button.
On the Cisco IP Phone, press the Services button.
The list of services that are available for the Cisco IP Phone appears.
The S+CC Service screen appears.
Step 3![]() Choose Signage from the list by using the navigation keys on the Cisco IP Phone.
Choose Signage from the list by using the navigation keys on the Cisco IP Phone.
The list of messages that are available for the location appears.
Step 4![]() Select the required message.
Select the required message.
The selected message is displayed on the signage that is associated to the location.
Step 5![]() Press Back to return to the previous screen, or press Exit to return to the S+CC Service screen.
Press Back to return to the previous screen, or press Exit to return to the S+CC Service screen.
 Feedback