Cisco Smart+Connected Personalized Spaces Installation Guide
Bias-Free Language
The documentation set for this product strives to use bias-free language. For the purposes of this documentation set, bias-free is defined as language that does not imply discrimination based on age, disability, gender, racial identity, ethnic identity, sexual orientation, socioeconomic status, and intersectionality. Exceptions may be present in the documentation due to language that is hardcoded in the user interfaces of the product software, language used based on RFP documentation, or language that is used by a referenced third-party product. Learn more about how Cisco is using Inclusive Language.
- Updated:
- May 15, 2013
Chapter: Installing the Smart+Connected PS on JBoss
- Installing the Application
- Configuring Audio Notification to the Cisco IP Phone
- Configuring the Database
- Creating JBoss Profile
- Setting Up Port
- Setting Up Security Configuration
- Setting Up Java Messaging Service (JMS)
- Setting Up Library
- Setting Up the BIRT Engine
- Configuring Logging
- Configuring the Properties Files
- Setting Up Run Parameters
- Setting Up the Push-to-Phone Feature
- Configuring the Secured URL
- Configuring Installer for the Mobile Devices
- Setting Up Apache Jackrabbit
- Importing SSL Certificates
- Starting the JBoss Server
- Accessing the Application and Verifying the Installation
- About Clustering
- Installing the Application
- Configuring Audio Notification to the Cisco IP Phone
- Configuring the Database
- Configuring the JBoss Profile
- Setting Up Port
- Setting Up Security Configuration
- Setting Up Java Messaging Service (JMS)
- Setting Up Library
- Setting Up the BIRT Engine
- Configuring Logging
- Configuring the Cluster Server Setup
- Configuring the Properties Files
- Setting Up Run Parameters
- Setting Up the Push-to-Phone Feature
- Configuring Installer for the Mobile Devices
- Setting Up Apache Jackrabbit
- Configuring the Jackrabbit Repository
- Importing SSL Certificates
- Starting the Cluster and Proxy
- Accessing the Application and Verifying the Installation
Installing the Smart+Connected PS on JBoss
This chapter describes how to install and deploy the Cisco Smart+Connected Personalized Spaces (Smart+Connected PS) application by using the PostgreSQL database and JBoss application server.
•![]() Installing on a Colocated or Non-Cluster Server Setup
Installing on a Colocated or Non-Cluster Server Setup
•![]() Installing on a Cluster Server Setup
Installing on a Cluster Server Setup
The Smart+Connected PS installation can be initiated only after the Cisco Service Platform Delivery (SDP) is set up and the database scripts for the SDP have been executed.
Prerequisites
•![]() Gathering Required Information
Gathering Required Information
•![]() Verifying Network Configurations
Verifying Network Configurations
Gathering Required Information
You need to provide the following information during installation:
•![]() Database Details:
Database Details:
–![]() Database server IP address.
Database server IP address.
–![]() Database name.
Database name.
–![]() Port number on which PostgreSQL is to run. The default port number is 5432.
Port number on which PostgreSQL is to run. The default port number is 5432.
–![]() Database schema username.
Database schema username.
–![]() Database schema password.
Database schema password.
–![]() SSH credentials.
SSH credentials.
•![]() Application Server Details:
Application Server Details:
–![]() Location of the <JBOSS_INSTALL_LOCATION> directory if the JBoss server has been pre-installed. The <JBOSS_INSTALL_LOCATION> directory is the complete path where the jboss files are available. Ensure that the $JBOSS_HOME environment variable is set to the <JBOSS_INSTALL_LOCATION> directory.
Location of the <JBOSS_INSTALL_LOCATION> directory if the JBoss server has been pre-installed. The <JBOSS_INSTALL_LOCATION> directory is the complete path where the jboss files are available. Ensure that the $JBOSS_HOME environment variable is set to the <JBOSS_INSTALL_LOCATION> directory.
–![]() Location of the <JDK_INSTALL_LOCATION> directory if the JDK has been pre-installed. The <JDK_INSTALL_LOCATION> directory is the complete path where you have installed JDK. Ensure that the $JAVA_HOME environment variable is set to the <JDK_INSTALL_LOCATION> directory and the PATH environment variable includes the $JAVA_HOME/bin directory.
Location of the <JDK_INSTALL_LOCATION> directory if the JDK has been pre-installed. The <JDK_INSTALL_LOCATION> directory is the complete path where you have installed JDK. Ensure that the $JAVA_HOME environment variable is set to the <JDK_INSTALL_LOCATION> directory and the PATH environment variable includes the $JAVA_HOME/bin directory.
–![]() SSH credentials.
SSH credentials.
Verifying Network Configurations
Verify the following network configurations:
•![]() All machines in the setup are in the same network domain.
All machines in the setup are in the same network domain.
•![]() All machines are in the same LAN.
All machines are in the same LAN.
•![]() All machines are configured to be on the same locale.
All machines are configured to be on the same locale.
•![]() System time is synchronized on all machines by using the Network Time Protocol (NTP).
System time is synchronized on all machines by using the Network Time Protocol (NTP).
•![]() All dependent components for the Smart+Connected PS application must be accessible over the network.
All dependent components for the Smart+Connected PS application must be accessible over the network.
Installing on a Colocated or Non-Cluster Server Setup
To install the Smart+Connected PS application on a colocated or non-cluster server setup, perform the following steps:
2. ![]() Configuring Audio Notification to the Cisco IP Phone
Configuring Audio Notification to the Cisco IP Phone
6. ![]() Setting Up Security Configuration
Setting Up Security Configuration
7. ![]() Setting Up Java Messaging Service (JMS)
Setting Up Java Messaging Service (JMS)
11. ![]() Configuring the Properties Files
Configuring the Properties Files
13. ![]() Setting Up the Push-to-Phone Feature
Setting Up the Push-to-Phone Feature
14. ![]() Configuring the Secured URL
Configuring the Secured URL
15. ![]() Configuring Installer for the Mobile Devices
Configuring Installer for the Mobile Devices
16. ![]() Setting Up Apache Jackrabbit
Setting Up Apache Jackrabbit
17. ![]() Importing SSL Certificates
Importing SSL Certificates
19. ![]() Accessing the Application and Verifying the Installation
Accessing the Application and Verifying the Installation
Installing the Application
For information on how to install the Smart+Connected PS application, see the
Configuring Audio Notification to the Cisco IP Phone
For information on how to configure audio notification to the Cisco IP phone, see the
Configuring the Database
Requirements
You must configure a database for the Smart+Connected PS environment. To configure the Smart+Connected PS database, verify the following requirements:
•![]() Ensure that the PostgreSQL is installed on your database server, and is ready for use.
Ensure that the PostgreSQL is installed on your database server, and is ready for use.
This document does not include information on how to set up the PostgreSQL database. For more information, see the PostgreSQL documentation.
•![]() Ensure that you have provided the `ALL' privilege to the PostgreSQL database.
Ensure that you have provided the `ALL' privilege to the PostgreSQL database.
•![]() Ensure that the following SDP database SQL scripts are already executed:
Ensure that the following SDP database SQL scripts are already executed:
–![]() setup-sdp-base.sql
setup-sdp-base.sql
–![]() setup-sdp-types.sql
setup-sdp-types.sql
For more information on how to execute the SDP database SQL scripts, see the "Executing Database Scripts" section.
About Database Scripts
A few database scripts are created after you install the Smart+Connected PS application. These database scripts are used to create the tables or objects that are necessary for the successful operation of the Smart+Connected PS application. Before you execute the database scripts, ensure that you are connected to the database schema on which the database scripts are to be executed.
•![]() PS Application Database Scripts
PS Application Database Scripts
SDP Database Scripts
The SDP database scripts are available at the following directory on the server where you have installed the SDP application:
<SDP_INSTALL_DIRECTORY>/sdp/
PS Application Database Scripts
The Smart+Connected PS database scripts are available at the following directory in the system where you have installed the application:
<PS_INSTALL_DIRECTORY>/scps/scripts/postgres
These scripts create the appropriate Smart+Connected PS database objects in the database.
Executing Database Scripts
To execute the SDP and Smart+Connected PS database scripts, perform the following steps:
Step 1 ![]() Copy the SDP and Smart+Connected PS database scripts:
Copy the SDP and Smart+Connected PS database scripts:
a. ![]() From the <SDP_INSTALL_DIRECTORY>/sdp/scripts/ directory on the server where you have installed the SDP application, copy the `postgres' directory to a location <PATH_OF_SDPDBSCRIPTS> in the database server.
From the <SDP_INSTALL_DIRECTORY>/sdp/scripts/ directory on the server where you have installed the SDP application, copy the `postgres' directory to a location <PATH_OF_SDPDBSCRIPTS> in the database server.
b. ![]() From the <PS_INSTALL_DIRECTORY>/scps/scripts/ directory on the server where you have installed the Smart+Connected PS application, copy the `postgres' directory to a location <PATH_OF_PSDBSCRIPTS> in the database server.
From the <PS_INSTALL_DIRECTORY>/scps/scripts/ directory on the server where you have installed the Smart+Connected PS application, copy the `postgres' directory to a location <PATH_OF_PSDBSCRIPTS> in the database server.
Step 2 ![]() Open the PG SQL Shell.
Open the PG SQL Shell.
Step 3 ![]() Enter the IP address of the database server, database name, port number (if you have changed it), schema username, and schema password.
Enter the IP address of the database server, database name, port number (if you have changed it), schema username, and schema password.
Step 4 ![]() For the SDP database scripts, do the following:
For the SDP database scripts, do the following:
a. ![]() To set the script path, enter the following command:
To set the script path, enter the following command:
\cd <PATH_OF_SDPDBSCRIPTS>/postgres
where, <PATH_OF_SDPDBSCRIPTS> is the location in which you had copied the SDP scripts directory.
b. ![]() To run the scripts, enter the following commands in order:
To run the scripts, enter the following commands in order:
\i setup-sdp-base.sql
\i setup-sdp-types.sql
The SDP application-related tables and basic data are created.

Note ![]() When you run the database scripts, a log file is automatically generated and saved in the <PATH_OF_SDPDBSCRIPTS> directory. You must check this log file to ensure that there are no errors logged. If the log file displays errors, these errors must be corrected before you proceed with the installation.
When you run the database scripts, a log file is automatically generated and saved in the <PATH_OF_SDPDBSCRIPTS> directory. You must check this log file to ensure that there are no errors logged. If the log file displays errors, these errors must be corrected before you proceed with the installation.
Step 5 ![]() For the Smart+Connected PS database scripts, do the following:
For the Smart+Connected PS database scripts, do the following:
a. ![]() To set the script path, enter the following command:
To set the script path, enter the following command:
\cd <PATH_OF_PSDBSCRIPTS>/postgres
where, <PATH_OF_PSDBSCRIPTS> is the location in which you had copied the Smart+Connected PS scripts directory.
b. ![]() To run the database scripts, enter the following command:
To run the database scripts, enter the following command:
\i setup-pvo-base.sql
The Smart+Connected PS application-related tables and basic data are created.
Note ![]() When you run the database scripts, a log file is automatically generated and saved in the <PATH_OF_PSDBSCRIPTS> directory. You must check this log file to ensure that there are no errors logged. If the log file displays errors, these errors must be corrected before you proceed with the installation.
When you run the database scripts, a log file is automatically generated and saved in the <PATH_OF_PSDBSCRIPTS> directory. You must check this log file to ensure that there are no errors logged. If the log file displays errors, these errors must be corrected before you proceed with the installation.
Creating JBoss Profile
After configuring the database, you need to create a profile in the JBoss server for running the Smart+Connected PS application.
To create a profile in the JBoss server, perform the following steps:
Step 1 ![]() Download jboss-6.0.0.Final.zip.
Download jboss-6.0.0.Final.zip.
JBoss is open source, and you can download it from the Internet. For example:
http://sourceforge.net/projects/jboss/files/JBoss/JBoss-6.0.0.Final/jboss-as-distribution- 6.0.0.Final.zip/download
Step 2 ![]() Create a directory named `jboss', and unzip the jboss-6.0.0.Final.zip file into that directory.
Create a directory named `jboss', and unzip the jboss-6.0.0.Final.zip file into that directory.
Step 3 ![]() Set the $JBOSS_HOME and $JAVA_HOME environment variables by entering the following commands:
Set the $JBOSS_HOME and $JAVA_HOME environment variables by entering the following commands:
$ export JAVA_HOME=<JDK_INSTALL_LOCATION>
$ export JBOSS_HOME=<JBOSS_INSTALL_LOCATION>
Where, <JBOSS_INSTALL_LOCATION> is the complete path where the unzipped jboss-6.0.0 files are available and <JDK_INSTALL_LOCATION> is the complete path where you have installed jdk1.6.0_24.
Note ![]() You can also add the preceding commands to the user's profile script so that the $JBOSS_HOME and $JAVA_HOME environment variables are automatically set up during login.
You can also add the preceding commands to the user's profile script so that the $JBOSS_HOME and $JAVA_HOME environment variables are automatically set up during login.
Step 4 ![]() Navigate to the server directory in $JBOSS_HOME by entering the following command:
Navigate to the server directory in $JBOSS_HOME by entering the following command:
cd $JBOSS_HOME/server
Step 5 ![]() Copy the `default' directory with the name `scps' by entering the following command:
Copy the `default' directory with the name `scps' by entering the following command:
cp -R default scps
The `scps' directory is created under the $JBOSS_HOME/server directory. The `scps' directory is used as the Smart+Connected PS application profile.
Step 6 ![]() Copy the ipsapp.war file, which is available in <PS_INSTALL_DIRECTORY>/scps/bin/war, to the $JBOSS_HOME/server/scps/deploy directory by entering the following command:
Copy the ipsapp.war file, which is available in <PS_INSTALL_DIRECTORY>/scps/bin/war, to the $JBOSS_HOME/server/scps/deploy directory by entering the following command:
cp <PS_INSTALL_DIRECTORY>/scps/bin/war/ipsapp.war $JBOSS_HOME/server/scps/deploy
Step 7 ![]() Create a datasource file so that the Smart+Connected PS application communicates with the database machine:
Create a datasource file so that the Smart+Connected PS application communicates with the database machine:
a. ![]() Create the postgres-ds.xml file under the `scps/deploy' directory with the following code:
Create the postgres-ds.xml file under the `scps/deploy' directory with the following code:
<?xml version="1.0" encoding="UTF-8"?>
<datasources>
<local-tx-datasource>
<jndi-name>jdbc/scc</jndi-name>
<connection-url>jdbc:postgresql://IPaddress:5432/schemaName</connection-url>
<driver-class>org.postgresql.Driver</driver-class>
<user-name>DBusername</user-name>
<password>DBpassword</password>
<min-pool-size>10</min-pool-size>
<max-pool-size>50</max-pool-size>
</local-tx-datasource>
</datasources>
b. ![]() Replace the following text with their actual values in the code that you had added in Step 7 a.:
Replace the following text with their actual values in the code that you had added in Step 7 a.:
–![]() `IPaddress' with the database server IP address or DNS hostname
`IPaddress' with the database server IP address or DNS hostname
–![]() `schemaName' with the database name
`schemaName' with the database name
–![]() `5432' with the database port number if changed during the PostgreSQL installation
`5432' with the database port number if changed during the PostgreSQL installation
–![]() `DBusername' with the database schema username
`DBusername' with the database schema username
–![]() `DBpassword' with the database schema password
`DBpassword' with the database schema password
c. ![]() Save the file.
Save the file.
d. ![]() Provide the executable permissions to the newly created postgres-ds.xml file by entering the following command:
Provide the executable permissions to the newly created postgres-ds.xml file by entering the following command:
chmod 755 postgres-ds.xml
Step 8 ![]() Add an entry for scanning deployers:
Add an entry for scanning deployers:
a. ![]() Navigate to the $JBOSS_HOME/server/scps/deployers directory, and open the scanning-deployers-jboss-beans.xml file.
Navigate to the $JBOSS_HOME/server/scps/deployers directory, and open the scanning-deployers-jboss-beans.xml file.
b. ![]() Search for the following text:
Search for the following text:
<install method="addIgnored">
<parameter>java.lang.LinkageError</parameter>
</install>
c. ![]() Add the following code after the searched text:
Add the following code after the searched text:
<install method="addIgnored">
<parameter>java.lang.reflect.MalformedParameterizedTypeException</parameter>
</install>
d. ![]() Save the file.
Save the file.
Step 9 ![]() Update the run.conf file to increase the memory:
Update the run.conf file to increase the memory:
a. ![]() Open the run.conf file available in $JBOSS_HOME/bin and search for the following text:
Open the run.conf file available in $JBOSS_HOME/bin and search for the following text:
JAVA_OPTS="-Xms128m -Xmx512m -XX:MaxPermSize=256m -Dorg.jboss.resolver.warning=true
-Dsun.rmi.dgc.client.gcInterval=3600000 -Dsun.rmi.dgc.server.gcInterval=3600000"
Replace with the following text:
JAVA_OPTS="-Xms256m -Xmx1024m -XX:MaxPermSize=512m -Dorg.jboss.resolver.warning=true
-Dsun.rmi.dgc.client.gcInterval=3600000 -Dsun.rmi.dgc.server.gcInterval=3600000"
b. ![]() Save the file.
Save the file.
Setting Up Port
You need to set up a port for the Smart+Connected PS application by changing the following default port values:
•![]() JBoss web HTTP connector socket value. By default, the `HttpConnector' value is 8080.
JBoss web HTTP connector socket value. By default, the `HttpConnector' value is 8080.
•![]() Listening socket for the naming service. By default, the `Port' value is 1099.
Listening socket for the naming service. By default, the `Port' value is 1099.
Note ![]() While changing the default port values, ensure that you do not change any other port number apart from the `HttpConnector' and `Port' values for the property name `bindingName'.
While changing the default port values, ensure that you do not change any other port number apart from the `HttpConnector' and `Port' values for the property name `bindingName'.
To set up a port for the Smart+Connected PS application, perform the following steps:
Step 1 ![]() Open the following file:
Open the following file:
$JBOSS_HOME/server/scps/conf/bindingservice.beans/META-INF/bindings-jboss-beans.xml
Step 2 ![]() Search for the port number 8080 that has the `bindingName' value as `HttpConnector' and replace with a port number that is not in use, for example 7001.
Search for the port number 8080 that has the `bindingName' value as `HttpConnector' and replace with a port number that is not in use, for example 7001.
After changing the value, the text is displayed as follows:
<bean class="org.jboss.services.binding.ServiceBindingMetadata">
<property name="serviceName">jboss.web:service=WebServer</property>
<property name="bindingName">HttpConnector</property>
<property name="port">7001</property>
  <property name="description">JBoss Web HTTP connector socket; also drives the values
for the HTTPS and AJP sockets</property>
</bean>
Step 3 ![]() Search for the port number 1099 that has the `bindingName' value as `Port' and replace with a port number 11099.
Search for the port number 1099 that has the `bindingName' value as `Port' and replace with a port number 11099.
After changing the value, the text is displayed as follows:
<bean class="org.jboss.services.binding.ServiceBindingMetadata">
<property name="serviceName">jboss:service=Naming</property>
<property name="bindingName">Port</property>
<property name="port">11099</property>
<property name="description">The listening socket for the Naming service</property>
</bean>
Step 4 ![]() Save the file.
Save the file.
Step 5 ![]() Repeat Step 1 through Step 4 in the bindings-jboss-beans.xml file for the SDP profile.
Repeat Step 1 through Step 4 in the bindings-jboss-beans.xml file for the SDP profile.
Setting Up Security Configuration
You need to set up security configuration in the Smart+Connected PS application for the following:
•![]() Disabling the JMS message security, its value is set to `true' by default.
Disabling the JMS message security, its value is set to `true' by default.
•![]() Authenticating LDAP users of the Smart+Connected PS application.
Authenticating LDAP users of the Smart+Connected PS application.
To set up security configuration, perform the following steps:
Step 1 ![]() To disable the JMS message security:
To disable the JMS message security:
a. ![]() In the $JBOSS_HOME/server/scps/deploy/hornetq/hornetq-configuration.xml file, add the tag
In the $JBOSS_HOME/server/scps/deploy/hornetq/hornetq-configuration.xml file, add the tag <security-enabled>false</security-enabled> after the </security-settings> end tag.
b. ![]() Save the file.
Save the file.
The JMS message security is now set to false.
Step 2 ![]() To enable the LDAP authentication for application users:
To enable the LDAP authentication for application users:
a. ![]() In the $JBOSS_HOME/server/scps/conf/login-config.xml file, search for the following text:
In the $JBOSS_HOME/server/scps/conf/login-config.xml file, search for the following text:
<application-policy name="JBossWS">
<authentication>
<login-module code="org.jboss.security.auth.spi.UsersRolesLoginModule"
flag="required">
     <module-option
name="usersProperties">props/jbossws-users.properties</module-option>
     <module-option
name="rolesProperties">props/jbossws-roles.properties</module-option>
<module-option name="unauthenticatedIdentity">anonymous</module-option>
</login-module>
</authentication>
</application-policy>
b. ![]() Add the following code after the preceding text:
Add the following code after the preceding text:
<application-policy name="SDP">
<authentication>
<login-module code="com.cisco.sdp.core.security.authn.module.ProxyLoginModule"
flag="sufficient">
    <module-option
name="loginModuleClass">com.cisco.sdp.core.security.authn.module.SDPDataSourceLoginMod
ule</module-option>
<module-option name="jndiName">java:jdbc/scc</module-option>
<module-option name="debug">true</module-option>
</login-module>
<login-module code="com.cisco.sdp.core.security.authn.module.ProxyLoginModule"
flag="sufficient">
    <module-option
name="loginModuleClass">com.cisco.sdp.core.security.authn.module.ldap.SDPLdapLoginModu
le</module-option>
<module-option name="jndiName">java:jdbc/scc</module-option>
    <module-option
name="initialContextFactory">com.sun.jndi.ldap.LdapCtxFactory</module-option>
            <module-option
name="connectionURL">ldap://ldap.example.com:389</module-option>
            <module-option
name="connectionUsername">uid=name1,ou=people,ou=com</module-option>
<module-option name="connectionPassword">password123</module-option>
<module-option name="authentication">simple</module-option>
            <module-option
name="userBase">ou=active,ou=employees,ou=people,o=example.com</module-option>
<module-option name="userSearchMatching">uid={0}</module-option>
<module-option name="userSearchSubtree">true</module-option>
<module-option name="debug">true</module-option>
</login-module>
</authentication>
</application-policy>
c. ![]() Replace the following LDAP server and LDAP user details with their actual values in the code that you added in Step 2 b.:
Replace the following LDAP server and LDAP user details with their actual values in the code that you added in Step 2 b.:
–![]() connectionURL
connectionURL
–![]() connectionUsername
connectionUsername
–![]() connectionPassword
connectionPassword
–![]() authentication
authentication
–![]() userBase
userBase
–![]() userSearchMatching
userSearchMatching
–![]() userSearchSubtree
userSearchSubtree
Note ![]() If LDAP does not require authentication or uses anonymous bind, the connectionUsername and connectionPassword values can be left blank.
If LDAP does not require authentication or uses anonymous bind, the connectionUsername and connectionPassword values can be left blank.
d. ![]() Save the file.
Save the file.
The LDAP configuration is complete.
Setting Up Java Messaging Service (JMS)
•![]() Creating a Connection Factory
Creating a Connection Factory
Creating a Connection Factory
You need to create a connection factory in the SDP and Smart+Connected PS application.
•![]() Creating a Connection Factory in the SDP
Creating a Connection Factory in the SDP
•![]() Creating a Connection Factory in the Smart+Connected PS
Creating a Connection Factory in the Smart+Connected PS
Creating a Connection Factory in the SDP
You need to create a connection factory in the SDP for the Smart+Connected PS application to work properly.
To create a connection factory in the SDP, perform the following steps:
Step 1 ![]() Navigate to the $JBOSS_HOME/server/<SDP_PROFILE_DIR>/deploy/hornetq directory, and open the hornetq-jms.xml file.
Navigate to the $JBOSS_HOME/server/<SDP_PROFILE_DIR>/deploy/hornetq directory, and open the hornetq-jms.xml file.
Where, <SDP_PROFILE_DIR> is the SDP JBoss profile directory.
Step 2 ![]() In the hornetq-jms.xml file, search for the following text:
In the hornetq-jms.xml file, search for the following text:
<connection-factory name="NettyConnectionFactory">
<connectors>
<connector-ref connector-name="netty"/>
</connectors>
<entries>
<entry name="/ConnectionFactory"/>
<entry name="/XAConnectionFactory"/>
</entries>
</connection-factory>
Step 3 ![]() Replace `/ConnectionFactory' with `/SDPXAConnectionFactory' as follows:
Replace `/ConnectionFactory' with `/SDPXAConnectionFactory' as follows:
<entries>
<entry name="/SDPXAConnectionFactory"/>
<entry name="/XAConnectionFactory"/>
</entries>
Step 4 ![]() In the hornetq-jms.xml file, search for the following text:
In the hornetq-jms.xml file, search for the following text:
<connection-factory name="InVMConnectionFactory">
<connectors>
<connector-ref connector-name="in-vm"/>
</connectors>
<entries>
<entry name="/ConnectionFactory"/>
<entry name="/XAConnectionFactory"/>
</entries>
</connection-factory>
Step 5 ![]() Replace `/ConnectionFactory' with `/SDPXAConnectionFactory' as follows:
Replace `/ConnectionFactory' with `/SDPXAConnectionFactory' as follows:
<entries>
<entry name="/SDPXAConnectionFactory"/>
<entry name="/XAConnectionFactory"/>
</entries>
Step 6 ![]() Save the file.
Save the file.
The connection factory is created in the SDP.
Creating a Connection Factory in the Smart+Connected PS
To create a connection factory in the Smart+Connected PS, perform the following steps:
Step 1 ![]() Navigate to the $JBOSS_HOME/server/scps/deploy/hornetq directory, and open the hornetq-jms.xml file.
Navigate to the $JBOSS_HOME/server/scps/deploy/hornetq directory, and open the hornetq-jms.xml file.
Step 2 ![]() In the hornetq-jms.xml file, search for the following text:
In the hornetq-jms.xml file, search for the following text:
<connection-factory name="NettyConnectionFactory">
<connectors>
<connector-ref connector-name="netty"/>
</connectors>
<entries>
<entry name="/ConnectionFactory"/>
<entry name="/XAConnectionFactory"/>
</entries>
</connection-factory>
Step 3 ![]() Replace `/ConnectionFactory' with `/jms/ipsConnectionFactory' as follows:
Replace `/ConnectionFactory' with `/jms/ipsConnectionFactory' as follows:
<entries>
<entry name="/jms/ipsConnectionFactory"/>
<entry name="/XAConnectionFactory"/>
</entries>
Step 4 ![]() In the hornetq-jms.xml file, search for the following text:
In the hornetq-jms.xml file, search for the following text:
<connection-factory name="InVMConnectionFactory">
<connectors>
<connector-ref connector-name="in-vm"/>
</connectors>
<entries>
<entry name="java:/ConnectionFactory"/>
<entry name="java:/XAConnectionFactory"/>
</entries>
</connection-factory>
Step 5 ![]() Replace `/ConnectionFactory' with `/jms/ipsConnectionFactory' as follows:
Replace `/ConnectionFactory' with `/jms/ipsConnectionFactory' as follows:
<entries>
<entry name="java:/jms/ipsConnectionFactory"/>
<entry name="java:/XAConnectionFactory"/>
</entries>
Step 6 ![]() Save the file.
Save the file.
The connection factory for the Smart+Connected PS is created.
Creating an Event Topic
You need to create an event topic in the SDP server.
To create an event topic, perform the following steps in the SDP server:
Step 1 ![]() Navigate to the $JBOSS_HOME/server/<SDP_PROFILE_DIR>/deploy/hornetq directory, and open the hornetq-jms.xml file.
Navigate to the $JBOSS_HOME/server/<SDP_PROFILE_DIR>/deploy/hornetq directory, and open the hornetq-jms.xml file.
Where, <SDP_PROFILE_DIR> is the SDP JBoss profile directory.
Step 2 ![]() In the hornetq-jms.xml file, search for the following text:
In the hornetq-jms.xml file, search for the following text:
<queue name="ExpiryQueue">
<entry name="/queue/ExpiryQueue"/>
</queue>
Step 3 ![]() At the end of the preceding text, add an entry for "/jms/sdp.event.Topic" as follows:
At the end of the preceding text, add an entry for "/jms/sdp.event.Topic" as follows:
<topic name="sdp.event.Topic">
<entry name="/jms/sdp.event.Topic"/>
</topic>
Step 4 ![]() Save the file.
Save the file.
An event topic is created in the SDP server.
Configuring an Event Topic
After creating an event topic in the SDP, perform the following steps to configure events in the SDP server:
Step 1 ![]() In a file browser, navigate to the $JBOSS_HOME/server/<SDP_PROFILE_DIR>/deploy/hornetq directory, and open the hornetq-configuration.xml file.
In a file browser, navigate to the $JBOSS_HOME/server/<SDP_PROFILE_DIR>/deploy/hornetq directory, and open the hornetq-configuration.xml file.
Where, <SDP_PROFILE_DIR> is the SDP JBoss profile directory.
Step 2 ![]() In the hornetq-configuration.xml file, add the following to disable the JMS message security:
In the hornetq-configuration.xml file, add the following to disable the JMS message security:
<security-enabled>false</security-enabled>
Note ![]() The value of the JMS message security is set to `true' by default.
The value of the JMS message security is set to `true' by default.
Step 3 ![]() Navigate to $JBOSS_HOME/bin, and open the run.sh file for the SDP profile.
Navigate to $JBOSS_HOME/bin, and open the run.sh file for the SDP profile.
Step 4 ![]() In the run.sh file, search for the following text:
In the run.sh file, search for the following text:
JAVA_OPTS="${JAVA_OPTS:--Dprogram.name=$PROGNAME}
-DANTLR_USE_DIRECT_CLASS_LOADING=true -Dshared.dir=$JBOSS_HOME/shared
-Dcom.sun.xml.bind.v2.bytecode.ClassTailor.noOptimize=true
-Dsdp.af.cache.root=$JBOSS_HOME/server/default/tmp"
Step 5 ![]() Add the following command line to the text that you have searched for:
Add the following command line to the text that you have searched for:
"-Dsdp.event.config.mode=global"
After adding the command line, the text is displayed as follows:
JAVA_OPTS="${JAVA_OPTS:--Dprogram.name=$PROGNAME}
-DANTLR_USE_DIRECT_CLASS_LOADING=true -Dsdp.event.config.mode=global
-Dshared.dir=$JBOSS_HOME/shared
-Dcom.sun.xml.bind.v2.bytecode.ClassTailor.noOptimize=true
-Dsdp.af.cache.root=$JBOSS_HOME/server/default/tmp"
Step 6 ![]() Save the file.
Save the file.
Creating a Queue
You need to create a queue in the Smart+Connected PS application server.
To create a queue, perform the following steps in the Smart+Connected PS application server:
Step 1 ![]() Navigate to the $JBOSS_HOME/server/scps/deploy/hornetq directory, and open the hornetq-jms.xml file.
Navigate to the $JBOSS_HOME/server/scps/deploy/hornetq directory, and open the hornetq-jms.xml file.
Step 2 ![]() In the hornetq-jms.xml file, search for the following text:
In the hornetq-jms.xml file, search for the following text:
<queue name="ExpiryQueue">
<entry name="/queue/ExpiryQueue"/>
</queue>
Step 3 ![]() After the preceding text, add an entry for "/jms/ipsQueue" as follows:
After the preceding text, add an entry for "/jms/ipsQueue" as follows:
<queue name="ipsQueue">
<entry name="/jms/ipsQueue"/>
</queue>
Step 4 ![]() Save the file.
Save the file.
A queue for the Smart+Connected PS application is created.
Setting Up Library
To set up the library, perform the following steps in the Smart+Connected PS application server:
Step 1 ![]() Copy the following jar files to the $JBOSS_HOME/server/scps/lib directory:
Copy the following jar files to the $JBOSS_HOME/server/scps/lib directory:
•![]() postgresql-9.0-801.jdbc4.jar—It is open source, and you can download it from the Internet. For example:
postgresql-9.0-801.jdbc4.jar—It is open source, and you can download it from the Internet. For example:
http://jdbc.postgresql.org/download/postgresql-9.0-801.jdbc4.jar
•![]() sdp-authmodules.jar—Available at the <SDP_INSTALL_DIRECTORY>/sdp/bin/jars location on the server where the SDP has been installed.
sdp-authmodules.jar—Available at the <SDP_INSTALL_DIRECTORY>/sdp/bin/jars location on the server where the SDP has been installed.
Step 2 ![]() Navigate to the $JBOSS_HOME/server/scps/lib directory, and provide the required permissions to the saved files (postgresql-9.0-801.jdbc4.jar and sdp-authmodules.jar) by entering the following command:
Navigate to the $JBOSS_HOME/server/scps/lib directory, and provide the required permissions to the saved files (postgresql-9.0-801.jdbc4.jar and sdp-authmodules.jar) by entering the following command:
chmod 755 *
Setting Up the BIRT Engine
The Smart+Connected PS application uses the BIRT runtime reporting engine to generate reports and charts. Therefore, you must set up the BIRT engine after installing the Smart+Connected PS application. The BIRT runtime reporting engine is automatically installed while installing the Smart+Connected PS application.
To set up the BIRT engine, perform the following steps:
Step 1 ![]() From the <PS_INSTALL_DIRECTORY>/scps/resources/ directory, copy the BIRT runtime directory `birt-runtime-2_5_2' to a home directory or any other location.
From the <PS_INSTALL_DIRECTORY>/scps/resources/ directory, copy the BIRT runtime directory `birt-runtime-2_5_2' to a home directory or any other location.
Note ![]() If you copy the directory to a location other than the home directory, you must update the path in the BirtConfig.properties file available in the ipsapp.war file.
If you copy the directory to a location other than the home directory, you must update the path in the BirtConfig.properties file available in the ipsapp.war file.
Step 2 ![]() In a file browser, navigate to the directory contacting the $JBOSS_HOME/server/scps/deploy/ipsapp.war file, and double-click this file to open the Archive Manager screen.
In a file browser, navigate to the directory contacting the $JBOSS_HOME/server/scps/deploy/ipsapp.war file, and double-click this file to open the Archive Manager screen.
Step 3 ![]() Navigate to /WEB-INF/classes.
Navigate to /WEB-INF/classes.
Step 4 ![]() Select `BirtConfig.properties' and click Extract.
Select `BirtConfig.properties' and click Extract.
You can extract it to a suitable location, such as Desktop.
Step 5 ![]() Update the BirtConfig.properties file:
Update the BirtConfig.properties file:
a. ![]() Open the BirtConfig.properties file from the extracted location, in the edit mode, and update the directory path as follows:
Open the BirtConfig.properties file from the extracted location, in the edit mode, and update the directory path as follows:
EngineHome=/<path where the BIRT runtime directory is copied>/birt-runtime-2_5_2/birt-runtime-2_5_2/ReportEngine
b. ![]() Save and close the file.
Save and close the file.
Step 6 ![]() Navigate to the directory contacting the $JBOSS_HOME/server/scps/deploy/ipsapp.war file, and double-click this file to open the Archive Manager screen.
Navigate to the directory contacting the $JBOSS_HOME/server/scps/deploy/ipsapp.war file, and double-click this file to open the Archive Manager screen.
Step 7 ![]() Navigate to /WEB-INF/classes and Click Add. Browse and select the updated `BirtConfig.properties' file, and click OK.
Navigate to /WEB-INF/classes and Click Add. Browse and select the updated `BirtConfig.properties' file, and click OK.
This replaces the updated file in the ipsapp.war file. Verify that the date and time for the `BirtConfig.properties' file is updated to the current date and time.
Configuring Logging
To configure logging in the JBoss server, perform the following steps:
Step 1 ![]() Create the 'SCPS_Log' directory in the <PS_INSTALL_DIRECTORY>, and provide the read and write permissions to the users who run the JBoss profile for the Smart+Connected PS application.
Create the 'SCPS_Log' directory in the <PS_INSTALL_DIRECTORY>, and provide the read and write permissions to the users who run the JBoss profile for the Smart+Connected PS application.
Step 2 ![]() Navigate to the $JBOSS_HOME/server/scps/deploy/ directory, and open the `jboss-logging.xml' file in a text editor.
Navigate to the $JBOSS_HOME/server/scps/deploy/ directory, and open the `jboss-logging.xml' file in a text editor.
Step 3 ![]() Below the existing `periodic-rotating-file-handler' tag, add the following text:
Below the existing `periodic-rotating-file-handler' tag, add the following text:
<periodic-rotating-file-handler
file-name="<PS_INSTALL_DIRECTORY>/SCPS_Log/PS_Server.log"
name="SDPFILEHANDLER"
autoflush="true"
append="true"
suffix=".yyyy-MM-dd">
<error-manager>
<only-once/>
</error-manager>
<formatter>
<pattern-formatter pattern="%d %-5p [%c] (%t) %s%E%n"/>
</formatter>
</periodic-rotating-file-handler>
For example:
<periodic-rotating-file-handler
file-name="/home/scc-qa/scps/SCPS_Log/PS_Server.log"
name="SDPFILEHANDLER"
autoflush="true"
append="true"
suffix=".yyyy-MM-dd">
<error-manager>
<only-once/>
</error-manager>
<formatter>
<pattern-formatter pattern="%d %-5p [%c] (%t) %s%E%n"/>
</formatter>
</periodic-rotating-file-handler>
The logs are created after the application is up and running at the location that you had specified in the 'file-name' attribute.
Step 4 ![]() Search for the following text:
Search for the following text:
<root-logger>
<!-- Set the root logger priority via a system property, with a default value. -->
<level name="${jboss.server.log.threshold:INFO}"/>
<handlers>
<handler-ref name="CONSOLE"/>
<handler-ref name="FILE"/>
</handlers>
</root-logger>
Replace the text as follows:
<root-logger>
<!-- Set the root logger priority via a system property, with a default value. -->
<level name="${jboss.server.log.threshold:INFO}"/>
<handlers>
<handler-ref name="CONSOLE"/>
<handler-ref name="FILE"/>
<handler-ref name="SDPFILEHANDLER"/>
</handlers>
</root-logger>
Step 5 ![]() Save the `jboss-logging.xml' file.
Save the `jboss-logging.xml' file.
Logging is configured for the Smart+Connected PS application.
Configuring the Properties Files
•![]() Updating the Properties Files
Updating the Properties Files
About the Properties Files
•![]() About the LDAP Properties File
About the LDAP Properties File
•![]() About the JMS Properties File
About the JMS Properties File
•![]() About the Reservation Properties File
About the Reservation Properties File
•![]() About the Notificationservice Properties File
About the Notificationservice Properties File
About the LDAP Properties File
For information on the LDAP properties file, see
About the JMS Properties File
Table 3-3 displays the predefined properties, description, and sample values for each of the properties in the pvoJms.properties file. This file is available at: <PS_INSTALL_DIRECTORY>/scps/resources. These values must be applied in this properties file.
|
|
|
|
|---|---|---|
ips.jms.jndi |
Identifies the JNDI name for the ips queue. |
jms/ipsQueue1 |
ips.jms.connectionfactory |
Identifies the Connection factory for the ips queue. |
jms/ipsConnectionFactory1 |
ips.jms.initialContext |
Identifies the Smart+Connected PS initial context url. 11099 is the listening socket port that is defined as value for HttpConnector port (which you had set up in the "Setting Up Port" section). |
jnp://localhost:11099 |
URL |
Identifies the SDP topic URL. 11099 is the listening socket port that is defined as value for SDP HttpConnector port (which you had set up in Step 5 of the "Setting Up Port" section). |
jnp://<SDP_IPADDRESS>:11099 For example, jnp://10.10.10.10:11099 |
username |
Identifies the SDP domain username. |
admin |
password |
Identifies the SDP domain password. |
admin |
providerurl |
Identifies the Smart+Connected PS Queue URL. 11199 is the listening socket port that is defined by adding the HttpConnector port value (which you had set up in the "Setting Up Port" section) and the "ports-01" offset value in the bindings-jboss-beans.xml file (which is 100 by default). |
jnp://localhost:11199 |
provideruserName |
Identifies the Smart+Connected PS domain admin username. |
admin |
providerpassword |
Identifies the Smart+Connected PS domain admin password. |
admin |
1 This property value should not be changed. |
About the Reservation Properties File
For information on the reservation properties file, see
About the Notificationservice Properties File
For information on the notification service properties file, see
Updating the Properties Files
•![]() Preparing the Properties File
Preparing the Properties File
•![]() Setting Up Reservation and Notification Properties
Setting Up Reservation and Notification Properties
Preparing the Properties File
To prepare the LDAP.properties and pvoJms.properties files for the Smart+Connected PS, perform the following steps:
Step 1 ![]() Navigate to the <PS_INSTALL_DIRECTORY>/scps/resources directory, and open the LDAP.properties and pvoJms.properties files in a text editor.
Navigate to the <PS_INSTALL_DIRECTORY>/scps/resources directory, and open the LDAP.properties and pvoJms.properties files in a text editor.
Step 2 ![]() Edit the LDAP.properties file to provide the values for each of the property names as listed in
Edit the LDAP.properties file to provide the values for each of the property names as listed in
Step 3 ![]() Edit the pvoJms.properties file to provide the values for each of the property names as listed in Table 3-3
Edit the pvoJms.properties file to provide the values for each of the property names as listed in Table 3-3
Step 4 ![]() Make a note of the location where you save the LDAP.properties and pvoJms.properties files.
Make a note of the location where you save the LDAP.properties and pvoJms.properties files.
This location is used for setting up run parameters for the JBoss start-up configuration.
Setting Up Reservation and Notification Properties
To update the reservation and notification properties files, perform the following steps:
Step 1 ![]() In a file browser, navigate to the directory contacting the $JBOSS_HOME/server/scps/deploy/ipsapp.war file, and double-click this file to open the Archive Manager screen.
In a file browser, navigate to the directory contacting the $JBOSS_HOME/server/scps/deploy/ipsapp.war file, and double-click this file to open the Archive Manager screen.
Step 2 ![]() Navigate to /WEB-INF/classes, select the following files, and extract content of the files to a suitable location, such as Desktop:
Navigate to /WEB-INF/classes, select the following files, and extract content of the files to a suitable location, such as Desktop:
•![]() Reservation.properties
Reservation.properties
•![]() notificationservice.properties
notificationservice.properties
Step 3 ![]() Update the Reservation.properties file:
Update the Reservation.properties file:
a. ![]() Open the Reservation.properties file, which is available at the specified location, in the edit mode and update the property values as described in
Open the Reservation.properties file, which is available at the specified location, in the edit mode and update the property values as described in
b. ![]() Save and close the file.
Save and close the file.
Step 4 ![]() Update the notificationservice.properties file:
Update the notificationservice.properties file:
a. ![]() Open the notificationservice.properties file, which is available at the specified location, in the edit mode and update the property values as described in
Open the notificationservice.properties file, which is available at the specified location, in the edit mode and update the property values as described in
b. ![]() Save and close the file.
Save and close the file.
Step 5 ![]() Navigate to the directory contacting the $JBOSS_HOME/server/scps/deploy/ipsapp.war file, and double-click this file to open the Archive Manager screen.
Navigate to the directory contacting the $JBOSS_HOME/server/scps/deploy/ipsapp.war file, and double-click this file to open the Archive Manager screen.
Step 6 ![]() Navigate to /WEB-INF/classes, and click Add.
Navigate to /WEB-INF/classes, and click Add.
Step 7 ![]() Browse and select the following updated files, and click OK:
Browse and select the following updated files, and click OK:
•![]() Reservation.properties
Reservation.properties
•![]() notificationservice.properties
notificationservice.properties
The updated file is replaced in the ipsapp.war file. Verify that the date and time of the Reservation.properties and the notificationservice.properties files are updated to the current date and time.
Setting Up Run Parameters
To set up run parameters, perform the following steps:
Step 1 ![]() Navigate to $JBOSS_HOME/bin, copy the `run.sh' file, and create a file with the name `run_scps.sh'.
Navigate to $JBOSS_HOME/bin, copy the `run.sh' file, and create a file with the name `run_scps.sh'.
Step 2 ![]() To allow JMS to work in the Smart+Connected PS application through the SDP, set the `sdp.event.config.mode' property in the `run_scps.sh' file of the Smart+Connected PS profile:
To allow JMS to work in the Smart+Connected PS application through the SDP, set the `sdp.event.config.mode' property in the `run_scps.sh' file of the Smart+Connected PS profile:
a. ![]() In the run_scps.sh file, search for the following text:
In the run_scps.sh file, search for the following text:
# Setup JBoss specific properties
JAVA_OPTS="${JAVA_OPTS:+$JAVA_OPTS -Dprogram.name=$PROGNAME}"
JAVA_OPTS="${JAVA_OPTS:--Dprogram.name=$PROGNAME}"
b. ![]() Add the following text:
Add the following text:
JAVA_OPTS="$JAVA_OPTS -DANTLR_USE_DIRECT_CLASS_LOADING=true
-Dsdp.event.config.mode=global -DUseSunHttpHandler=true"
Step 3 ![]() Configure the LDAP properties:
Configure the LDAP properties:
a. ![]() In the run_scps.sh file, search for the following text:
In the run_scps.sh file, search for the following text:
JAVA_OPTS="$JAVA_OPTS -DANTLR_USE_DIRECT_CLASS_LOADING=true
-Dsdp.event.config.mode=global -DUseSunHttpHandler=true"
b. ![]() Add the following text at the end of the searched text before the ("):
Add the following text at the end of the searched text before the ("):
-Dcom.cisco.sdp.ldap.configfilepath=<path to LDAP.properties file>/LDAP.properties
-Dpvo_ldap_props=/u01/scps/config/LDAP.properties
For example:
-Dcom.cisco.sdp.ldap.configfilepath=/u01/scps/config/LDAP.properties
-Dpvo_ldap_props=/u01/scps/config/LDAP.properties"
c. ![]() After adding the command line, the text is displayed as follows:
After adding the command line, the text is displayed as follows:
JAVA_OPTS="$JAVA_OPTS -DANTLR_USE_DIRECT_CLASS_LOADING=true
-Dsdp.event.config.mode=global -DUseSunHttpHandler=true
-Dcom.cisco.sdp.ldap.configfilepath=/u01/scps/config/LDAP.properties
-Dpvo_ldap_props=/u01/scps/config/LDAP.properties"
Step 4 ![]() Configure the application properties:
Configure the application properties:
a. ![]() In the run_scps.sh file, search for the following text:
In the run_scps.sh file, search for the following text:
JAVA_OPTS="$JAVA_OPTS -DANTLR_USE_DIRECT_CLASS_LOADING=true
-Dsdp.event.config.mode=global -DUseSunHttpHandler=true
b. ![]() Add the following text at the end of the line before the ("):
Add the following text at the end of the line before the ("):
-Dpvo_jms_props=<path to pvoJms.properties>/pvoJms.properties
For example:
-Dpvo_jms_props=/u01/scps/config/pvoJms.properties
c. ![]() After adding the command line, the text is displayed as follows:
After adding the command line, the text is displayed as follows:
JAVA_OPTS="$JAVA_OPTS -DANTLR_USE_DIRECT_CLASS_LOADING=true
-Dsdp.event.config.mode=global -DUseSunHttpHandler=true
-Dcom.cisco.sdp.ldap.configfilepath=/u01/scps/config/LDAP.properties
-Dpvo_jms_props=/u01/scps/config/pvoJms.properties"
Step 5 ![]() Save and close the run_scps.sh file.
Save and close the run_scps.sh file.
Setting Up the Push-to-Phone Feature
To configure the Push-to-Phone feature on the JBoss server for the Smart+Connected PS application, perform the following steps:
Step 1 ![]() From the file browser, navigate to $JBOSS_HOME/bin directory, and open the run_scps.sh file.
From the file browser, navigate to $JBOSS_HOME/bin directory, and open the run_scps.sh file.
Step 2 ![]() In the run_scps.sh file, search for the following text:
In the run_scps.sh file, search for the following text:
JAVA_OPTS="$JAVA_OPTS -DANTLR_USE_DIRECT_CLASS_LOADING=true
-Dsdp.event.config.mode=global
Step 3 ![]() Add the following text at the end of the line before the ("):
Add the following text at the end of the line before the ("):
-Djboss.net.proxyAuthenticatorClassName=java.net.Authenticator
-DUseSunHttpHandler=true
After adding the command line, the text is displayed as follows:
JAVA_OPTS="$JAVA_OPTS -DANTLR_USE_DIRECT_CLASS_LOADING=true
-Dsdp.event.config.mode=global
-Dcom.cisco.sdp.ldap.configfilepath=/u01/scps/config/LDAP.properties
-Dpvo_jms_props=/u01/scps/config/pvoJms.properties
-Djboss.net.proxyAuthenticatorClassName=java.net.Authenticator
-DUseSunHttpHandler=true"
Step 4 ![]() Save the file.
Save the file.
Configuring the Secured URL
To launch the Smart+Connected PS application in a secured environment, you need to configure the secured URL.
To configure the secured URL, perform the following steps:
Step 1 ![]() Create a simple SSL cerifitcate keystore:
Create a simple SSL cerifitcate keystore:
a. ![]() Open a terminal and navigate to the $JBOSS_HOME/server/scps/conf directory.
Open a terminal and navigate to the $JBOSS_HOME/server/scps/conf directory.
b. ![]() Remove the existing server.keystore file.
Remove the existing server.keystore file.
c. ![]() Navigate to the $JAVA_HOME/bin directory, and enter the following command to create a certificate and a storefile with the name `server.keystore':
Navigate to the $JAVA_HOME/bin directory, and enter the following command to create a certificate and a storefile with the name `server.keystore':
./keytool -genkey -alias <keystore alias> -keyalg RSA -keystore $JBOSS_HOME/server/scps/conf/server.keystore -validity <number of days>
For example:
./keytool -genkey -alias jbosshttps -keyalg RSA -keystore
$JBOSS_HOME/server/scps/conf/server.keystore -validity 3650
You are prompted to specify the following required details:
–![]() Enter keystore password—Specify a password for keystore. For example, password1. You also need to use the same keystore password when prompted.
Enter keystore password—Specify a password for keystore. For example, password1. You also need to use the same keystore password when prompted.
–![]() Re-enter new password—Specify the new password again.
Re-enter new password—Specify the new password again.
–![]() What is your first and last name?—Specify the host name of the machine.
What is your first and last name?—Specify the host name of the machine.
–![]() What is the name of your organizational unit?—Specify your organizational unit.
What is the name of your organizational unit?—Specify your organizational unit.
–![]() What is the name of your organization?—Specify your organization name.
What is the name of your organization?—Specify your organization name.
–![]() What is the name of your City or Locality?—Specify the name of your city.
What is the name of your City or Locality?—Specify the name of your city.
–![]() What is the name of your State or Province?—Specify the name of your state or province.
What is the name of your State or Province?—Specify the name of your state or province.
–![]() What is the two-letter country code for this unit?—Specify the first two letters of your country.
What is the two-letter country code for this unit?—Specify the first two letters of your country.
–![]() Is CN=<name>, OU=<organizational unit>, O=<organization>, L=<city>, ST=<state>, C=<country> correct?—Verify the specified values, enter `Yes' if the values are correct, and press Enter.
Is CN=<name>, OU=<organizational unit>, O=<organization>, L=<city>, ST=<state>, C=<country> correct?—Verify the specified values, enter `Yes' if the values are correct, and press Enter.
The certificate with a validity of <number of days> days is generated. You are prompted for the key password of the <alias name>.
d. ![]() Press Enter.
Press Enter.
The certificate is retained in the sevrer.keystore file.
Step 2 ![]() Configuring the JBoss server to create an SSL connector:
Configuring the JBoss server to create an SSL connector:
a. ![]() Open a terminal and navigate to the $JBOSS_HOME/server/scps/deploy/jbossweb.sar directory.
Open a terminal and navigate to the $JBOSS_HOME/server/scps/deploy/jbossweb.sar directory.
b. ![]() Open the server.xml file in an edit mode, and uncomment the following text:
Open the server.xml file in an edit mode, and uncomment the following text:
<Connector protocol="HTTP/1.1" SSLEnabled="true"
port="${jboss.web.https.port}" address="${jboss.bind.address}"
scheme="https" secure="true" clientAuth="false"
keystoreFile="${jboss.server.home.dir}/conf/chap8.keystore"
keystorePass="rmi+ssl" sslProtocol = "TLS" />
c. ![]() In the above text, replace the following:
In the above text, replace the following:
–![]() ${jboss.web.https.port} with the unique port number that will be used as the SSL port (for example, 9001)
${jboss.web.https.port} with the unique port number that will be used as the SSL port (for example, 9001)
–![]() ${jboss.server.home.dir} with $JBOSS_HOME/server/scps/conf/server.keystore
${jboss.server.home.dir} with $JBOSS_HOME/server/scps/conf/server.keystore
–![]() rmi+ssl with the keystore password (for example, password1)
rmi+ssl with the keystore password (for example, password1)
Configuring Installer for the Mobile Devices
The Smart+Connected PS installation package comprises the following files in the MobileApps directory:
•![]() For the Android phones—SCPS_Mobile.apk
For the Android phones—SCPS_Mobile.apk
•![]() For the iPhones—SCPSMobileIOSNew.ipa and SCPSMobileIOSNew.plist
For the iPhones—SCPSMobileIOSNew.ipa and SCPSMobileIOSNew.plist
These files are required for configuring installer for the mobile devices.
•![]() Configuring Installer for the Android Phones
Configuring Installer for the Android Phones
•![]() Configuring Installer for the iPhones
Configuring Installer for the iPhones
Configuring Installer for the Android Phones
To configure installer for the Android phones, perform the following steps:
Step 1 ![]() Extract the Messages.properties file:
Extract the Messages.properties file:
a. ![]() Copy the SCPS_Mobile.apk file from the MobileApps directory to a local directory.
Copy the SCPS_Mobile.apk file from the MobileApps directory to a local directory.
b. ![]() Double-click the copied SCPS_Mobile.apk file and open the Archive Manager screen.
Double-click the copied SCPS_Mobile.apk file and open the Archive Manager screen.
c. ![]() Navigate to /assets/www/resources, select the Messages.properties file, and click Extract.
Navigate to /assets/www/resources, select the Messages.properties file, and click Extract.
You can extract it to a suitable location, such as Desktop.
Step 2 ![]() Update the Messages.properties file:
Update the Messages.properties file:
a. ![]() Open the Messages.properties file from the extracted location in an edit mode and update the following values:
Open the Messages.properties file from the extracted location in an edit mode and update the following values:
–![]() secureServerURL = https://<host>:<SSL port>
secureServerURL = https://<host>:<SSL port>
Where, `host' is the IP address or the DNS hostname of the host on which the WebLogic Administration server has been set up and `SSL port' is the port number that you have defined as the SSL listen port for the proxy server in the "Configuring the Secured URL" section.
Note ![]() If you have not configured the secured URL, you must provide the `serverURL' value in the `secureServerURL' field so that the application can be accessed in a non-secured environment.
If you have not configured the secured URL, you must provide the `serverURL' value in the `secureServerURL' field so that the application can be accessed in a non-secured environment.
–![]() serverURL = http://<host>:<port>
serverURL = http://<host>:<port>
Where, `host' is the IP address or the DNS hostname of the host on which the WebLogic Administration server has been set up and `port' is the port number that you have defined for the WebLogic proxy server.
b. ![]() Save and close the file.
Save and close the file.
Step 3 ![]() Replace the Messages.properties file in the SCPS_Mobile.apk file:
Replace the Messages.properties file in the SCPS_Mobile.apk file:
a. ![]() Double-click the SCPS_Mobile.apk file from the extracted location and open the Archive Manager screen.
Double-click the SCPS_Mobile.apk file from the extracted location and open the Archive Manager screen.
b. ![]() Navigate to /assets/www/resources, and click Add.
Navigate to /assets/www/resources, and click Add.
c. ![]() Browse and select the updated Messages.properties file, and click OK.
Browse and select the updated Messages.properties file, and click OK.
d. ![]() Close the Archive Manager screen of the SCPS_Mobile.apk file.
Close the Archive Manager screen of the SCPS_Mobile.apk file.
Step 4 ![]() Navigate to the $JAVA_HOME/bin directory, and enter the following command to generate a key for signing the SCPS_Mobile.apk file:
Navigate to the $JAVA_HOME/bin directory, and enter the following command to generate a key for signing the SCPS_Mobile.apk file:
./keytool -genkey -v -keystore my-release-key.keystore -alias <alias name> -keyalg RSA -keysize 2048 -validity <number of days>
For example:
./keytool -genkey -v -keystore my-release-key.keystore  -alias scps -keyalg RSA -keysize
2048 -validity 10000
You are prompted to specify the following required details:
•![]() Enter keystore password—Specify a password for keystore. You also need to use the same keystore password for the signing the SCPS_Mobile.apk file.
Enter keystore password—Specify a password for keystore. You also need to use the same keystore password for the signing the SCPS_Mobile.apk file.
•![]() Re-enter new password—Specify the new password again.
Re-enter new password—Specify the new password again.
•![]() What is your first and last name?—Specify the host name of the machine.
What is your first and last name?—Specify the host name of the machine.
•![]() What is the name of your organizational unit?—Specify your organizational unit.
What is the name of your organizational unit?—Specify your organizational unit.
•![]() What is the name of your organization?—Specify your organization name.
What is the name of your organization?—Specify your organization name.
•![]() What is the name of your City or Locality?——Specify the name of your city.
What is the name of your City or Locality?——Specify the name of your city.
•![]() What is the name of your State or Province?—Specify the name of your state or province.
What is the name of your State or Province?—Specify the name of your state or province.
•![]() What is the two-letter country code for this unit?—Specify the first two letters of your country.
What is the two-letter country code for this unit?—Specify the first two letters of your country.
•![]() Is CN=<name>, OU=<organizational unit>, O=<organization>, L=<city>, ST=<state>, C=<country> correct?—Verify the specified values, enter `Yes' if the values are correct, and press Enter.
Is CN=<name>, OU=<organizational unit>, O=<organization>, L=<city>, ST=<state>, C=<country> correct?—Verify the specified values, enter `Yes' if the values are correct, and press Enter.
The RSA key and self-signed certificate with a validity of <number of days> days is generated. You are prompted for the key password of the <alias name>. Press Enter.
Automatically, the keystore password is retained for the <alias name> key password.
Step 5 ![]() Enter the following command to sign the SCPS_Mobile.apk file:
Enter the following command to sign the SCPS_Mobile.apk file:
./jarsigner -verbose -sigalg MD5withRSA -digestalg SHA1 -keystore my-release-key.keystore <location of SCPS_Mobile.apk>/SCPS_Mobile.apk <alias name>
For example:
./jarsigner -verbose -sigalg MD5withRSA -digestalg SHA1 -keystore my-release-key.keystore
/home/u01/Desktop/SCPS_Mobile.apk SCPS
You are prompted for the keystore password. Enter the keystore password, and press Enter.
The SCPS_Mobile.apk file is successfully signed.
Step 6 ![]() Replace the SCPS_Mobile.apk file in the ipsapp.war file:
Replace the SCPS_Mobile.apk file in the ipsapp.war file:
a. ![]() Double-click the ipsapp.war file from the $JBOSS_HOME/server/scps/deploy/ipsapp.war directory, and open the Archive Manager screen.
Double-click the ipsapp.war file from the $JBOSS_HOME/server/scps/deploy/ipsapp.war directory, and open the Archive Manager screen.
b. ![]() Navigate to /mobile_download, and click Add.
Navigate to /mobile_download, and click Add.
c. ![]() Browse and select the signed SCPS_Mobile.apk file, and click OK.
Browse and select the signed SCPS_Mobile.apk file, and click OK.
d. ![]() Close the Archive Manager screen of the ipsapp.war file.
Close the Archive Manager screen of the ipsapp.war file.
Configuring Installer for the iPhones
While configuring installer for the iPhones, you need to sign the SCPSMobileIOSNew.ipa file using the MAC machine. Therefore, the provisioning profile must be available in your MAC machine.
To configure installer for the iPhones, perform the following steps:
Step 1 ![]() Extract the download.properties file:
Extract the download.properties file:
a. ![]() In a file browser, navigate to the directory contacting the $JBOSS_HOME/server/scps/deploy/ipsapp.war file and double-click this file to open the Archive Manager screen.
In a file browser, navigate to the directory contacting the $JBOSS_HOME/server/scps/deploy/ipsapp.war file and double-click this file to open the Archive Manager screen.
b. ![]() Navigate to /mobile_download, select the download.properties file, and click Extract.
Navigate to /mobile_download, select the download.properties file, and click Extract.
You can extract it to a suitable location, such as Desktop.
Step 2 ![]() Update the download.properties file:
Update the download.properties file:
a. ![]() In a terminal, navigate to the directory where the download.properties file is available.
In a terminal, navigate to the directory where the download.properties file is available.
b. ![]() Open the download.properties file in an edit mode, and update the following line:
Open the download.properties file in an edit mode, and update the following line:
ios_url=http://<host>:<port>/ipsapp/mobile_download/SCPSMobileIOSNew.plist
Where, `host' is the IP address or DNS hostname of the host on which the JBoss application server has been set up and `port is the value that appears in the output after starting the JBoss server. The `port' value is obtained by adding the HttpConnector port value (which you had set up in "Setting Up Port" section) and the "ports-01" offset value in the bindings-jboss-beans.xml file (which is 100 by default).
c. ![]() Save and close the file.
Save and close the file.
Step 3 ![]() Copy the SCPSMobileIOSNew.ipa and SCPSMobileIOSNew.plist files from the MobileApps directory to your MAC machine.
Copy the SCPSMobileIOSNew.ipa and SCPSMobileIOSNew.plist files from the MobileApps directory to your MAC machine.
Step 4 ![]() In the MAC machine, update the SCPSMobileIOSNew.plist file:
In the MAC machine, update the SCPSMobileIOSNew.plist file:
a. ![]() In a terminal, navigate to the directory where the SCPSMobileIOSNew.plist file is available.
In a terminal, navigate to the directory where the SCPSMobileIOSNew.plist file is available.
b. ![]() Open the SCPSMobileIOSNew.plist file in an edit mode, and update the following string:
Open the SCPSMobileIOSNew.plist file in an edit mode, and update the following string:
<string>http://<host>:<port>/ipsapp/mobile_download/SCPSMobileIOSNew.ipa</string>
Where, `host' is the IP address or DNS hostname of the host on which the JBoss application server has been set up and `port is the value that appears in the output after starting the JBoss server. The `port' value is obtained by adding the HttpConnector port value (which you had set up in "Setting Up Port" section) and the "ports-01" offset value in the bindings-jboss-beans.xml file (which is 100 by default).
c. ![]() Save and close the file.
Save and close the file.
Step 5 ![]() In the MAC machine, sign the SCPSMobileIOSNew.ipa file:
In the MAC machine, sign the SCPSMobileIOSNew.ipa file:
a. ![]() In a terminal, navigate to the directory where the SCPSMobileIOSNew.ipa file is available.
In a terminal, navigate to the directory where the SCPSMobileIOSNew.ipa file is available.
b. ![]() Unzip the SCPSMobileIOSNew.ipa file by entering the following command:
Unzip the SCPSMobileIOSNew.ipa file by entering the following command:
unzip SCPSMobileIOSNew.ipa
c. ![]() Remove the existing signature by entering the follwoing command:
Remove the existing signature by entering the follwoing command:
rm -rf Payload/SCPSMobileIOSNew.app/_CodeSignature
d. ![]() Open the Messages.properties file in an edit mode using the following command:
Open the Messages.properties file in an edit mode using the following command:
vi Payload/SCPSMobileIOSNew.app/www/resources/Messages.properties
e. ![]() Update the following values:
Update the following values:
–![]() secureServerURL = https://<host>:<SSL port>
secureServerURL = https://<host>:<SSL port>
Where, `host' is the IP address or DNS hostname of the host on which the JBoss application server has been set up and `SSL port is the value that appears in the output after starting the JBoss server. The `SSL port' value is obtained by adding the jboss.web.https.port value (which you had set up in the "Configuring the Secured URL" section) and the "ports-01" offset value in the bindings-jboss-beans.xml file (which is 100 by default).
Note ![]() If you have not configured the secured URL, you must provide the `serverURL' value in the `secureServerURL' field so that the application can be accessed in a non-secured environment.
If you have not configured the secured URL, you must provide the `serverURL' value in the `secureServerURL' field so that the application can be accessed in a non-secured environment.
–![]() serverURL = http://<host>:<port>
serverURL = http://<host>:<port>
Where, `host' is the IP address or DNS hostname of the host on which the JBoss application server has been set up and `port is the value that appears in the output after starting the JBoss server. The `port' value is obtained by adding the HttpConnector port value (which you had set up in "Setting Up Port" section) and the "ports-01" offset value in the bindings-jboss-beans.xml file (which is 100 by default).
f. ![]() Save and close the file.
Save and close the file.
g. ![]() Copy the available provisioning profile (.mobileprovision file) to Payload/SCPSMobileIOSNew.app/ directory and name it as `embedded.mobileprovision'.
Copy the available provisioning profile (.mobileprovision file) to Payload/SCPSMobileIOSNew.app/ directory and name it as `embedded.mobileprovision'.
h. ![]() Enter the following command:
Enter the following command:
/usr/bin/codesign -f -s "iPhone Distribution: <distribution name>" --resource-rules "Payload/SCPSMobileIOSNew.app/ResourceRules.plist" "Payload/SCPSMobileIOSNew.app"
Where <distribution name> is the distribution license name.
i. ![]() Zip the SCPSMobileIOSNew.ipa file by entering the following command:
Zip the SCPSMobileIOSNew.ipa file by entering the following command:
zip -r SCPSMobileIOSNew.ipa Payload
Step 6 ![]() Copy the updated SCPSMobileIOSNew.ipa and SCPSMobileIOSNew.plist files from the MAC machine to the machine where the Smart+Connected PS application is installed.
Copy the updated SCPSMobileIOSNew.ipa and SCPSMobileIOSNew.plist files from the MAC machine to the machine where the Smart+Connected PS application is installed.
Step 7 ![]() Replace the download.properties, SCPSMobileIOSNew.ipa, and SCPSMobileIOSNew.plist files in the ipsapp.war file:
Replace the download.properties, SCPSMobileIOSNew.ipa, and SCPSMobileIOSNew.plist files in the ipsapp.war file:
a. ![]() Double-click the ipsapp.war file from the $JBOSS_HOME/server/scps/deploy directory, and open the Archive Manager screen.
Double-click the ipsapp.war file from the $JBOSS_HOME/server/scps/deploy directory, and open the Archive Manager screen.
b. ![]() Navigate to /mobile_download, and click Add.
Navigate to /mobile_download, and click Add.
c. ![]() Browse and select the updated download.properties, signed SCPSMobileIOSNew.ipa, and SCPSMobileIOSNew.plist files, and click OK.
Browse and select the updated download.properties, signed SCPSMobileIOSNew.ipa, and SCPSMobileIOSNew.plist files, and click OK.
d. ![]() Close the Archive Manager screen of the ipsapp.war file.
Close the Archive Manager screen of the ipsapp.war file.
Setting Up Apache Jackrabbit
The Apache Jackrabbit server is an open source content repository for the Java platform, and the Smart+Connected PS application uses the Apache Jackrabbit to store content.
To set up Jackrabbit, perform the following steps:
Step 1 ![]() Copy the jackrabbit.war file that is available in <PS_INSTALL_DIRECTORY>/scps/bin/war to $JBOSS_HOME/server/scps/deploy directory by entering the following command:
Copy the jackrabbit.war file that is available in <PS_INSTALL_DIRECTORY>/scps/bin/war to $JBOSS_HOME/server/scps/deploy directory by entering the following command:
cp <PS_INSTALL_DIRECTORY>/scps/bin/war/jackrabbit.war $JBOSS_HOME/server/scps/deploy
Step 2 ![]() Navigate to the directory contacting the $JBOSS_HOME/server/scps/deploy/jackrabbit.war file, and double-click this file to open the Archive Manager screen.
Navigate to the directory contacting the $JBOSS_HOME/server/scps/deploy/jackrabbit.war file, and double-click this file to open the Archive Manager screen.
Step 3 ![]() Navigate to /WEB-INF/lib, select the jcr-2.0.jar file, and extract content of the file to the following location:
Navigate to /WEB-INF/lib, select the jcr-2.0.jar file, and extract content of the file to the following location:
$JBOSS_HOME/common/lib
Step 4 ![]() Start the JBoss server.
Start the JBoss server.
For more information on how to start the JBoss server, see the "Starting the JBoss Server" section.
Ensure that the JBoss server is now up and running.
Step 5 ![]() In a Web browser, enter the URL http://host:port/jackrabbit.
In a Web browser, enter the URL http://host:port/jackrabbit.
Where, `host' is the IP address or DNS hostname of the host on which the JBoss application server has been set up and `port' is the Jboss binding server port that you had configured in the "Setting Up Port" section.
The Content Repository Setup page appears.
Step 6 ![]() Click Create Content Repository.
Click Create Content Repository.
The $JBOSS_HOME/bin/jackrabbit directory repository structure is created.
Importing SSL Certificates
You must import SSL certificate for the Cisco Unified Communications Manager (CUCM). You may require to import SSL certificate for the Cisco Digital Media Player (DMP) and Light Weight Directory Access Protocol (LDAP).
Before you begin importing SSL certificates, ensure that you obtain the certificates from CUCM, DMP, and LDAP, and store the certificates in a directory on the application server.
To import SSL certificates, perform the following steps:
Step 1 ![]() Using a terminal session, navigate to the $JAVA_HOME/bin directory, where the $JAVA_HOME environment variable is set to the <JDK_INSTALL_LOCATION> directory.
Using a terminal session, navigate to the $JAVA_HOME/bin directory, where the $JAVA_HOME environment variable is set to the <JDK_INSTALL_LOCATION> directory.
Step 2 ![]() Enter the following command:
Enter the following command:
./keytool -import -alias <Alias Name> -file <certificate file name with complete path> -keystore $JAVA_HOME/jre/lib/security/cacerts -storepass changeit
Where, <certificate file name with complete path> is the certificate file name with a complete directory path where you store your certificates. The <Alias Name> is the unique alias name provided to the certificate.
For example:
./keytool -import -alias CM  -file /home/scc-qa/CM115.cer -keystore
/home/scc-qa/Desktop/jdk1.6.0_24/jre/lib/security/cacerts -storepass changeit
Note ![]() If you have installed JDK using an RPM bundle, then you need the SUDO access to add the certificate to the keystore.
If you have installed JDK using an RPM bundle, then you need the SUDO access to add the certificate to the keystore.
A message prompts you to trust this certificate.
Step 3 ![]() Choose Yes, and press Enter.
Choose Yes, and press Enter.
The certificates are imported.
Step 4 ![]() In the $JBOSS_HOME/bin/run_scps.sh file, append the JAVA_OPTS line just before (") with the following line:
In the $JBOSS_HOME/bin/run_scps.sh file, append the JAVA_OPTS line just before (") with the following line:
-Djavax.net.ssl.trustStore=$JAVA_HOME/jre/lib/security/cacerts
-Djavax.net.ssl.trustStorePassword=changeit
After adding the command line, the text is displayed as follows:
JAVA_OPTS="$JAVA_OPTS -DANTLR_USE_DIRECT_CLASS_LOADING=true
-Dsdp.event.config.mode=global
-Dcom.cisco.sdp.ldap.configfilepath=/u01/scps/config/LDAP.properties
-Dpvo_jms_props=/u01/scps/config/pvoJms.properties
-Djboss.net.proxyAuthenticatorClassName=java.net.Authenticator
-DUseSunHttpHandler=true
-Djavax.net.ssl.trustStore=/usr/java/default/jre/lib/security/cacerts
-Djavax.net.ssl.trustStorePassword=changeit"
Step 5 ![]() Save the run_scps.sh file.
Save the run_scps.sh file.
Starting the JBoss Server
To start the JBoss application server for the Smart+Connected PS application, perform the following steps:
Step 1 ![]() Ensure that:
Ensure that:
•![]() SDP is up and running without any binding offset value.
SDP is up and running without any binding offset value.
•![]() The $JAVA_HOME environment variable is set to the location in which JDK is installed.
The $JAVA_HOME environment variable is set to the location in which JDK is installed.
•![]() The $JBOSS_HOME environment variable is set to the complete path where the unzipped jboss-6.0.0 files are available.
The $JBOSS_HOME environment variable is set to the complete path where the unzipped jboss-6.0.0 files are available.
Step 2 ![]() Using a terminal, navigate to the $JBOSS_HOME/bin directory, and run the following command:
Using a terminal, navigate to the $JBOSS_HOME/bin directory, and run the following command:
./run_scps.sh -c scps -Djboss.service.binding.set=ports-01 -b 0.0.0.0
The JBoss application server starts. After the server initialization is complete, an output similar to the following is listed:
2012-11-20 11:41:31,360 INFO  [org.apache.coyote.http11.Http11Protocol] (Thread-2)
Starting Coyote HTTP/1.1 on http-0.0.0.0-7101
The port value that appears in the output is the value obtained by adding the HttpConnector port value
(which you had set up in "Setting Up Port" section) and the "ports-01" offset value in the
bindings-jboss-beans.xml file (which is 100 by default).
Accessing the Application and Verifying the Installation
To access the Smart+Connected PS application and to verify the installation, perform the following steps:
Step 1 ![]() In the Address field of a Web browser, type one of the following application server URLs, and press Enter:
In the Address field of a Web browser, type one of the following application server URLs, and press Enter:
•![]() http://<host>:<port>/ipsapp—To access the application in a non-secured environment.
http://<host>:<port>/ipsapp—To access the application in a non-secured environment.
Where, `host' is the IP address or DNS hostname of the host on which the JBoss application server has been set up and `port is the value that appears in the output after starting the JBoss server. The `port' value is obtained by adding the HttpConnector port value (which you had set up in "Setting Up Port" section) and the "ports-01" offset value in the bindings-jboss-beans.xml file (which is 100 by default).
•![]() https://<host>:<SSL port>/ipsapp—To access the application in a secured environment.
https://<host>:<SSL port>/ipsapp—To access the application in a secured environment.
Where, `host' is the IP address or DNS hostname of the host on which the JBoss application server has been set up and `SSL port is the value that appears in the output after starting the JBoss server. The `SSL port' value is obtained by adding the jboss.web.https.port value (which you had set up in the "Configuring the Secured URL" section) and the "ports-01" offset value in the bindings-jboss-beans.xml file (which is 100 by default).
The Smart+Connected PS login page appears.
Step 2 ![]() Enter the username and password for the Smart+Connected PS application, and click Login.
Enter the username and password for the Smart+Connected PS application, and click Login.
Your default login credentials are:
•![]() Username—superadmin
Username—superadmin
•![]() Password—superadmin
Password—superadmin
You can change your password by logging in to the SDP application. You can also create additional users by using the SDP application. For more information on how to assign roles and permissions to users in the SDP application, see the Cisco Service Delivery Platform Administrator Guide.
For more information on how to use the Smart+Connected PS features, see the Cisco Smart+Connected Personalized Spaces User Guide.
Installing on a Cluster Server Setup
To install the Smart+Connected PS application on a cluster server setup, perform the following steps:
2. ![]() Configuring Audio Notification to the Cisco IP Phone
Configuring Audio Notification to the Cisco IP Phone
4. ![]() Configuring the JBoss Profile
Configuring the JBoss Profile
6. ![]() Setting Up Security Configuration
Setting Up Security Configuration
7. ![]() Setting Up Java Messaging Service (JMS)
Setting Up Java Messaging Service (JMS)
11. ![]() Configuring the Cluster Server Setup
Configuring the Cluster Server Setup
12. ![]() Configuring the Properties Files
Configuring the Properties Files
14. ![]() Setting Up the Push-to-Phone Feature
Setting Up the Push-to-Phone Feature
15. ![]() Configuring Installer for the Mobile Devices
Configuring Installer for the Mobile Devices
16. ![]() Setting Up Apache Jackrabbit
Setting Up Apache Jackrabbit
17. ![]() Configuring the Jackrabbit Repository
Configuring the Jackrabbit Repository
18. ![]() Importing SSL Certificates
Importing SSL Certificates
19. ![]() Starting the Cluster and Proxy
Starting the Cluster and Proxy
20. ![]() Accessing the Application and Verifying the Installation
Accessing the Application and Verifying the Installation
About Clustering
A JBoss server cluster consists of multiple JBoss server instances running simultaneously and working together to provide increased scalability, reliability, and high availability. A cluster appears to clients to be a single JBoss server instance. The server instances that constitute a cluster can run on the same machine or are usually located on different machines. You can increase a cluster's capacity by adding additional server instances to the cluster on an existing machine or on different machines. Each server instance in a cluster must run on the same JBoss version.
An example of clustered deployment in a distributed environment is as follows:
•![]() The database is non-clustered.
The database is non-clustered.
•![]() The application servers are clustered.
The application servers are clustered.
•![]() Two virtual machines host the application servers. The application is deployed on these two virtual machines, Node 1 and Node 2.
Two virtual machines host the application servers. The application is deployed on these two virtual machines, Node 1 and Node 2.
•![]() One virtual machine hosts the proxy server. This proxy server acts as a software load balancer.
One virtual machine hosts the proxy server. This proxy server acts as a software load balancer.
You can modify this setup based on your requirement (number of servers, port numbers, and so on).
The requirements for the clustered deployment in this example, includes the following:
•![]() Machine 1: JBoss Server Node 1 (JBoss 6.0)
Machine 1: JBoss Server Node 1 (JBoss 6.0)
•![]() Machine 2: JBoss Server Node 2 (JBoss 6.0)
Machine 2: JBoss Server Node 2 (JBoss 6.0)
•![]() Machine 3: Proxy Node (JBoss 6.0)
Machine 3: Proxy Node (JBoss 6.0)
•![]() Machine 4: Database Server (PostgreSQL 9.0)
Machine 4: Database Server (PostgreSQL 9.0)
Figure 3-1 Example of a Clustering Setup
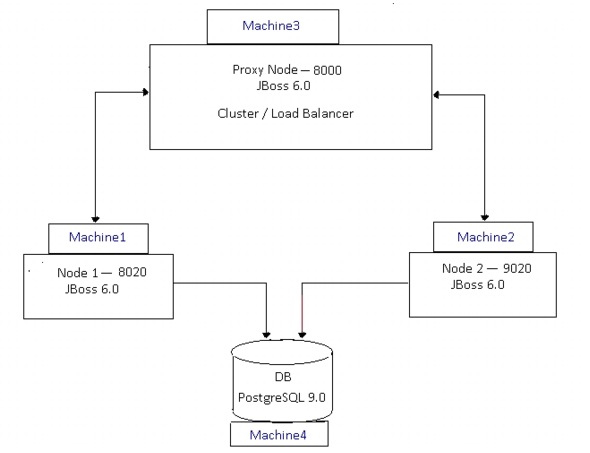
Installing the Application
You need to install the Smart+Connected PS application on the Node 1 and Node 2 servers.
For information on how to install the Smart+Connected PS application, see the
Configuring Audio Notification to the Cisco IP Phone
You need to configure audio notification to the Cisco IP phone on the Node 1 and Node 2 servers.
For information on how to configure audio notification to the Cisco IP phone, see the
Configuring the Database
For information on how to configure the database, see the "Configuring the Database" section.
Configuring the JBoss Profile
You need to configure the JBoss profile on the Node 1 and Node 2 servers for a cluster deployment.
To configure the JBoss profile, perform the following steps on both the Node 1 and Node 2 servers:
Step 1 ![]() Download the jboss-6.0.0.Final.zip file.
Download the jboss-6.0.0.Final.zip file.
JBoss is open source, and you can download it from the Internet. For example:
http://sourceforge.net/projects/jboss/files/JBoss/JBoss-6.0.0.Final/jboss-as-distribution- 6.0.0.Final.zip/download
Step 2 ![]() Create a directory named `jboss', and unzip the jboss-6.0.0.Final.zip file into it.
Create a directory named `jboss', and unzip the jboss-6.0.0.Final.zip file into it.
Step 3 ![]() Set the $JBOSS_HOME and $JAVA_HOME environment variables by entering the following commands:
Set the $JBOSS_HOME and $JAVA_HOME environment variables by entering the following commands:
$ export JAVA_HOME=<JDK_INSTALL_LOCATION>
$ export JBOSS_HOME=<JBOSS_INSTALL_LOCATION>
Where, <JBOSS_INSTALL_LOCATION> is the complete path where the unzipped jboss-6.0.0 files are available and <JDK_INSTALL_LOCATION> is the complete path where you have installed jdk1.6.0_24.
Note ![]() You can also add the preceding commands to the user's profile script so that the $JBOSS_HOME and $JAVA_HOME environment variables are automatically set up during login.
You can also add the preceding commands to the user's profile script so that the $JBOSS_HOME and $JAVA_HOME environment variables are automatically set up during login.
Step 4 ![]() Navigate to the server directory in $JBOSS_HOME by entering the following command:
Navigate to the server directory in $JBOSS_HOME by entering the following command:
cd $JBOSS_HOME/server
Step 5 ![]() Copy the `all' directory with the name `scps' by entering the following command:
Copy the `all' directory with the name `scps' by entering the following command:
cp -R all scps
The `scps' directory is created under the $JBOSS_HOME/server directory. The `scps' directory is used as the Smart+Connected PS application profile.
Step 6 ![]() Copy the ipsapp.war file, available in <PS_INSTALL_DIRECTORY>/scps/bin/war, to the $JBOSS_HOME/server/scps/deploy directory by entering the following command:
Copy the ipsapp.war file, available in <PS_INSTALL_DIRECTORY>/scps/bin/war, to the $JBOSS_HOME/server/scps/deploy directory by entering the following command:
cp <PS_INSTALL_DIRECTORY>/scps/bin/war/ipsapp.war $JBOSS_HOME/server/scps/deploy
Step 7 ![]() Create a datasource file so that the Smart+Connected PS application communicates with the database machine:
Create a datasource file so that the Smart+Connected PS application communicates with the database machine:
a. ![]() Create the postgres-ds.xml file under the `scps/deploy' directory with the following code:
Create the postgres-ds.xml file under the `scps/deploy' directory with the following code:
<?xml version="1.0" encoding="UTF-8"?>
<datasources>
<local-tx-datasource>
<jndi-name>jdbc/scc</jndi-name>
<connection-url>jdbc:postgresql://IPaddress:5432/schemaName</connection-url>
<driver-class>org.postgresql.Driver</driver-class>
<user-name>DBusername</user-name>
<password>DBpassword</password>
<min-pool-size>10</min-pool-size>
<max-pool-size>50</max-pool-size>
</local-tx-datasource>
</datasources>
b. ![]() Replace the following text with their actual values in the code that you had added in Step 7 a.:
Replace the following text with their actual values in the code that you had added in Step 7 a.:
–![]() `IPaddress' with the database server IP address or DNS hostname
`IPaddress' with the database server IP address or DNS hostname
–![]() `schemaName' with the database name
`schemaName' with the database name
–![]() `5432' with the database port number, if changed during the PostgreSQL installation
`5432' with the database port number, if changed during the PostgreSQL installation
–![]() `DBusername' with the database schema username
`DBusername' with the database schema username
–![]() `DBpassword' with the database schema password
`DBpassword' with the database schema password
c. ![]() Save the file.
Save the file.
d. ![]() Provide the executable permissions to the newly created postgres-ds.xml file by entering the following command:
Provide the executable permissions to the newly created postgres-ds.xml file by entering the following command:
chmod 755 postgres-ds.xml
Step 8 ![]() Add an entry for scanning deployers:
Add an entry for scanning deployers:
a. ![]() Navigate to the $JBOSS_HOME/server/scps/deployers directory, and open the scanning-deployers-jboss-beans.xml file.
Navigate to the $JBOSS_HOME/server/scps/deployers directory, and open the scanning-deployers-jboss-beans.xml file.
b. ![]() Search for the following text:
Search for the following text:
<install method="addIgnored">
<parameter>java.lang.LinkageError</parameter>
</install>
c. ![]() Add the following code after the searched text.
Add the following code after the searched text.
<install method="addIgnored">
<parameter>java.lang.reflect.MalformedParameterizedTypeException</parameter>
</install>
d. ![]() Save the file.
Save the file.
Step 9 ![]() Update the run.conf file to increase the memory:
Update the run.conf file to increase the memory:
a. ![]() Open the run.conf file available in $JBOSS_HOME/bin and search for the following text:
Open the run.conf file available in $JBOSS_HOME/bin and search for the following text:
JAVA_OPTS="-Xms128m -Xmx512m -XX:MaxPermSize=256m -Dorg.jboss.resolver.warning=true
-Dsun.rmi.dgc.client.gcInterval=3600000 -Dsun.rmi.dgc.server.gcInterval=3600000"
Replace with the following text:
JAVA_OPTS="-Xms256m -Xmx1024m -XX:MaxPermSize=512m -Dorg.jboss.resolver.warning=true
-Dsun.rmi.dgc.client.gcInterval=3600000 -Dsun.rmi.dgc.server.gcInterval=3600000"
b. ![]() Save the file.
Save the file.
Setting Up Port
You need to set up a port for the Smart+Connected PS application by changing the default port values on the Node 1 and Node 2 servers.
For more information on how to set up the port, see the "Setting Up Port" section.
Setting Up Security Configuration
You need to set up security configuration on the Node 1 and Node 2 servers for the following:
•![]() Disabling the JMS message security, its value is set to `true' by default.
Disabling the JMS message security, its value is set to `true' by default.
•![]() Authenticating LDAP users of the Smart+Connected PS application.
Authenticating LDAP users of the Smart+Connected PS application.
For more information on how to set up security configuration on the Node 1 and Node 2 servers, see the "Setting Up Security Configuration" section.
Setting Up Java Messaging Service (JMS)
For more information on how to set up JMS on the Node 1 and Node 2 servers, see the "Setting Up Java Messaging Service (JMS)" section.
Setting Up Library
To set up the library, perform the following steps in the Smart+Connected PS application server on the Node 1 and Node 2 servers:
Step 1 ![]() Copy the following jar files to the $JBOSS_HOME/server/scps/lib directory:
Copy the following jar files to the $JBOSS_HOME/server/scps/lib directory:
•![]() postgresql-9.0-801.jdbc4.jar—It is open source, and you can be download it from the Internet. For example:
postgresql-9.0-801.jdbc4.jar—It is open source, and you can be download it from the Internet. For example:
http://jdbc.postgresql.org/download/postgresql-9.0-801.jdbc4.jar
•![]() sdp-authmodules.jar—Available in the <SDP_INSTALL_DIRECTORY>/sdp/bin/jars location on the server where the SDP has been installed.
sdp-authmodules.jar—Available in the <SDP_INSTALL_DIRECTORY>/sdp/bin/jars location on the server where the SDP has been installed.
Step 2 ![]() Navigate to the $JBOSS_HOME/server/scps/lib directory, and provide the required permissions to the saved files (postgresql-9.0-801.jdbc4.jar and sdp-authmodules.jar) by entering the following command:
Navigate to the $JBOSS_HOME/server/scps/lib directory, and provide the required permissions to the saved files (postgresql-9.0-801.jdbc4.jar and sdp-authmodules.jar) by entering the following command:
chmod 755 *
Setting Up the BIRT Engine
The Smart+Connected PS application uses the BIRT runtime reporting engine to generate reports and charts. Therefore, you must set up the BIRT engine after installing the Smart+Connected PS installation. The BIRT runtime reporting engine is automatically installed while installing the Smart+Connected PS.
For more information on how to set up the BIRT engine on the Node 1 and Node 2 servers, see the "Setting Up the BIRT Engine" section.
Configuring Logging
For more information on how to configure logging on the Node 1 and Node 2 servers, see the "Configuring Logging" section.
Configuring the Cluster Server Setup
•![]() Installing mod_cluster on the Proxy Node
Installing mod_cluster on the Proxy Node
Installing mod_cluster on the Proxy Node
The mod_cluster is an httpd-based load balancer that uses a communication channel for forwarding requests from httpd to a set of application server nodes. The application server nodes use this connection to transmit the server-side load balance factors and events back to httpd using a set of HTTP methods.
To install mod_cluster on the proxy node, perform the following steps:
Step 1 ![]() Create a directory in your local system where you want to install the mod_cluster binary bundle.
Create a directory in your local system where you want to install the mod_cluster binary bundle.
Step 2 ![]() Download the Linux 64-bit mod_cluster 1.1.0 bundle.
Download the Linux 64-bit mod_cluster 1.1.0 bundle.
The mod_cluster is open source, and you can download it from the Internet. For example:
http://www.jboss.org/mod_cluster/downloads.html
Step 3 ![]() Save and untar the mod_cluster binary bundle in the directory that you had created in Step 1.
Save and untar the mod_cluster binary bundle in the directory that you had created in Step 1.
The directory where you have extracted the mod_cluster bundle is referred as <MOD_CLUSTER_HOME>.
Step 4 ![]() Navigate to the <MOD_CLUSTER_HOME>/opt/jboss/httpd/sbin directory and run the "installhome.sh" file.
Navigate to the <MOD_CLUSTER_HOME>/opt/jboss/httpd/sbin directory and run the "installhome.sh" file.
The httpd now runs on port "8000".
Step 5 ![]() To allow the cluster nodes in the network to communicate with the proxy, perform the following:
To allow the cluster nodes in the network to communicate with the proxy, perform the following:
a. ![]() Navigate to the following location:
Navigate to the following location:
<MOD_CLUSTER_HOME>/opt/jboss/httpd/httpd/conf/
b. ![]() Open the httpd.conf file and search for the following text:
Open the httpd.conf file and search for the following text:
<Directory />
Order deny,allow
Deny from all
</Directory>
c. ![]() Replace the default values in the searched text as follows:
Replace the default values in the searched text as follows:
<Directory />
Order deny,allow
Allow from all
</Directory>
d. ![]() Save the file.
Save the file.
Note ![]() By default, mod_cluster communicates only with the server instances that run on localhost. Step 5 should be performed to allow mod_cluster to communicate with the proxy.
By default, mod_cluster communicates only with the server instances that run on localhost. Step 5 should be performed to allow mod_cluster to communicate with the proxy.
Step 6 ![]() To modify the directory access for Manager Module, perform the following:
To modify the directory access for Manager Module, perform the following:
a. ![]() Navigate to the following location:
Navigate to the following location:
<MOD_CLUSTER_HOME>/opt/jboss/httpd/httpd/conf/
b. ![]() Open the httpd.conf file and search for the following text:
Open the httpd.conf file and search for the following text:
<IfModule manager_module>
Listen 127.0.0.1:6666
ManagerBalancerName mycluster
<VirtualHost 127.0.0.1:6666>
<Directory />
Order deny,allow
Allow from all
</Directory>
KeepAliveTimeout 300
MaxKeepAliveRequests 0
#ServerAdvertise on http://@IP@:6666
AdvertiseFrequency 5
#AdvertiseSecurityKey secret
#AdvertiseGroup @ADVIP@:23364
<Location /mod_cluster_manager>
SetHandler mod_cluster-manager
Order deny,allow
Deny from all
Allow from 127.0.0
</Location>
</VirtualHost>
</IfModule>
c. ![]() Replace the directory access of the Manager Module in the <Location /mod_cluster_manager> element as follows:
Replace the directory access of the Manager Module in the <Location /mod_cluster_manager> element as follows:
<Location /mod_cluster_manager>
SetHandler mod_cluster-manager
Order deny,allow
Allow from all
</Location>
After replacing, the text is displayed as follows:
<IfModule manager_module>
Listen 127.0.0.1:6666
ManagerBalancerName mycluster
<VirtualHost 127.0.0.1:6666>
<Directory />
Order deny,allow
Allow from all
</Directory>
KeepAliveTimeout 300
MaxKeepAliveRequests 0
#ServerAdvertise on http://@IP@:6666
AdvertiseFrequency 5
#AdvertiseSecurityKey secret
#AdvertiseGroup @ADVIP@:23364
<Location /mod_cluster_manager>
SetHandler mod_cluster-manager
Order deny,allow
Allow from all
</Location>
</VirtualHost>
</IfModule>
d. ![]() Save and close the file.
Save and close the file.
Configuring Cluster on Nodes
To configure cluster on nodes, perform the following steps on the Node 1 and Node 2 servers:
Step 1 ![]() Update the server.xml file:
Update the server.xml file:
a. ![]() Navigate to the $JBOSS_HOME/server/scps/deploy/jbossweb.sar directory, and open the server.xml file.
Navigate to the $JBOSS_HOME/server/scps/deploy/jbossweb.sar directory, and open the server.xml file.
b. ![]() In the server.xml file, search for the following text:
In the server.xml file, search for the following text:
<Engine name="jboss.web" defaultHost="localhost">
c. ![]() Add jvmRoute to the Engine "jboss.web". For example:
Add jvmRoute to the Engine "jboss.web". For example:
–![]() For Node 1:
For Node 1:
<Engine name="jboss.web" defaultHost="localhost" jvmRoute="node1">
–![]() For Node 2:
For Node 2:
<Engine name="jboss.web" defaultHost="localhost" jvmRoute="node2">
d. ![]() In the server.xml file, uncomment the following valve, which is commented by default:
In the server.xml file, uncomment the following valve, which is commented by default:
<Valve className="org.jboss.web.tomcat.service.sso.ClusteredSingleSignOn" />
Note ![]() The valve is uncommented to enable single sign on across web applications deployed on all the hosts in a cluster.
The valve is uncommented to enable single sign on across web applications deployed on all the hosts in a cluster.
e. ![]() In the server.xml file, set the HTTP port, for example, 8020 for Node 1 and 9020 for Node 2:
In the server.xml file, set the HTTP port, for example, 8020 for Node 1 and 9020 for Node 2:
1. ![]() Search for the following text:
Search for the following text:
<!-- A HTTP/1.1 Connector on port 8080 -->
<Connector protocol="HTTP/1.1" port="${jboss.web.http.port}"
address="${jboss.bind.address}"
redirectPort="${jboss.web.https.port}" />
2. ![]() Replace the port="${jboss.web.http.port}" with port="8020" for Node 1 and port="9020" for Node 2.
Replace the port="${jboss.web.http.port}" with port="8020" for Node 1 and port="9020" for Node 2.
f. ![]() Save the server.xml file.
Save the server.xml file.
Step 2 ![]() Add the proxy hostname and port in the proxyList:
Add the proxy hostname and port in the proxyList:
a. ![]() In a file browser, navigate to the $JBOSS_HOME/server/scps/deploy/mod_cluster.sar/META_INF directory.
In a file browser, navigate to the $JBOSS_HOME/server/scps/deploy/mod_cluster.sar/META_INF directory.
b. ![]() Open the mod_cluster-jboss-beans.xml file and search for the following text:
Open the mod_cluster-jboss-beans.xml file and search for the following text:
<property name="proxyList">
c. ![]() Add proxies in the proxyList property as follows:
Add proxies in the proxyList property as follows:
<property name="proxyList">${jboss.mod_cluster.proxyList:address:port}</property>
Note ![]() In the proxyList property format, the "address:port" refers to the host IP address and port where the proxy is running. The port number is 8000 that you had configured in Step 4 in the "Installing mod_cluster on the Proxy Node" section.
In the proxyList property format, the "address:port" refers to the host IP address and port where the proxy is running. The port number is 8000 that you had configured in Step 4 in the "Installing mod_cluster on the Proxy Node" section.
d. ![]() Save the mod_cluster-jboss-beans.xml file.
Save the mod_cluster-jboss-beans.xml file.
Configuring the Properties Files
You need to configure the LDAP.properties, pvoJms.properties, Reservation.properties, and notificationservice.properties files on the Node 1 and Node 2 servers.
For information on how to configure the properties files, see the "Configuring the Properties Files" section.
Setting Up Run Parameters
For information on how to set up run parameters on the Node 1 and Node 2 servers, see the "Setting Up Run Parameters" section.
Setting Up the Push-to-Phone Feature
For information on how to set up the push-to-phone feature on the Node 1 and Node 2 servers, see the "Setting Up the Push-to-Phone Feature" section.
Configuring Installer for the Mobile Devices
The Smart+Connected PS installation package comprises the following files in the MobileApps directory:
•![]() For the Android phones—SCPS_Mobile.apk
For the Android phones—SCPS_Mobile.apk
•![]() For the iPhones—SCPSMobileIOSNew.ipa and SCPSMobileIOSNew.plist
For the iPhones—SCPSMobileIOSNew.ipa and SCPSMobileIOSNew.plist
These files are required for configuring installer for the mobile devices.
•![]() Configuring Installer for the Android Phones
Configuring Installer for the Android Phones
•![]() Configuring Installer for the iPhones
Configuring Installer for the iPhones
Configuring Installer for the Android Phones
To configure installer for the Android phones, perform the following steps on the Node 1 and Node 2 servers:
Step 1 ![]() Extract the Messages.properties file:
Extract the Messages.properties file:
a. ![]() Copy the SCPS_Mobile.apk file from the MobileApps directory to a local directory.
Copy the SCPS_Mobile.apk file from the MobileApps directory to a local directory.
b. ![]() Double-click the copied SCPS_Mobile.apk file and open the Archive Manager screen.
Double-click the copied SCPS_Mobile.apk file and open the Archive Manager screen.
c. ![]() Navigate to /assets/www/resources, select the Messages.properties file, and click Extract.
Navigate to /assets/www/resources, select the Messages.properties file, and click Extract.
You can extract it to a suitable location, such as Desktop.
Step 2 ![]() Update the Messages.properties file:
Update the Messages.properties file:
a. ![]() Open the Messages.properties file from the extracted location in an edit mode and update the following values:
Open the Messages.properties file from the extracted location in an edit mode and update the following values:
–![]() secureServerURL =http://<host>:<port>
secureServerURL =http://<host>:<port>
Where, `address' is the host IP address of the proxy server and `port' is the proxy server port (default 8000) that you had configured in Step 4 in the "Installing mod_cluster on the Proxy Node" section.
–![]() serverURL = http://<host>:<port>
serverURL = http://<host>:<port>
Where, `address' is the host IP address of the proxy server and `port' is the proxy server port (default 8000) that you had configured in Step 4 in the "Installing mod_cluster on the Proxy Node" section.
Note ![]() The secureServerURL and serverURL values are same.
The secureServerURL and serverURL values are same.
b. ![]() Save and close the file.
Save and close the file.
Step 3 ![]() Replace the Messages.properties file in the SCPS_Mobile.apk file:
Replace the Messages.properties file in the SCPS_Mobile.apk file:
a. ![]() Double-click the SCPS_Mobile.apk file from the extracted location and open the Archive Manager screen.
Double-click the SCPS_Mobile.apk file from the extracted location and open the Archive Manager screen.
b. ![]() Navigate to /assets/www/resources, and click Add.
Navigate to /assets/www/resources, and click Add.
c. ![]() Browse and select the updated Messages.properties file, and click OK.
Browse and select the updated Messages.properties file, and click OK.
d. ![]() Close the Archive Manager screen of the SCPS_Mobile.apk file.
Close the Archive Manager screen of the SCPS_Mobile.apk file.
Step 4 ![]() Navigate to the $JAVA_HOME/bin directory, and enter the following command to generate a key for signing the SCPS_Mobile.apk file:
Navigate to the $JAVA_HOME/bin directory, and enter the following command to generate a key for signing the SCPS_Mobile.apk file:
./keytool -genkey -v -keystore my-release-key.keystore -alias <alias name> -keyalg RSA -keysize 2048 -validity <number of days>
For example:
./keytool -genkey -v -keystore my-release-key.keystore  -alias scps -keyalg RSA -keysize
2048 -validity 10000
You are prompted to specify the following required details:
•![]() Enter keystore password—Specify a password for keystore. You also need to use the same keystore password for the signing the SCPS_Mobile.apk file.
Enter keystore password—Specify a password for keystore. You also need to use the same keystore password for the signing the SCPS_Mobile.apk file.
•![]() Re-enter new password—Specify the new password again.
Re-enter new password—Specify the new password again.
•![]() What is your first and last name?—Specify the host name of the machine.
What is your first and last name?—Specify the host name of the machine.
•![]() What is the name of your organizational unit?—Specify your organizational unit.
What is the name of your organizational unit?—Specify your organizational unit.
•![]() What is the name of your organization?—Specify your organization name.
What is the name of your organization?—Specify your organization name.
•![]() What is the name of your City or Locality?——Specify the name of your city.
What is the name of your City or Locality?——Specify the name of your city.
•![]() What is the name of your State or Province?—Specify the name of your state or province.
What is the name of your State or Province?—Specify the name of your state or province.
•![]() What is the two-letter country code for this unit?—Specify the first two letters of your country.
What is the two-letter country code for this unit?—Specify the first two letters of your country.
•![]() Is CN=<name>, OU=<organizational unit>, O=<organization>, L=<city>, ST=<state>, C=<country> correct?—Verify the specified values, enter `Yes' if the values are correct, and press Enter.
Is CN=<name>, OU=<organizational unit>, O=<organization>, L=<city>, ST=<state>, C=<country> correct?—Verify the specified values, enter `Yes' if the values are correct, and press Enter.
The RSA key and self-signed certificate with a validity of <number of days> days is generated. You are prompted for the key password of the <alias name>. Press Enter.
Automatically, the keystore password is retained for the <alias name> key password.
Step 5 ![]() Enter the following command to sign the SCPS_Mobile.apk file:
Enter the following command to sign the SCPS_Mobile.apk file:
./jarsigner -verbose -sigalg MD5withRSA -digestalg SHA1 -keystore my-release-key.keystore <location of SCPS_Mobile.apk>/SCPS_Mobile.apk <alias name>
For example:
./jarsigner -verbose -sigalg MD5withRSA -digestalg SHA1 -keystore my-release-key.keystore
/home/u01/Desktop/SCPS_Mobile.apk SCPS
You are prompted for the keystore password. Enter the keystore password, and press Enter.
The SCPS_Mobile.apk file is successfully signed.
Step 6 ![]() Replace the SCPS_Mobile.apk file in the ipsapp.war file:
Replace the SCPS_Mobile.apk file in the ipsapp.war file:
a. ![]() Double-click the ipsapp.war file from the $JBOSS_HOME/server/scps/deploy/ipsapp.war directory, and open the Archive Manager screen.
Double-click the ipsapp.war file from the $JBOSS_HOME/server/scps/deploy/ipsapp.war directory, and open the Archive Manager screen.
b. ![]() Navigate to /mobile_download, and click Add.
Navigate to /mobile_download, and click Add.
c. ![]() Browse and select the signed SCPS_Mobile.apk file, and click OK.
Browse and select the signed SCPS_Mobile.apk file, and click OK.
d. ![]() Close the Archive Manager screen of the ipsapp.war file.
Close the Archive Manager screen of the ipsapp.war file.
Configuring Installer for the iPhones
While configuring installer for the iPhones, you need to sign the SCPSMobileIOSNew.ipa file using the MAC machine. Therefore, the provisioning profile must be available in your MAC machine.
To configure installer for the iPhones, perform the following steps on the Node 1 and Node 2 servers:
Step 1 ![]() Extract the download.properties file:
Extract the download.properties file:
a. ![]() In a file browser, navigate to the directory contacting the $JBOSS_HOME/server/scps/deploy/ipsapp.war file and double-click this file to open the Archive Manager screen.
In a file browser, navigate to the directory contacting the $JBOSS_HOME/server/scps/deploy/ipsapp.war file and double-click this file to open the Archive Manager screen.
b. ![]() Navigate to /mobile_download, select the download.properties file, and click Extract.
Navigate to /mobile_download, select the download.properties file, and click Extract.
You can extract it to a suitable location, such as Desktop.
Step 2 ![]() Update the download.properties file:
Update the download.properties file:
a. ![]() In a terminal, navigate to the directory where the download.properties file is available.
In a terminal, navigate to the directory where the download.properties file is available.
b. ![]() Open the download.properties file in an edit mode, and update the following line:
Open the download.properties file in an edit mode, and update the following line:
ios_url=http://<host>:<port>/ipsapp/mobile_download/SCPSMobileIOSNew.plist
Where, `address' is the host IP address of the proxy server and `port' is the proxy server port (default 8000) that you had configured in Step 4 in the "Installing mod_cluster on the Proxy Node" section.
c. ![]() Save and close the file.
Save and close the file.
Step 3 ![]() Copy the SCPSMobileIOSNew.ipa and SCPSMobileIOSNew.plist files from the MobileApps directory to your MAC machine.
Copy the SCPSMobileIOSNew.ipa and SCPSMobileIOSNew.plist files from the MobileApps directory to your MAC machine.
Step 4 ![]() In the MAC machine, update the SCPSMobileIOSNew.plist file:
In the MAC machine, update the SCPSMobileIOSNew.plist file:
a. ![]() In a terminal, navigate to the directory where the SCPSMobileIOSNew.plist file is available.
In a terminal, navigate to the directory where the SCPSMobileIOSNew.plist file is available.
b. ![]() Open the SCPSMobileIOSNew.plist file in an edit mode, and update the following string:
Open the SCPSMobileIOSNew.plist file in an edit mode, and update the following string:
<string>http://<host>:<port>/ipsapp/mobile_download/SCPSMobileIOSNew.ipa</string>
Where, `address' is the host IP address of the proxy server and `port' is the proxy server port (default 8000) that you had configured in Step 4 in the "Installing mod_cluster on the Proxy Node" section.
c. ![]() Save and close the file.
Save and close the file.
Step 5 ![]() In the MAC machine, sign the SCPSMobileIOSNew.ipa file:
In the MAC machine, sign the SCPSMobileIOSNew.ipa file:
a. ![]() In a terminal, navigate to the directory where the SCPSMobileIOSNew.ipa file is available.
In a terminal, navigate to the directory where the SCPSMobileIOSNew.ipa file is available.
b. ![]() Unzip the SCPSMobileIOSNew.ipa file by entering the following command:
Unzip the SCPSMobileIOSNew.ipa file by entering the following command:
unzip SCPSMobileIOSNew.ipa
c. ![]() Remove the existing signature by entering the follwoing command:
Remove the existing signature by entering the follwoing command:
rm -rf Payload/SCPSMobileIOSNew.app/_CodeSignature
d. ![]() Open the Messages.properties file in an edit mode using the following command:
Open the Messages.properties file in an edit mode using the following command:
vi Payload/SCPSMobileIOSNew.app/www/resources/Messages.properties
e. ![]() Update the following values:
Update the following values:
–![]() secureServerURL = http://<host>:<port>
secureServerURL = http://<host>:<port>
Where, `address' is the host IP address of the proxy server and `port' is the proxy server port (default 8000) that you had configured in Step 4 in the "Installing mod_cluster on the Proxy Node" section.
–![]() serverURL = http://<host>:<port>
serverURL = http://<host>:<port>
Where, `address' is the host IP address of the proxy server and `port' is the proxy server port (default 8000) that you had configured in Step 4 in the "Installing mod_cluster on the Proxy Node" section.
Note ![]() The secureServerURL and serverURL values are same.
The secureServerURL and serverURL values are same.
f. ![]() Save and close the file.
Save and close the file.
g. ![]() Copy the available provisioning profile (.mobileprovision file) to Payload/SCPSMobileIOSNew.app/ directory and name it as `embedded.mobileprovision'.
Copy the available provisioning profile (.mobileprovision file) to Payload/SCPSMobileIOSNew.app/ directory and name it as `embedded.mobileprovision'.
h. ![]() Enter the following command:
Enter the following command:
/usr/bin/codesign -f -s "iPhone Distribution: <distribution name>" --resource-rules "Payload/SCPSMobileIOSNew.app/ResourceRules.plist" "Payload/SCPSMobileIOSNew.app"
Where <distribution name> is the distribution license name.
i. ![]() Zip the SCPSMobileIOSNew.ipa file by entering the following command:
Zip the SCPSMobileIOSNew.ipa file by entering the following command:
zip -r SCPSMobileIOSNew.ipa Payload
Step 6 ![]() Copy the updated SCPSMobileIOSNew.ipa and SCPSMobileIOSNew.plist files from the MAC machine to the machine where the Smart+Connected PS application is installed.
Copy the updated SCPSMobileIOSNew.ipa and SCPSMobileIOSNew.plist files from the MAC machine to the machine where the Smart+Connected PS application is installed.
Step 7 ![]() Replace the download.properties, SCPSMobileIOSNew.ipa, and SCPSMobileIOSNew.plist files in the ipsapp.war file:
Replace the download.properties, SCPSMobileIOSNew.ipa, and SCPSMobileIOSNew.plist files in the ipsapp.war file:
a. ![]() Double-click the ipsapp.war file from the $JBOSS_HOME/server/scps/deploy directory, and open the Archive Manager screen.
Double-click the ipsapp.war file from the $JBOSS_HOME/server/scps/deploy directory, and open the Archive Manager screen.
b. ![]() Navigate to /mobile_download, and click Add.
Navigate to /mobile_download, and click Add.
c. ![]() Browse and select the updated download.properties, signed SCPSMobileIOSNew.ipa, and SCPSMobileIOSNew.plist files, and click OK.
Browse and select the updated download.properties, signed SCPSMobileIOSNew.ipa, and SCPSMobileIOSNew.plist files, and click OK.
d. ![]() Close the Archive Manager screen of the ipsapp.war file.
Close the Archive Manager screen of the ipsapp.war file.
Setting Up Apache Jackrabbit
The Apache Jackrabbit server is an open source content repository for the Java platform, and the Smart+Connected PS application uses the Apache Jackrabbit to store content.
To set up Jackrabbit, perform the following steps:
Step 1 ![]() Copy the jackrabbit.war file that is available in <PS_INSTALL_DIRECTORY>/scps/bin/war to the $JBOSS_HOME/server/scps/deploy directory by entering the following command:
Copy the jackrabbit.war file that is available in <PS_INSTALL_DIRECTORY>/scps/bin/war to the $JBOSS_HOME/server/scps/deploy directory by entering the following command:
cp <PS_INSTALL_DIRECTORY>/scps/bin/war/jackrabbit.war $JBOSS_HOME/server/all/deploy
Step 2 ![]() In a file browser, navigate to the directory contacting the $JBOSS_HOME/server/scps/deploy/jackrabbit.war file, and double-click this file to open the Archive Manager screen.
In a file browser, navigate to the directory contacting the $JBOSS_HOME/server/scps/deploy/jackrabbit.war file, and double-click this file to open the Archive Manager screen.
Step 3 ![]() Navigate to /WEB-INF/lib, select the jcr-2.0.jar file, and extract content of the file to the following location:
Navigate to /WEB-INF/lib, select the jcr-2.0.jar file, and extract content of the file to the following location:
$JBOSS_HOME/common/lib
Step 4 ![]() Start the proxy on the proxy node and JBoss on the Node 1 server.
Start the proxy on the proxy node and JBoss on the Node 1 server.
For more information on how to start the proxy and JBoss server, see the "Starting the Cluster and Proxy" section.
The proxy is up and running on the proxy node, and the JBoss is up and running on the Node 1 server.
Step 5 ![]() In a Web browser, enter the URL http://address:port/jackrabbit.
In a Web browser, enter the URL http://address:port/jackrabbit.
Where, `address' is the IP address of the proxy server and `port' is the proxy server port that you had configured in Step 4 in the "Installing mod_cluster on the Proxy Node" section.
The Content Repository Setup page appears.
Step 6 ![]() Click Create Content Repository.
Click Create Content Repository.
The $JBOSS_HOME/bin/jackrabbit directory repository structure is created.
Step 7 ![]() Stop the proxy on the proxy node and JBoss on the Node 1 server.
Stop the proxy on the proxy node and JBoss on the Node 1 server.
Step 8 ![]() Repeat Step 1 through Step 7 on the Node 2 server.
Repeat Step 1 through Step 7 on the Node 2 server.
Configuring the Jackrabbit Repository
You need to configure the Jackrabbit repository by providing the DB host IP address, DB port number (default 5432), DB schema name, PS schema username, and PS schema password.
To configure the Jackrabbit repository for clustering, perform the following steps on the Node 1 and Node 2 servers:
Step 1 ![]() Navigate to the $JBOSS_HOME/bin/jackrabbit directory, and open the repository.xml file.
Navigate to the $JBOSS_HOME/bin/jackrabbit directory, and open the repository.xml file.
Step 2 ![]() Search for the below text:
Search for the below text:
<FileSystem class="org.apache.jackrabbit.core.fs.local.LocalFileSystem">
<param name="path" value="${rep.home}/repository"/>
</FileSystem>
Replace with:
<FileSystem class="org.apache.jackrabbit.core.fs.db.DbFileSystem">
<param name="driver" value="org.postgresql.Driver"/>
   <param name="url" value="jdbc:postgresql://<db host IP address>:<db port
number>/<db schemaName>"/>
<param name="schema" value="postgresql"/>
<param name="user" value="<schema username>"/>
<param name="password" value="<schema password>"/>
<param name="schemaObjectPrefix" value="F_1_"/>
</FileSystem>
Step 3 ![]() Search for the below text:
Search for the below text:
<DataStore class="org.apache.jackrabbit.core.data.FileDataStore"/>
Replace with:
<DataStore class="org.apache.jackrabbit.core.data.db.DbDataStore">
   <param name="url" value="jdbc:postgresql://<db host IP address>:<db port number>/<db
schemaName>"/>
<param name="user" value="<schema username>"/>
<param name="password" value="<schema password>"/>
<param name="databaseType" value="postgresql"/>
<param name="driver" value="org.postgresql.Driver"/>
<param name="minRecordLength" value="1024"/>
<param name="copyWhenReading" value="true"/>
<param name="tablePrefix" value=""/>
<param name="schemaObjectPrefix" value="D_1_"/>
<param name="schemaCheckEnabled" value="true"/>
</DataStore>
Step 4 ![]() Search for the below text:
Search for the below text:
<PersistenceManager
class="org.apache.jackrabbit.core.persistence.pool.DerbyPersistenceManager">
<param name="url" value="jdbc:derby:${wsp.home}/db;create=true"/>
<param name="schemaObjectPrefix" value="${wsp.name}_"/>
</PersistenceManager>
Replace with:
<PersistenceManager
class="org.apache.jackrabbit.core.persistence.pool.PostgreSQLPersistenceManager">
   <param name="url" value="jdbc:postgresql://<db host IP address>:<db port number>/<db
schemaName>"/>
<param name="schema" value="postgresql"/>
<param name="user" value="<schema username>"/>
<param name="password" value="<schema password>"/>
<param name="schemaObjectPrefix" value="W_1_"/>
</PersistenceManager>
Step 5 ![]() Search for the below text:
Search for the below text:
<PersistenceManager
class="org.apache.jackrabbit.core.persistence.pool.DerbyPersistenceManager">
<param name="url" value="jdbc:derby:${rep.home}/version/db;create=true"/>
<param name="schemaObjectPrefix" value="version_"/>
</PersistenceManager>
Replace with:
<PersistenceManager
class="org.apache.jackrabbit.core.persistence.pool.PostgreSQLPersistenceManager">
   <param name="url" value="jdbc:postgresql://<db host IP address>:<db port
number>/<db schemaName>"/>
<param name="schema" value="postgresql"/>
<param name="user" value="<schema username>"/>
<param name="password" value="<schema password>"/>
<param name="schemaObjectPrefix" value="V_1_"/>
</PersistenceManager>
Step 6 ![]() Add the following text at the end of the preceding text:
Add the following text at the end of the preceding text:
<Cluster id ="node1" syncDelay = "1000">
<Journal class="org.apache.jackrabbit.core.journal.DatabaseJournal">
<param name="driver" value="org.postgresql.Driver"/>
       <param name="url" value="jdbc:postgresql://<db host IP address>:<db port
number>/<db schemaName>"/>
<param name="schema" value="postgresql"/>
<param name="user" value="<schema username>"/>
<param name="password" value="<schema password>3"/>
<param name="schemaObjectPrefix" value="C_1_"/>
</Journal>
</Cluster>
Note ![]() Change the cluster ID accordingly for each node. For example, "node1" for the Node 1 server, "node2" for the Node 2 server, so on.
Change the cluster ID accordingly for each node. For example, "node1" for the Node 1 server, "node2" for the Node 2 server, so on.
Step 7 ![]() In the preceding steps, replace the following strings with their actual values:
In the preceding steps, replace the following strings with their actual values:
•![]() <db host IP address>—Database server IP address
<db host IP address>—Database server IP address
•![]() <db port number>—Database port number
<db port number>—Database port number
•![]() <db schemaName>—Schema name of the database
<db schemaName>—Schema name of the database
•![]() <schema username>—Database user name
<schema username>—Database user name
•![]() <schema password>—Database user password
<schema password>—Database user password
Step 8 ![]() Navigate to the $JBOSS_HOME/bin/jackrabbit/workspaces/ directory, and delete the available default and security directories.
Navigate to the $JBOSS_HOME/bin/jackrabbit/workspaces/ directory, and delete the available default and security directories.
Step 9 ![]() Start the proxy on the proxy node and JBoss on the Node 1 and Node 2 servers, and verify that 13 new tables and two new sequences have been created in the database.
Start the proxy on the proxy node and JBoss on the Node 1 and Node 2 servers, and verify that 13 new tables and two new sequences have been created in the database.
These tables and sequences have names starting with c_1_, d_1_, f_1_, v_1_, w_1_, and so on.
Importing SSL Certificates
You must import SSL certificate for the Cisco Unified Communications Manager (CUCM). You may require to import SSL certificate for the Cisco Digital Media Player (DMP) and Light Weight Directory Access Protocol (LDAP).
For information on how to import SSL certificates on the Node 1 and Node 2 servers, see the "Importing SSL Certificates" section.
Starting the Cluster and Proxy
To start the cluster and proxy, perform the following steps:
Step 1 ![]() Start the cluster by performing the following steps on the Node 1 and Node 2 servers:
Start the cluster by performing the following steps on the Node 1 and Node 2 servers:
a. ![]() Ensure that:
Ensure that:
–![]() SDP is up and running without any binding offset value.
SDP is up and running without any binding offset value.
–![]() The $JAVA_HOME environment variable is set to the location in which JDK is installed.
The $JAVA_HOME environment variable is set to the location in which JDK is installed.
–![]() The $JBOSS_HOME environment variable is set to the complete path where the unzipped jboss-6.0.0 files are available.
The $JBOSS_HOME environment variable is set to the complete path where the unzipped jboss-6.0.0 files are available.
b. ![]() Using a terminal session, navigate to the $JBOSS_HOME/bin directory.
Using a terminal session, navigate to the $JBOSS_HOME/bin directory.
c. ![]() Enter the following command to start each node in the cluster:
Enter the following command to start each node in the cluster:
./run_scps.sh -c scps -Djboss.service.binding.set=ports-01 -b <SERVER_IP_ADDRESS> -g sdpPartition -Djboss.messaging.ServerPeerID=1
Where, <SERVER_IP_ADDRESS> is the IP address of the node.
The following options are used to start each node in a cluster:
–![]() -c—Refers to start from "scps" configuration.
-c—Refers to start from "scps" configuration.
–![]() -b—Refers to the address used to bind the sockets to the default host namely, the localhost.
-b—Refers to the address used to bind the sockets to the default host namely, the localhost.
–![]() -g—Refers to the clusters' partition name. The default name for a JBoss AS cluster is "DefaultPartition".
-g—Refers to the clusters' partition name. The default name for a JBoss AS cluster is "DefaultPartition".
–![]() jboss.service.binding.set—Refers to setting another JBoss instance for the Smart+Connected PS application. The ports-01 bindings are obtained by taking the base bindings and by adding 100 to each port value.
jboss.service.binding.set—Refers to setting another JBoss instance for the Smart+Connected PS application. The ports-01 bindings are obtained by taking the base bindings and by adding 100 to each port value.
–![]() jboss.messaging.ServerPeerID—Refers to the JBoss Messaging Clustering (JBM). In JBM, each node in a cluster has a unique integer ID called the "ServerPeerID". The "ServerPeerID" should remain the same even if the server is restarted many a times.
jboss.messaging.ServerPeerID—Refers to the JBoss Messaging Clustering (JBM). In JBM, each node in a cluster has a unique integer ID called the "ServerPeerID". The "ServerPeerID" should remain the same even if the server is restarted many a times.
Step 2 ![]() Start the proxy by performing the following steps on the proxy node:
Start the proxy by performing the following steps on the proxy node:
a. ![]() Using a terminal session, navigate to the following location:
Using a terminal session, navigate to the following location:
<MOD_CLUSTER_HOME>/opt/jboss/httpd/sbin
b. ![]() Enter the following command to start the proxy:
Enter the following command to start the proxy:
./apachectl start
c. ![]() Click Enter.
Click Enter.
The application can be accessed using the proxy that runs on port "8000" by default.
Step 3 ![]() (Optional) If you want to stop the proxy, perform the following steps on the proxy node:
(Optional) If you want to stop the proxy, perform the following steps on the proxy node:
a. ![]() Using a terminal session, navigate to the following location:
Using a terminal session, navigate to the following location:
<MOD_CLUSTER_HOME>/opt/jboss/httpd/sbin
b. ![]() Enter the following command to stop the proxy:
Enter the following command to stop the proxy:
./apachectl stop
c. ![]() Click Enter.
Click Enter.
Accessing the Application and Verifying the Installation
To access the Smart+Connected PS application in a cluster environment and to verify the installation, perform the following steps:
Step 1 ![]() In the Address field of a Web browser, type the application server URL, http://<address:port>/ipsapp, and then press Enter.
In the Address field of a Web browser, type the application server URL, http://<address:port>/ipsapp, and then press Enter.
Where, `address' is the host IP address of the proxy server and `port' is the proxy server port (default 8000) that you had configured in Step 4 in the "Installing mod_cluster on the Proxy Node" section.
The Smart+Connected PS login page appears.
Step 2 ![]() Enter the username and password for the Smart+Connected PS application, and click Login.
Enter the username and password for the Smart+Connected PS application, and click Login.
Your default login credentials are:
•![]() Username—superadmin
Username—superadmin
•![]() Password—superadmin
Password—superadmin
You can change your password by logging in to the SDP application. You can also create additional users by using the SDP application. For more information on how to assign roles and permissions to users in the SDP application, see the Cisco Service Delivery Platform Administrator Guide.
For more information on how to use the Smart+Connected PS features, see the Cisco Smart+Connected Personalized Spaces User Guide.
 Feedback