- Preface
- Getting Started
- Creating The Meeting Spaces Service
- Working with Configurations
- Working with Faults
- Working with the Signage Menu
- Working with the Signage Content
- Working with Reports
- Configuring Room Setup
- Working with Emergency Notifications
- Working with Information Signage
- Working with Smart+Connected Green Advisor
- Working with Tools
- Usage Scenarios
- Troubleshooting
- Index
Cisco Smart+Connected Meeting Spaces Administrator Guide
Bias-Free Language
The documentation set for this product strives to use bias-free language. For the purposes of this documentation set, bias-free is defined as language that does not imply discrimination based on age, disability, gender, racial identity, ethnic identity, sexual orientation, socioeconomic status, and intersectionality. Exceptions may be present in the documentation due to language that is hardcoded in the user interfaces of the product software, language used based on RFP documentation, or language that is used by a referenced third-party product. Learn more about how Cisco is using Inclusive Language.
- Updated:
- October 20, 2013
Chapter: Getting Started
Getting Started
This chapter describes how to log in to the Cisco Smart+Connected Meeting Spaces (Smart+Connected MS) web portal and the tasks that you can perform using this portal.
•![]() About Smart+Connected Meeting Spaces
About Smart+Connected Meeting Spaces
•![]() Smart+Connected Meeting Spaces Portal
Smart+Connected Meeting Spaces Portal
•![]() Understanding the Smart+Connected MS User Interface
Understanding the Smart+Connected MS User Interface
About Smart+Connected Meeting Spaces
The Smart+Connected MS is a solution that leverages the Cisco Service Delivery Platform (SDP). The solution allows you to easily access information about conference/TelePresence (TP) rooms and the enterprise by using digital signage/IEC, Cisco IP phones, and the web portal. For example, you can easily view information, such as meeting details, news, energy consumption data, energy saving tips, and so on.
The application also allows you to book conference/TP rooms instantly using touchscreen signage, room panels, and Cisco IP phones, manage conference room resources, and report the issues, if any, in the conference rooms. The automatic energy saving settings lead to reduced power consumption and contribute to the eco-friendly policies of the organization. In case of any mishaps, emergency notifications are sent out to the users through Cisco IP phones and signage.
The Smart+Connected MS solution leads to enhanced enterprise communication as the updated meeting room information is widely available and easily accessible to employees. It also leads to better resource management and energy savings which translate to reduced energy bills and more environment-friendly corporate practices.
The Smart+Connected MS solution allows the end user to do the following:
•![]() Using Digital Signag/IEC
Using Digital Signag/IEC
–![]() Book conference/TP rooms.
Book conference/TP rooms.
–![]() View detailed floor plans with the locations of the conference rooms.
View detailed floor plans with the locations of the conference rooms.
–![]() View the conference room schedule in different views—Building level, Floor level, and Conference Room level.
View the conference room schedule in different views—Building level, Floor level, and Conference Room level.
–![]() Cisco Smart+Connected Emergency Notifications™ (Smart+Connected EN)—Displays the notifications and exit routes on the digital signage in times of an emergency and sends audio and visual notifications on the Cisco IP phones during a crisis.
Cisco Smart+Connected Emergency Notifications™ (Smart+Connected EN)—Displays the notifications and exit routes on the digital signage in times of an emergency and sends audio and visual notifications on the Cisco IP phones during a crisis.
–![]() Cisco Smart+Connected Information Signage™ (Smart+Connected IS)—Displays the general information and news on the digital signage.
Cisco Smart+Connected Information Signage™ (Smart+Connected IS)—Displays the general information and news on the digital signage.
–![]() Cisco Smart+Connected Green Advisor™ (Smart+Connected GA)—Displays energy consumption data, energy saving tips, and green information.
Cisco Smart+Connected Green Advisor™ (Smart+Connected GA)—Displays energy consumption data, energy saving tips, and green information.
•![]() Using Kiosks
Using Kiosks
–![]() Book conference rooms and TelePresence rooms.
Book conference rooms and TelePresence rooms.
–![]() Check into any available workspace.
Check into any available workspace.
–![]() View the overall conference/TelePresence room and workspace availability on all the floors of all the buildings in the organization and book/check into any of these spaces.
View the overall conference/TelePresence room and workspace availability on all the floors of all the buildings in the organization and book/check into any of these spaces.
–![]() View the neighborhoods/zones on a floor.
View the neighborhoods/zones on a floor.
–![]() Access the floor plans for any building in the enterprise to view the locations and availability of the conference room/TelePresence rooms and workspaces.
Access the floor plans for any building in the enterprise to view the locations and availability of the conference room/TelePresence rooms and workspaces.
–![]() Search for the available conference rooms and TelePresence rooms based on your requirements such as the features available, seating capacity, location, and time and book them.
Search for the available conference rooms and TelePresence rooms based on your requirements such as the features available, seating capacity, location, and time and book them.
–![]() Search for the people within the enterprise.
Search for the people within the enterprise.

Note ![]() You can also perform all these tasks by using the kiosk web portal and the MS web portal.
You can also perform all these tasks by using the kiosk web portal and the MS web portal.
•![]() Using Kiosk Web Portal
Using Kiosk Web Portal
In addition to the above mentioned features that you can access using kiosks, you can do the following:
–![]() Locate the workspace you have checked into.
Locate the workspace you have checked into.
–![]() View the building, floor, and name of the workspace you have checked into.
View the building, floor, and name of the workspace you have checked into.
–![]() Choose not to display your current check in location.
Choose not to display your current check in location.
Note ![]() This option is available only if it is configured by the administrator.
This option is available only if it is configured by the administrator.
–![]() Check out from the workspace that you have occupied.
Check out from the workspace that you have occupied.
–![]() Login and logout of the kiosk web portal.
Login and logout of the kiosk web portal.
•![]() Using IP Phones
Using IP Phones
–![]() Quickly book the conference room wherever the IP phone is located based on the room availability.
Quickly book the conference room wherever the IP phone is located based on the room availability.
–![]() Control the meeting room devices and equipment.
Control the meeting room devices and equipment.
–![]() Save energy by manually releasing a room for the duration it is unoccupied, in addition to the energy savings made when the solution automatically switches off devices.
Save energy by manually releasing a room for the duration it is unoccupied, in addition to the energy savings made when the solution automatically switches off devices.
–![]() Configure multiple devices to suit your meeting and presentation needs using a single menu option.
Configure multiple devices to suit your meeting and presentation needs using a single menu option.
–![]() Create a case to notify the facilities team of any issues/problems that might be present in the conference room, and convey the same to the others in the organization by sending messages to the Cisco IP phone in the conference room. Once the case is created, the facilities team of the building can try to resolve the fault.
Create a case to notify the facilities team of any issues/problems that might be present in the conference room, and convey the same to the others in the organization by sending messages to the Cisco IP phone in the conference room. Once the case is created, the facilities team of the building can try to resolve the fault.
•![]() Using the Smart+Connected MS user portal
Using the Smart+Connected MS user portal
–![]() Search for the available conference/TP rooms based on your requirements such as room setup, room size, location, and so on and book them. Rooms that closely meet your search criteria are displayed if no exact match is found.
Search for the available conference/TP rooms based on your requirements such as room setup, room size, location, and so on and book them. Rooms that closely meet your search criteria are displayed if no exact match is found.
–![]() View the current and upcoming meetings that you are part of or have organized.
View the current and upcoming meetings that you are part of or have organized.
–![]() Accept, decline, or tentatively accept meeting invites.
Accept, decline, or tentatively accept meeting invites.
–![]() View all the scheduled meetings as a day, week, or month based calendar view.
View all the scheduled meetings as a day, week, or month based calendar view.
–![]() Book conference rooms easily by holding down the mouse key and dragging across the required time slot in the calendar view.
Book conference rooms easily by holding down the mouse key and dragging across the required time slot in the calendar view.
–![]() Book conference rooms instantly using the Quick Booking option. Reservation is made simpler as you can key in the number of participants. Booking duration options range from 30 (the default duration) to 60 minutes. Location is by default the one specified in your Preferences.
Book conference rooms instantly using the Quick Booking option. Reservation is made simpler as you can key in the number of participants. Booking duration options range from 30 (the default duration) to 60 minutes. Location is by default the one specified in your Preferences.
–![]() Use the detailed booking option where you can request for change in the room setup, book equipment, add meeting agenda and notes, and so on.
Use the detailed booking option where you can request for change in the room setup, book equipment, add meeting agenda and notes, and so on.
–![]() Edit the details of the meetings you have organized.
Edit the details of the meetings you have organized.
–![]() Save drafts of the bookings and edit them later.
Save drafts of the bookings and edit them later.
–![]() Save your preferred settings such as favorite rooms, location, and time zone.
Save your preferred settings such as favorite rooms, location, and time zone.
•![]() Using Room Panels
Using Room Panels
–![]() View the conference/TelePresence room schedule and availability/occupancy status.
View the conference/TelePresence room schedule and availability/occupancy status.
–![]() Book conference/TelePresence rooms.
Book conference/TelePresence rooms.
–![]() Confirm conference/TelePresence room occupancy.
Confirm conference/TelePresence room occupancy.
–![]() Release conference/TelePresence rooms.
Release conference/TelePresence rooms.
In addition, the solution can help in energy savings by automatically switching devices to a standby mode when the meeting room is unoccupied and based on the configuration, turn them back on before the actual occupancy.
As administrator, you need to manage the overall configuration, maintenance, and content creation for the Smart+Connected MS solution through a web portal. You need to add locations and devices, create users, and associate devices to locations for the solution in the SDP. For more information on performing these tasks, see the Cisco Service Delivery Platform User Guide and Cisco Service Delivery Platform Installation Guide. After the locations are added, and the devices are associated to them in the SDP, they are available in the Smart+Connected MS portal. You can select a location and associate a configuration to it. The features such as fault messages, device control options, signage menu messaging, and room booking that are added to the configuration can be accessed by the end user from the IP phones at the location.
Smart+Connected Meeting Spaces Portal
The Smart+Connected MS portal allows you to create, edit, and delete the content that appears on digital signage and IP phones. You can manage the communication and transfer of information between IP phones and digital signage using the various tabs provided by the portal. You can also generate reports about the conference room usage. It allows the end users to access information such as emergency notifications, news, general organizational updates, tips on better resource management, energy savings, and corporate practices through digital signage/IEC. All emergency or alert notifications can be configured so that they can be sent out on different channels such as the digital signage/IEC and the Cisco IP phones.
Logging In to the Smart+Connected MS
You can log in to the Smart+Connected MS web portal using any of the browsers certified for the application. After you complete the installation process, the portal can be accessed using http://host-name:domain-port/solutions. You can use "superadmin" as the username and password, which is created by default during installation.
Note ![]() For security reasons, it is recommended that you change the default password.
For security reasons, it is recommended that you change the default password.
If you want other users to access the application, you need to create additional roles and users by logging in to the Cisco Service Delivery Platform (SDP). For more information, see the Cisco Smart+Connected Meeting Spaces & Cisco Smart+Connected Digital Signage Installation Guide and the Cisco Service Delivery Platform User Guide.
To log in to the Smart+Connected MS portal, perform the following steps:
Step 1 ![]() Enter the URL in the address field of the web browser, and click Enter.
Enter the URL in the address field of the web browser, and click Enter.
The Smart+Connected MS Login page appears.
Step 2 ![]() Enter the username and password.
Enter the username and password.
Step 3 ![]() Click Login.
Click Login.
The Smart+Connected MS home page appears.
After logging in, if you do not use the portal for a while, your browsing session will time out. In such a situation, you must re-log in to the portal.
Understanding the Smart+Connected MS User Interface
Figure 1-1 describes the tabs of the Smart+Connected MS user interface for the administrator.
Figure 1-1 Smart+Connected MS User Interface—Tabs

Table describes the Smart+Connected MS User Interface tabs.
Rich Text Editor
In the Smart+Connected DS application, you can use the rich text editor to create content that you want to display on the digital signage/IEC. This editor allows you to do a visual editing of the content, in addition to editing the source level (HTML source) editing (see Figure 1-2). This information can be the emergency notification messages, news content, or green advisor.
You can configure templates and insert those in the rich text editor. This enables you to quickly update the content during emergency situations.
For more information on how to work with the rich text editor, click the 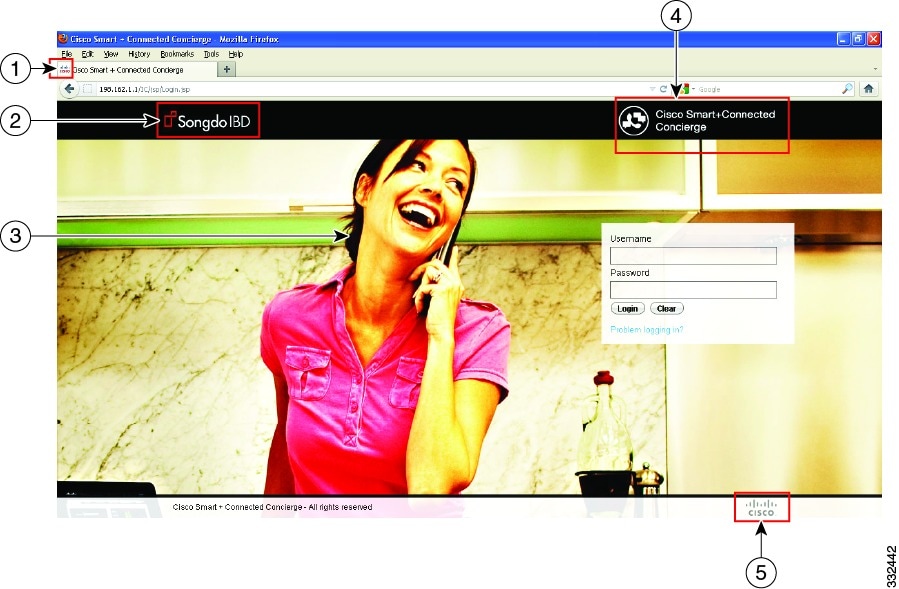 icon available in the rich text editor toolbar.
Figure 1-2 displays the rich text editor.
Figure 1-2 Rich Text Editor

 Feedback