Configuring Connector
Available Languages
Table Of Contents
Web Proxy Auto-Discovery Protocol
Connector Host and Client on the Same Computer
Multiple LDAP Servers and Domains
Configuring Connector
Revised: October 12, 2011Overview
This chapter describes how to configure Connector, how to enable Acceptable Usage Policy (AUP) support, and how to configure your users' Web browser to use Connector.
Web Browser Configuration
When Connector is installed and running, you will need to configure your users' Web browser proxy settings to point to the Connector. For example, in Microsoft Internet Explorer this is configured in the Local Area Network (LAN) Settings dialog.
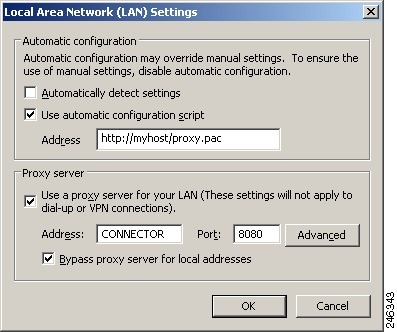
In this example the browser is configured to look for a Proxy Auto-Config (PAC) file on a local Web server and use that to configure the proxy settings automatically. In the event that the PAC file cannot be found, the browser will fall back to the local settings. The Address box must contain the IP address or DNS name of the server where Connector is installed. The Port box must contain 8080 (the default port that Connector listens to HTTP requests on).
In larger organizations, the most effective way to implement this change is either via a network Logon Script or through Group Policy Objects (GPO) in Active Directory.
The following sections are intended to help you choose the method that best suits your requirements.
Manual Configuration
This method allows the use of a single proxy defined in the browser connection settings. It is the simplest method and thus usually the more reliable choice.
The advantages are:
•
It is simple to configure. All that is required is the location of the proxy and the relevant port.
•
•
The disadvantages are:
•
•
Proxy Auto-Config File
This is likely to be the preferred method in most cases. The location of the Proxy Auto-Config PAC file must still be set in each browser, either manually or by group policy. However, the PAC file allows greater control and flexibility limited only by the author's ability to code the file in JavaScript and the infrastructure available.
The advantages are:
•
•
The disadvantage is:
•
Web Proxy Auto-Discovery Protocol
The Web Proxy Auto-Discovery Protocol (WPAD) is a method used by Web browsers to locate a PAC file.
The advantages are:
•
•
The disadvantages are:
•
•
•
See Web Proxy Auto Discovery Protocol.
Connector Host and Client on the Same Computer
This method is used when Connector is installed on a portable computer for individual system use. The normal system requirements do not apply in this instance because Connector will only be processing the requests of a single user. You can use the client version of any of the supported server operating system. If you wish to use a different client operating system you should contact Support.

Note
NTLM Pass-Through
Connector supports websites that require NTLM authentication. This feature is referred to as NTLM pass-through because messages pass from the client, through Connector, to the website. This could be a direct connection to a website that has been configured as a host exception, or a connection that goes via Cloud Web Security.
NTLM pass-through requires the keepalive.enable property to be set to TRUE to enable persistent connections. If no value is set then the property is set to TRUE by default. NTLM pass-through is also supported when Connector is used in conjunction with the Cisco Web Security Appliance and other third-party proxy servers.
Host Exceptions
With Windows, host exceptions can be configured using the configuration wizard. See Adding Host Exceptions. It is also possible to edit or add exceptions by editing the agent.properties file in a text editor. With Linux this is the only method. See Configuring Connector.
Host exceptions are added using the following properties:
<exception name>-exception_pattern=<host patterns> (mandatory)<exception name>-primaryProxy=<primary proxy> (mandatory)<exception name>-primaryProxyPort=<primary proxy port> (only applicable if primaryProxy is not DIRECT)<exception name>-primary_allowed=<allowed port list for primary> (only applicable if primaryProxy is DIRECT)<exception name>-secondaryProxy=<secondary proxy><exception name>-secondaryProxyPort=<secondary proxy port> (only applicable if secondaryProxy is not DIRECT)<exception name>-secondary_allowed=<allowed port list for secondary> (only applicable if secondaryProxy is DIRECT)<exception name>-tertiaryProxy=<tertiary proxy><exception name>-tertiaryProxyPort=<tertiary proxy port> (only applicable if tertiaryProxy is not DIRECT)<exception name>-tertiary_allowed=<allowed port list for tertiary> (only applicable if tertiaryProxy is DIRECT)<exception name>-keepalive.enable=<boolean> (use a persistent connection)<exception name>-tunnel=<boolean> (make a connection through a tunnel)Example Host Exceptions
To configure an exception with a single proxy on a specific IP address and port for a range of domains use the following:
<exception name>-exception_pattern=*.<domain1>, *.<domain2><exception name>-primaryProxy=<IP><exception name>-primaryProxyPort=<port>For example:
example-exception_pattern=*.example.com, *.example.netexample-primaryProxy=192.168.32.122example-primaryProxyPort=8081To configure an exception with a direct connection for a range of domains on port 8080 (the default) use the following:
<exception name>-exception_pattern=*.<domain1>, *.<domain2><exception name>-primaryProxy=DIRECTFor example:
example-exception_pattern=*.example.com, *.example.netexample-primaryProxy=DIRECT
Note
To configure an exception with a direct connection for all hosts on a given domain using the default port use the following:
<exception name>-exception_pattern=*.<domain><exception name>-primaryProxy=DIRECTFor example:
example-exception_pattern=*.example.comexample-primaryProxy=DIRECTTo enable additional ports use the following:
<exception name>-exception_pattern=*.<domain><exception name>-primaryProxy=DIRECT<exception name>-primary_allowed=<port1>, <port2>For example:
example-exception_pattern=*.example.comexample-primaryProxy=DIRECTexample-primary_allowed=443, 8443, 1245
Note
Persistent Connections
Persistent connections were introduced in version 1.1 of the HTTP protocol to improve performance by removing the need to reopen closed connections. Connector enables persistent connections by default. This enables Connector to reuse connections to upstream servers, and clients to reuse connections to Connector. If required, persistent connections can be switched off for exceptions as follows:
<exception name>-keepalive.enable=FALSETunnels
You may want to use a tunnel if Connector has problems with the HTTP response message or the body of an HTTP request message. After the initial connection is established, a direct tunnel is created over that connection between the client and the server, enabling messages to pass unmodified between them. Tunnels can be enabled for exceptions as follows:
<exception name>-tunnel=TRUE
Caution
Acceptable Usage Policy
To show an Acceptable Usage Policy (AUP) page to your users on a daily or weekly basis with Connector in workgroup mode:
Step 1
aup.enable=trueStep 2
Step 3
Step 4
Step 5
Step 6
Step 7
Step 8
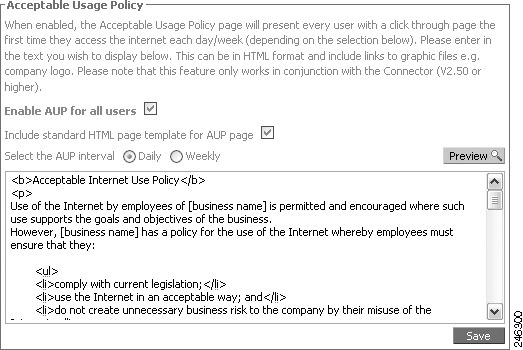
A sample page is provided as a template to use if your organization does not currently have an AUP. However, recommends you seek professional advice in creating your own AUP. Care should be taken to include references to the latest Web 2.0 technologies and you should lock down your users' portable computers so that they can only use the Internet through Cloud Web Security (both internally and externally). Any attempt to circumvent this should be strictly prohibited in the AUP. All AUP pages will have an I Agree button at the bottom of the page for users to click. You should include this in your AUP, stating that by clicking I Agree the user agrees to abide by your organization's AUP.
When the Include standard HTML page templates for AUP page check box is cleared you can specify the full content of the page, from the opening <html> tag to the closing /html> tag. Any images or CSS (cascading style sheets) must be stored at a resolvable location. Normally you must host your own images and CSS. When you have saved your changes you can view the AUP page by clicking the Preview button.
Note
SSL Tunneling
You can send all Web traffic to Cloud Web Security using an SSL-based tunnel. Note that not all Web Scanning Service proxies support this functionality and you should work with the support team to make sure you are provisioned on a proxy that supports this functionality.
Note
LDAP Servers
Connector supports the use of multiple LDAP servers, including generic LDAP servers such as Lotus Domino. By default, Connector uses Active Directory LDAP.
Generic LDAP
Connector supports basic authentication lookups against generic LDAP servers. You may have to change the default settings in your LDAP server to allow this.
In order to perform generic LDAP lookups you need to enable basic authentication rather than NTLM authentication in the agent.properties file:
useNtlm=falseuseBasic=trueauth.realm=MyRealmpasswordRequired=trueYou can also change the name of the realm that appears in the basic authentication dialog by changing the auth.realm value.
After selecting basic authentication, the LDAP server must be configured. By default the LDAP type is Active Directory. To use generic LDAP use the following:
ldap.type=genericuseLdap=trueuseNtlm=falseuseBasic=trueproviderUrl=ldap://127.0.0.1:3268securityPrincipal=cn=proxyagent,cn=users,dc=company,dc=comldap.base.dn=ou=People,dc=example,dc=comldap.user.attr=uidldap.group.attr=ouldap.accountdisabled.attribute=ldap.group.attr.string.parse=The ldap.base.dn property specifies the base DN in the LDAP tree where the query starts.
The ldap.user.attr is the name of the user attribute in the LDAP server configuration.
The ldap.group.attr is the name of the group attribute in the LDAP server configuration.
The ldap.accountdisabled.attribute, if it has a non-empty value, represents the name of the attribute that flags if the user is allowed to browse. If a user is marked as 'disabled' in the LDAP server, then that user is not allowed to browse, even if they provide the correct password and user account when prompted with the basic authentication dialog.
The ldap.group.attr.string.parse property is the name of the attribute for parsing out the group name from a LDAP query response. For example, if the response to the group LDAP query is ou=mygroup, o=mycompany, l=mylocation, then by specifying ldap.group.attr.string.parse=ou the group name is parsed out from the LDAP response string, which in this case is mygroup.
Novell
The Connector LDAP settings for Novell LDAP are:
useNtlm=falseuseBasic=trueauth.realm=<realm>ldap.type=genericuseLdap=trueproviderUrl=ldap://<IP address>:389securityPrincipal=cn=<admin user name>,o=<context path>securityCredentials=<admin password>ldap.base.dn=o=<context path>ldap.user.attr=cnldap.group.attr=groupMembershipldap.group.attr.string.parse=cnLotus Domino
The Connector LDAP settings for Lotus Domino are:
useNtlm=falseuseBasic=trueauth.realm=<realm>ldap.type=genericuseLdap=trueproviderUrl=ldap://<IP address>:389securityPrincipal=cn=<admin user name>,o=<organization>securityCredentials=<admin password>ldap.base.dn=o=<organization>ldap.user.attr=cnldap.group.attr=dominoaccessgroupsldap.group.attr.string.parse=cnSecondary LDAP Server
Connector supports secondary LDAP servers in case of primary failure. For backward compatibility, primary settings can also be specified without '.primary' suffix. For example:
providerUrl.primary=ldap://192.168.10.251:3268securityPrincipal.primary=cn=proxyagent,cn=users,dc=UK,dc=mycompany,dc=comsecurityCredentials.primary=abcproviderUrl.secondary=ldap://192.168.0.251:3268securityPrincipal.secondary=cn=proxyagent,cn=users,dc=UK,dc=mycompany0,dc=comsecurityCredentials.secondary=abcSecondary settings can also be specified for a particular domain:providerUrl.primary.uk=ldap://192.168.10.251:3268securityPrincipal.primary.uk=cn=proxyagent,cn=users,dc=UK,dc=mycompany,dc=comsecurityCredentials.primary.uk=abcproviderUrl.secondary.uk=ldap://192.168.0.251:3268securityPrincipal.secondary.uk=cn=proxyagent,cn=users,dc=UK,dc=mycompany,dc=comsecurityCredentials.secondary.uk=abcMultiple LDAP Servers and Domains
Connector can support multiple LDAP Servers and domains. Default LDAP must be switched off, but otherwise the initial configuration is similar to that for a single LDAP server.
useLdap=falseproviderUrl=ldap://192.168.0.251:3268securityPrincipal=cn=proxyagent,cn=users,dc=UK,dc=company,dc=comsecurityCredentials=mBxm8shsZArd1ds3dbw_-DsSBrGK5xldapRefreshTimeout=3600000Connector has the ability to specify a separate LDAP server for specific domains. For example, given this authorization user name obtained from the NTLM challenge: UK\somebody, you can set up a specific LDAP server that will be queried to get the group details for this user. For example:
useLdap.UK=trueproviderUrl.UK=ldap://127.0.0.1:3268securityPrincipal.UK=cn=proxyagent,cn=users,dc=company,dc=comsecurityCredentials.UK="?H&*FH
Note
To configure specific LDAP servers for querying groups for certain domains you will need to use the domain name as a suffix for the LDAP properties as in the previous example.
The useLdap.<domain> properties are always mandatory for all defined LDAP servers. The name of the domain is case sensitive.
If any of the other properties for the extending LDAP servers is missing, then the property will be inherited from the default LDAP setting.
Caution
It is also possible to assign multiple domain names to a domain configuration. You can do this with the domains property, for example:
useLdap.UK=trueproviderUrl.UK=ldap://127.0.0.1:3268securityPrincipal.UK=cn=proxyagent,cn=users,dc=company,dc=comdomains.UK=DOMA,DOMB,DOMCsecurityCredentials.UK="?Y*FHIn this example the UK domain configuration will be assigned to the domains DOMA, DOMB and DOMC, but not UK. To include the UK domain name for this configuration you would need to define it in the list of the acceptable domains:
domains.UK=DOMA,DOMB,DOMC,UKGroups
Connector enables you to manage connections based on group membership. You can enable multiple authentication keys by group, exclude groups from Web filtering, and set the depth of nested groups.
Note
Multiple Authentication Keys
Multiple authentication keys can be specified in the agent.properties file. Authentication keys will be mapped to the groups user belong to, for example:
licence.1=authkey1licence.1.groups=a,b,clicence.2=authkey2licence.2.groups=d,elicence=defaultauthkeyIn the example, if a user belongs to group a, b, or c then the licence.1 authentication key is used. If the user belongs to group d or e then the licence.2 authentication key is used. If the user does not belong to any of these groups then the default authentication key is used.
The groups can also contain trailing wildcards, for example:
licence.1.groups=WinNT://UK*This would match all the groups that start with WinNT://UK.
Excluding Groups
Many organizations use a large number of directory groups for different internal functionality. Adding all these groups into the headers would create a large overhead on each request. To avoid this, Connector can exclude any groups that are not relevant to Web filtering.
Groups to be excluded are specified in the agent.properties file. You can either have global group exclusions which apply across all directories or specific exclusions on a directory basis.
Any combination of filters is permitted. If no filters are defined or if both are empty, there will be no group filtering at all.
Global Group Exclusions
This exclusion applies to all groups determined by both LDAP and Domain Controller querying. The property for this filter is called groupInclude. If it is absent, or empty, there will be no global group filtering at this level. Group names are case insensitive and they must be comma separated, for example:
groupInclude=Winnt://UK\\Dev, Winnt://UK\\othersDomain names and group names can include wildcards, for example:
groupInclude=Winnt://UK\\group*, Winnt://UK*\\Dev, Winnt://domain*\\group*LDAP Group Exclusions
These exclusions apply per LDAP setting only. The default LDAP configuration cannot have group filters (use the global group filters in this case). If it is absent, or empty, there will be no global group filtering at this level, for example:
useLdap.UK=trueproviderUrl.UK=ldap://127.0.0.1:3268securityPrincipal.UK=cn=proxyagent,cn=users,dc=UK,dc=domain, dc=comsecurityCredentials.UK=mBxm8Ard1dwIdTs3dbw_-DsSBrGK5xgroupInclude.UK=WinNT://UK\\dev,WinnT://UK\\testNested Groups
Connector supports nested groups. By default the depth for the nested group hierarchy is five. Nested groups can be configured by adding the following properties to the agent.properties file.
This groupslookup.recursive.exclude property can also be set for the domain, for example:
groupslookup.recursive.exclude.UKThis will contain the exception groups for UK domain.
 Feedback