Integrated Service Adapter and Integrated Service Module Installation and Configuration
Bias-Free Language
The documentation set for this product strives to use bias-free language. For the purposes of this documentation set, bias-free is defined as language that does not imply discrimination based on age, disability, gender, racial identity, ethnic identity, sexual orientation, socioeconomic status, and intersectionality. Exceptions may be present in the documentation due to language that is hardcoded in the user interfaces of the product software, language used based on RFP documentation, or language that is used by a referenced third-party product. Learn more about how Cisco is using Inclusive Language.
- Updated:
- August 3, 2007
Chapter: Configuring the ISA and ISM
Configuring the ISA and ISM
This chapter contains the information and procedures needed to configure the ISA or the ISM in the Cisco 7100 series VPN routers and Cisco 7200 series routers. This chapter contains the following sections:
•![]() Using the EXEC Command Interpreter
Using the EXEC Command Interpreter
•![]() Applying Crypto Maps to Interfaces
Applying Crypto Maps to Interfaces
Overview
On power up if the enabled LED is on, the ISA or the ISM is fully functional and does not require any configuration commands. However, for the ISA or the ISM to provide encryption services, you must complete the steps in the following sections:
•![]() Enabling MPPE (required)
Enabling MPPE (required)
•![]() Configuring IKE (required)
Configuring IKE (required)
•![]() Configuring IPSec (required)
Configuring IPSec (required)
•![]() Creating Crypto Maps (required)
Creating Crypto Maps (required)
Optionally, you can configure Certification Authority (CA) interoperability (refer to the "Configuring Certification Authority Interoperability" chapter in the Security Configuration Guide publication).
The ISA or the ISM provides encryption services for any interface in Cisco 7100 series and Cisco 7200 series routers. If you have previously configured IPSec on the router and you install an ISA or an ISM, the ISA or the ISM automatically performs encryption services.

Note ![]() There are no interfaces to configure on the ISA or the ISM.
There are no interfaces to configure on the ISA or the ISM.
Configuring IPSec requires privileged-level access to the EXEC command interpreter. Also, privileged-level access usually requires a password. (Contact your system administrator, if necessary, to obtain privileged-level access.)
These sections contain basic configuration information only. For detailed configuration information, refer to the "IP Security and Encryption" chapter of the Security Configuration Guide publication.
Using the EXEC Command Interpreter
You modify the configuration of your router through the software command interpreter called the EXEC (also called enable mode). You must enter the privileged level of the EXEC command interpreter with the enable command before you can use the configure command to configure a new interface or change the existing configuration of an interface. The system prompts you for a password if one has been set.
The system prompt for the privileged level ends with a pound sign (#) instead of an angle bracket (>). At the console terminal, use the following procedure to enter the privileged level:
Step 1 ![]() At the user-level EXEC prompt, enter the enable command. The EXEC prompts you for a privileged-level password as follows:
At the user-level EXEC prompt, enter the enable command. The EXEC prompts you for a privileged-level password as follows:
Router> enable
Password:
Step 2 ![]() Enter the password (the password is case sensitive). For security purposes, the password is not displayed.
Enter the password (the password is case sensitive). For security purposes, the password is not displayed.
When you enter the correct password, the system displays the privileged-level system prompt (#):
Router#
Enabling MPPE
Use the encryption mppe command in ISA controller configuration mode to enable MPPE on the ISA or the ISM. This off-loads the MPPE function from the route processor to the ISA or the ISM.
Note ![]() The ISA does not support MSCHAP-v2.
The ISA does not support MSCHAP-v2.
The boot LED remains lit instead of pulsating when the ISA/ISM is configured for IPSec (default). When the ISA/ISM is configured for MPPE, the Boot LED pulsates. The ISA/ISM functions normally whether the Boot LED is pulsating or is solid.
To use the encryption mppe command, PPP encapsulation must be enabled.
|
|
|
|
|---|---|---|
1. |
Router(config)# controller isa slot/port |
Enter controller configuration mode on the ISA card. |
2. |
Router(config-controller)# encryption mppe |
Enables MPPE encryption. |
Use the ppp encrypt mppe{auto | 40 | 128} [passive | required] [stateful] command in interface configuration mode to enable MPPE on the virtual template.
Configuring IKE
IKE is enabled by default. IKE does not have to be enabled for individual interfaces but is enabled globally for all interfaces at the router. You must create IKE policies at each peer. An IKE policy defines a combination of security parameters to be used during the IKE negotiation.
You can create multiple IKE policies, each with a different combination of parameter values. If you do not configure any IKE policies, the router uses the default policy, which is always set to the lowest priority, and which contains each parameter's default value.
For each policy that you create, you assign a unique priority (1 through 10,000, with 1 being the highest priority). You can configure multiple policies on each peer—but at least one of these policies must contain exactly the same encryption, hash, authentication, and Diffie-Hellman parameter values as one of the policies on the remote peer.
If you do not specify a value for a parameter, the default value is assigned. For information on default values, refer to the "IP Security and Encryption" chapter of the Security Command Reference publication.
Note ![]() The default policy and the default values for configured policies do not show up in the configuration when you issue a show running-config EXEC command. Instead, to see the default policy and any default values within configured policies, use the show crypto isakmp policy EXEC command.
The default policy and the default values for configured policies do not show up in the configuration when you issue a show running-config EXEC command. Instead, to see the default policy and any default values within configured policies, use the show crypto isakmp policy EXEC command.
To configure a policy, use the following commands, starting in global configuration mode:
For detailed information on creating IKE policies, refer to the "Configuring Internet Key Exchange Security Protocol" chapter in the Security Configuration Guide publication. This chapter contains information on the following topics:
•![]() Why Do You Need to Create These Policies?
Why Do You Need to Create These Policies?
•![]() What Parameters Do You Define in a Policy?
What Parameters Do You Define in a Policy?
•![]() How Do IKE Peers Agree upon a Matching Policy?
How Do IKE Peers Agree upon a Matching Policy?
•![]() Which Value Should You Select for Each Parameter?
Which Value Should You Select for Each Parameter?
•![]() Creating Policies
Creating Policies
•![]() Additional Configuration Required for IKE Policies
Additional Configuration Required for IKE Policies
Configuring IPSec
After you have completed IKE configuration, configure IPSec at each participating IPSec peer. This section contains basic steps to configure IPSec and includes the tasks discussed in the following sections:
For detailed information on configuring IPSec, refer to the "Configuring IPSec Network Security" chapter in the Security Configuration Guide publication. This chapter contains information on the following topics:
•![]() Ensure Access Lists Are Compatible with IPSec
Ensure Access Lists Are Compatible with IPSec
•![]() Set Global Lifetimes for IPSec Security Associations
Set Global Lifetimes for IPSec Security Associations
•![]() Create Crypto Access Lists
Create Crypto Access Lists
•![]() Define Transform Sets
Define Transform Sets
•![]() Create Crypto Map Entries
Create Crypto Map Entries
•![]() Apply Crypto Map Sets to Interfaces
Apply Crypto Map Sets to Interfaces
•![]() Monitor and Maintain IPSec
Monitor and Maintain IPSec
Creating Crypto Access Lists
Crypto access lists are used to define which IP traffic will be protected by encryption and which will not. (These access lists are not the same as regular access lists, which determine what traffic to forward or block at an interface.) For example, access lists can be created to protect all IP traffic between subnet A and subnet Y or Telnet traffic between host A and host B.
The access lists themselves are not specific to IPSec—they are no different from what is used for Cisco Encryption Technology (CET). It is the crypto map entry referencing the specific access list that defines whether IPSec or CET processing is applied to the traffic matching a permit entry in the access list.
Crypto access lists associated with IPSec crypto map entries have four primary functions:
•![]() Select outbound traffic to be protected by IPSec (permit = protect).
Select outbound traffic to be protected by IPSec (permit = protect).
•![]() Indicate the data flow to be protected by the new security associations (specified by a single permit entry) when initiating negotiations for IPSec security associations.
Indicate the data flow to be protected by the new security associations (specified by a single permit entry) when initiating negotiations for IPSec security associations.
•![]() Process inbound traffic in order to filter out and discard traffic that should have been protected by IPSec.
Process inbound traffic in order to filter out and discard traffic that should have been protected by IPSec.
•![]() Determine whether or not to accept requests for IPSec security associations on behalf of the requested data flows when processing IKE negotiation from the IPSec peer. (Negotiation is only done for ipsec-isakmp crypto map entries.) In order to be accepted, if the peer initiates the IPSec negotiation, it must specify a data flow that is "permitted" by a crypto access list associated with an ipsec-isakmp crypto map entry.
Determine whether or not to accept requests for IPSec security associations on behalf of the requested data flows when processing IKE negotiation from the IPSec peer. (Negotiation is only done for ipsec-isakmp crypto map entries.) In order to be accepted, if the peer initiates the IPSec negotiation, it must specify a data flow that is "permitted" by a crypto access list associated with an ipsec-isakmp crypto map entry.
If you want certain traffic to receive one combination of IPSec protection (for example, authentication only) and other traffic to receive a different combination of IPSec protection
(for example, both authentication and encryption), you need to create two different crypto access lists to define the two different types of traffic. These different access lists are then used in different crypto map entries that specify different IPSec policies.
Later, you will associate the crypto access lists to particular interfaces when you configure and apply crypto map sets to the interfaces (following instructions in the section "Creating Crypto Maps" section).
Note ![]() IKE uses UDP port 500. The IPSec Encapsulation Security Protocol (ESP) and Authentication Header (AH) protocols use protocol numbers 50 and 51. Ensure that your interface access lists are configured so that protocol numbers 50, 51, and UDP port 500 traffic are not blocked at interfaces used by IPSec. In some cases you might need to add a statement to your access lists to explicitly permit this traffic.
IKE uses UDP port 500. The IPSec Encapsulation Security Protocol (ESP) and Authentication Header (AH) protocols use protocol numbers 50 and 51. Ensure that your interface access lists are configured so that protocol numbers 50, 51, and UDP port 500 traffic are not blocked at interfaces used by IPSec. In some cases you might need to add a statement to your access lists to explicitly permit this traffic.
To create crypto access lists, use the following commands in global configuration mode:
|
|
|
|
|---|---|---|
1. |
access-list access-list-number {deny | permit} protocol source source-wildcard destination destination-wildcard [log] or ip access-list extended name |
Specify conditions to determine which IP packets are protected.1 (Enable or disable encryption for traffic that matches these conditions.) We recommend that you configure "mirror image" crypto access lists for use by IPSec and that you avoid using the any keyword. |
2. |
Add permit and deny statements as appropriate. |
|
3. |
end |
Exit the configuration command mode. |
1 You specify conditions using an IP access list designated by either a number or a name. The access-list command designates a numbered extended access list; the ip access-list extended command designates a named access list. |
For detailed information on configuring access lists, refer to the "Configuring IPSec Network Security" chapter in the Security Configuration Guide publication. This chapter contains information on the following topics:
•![]() Crypto Access List Tips
Crypto Access List Tips
•![]() Defining Mirror Image Crypto Access Lists at Each IPSec Peer
Defining Mirror Image Crypto Access Lists at Each IPSec Peer
•![]() Using the any Keyword in Crypto Access Lists
Using the any Keyword in Crypto Access Lists
Defining a Transform Set
A transform set represents a certain combination of security protocols and algorithms. During the IPSec security association negotiation, the peers agree to use a particular transform set for protecting a particular data flow.
You can specify multiple transform sets, and then specify one or more of these transform sets in a crypto map entry. The transform set defined in the crypto map entry is used in the IPSec security association negotiation to protect the data flows specified by that crypto map entry's access list.
During IPSec security association negotiations with IKE, the peers search for a transform set that is the same at both peers. When such a transform set is found, it is selected and is applied to the protected traffic as part of both peers' IPSec security associations.
With manually established security associations, there is no negotiation with the peer, so both sides must specify the same transform set.
If you change a transform set definition, the change is only applied to crypto map entries that reference the transform set. The change is not applied to existing security associations but is used in subsequent negotiations to establish new security associations. If you want the new settings to take effect sooner, you can clear all or part of the security association database by using the clear crypto sa command.
To define a transform set, use the following commands, starting in global configuration mode:
|
|
|
|
|---|---|---|
1. |
crypto ipsec transform-set transform-set-name transform1 [transform2 [transform3]] |
Define a transform set and enter crypto transform configuration mode. Complex rules define which entries you can use for the transform arguments. These rules are explained in the command description for the crypto ipsec transform-set command, and Table 4-1 provides a list of allowed transform combinations. |
2. |
mode [tunnel | transport] |
Change the mode associated with the transform set. The mode setting is applicable only to traffic whose source and destination addresses are the IPSec peer addresses; it is ignored for all other traffic. (All other traffic is in tunnel mode only.) |
3. |
end |
Exit the crypto transform configuration mode to enabled mode. |
4. |
clear crypto sa or clear crypto sa peer {ip-address | peer-name} or clear crypto sa map map-name or clear crypto sa spi destination-address protocol spi |
This step clears existing IPSec security associations so that any changes to a transform set take effect on subsequently established security associations (SAs). (Manually established SAs are reestablished immediately.) Using the clear crypto sa command without parameters clears out the full SA database, which clears out active security sessions. You may also specify the peer, map, or entry keywords to clear out only a subset of the SA database. |
Table 4-1 shows allowed transform combinations.
|
|
|
|
|||
|---|---|---|---|---|---|
|
|
|
|
|
|
|
ah-md5-hmac |
AH with MD5 (HMAC variant) authentication algorithm |
esp-3des |
ESP with 168-bit Triple DES encryption algorithm |
esp-md5-hmac |
ESP with MD5 (HMAC variant) authentication algorithm |
ah-sha-hmac |
AH with SHA (HMAC variant) authentication algorithm |
esp-des |
ESP with 56-bit DES encryption algorithm |
esp-sha-hmac |
ESP with SHA (HMAC variant) authentication algorithm |
esp-null |
ESP transform without cipher |
||||
1 Pick one transform option. 2 Pick one transform option, but only if you selected esp-null or ESP encryption transform. |
Creating Crypto Maps
Crypto map entries created for IPSec pull together the various elements used to set up IPSec security associations, including:
•![]() Which traffic should be protected by IPSec (according to a crypto access list)
Which traffic should be protected by IPSec (according to a crypto access list)
•![]() Granularity of the flow to be protected by a set of security associations
Granularity of the flow to be protected by a set of security associations
•![]() Where IPSec-protected traffic should be sent (who the remote IPSec peer is)
Where IPSec-protected traffic should be sent (who the remote IPSec peer is)
•![]() Local address to be used for the IPSec traffic (see the "Applying Crypto Maps to Interfaces" section for more details)
Local address to be used for the IPSec traffic (see the "Applying Crypto Maps to Interfaces" section for more details)
•![]() What IPSec security should be applied to this traffic (selecting from a list of one or more transform sets)
What IPSec security should be applied to this traffic (selecting from a list of one or more transform sets)
•![]() Whether security associations are manually established or are established through IKE
Whether security associations are manually established or are established through IKE
•![]() Other parameters that might be necessary to define an IPSec security association
Other parameters that might be necessary to define an IPSec security association
Crypto map entries with the same crypto map name (but different map sequence numbers) are grouped into a crypto map set. Later, you will apply these crypto map sets to interfaces; then, all IP traffic passing through the interface is evaluated against the applied crypto map set. If a crypto map entry sees outbound IP traffic that should be protected and the crypto map specifies the use of IKE, a security association is negotiated with the remote peer according to the parameters included in the crypto map entry; otherwise, if the crypto map entry specifies the use of manual security associations, a security association should have already been established through configuration.
(If a dynamic crypto map entry sees outbound traffic that should be protected and no security association exists, the packet is dropped.)
The policy described in the crypto map entries is used during the negotiation of security associations. If the local router initiates the negotiation, it uses the policy specified in the static crypto map entries to create the offer to be sent to the specified IPSec peer. If the IPSec peer initiates the negotiation, the local router checks the policy from the static crypto map entries, as well as any referenced dynamic crypto map entries, to decide whether to accept or reject the peer's request (offer).
For IPSec to succeed between two IPSec peers, both peers' crypto map entries must contain compatible configuration statements.
When two peers try to establish a security association, each must have at least one crypto map entry that is compatible with one of the other peer's crypto map entries. For two crypto map entries to be compatible, they must meet the following criteria:
•![]() The crypto map entries must contain compatible crypto access lists (for example, mirror image access lists). When the responding peer is using dynamic crypto maps, the entries in the local crypto access list must be "permitted" by the peer's crypto access list.
The crypto map entries must contain compatible crypto access lists (for example, mirror image access lists). When the responding peer is using dynamic crypto maps, the entries in the local crypto access list must be "permitted" by the peer's crypto access list.
•![]() The crypto map entries must each identify the other peer (unless the responding peer is using dynamic crypto maps).
The crypto map entries must each identify the other peer (unless the responding peer is using dynamic crypto maps).
•![]() The crypto map entries must have at least one transform set in common.
The crypto map entries must have at least one transform set in common.
When IKE is used to establish security associations, the IPSec peers can negotiate the settings they will use for the new security associations. This means that you can specify lists (such as lists of acceptable transforms) within the crypto map entry.
To create crypto map entries that use IKE to establish the security associations, use the following commands, starting in global configuration mode:
Repeat these steps to create additional crypto map entries as required.
For detailed information on configuring crypto maps, refer to the "Configuring IPSec Network Security" chapter in the Security Configuration Guide publication. This chapter contains information on the following topics:
•![]() About Crypto Maps
About Crypto Maps
•![]() Load Sharing
Load Sharing
•![]() How Many Crypto Maps Should You Create?
How Many Crypto Maps Should You Create?
•![]() Creating Crypto Map Entries for Establishing Manual Security Associations
Creating Crypto Map Entries for Establishing Manual Security Associations
•![]() Creating Crypto Map Entries That Use IKE to Establish Security Associations
Creating Crypto Map Entries That Use IKE to Establish Security Associations
•![]() Creating Dynamic Crypto Maps
Creating Dynamic Crypto Maps
Applying Crypto Maps to Interfaces
You need to apply a crypto map set to each interface through which IPSec traffic flows. Applying the crypto map set to an interface instructs the router to evaluate all the interface's traffic against the crypto map set and to use the specified policy during connection or security association negotiation on behalf of traffic to be protected by encryption.
To apply a crypto map set to an interface, use the following commands, starting in global configuration mode:
For redundancy, you could apply the same crypto map set to more than one interface. The default behavior is as follows:
•![]() Each interface has its own piece of the security association database.
Each interface has its own piece of the security association database.
•![]() The IP address of the local interface is used as the local address for IPSec traffic originating from or destined to that interface.
The IP address of the local interface is used as the local address for IPSec traffic originating from or destined to that interface.
If you apply the same crypto map set to multiple interfaces for redundancy purposes, you need to specify an identifying interface. This has the following effects:
•![]() The per-interface portion of the IPSec security association database is established one time and shared for traffic through all the interfaces that share the same crypto map.
The per-interface portion of the IPSec security association database is established one time and shared for traffic through all the interfaces that share the same crypto map.
•![]() The IP address of the identifying interface is used as the local address for IPSec traffic originating from or destined to those interfaces sharing the same crypto map set.
The IP address of the identifying interface is used as the local address for IPSec traffic originating from or destined to those interfaces sharing the same crypto map set.
One suggestion is to use a loopback interface as the identifying interface.
To specify redundant interfaces and name an identifying interface, use the following command in global configuration mode:
crypto map map-name local-address interface-id
This command permits redundant interfaces to share the same crypto map, using the same local identity.
Verifying Configuration
Certain configuration changes only take effect when subsequent security associations are negotiated. If you want the new settings to take immediate effect, you must clear the existing security associations so that they are reestablished with the changed configuration. For manually established security associations, you must clear and reinitialize the security associations, or the changes do not take effect. If the router is actively processing IPSec traffic, it is desirable to clear only the portion of the security association database that would be affected by the configuration changes (that is, clear only the security associations established by a given crypto map set). Clearing the full security association database should be reserved for large-scale changes or when the router is processing very little other IPSec traffic.
To clear (and reinitialize) IPSec security associations, use one of the following commands in global configuration mode:
To view information about your IPSec configuration, use one or more of the following commands in EXEC mode:
The following is sample output for the show crypto ipsec transform-set command. This command shows the type of transform set configured on the router.
Router# show crypto ipsec transform-set
Transform set combined-des-md5: {esp-des esp-md5-hmac}
will negotiate = {Tunnel,},
Transform set t1: {esp-des esp-md5-hmac}
will negotiate = {Tunnel,},
Transform set t100: {ah-sha-hmac}
will negotiate = {Transport,},
Transform set t2: {ah-sha-hmac}
will negotiate = {Tunnel,},
{esp-des}
will negotiate = {Tunnel,},
The following is sample output for the show crypto map command. Peer 172.21.114.67 is the IP address of the remote IPSec peer. Extended IP access list 141 lists the access list associated with the crypto map. Current peer indicates the current IPSec peer. Security-association lifetime indicates the lifetime of the security association. PFS N indicates that IPSec does not negotiate perfect forward secrecy when establishing new security associations for this crypto map. Transform sets indicates the name of the transform set that can be used with the crypto map.
Router# show crypto map
Crypto Map: "router-alice" idb: Ethernet0 local address: 172.21.114.123
Crypto Map "router-alice" 10 ipsec-isakmp
Peer = 172.21.114.67
Extended IP access list 141
access-list 141 permit ip
source: addr = 172.21.114.123/0.0.0.0
dest: addr = 172.21.114.67/0.0.0.0
Current peer: 172.21.114.67
Security-association lifetime: 4608000 kilobytes/120 seconds
PFS (Y/N): N
Transform sets={t1,}
The following is sample output for the show crypto ipsec sa command:
Router# show crypto ipsec sa
interface: Ethernet0
Crypto map tag: router-alice, local addr. 172.21.114.123
local ident (addr/mask/prot/port): (172.21.114.123/255.255.255.255/0/0)
remote ident (addr/mask/prot/port): (172.21.114.67/255.255.255.255/0/0)
current_peer: 172.21.114.67
PERMIT, flags={origin_is_acl,}
#pkts encaps: 10, #pkts encrypt: 10, #pkts digest 10
#pkts decaps: 10, #pkts decrypt: 10, #pkts verify 10
#send errors 10, #recv errors 0
local crypto endpt.: 172.21.114.123, remote crypto endpt.: 172.21.114.67
path mtu 1500, media mtu 1500
current outbound spi: 20890A6F
inbound esp sas:
spi: 0x257A1039(628756537)
transform: esp-des esp-md5-hmac,
in use settings ={Tunnel,}
slot: 0, conn id: 26, crypto map: router-alice
sa timing: remaining key lifetime (k/sec): (4607999/90)
IV size: 8 bytes
replay detection support: Y
inbound ah sas:
outbound esp sas:
spi: 0x20890A6F(545852015)
transform: esp-des esp-md5-hmac,
in use settings ={Tunnel,}
slot: 0, conn id: 27, crypto map: router-alice
sa timing: remaining key lifetime (k/sec): (4607999/90)
IV size: 8 bytes
replay detection support: Y
outbound ah sas:
interface: Tunnel0
Crypto map tag: router-alice, local addr. 172.21.114.123
local ident (addr/mask/prot/port): (172.21.114.123/255.255.255.255/0/0)
remote ident (addr/mask/prot/port): (172.21.114.67/255.255.255.255/0/0)
current_peer: 172.21.114.67
PERMIT, flags={origin_is_acl,}
#pkts encaps: 10, #pkts encrypt: 10, #pkts digest 10
#pkts decaps: 10, #pkts decrypt: 10, #pkts verify 10
#send errors 10, #recv errors 0
local crypto endpt.: 172.21.114.123, remote crypto endpt.: 172.21.114.67
path mtu 1500, media mtu 1500
current outbound spi: 20890A6F
inbound esp sas:
spi: 0x257A1039(628756537)
transform: esp-des esp-md5-hmac,
in use settings ={Tunnel,}
slot: 0, conn id: 26, crypto map: router-alice
sa timing: remaining key lifetime (k/sec): (4607999/90)
IV size: 8 bytes
replay detection support: Y
inbound ah sas:
outbound esp sas:
spi: 0x20890A6F(545852015)
transform: esp-des esp-md5-hmac,
in use settings ={Tunnel,}
slot: 0, conn id: 27, crypto map: router-alice
sa timing: remaining key lifetime (k/sec): (4607999/90)
IV size: 8 bytes
replay detection support: Y
outbound ah sas:
For a detailed description of the information displayed by the show commands, refer to the "IP Security and Encryption" chapter of the Security Command Reference publication.
IPSec Example
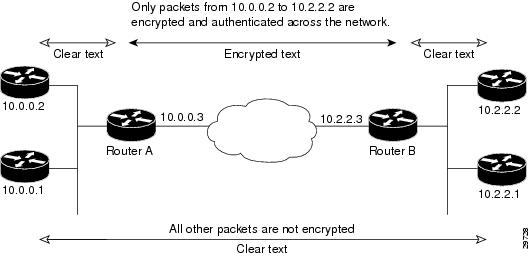
The following is an example of an IPSec configuration in which the security associations are established through IKE. In this example an access list is used to restrict the packets that are encrypted and decrypted. In this example, all packets going from IP address 12.120.0.2 to IP address 15.1.2.1 are encrypted and decrypted and all packets going from IP address 15.1.2.1 to IP address 12.120.0.2 are encrypted and decrypted. (See Figure 4-1.) Also, one IKE policy is created.
Figure 4-1 Basic IPSec Configuration
Router A Configuration
Specify the parameters to be used during an IKE negotiation.
crypto isakmp policy 15
encryption des
hash md5
authentication pre-share
group 2
lifetime 5000
crypto isakmp key 1234567890 address 10.0.0.2
crypto isakmp identity address
Note ![]() In the above example, the encryption DES of policy 15 would not appear in the written configuration because this is the default value for the encryption algorithm parameter.
In the above example, the encryption DES of policy 15 would not appear in the written configuration because this is the default value for the encryption algorithm parameter.
A transform set defines how the traffic will be protected
crypto ipsec transform-set auth1 ah-md5-hmac esp-des esp-md5-hmac
mode tunnel
A crypto map joins the transform set and specifies where the protected traffic is sent (the remote IPSec peer).
crypto map toRemoteSite 10 ipsec-isakmp
set peer 10.0.0.2
set transform-set auth1
The crypto map is applied to an interface.
interface Serial0
ip address 11.0.0.2
crypto map toRemoteSite
An IPSec access list defines which traffic to protect.
access-list 101 permit ip host 12.120.0.2 host 15.1.2.1
access-list 101 permit ip host 11.0.0.2 host 10.0.0.2
Router B Configuration
Specify the parameters to be used during an IKE negotiation.
crypto isakmp policy 15
encryption des
hash md5
authentication pre-share
group 2
lifetime 5000
crypto isakmp key 1234567890 address 11.0.0.2
crypto isakmp identity address
A transform set defines how the traffic will be protected.
crypto ipsec transform-set auth1 ah-md5-hmac esp-des ah-md5-hmac
mode tunnel
A crypto map joins the transform set and specifies where the protected traffic is sent (the remote IPSec peer).
crypto map toRemoteSite 10 ipsec-isakmp
set peer 11.0.0.2
set transform-set auth1
The crypto map is applied to an interface
interface Serial0
ip address 10.0.0.2
crypto map toRemoteSite
An IPSec access list defines which traffic to protect
access-list 101 permit ip host 15.1.2.1 host 12.120.0.2
access-list 101 permit ip host 10.0.0.2 host 11.0.0.2
 Feedback