
Configure Duo SSO Authentication for Remote Workers Using Secure Firewall Management Center
About Duo Single Sign-On
Duo Single Sign-On (SSO) provides users with easy access to and a consistent login experience across all the essential applications in an organization. By enabling Duo SSO, users do not have to remember multiple passwords, reducing the risks associated with credential compromise, and taking a key step towards a password-less future.
This guide provides instructions on using the cloud-hosted Duo SSO solution to secure your remote access VPN tunnel with your user’s existing credentials in a local active directory or a SAML identity provider. The sample configuration described in this guide uses Microsoft Entra ID (formerly, Azure Active Directory) as the authentication source.
How Does Duo Single-Sign-On Work?
The following diagram illustrates the workflow that occurs when a remote user authenticates to use the remote access VPN using Duo SSO.
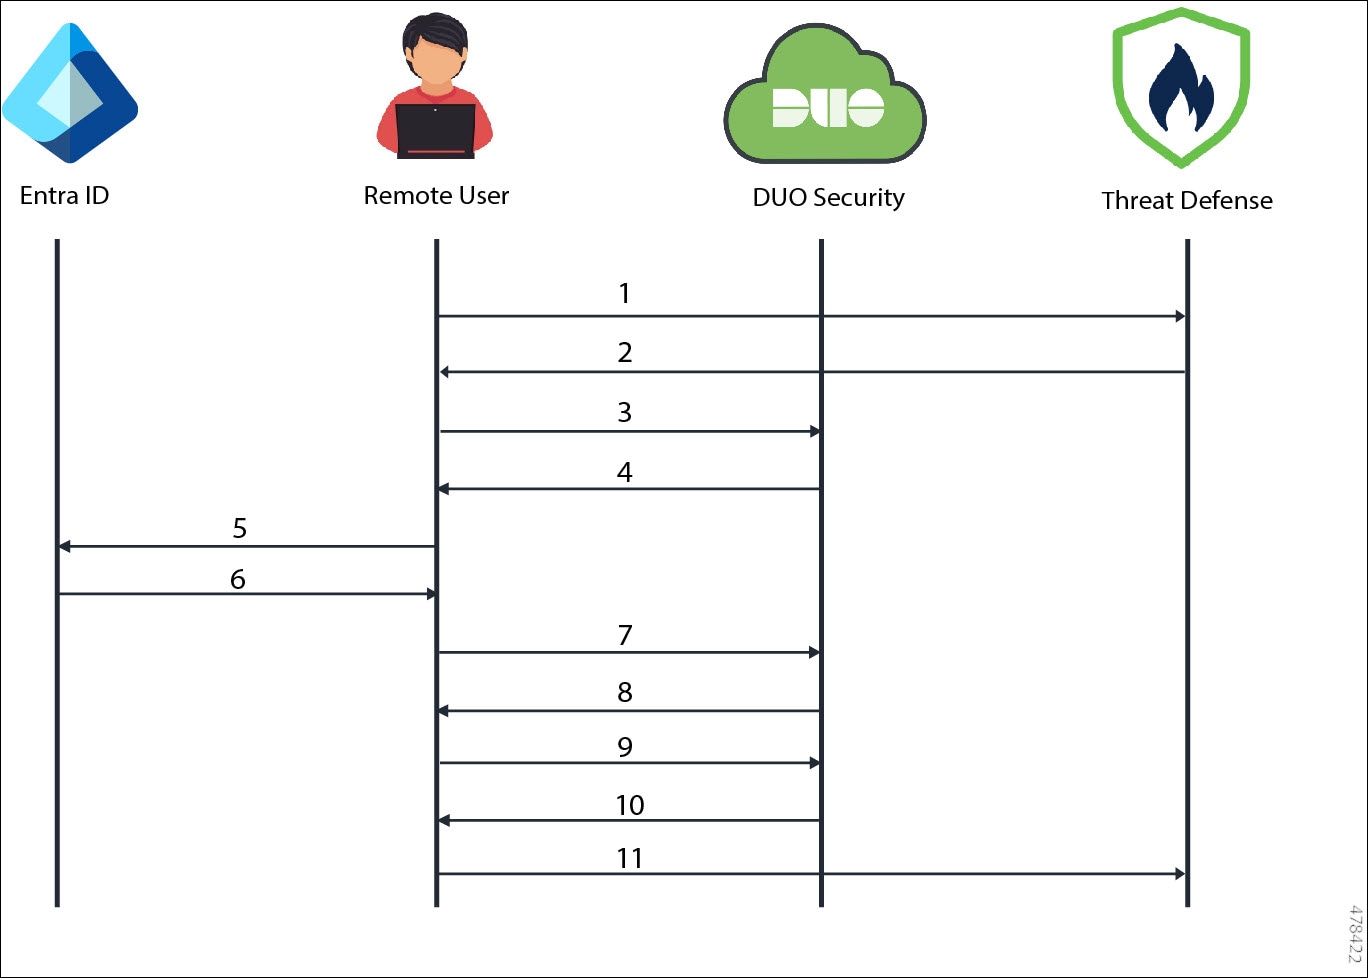
Workflow
-
A remote user uses Secure Client and initiates a remote access VPN connection request to the threat defense device.
-
The threat defense device redirects the user's browser to Duo SSO with an SAML request message.
-
User's browser gets redirected to Duo SSO.
-
Duo SSO redirects the user's browser to Entra ID with an SAML request message.
-
User's browser gets redirected to Entra ID SSO login page.
-
User logs in with primary credentials. Entra ID generates the SAML assertion and redirects the user's browser to Duo SSO with the SAML assertion.
SAML assertions are the messages that are exchanged between the SAML identity provider and the SAML service provider that confidentially identify the remote user and what the remote user is authorized to access. SAML assertions also specify security conditions and assurances that the assertions are valid.
-
User's browser gets redirected to Duo SSO.
-
Duo requests the user to authenticate using Duo two-factor authentication.
-
User completes Duo two-factor authentication.
-
Duo SSO redirects the user's browser to the threat defense with an SAML response message.
-
User's browser gets redirected to the threat defense device with the SAML response and completes the remote access VPN authentication.
End-to-End Configuration Overview
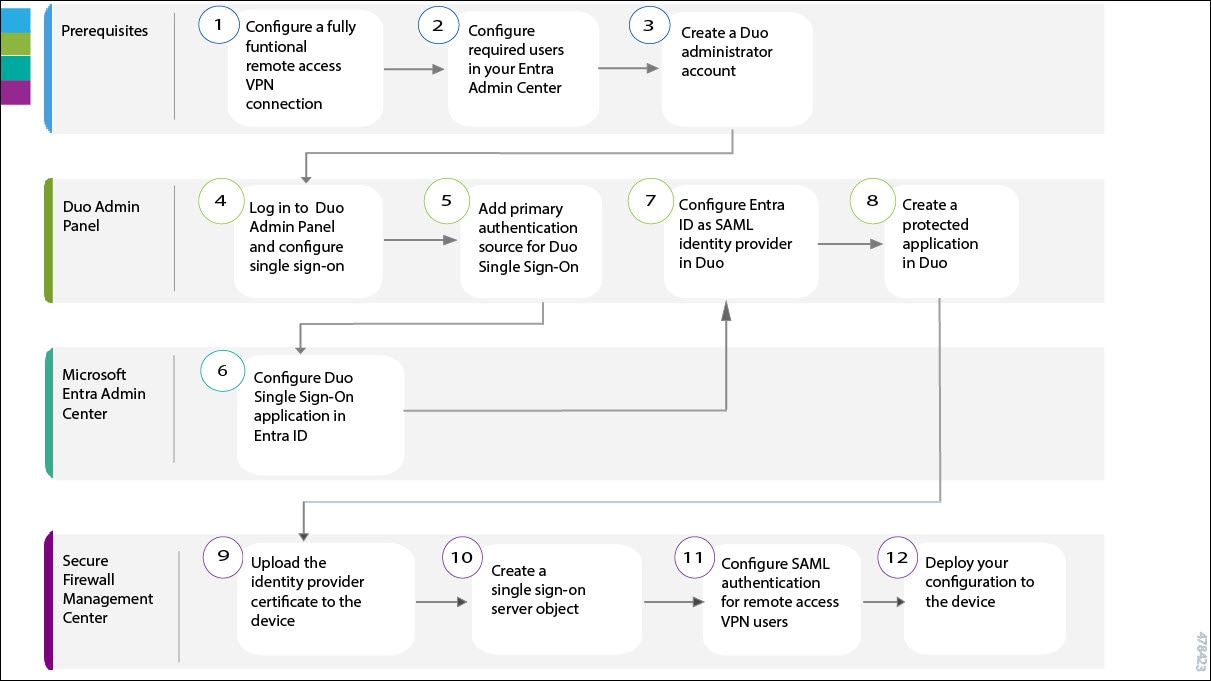
The following flowchart illustrates the end-to-end workflow of configuring Duo SSO for your remote workers.
|
Step |
Application |
Description |
|---|---|---|
|
1 |
Prerequisites |
Configure a fully functional remote access VPN connection. See Prerequisites. |
|
2 |
Prerequisites |
Configure the required users in your Entra Admin Center. See Prerequisites. |
|
3 |
Prerequisites |
Create a Duo administrator account. See Prerequisites. |
|
4 |
Duo Admin Panel |
Log in to your Duo Admin Panel and configure single sign-on. See Configure Duo Single Sign-On and Authentication Source. |
|
5 |
Duo Admin Panel |
Add a primary authentication source for Duo SSO. See Configure Duo Single Sign-On and Authentication Source. |
|
6 |
Microsoft Entra Admin Center |
|
|
7 |
Duo Admin Panel |
|
|
8 |
Duo Admin Panel |
|
|
9 |
Secure Firewall Management Center |
Upload the Identity Provider Certificate to the Threat Defense Device. |
|
10 |
Secure Firewall Management Center |
|
|
11 |
Secure Firewall Management Center |
|
|
12 |
Secure Firewall Management Center |
Prerequisites for Configuring Duo Single Sign-On
Ensure that you have met the following prerequisites before you begin the Duo SSO configuration described in this guide:
-
An active Entra ID subscription with the required user configuration. For more information on getting started with Entra ID, see Microsoft Entra ID Documentation.
-
A Duo admin account with Owner role. For more information, see Getting Started with Duo Security.
-
A fully functional remote access VPN configuration on the threat defense device managed by the management center.
-
Secure Firewall Management Center Version 7.0.0 or later.
-
Secure Firewall Threat Defense Version 6.7.0 or later on the managed devices.
-
Secure Client Version 4.6 or later.
System Requirements
-
Secure Firewall Management Center Version 7.0.0 or later.
-
Secure Firewall Threat Defense Version 6.7.0 or later on the managed devices.
-
Secure Client Version 4.6 or later.
Configure Duo Single Sign-On and Authentication Source
Duo SSO is a cloud-hosted SAML 2.0 identity provider that provides secure access to web applications with an existing user directory such as Entra ID. Duo SSO supports local Active Directory (AD) and SAML Identity Providers (IdP) as authentication sources. This sample configuration uses Microsoft Entra ID as the primary authentication source.
For more information about configuring Duo SSO and the authentication source, see Duo documentation.
Step 1 | Log in to your Duo Admin Panel and click Single Sign-On. |
Step 2 | (Optional) If you are configuring Duo Single Sign-On for the first time, review the information on the Single Sign-On page and the Duo privacy statements. Agree to the user terms and click Activate and Start Setup. |
Step 3 | On the Customize your SSO subdomain page, specify a subdomain that you want your users to see when they log in with Duo SSO. For example, you can enter example and users will see example.login.duosecurity.com in the URL when logging into Duo SSO. Click Save and continue to use the subdomain or click Skip for now to customize your subdomain later. |
Step 4 | On the Add Authentication Source page, click Add SAML Identity Provider. The Duo SSO metadata information that you need to provide the SAML identity provider is displayed under the Configure the SAML Identity Provider section. |
Configure Duo Single Sign-On Application in Entra ID
SAML delegates authentication from a service provider to an identity provider. In this configuration, Duo SSO acts as the SAML service provider that uses Microsoft Entra ID as the SAML identity provider for primary authentication. For more information, see the instructions for using Entra ID described in the SAML Identity Provider section of the Duo documentation.
Before you begin
Ensure that you have a Microsoft Entra ID account with the required user configuration.
Step 1 | Log in to your Microsoft Azure Portal and click Microsoft Entra ID. |
Step 2 | On the left pane, click Enterprise applications, and then click + New application. |
Step 3 | Click + Create your own application to create a new application for Duo SSO configuration. |
Step 4 | Specify a display name to uniquely identify your application, for example, Duo SSO. |
Step 5 | Choose the option Integrate any other application you don't find in the gallery and click Create. |
Step 6 | On the Duo SSO application Overview page, click Users and groups. |
Step 7 | Click + Add user/group and choose the users and groups that you want to provide access to log in to Duo SSO using Entra ID credentials. After selecting the users and groups, click Assign at the bottom of the page. |
Step 8 | On the left pane, click Single sign-on, and then click SAML from the Select a single sign-on method page. |
Step 9 | On the Set up Single Sign-On with SAML page, click Edit next to Basic SAML Configuration. |
Step 10 | Provide the Duo SSO metadata information that is available under the Configure the SAML Identity Provider section of your Duo Admin Panel. 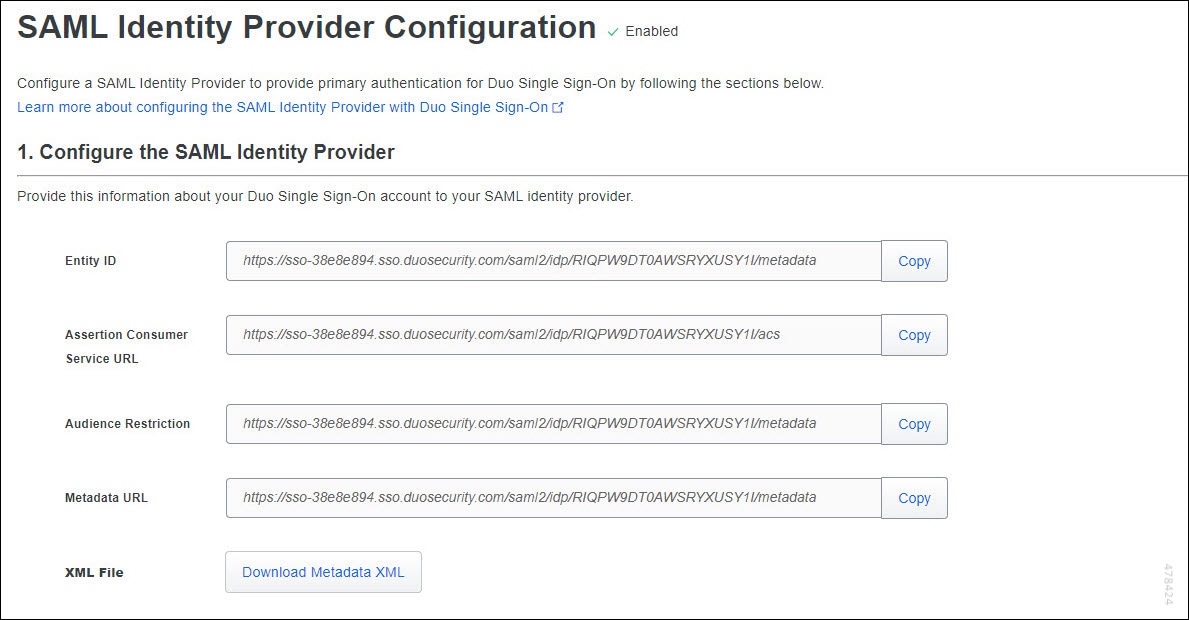
|
Step 11 | Click Edit next to the Attributes & Claims section to configure the attribute names to use while sending SAML responses to Duo. With these attribute names in the SAML responses, Duo automatically selects the correct attributes when signing in users into their applications. When configuring an SAML application, you can pick any of these five bridge attributes and additional custom bridge attributes, if any, that you have configured. If you pick a bridge attribute on the application's configuration page in the Duo Admin Panel, it will automatically map to the appropriate attribute for the enabled authentication source.  Note NoteDuo SSO does not support the option to test your single sign-on connection from Entra ID. |
Configure Entra ID As the Identity Provider in Duo
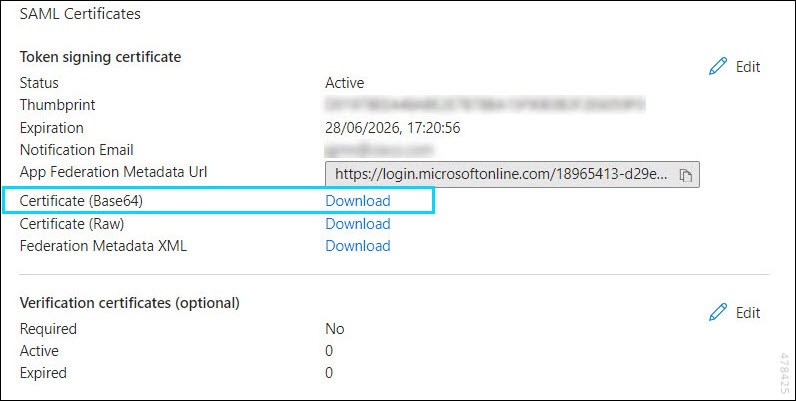
Step 1 | When a user authenticates through Microsoft Entra ID by using SAML, Entra ID issues a token to Duo. Instead of prompting for a username and password, Duo uses the token to sign in the user. Microsoft Entra ID signs these SAML tokens with a unique certificate. Follow these steps to download the SAML certificate from Entra ID that Duo can use for decrypting the tokens:
|
Step 2 | Copy the metadata information for Entra ID that is available under Set up Duo SSO (or the name you specified). 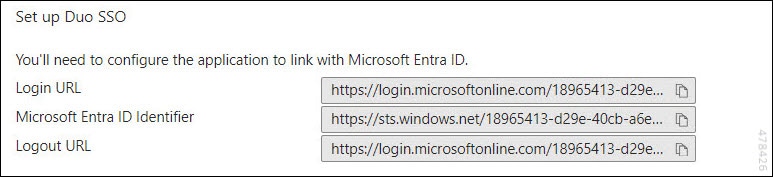
|
Step 3 | Return to your Duo Admin Panel and scroll down to the Configure Duo Single Sign-On section on the SAML Identity Provider Configuration page. |
Step 4 | Specify a unique display name to identify the SAML identity provider, for example, Entra ID. |
Step 5 | Copy and paste the Microsoft Entra ID Identifier from the Entra ID into the Entity ID field in the Duo Admin Panel. |
Step 6 | Copy and paste the Login URL from Entra ID into the Single Sign-On URL field in the Duo Admin Panel. |
Step 7 | Upload the SAML certificate that you downloaded from Entra ID to the Certificate section in the Duo Admin Panel. |
Step 8 | Leave the Username Normalization option set to Simple. The username normalization determines whether the username entered for primary authentication needs to be altered before matching it to a Duo user account. |
Step 9 | Click Save. |
Create a Protected Application in Duo
A protected application in Duo is a service that integrates Duo and a threat defense remote access VPN. See Protecting Applications for more information about protecting applications in Duo and additional application options.
Before you begin
Enable Duo SSO for your Duo account and configure a working authentication source as described in the Configure DUO Single Sign-On and Authentication Source.
Step 1 | Log in to your Duo Admin Panel and choose Applications. |
Step 2 | Click Protect an Application. |
Step 3 | Scroll down and locate the entry Cisco Firepower Threat Defense VPN with the protection type 2FA with SSO hosted by Duo (Single Sign-On) in the applications list, and click Protect next to the application. 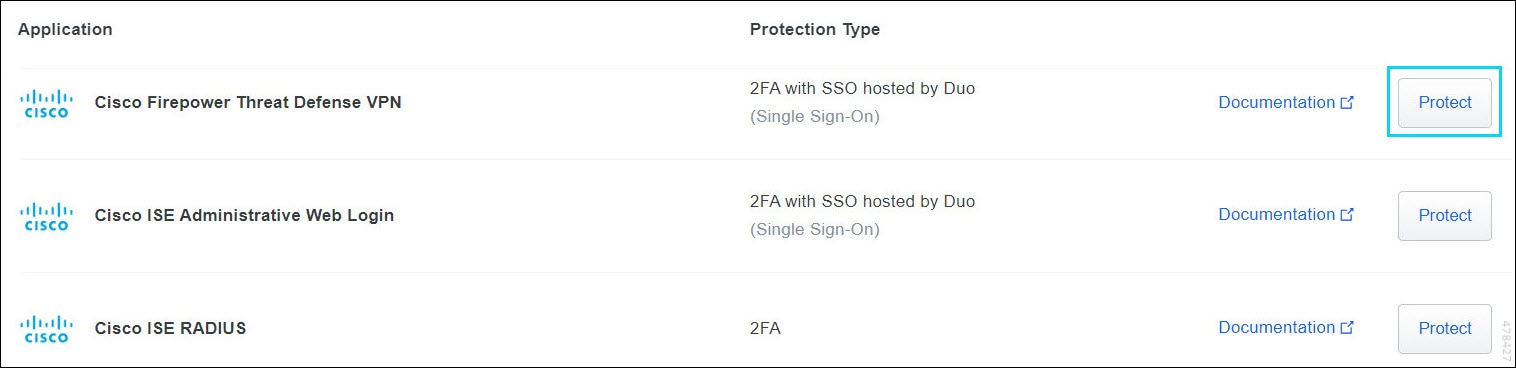
|
Step 4 | Enter the publicly resolvable hostname of your Cisco Secure Firewall Threat Defense as the Cisco Firepower Base URL. |
Step 5 | Enter the name of the connection profile of your remote access VPN for which you want to configure SSO as the Connection Profile Name. |
Step 6 | Scroll to the bottom of the page and click Save. |
Upload the Identity Provider Certificate to the Threat Defense Device
Step 1 | Log in to your Duo Admin panel and choose Applications. |
Step 2 | Under the list of applications, choose the Cisco Firepower Threat Defense VPN application that you have configured, as described in Create a Protected Application in Duo. |
Step 3 | Click Download certificate next to Identity Provider Certificate under Downloads on the details page for your application. |
Step 4 | Log in to your management center and choose . |
Step 5 | Click Add. |
Step 6 | Choose the threat defense device in which you are configuring Duo SSO. |
Step 7 | Click + next to Cert Enrollment. |
Step 8 | Specify a name for the certificate, for example, duo_sso_cert. |
Step 9 | From the Enrollment Type drop-down list, choose Manual. |
Step 10 | Check the CA Only check box. |
Step 11 | Open the certificate file that you downloaded earlier in a text editor (such as Notepad) and copy the entire contents of the file (including the -----BEGIN CERTIFICATE----- and -----END CERTIFICATE----- lines). Paste the certificate file text into the CA Certificate field in the management center. |
Step 12 | Check the Skip Check for CA flag in basic constraints of the CA Certificate check box to skip checking the basic constraints extension and the CA flag in the trustpoint certificate. |
Step 13 | Click Save. |
Step 14 | Click Add. |
Create a Single Sign-On Server Object
Before you begin
Ensure that you have the following information from your Duo Admin Panel.
|
Metadata |
Description |
|---|---|
|
Identity Provider Entity ID |
The URL that is defined in SAML IdP to uniquely identify a service provider. Example: https://sso-rbdef4.sso.duosecurity.com/saml2/sp/DIABC1367234567/metadata |
|
SSO URL |
The URL for signing into the SAML identity provider server. Example: https://sso-rbdef4.sso.duosecurity.com/saml2/sp/DIABC1367234567/sso |
|
Logout URL |
This field is optional. After users are logged out of Duo SSO, they will be redirected to the URL in this field. |
|
Identity Provider Certificate |
Certificate of the IdP enrolled with the threat defense to verify the messages signed by the IdP. |
Step 1 | In your management center, choose . |
Step 2 | Click Add Single Sign-on Server. |
Step 3 | Enter the name as Duo SSO in the Name field. |
Step 4 | Copy the Identity Provider Entity ID from the Duo Admin Panel Metadata section and paste it into the management center's Identity Provider Entity ID field. |
Step 5 | Copy the SSO URL from the Duo Admin Panel Metadata section and paste it into the management center's SSO URL field. |
Step 6 | (Optional) Copy the Logout URL from the Duo Admin Panel Metadata section and paste it in the management center's Logout URL field. |
Step 7 | Specify the publicly resolvable hostname of the threat defense as the Base URL. This URL redirects the user back to Secure Firewall Threat Defense after the identity provider authentication is complete. |
Step 8 | Choose the identity provider certificate duo_sso_cert from the Identity Provider Certificate drop-down list. |
Step 9 | Leave the Request Signature set to No Signature. |
Step 10 | Ensure that you uncheck the Request IdP re-authentication on Login check box. |
Step 11 | Leave all the other options to the default setting and click Save. |
Configure SAML Authentication for Remote Access VPN Users
Step 1 | In your management center, choose . |
Step 2 | Click the Edit ( |
Step 3 | Click the Edit ( |
Step 4 | Click the AAA tab. |
Step 5 | Choose SAML from the Authentication Method drop-down list. |
Step 6 | Choose the Duo single sign-on server Duo SSO from the Authentication Server drop-down list. |
Step 7 | Click the Aliases tab and add an alias name for this connection profile to map the connections to this connection profile. Users can see this alias name in the drop-down list that appears in the Secure Client. |
Step 8 | Save your changes. |

Deploy Your Configuration to the Threat Defense Device
After you complete all the configurations, deploy them to the managed device.
Step 1 | On the management center menu bar, click Deploy. |
Step 2 | Click Advanced Deploy. |
Step 3 | Check the check box next to the threat defense device in which you want to deploy the configurations and click Deploy. For more information about configuration deployment, see the Configuration Deployment section of the Cisco Secure Firewall Management Center Device Configuration Guide. |
Verify Your Configuration
Step 1 | Open the Secure Client, choose the VPN connection profile that uses SAML SSO authentication, and click Connect. |
Step 2 | The Secure Client redirects you to the Microsoft Entra ID login page for primary authentication. Log in using your credentials. |
Step 3 | Upon successful verification of the user credentials, you will be redirected to Duo for two-factor authentication. When prompted, complete the Duo two-factor authentication. After you successfully complete the authentication, you will be connected to the VPN tunnel. |
Troubleshoot the Duo Single Sign-On Configuration
After the deployment, use the following CLIs to troubleshoot issues related to Duo SSO authentication configuration on your Secure Firewall Threat Defense device.
 Caution
Proceed with caution when you run debug commands on the threat defense device in production environments. You can set various debug levels on the device that may have verbose outputs; by default, level 1 is used.
|
Troubleshooting Task |
Command |
|---|---|
|
Debug the remote access VPN related information. |
debug webvpn 255 |
|
Debug the remote access VPN Secure Client-related information. |
debug webvpn anyconnect 255 |
|
Debug the remote access VPN session-related information. |
debug webvpn session 255 |
|
Debug the common IKE-related transactions. |
debug webvpn request 255 |
|
Debug SAML authentication-related information. |
debug aaa authentication |