Cisco Video Surveillance Monitoring Workstation Performance Baseline Specification, Release 7.7
Available Languages
Table of Contents
Cisco Video Surveillance Monitoring Workstation Performance Baseline Specification, Release 7.7
Best Practice: Use the Workstation Profiler Tool
Improving Workstation Playback Performance
Using the Smooth Video Options
Displaying the Secondary Stream by Default
Enabling 64-Bit Video Monitoring using Internet Explorer (IE)
Windows 7—Enabling 64-bit Video Monitoring with IE 10 or 11
Windows 8 / 8.1—Enabling 64-bit Video Monitoring with IE 10 or 11
Saving Clips in Protected Mode Internet Explorer 64 bit
Contents
- Overview
- Workstation Specifications
- Mixing Resolutions and Codecs
- Best Practice: Use the Workstation Profiler Tool
- Improving Workstation Playback Performance
Overview
This document provides the performance baseline for a video surveillance monitoring workstation. The performance of a workstation on which you display multiple windows of surveillance video depends on many variables, including, CPU, memory, bus speeds, graphics card capabilities, and other applications that are installed on the workstation. Overall quality of experience also can vary depending on the type of system used, the number of video streams being rendered, and the characteristics of those streams.
This document describes the performance baseline for a dedicated surveillance monitoring workstation to ensure the overall quality of the monitoring experience. This document also describes the maximum number of video streams that can run with acceptable quality on a monitoring workstation when using different codecs (MPEG-4 and H.264) The values listed in the standard-definition acceptable load table were verified using NTSC video settings.

Note![]() Make sure that you are using the version of this specification that matches your version of Cisco Video Surveillance Manager (VSM). This specification is used to validate acceptable loads.
Make sure that you are using the version of this specification that matches your version of Cisco Video Surveillance Manager (VSM). This specification is used to validate acceptable loads.

Tip![]() Use the Cisco Video Surveillance Workstation Profiler Tool to determine the expected performance of a workstation. See the Using the Cisco Video Surveillance Monitoring Workstation Profiler Tool for more information.
Use the Cisco Video Surveillance Workstation Profiler Tool to determine the expected performance of a workstation. See the Using the Cisco Video Surveillance Monitoring Workstation Profiler Tool for more information.
Workstation Specifications
Refer to the following for workstation requirements and acceptable loads:
- Table 1 —Workstation Specifications
- Table 2 —Windows OS and web browser requirements
- Table 3 —Windows OS and Cisco SASD requirements
- Table 4 —Acceptable Load per Client by Codec for Standard Definition (SD)
- Table 5 —Acceptable Load per Client for High Definition (HD) H.264
Tip![]() See the “Enabling 64-Bit Video Monitoring using Internet Explorer (IE)” section for more information.
See the “Enabling 64-Bit Video Monitoring using Internet Explorer (IE)” section for more information.
Table 1 describes configurations for a monitoring workstation that displays video from Cisco Video Surveillance Manager (VSM) Release 7.7. Workstations with these configurations were used to determine the recommended maximum video loads. This assumes that the workstation is dedicated to video. Running other software, such as firewalls, anti virus applications, CD/DVD burning utilities, and general-purpose applications will reduce the quality of the user experience.
See Table 2 . |
|
Windows 7, 8, or 8.1, 64-bit version. See Table 3 for more information. |
|
6 GB DDR3 or greater (we recommend 12 GB for optimal performance). |
|
– – |
|
The Cisco Multi-Pane client software installed on the PC.
Note By default, all video monitoring using Internet Explorer 10 is performed using the 32-bit Cisco Multi-Pane client software. To enable 64-bit browser monitoring in Windows 7 or 8 using IE 10, see the “Enabling 64-Bit Video Monitoring using Internet Explorer (IE)” section |
|
You will also be prompted to install the required Microsoft.Net 4.0 component, if necessary. If your workstation does not have Internet access, the.Net 4.0 installer can be downloaded from http://www.microsoft.com/en-us/download/details.aspx?id=17718. |
|
A standard Windows 7 user account is required (guest accounts are not supported). |
|
Table 2 describes the supported OS and web browser versions that can be used to monitor video.
Internet Explorer 10 desktop version, 32-bit or 64-bit Note The Metro version of I.E. 10 is not supported. I.E. 11 is not supported. |
|
Note![]() The 64-bit version of Internet Explorer requires that the workstation run in “Protected Mode” See Enabling 64-Bit Video Monitoring using Internet Explorer (IE) for instructions.
The 64-bit version of Internet Explorer requires that the workstation run in “Protected Mode” See Enabling 64-Bit Video Monitoring using Internet Explorer (IE) for instructions.
Table 3 describes the supported OS to monitor video using Cisco SASD.
Table 4 shows the maximum number of standard-definition video streams that can run with acceptable quality on the recommended monitoring workstation.
Table 5 shows the maximum number of high-definition video streams that can run with acceptable quality on the recommended monitoring workstation when using the H.264 codec.
Mixing Resolutions and Codecs
You can use several codecs on a monitoring workstation simultaneously. However, the number of streams does not necessarily combine linearly. In addition, a 1080p 12 Mbps streams should be mixed only with a single smaller resolution stream.
Best Practice: Use the Workstation Profiler Tool
It is best practice to validate the performance of any existing system by using the Cisco Video Surveillance Workstation Profiler Tool. This tool enables the user of a workstation to determine the expected performance of the workstation.
See the Using the Cisco Video Surveillance Monitoring Workstation Profiler Tool for information about installing and operating this tool.
Improving Workstation Playback Performance
Use the following methods to improve the performance of monitoring workstations when playing video:
Using the Smooth Video Options
If live video playback is jittery due to network or other performance issues, use the Smooth video settings to automatically do the following:
Live video can then be played back smoothly despite network delays between the camera, Media Server, and workstation.
 indicates video is performing as expected.
 indicates that the client workstation has detected that playback is not smooth.
 indicates a severe adverse situation. Action will be taken to correct the situation such as switching to secondary stream or iFrame streaming.
 or
or
 ) indicates that the primary stream is being used.
 indicates that the secondary or iFrame stream is being used.
Usage Notes
- The Smooth Video Options are available only for live video on non-PTZ cameras (the Smooth Video Options are disabled on PTZ cameras).
- The settings are applied to all non-PTZ cameras and are persistent for the current PC workstation.
For example, the settings remain if you log out and back in, or view a different camera and then return to the current camera.
- The settings also apply to the non-PTZ cameras when using the Cisco Safety and Security Desktop (SASD) application and the Cisco Video Surveillance Management Console.
- The Smooth Video options are disabled if you manually select a stream (click
 in the control bar).
–![]() The pane displays the selected stream even if the video quality is poor (the video does not automatically switch to the Smooth Video alternate stream).
The pane displays the selected stream even if the video quality is poor (the video does not automatically switch to the Smooth Video alternate stream).
–![]() To cancel the manually selected stream and re-enable the Smooth Video settings, reload the view or drag the camera onto the pane again.
To cancel the manually selected stream and re-enable the Smooth Video settings, reload the view or drag the camera onto the pane again.
Procedure
Step 1![]() Launch a Cisco VSM monitoring application, such as the Cisco Video Surveillance Safety and Security Desktop (Cisco SASD) application or the Smooth Cisco SASD Advanced Video Player.
Launch a Cisco VSM monitoring application, such as the Cisco Video Surveillance Safety and Security Desktop (Cisco SASD) application or the Smooth Cisco SASD Advanced Video Player.
Step 2![]() Select Settings > Video to display the Video Settings window.
Select Settings > Video to display the Video Settings window.
Step 3![]() In the Smooth Video Settings pane, select the Enable Smooth Video for Live/Non-PTZ Camera check box to enable the smooth video options.
In the Smooth Video Settings pane, select the Enable Smooth Video for Live/Non-PTZ Camera check box to enable the smooth video options.
Step 4![]() (Optional) Enter a value for Buffer Pre-Roll (Seconds) to define the number of seconds that live video to delay until recording begins.
(Optional) Enter a value for Buffer Pre-Roll (Seconds) to define the number of seconds that live video to delay until recording begins.
Video data is saved in a cache on your PC to avoid pauses caused by network bandwidth and other issues.
We recommend a value between 1.5 and 3 seconds.
Caution! We strongly recommend that Buffer Pre-Roll (Seconds) be disabled (= 0) because streaming delays can cause a potential security risk. It is a better practice to address the network bandwidth or performance issues that are causing the delays. Use Buffer Pre-Roll (Seconds) only when significant jitter occurs and a network resolution is not available.
Step 5![]() Use the Smooth Video Settings to define an alternate video stream to use if video quality is poor despite the smooth video buffer (video quality is indicated by the
Use the Smooth Video Settings to define an alternate video stream to use if video quality is poor despite the smooth video buffer (video quality is indicated by the  icon on the live viewing pane).
 , automatically switch to the secondary video stream. Secondary streams typically present a lower-quality image that requires less bandwidth and processing.
 , then display only iFrame video. iFrame video reduces the bandwidth requirement to correct the situation.
 , make no change and display the selected stream even if it results in jittery or paused playback.
–![]() These options are not used if the video quality is acceptable
These options are not used if the video quality is acceptable  or if the icon is yellow ( intermediate)
  . The selected stream displays.
–![]() A red cable
A red cable  displays when the secondary or iFrame stream is applied.
–![]() If an alternate stream is applied, the settings remain until you close and reopen the video source (camera).
If an alternate stream is applied, the settings remain until you close and reopen the video source (camera).
Displaying the Secondary Stream by Default
By default, cameras display a camera’s primary video stream, which is often configured to display high resolution video. If workstation or network performance issues occur, you can create a video View to display the camera’s secondary stream by default. Secondary streams are often configured to display the same video in lower resolution.
Step 1![]() Access the video monitoring screen using the Cisco SASD or the Operations Manager UI.
Access the video monitoring screen using the Cisco SASD or the Operations Manager UI.
Step 2![]() Select a layout and add video cameras to the panes.
Select a layout and add video cameras to the panes.
Step 3![]() Select the secondary stream for the cameras:
Select the secondary stream for the cameras:
- Cisco SASD—Select the stream and select Stream 2 from the controls.
- Operations Manager—Right-click the video pane, select Select Streams and select a lower-resolution secondary stream.
Step 4![]() Save the layout as a View.
Save the layout as a View.
Step 5![]() Select the view using Cisco SASD or the Operations Manager UI. The camera’s secondary stream will be displayed.
Select the view using Cisco SASD or the Operations Manager UI. The camera’s secondary stream will be displayed.
See the Cisco Video Surveillance Operations Manager User Guide or Cisco Video Surveillance Safety and Security Desktop User Guide for more information.
Questions & Answers
Q. Can two video monitors be used, either with two graphics cards or one card with dual connectors?
Up to 2 identical graphics cards may be used in a single system with up to a maximum of 4 monitors, two per graphics card. While additional graphics cards and/or additional monitors do not generate additional performance within a system, this configuration may be used to provide greater display flexibility. It must be ensured that the total aggregate video displayed within a single system, regardless of number of displays or graphics card, stays within parameters outlined above.
Q. What is the recommended Windows 7 Configuration when using dual graphics cards?
To configure a Windows 7 workstation with dual cards, we recommend the following.
1. Connect the monitors to the of the graphics cards using DVI connections.
2. On the Window 7 workstation select Control Panel > System and Security.
3. Select System and click Advanced System Settings.
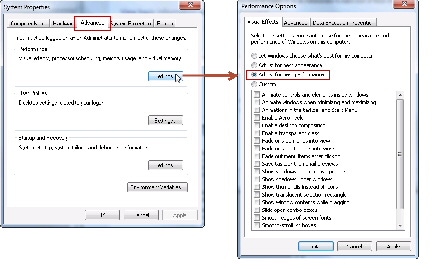
4. In the Advanced tab, click the Performance Settings and select Adjust for best Performance (Figure 1).
Figure 1 Adjusting a Workstation for Best Performance
Q. Is the Video Surveillance Multipane Client supported on Windows 7 and Windows 8?
Yes, the Video Surveillance Multipane Client is supported on Windows 7 and Windows 8 using Internet Explorer or the Cisco Safety and Security Desktop. See the “Workstation Specifications” section. If you have a question about whether your workstation supports the VSM Multipane Client, use the workstation Profiler Tool (as described in the “Best Practice: Use the Workstation Profiler Tool” section).
Q. How do PAL video settings affect expected behavior?
While the standard-definition acceptable load tables were verified using NTSC video settings, using PAL settings (such as 25 fps) should not degrade the quality of the monitoring experience.
Q. Can I use a workstation that does not meet the recommended baseline specifications?
When considering the number of codecs, resolutions, and frame rates supported by VSM, and the number of workstations, graphics cards and processors that are available, it is difficult to determine the optimal workstation for a given user experience, so this document provides recommended maximum loads. Workstations that do not meet the baseline specifications may be able to render some video, but they cannot provide the same quality of monitoring experience. If you have a question about whether your workstation can perform the tasks that you need, follow the best practice of using the workstation Profiler Tool (as described in the “Best Practice: Use the Workstation Profiler Tool” section).
Q. What is the difference between “minimum requirements” and this “baseline specification”?
Minimum requirements define what is required to install and run the VSM Multipane Client to display a single video stream. They do not define acceptable loads for multi-paned use cases or the necessary configuration to ensure a quality monitoring experience.
Enabling 64-Bit Video Monitoring using Internet Explorer (IE)
By default, all video monitoring using Internet Explorer is performed using the 32-bit Cisco Multi-Pane client software.
- The 32-bit version can display a maximum of 4 video panes (for example, in a 2x2 layout).
- The 64-bit version can display a maximum of 25 video panes (for example, in a 5x5 layout).
The 64-bit version of Internet Explorer, however, requires that the workstation run in “Protected Mode”. To enable video monitoring in Windows 7, 8, or 8.1 therefore, you must first enable “Protected Mode” on the workstation.
Refer to the following topics for instructions:
- Windows 7—Enabling 64-bit Video Monitoring with IE 10 or 11
- Windows 8 / 8.1—Enabling 64-bit Video Monitoring with IE 10 or 11
Note![]() See Table 2, Windows OS and web browser requirements, for the IE support for your OS version
See Table 2, Windows OS and web browser requirements, for the IE support for your OS version
Windows 7—Enabling 64-bit Video Monitoring with IE 10 or 11
Step 1![]() Turn on Enable Protected Mode.
Turn on Enable Protected Mode.
a.![]() Go to Control Panel > Network and Internet > Internet Options.
Go to Control Panel > Network and Internet > Internet Options.
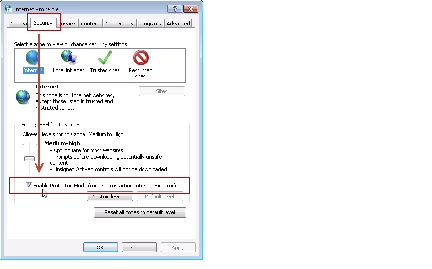
c.![]() Check the box for Enable Protected Mode (Figure 2).
Check the box for Enable Protected Mode (Figure 2).
Figure 2 Enable Protected Mode
Step 2![]() Turn on Enable Enhanced Protected mode.
Turn on Enable Enhanced Protected mode.
a.![]() Select the Advanced tab (Control Panel > Network and Internet > Internet Options).
Select the Advanced tab (Control Panel > Network and Internet > Internet Options).
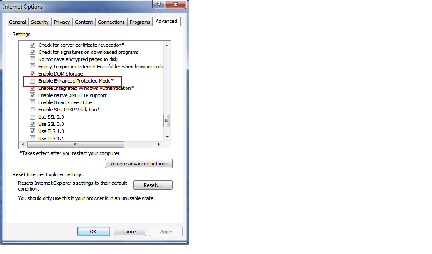
c.![]() Check the box for Enable Enhanced Protected Mode (Figure 3).
Check the box for Enable Enhanced Protected Mode (Figure 3).
Figure 3 Enable Enhanced Protected Mode
Step 3![]() Ensure that User Account Control (UAC) is enabled.
Ensure that User Account Control (UAC) is enabled.
a.![]() Go to Control Panel > User Accounts > User Accounts.
Go to Control Panel > User Accounts > User Accounts.
b.![]() Click Change User Account Control settings.
Click Change User Account Control settings.
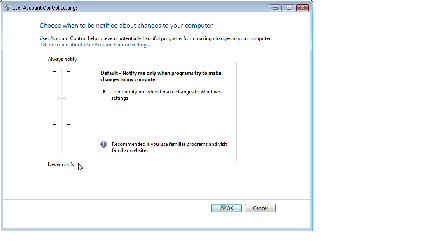
c.![]() Verify that the slider is NOT set to Never notify (Figure 4).
Verify that the slider is NOT set to Never notify (Figure 4).
Figure 4 User Account Control (UAC)
Step 4![]() Create a registry entry under the key:
Create a registry entry under the key:
HKEY_CURRENT_USER\Software\Microsoft\Internet Explorer\Main\‘TabProcGrowth’ = 0
Step 6![]() Launch the 64-bit Internet Explorer in normal user (non-admin mode).
Launch the 64-bit Internet Explorer in normal user (non-admin mode).
Step 7![]() Log on to the Operations Manager.
Log on to the Operations Manager.
Step 8![]() Install the 64-bit multi-pane client, when prompted.
Install the 64-bit multi-pane client, when prompted.
Windows 8 / 8.1—Enabling 64-bit Video Monitoring with IE 10 or 11
Step 1![]() Turn on Enable Protected Mode.
Turn on Enable Protected Mode.
a.![]() Go to Control Panel > Internet Options > Security.
Go to Control Panel > Internet Options > Security.
b.![]() Check the box for Enable Protected Mode (under Internet Zone).
Check the box for Enable Protected Mode (under Internet Zone).
Step 2![]() Turn on Enable Enhanced Protected mode.
Turn on Enable Enhanced Protected mode.
a.![]() Go to Control Panel > Internet Options > Advanced.
Go to Control Panel > Internet Options > Advanced.
b.![]() Scroll down to Security and check the box for Enable Enhanced Protected Mode.
Scroll down to Security and check the box for Enable Enhanced Protected Mode.
Step 3![]() Create a registry entry under the key:
Create a registry entry under the key:
HKEY_CURRENT_USER\Software\Microsoft\Internet Explorer\Main\‘TabProcGrowth’ = 0
Step 4![]() Launch the 64-bit desktop version of Internet Explorer in normal user (non-admin mode).
Launch the 64-bit desktop version of Internet Explorer in normal user (non-admin mode).
Step 5![]() Log on to the Operations Manager.
Log on to the Operations Manager.
Step 6![]() Install the 64-bit multi-pane client, when prompted.
Install the 64-bit multi-pane client, when prompted.
Saving Clips in Protected Mode Internet Explorer 64 bit
Internet Explorer running in “Protected Mode” is a low integrity process that can only write files to low integrity folders.
The default low integrity folder in the system is $USER$\AppData\LocalLow. To perform file system functions, such as saving snapshot, you can save the file to the default low-integrity folder or create a low integrity folder using the following steps:
Step 1![]() Create a new folder using file explorer.
Create a new folder using file explorer.
Step 2![]() Lower the integrity of that folder using the icacls command:
Lower the integrity of that folder using the icacls command:
icacls <path> /setintegritylevel (OI)(CI)low
Step 3![]() Save the clips to the new folder.
Save the clips to the new folder.
Related Documentation
See the Cisco Video Surveillance 7 Documentation Roadmap for descriptions and links to Cisco Video Surveillance documentation, server and storage platform documentation, and other related documentation.
Cisco and the Cisco logo are trademarks or registered trademarks of Cisco and/or its affiliates in the U.S. and other countries. To view a list of Cisco trademarks, go to this URL: www.cisco.com/go/trademarks. Third-party trademarks mentioned are the property of their respective owners. The use of the word partner does not imply a partnership relationship between Cisco and any other company. (1110R)
Any Internet Protocol (IP) addresses and phone numbers used in this document are not intended to be actual addresses and phone numbers. Any examples, command display output, network topology diagrams, and other figures included in the document are shown for illustrative purposes only. Any use of actual IP addresses or phone numbers in illustrative content is unintentional and coincidental.
 Feedback
Contact Cisco
- Open a Support Case

- (Requires a Cisco Service Contract)