Cisco Video Surveillance 8930 IP Camera Reference Guide, Release 1.0.2
Bias-Free Language
The documentation set for this product strives to use bias-free language. For the purposes of this documentation set, bias-free is defined as language that does not imply discrimination based on age, disability, gender, racial identity, ethnic identity, sexual orientation, socioeconomic status, and intersectionality. Exceptions may be present in the documentation due to language that is hardcoded in the user interfaces of the product software, language used based on RFP documentation, or language that is used by a referenced third-party product. Learn more about how Cisco is using Inclusive Language.
- Updated:
- April 18, 2018
Chapter: IP Camera Main Page
IP Camera Main Page
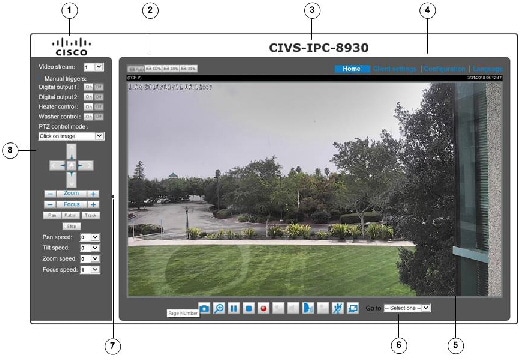
This chapter explains the layout of the IP camera Main page. It is composed of the following sections: Cisco Logo, Host Name, Camera Control Area, Configuration Area, Menu, and Live Video Window.
Figure 3-1 illustrates the Main page.
|
|
|
|
|
|
|
|
Host Name. The host name can be customized to fit your needs. For more information, see the “System > General settings” section. |
|
|
|
|
|
Video view window. Shows the video stream from the IP camera. The information in this window depends on the video stream configuration. Depending on the camera model and camera configuration, some buttons may not be available. See the “Live Video Window for MJPEG Video Streams” section and the “Live Video Window for H.264 or H.265 Video Streams” section. |
|
|
Go to drop-down list. If you have PTZ preset positions, these positions will be available in the Go to menu. See the “PTZ > PTZ settings” section for more information. |
|
|
Hide button. You can click the hide button to hide or display the control panel. |
|
|
|
Mouse and Screen Control
In addition to the use of a joystick, mouse control is also supported by the web session. You can click on any spot on the screen to bring that spot to the center of the view. To pan 360 degrees, you can click and hold down the left mouse button when clicking a PTZ button. The same applies to arrow keys Zoom, and Focus buttons on the PTZ panel.

Note![]() If your screen control malfunctions, it is possible that the CPU of your current view station can not cope with the HD video feeds or that an incompatibility issue occurred with the ActiveX control plugins.
If your screen control malfunctions, it is possible that the CPU of your current view station can not cope with the HD video feeds or that an incompatibility issue occurred with the ActiveX control plugins.
PTZ Control Panel
Figure 3-2 shows the PTZ Control Panel.

|
|
|
|
|
|
|
|
|
|
|
|
|
|
|
|
|
|
|
|
Auto tracking. Allows the camera to move along following the moving objects in the current field of view. If you observe an object of your interest, click this button to track the object. Note that this function does not apply in an extremely crowded area, such as a market or sidewalk full of pedestrian activities. Constant shift of tracked objects will decrease the usability of this feature. Once started, you can use the Stop button to stop the current action. A click on the screen can also stop the tracking action. The camera only detect movements within the current field of view |
|
|
Start auto patrol. Once the administrator has determined the list of preset positions (including the zoom-in action on a particular position), click this button to command the camera to patrol among those positions on the Patrol List. The camera will patrol continuously. For more information, please see the “PTZ > PTZ settings” section. Once started, you can use the Stop button to stop the current action. |
|
|
Stop Auto Panning/patrolling/tracking. Click this button to stop the auto pan, auto patrol, and auto tracking functions |
|
|
Start auto pan. Click to start the auto pan (360° continuous rotation). Once started, you can use the Stop button to stop the current action. |
|
|
|
|
|
|
|
|
|
|
|
See the “PTZ > Auto tracking” section for tracking configuration details
Adjust the speed of these controls when exerted:
|
|
|
|
|
|
|---|---|---|---|---|
Live Video Window for H.264 or H.265 Video Streams
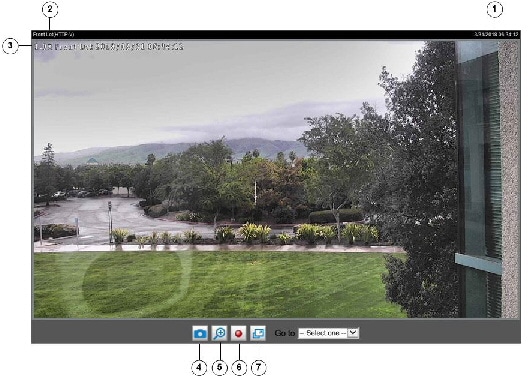
When the video mode is set to H.264 or H.265, the Live Video window appears as shown in Figure 3-3. For further configuration, see Chapter4, “Client Settings”
Figure 3-3 Live Video Window for H.264 or H.265

|
|
Time. Display the current date and time. For more information, see the “Media > Image” section. |
|
|
H.265/H.264 Protocol, Media Options, and title if configured: The transmission protocol and media options for H.265 / H.264 video streaming. For further configuration, see Chapter4, “Client Settings” The title can be configured. For more information, see the “Image settings” section. |
|
|
Title and Time. The video title and time can be stamped on the streaming video. For more information, see the “Image settings” section. |
|
|
Snapshot button. Click this button to capture and save still images. The captured images will be displayed in a pop-up window. Right-click the image and choose Save Picture As to save it in JPEG (*.jpg) or BMP (*.bmp) format. |
|
|
Digital Zoom. Click and deselect Disable digital zoom to enable the zoom operation. The navigation screen indicates the part of the image being magnified. To control the zoom level, drag the slider bar. To move to a different area you want to magnify, drag the navigation screen. |
|
|
Pause button. Pause the transmission of the streaming media. The button becomes the Resume button |
|
|
Stop button. Stop the transmission of the streaming media. Click the Resume button |
|
|
Start MP4 Recording button. Click this button to record video clips in MP4 file format to your computer. Press the Stop MP4 Recording button |
|
|
Volume button. When the Mute function is not activated, move the slider bar to adjust the volume on the local computer. |
|
|
Mute button. Turn off the volume on the local computer. The button becomes the Audio On button |
|
|
Talk button. Click this button to talk to people around the camera. Audio will project from the external speaker connected to the camera. Click this button again to end talking transmission. |
|
|
Mic Volume button. When the Mute function is not activated, move the slider bar to adjust the microphone volume on the local computer. |
|
|
Mute. Turn off the mic volume on the local computer. The button becomes the Mic On button |
|
|
Full Screen. Click this button to switch to full screen mode. Press the Esc key to switch back to normal mode. |
 after clicking the Pause button.
 to continue transmission.
 to end recording. When you exit the web browser, video recording stops accordingly. To specify the storage destination and file name, see the
  after clicking the Mute button.
 after clicking the Mute button.
Live Video Window for MJPEG Video Streams
When the video mode is set to MJPEG, the Live Video window appears as shown in Figure 3-4.
Figure 3-4 Live Video Window for MJPEG
|
|
Time. Display the current date and time. For more information, see the “Media > Image” section. |
|
|
Video title. The video title can be configured. For more information, see the “Image settings” section. |
|
|
Title and Time. The video title and time can be stamped on the streaming video. For more information, see the “Image settings” section. |
|
|
Snapshot button. Click this button to capture and save still images. The captured images will be displayed in a pop-up window. Right-click the image and choose Save Picture As to save it in JPEG (*.jpg) or BMP (*.bmp) format. |
|
|
Digital Zoom. Click and uncheck Disable digital zoom to enable the zoom operation. The navigation screen indicates the part of the image being magnified. To control the zoom level, drag the slider bar. To move to a different area you want to magnify, drag the navigation screen. |
|
|
Start MP4 Recording button. Click this button to record video clips in MP4 file format to your computer. Press the Stop MP4 Recording button |
|
|
Full Screen button. Click this button to switch to full screen mode. Press the Esc key to switch back to normal mode. |
 to end recording. When you exit the web browser, video recording stops accordingly. To specify the storage destination and file name, see the
  Feedback