- Preface
- Getting Started
- Setting Up the Sensor
- Configuring Interfaces
- Configuring Virtual Sensors
- Policies--Signature Definitions
- Policies--Event Action Rules
- Policies--Anomaly Detection
- Configuring Attack Response Controller for Blocking and Rate Limiting
- Configuring SNMP
- Configuring External Product Interfaces
- Maintaining the Sensor
- Monitoring the Sensor
- Obtaining Software
- Upgrading, Downgrading, and Installing System Images
- System Architecture
- Signature Engines
- Troubleshooting
- Glossary
- Index
Cisco Intrusion Prevention System Device Manager Configuration Guide for IPS 6.0
Bias-Free Language
The documentation set for this product strives to use bias-free language. For the purposes of this documentation set, bias-free is defined as language that does not imply discrimination based on age, disability, gender, racial identity, ethnic identity, sexual orientation, socioeconomic status, and intersectionality. Exceptions may be present in the documentation due to language that is hardcoded in the user interfaces of the product software, language used based on RFP documentation, or language that is used by a referenced third-party product. Learn more about how Cisco is using Inclusive Language.
- Updated:
- September 19, 2007
Chapter: Policies--Event Action Rules
- Understanding Security Policies
- Understanding Event Action Rules
- Configuring Event Action Rules Policies
- Event Action Rules Policy rules0
- Configuring Event Action Overrides
- Configuring Target Value Ratings
- Configuring Event Action Filters
- Configuring OS Maps
- Configuring Event Variables
- Configuring the General Settings
- Monitoring Events
- Monitoring OS Identifications
Policies—Event Action Rules
This chapter explains how to add event action rules policies and how to configure event action rules. It contains the following sections:
•![]() Understanding Security Policies
Understanding Security Policies
•![]() Understanding Event Action Rules
Understanding Event Action Rules
•![]() Configuring Event Action Rules Policies
Configuring Event Action Rules Policies
•![]() Event Action Rules Policy rules0
Event Action Rules Policy rules0
•![]() Configuring Event Action Overrides
Configuring Event Action Overrides
•![]() Configuring Target Value Ratings
Configuring Target Value Ratings
•![]() Configuring Event Action Filters
Configuring Event Action Filters
•![]() Configuring the General Settings
Configuring the General Settings
•![]() Monitoring OS Identifications
Monitoring OS Identifications
Understanding Security Policies
You can create multiple security policies and apply them to individual virtual sensors. A security policy is made up of a signature definition policy, an event action rules policy, and an anomaly detection policy. IPS 6.0 contains a default signature definition policy called sig0, a default event action rules policy called rules0, and a default anomaly detection policy called ad0. You can assign the default policies to a virtual sensor or you can create new policies.
The use of multiple security policies lets you create security policies based on different requirements and then apply these customized policies per VLAN or physical interface.
Understanding Event Action Rules
This section describes event action rules, and contains the following topics:
•![]() Understanding the Threat Rating
Understanding the Threat Rating
•![]() Event Action Summarization and Aggregation
Event Action Summarization and Aggregation
•![]() Signature Event Action Processor
Signature Event Action Processor
Event Action Rules Functions
Event action rules are a group of settings you configure for the event action processing component of the sensor. These rules dictate the actions the sensor performs when an event occurs.
The event action processing component is responsible for the following functions:
•![]() Calculating the risk rating
Calculating the risk rating
•![]() Adding event action overrides
Adding event action overrides
•![]() Filtering event action
Filtering event action
•![]() Executing the resulting event action
Executing the resulting event action
•![]() Summarizing and aggregating events
Summarizing and aggregating events
•![]() Maintaining a list of denied attackers
Maintaining a list of denied attackers
Calculating the Risk Rating
A risk rating is a value between 0 and 100 that represents a numerical quantification of the risk associated with a particular event on the network. The calculation takes in to account the value of the network asset being attacked (for example, a particular server), so it is configured on a per-signature basis (attack severity rating and signature fidelity rating) and on a per-server basis (target value rating). The risk rating is calculated from several components, some of which are configured, some collected, and some derived.

Note ![]() The risk rating is associated with alerts not signatures.
The risk rating is associated with alerts not signatures.
Risk ratings let you prioritize alerts that need your attention. These risk rating factors take in to consideration the severity of the attack if it succeeds, the fidelity of the signature, and the overall value of the target host to you. The risk rating is reported in the evIdsAlert.
The following values are used to calculate the risk rating for a particular event:
•![]() Signature fidelity rating (SFR)—A weight associated with how well this signature might perform in the absence of specific knowledge of the target. The signature fidelity rating is configured per signature and indicates how accurately the signature detects the event or condition it describes.
Signature fidelity rating (SFR)—A weight associated with how well this signature might perform in the absence of specific knowledge of the target. The signature fidelity rating is configured per signature and indicates how accurately the signature detects the event or condition it describes.
Signature fidelity rating is calculated by the signature author on a per-signature basis. The signature author defines a baseline confidence ranking for the accuracy of the signature in the absence of qualifying intelligence on the target. It represents the confidence that the detected behavior would produce the intended effect on the target platform if the packet under analysis were allowed to be delivered. For example, a signature that is written with very specific rules (specific regular expression) has a higher signature fidelity rating than a signature that is written with generic rules.
Note ![]() The signature fidelity rating does not indicate how bad the detected event may be.
The signature fidelity rating does not indicate how bad the detected event may be.
•![]() Attack severity rating (ASR)—A weight associated with the severity of a successful exploit of the vulnerability.
Attack severity rating (ASR)—A weight associated with the severity of a successful exploit of the vulnerability.
The attack severity rating is derived from the alert severity parameter (informational, low, medium, or high) of the signature. The attack severity rating is configured per signature and indicates how dangerous the event detected is.
Note ![]() The attack severity rating does not indicate how accurately the event is detected.
The attack severity rating does not indicate how accurately the event is detected.
•![]() Target value rating (TVR)—A weight associated with the perceived value of the target.
Target value rating (TVR)—A weight associated with the perceived value of the target.
Target value rating is a user-configurable value (zero, low, medium, high, or mission critical) that identifies the importance of a network asset (through its IP address). You can develop a security policy that is more stringent for valuable corporate resources and looser for less important resources. For example, you could assign a target value rating to the company web server that is higher than the target value rating you assign to a desktop node. In this example, attacks against the company web server have a higher risk rating than attacks against the desktop node. Target value rating is configured in the event action rules policy.
•![]() Attack relevance rating (ARR)—A weight associated with the relevancy of the targeted OS.
Attack relevance rating (ARR)—A weight associated with the relevancy of the targeted OS.
Attack relevance rating is a derived value (relevant, unknown, or not relevant), which is determined at alert time. The relevant OSes are configured per signature.
•![]() Promiscuous delta (PD)—A weight associated with the promiscuous delta.
Promiscuous delta (PD)—A weight associated with the promiscuous delta.
Promiscuous delta is in the range of 0 to 30 and is configured per signature.
Note ![]() If the trigger packet is not inline, the promiscuous delta is subtracted from the rating.
If the trigger packet is not inline, the promiscuous delta is subtracted from the rating.
•![]() Watch list rating (WLR)—A weight associated with the CSA MC watch list in the range of 0 to 100 (CSA MC only uses the range 0 to 35).
Watch list rating (WLR)—A weight associated with the CSA MC watch list in the range of 0 to 100 (CSA MC only uses the range 0 to 35).
If the attacker for the alert is found on the watch list, the watch list rating for that attacker is added to the rating.
Figure 6-1 illustrates the risk rating formula:
Figure 6-1 Risk Rating Formula

Understanding the Threat Rating
Threat rating is risk rating that has been lowered by event actions that have been taken. All event actions have a threat rating adjustment. The largest threat rating from all of the event actions taken is subtracted from the risk rating.
The event actions have the following threat ratings:
•![]() Deny attacker inline—45
Deny attacker inline—45
•![]() Deny attacker victim pair inline—40
Deny attacker victim pair inline—40
•![]() Deny attacker service pair inline—40
Deny attacker service pair inline—40
•![]() Deny connection inline—35
Deny connection inline—35
•![]() Deny packet inline—35
Deny packet inline—35
•![]() Modify packet inline—35
Modify packet inline—35
•![]() Request block host—20
Request block host—20
•![]() Request block connection—20
Request block connection—20
•![]() Reset TCP connection—20
Reset TCP connection—20
•![]() Request rate limit—20
Request rate limit—20
Event Action Overrides
You can add an event action override to change the actions associated with an event based on the risk rating of that event. Event action overrides are a way to add event actions globally without having to configure each signature individually. Each event action has an associated risk rating range. If a signature event occurs and the risk rating for that event falls within the range for an event action, that action is added to the event. For example, if you want any event with a risk rating of 85 or more to generate an SNMP trap, you can set the risk rating range for Request SNMP Trap to 85-100. If you do not want to use action overrides, you can disable the entire event action override component.
Event Action Filters
Event action filters are processed as an ordered list and you can move filters up or down in the list.
Filters let the sensor perform certain actions in response to the event without requiring the sensor to perform all actions or remove the entire event. Filters work by removing actions from an event. A filter that removes all actions from an event effectively consumes the event.
Note ![]() When filtering sweep signatures, we recommend that you do not filter the destination addresses. If there are multiple destination addresses, only the last address is used for matching the filter.
When filtering sweep signatures, we recommend that you do not filter the destination addresses. If there are multiple destination addresses, only the last address is used for matching the filter.
Event Action Summarization and Aggregation
This section explains how event actions are summarized and aggregated. It contains the following topics:
Event Action Summarization
Summarization decreases the volume of alerts sent out from the sensor by providing basic aggregation of events in to a single alert. Special parameters are specified for each signature and they influence the handling of the alerts. Each signature is created with defaults that reflect a preferred normal behavior. However, you can tune each signature to change this default behavior within the constraints for each engine type.
The nonalert-generating actions (deny, block, TCP reset) go through the filters for each signature event unsummarized. The alert-generating actions are not performed on these summarized alerts; instead the actions are applied to the one summary alert and then put through the filters.
If you select one of the other alert-generating actions and do not have it filtered out, the alert is created even if you do not select Produce Alert. To prevent alerts from being created, you must have all alert-generating actions filtered out.
Summarization and event actions are processed after the Meta engine has processed the component events. This lets the sensor watch for suspicious activity transpiring over a series of events.
Event Action Aggregation
Basic aggregation provides two operating modes. The simple mode involves configuring a threshold number of hits for a signature that must be met before the alert is sent. A more advanced mode is timed-interval counting. In this mode, the sensor tracks the number of hits per second and only sends alerts when that threshold is met. In this example, a hit is a term used to describe an event, which is basically an alert, but it is not sent out of the sensor as an alert until the threshold number of hits has been exceeded.
You can choose from the following summarization options:
•![]() Fire All—Fire All mode fires an alert each time the signature is triggered. If the threshold is set for summarization, alerts are fired for each execution until summarization occurs. After summarization starts only one alert every summary interval fires for each address set. Alerts for other address sets are either all seen or separately summarized. The signature reverts to Fire All mode after a period of no alerts for that signature.
Fire All—Fire All mode fires an alert each time the signature is triggered. If the threshold is set for summarization, alerts are fired for each execution until summarization occurs. After summarization starts only one alert every summary interval fires for each address set. Alerts for other address sets are either all seen or separately summarized. The signature reverts to Fire All mode after a period of no alerts for that signature.
•![]() Summary—Summary mode fires an alert the first time a signature is triggered, and then additional alerts for that signature are summarized for the duration of the summary interval. Only one alert every summary interval should fire for each address set. If the global summary threshold is reached, the signature goes in to Global Summarization mode.
Summary—Summary mode fires an alert the first time a signature is triggered, and then additional alerts for that signature are summarized for the duration of the summary interval. Only one alert every summary interval should fire for each address set. If the global summary threshold is reached, the signature goes in to Global Summarization mode.
•![]() Global Summarization—Global Summarization mode fires an alert for every summary interval. Signatures can be preconfigured for global summarization.
Global Summarization—Global Summarization mode fires an alert for every summary interval. Signatures can be preconfigured for global summarization.
•![]() Fire Once—Fire Once mode fires an alert for each address set. You can upgrade this mode to Global Summarization mode.
Fire Once—Fire Once mode fires an alert for each address set. You can upgrade this mode to Global Summarization mode.
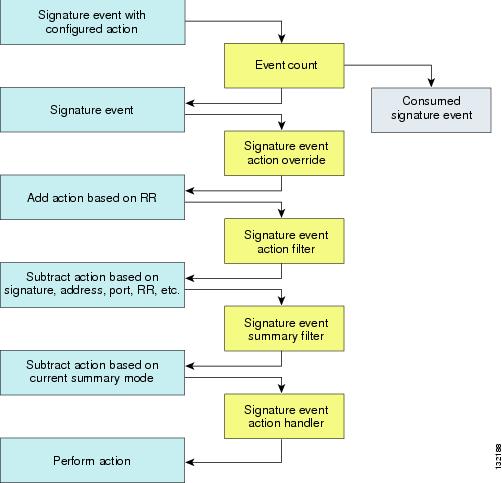
Signature Event Action Processor
Signature Event Action Processor coordinates the data flow from the signature event in the alarm channel to processing through the Signature Event Action Override, the Signature Event Action Filter, and the Signature Event Action Handler. It consists of the following components:
•![]() Alarm channel
Alarm channel
The unit that represents the area to communicate signature events from the SensorApp inspection path to signature event handling.
•![]() Signature Event Action Override
Signature Event Action Override
Adds actions based on the risk rating value. The Signature Event Action Override applies to all signatures that fall in the range of the configured risk rating threshold. Each Signature Event Action Override is independent and has a separate configuration value for each action type.
•![]() Signature Event Action Filter
Signature Event Action Filter
Subtracts actions based on the signature ID, addresses, and risk rating of the signature event. The input to the Signature Event Action Filter is the signature event with actions possibly added by the Signature Event Action Override.
Note ![]() The Signature Event Action Filter can only subtract actions, it cannot add new actions.
The Signature Event Action Filter can only subtract actions, it cannot add new actions.
The following parameters apply to the Signature Event Action Filter:
–![]() Signature ID
Signature ID
–![]() Subsignature ID
Subsignature ID
–![]() Attacker address
Attacker address
–![]() Attacker port
Attacker port
–![]() Victim address
Victim address
–![]() Victim port
Victim port
–![]() Risk rating threshold range
Risk rating threshold range
–![]() Actions to subtract
Actions to subtract
–![]() Sequence identifier (optional)
Sequence identifier (optional)
–![]() Stop-or-continue bit
Stop-or-continue bit
–![]() Enable action filter line bit
Enable action filter line bit
–![]() Victim OS relevance or OS relevance
Victim OS relevance or OS relevance
•![]() Signature Event Action Handler
Signature Event Action Handler
Performs the requested actions. The output from the Signature Event Action Handler is the actions being performed and possibly an evIdsAlert written to the Event Store.
Figure 6-2 illustrates the logical flow of the signature event through the Signature Event Action Handler and the operations performed on the action for this event. It starts with the signature event with configured action received in the alarm channel and flows top to bottom as the signature event passes through the functional components of the Signature Event Action Handler.
Figure 6-2 Signature Event Through the Signature Event Action Processor
For More Information
For more information on how the risk rating is calculated, see Calculating the Risk Rating.
Event Actions
The Cisco IPS has the following event actions.
Alert and Log Actions
•![]() Product Alert—Writes the event to the Event Store as an alert.
Product Alert—Writes the event to the Event Store as an alert.
Note ![]() The Product Alert action is not automatic when you enable alerts for a signature. To have an alert created in the Event Store, you must select Product Alert. If you add a second action, you must include Product Alert if you want an alert sent to the Event Store. Also, every time you configure the event actions, a new list is created and it replaces the old list. Make sure you include all the event actions you need for each signature.
The Product Alert action is not automatic when you enable alerts for a signature. To have an alert created in the Event Store, you must select Product Alert. If you add a second action, you must include Product Alert if you want an alert sent to the Event Store. Also, every time you configure the event actions, a new list is created and it replaces the old list. Make sure you include all the event actions you need for each signature.
Note ![]() There are other event actions that force a Product Alert. These actions use Product Alert as the vehicle for performing the action. Even if Product Alert is not selected or is filtered, the alert is still produced. The actions are the following: Produce Verbose Alert, Request SNMP Trap, Log Attacker Packets, Log Victim Packets, and Log Pair Packets.
There are other event actions that force a Product Alert. These actions use Product Alert as the vehicle for performing the action. Even if Product Alert is not selected or is filtered, the alert is still produced. The actions are the following: Produce Verbose Alert, Request SNMP Trap, Log Attacker Packets, Log Victim Packets, and Log Pair Packets.
Note ![]() A Produce Alert event action is added for an event when global correlation has increased the risk rating of an event, and has added either the Deny Packet Inline or Deny Attacker Inline event action.
A Produce Alert event action is added for an event when global correlation has increased the risk rating of an event, and has added either the Deny Packet Inline or Deny Attacker Inline event action.
•![]() Produce Verbose Alert—Includes an encoded dump of the offending packet in the alert. This action causes an alert to be written to the Event Store, even if Product Alert is not selected.
Produce Verbose Alert—Includes an encoded dump of the offending packet in the alert. This action causes an alert to be written to the Event Store, even if Product Alert is not selected.
•![]() Log Attacker Packets—Starts IP logging on packets that contain the attacker address and sends an alert. This action causes an alert to be written to the Event Store, even if Product Alert is not selected.
Log Attacker Packets—Starts IP logging on packets that contain the attacker address and sends an alert. This action causes an alert to be written to the Event Store, even if Product Alert is not selected.
•![]() Log Victim Packets—Starts IP logging on packets that contain the victim address and sends an alert. This action causes an alert to be written to the Event Store, even if Product Alert is not selected.
Log Victim Packets—Starts IP logging on packets that contain the victim address and sends an alert. This action causes an alert to be written to the Event Store, even if Product Alert is not selected.
•![]() Log Pair Packets—Starts IP logging on packets that contain the attacker/victim address pair. This action causes an alert to be written to the Event Store, even if Product Alert is not selected.
Log Pair Packets—Starts IP logging on packets that contain the attacker/victim address pair. This action causes an alert to be written to the Event Store, even if Product Alert is not selected.
•![]() Request SNMP Trap—Sends a request to the Notification Application component of the sensor to perform SNMP notification. This action causes an alert to be written to the Event Store, even if Product Alert is not selected. You must have SNMP configured on the sensor to implement this action.
Request SNMP Trap—Sends a request to the Notification Application component of the sensor to perform SNMP notification. This action causes an alert to be written to the Event Store, even if Product Alert is not selected. You must have SNMP configured on the sensor to implement this action.
Deny Actions
•![]() Deny Packet Inline (inline only)—Terminates the packet.
Deny Packet Inline (inline only)—Terminates the packet.
Note ![]() You cannot delete the event action override for Deny Packet Inline because it is protected. If you do not want to use that override, disable it.
You cannot delete the event action override for Deny Packet Inline because it is protected. If you do not want to use that override, disable it.
•![]() Deny Connection Inline (inline only)—Terminates the current packet and future packets on this TCP flow.
Deny Connection Inline (inline only)—Terminates the current packet and future packets on this TCP flow.
•![]() Deny Attacker Victim Pair Inline (inline only)—Does not transmit this packet and future packets on the attacker/victim address pair for a specified period of time.
Deny Attacker Victim Pair Inline (inline only)—Does not transmit this packet and future packets on the attacker/victim address pair for a specified period of time.
•![]() Deny Attacker Service Pair Inline (inline only)—Does not transmit this packet and future packets on the attacker address victim port pair for a specified period of time.
Deny Attacker Service Pair Inline (inline only)—Does not transmit this packet and future packets on the attacker address victim port pair for a specified period of time.
•![]() Deny Attacker Inline (inline only)—Terminates the current packet and future packets from this attacker address for a specified period of time.
Deny Attacker Inline (inline only)—Terminates the current packet and future packets from this attacker address for a specified period of time.
•![]() The sensor maintains a list of attackers being denied by the system. To remove an entry from the denied attacker list, you can view the list of attackers and clear the entire list, or you can wait for the timer to expire. The timer is a sliding timer for each entry. Therefore, if attacker A is being denied, but issues another attack, the timer for attacker A is reset and attacker A remains in the denied attacker list until the timer expires. If the denied attacker list is at capacity and cannot add a new entry, the packet is still denied.
The sensor maintains a list of attackers being denied by the system. To remove an entry from the denied attacker list, you can view the list of attackers and clear the entire list, or you can wait for the timer to expire. The timer is a sliding timer for each entry. Therefore, if attacker A is being denied, but issues another attack, the timer for attacker A is reset and attacker A remains in the denied attacker list until the timer expires. If the denied attacker list is at capacity and cannot add a new entry, the packet is still denied.
•![]() Modify Packet Inline (inline only)—Modifies packet data to remove ambiguity about what the end point might do with the packet.
Modify Packet Inline (inline only)—Modifies packet data to remove ambiguity about what the end point might do with the packet.
Note ![]() You cannot use Modify Packet Inline as an action when adding event action filters or overrides.
You cannot use Modify Packet Inline as an action when adding event action filters or overrides.
Other Actions
•![]() Request Block Connection—Sends a request to ARC to block this connection. You must have blocking devices configured to implement this action.
Request Block Connection—Sends a request to ARC to block this connection. You must have blocking devices configured to implement this action.
Note ![]() Connection blocks and network blocks are not supported on adaptive security appliances. Adaptive security appliances only support host blocks with additional connection information.
Connection blocks and network blocks are not supported on adaptive security appliances. Adaptive security appliances only support host blocks with additional connection information.
Note ![]() IPv6 does not support Request Block Connection.
IPv6 does not support Request Block Connection.
•![]() Request Block Host—Sends a request to ARC to block this attacker host. You must have blocking devices configured to implement this action.
Request Block Host—Sends a request to ARC to block this attacker host. You must have blocking devices configured to implement this action.
Note ![]() IPv6 does not support Request Block Host.
IPv6 does not support Request Block Host.
•![]() Request Rate Limit—Sends a rate limit request to ARC to perform rate limiting. You must have rate limiting devices configured to implement this action.
Request Rate Limit—Sends a rate limit request to ARC to perform rate limiting. You must have rate limiting devices configured to implement this action.
Note ![]() Request Rate Limit applies to a select set of signatures.
Request Rate Limit applies to a select set of signatures.
Note ![]() IPv6 does not support Request Rate Limit.
IPv6 does not support Request Rate Limit.
•![]() Reset TCP Connection—Sends TCP resets to hijack and terminate the TCP flow. Reset TCP Connection only works on TCP signatures that analyze a single connection. It does not work for sweeps or floods.
Reset TCP Connection—Sends TCP resets to hijack and terminate the TCP flow. Reset TCP Connection only works on TCP signatures that analyze a single connection. It does not work for sweeps or floods.
Understanding Deny Packet Inline
For signatures that have Deny Packet Inline configured as an action or for an event action override that adds Deny Packet Inline as an action, the following actions may be taken:
•![]() Dropped Packet
Dropped Packet
•![]() Denied Flow
Denied Flow
•![]() TCP One Way Reset Sent TCP
TCP One Way Reset Sent TCP
The Deny Packet Inline action is represented as a dropped packet action in the alert. When a Deny Packet Inline occurs for a TCP connection, it is automatically upgraded to a Deny Connection Inline action and seen as a denied flow in the alert. If the IPS denies just one packet, the TCP continues to try to send that same packet again and again, so the IPS denies the entire connection to ensure it never succeeds with the resends.
When a Deny Connection Inline occurs, the IPS also automatically sends a TCP one-way reset, which shows up as a TCP one-way reset sent in the alert. When the IPS denies the connection, it leaves an open connection on both the client (generally the attacker) and the server (generally the victim). Too many open connections can result in resource problems on the victim. So the IPS sends a TCP reset to the victim to close the connection on the victim side (usually the server), which conserves the resources of the victim. It also prevents a failover that would otherwise allow the connection to fail over to a different network path and reach the victim. The IPS leaves the attacker side open and denies all traffic from it.
TCP Reset Differences Between IPS Appliances and AIP SSM
The IPS appliance sends TCP reset packets to both the attacker and victim when Reset TCP Connection is selected. The IPS appliance sends a TCP reset packet only to the victim under the following circumstances:
•![]() When a Deny Packet Inline or Deny Connection Inline is selected
When a Deny Packet Inline or Deny Connection Inline is selected
•![]() When TCP-based signatures and Reset TCP Connection have NOT been selected
When TCP-based signatures and Reset TCP Connection have NOT been selected
In the case of the AIP SSM, the TCP reset request is sent to the ASA, and then the ASA sends the TCP reset packets. The ASA sends TCP reset packets to both the attacker and victim when the Reset TCP Connection is selected. When Deny Packet Inline or Deny Connection Inline is selected, the ASA sends the TCP reset packet to either the attacker or victim depending on the configuration of the signature. Signatures configured to swap the attacker and victim when reporting the alert can cause the ASA to send the TCP reset packet to the attacker.
For More Information
•![]() For the procedure for clearing the denied attacker list, see Monitoring the Denied Attackers List.
For the procedure for clearing the denied attacker list, see Monitoring the Denied Attackers List.
•![]() For the procedure for configuring the general settings, see Configuring the General Settings.
For the procedure for configuring the general settings, see Configuring the General Settings.
•![]() For more information on ARC and configuring blocking and rate limiting, see Chapter 9 "Configuring Attack Response Controller for Blocking and Rate Limiting."
For more information on ARC and configuring blocking and rate limiting, see Chapter 9 "Configuring Attack Response Controller for Blocking and Rate Limiting."
•![]() For more information about SNMP, see Chapter 8 "Configuring SNMP."
For more information about SNMP, see Chapter 8 "Configuring SNMP."
Event Action Rules Example
The following example demonstrates how the individual components of your event action rules work together.
Risk Rating Ranges
•![]() Produce Alert—1-100
Produce Alert—1-100
•![]() Produce Verbose Alert—90-100
Produce Verbose Alert—90-100
•![]() Request SNMP Trap—50-100
Request SNMP Trap—50-100
•![]() Log Pair Packets—90-100
Log Pair Packets—90-100
•![]() Log Victim Packets—90-100
Log Victim Packets—90-100
•![]() Log Attacker Packets—90-100
Log Attacker Packets—90-100
•![]() Reset TCP Connection—90-100
Reset TCP Connection—90-100
•![]() Request Block Connection—70-89
Request Block Connection—70-89
•![]() Request Block Host—90-100
Request Block Host—90-100
•![]() Deny Attacker Inline—0-0
Deny Attacker Inline—0-0
•![]() Deny Connection Inline—90-100
Deny Connection Inline—90-100
•![]() Deny Packet Inline—90-100
Deny Packet Inline—90-100
Event Action Filters
The filters are applied in the following order:
1. ![]() SigID=2004, Attacker Address=*, Victim Address=20.1.1.1, Actions to Remove=ALL, Risk Rating Range=1-100, StopOnMatch=True
SigID=2004, Attacker Address=*, Victim Address=20.1.1.1, Actions to Remove=ALL, Risk Rating Range=1-100, StopOnMatch=True
2. ![]() SigID=2004, Attacker Address=30.1.1.1, Victim Address=*, Actions to Remove=ALL, Risk Rating Range=1-100, StopOnMatch=True
SigID=2004, Attacker Address=30.1.1.1, Victim Address=*, Actions to Remove=ALL, Risk Rating Range=1-100, StopOnMatch=True
3. ![]() SigID=2004, Attacker Address=*, Victim Address=*, Actions to Remove=None, Risk Rating Range=95-100, StopOnMatch=True
SigID=2004, Attacker Address=*, Victim Address=*, Actions to Remove=None, Risk Rating Range=95-100, StopOnMatch=True
4. ![]() SigID=2004, Attacker Address=*, Victim Address=*, Actions to Remove=denyAttackerInline, requestBlockHost, requestBlockConnection, Risk Rating Range=56-94, StopOnMatch=True
SigID=2004, Attacker Address=*, Victim Address=*, Actions to Remove=denyAttackerInline, requestBlockHost, requestBlockConnection, Risk Rating Range=56-94, StopOnMatch=True
5. ![]() SigID=2004, Attacker Address=*, Victim Address=*, Actions to Remove=denyAttackerInline, requestBlockHost, produceAlert, resetTcpConnection, logAttackerPackets, Risk Rating Range=1-55, StopOnMatch=True
SigID=2004, Attacker Address=*, Victim Address=*, Actions to Remove=denyAttackerInline, requestBlockHost, produceAlert, resetTcpConnection, logAttackerPackets, Risk Rating Range=1-55, StopOnMatch=True
Results
When SIG 2004 is detected:
•![]() If the attacker address is 30.1.1.1 or the victim address is 20.1.1.1, the event is consumed (ALL actions are subtracted).
If the attacker address is 30.1.1.1 or the victim address is 20.1.1.1, the event is consumed (ALL actions are subtracted).
If the attacker address is not 30.1.1.1 and the victim address is not 20.1.1.1:
•![]() If the risk rating is 50, Produce Alert and Request SNMP Trap are added by the event action override component, but Produce Alert is subtracted by the event action filter. However, the event action policy forces the alert action because Request SNMP Trap is dependent on the evIdsAlert.
If the risk rating is 50, Produce Alert and Request SNMP Trap are added by the event action override component, but Produce Alert is subtracted by the event action filter. However, the event action policy forces the alert action because Request SNMP Trap is dependent on the evIdsAlert.
•![]() If the risk rating is 89, Request SNMP Trap and Request Block Connection are added by the event action override component. However, Request Block Connection is subtracted by the event action filter.
If the risk rating is 89, Request SNMP Trap and Request Block Connection are added by the event action override component. However, Request Block Connection is subtracted by the event action filter.
•![]() If the risk rating is 96, all actions except Deny Attacker Inline and Request Block Connection are added by the event action override component, and none are removed by the event action filter. The third filter line with the filter action NONE is optional, but is presented as a clearer way to define this type of filter.
If the risk rating is 96, all actions except Deny Attacker Inline and Request Block Connection are added by the event action override component, and none are removed by the event action filter. The third filter line with the filter action NONE is optional, but is presented as a clearer way to define this type of filter.
Configuring Event Action Rules Policies
This section describes how to create event action rules policies, and contains the following topics:
•![]() Event Action Rules Pane Field Definitions
Event Action Rules Pane Field Definitions
•![]() Add and Clone Policy Dialog Boxes Field Definitions
Add and Clone Policy Dialog Boxes Field Definitions
•![]() Adding, Cloning, and Deleting Event Action Rules Policies
Adding, Cloning, and Deleting Event Action Rules Policies
Event Action Rules Pane
Note ![]() You must be administrator or operator to add, clone, or delete event action rules policies.
You must be administrator or operator to add, clone, or delete event action rules policies.
In the Event Action Rules pane, you can add, clone, or delete an event action rules policy. The default event action rules policy is rules0. When you add a policy, a control transaction is sent to the sensor to create the policy instance. If the response is successful, the new policy instance is added under Event Action Rules. If the control transaction fails, for example because of resource limitations, an error message appears.
If your platform does not support virtual policies, this means you can only have one instance for each component and you cannot create new ones or delete the existing one. In this case, the Add, Clone, and Delete buttons are disabled.

Event Action Rules Pane Field Definitions
The following fields are found in the Event Action Rules pane:
•![]() Policy Name—Identifies the name of this event action rules policy.
Policy Name—Identifies the name of this event action rules policy.
•![]() Assigned Virtual Sensor—Identifies the virtual sensor to which this event action rules policy is assigned.
Assigned Virtual Sensor—Identifies the virtual sensor to which this event action rules policy is assigned.
Add and Clone Policy Dialog Boxes Field Definitions
The following field is found in the Add and Clone Policy dialog boxes:
•![]() Policy Name—Lets you create a unique name for the new policy.
Policy Name—Lets you create a unique name for the new policy.
Adding, Cloning, and Deleting Event Action Rules Policies
To add, clone, or delete an event action rules policy, follow these steps:
Step 1 ![]() Log in to IDM using an account with administrator or operator privileges.
Log in to IDM using an account with administrator or operator privileges.
Step 2 ![]() Choose Configuration > Policies > Event Action Rules, and then click Add.
Choose Configuration > Policies > Event Action Rules, and then click Add.
Step 3 ![]() Enter a name for the event action rules policy in the Policy Name field.
Enter a name for the event action rules policy in the Policy Name field.

Tip ![]() To discard your changes and close the Add Policy dialog box, click Cancel.
To discard your changes and close the Add Policy dialog box, click Cancel.
Step 4 ![]() Click OK.
Click OK.
The event action rules policy appears in the list in the Event Action Rules pane.
Step 5 ![]() To clone an existing event action rules policy, select it in the list, and then click Clone.
To clone an existing event action rules policy, select it in the list, and then click Clone.
The Clone Policy dialog box appears with "_copy" appended to the existing event action rules policy name.
Step 6 ![]() Enter a unique name in the Policy Name field.
Enter a unique name in the Policy Name field.
Step 7 ![]() Click OK.
Click OK.
The cloned event action rules policy appears in the list in the Event Action Rules pane.
Tip ![]() To discard your changes and close the Clone Policy dialog box, click Cancel.
To discard your changes and close the Clone Policy dialog box, click Cancel.
Step 8 ![]() To remove an event action rules policy, select it, and then click Delete.
To remove an event action rules policy, select it, and then click Delete.
The Delete Policy dialog box appears asking if you are sure you want to delete this policy permanently.
Step 9 ![]() Click Yes.
Click Yes.
The event action rules policy no longer appears in the list in the Event Action Rules pane.
Tip ![]() To discard your changes, click Reset.
To discard your changes, click Reset.
Step 10 ![]() Click Apply to apply your changes and save the revised configuration.
Click Apply to apply your changes and save the revised configuration.
Event Action Rules Policy rules0
The rules0 pane (default) contains the event action rules policy configuration and the tools to configure event action rules. There are six tabs:
•![]() Event Action Overrides—Lets you add an event action override that acts globally (rather than per signature) to change the actions associated with an event based on the risk rating of that event.
Event Action Overrides—Lets you add an event action override that acts globally (rather than per signature) to change the actions associated with an event based on the risk rating of that event.
•![]() Target Value Rating—Lets you assign a target value rating to your network assets. The target value rating is one of the factors used to calculate the risk rating value for each alert.
Target Value Rating—Lets you assign a target value rating to your network assets. The target value rating is one of the factors used to calculate the risk rating value for each alert.
•![]() Event Action Filters—Lets you remove specific actions from an event or discard an entire event and prevent further processing by the sensor.
Event Action Filters—Lets you remove specific actions from an event or discard an entire event and prevent further processing by the sensor.
•![]() OS Identifications—Lets you associate IP addresses with an OS type, which in turn helps the sensor calculate the attack relevance rating.
OS Identifications—Lets you associate IP addresses with an OS type, which in turn helps the sensor calculate the attack relevance rating.
•![]() Event Variables—Lets you create event variables for use in event action filters. When you want to use the same value within multiple filters, you can use an event variable.
Event Variables—Lets you create event variables for use in event action filters. When you want to use the same value within multiple filters, you can use an event variable.
•![]() General Settings—Lets you configure the general settings that apply to event action rules, such as whether you want to use the Summarizer and the Meta Event Generator.
General Settings—Lets you configure the general settings that apply to event action rules, such as whether you want to use the Summarizer and the Meta Event Generator.
Configuring Event Action Overrides
This section describes the Event Action Overrides tab and how to configure event action overrides. It contains the following topics:
•![]() Event Action Overrides Tab Field Definitions
Event Action Overrides Tab Field Definitions
•![]() Add and Edit Event Action Override Dialog Boxes Field Definitions
Add and Edit Event Action Override Dialog Boxes Field Definitions
•![]() Adding, Editing, Deleting, Enabling, and Disabling Event Action Overrides
Adding, Editing, Deleting, Enabling, and Disabling Event Action Overrides
Event Action Overrides Tab
Note ![]() You must be administrator or operator to configure event action overrides.
You must be administrator or operator to configure event action overrides.
You can add an event action override to change the actions associated with an event based on specific details about that event.
Event Action Overrides Tab Field Definitions
The following fields are found on the Event Action Overrides tab:
•![]() Use Event Action Overrides—If checked, lets you use any event action override that is enabled.
Use Event Action Overrides—If checked, lets you use any event action override that is enabled.
•![]() Event Action—Specifies the event action that will be added to an event if the conditions of this event action override are satisfied.
Event Action—Specifies the event action that will be added to an event if the conditions of this event action override are satisfied.
•![]() Enabled—Indicates whether or not the override is enabled.
Enabled—Indicates whether or not the override is enabled.
•![]() Risk Rating—Indicates the risk rating range between 0 and 100 that should be used to trigger this event action override.
Risk Rating—Indicates the risk rating range between 0 and 100 that should be used to trigger this event action override.
If an event occurs with a risk rating that falls within the minimum-maximum range you configure here, the event action is added to this event.
Add and Edit Event Action Override Dialog Boxes Field Definitions
The following fields are found in the Add and Edit Event Action Override dialog boxes:
•![]() Event Action—Specifies the event action that will be added to an event if the conditions of this event action override are satisfied.
Event Action—Specifies the event action that will be added to an event if the conditions of this event action override are satisfied.
–![]() Deny Attacker Inline—(Inline only) Terminates the current packet and future packets from this attacker address for a specified period of time.
Deny Attacker Inline—(Inline only) Terminates the current packet and future packets from this attacker address for a specified period of time.
The sensor maintains a list of attackers being denied by the system. To remove an entry from the denied attacker list, you can view the list of attackers and clear the entire list, or you can wait for the timer to expire. The timer is a sliding timer for each entry. Therefore, if attacker A is being denied, but issues another attack, the timer for attacker A is reset and attacker A remains in the denied attacker list until the timer expires. If the denied attacker list is at capacity and cannot add a new entry, the packet is still denied.
Note ![]() This is the most severe of the deny actions. It denies current and future packets from a single attacker address. To clear all denied attacker entries, choose Monitoring > Denied Attackers > Clear List, which permits the addresses back on the network.
This is the most severe of the deny actions. It denies current and future packets from a single attacker address. To clear all denied attacker entries, choose Monitoring > Denied Attackers > Clear List, which permits the addresses back on the network.
–![]() Deny Attacker Service Pair Inline—(Inline only) Does not transmit this packet and future packets on the attacker address victim port pair for a specified period of time.
Deny Attacker Service Pair Inline—(Inline only) Does not transmit this packet and future packets on the attacker address victim port pair for a specified period of time.
–![]() Deny Attacker Victim Pair Inline—(Inline only) Does not transmit this packet and future packets on the attacker/victim address pair for a specified period of time.
Deny Attacker Victim Pair Inline—(Inline only) Does not transmit this packet and future packets on the attacker/victim address pair for a specified period of time.
Note ![]() For deny actions, to set the specified period of time and maximum number of denied attackers, choose Configuration > Policies > Event Action Rules > rules0 > General Settings.
For deny actions, to set the specified period of time and maximum number of denied attackers, choose Configuration > Policies > Event Action Rules > rules0 > General Settings.
–![]() Deny Connection Inline—(Inline only) Terminates the current packet and future packets on this TCP flow.
Deny Connection Inline—(Inline only) Terminates the current packet and future packets on this TCP flow.
–![]() Deny Packet Inline—(Inline only) Terminates the packet.
Deny Packet Inline—(Inline only) Terminates the packet.
Note ![]() You cannot delete the event action override for Deny Packet Inline because it is protected. If you do not want to use that override, disable it.
You cannot delete the event action override for Deny Packet Inline because it is protected. If you do not want to use that override, disable it.
–![]() Log Attacker Packets—Starts IP logging on packets that contain the attacker address and sends an alert. This action causes an alert to be written to the Event Store, even if Produce Alert is not selected.
Log Attacker Packets—Starts IP logging on packets that contain the attacker address and sends an alert. This action causes an alert to be written to the Event Store, even if Produce Alert is not selected.
–![]() Log Pair Packets—Starts IP Logging on packets that contain the attacker/victim address pair. This action causes an alert to be written to the Event Store, even if Produce Alert is not selected.
Log Pair Packets—Starts IP Logging on packets that contain the attacker/victim address pair. This action causes an alert to be written to the Event Store, even if Produce Alert is not selected.
–![]() Log Victim Packets—Starts IP Logging on packets that contain the victim address and sends an alert. This action causes an alert to be written to the Event Store, even if Produce Alert is not selected.
Log Victim Packets—Starts IP Logging on packets that contain the victim address and sends an alert. This action causes an alert to be written to the Event Store, even if Produce Alert is not selected.
–![]() Modify Packet Inline— Modifies packet data to remove ambiguity about what the end point might do with the packet.
Modify Packet Inline— Modifies packet data to remove ambiguity about what the end point might do with the packet.
Note ![]() Modify Packet Inline is not an option for Add Event Action Filter or Add Event Action Override.
Modify Packet Inline is not an option for Add Event Action Filter or Add Event Action Override.
–![]() Produce Alert—Writes the event to the Event Store as an alert.
Produce Alert—Writes the event to the Event Store as an alert.
–![]() Produce Verbose Alert—Includes an encoded dump of the offending packet in the alert. This action causes an alert to be written to the Event Store, even if Produce Alert is not selected.
Produce Verbose Alert—Includes an encoded dump of the offending packet in the alert. This action causes an alert to be written to the Event Store, even if Produce Alert is not selected.
–![]() Request Block Connection—Sends a request to ARC to block this connection. You must have blocking devices configured to implement this action.
Request Block Connection—Sends a request to ARC to block this connection. You must have blocking devices configured to implement this action.
–![]() Request Block Host—Sends a request to ARC to block this attacker host. You must have blocking devices configured to implement this action.
Request Block Host—Sends a request to ARC to block this attacker host. You must have blocking devices configured to implement this action.
Note ![]() For block actions, to set the duration of the block, choose Configuration > Policies > Event Action Rules > rules0 > General Settings.
For block actions, to set the duration of the block, choose Configuration > Policies > Event Action Rules > rules0 > General Settings.
–![]() Request Rate Limit—Sends a rate limit request to ARC to perform rate limiting. You must have rate limiting devices configured to implement this action.
Request Rate Limit—Sends a rate limit request to ARC to perform rate limiting. You must have rate limiting devices configured to implement this action.
Note ![]() Request Rate Limit applies to a select set of signatures.
Request Rate Limit applies to a select set of signatures.
–![]() Request SNMP Trap—Sends a request to the Notification Application component of the sensor to perform SNMP notification. This action causes an alert to be written to the Event Store, even if Produce Alert is not selected. You must have SNMP configured on the sensor to implement this action.
Request SNMP Trap—Sends a request to the Notification Application component of the sensor to perform SNMP notification. This action causes an alert to be written to the Event Store, even if Produce Alert is not selected. You must have SNMP configured on the sensor to implement this action.
–![]() Reset TCP Connection—Sends TCP resets to hijack and terminate the TCP flow. Reset TCP Connection only works on TCP signatures that analyze a single connection. It does not work for sweeps or floods.
Reset TCP Connection—Sends TCP resets to hijack and terminate the TCP flow. Reset TCP Connection only works on TCP signatures that analyze a single connection. It does not work for sweeps or floods.
•![]() Enabled—Check the Yes check box to enable the override; check the No check box to disable the override.
Enabled—Check the Yes check box to enable the override; check the No check box to disable the override.
•![]() Risk Rating—Indicates the risk rating range between 0 and 100 that should be used to trigger this event action override.
Risk Rating—Indicates the risk rating range between 0 and 100 that should be used to trigger this event action override.
If an event occurs with an risk rating that falls within the minimum-maximum range you configure here, the event action is added to this event.
For More Information
For detailed information about event actions, see Event Actions.
Adding, Editing, Deleting, Enabling, and Disabling Event Action Overrides
To add, edit, delete, enable, and disable event action overrides, follow these steps:
Step 1 ![]() Log in to IDM using an account with administrator or operator privileges.
Log in to IDM using an account with administrator or operator privileges.
Step 2 ![]() Choose Configuration > Policies > Event Action Rules > rules0 > Event Action Overrides, and then click Add.
Choose Configuration > Policies > Event Action Rules > rules0 > Event Action Overrides, and then click Add.
Step 3 ![]() From the Event Action drop-down list, choose the event action this event action override will correspond to.
From the Event Action drop-down list, choose the event action this event action override will correspond to.
Step 4 ![]() In the Enabled field, click the Yes radio button to enable the override.
In the Enabled field, click the Yes radio button to enable the override.
Step 5 ![]() Under Risk Rating, enter a risk rating range to this network asset in the Minimum and Maximum fields.
Under Risk Rating, enter a risk rating range to this network asset in the Minimum and Maximum fields.
All values should be between 0 and 100 and the value in the Minimum field must be less than or equal to the value in the Maximum field.
Tip ![]() To discard your changes and close the Add Event Action Override dialog box, click Cancel.
To discard your changes and close the Add Event Action Override dialog box, click Cancel.
Step 6 ![]() Click OK.
Click OK.
The new event action override now appears in the list on the Event Action Overrides tab.
Step 7 ![]() Check the Use Event Action Overrides check box.
Check the Use Event Action Overrides check box.
Note ![]() You must check the Use Event Action Overrides check box on the Event Action Overrides tab or none of the event action overrides will be enabled regardless of the value you set.
You must check the Use Event Action Overrides check box on the Event Action Overrides tab or none of the event action overrides will be enabled regardless of the value you set.
Step 8 ![]() To edit an existing event action override, select it in the list, and then click Edit.
To edit an existing event action override, select it in the list, and then click Edit.
Step 9 ![]() In the Enabled field, click the Yes radio button to enable the override.
In the Enabled field, click the Yes radio button to enable the override.
Step 10 ![]() Under Risk Rating, enter a risk rating range to this network asset in the Minimum and Maximum fields.
Under Risk Rating, enter a risk rating range to this network asset in the Minimum and Maximum fields.
All values should be between 0 and 100 and the value in the Minimum field must be less than or equal to the value in the Maximum field.
Tip ![]() To discard your changes and close the Edit Event Action Override dialog box, click Cancel.
To discard your changes and close the Edit Event Action Override dialog box, click Cancel.
Step 11 ![]() Click OK.
Click OK.
The edited event action override now appears in the list on the Event Action Overrides tab.
Step 12 ![]() Check the Use Event Action Overrides check box.
Check the Use Event Action Overrides check box.
Note ![]() You must check the Use Event Action Overrides check box on the Event Action Overrides tab or none of the event action overrides will be enabled regardless of the value you set.
You must check the Use Event Action Overrides check box on the Event Action Overrides tab or none of the event action overrides will be enabled regardless of the value you set.
Step 13 ![]() To delete an event action override, select it in the list, and then click Delete.
To delete an event action override, select it in the list, and then click Delete.
The event action override no longer appears in the list on the Event Action Overrides tab.
Note ![]() You cannot delete the event action override for Deny Packet Inline because it is protected. If you do not want to use that override, disable it.
You cannot delete the event action override for Deny Packet Inline because it is protected. If you do not want to use that override, disable it.
Step 14 ![]() To enable or disable an event action override, select it in the list, and then click Enable or Disable.
To enable or disable an event action override, select it in the list, and then click Enable or Disable.
Tip ![]() To discard your changes, click Reset.
To discard your changes, click Reset.
Step 15 ![]() Click Apply to apply your changes and save the revised configuration.
Click Apply to apply your changes and save the revised configuration.
Configuring Target Value Ratings
This section describes the Target Value Ratings tab and how to configure target value ratings. It contains the following topics:
•![]() Target Value Rating Field Definitions
Target Value Rating Field Definitions
•![]() Add and Edit Target Value Rating Dialog Boxes Field Definitions
Add and Edit Target Value Rating Dialog Boxes Field Definitions
•![]() Adding, Editing, and Deleting Target Value Ratings
Adding, Editing, and Deleting Target Value Ratings
Target Value Ratings Tab
Note ![]() You must be administrator or operator to configure target value ratings.
You must be administrator or operator to configure target value ratings.
You can assign a target value rating to your network assets. The target value rating is one of the factors used to calculate the risk rating value for each alert. You can assign different target value ratings to different targets. Events with a higher risk rating trigger more severe signature event actions.
For More Information
For more information on risk rating, see Calculating the Risk Rating.
Target Value Rating Field Definitions
The following fields are found on the Target Value Rating tab:
•![]() Target Value Rating (TVR)—Identifies the value assigned to this network asset. The value can be High, Low, Medium, Mission Critical, or No Value.
Target Value Rating (TVR)—Identifies the value assigned to this network asset. The value can be High, Low, Medium, Mission Critical, or No Value.
•![]() Target IP Address—Identifies the IP address of the network asset you want to prioritize with a target value rating.
Target IP Address—Identifies the IP address of the network asset you want to prioritize with a target value rating.
Add and Edit Target Value Rating Dialog Boxes Field Definitions
The following fields are found in the Add and Edit Target Value Rating dialog boxes:
•![]() Target Value Rating (TVR)—Identifies the value assigned to this network asset. The value can be High, Low, Medium, Mission Critical, or No Value.
Target Value Rating (TVR)—Identifies the value assigned to this network asset. The value can be High, Low, Medium, Mission Critical, or No Value.
•![]() Target IP Address(es)—Identifies the IP address of the network asset you want to prioritize with a target value rating.
Target IP Address(es)—Identifies the IP address of the network asset you want to prioritize with a target value rating.
Adding, Editing, and Deleting Target Value Ratings
To add, edit, and delete the target value rating for network assets, follow these steps:
Step 1 ![]() Log in to IDM using an account with administrator or operator privileges.
Log in to IDM using an account with administrator or operator privileges.
Step 2 ![]() Choose Configuration > Policies > Event Action Rules > rules0 > Target Value Rating, and then click Add.
Choose Configuration > Policies > Event Action Rules > rules0 > Target Value Rating, and then click Add.
Step 3 ![]() To assign a target value rating to a new group of assets, follow these steps:
To assign a target value rating to a new group of assets, follow these steps:
a. ![]() From the Target Value Rating drop-down list, choose a rating.
From the Target Value Rating drop-down list, choose a rating.
The values are High, Low, Medium, Mission Critical, or No Value.
b. ![]() In the Target IP Address(es) field, enter the IP address of the network asset.
In the Target IP Address(es) field, enter the IP address of the network asset.
To enter a range of IP addresses, enter the lowest address followed by a hyphen and then the highest address in the range. For example: 10.10.2.1-10.10.2.30.
Tip ![]() To discard your changes and close the Add Target Value Rating dialog box, click Cancel.
To discard your changes and close the Add Target Value Rating dialog box, click Cancel.
Step 4 ![]() Click OK.
Click OK.
The new target value rating for the new asset appears in the list on the Target Value Rating tab.
Step 5 ![]() To edit an existing target value rating, select it in the list, and then click Edit.
To edit an existing target value rating, select it in the list, and then click Edit.
Step 6 ![]() Make your changes to the values in the Target IP Address(es) field.
Make your changes to the values in the Target IP Address(es) field.
Tip ![]() To discard your changes and close the Edit Target Value Rating dialog box, click Cancel.
To discard your changes and close the Edit Target Value Rating dialog box, click Cancel.
Step 7 ![]() Click OK.
Click OK.
The edited network asset now appears in the list on the Target Value Rating tab.
Step 8 ![]() To delete a network asset, select in the list, and then click Delete.
To delete a network asset, select in the list, and then click Delete.
The network asset no longer appears in the list on the Target Value Rating tab.
Tip ![]() To discard your changes, click Reset.
To discard your changes, click Reset.
Step 9 ![]() Click Apply to apply your changes and save the revised configuration.
Click Apply to apply your changes and save the revised configuration.
Configuring Event Action Filters
This section describes the Event Action Filters tab and how to configure event action filters. It contains the following topics:
•![]() Event Action Filters Field Definitions
Event Action Filters Field Definitions
•![]() Add and Edit Event Action Filter Dialog Boxes Field Definitions
Add and Edit Event Action Filter Dialog Boxes Field Definitions
•![]() Adding, Editing, Deleting, Enabling, Disabling, and Moving Event Action Filters
Adding, Editing, Deleting, Enabling, Disabling, and Moving Event Action Filters
Event Action Filter Tab
Note ![]() You must be administrator or operator to configure event action filters.
You must be administrator or operator to configure event action filters.
You can configure event action filters to remove specific actions from an event or to discard an entire event and prevent further processing by the sensor. You can use the variables that you defined on the Event Variables pane to group addresses for your filters.
Note ![]() You must preface the variable with a dollar sign ($) to indicate that you are using a variable rather than a string. Otherwise, you receive the
You must preface the variable with a dollar sign ($) to indicate that you are using a variable rather than a string. Otherwise, you receive the Bad source and destination error.
Event Action Filters Field Definitions
The following fields are found on the Event Action Filters tab:
•![]() Use Event Action Filters—Enables the event action filter component.
Use Event Action Filters—Enables the event action filter component.
You must check this check box to use any filter that is enabled.
•![]() Name—Lets you name the filter you are adding.
Name—Lets you name the filter you are adding.
You need to name your filters so that you can move them around in the list and move them to the inactive list if needed.
•![]() Active—Indicates whether the filter has been put in to the filter list and will take effect on filtering events.
Active—Indicates whether the filter has been put in to the filter list and will take effect on filtering events.
•![]() Enabled—Indicates whether or not this filter is enabled.
Enabled—Indicates whether or not this filter is enabled.
•![]() Sig ID—Identifies the unique numerical value assigned to this signature.
Sig ID—Identifies the unique numerical value assigned to this signature.
This value lets the sensor identify a particular signature. You can also enter a range of signatures.
•![]() SubSig ID—Identifies the unique numerical value assigned to this subsignature.
SubSig ID—Identifies the unique numerical value assigned to this subsignature.
The subSig ID identifies a more granular version of a broad signature. You can also enter a range of subSig IDs.
•![]() Attacker (address/port)—Identifies the IP address and/or port of the host that sent the offending packet.
Attacker (address/port)—Identifies the IP address and/or port of the host that sent the offending packet.
You can also enter a range of addresses.
•![]() Victim (address/port)—Identifies the IP address and/or port used by the attacker host.
Victim (address/port)—Identifies the IP address and/or port used by the attacker host.
This is the port from where the offending packet originated. You can also enter a range of ports.
•![]() Risk Rating—Indicates the risk rating range between 0 and 100 that should be used to trigger this event action filter.
Risk Rating—Indicates the risk rating range between 0 and 100 that should be used to trigger this event action filter.
If an event occurs with a risk rating that falls within the minimum-maximum range you configure here, the event is processed against the rules of this event filter.
•![]() Actions to Subtract—Indicates the actions that should be removed from the event, should the conditions of the event meet the criteria of the event action filter.
Actions to Subtract—Indicates the actions that should be removed from the event, should the conditions of the event meet the criteria of the event action filter.
•![]() OS Relevance—Indicates whether the alert is relevant to the OS that has been identified for the victim.
OS Relevance—Indicates whether the alert is relevant to the OS that has been identified for the victim.
•![]() Deny Pct—Indicates the percentage of packets to deny for deny attacker features.
Deny Pct—Indicates the percentage of packets to deny for deny attacker features.
•![]() Stop on Match—Determines whether or not this event will be processed against remaining filters in the event action filters list.
Stop on Match—Determines whether or not this event will be processed against remaining filters in the event action filters list.
If set to No, the remaining filters are processed for a match until a Stop flag is encountered.
If set to Yes, no further processing is done. The actions specified by this filter are removed and the remaining actions are performed.
•![]() Comments—Displays the user comments associated with this filter.
Comments—Displays the user comments associated with this filter.
Add and Edit Event Action Filter Dialog Boxes Field Definitions
The following fields are found in the Add and Edit Event Action Filter dialog boxes:
•![]() Name—Lets you name the filter you are adding.
Name—Lets you name the filter you are adding.
You need to name your filters so that you can move them around in the list and move them to the inactive list if needed.
•![]() Active—Lets you add the filter to the filter list so that it takes effect on filtering events.
Active—Lets you add the filter to the filter list so that it takes effect on filtering events.
•![]() Enabled—Indicates whether or not this filter is enabled.
Enabled—Indicates whether or not this filter is enabled.
•![]() Signature ID—Identifies the unique numerical value assigned to this signature.
Signature ID—Identifies the unique numerical value assigned to this signature.
This value lets the sensor identify a particular signature. You can also enter a range of signatures.
•![]() Subsignature ID—Identifies the unique numerical value assigned to this subsignature.
Subsignature ID—Identifies the unique numerical value assigned to this subsignature.
The subsignature ID identifies a more granular version of a broad signature. You can also enter a range of subsignature IDs.
•![]() Attacker Address—Identifies the IP address of the host that sent the offending packet.
Attacker Address—Identifies the IP address of the host that sent the offending packet.
You can also enter a range of addresses.
•![]() Attacker Port—Identifies the port used by the attacker host.
Attacker Port—Identifies the port used by the attacker host.
This is the port from where the offending packet originated. You can also enter a range of ports.
•![]() Victim Address—Identifies the IP address of the host being attacked (the recipient of the offending packet).
Victim Address—Identifies the IP address of the host being attacked (the recipient of the offending packet).
You can also enter a range of addresses.
•![]() Victim Port—Identifies the port through which the offending packet was received.
Victim Port—Identifies the port through which the offending packet was received.
You can also enter a range of ports.
•![]() Risk Rating—Indicates the risk rating range between 0 and 100 that should be used to trigger this event action filter.
Risk Rating—Indicates the risk rating range between 0 and 100 that should be used to trigger this event action filter.
If an event occurs with a risk rating that falls within the minimum-maximum range you configure here, the event is processed against the rules of this event filter.
•![]() Actions to Subtract—Indicates the actions that should be removed from the event, should the conditions of the event meet the criteria of the event action filter.
Actions to Subtract—Indicates the actions that should be removed from the event, should the conditions of the event meet the criteria of the event action filter.
–![]() Deny Attacker Inline—(Inline only) Terminates the current packet and future packets from this attacker address for a specified period of time.
Deny Attacker Inline—(Inline only) Terminates the current packet and future packets from this attacker address for a specified period of time.
The sensor maintains a list of attackers being denied by the system. To remove an entry from the denied attacker list, you can view the list of attackers and clear the entire list, or you can wait for the timer to expire. The timer is a sliding timer for each entry. Therefore, if attacker A is being denied, but issues another attack, the timer for attacker A is reset and attacker A remains in the denied attacker list until the timer expires. If the denied attacker list is at capacity and cannot add a new entry, the packet is still denied.
Note ![]() This is the most severe of the deny actions. It denies current and future packets from a single attacker address. To clear all denied attacker entries, choose Monitoring > Denied Attackers > Clear List, which permits the addresses back on the network.
This is the most severe of the deny actions. It denies current and future packets from a single attacker address. To clear all denied attacker entries, choose Monitoring > Denied Attackers > Clear List, which permits the addresses back on the network.
–![]() Deny Attacker Service Pair Inline—(Inline only) Does not transmit this packet and future packets on the attacker address victim port pair for a specified period of time.
Deny Attacker Service Pair Inline—(Inline only) Does not transmit this packet and future packets on the attacker address victim port pair for a specified period of time.
–![]() Deny Attacker Victim Pair Inline—(Inline only) Does not transmit this packet and future packets on the attacker/victim address pair for a specified period of time.
Deny Attacker Victim Pair Inline—(Inline only) Does not transmit this packet and future packets on the attacker/victim address pair for a specified period of time.
Note ![]() For deny actions, to set the specified period of time and maximum number of denied attackers, choose Configuration > Policies > Event Action Rules > rules0 > General Settings.
For deny actions, to set the specified period of time and maximum number of denied attackers, choose Configuration > Policies > Event Action Rules > rules0 > General Settings.
–![]() Deny Connection Inline—(Inline only) Terminates the current packet and future packets on this TCP flow.
Deny Connection Inline—(Inline only) Terminates the current packet and future packets on this TCP flow.
–![]() Deny Packet Inline—(Inline only) Terminates the packet.
Deny Packet Inline—(Inline only) Terminates the packet.
Note ![]() You cannot delete the event action override for Deny Packet Inline because it is protected. If you do not want to use that override, disable it.
You cannot delete the event action override for Deny Packet Inline because it is protected. If you do not want to use that override, disable it.
–![]() Log Attacker Packets—Starts IP logging on packets that contain the attacker address and sends an alert. This action causes an alert to be written to the Event Store, even if Produce Alert is not selected.
Log Attacker Packets—Starts IP logging on packets that contain the attacker address and sends an alert. This action causes an alert to be written to the Event Store, even if Produce Alert is not selected.
–![]() Log Pair Packets—Starts IP Logging on packets that contain the attacker/victim address pair. This action causes an alert to be written to the Event Store, even if Produce Alert is not selected.
Log Pair Packets—Starts IP Logging on packets that contain the attacker/victim address pair. This action causes an alert to be written to the Event Store, even if Produce Alert is not selected.
–![]() Log Victim Packets—Starts IP Logging on packets that contain the victim address and sends an alert. This action causes an alert to be written to the Event Store, even if Produce Alert is not selected.
Log Victim Packets—Starts IP Logging on packets that contain the victim address and sends an alert. This action causes an alert to be written to the Event Store, even if Produce Alert is not selected.
–![]() Modify Packet Inline— Modifies packet data to remove ambiguity about what the end point might do with the packet.
Modify Packet Inline— Modifies packet data to remove ambiguity about what the end point might do with the packet.
Note ![]() Modify Packet Inline is not an option for Add Event Action Filter or Add Event Action Override.
Modify Packet Inline is not an option for Add Event Action Filter or Add Event Action Override.
–![]() Produce Alert—Writes the event to the Event Store as an alert.
Produce Alert—Writes the event to the Event Store as an alert.
–![]() Produce Verbose Alert—Includes an encoded dump of the offending packet in the alert. This action causes an alert to be written to the Event Store, even if Produce Alert is not selected.
Produce Verbose Alert—Includes an encoded dump of the offending packet in the alert. This action causes an alert to be written to the Event Store, even if Produce Alert is not selected.
–![]() Request Block Connection—Sends a request to ARC to block this connection. You must have blocking devices configured to implement this action.
Request Block Connection—Sends a request to ARC to block this connection. You must have blocking devices configured to implement this action.
–![]() Request Block Host—Sends a request to ARC to block this attacker host. You must have blocking devices configured to implement this action.
Request Block Host—Sends a request to ARC to block this attacker host. You must have blocking devices configured to implement this action.
Note ![]() For block actions, to set the duration of the block, choose Configuration > Policies > Event Action Rules > rules0 > General Settings.
For block actions, to set the duration of the block, choose Configuration > Policies > Event Action Rules > rules0 > General Settings.
–![]() Request Rate Limit—Sends a rate limit request to ARC to perform rate limiting. You must have rate limiting devices configured to implement this action.
Request Rate Limit—Sends a rate limit request to ARC to perform rate limiting. You must have rate limiting devices configured to implement this action.
Note ![]() Request Rate Limit applies to a select set of signatures.
Request Rate Limit applies to a select set of signatures.
–![]() Request SNMP Trap—Sends a request to the Notification Application component of the sensor to perform SNMP notification. This action causes an alert to be written to the Event Store, even if Produce Alert is not selected. You must have SNMP configured on the sensor to implement this action.
Request SNMP Trap—Sends a request to the Notification Application component of the sensor to perform SNMP notification. This action causes an alert to be written to the Event Store, even if Produce Alert is not selected. You must have SNMP configured on the sensor to implement this action.
–![]() Reset TCP Connection—Sends TCP resets to hijack and terminate the TCP flow. Reset TCP Connection only works on TCP signatures that analyze a single connection. It does not work for sweeps or floods.
Reset TCP Connection—Sends TCP resets to hijack and terminate the TCP flow. Reset TCP Connection only works on TCP signatures that analyze a single connection. It does not work for sweeps or floods.
•![]() OS Relevance—Lets you filter out events where the attack is not relevant to the victim OS.
OS Relevance—Lets you filter out events where the attack is not relevant to the victim OS.
•![]() Deny Percentage—Determines the percentage of packets to deny for deny attacker features.
Deny Percentage—Determines the percentage of packets to deny for deny attacker features.
The valid range is 0 to 100. The default is 100 percent.
•![]() Stop on Match—Determines whether or not this event will be processed against remaining filters in the event action filters list.
Stop on Match—Determines whether or not this event will be processed against remaining filters in the event action filters list.
If set to No, the remaining filters are processed for a match until a Stop flag is encountered.
If set to Yes, no further processing is done. The actions specified by this filter are removed and the remaining actions are performed.
•![]() Comments—Displays the user comments associated with this filter.
Comments—Displays the user comments associated with this filter.
For More Information
•![]() For the procedure for clearing the denied attacker list, see Monitoring the Denied Attackers List.
For the procedure for clearing the denied attacker list, see Monitoring the Denied Attackers List.
•![]() For the procedure for configuring the general settings, see Configuring the General Settings.
For the procedure for configuring the general settings, see Configuring the General Settings.
•![]() For more information on ARC and configuring blocking and rate limiting, see Chapter 9 "Configuring Attack Response Controller for Blocking and Rate Limiting."
For more information on ARC and configuring blocking and rate limiting, see Chapter 9 "Configuring Attack Response Controller for Blocking and Rate Limiting."
•![]() For more information about SNMP, see Chapter 8 "Configuring SNMP."
For more information about SNMP, see Chapter 8 "Configuring SNMP."
Adding, Editing, Deleting, Enabling, Disabling, and Moving Event Action Filters
To add, edit, delete, enable, disable, and move event action filters, follow these steps:
Step 1 ![]() Log in to IDM using an account with administrator or operator privileges.
Log in to IDM using an account with administrator or operator privileges.
Step 2 ![]() Choose Configuration > Policies > Event Action Rules > rules0 > Event Action Filters, and then click Add.
Choose Configuration > Policies > Event Action Rules > rules0 > Event Action Filters, and then click Add.
Step 3 ![]() In the Name field, enter a name for the event action filter.
In the Name field, enter a name for the event action filter.
A default name is supplied, but you can change it to a more meaningful name.
Step 4 ![]() In the Active field, click the Yes radio button to add this filter to the list so that it takes effect on filtering events.
In the Active field, click the Yes radio button to add this filter to the list so that it takes effect on filtering events.
Step 5 ![]() In the Enabled field, click the Yes radio button to enable the filter.
In the Enabled field, click the Yes radio button to enable the filter.
Note ![]() You must also check the Use Event Action Filters check box on the Event Action Filters tab or none of the event action filters will be enabled regardless of whether you check the Yes check box in the Add Event Action Filter dialog box.
You must also check the Use Event Action Filters check box on the Event Action Filters tab or none of the event action filters will be enabled regardless of whether you check the Yes check box in the Add Event Action Filter dialog box.
Step 6 ![]() In the Signature ID field, enter the signature IDs of all signatures to which this filter should be applied.
In the Signature ID field, enter the signature IDs of all signatures to which this filter should be applied.
You can use a list (2001, 2004), or a range (2001-2004) or one of the SIG variables if you defined them on the Event Variables tab. Preface the variable with $.
Step 7 ![]() In the SubSignature ID field, enter the subsignature IDs of the subsignatures to which this filter should be applied.
In the SubSignature ID field, enter the subsignature IDs of the subsignatures to which this filter should be applied.
Step 8 ![]() In the Attacker Address field, enter the IP address of the source host.
In the Attacker Address field, enter the IP address of the source host.
You can use one of the variables if you defined them on the Event Variables tab. Preface the variable with $. You can also enter a range of addresses (for example, 0.0.0.0-255.255.255.255).
Step 9 ![]() In the Attacker Port field, enter the port number used by the attacker to send the offending packet.
In the Attacker Port field, enter the port number used by the attacker to send the offending packet.
Step 10 ![]() In the Victim Address field, enter the IP address of the recipient host.
In the Victim Address field, enter the IP address of the recipient host.
You can use one of the variables if you defined them on the Event Variables tab. Preface the variable with $. You can also enter a range of addresses (for example, 0.0.0.0-255.255.255.255).
Step 11 ![]() In the Victim Port field, enter the port number used by the victim host to receive the offending packet.
In the Victim Port field, enter the port number used by the victim host to receive the offending packet.
Step 12 ![]() In the Risk Rating field, enter a risk rating range for this filter.
In the Risk Rating field, enter a risk rating range for this filter.
If the risk rating for an event falls within the range you specify, the event is processed against the criteria of this filter.
Step 13 ![]() From the Actions to Subtract drop-down list, choose the actions you want this filter to remove from the event.
From the Actions to Subtract drop-down list, choose the actions you want this filter to remove from the event.
Tip ![]() To choose more than one event action in the list, hold down the Ctrl key.
To choose more than one event action in the list, hold down the Ctrl key.
Step 14 ![]() In the OS Relevance drop-down list, choose whether you want to know if the alert is relevant to the OS that has been identified for the victim.
In the OS Relevance drop-down list, choose whether you want to know if the alert is relevant to the OS that has been identified for the victim.
Step 15 ![]() In the Deny Percentage field, enter the percentage of packets to deny for deny attacker features.
In the Deny Percentage field, enter the percentage of packets to deny for deny attacker features.
The default is 100 percent.
Step 16 ![]() In the Stop on Match field, click one of the following radio buttons:
In the Stop on Match field, click one of the following radio buttons:
a. ![]() Yes—If you want the Event Action Filters component to stop processing after the actions of this particular filter have been removed.
Yes—If you want the Event Action Filters component to stop processing after the actions of this particular filter have been removed.
Any remaining filters will not be processed; therefore, no additional actions can be removed from the event.
b. ![]() No—If you want to continue processing additional filters.
No—If you want to continue processing additional filters.
Step 17 ![]() In the Comments field, enter any comments that you want to store with this filter, such as the purpose of this filter or why you have configured this filter in a particular way.
In the Comments field, enter any comments that you want to store with this filter, such as the purpose of this filter or why you have configured this filter in a particular way.
Tip ![]() To discard your changes and close the Add Event Action Filter dialog box, click Cancel.
To discard your changes and close the Add Event Action Filter dialog box, click Cancel.
Step 18 ![]() Click OK.
Click OK.
The new event action filter now appears in the list on the Event Action Filters tab.
Step 19 ![]() Check the Use Event Action Overrides check box.
Check the Use Event Action Overrides check box.
Note ![]() You must check the Use Event Action Overrides check box on the Event Action Overrides tab or none of the event action overrides will be enabled regardless of the value you set in the Add Event Action Filter dialog box.
You must check the Use Event Action Overrides check box on the Event Action Overrides tab or none of the event action overrides will be enabled regardless of the value you set in the Add Event Action Filter dialog box.
Step 20 ![]() To edit an existing event action filter, select it in the list, and then click Edit.
To edit an existing event action filter, select it in the list, and then click Edit.
Step 21 ![]() Change any values in the fields that you need to.
Change any values in the fields that you need to.
See Steps 4 through 18 for information on completing the fields.
Tip ![]() To discard your changes and close the Edit Event Action Filter dialog box, click Cancel.
To discard your changes and close the Edit Event Action Filter dialog box, click Cancel.
Step 22 ![]() Click OK.
Click OK.
The edited event action filter now appears in the list on the Event Action Filters tab.
Step 23 ![]() Check the Use Event Action Overrides check box.
Check the Use Event Action Overrides check box.
Note ![]() You must check the Use Event Action Overrides check box on the Event Action Overrides tab or none of the event action overrides will be enabled regardless of the value you set in the Edit Event Action Filter dialog box.
You must check the Use Event Action Overrides check box on the Event Action Overrides tab or none of the event action overrides will be enabled regardless of the value you set in the Edit Event Action Filter dialog box.
Step 24 ![]() To delete an event action filter, select it in the list, and then click Delete.
To delete an event action filter, select it in the list, and then click Delete.
The event action filter no longer appears in the list on the Event Action Filters tab.
Step 25 ![]() To enable or disable an event action filter, select it in the list, and then click Enable or Disable.
To enable or disable an event action filter, select it in the list, and then click Enable or Disable.
Step 26 ![]() To move an event action filter up or down in the list, select it, and then click Move Up or Move Down.
To move an event action filter up or down in the list, select it, and then click Move Up or Move Down.
Tip ![]() To discard your changes, click Reset.
To discard your changes, click Reset.
Step 27 ![]() Click Apply to apply your changes and save the revised configuration.
Click Apply to apply your changes and save the revised configuration.
Configuring OS Maps
This section describes the OS Identifications tab and how to configure OS maps. It contains the following topics:
•![]() Passive OS Fingerprinting Configuration Considerations
Passive OS Fingerprinting Configuration Considerations
•![]() OS Identifications Tab Field Definitions
OS Identifications Tab Field Definitions
•![]() Add and Edit Configured OS Map Dialog Boxes Field Definitions
Add and Edit Configured OS Map Dialog Boxes Field Definitions
•![]() Adding, Editing, Deleting, and Moving Configured OS Maps
Adding, Editing, Deleting, and Moving Configured OS Maps
OS Identifications Tab
Note ![]() You must be administrator or operator to add, edit, and delete configured OS maps.
You must be administrator or operator to add, edit, and delete configured OS maps.
Passive OS fingerprinting lets the sensor determine the OS that hosts are running. The sensor analyzes network traffic between hosts and stores the OS of these hosts with their IP addresses. The sensor inspects TCP SYN and SYNACK packets exchanged on the network to determine the OS type.
The sensor then uses the OS of the target host OS to determine the relevance of the attack to the victim by computing the attack relevance rating component of the risk rating. Based on the relevance of the attack, the sensor may alter the risk rating of the alert for the attack and/or the sensor may filter the alert for the attack. You can then use the risk rating to reduce the number of false positive alerts (a benefit in IDS mode) or definitively drop suspicious packets (a benefit in IPS mode). Passive OS fingerprinting also enhances the alert output by reporting the victim OS, the source of the OS identification, and the relevance to the victim OS in the alert.
Passive OS fingerprinting consists of three components:
•![]() Passive OS learning
Passive OS learning
Passive OS learning occurs as the sensor observes traffic on the network. Based on the characteristics of TCP SYN and SYNACK packets, the sensor makes a determination of the OS running on the host of the source IP address.
•![]() User-configurable OS identification
User-configurable OS identification
You can configure OS host mappings, which take precedence over learned OS mappings.
•![]() Computation of attack relevance rating and risk rating
Computation of attack relevance rating and risk rating
The sensor uses OS information to determine the relevance of the attack signature to the targeted host. The attack relevance is the attack relevance rating component of the risk rating value for the attack alert. The sensor uses the OS type reported in the host posture information imported from the CSA MC to compute the attack relevance rating.
There are three sources of OS information. The sensor ranks the sources of OS information in the following order:
1. ![]() Configured OS mappings—OS mappings you enter.
Configured OS mappings—OS mappings you enter.
Configured OS mappings reside in the event action rules policy and can apply to one or many virtual sensors.
2. ![]() Imported OS mappings—OS mappings imported from an external data source.
Imported OS mappings—OS mappings imported from an external data source.
Imported OS mappings are global and apply to all virtual sensors.
Note ![]() Currently CSA MC is the only external data source.
Currently CSA MC is the only external data source.
3. ![]() Learned OS mappings—OS mappings observed by the sensor through the fingerprinting of TCP packets with the SYN control bit set.
Learned OS mappings—OS mappings observed by the sensor through the fingerprinting of TCP packets with the SYN control bit set.
Learned OS mappings are local to the virtual sensor that sees the traffic.
When the sensor needs to determine the OS for a target IP address, it consults the configured OS mappings. If the target IP address is not in the configured OS mappings, the sensor looks in the imported OS mappings. If the target IP address is not in the imported OS mappings, the sensor looks in the learned OS mappings. If it cannot find it there, the sensor treats the OS of the target IP address as unknown.
Note ![]() Passive OS fingerprinting is enabled by default and the IPS contains a default vulnerable OS list for each signature.
Passive OS fingerprinting is enabled by default and the IPS contains a default vulnerable OS list for each signature.
Use the OS Identifications tab to configure OS host mappings, which take precedence over learned OS mappings. On the OS Identifications tab you can add, edit, and delete configured OS maps. You can move them up and down in the list to change the order in which the sensor computes the attack relevance rating and risk rating for that particular IP address and OS type combination.
You can also move them up and down in the list to change the order in which the sensor resolves the OS associated with a particular IP address.
Configured OS mappings allow for ranges, so for network 192.168.1.0/24 an administrator might define the following (Table 6-1):
|
|
|
|---|---|
192.168.1.1 |
IOS |
192.168.1.2-192.168.1.10,192.168.1.25 |
UNIX |
192.168.1.1-192.168.1.255 |
Windows |
More specific mappings should be at the beginning of the list. Overlap in the IP address range sets is allowed, but the entry closest to the beginning of the list takes precedence.
Passive OS Fingerprinting Configuration Considerations
You do not have to configure passive OS fingerprinting for it to function. IPS provides a default vulnerable OS list for each signature and passive analysis is enabled by default.
You can configure the following aspects of passive OS fingerprinting:
•![]() Define OS mappings
Define OS mappings
We recommend configuring OS mappings to define the identity of the OS running on critical systems. It is best to configure OS mappings when the OS and IP address of the critical systems are unlikely to change.
•![]() Limit the attack relevance rating calculation to a specific IP address range
Limit the attack relevance rating calculation to a specific IP address range
This limits the attack relevance rating calculations to IP addresses on the protected network.
•![]() Import OS mappings
Import OS mappings
Importing OS mappings provides a mechanism for accelerating the learning rate and fidelity of the OS identifications made through passive analysis. If you have an external product interface, such as the CSA MC, you can import OS identifications from it.
•![]() Define event action rules filters using the OS relevancy value of the target
Define event action rules filters using the OS relevancy value of the target
This provides a way to filter alerts solely on OS relevancy.
•![]() Disable passive analysis
Disable passive analysis
Stops the sensor from learning new OS mappings.
•![]() Edit signature vulnerable OS lists
Edit signature vulnerable OS lists
The vulnerable OS list specifies what OS types are vulnerable to each signature. The default, general-os, applies to all signatures that do not specify a vulnerable OS list.
OS Identifications Tab Field Definitions
The following fields are found on the OS Identifications tab:
•![]() Enable passive OS fingerprinting analysis—When checked, lets the sensor perform passive OS analysis.
Enable passive OS fingerprinting analysis—When checked, lets the sensor perform passive OS analysis.
•![]() Restrict OS mapping and ARR to these IP addresses—Lets you configure the mapping of OS type to a specific IP address and have the sensor calculate the attack relevance rating for that IP address.
Restrict OS mapping and ARR to these IP addresses—Lets you configure the mapping of OS type to a specific IP address and have the sensor calculate the attack relevance rating for that IP address.
•![]() Configured OS Map—Displays the attributes of the configured OS map.
Configured OS Map—Displays the attributes of the configured OS map.
–![]() Name—The Name you give the configured OS map.
Name—The Name you give the configured OS map.
–![]() Active—Wether this configured OS map is active or inactive.
Active—Wether this configured OS map is active or inactive.
–![]() IP Address—The IP address of this configured OS map.
IP Address—The IP address of this configured OS map.
–![]() OS Type—The OS type of this configured OS map.
OS Type—The OS type of this configured OS map.
Add and Edit Configured OS Map Dialog Boxes Field Definitions
The following fields are found on the Add and Edit Configured OS Map dialog boxes:
•![]() Name—Lets you name this configured OS map.
Name—Lets you name this configured OS map.
•![]() Active—Lets you choose to have the configured OS map active or inactive.
Active—Lets you choose to have the configured OS map active or inactive.
•![]() IP Address—Lets you enter the IP address associated with this configured OS map.
IP Address—Lets you enter the IP address associated with this configured OS map.
The IP address for configured OS mappings (and only configured OS mappings) can be a set of IP addresses and IP address ranges. The following are all valid IP address values for configured OS mappings:
–![]() 10.1.1.1,10.1.1.2,10.1.1.15
10.1.1.1,10.1.1.2,10.1.1.15
–![]() 10.1.2.1
10.1.2.1
–![]() 10.1.1.1-10.2.1.1,10.3.1.1
10.1.1.1-10.2.1.1,10.3.1.1
–![]() 10.1.1.1-10.1.1.5
10.1.1.1-10.1.1.5
•![]() OS Type—Lets you choose one of the following OS Types to associate with the IP address:
OS Type—Lets you choose one of the following OS Types to associate with the IP address:
–![]() AIX
AIX
–![]() BSD
BSD
–![]() General OS
General OS
–![]() HP UX
HP UX
–![]() IOS
IOS
–![]() IRIX
IRIX
–![]() Linux
Linux
–![]() Mac OS
Mac OS
–![]() Netware
Netware
–![]() Other
Other
–![]() Solaris
Solaris
–![]() UNIX
UNIX
–![]() Unknown OS
Unknown OS
–![]() Win NT
Win NT
–![]() Windows
Windows
–![]() Windows NT/2K/XP
Windows NT/2K/XP
Adding, Editing, Deleting, and Moving Configured OS Maps
To add, edit, delete, and move configured OS maps, follow these steps:
Step 1 ![]() Log in to for example using an account with administrator or operator privileges.
Log in to for example using an account with administrator or operator privileges.
Step 2 ![]() Choose Configuration > Policies > Event Action Rules > rules0 > OS Identifications, and then click Add.
Choose Configuration > Policies > Event Action Rules > rules0 > OS Identifications, and then click Add.
Step 3 ![]() In the Name field, enter a name for the configured OS map.
In the Name field, enter a name for the configured OS map.
A default name is supplied, but you can change it to a more meaningful name.
Step 4 ![]() In the Active field, click the Yes radio button to add this configured OS map to the list so that it takes effect.
In the Active field, click the Yes radio button to add this configured OS map to the list so that it takes effect.
Step 5 ![]() In the IP Address field, enter the IP address of the host that you are mapping to an OS.
In the IP Address field, enter the IP address of the host that you are mapping to an OS.
Step 6 ![]() From the OS Type drop-down list, choose the OS that will be mapped to the IP address.
From the OS Type drop-down list, choose the OS that will be mapped to the IP address.
Tip ![]() To discard your changes and close the Add Configured OS Map dialog box, click Cancel.
To discard your changes and close the Add Configured OS Map dialog box, click Cancel.
Step 7 ![]() Click OK.
Click OK.
The new configured OS map now appears in the list on the OS Identifications tab.
Step 8 ![]() Check the Enable passive OS fingerprinting analysis check box.
Check the Enable passive OS fingerprinting analysis check box.
Note ![]() You must check the Enable passive OS fingerprinting analysis check box on the OS Identifications tab or none of the configured OS maps will be enabled regardless of the value you set in the Add Configured OS Map dialog box.
You must check the Enable passive OS fingerprinting analysis check box on the OS Identifications tab or none of the configured OS maps will be enabled regardless of the value you set in the Add Configured OS Map dialog box.
Step 9 ![]() To edit a configured OS map, select it in the list, and then click Edit.
To edit a configured OS map, select it in the list, and then click Edit.
Step 10 ![]() Change any values in the fields that you need to.
Change any values in the fields that you need to.
Tip ![]() To discard your changes and close the Edit Configured OS Map dialog box, click Cancel.
To discard your changes and close the Edit Configured OS Map dialog box, click Cancel.
Step 11 ![]() Click OK.
Click OK.
The edited configured OS map now appears in the list on the OS Identifications tab.
Step 12 ![]() Check the Enable passive OS fingerprinting analysis check box.
Check the Enable passive OS fingerprinting analysis check box.
Note ![]() You must check the Enable passive OS fingerprinting analysis check box on the OS Identifications tab or none of the configured OS maps will be enabled regardless of the value you set in the Edit Configured OS Map dialog box.
You must check the Enable passive OS fingerprinting analysis check box on the OS Identifications tab or none of the configured OS maps will be enabled regardless of the value you set in the Edit Configured OS Map dialog box.
Step 13 ![]() To delete a configured OS map, select it in the list, and then click Delete.
To delete a configured OS map, select it in the list, and then click Delete.
The configured OS map no longer appears in the list on the OS Identifications tab.
Step 14 ![]() To move a configured OS map up or down in the list, select it, and then click Move Up or Move Down.
To move a configured OS map up or down in the list, select it, and then click Move Up or Move Down.
Tip ![]() To discard your changes, click Reset.
To discard your changes, click Reset.
Step 15 ![]() Click Apply to apply your changes and save the revised configuration.
Click Apply to apply your changes and save the revised configuration.
Configuring Event Variables
This section describes the Event Variables tab and how to configure event variables. It contains the following topics:
•![]() Event Variables Tab Field Definitions
Event Variables Tab Field Definitions
•![]() Add and Edit Event Variable Dialog Boxes Field Definitions
Add and Edit Event Variable Dialog Boxes Field Definitions
•![]() Adding, Editing, and Deleting Event Variables
Adding, Editing, and Deleting Event Variables
Event Variables Tab
Note ![]() You must be administrator or operator to configure event variables.
You must be administrator or operator to configure event variables.
You can create event variables and then use those variables in event action filters. When you want to use the same value within multiple filters, use a variable. When you change the value of the variable, any filter that uses that variable is updated with the new value.
Note ![]() You must preface the variable with a dollar ($) sign to indicate that you are using a variable rather than a string.
You must preface the variable with a dollar ($) sign to indicate that you are using a variable rather than a string.
Some variables cannot be deleted because they are necessary to the signature system. If a variable is protected, you cannot select it to edit it. You receive an error message if you try to delete protected variables. You can edit only one variable at a time.
When configuring IP addresses, specify the full IP address or ranges or set of ranges. For example:
•![]() 10.89.10.10-10.89.10.23
10.89.10.10-10.89.10.23
•![]() 10.90.1.1
10.90.1.1
•![]() 192.56.10.1-192.56.10.255
192.56.10.1-192.56.10.255
•![]() 10.1.1.1-10.2.255.255, 10.89.10.10-10.89.10.23
10.1.1.1-10.2.255.255, 10.89.10.10-10.89.10.23

Timesaver ![]() For example, if you have an IP address space that applies to your engineering group and there are no Windows systems in that group, and you are not worried about any Windows-based attacks to that group, you could set up a variable to be the IP address space of the engineering group. You could then use this variable to configure a filter that would ignore all Windows-based attacks for this group.
For example, if you have an IP address space that applies to your engineering group and there are no Windows systems in that group, and you are not worried about any Windows-based attacks to that group, you could set up a variable to be the IP address space of the engineering group. You could then use this variable to configure a filter that would ignore all Windows-based attacks for this group.
Event Variables Tab Field Definitions
The following fields are found on the Event Variables tab:
•![]() Name—Lets you assign a name to this variable.
Name—Lets you assign a name to this variable.
•![]() Type—Identifies the variable as an address.
Type—Identifies the variable as an address.
•![]() Value—Lets you add the value(s) represented by this variable.
Value—Lets you add the value(s) represented by this variable.
Add and Edit Event Variable Dialog Boxes Field Definitions
The following fields are found in the Add and Edit Event Variable dialog boxes:
•![]() Name—Lets you assign a name to this variable.
Name—Lets you assign a name to this variable.
•![]() Type—Identifies the variable as an address.
Type—Identifies the variable as an address.
•![]() Value—Lets you add the value(s) represented by this variable.
Value—Lets you add the value(s) represented by this variable.
Adding, Editing, and Deleting Event Variables
To add, edit, and delete event variables, follow these steps:
Step 1 ![]() Log in to for example using an account with administrator or operator privileges.
Log in to for example using an account with administrator or operator privileges.
Step 2 ![]() Choose Configuration > Policies > Event Action Rules > rules0 > Event Variables, and then click Add.
Choose Configuration > Policies > Event Action Rules > rules0 > Event Variables, and then click Add.
Step 3 ![]() In the Name field, enter a name for this variable.
In the Name field, enter a name for this variable.
Note ![]() A valid name can only contain numbers or letters. You can also use a hyphen (-) or an underscore (_).
A valid name can only contain numbers or letters. You can also use a hyphen (-) or an underscore (_).
Step 4 ![]() In the Value field, enter the values for this variable.
In the Value field, enter the values for this variable.
Specify the full IP address or ranges or set of ranges. For example:
•![]() 10.89.10.10-10.89.10.23
10.89.10.10-10.89.10.23
•![]() 10.90.1.1
10.90.1.1
•![]() 192.56.10.1-192.56.10.255
192.56.10.1-192.56.10.255
Note ![]() You can use commas as delimiters. Make sure there are no trailing spaces after the comma. Otherwise, you receive a
You can use commas as delimiters. Make sure there are no trailing spaces after the comma. Otherwise, you receive a Validation failed error.
Tip ![]() To discard your changes and close the Add Variable dialog box, click Cancel.
To discard your changes and close the Add Variable dialog box, click Cancel.
Step 5 ![]() Click OK.
Click OK.
The new variable appears in the list on the Event Variables tab.
Step 6 ![]() To edit an existing variable, select it in the list, and then click Edit.
To edit an existing variable, select it in the list, and then click Edit.
Step 7 ![]() In the Value field, enter your changes to the value.
In the Value field, enter your changes to the value.
Tip ![]() To discard your changes and close the Edit Variable dialog box, click Cancel.
To discard your changes and close the Edit Variable dialog box, click Cancel.
Step 8 ![]() Click OK.
Click OK.
The edited event variable now appears in the list on the Event Variables tab.
Tip ![]() To discard your changes, click Reset.
To discard your changes, click Reset.
Step 9 ![]() Click Apply to apply your changes and save the revised configuration.
Click Apply to apply your changes and save the revised configuration.
Configuring the General Settings
This section describes the General Settings tab and how to configure the general settings. It contains the following topics:
•![]() General Settings Tab Field Definitions
General Settings Tab Field Definitions
•![]() Configuring the General Settings
Configuring the General Settings
General Settings Tab
Note ![]() You must be administrator or operator to configure the general settings for event action rules.
You must be administrator or operator to configure the general settings for event action rules.
You can configure the general settings that apply to event action rules, such as whether you want to use the Summarizer and the Meta Event Generator. The Summarizer groups events in to a single alert, thus decreasing the number of alerts the sensor sends out. The Meta Event Generator processes the component events, which lets the sensor watch for suspicious activity transpiring over a series of events.
You can configure how long you want to deny attackers, the maximum number of denied attackers, and how long you want blocks to last.
General Settings Tab Field Definitions
The following fields are found on the General Settings tab:
•![]() Use Summarizer—Enables the Summarizer component.
Use Summarizer—Enables the Summarizer component.
By default, the Summarizer is enabled. If you disable it, all signatures are set to Fire All with no summarization. If you configure individual signatures to summarize, this configuration will be ignored if the Summarizer is not enabled.
•![]() Use Meta Event Generator—Enables the Meta Event Generator.
Use Meta Event Generator—Enables the Meta Event Generator.
By default, the Meta Event Generator is enabled. If you disable the Meta Event Generator, all Meta engine signatures are disabled.
•![]() Use Threat Rating Adjustment—Enables threat rating adjustment, which adjusts the risk rating. If disabled, then the risk rating is equal to the threat rating.
Use Threat Rating Adjustment—Enables threat rating adjustment, which adjusts the risk rating. If disabled, then the risk rating is equal to the threat rating.
•![]() Deny Attacker Duration—Number of seconds to deny the attacker inline.
Deny Attacker Duration—Number of seconds to deny the attacker inline.
The valid range is 0 to 518400. The default is 3600.
•![]() Block Attack Duration—Number of minutes to block a host or connection.
Block Attack Duration—Number of minutes to block a host or connection.
The valid range is 0 to 10000000. The default is 30.
•![]() Maximum Denied Attackers—Limits the number of denied attackers possible in the system at any one time.
Maximum Denied Attackers—Limits the number of denied attackers possible in the system at any one time.
The valid range is 0 to 100000000. The default is 10000.
Configuring the General Settings
To configure the general settings for event action rules, follow these steps:
Step 1 ![]() Log in to disable using an account with administrator or operator privileges.
Log in to disable using an account with administrator or operator privileges.
Step 2 ![]() Choose Configuration > Policies > Action Rules > rules0 > General Settings.
Choose Configuration > Policies > Action Rules > rules0 > General Settings.
Step 3 ![]() To enable the summarizer feature, check the Use Summarizer check box.
To enable the summarizer feature, check the Use Summarizer check box.
Step 4 ![]() To enable the meta event generator, check the Use Meta Event Generator check box.
To enable the meta event generator, check the Use Meta Event Generator check box.
Step 5 ![]() To enable threat rating adjustment, check the Use Threat Rating Adjustment check box.
To enable threat rating adjustment, check the Use Threat Rating Adjustment check box.
Step 6 ![]() In the Deny Attacker Duration field, enter the number of seconds you want to deny the attacker inline.
In the Deny Attacker Duration field, enter the number of seconds you want to deny the attacker inline.
Step 7 ![]() In the Block Action Duration field, enter the number of minutes you want to block a host or connection.
In the Block Action Duration field, enter the number of minutes you want to block a host or connection.
Step 8 ![]() In the Maximum Denied Attackers field, enter the maximum number of denied attackers you want at any one time.
In the Maximum Denied Attackers field, enter the maximum number of denied attackers you want at any one time.
Tip ![]() To discard your changes, click Reset.
To discard your changes, click Reset.
Step 9 ![]() Click Apply to apply your changes and save the revised configuration.
Click Apply to apply your changes and save the revised configuration.
Monitoring Events
This section describes the Events pane and how to monitor events. It contains the following topics:
•![]() Events Pane Field Definitions
Events Pane Field Definitions
•![]() Event Viewer Window Field Definitions
Event Viewer Window Field Definitions
Events Pane
The Events pane lets you filter and view event data. You can filter events based on type, time, or both. By default all alert and error events are displayed for the past one hour. To access these events, click View.
When you click View, IDM defines a time range for the events if you have not already configured one. If you do not specify an end time of the range, it is defined as the moment you click View.
To prevent system errors when retrieving large numbers of events from the sensor, IDM limits the number of events you can view at one time (the maximum number of rows per page is 500). Click Back and Next to view more events.
Events Pane Field Definitions
The following fields are found in the Events pane:
•![]() Show Alert Events—Lets you configure the level of alert you want to view:
Show Alert Events—Lets you configure the level of alert you want to view:
–![]() Informational
Informational
–![]() Low
Low
–![]() Medium
Medium
–![]() High
High
The default is all levels enabled.
•![]() Threat Rating (0-100)—Lets you change the range (minimum and maximum levels) of the threat rating value.
Threat Rating (0-100)—Lets you change the range (minimum and maximum levels) of the threat rating value.
•![]() Show Error Events—Lets you configure the type of errors you want to view:
Show Error Events—Lets you configure the type of errors you want to view:
–![]() Warning
Warning
–![]() Error
Error
–![]() Fatal
Fatal
The default is all levels enabled.
•![]() Show Attack Response Controller events—Shows ARC (formerly known as Network Access Controller) events.
Show Attack Response Controller events—Shows ARC (formerly known as Network Access Controller) events.
The default is disabled.
Note ![]() NAC is now known as ARC; however, in IPS 6.0, the name change has not been completed throughout IDM and the CLI.
NAC is now known as ARC; however, in IPS 6.0, the name change has not been completed throughout IDM and the CLI.
•![]() Show status events—Shows status events.
Show status events—Shows status events.
The default is disabled.
•![]() Select the number of the rows per page—Lets you determine how many rows you want to view per page.
Select the number of the rows per page—Lets you determine how many rows you want to view per page.
The valid range is 100 to 500. The default is 100.
•![]() Show all events currently stored on the sensor—Retrieves all events stored on the sensor.
Show all events currently stored on the sensor—Retrieves all events stored on the sensor.
•![]() Show past events—Lets you go back a specified number of hours or minutes to view past events.
Show past events—Lets you go back a specified number of hours or minutes to view past events.
•![]() Show events from the following time range—Retrieves events from the specified time range.
Show events from the following time range—Retrieves events from the specified time range.
For More Information
For more information about how to calculate threat rating, see Understanding the Threat Rating.
Event Viewer Window Field Definitions
The following fields are found on the Event Viewer window.
•![]() #—Identifies the order number of the event in the results query.
#—Identifies the order number of the event in the results query.
•![]() Type—Identifies the type of event as Error, NAC, Status, or Alert.
Type—Identifies the type of event as Error, NAC, Status, or Alert.
•![]() Sensor UTC Time—Identifies when the event occurred.
Sensor UTC Time—Identifies when the event occurred.
•![]() Event ID—The numerical identifier the sensor has assigned to the event.
Event ID—The numerical identifier the sensor has assigned to the event.
•![]() Events—Briefly describes the event.
Events—Briefly describes the event.
•![]() Sig ID—Identifies the signature that fired and caused the alert event.
Sig ID—Identifies the signature that fired and caused the alert event.
Configuring Event Display
To configure how you want events to be displayed, follow these steps:
Step 1 ![]() Log in to IDM.
Log in to IDM.
Step 2 ![]() Choose Monitoring > Events.
Choose Monitoring > Events.
Step 3 ![]() Under Show Alert Events, check the check boxes of the levels of alerts you want to be displayed.
Under Show Alert Events, check the check boxes of the levels of alerts you want to be displayed.
Step 4 ![]() In the Threat Rating field, enter the minimum and maximum range of threat rating.
In the Threat Rating field, enter the minimum and maximum range of threat rating.
Step 5 ![]() Under Show Error Events, check the check boxes of the types of errors you want to be displayed.
Under Show Error Events, check the check boxes of the types of errors you want to be displayed.
Step 6 ![]() To display ARC (formerly known as Network Access Controller) events, check the Show Attack Response Controller events check box.
To display ARC (formerly known as Network Access Controller) events, check the Show Attack Response Controller events check box.
Step 7 ![]() To display status events, check the Show status events check box.
To display status events, check the Show status events check box.
Step 8 ![]() In the Select the number of the rows per page field, enter the number of rows per page you want displayed.
In the Select the number of the rows per page field, enter the number of rows per page you want displayed.
The default is 100. The values are 100, 200, 300, 400, or 500.
Step 9 ![]() To set a time for events to be displayed, click one of the following ratio buttons:
To set a time for events to be displayed, click one of the following ratio buttons:
•![]() Show all events currently stored on the sensor
Show all events currently stored on the sensor
•![]() Show past events
Show past events
Enter the hours and minutes you want to go back to view past events.
•![]() Show events from the following time range
Show events from the following time range
Enter a start and end time.
Tip ![]() To discard your changes, click Reset.
To discard your changes, click Reset.
Step 10 ![]() Click View to display the events you configured.
Click View to display the events you configured.
Step 11 ![]() To sort up and down in a column, click the right-hand side to see the up and down arrow.
To sort up and down in a column, click the right-hand side to see the up and down arrow.
Step 12 ![]() Click Next or Back to page by one hundred.
Click Next or Back to page by one hundred.
Step 13 ![]() To view details of an event, select it, and click Details.
To view details of an event, select it, and click Details.
The details for that event appear in another dialog box. The dialog box has the Event ID as its title.
For More Information
For more information about how to calculate threat rating, see Understanding the Threat Rating.
Monitoring OS Identifications
This section describes the Learned OS and Imported OS panes and how to monitor OS identifications. It contains the following topics:
Learned OS Pane
Note ![]() You must be administrator to clear and delete learned OS mappings.
You must be administrator to clear and delete learned OS mappings.
The Learned OS pane displays the learned OS mappings that the sensor has learned from observing traffic on the network. The sensor inspects TCP session negotiations to determine the OS running on each host.
To clear the list or delete one entry, select the row and click Delete.
Note ![]() If Passive OS Fingerprinting is still enabled and hosts are still communicating on the network, the learned OS mappings are immediately repopulated.
If Passive OS Fingerprinting is still enabled and hosts are still communicating on the network, the learned OS mappings are immediately repopulated.
Field Definitions
The following fields are found in the Learned OS pane:
•![]() Virtual Sensor—The virtual sensor that the OS value is associated with.
Virtual Sensor—The virtual sensor that the OS value is associated with.
•![]() Host IP Address—The IP address the OS value is mapped to.
Host IP Address—The IP address the OS value is mapped to.
•![]() OS Type—The OS type associated with the IP address.
OS Type—The OS type associated with the IP address.
Deleting and Clearing Learned OS Values
To delete a learned OS value or to clear the entire list, follow these steps:
Step 1 ![]() Log in to IDM using an account with administrator privileges.
Log in to IDM using an account with administrator privileges.
Step 2 ![]() Choose Monitoring > OS Identifications > Learned OS.
Choose Monitoring > OS Identifications > Learned OS.
Step 3 ![]() To delete one entry in the list, select it, and click Delete.
To delete one entry in the list, select it, and click Delete.
The learned OS value no longer appears in the list on the Learned OS pane.
Step 4 ![]() To get the most recent list of learned OS values, click Refresh.
To get the most recent list of learned OS values, click Refresh.
The learned OS list is refreshed.
Step 5 ![]() To clear all learned OS values, click Clear List.
To clear all learned OS values, click Clear List.
The learned OS list is now empty.
For More Information
For more information on passive OS fingerprinting and the sensor, see Configuring OS Maps.
Imported OS Pane
Note ![]() You must be administrator to clear and delete imported OS mappings.
You must be administrator to clear and delete imported OS mappings.
The Imported OS pane displays the OS mappings that the sensor has imported from CSA MC if you have CSA MC set up as an external interface product on the Configuration > External Product Interfaces pane. To clear the list or delete one entry, select the row and click Delete.
Field Definitions
The following fields are found in the Imported OS pane:
•![]() Host IP Address—The IP address the OS value is mapped to.
Host IP Address—The IP address the OS value is mapped to.
•![]() OS Type—The OS type associated with the IP address.
OS Type—The OS type associated with the IP address.
Monitoring the Imported OS Values
To delete an imported OS value or to clear the entire list, follow these steps:
Step 1 ![]() Log in to IDM using an account with administrator privileges.
Log in to IDM using an account with administrator privileges.
Step 2 ![]() Choose Monitoring > OS Identifications > Imported OS.
Choose Monitoring > OS Identifications > Imported OS.
Step 3 ![]() To delete one entry in the list, select it, and click Delete.
To delete one entry in the list, select it, and click Delete.
The imported OS value no longer appears in the list on the Imported OS pane.
Step 4 ![]() To clear all imported OS values, click Clear List.
To clear all imported OS values, click Clear List.
The imported OS list is now empty.
For More Information
For more information on external product interfaces, see Chapter 10 "Configuring External Product Interfaces."
 Feedback