- Introduction to the Cisco ASA FirePOWER Module
- Managing Reusable Objects
- Managing Device Configuration
- Getting Started with Access Control Policies
- Blacklisting Using Security Intelligence IP Address Reputation
- Tuning Traffic Flow Using Access Control Rules
- Controlling Traffic with Network-Based Rules
- Controlling Traffic with Reputation-Based Rules
- Access Control Rules: Realms and Users
- Access Control Rules: Custom Security Group Tags
- Controlling Traffic Using Intrusion and File Policies
- Intelligent Application Bypass
- Access Control Using Content Restriction
- Understanding Traffic Decryption
- Getting Started with SSL Policies
- Getting Started with SSL Rules
- Tuning Traffic Decryption Using SSL Rules
- Understanding Network Analysis and Intrusion Policies
- Using Layers in a Network Analysis or Intrusion Policy
- Customizing Traffic Preprocessing
- Getting Started with Network Analysis Policies
- Using Application Layer Preprocessors
- Configuring SCADA Preprocessing
- Configuring Transport & Network Layer Preprocessing
- Access Control Policies: Adaptive Profiles
- Getting Started with Intrusion Policies
- Tuning Intrusion Policies Using Rules
- Detecting Specific Threats
- Globally Limiting Intrusion Event Logging
- Understanding and Writing Intrusion Rules
- Introduction to Identity Data
- Realms and Identity Policies
- User Identity Sources
- DNS Policies
- Blocking Malware and Prohibited Files
- Logging Connections in Network Traffic
- Viewing Events
- Configuring External Alerting
- Configuring External Alerting for Intrusion Rules
- Using the ASA FirePOWER Dashboard
- Using ASA FirePOWER Reporting
- Scheduling Tasks
- Managing System Policies
- Configuring ASA FirePOWER Module Settings
- Licensing the ASA FirePOWER Module
- Updating ASA FirePOWER Module Software
- Monitoring the System
- Using Backup and Restore
- Generating Troubleshooting Files
- Importing and Exporting Configurations
- Viewing the Status of Long-Running Tasks
- Security, Internet Access, and Communication Ports
Blocking Malware and Prohibited Files
Malicious software, or malware , can enter your organization’s network via multiple routes. To help you identify and mitigate the effects of malware, the ASA FirePOWER module’s file control and advanced malware protection components can detect, track, store, analyze, and optionally block the transmission of malware and other types of files in network traffic.
You configure the system to perform malware protection and file control as part of your overall access control configuration. File policies that you create and associate with access control rules handle network traffic that matches the rules.
Although you can create file policies with any license, certain aspects of malware protection and file control require that you enable specific licensed capabilities on the ASA FirePOWER module, as described in the following table.
Understanding Malware Protection and File Control
License: Protection, Malware, or Any
Using the advanced malware protection feature, you can configure the ASA FirePOWER module to detect, track, analyze, and optionally block malware files being transmitted on your network.
The system can detect and optionally block malware in many types of files, including PDFs, Microsoft Office documents, and others. ASA FirePOWER modules monitor specific application protocol-based network traffic for transmissions of those file types. When the ASA FirePOWER module detects an eligible file, the ASA FirePOWER module then performs a malware cloud lookup using the file’s SHA-256 hash value. Based on these results, the Cisco cloud returns a file disposition to the ASA FirePOWER module.
If a file has a disposition in the cloud that you know to be incorrect, you can add the file’s SHA-256 value to a file list:
- To treat a file as if the cloud assigned a clean disposition, add the file to the clean list .
- To treat a file as if the cloud assigned a malware disposition, add the file to the custom detection list.
If the system detects a file’s SHA-256 value on a file list, it takes the appropriate action without performing a malware lookup or checking the file disposition. Note that you must configure a rule in the file policy with either a Malware Cloud Lookup or Block Malware action and a matching file type to calculate a file’s SHA value. You can enable use of the clean list or custom detection list on a per-file-policy basis.
To inspect or block files, you must enable a Protection license on the ASA FirePOWER module. To add files to a file list, you must also enable a Malware license.
Understanding File Dispositions
The system determines file dispositions based on the disposition returned by the Cisco cloud. A file can have one of the following file dispositions returned by the Cisco cloud, as a result of addition to a file list, or due to threat score:
-
Malwareindicates that the cloud categorized the file as malware. -
Cleanindicates that the cloud categorized the file as clean, or that a user added the file to the clean list. -
Unknownindicates that a malware cloud lookup occurred before the cloud assigned a disposition. The cloud has not categorized the file. -
Custom Detectionindicates that a user added the file to the custom detection list. -
Unavailableindicates that the ASA FirePOWER module could not perform a malware cloud lookup. You may see a small percentage of events with this disposition; this is expected behavior.

Tip If you see several Unavailable malware events in quick succession, check your cloud connection and port configuration. For more information, see Security, Internet Access, and Communication Ports.
Based on the file disposition, the ASA FirePOWER module either blocks the file or blocks its upload or download. To improve performance, if the system already knows the disposition for a file based on its SHA-256 value, your appliance uses the cached disposition rather than querying the Cisco cloud.
Note that file dispositions can change. For example, the cloud can determine that a file that was previously thought to be clean is now identified as malware, or the reverse—that a malware-identified file is actually clean. When the disposition changes for a file for which you performed a malware lookup in the last week, the cloud notifies the ASA FirePOWER module so the system can take appropriate action the next time it detects that file being transmitted. A changed file disposition is called a retrospective disposition.
File dispositions returned from a malware cloud lookup have a time-to-live (TTL) value. After a file disposition has been held for the duration specified in the TTL value without update, the system purges the cached information. Dispositions have the following TTL values:
If a malware cloud lookup against the cache identifies a cached disposition that timed out, the system performs a fresh lookup to determine a file disposition.
If your organization wants to block not only the transmission of malware files, but all files of a specific type (regardless of whether the files contain malware), the file control feature allows you to cast a wider net. As with malware protection, the ASA FirePOWER module monitors network traffic for transmissions of specific file types, then either blocks or allows the file.
File control is supported for all file types where the system can detect malware, plus many additional file types. These file types are grouped into basic categories, including multimedia (swf, mp3), executables (exe, torrent), and PDFs. Note that file control, unlike malware protection, does not require queries of the Cisco cloud.
Configuring Malware Protection and File Control
License: Protection or Malware
You configure malware protection and file control as part of your overall access control configuration by associating file policies with access control rules. This association ensures that before the system passes a file in traffic that matches an access control rule’s conditions, it first inspects the file.
A file policy, like its parent access control policy, contains rules that determine how the system handles files that match the conditions of each rule. You can configure separate file rules to take different actions for different file types, application protocols, or directions of transfer.
When a file matches a rule, the rule can:
- allow or block files based on simple file type matching
- block files based on malware file disposition
In addition, the file policy can automatically treat a file as if it is clean or malware based on entries in the clean list or custom detection list
As a simple example, you could implement a file policy that blocks your users from downloading executable files. For detailed information on file policies and associating them with access control rules, see Understanding and Creating File Policies.
Logging Events Based on Malware Protection and File Control
License: Protection or Malware
The ASA FirePOWER module logs records of the system’s file inspection and handling file events, and malware events:
- File events represent files that the system detected, and optionally blocked, in network traffic.
- Malware events represent malware files detected, and optionally blocked, in network traffic by the system.
- Retrospective malware events represent files whose malware file dispositions have changed.
When the system generates a malware event based on detection or blocking of malware in network traffic, it also generates a file event, because to detect malware in a file the system must first detect the file itself.
Understanding and Creating File Policies
License: Protection or Malware
A file policy is a set of configurations that the system uses to perform advanced malware protection and file control, as part of your overall access control configuration.
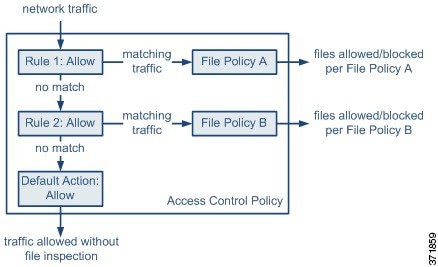
The policy has two access control rules, both of which use the Allow action and are associated with file policies. The policy’s default action is also to allow traffic, but without file policy inspection. In this scenario, traffic is handled as follows:
-
Traffic that matches
Rule 1is inspected byFile Policy A. -
Traffic that does not match
Rule 1is evaluated againstRule 2. Traffic that matchesRule 2is inspected byFile Policy B. - Traffic that does not match either rule is allowed; you cannot associate a file policy with the default action.
A file policy, like its parent access control policy, contains rules that determine how the system handles files that match the conditions of each rule. You can configure separate file rules to take different actions for different file types, application protocols, or directions of transfer.
Once a file matches a rule, the rule can:
- allow or block files based on simple file type matching
- block files based on Malware file disposition
In addition, the file policy can automatically treat a file as if it is clean or malware based on entries in the clean list or custom detection list
You can associate a single file policy with an access control rule whose action is Allow , Interactive Block , or Interactive Block with reset . The system then uses that file policy to inspect network traffic that meets the conditions of the access control rule. By associating different file policies with different access control rules, you have granular control over how you identify and block files transmitted on your network. Note, however, that you cannot use a file policy to inspect traffic handled by the access control default action. For detailed information, see Inspecting Allowed Traffic For Intrusions and Malware.
You populate a file policy with file rules. The following table describes the components of a file rule.
The system can detect and inspect files transmitted via FTP, HTTP, SMTP, IMAP, POP3, and NetBIOS-ssn (SMB). To improve performance, you can restrict file detection to only one of those application protocols on a per-file rule basis. |
|
You can inspect incoming FTP, HTTP, IMAP, POP3, and NetBIOS-ssn (SMB) traffic for downloaded files; you can inspect outgoing FTP, HTTP, SMTP, and NetBIOS-ssn (SMB) traffic for uploaded files. |
|
The system can detect various types of files. These file types are grouped into basic categories, including multimedia (swf, mp3), executables (exe, torrent), and PDFs. You can configure file rules that detect individual file types, or on entire categories of file types. For example, you could block all multimedia files, or just ShockWave Flash (swf) files. Or, you could configure the system to alert you when a user downloads a BitTorrent (torrent) file. 
|
|
A file rule’s action determines how the system handles traffic that matches the conditions of the rule. Note File rules are evaluated in rule-action, not numerical, order. For more information, see the next section, File Rule Actions and Evaluation Order. |
File Rule Actions and Evaluation Order
Each file rule has an associated action that determines how the system handles traffic that matches the conditions of the rule. You can set separate rules within a file policy to take different actions for different file types, application protocols, or directions of transfer. The rule actions are as follows, in rule-action order:
- Block Files rules allow you to block specific file types.
- Block Malware rules allow you to calculate the SHA-256 hash value of specific file types, then use a cloud lookup process to first determine if files traversing your network contain malware, then block files that represent threats.
- Malware Cloud Lookup rules allow you to log the malware disposition of files traversing your network based on a cloud lookup, while still allowing their transmission.
- Detect Files rules allow you to log the detection of specific file types while still allowing their transmission.
For each file rule action, you can configure options to reset the connection when a file transfer is blocked. The following table details the options available to each file action.
File and Malware Detection, Capture, and Blocking Notes and Limitations
Note the following details and limitations on file and malware detection, capture, and blocking behavior:
- Until a file is detected and block in a session, packets from the session may be subject to intrusion inspection.
- If an end-of-file marker is not detected for a file, regardless of transfer protocol, the file is not blocked by a Block Malware rule or by the custom detection list. The system waits to block the file until the entire file has been received, as indicated by the end-of-file marker, and blocks the file after the marker is detected.
- If the end-of-file marker for an FTP file transfer is transmitted separately from the final data segment, the marker is blocked and the FTP client indicates that the file transfer failed, but the file actually completely transfers to disk.
- FTP transfers commands and data over different channels. In a passive deployment, the traffic from an FTP data session and its control session may not be load-balanced to the same Snort.
- If a file matches a rule with an application protocol condition, file event generation occurs after the system successfully identifies a file’s application protocol. Unidentified files do not generate file events.
- For an access control policy using a file policy with Block Malware rules for FTP, if you set the default action to an intrusion policy with Drop when Inline disabled, the system generates events for detected files or malware matching the rules, but does not drop the files. To block FTP fire transfers and use an intrusion policy as the default action for the access control policy where you select the file policy, you must select an intrusion policy with Drop when Inline enabled.
- File rules with Block Files and Block Malware actions block automatic resumption of file download via HTTP by blocking new sessions with the same file, URL, server, and client application detected for 24 hours after the initial file transfer attempt occurs.
- In rare cases, if traffic from an HTTP upload session is out of order, the system cannot reassemble the traffic correctly and therefore does not block it or generate a file event.
- If you transfer a file over NetBIOS-ssn (such as an SMB file transfer) that is blocked with a Block Files rule, you may see a file on the destination host. However, the file is unusable because it is blocked after the download starts, resulting in an incomplete file transfer.
- If you create file rules to detect or block files transferred over NetBIOS-ssn (such as an SMB file transfer), the system does not inspect files transferred in an established TCP or SMB session started before you apply an access control policy invoking the file policy, so those files will not be detected or blocked.
- A rule configured to block files in a passive deployment does not block matching files. Because the connection continues to transmit the file, if you configure the rule to log the beginning of the connection, you may see multiple events logged for this connection.
- If the total number of bytes for all file names for files in a POP3, POP, SMTP, or IMAP session exceeds 1024, file events from the session may not reflect the correct file names for files that were detected after the file name buffer filled.
- When transmitting text-based files over SMTP, some mail clients convert newlines to the CRLF newline character standard. Since Mac-based hosts use the carriage return (CR) character and Unix/Linux-based hosts use the line feed (LF) character, newline conversion by the mail client may modify the size of the file. Note that some mail clients default to newline conversion when processing an unrecognizable file type.
- Cisco recommends that you enable Reset Connection for the Block Files and Block Malware actions to prevent blocked application sessions from remaining open until the TCP connection resets. If you do not reset connections, the client session remains open until the TCP connection resets itself.
- If a file rule is configured with a Malware Cloud Lookup or Block Malware action and the ASA FirePOWER module cannot establish connectivity with the cloud, the system cannot perform any configured rule action options until cloud connectivity is restored.
Unlike in access control policies, where rules are evaluated in numerical order, file policies handle files in File Rule Actions and Evaluation Order. That is, simple blocking takes precedence over malware inspection and blocking, which takes precedence over simple detection and logging. As an example, consider four rules that handle PDF files in a single file policy. Regardless of the order in which they appear in the module interface, these rules are evaluated in the following order:
The ASA FirePOWER module uses warning icons ( ) to designate conflicting file rules.
Note that you cannot perform malware analysis on all file types detected by the system. After you select values from the Application Protocol , Direction of Transfer , and Action drop-down lists, the system constrains the list of file types.
Logging File Events, Malware Events and Alerts
When you associate a file policy with an access control rule, the system automatically enables file and malware event logging for matching traffic. When the system inspects a file, it can generate the following types of events:
- file events , which represent detected or blocked files, as well as detected malware files
- malware events , which represent detected malware files
- retrospective malware events , which are generated when the Malware file disposition for a previously detected file changes
When a file policy generates a file or malware event, or captures a file, the system automatically logs the end of the associated connection, regardless of the logging configuration of the invoking access control rule.

Note File events generated by inspecting NetBIOS-ssn (SMB) traffic do not immediately generate connection events because the client and server establish a persistent connection. The system generates connection events after the client or server ends the session.
For each of these connection events:
- The Files field contains an icon (
 ) that indicates the number of files (including malware files) detected in the connection; click the icon to see a list of those files and, for malware files, their file dispositions.
- The Reason field indicates the reason the connection event was logged, which depends on the file rule action:
–
File Monitor
for Detect Files and Malware Cloud Lookup file rules and for files on the clean list
–
File Block
for Block Files or Block Malware file rules
–
File Custom Detection
if the system encountered a file on the custom detection list
–
File Resume Allow
where file transmission was originally blocked by a Block Files or Block Malware file rule. After a new access control policy was applied that allowed the file, the HTTP session automatically resumed.
–
File Resume Block
where file transmission was originally allowed by a Detect Files or Malware Cloud Lookup file rule. After a new access control policy was applied that blocked the file, the HTTP session automatically stopped.
As with any kind of event generated by the ASA FirePOWER module, you can view file and malware events. You can also use malware events to alert you via SNMP or syslog.
The system uses port 443 to perform malware cloud lookups for network-based AMP. You must open that port outbound on the ASA FirePOWER module.
You create, edit, delete, and compare file policies on the File Policies page ( Policies > Files ), which displays a list of existing file policies along with their last-modified dates.
Clicking the apply icon ( ) for a file policy displays a dialog box that tells you which access control policies use the file policy, then redirects you to the Access Control Policy page. This is because you cannot apply a file policy independently, as a file policy is considered part of its parent access control policies. To use a new file policy, or to apply changes made to an existing file policy, you must apply or reapply the parent access control policies.
Note that you cannot delete a file policy used in a saved or applied access control policy.
For more information on managing file policies, see the following sections:
Creating a File Policy
License: Protection or Malware
After you create a file policy and populate it with rules, you can use it in an access control policy.
Tip To make a copy of an existing file policy, click the copy icon ( ), then type a unique name for the new policy in the dialog box that appears. You can then modify the copy.
Step 1 Select Configuration > ASA FirePOWER Configuration > Policies > Files .
The File Policies page appears.
Step 2 Click New File Policy .
The New File Policy dialog box appears.
For a new policy, the module interface indicates that the policy is not in use. If you are editing an in-use file policy, the module interface tells you how many access control policies use the file policy. In either case, you can click the text to jump to the Access Control Policies page; see Getting Started with Access Control Policies.
Step 3 Enter a Name and optional Description for your new policy, then click Save .
The File Policy Rules tab appears.
Step 4 Add one or more rules to the file policy.
File rules give you granular control over which file types you want to log, block, or scan for malware. For information on adding file rules, see Working with File Rules.
Step 5 Configure the advanced options. See Configuring Advanced File Policy General Options for more information.
Step 6 Click Store ASA FirePOWER Changes .
To use your new policy, you must add the file policy to an access control rule, then apply the access control policy. If you are editing an existing file policy, you must reapply any access control policies that use the file policy.
Working with File Rules
License: Protection or Malware
To be effective, a file policy must contain one or more rules. You create, edit, and delete rules on the File Policy Rules page, which appears when you create a new file policy or edit an existing policy. The page lists all the rules in the policy, along with each rule’s basic characteristics.
The page also notifies you of how many access control policies use this file policy. You can click the notification to display a list of the parent policies and, optionally, continue to the Access Control Policies page.
Step 1 Select Configuration > ASA FirePOWER Configuration > Policies > Files .
The File Policies page appears.
Step 2 You have the following options:
- To add rules to a new policy, click New File Policy to create a new policy; see Creating a File Policy.
- To add rules to an existing policy, click the edit icon (
 ) next to the policy.
Step 3 On the File Policy Rules page that appears, click Add File Rule .
The Add File Rule dialog box appears.
Step 4 Select an Application Protocol from the drop-down list.
Any , the default, detects files in HTTP, SMTP, IMAP, POP3, FTP, and NetBIOS-ssn (SMB) traffic.
Step 5 Select a Direction of Transfer from the drop-down list.
You can inspect the following types of incoming traffic for downloaded files:
You can inspect the following types of outgoing traffic for uploaded files:
Use Any to detect files over multiple application protocols, regardless of whether users are sending or receiving.
Step 6 Select a file rule Action . See the File Rule Actions table for more information.
When you select either Block Files or Block Malware , Reset Connection is enabled by default. To not reset the connection where a blocked file transfer occurs, clear the Reset Connection check box.
Note Cisco recommends that you leave Reset Connection enabled to prevent blocked application sessions from remaining open until the TCP connection resets.
For detailed information on file rule actions, see File Rule Actions and Evaluation Order.
Step 7 Select one or more File Types . Use the Shift and Ctrl keys to select multiple file types. You can filter the list of file types in the following ways:
The file types that you can use in a file rule vary depending on your selections for Application Protocol , Direction of Transfer , and Action .
For example, selecting
Download
as the
Direction of Transfer
removes
GIF
,
PNG
,
JPEG
,
TIFF
, and
ICO
from the
Graphics
category to prevent an excess of file events.
Step 8 Add the selected file types to the Selected Files Categories and Types list:
- Click Add to add selected file types to the rule.
- Drag and drop one or more file types into the Selected Files Categories and Types list.
- With a category selected, click All types in selected Categories , then either click Add or drag and drop that selection to the Selected Files Categories and Types list.
Step 9 Click Store ASA FirePOWER Changes .
The file rule is added to the policy. If you are editing an existing file policy, you must reapply any access control policies that use the file policy for your changes to take effect.
Configuring Advanced File Policy General Options
In a file policy, you can set the following advanced options in the General section.
To configure advanced file policy general options:
Step 1 Select Configuration > ASA FirePOWER Configuration > Policies > Files .
The File Policies page appears.
Step 2 Click the edit icon ( ) next to the policy you want to edit.
The File Policy Rule page appears.
Step 3 Select the Advanced tab.
Step 4 Modify the options as described in the Advanced File Policy General Options table.
Step 5 Click Store ASA FirePOWER Changes .
You must reapply any access control policies that use the file policy you edited.
Comparing Two File Policies
To review policy changes for compliance with your organization’s standards or to optimize system performance, you can examine the differences between any two file policies, or two revisions of the same policy.
The file policy comparison view displays two file policies or revisions in a side-by-side format, with the time of last modification and the last user to modify displayed next to each policy name. Differences between the two policies are highlighted:
- Blue indicates that the highlighted setting is different in the two policies, and the difference is noted in red text.
- Green indicates that the highlighted setting appears in one policy but not the other.
You can navigate through the differences by clicking
Previous
and
Next
. The double-arrow icon ( ) centered between the left and right sides moves, and the
Difference
number adjusts to identify which difference you are viewing. Optionally, you can generate a file policy
comparison report
, which is a PDF version of the comparison view.
) centered between the left and right sides moves, and the
Difference
number adjusts to identify which difference you are viewing. Optionally, you can generate a file policy
comparison report
, which is a PDF version of the comparison view.
Step 1 Select Configuration > ASA FirePOWER Configuration > Policies > Files.
The File Policies page appears.
Step 2 Click Compare Policies .
The Select Comparison dialog box appears.
Step 3 From the Compare Against drop-down list, select the type of comparison you want to make:
- To compare two different policies, select either Running Configuration or Other Policy . The practical difference between the two options is that if you select Running Configuration , the system limits one of your comparison choices to the set of currently applied file policies.
- To compare revisions of the same policy, select Other Revision .
The dialog box refreshes, displaying your comparison options.
Step 4 Depending on the comparison type you selected, you have the following choices:
- If you are comparing two different policies, select the policies you want to compare: Policy A or Target/Running Configuration A , and Policy B .
- If you are comparing revisions of the same policy, select the Policy you want to use, then select the two revisions: Revision A and Revision B . Revisions are listed by date and user name.
Step 6 Optionally, click Comparison Report to generate a file policy comparison report. You are prompted to save the report to your computer.
 Feedback