- Preface
- Cisco 900 Series Integrated Services Routers Overview
- Installing the Software
- Basic Router Configuration
- Configuring the Ethernet Switches
- Configuring PPP over Ethernet with NAT
- Configuring a LAN with DHCP and VLANs
- Configuring Identity Features on Layer 3 Interface
- Configuring Security Features
- Configuring VDSL2 and ADSL2/2+
- Configuring 4G Wireless WAN
- Configuring Secure Storage
- Overview of 4G LTE
- Cisco 4G LTE Features
- Prerequisites for Configuring Cisco 4G LTE
- Restrictions for Configuring Cisco 4G LTE
- How to Configure Cisco 4G LTE
- Verifying Modem Signal Strength and Service Availability
- Creating, Modifying, or Deleting Modem Data Profiles
- Configuring a SIM for Data Calls
- Data Call Setup
- Configuring 4G SMS Messaging
- Upgrading Modem Firmware
- Configuring Modem DM Log Collection
- Enabling Modem Crashdump Collection
- Displaying Modem Log Error and Dump Information
- Configuration Examples for 4G LTE
Configuring 4G Wireless WAN
This chapter provides information about configuring the 4G Wireless WAN interface on Cisco 900 Series ISRs and contains the following sections:
Overview of 4G LTE
Cisco 900 series routers support Wireless WAN (WWAN). The WWAN SKUs operate over Fourth-Generation Long-Term Evolution (4G LTE) cellular networks and Third-Generation (3G) cellular networks. The Cisco 900 series routers offer a highly secure, simplified, and cost-effective WAN alternative to DSL or Frame Relay. In areas where terrestrial broadband services (cable, DSL, or T1) are not available or are expensive, 4G LTE WWAN connectivity can be a viable alternative.
Cisco 900 series routers support the following 4G/3G modes:
- 4G LTE —4G LTE mobile specification provides multi-megabit bandwidth, more efficient radio network, latency reduction, and improved mobility. LTE solutions target new cellular networks. These networks initially support up to 97Mb/s peak rates in the downlink and up to 50 Mb/s peak rates in the uplink. The throughput of these networks is higher than the existing 3G networks
- 3G Evolution High-Speed Packet Access (HSPA/HSPA+) —HSPA is a UMTS-based 3G network. It supports High-Speed Downlink Packet Access (HSDPA) and High-Speed Uplink Packet Access (HSUPA) data for improved download and upload speeds. Evolution High-Speed Packet Access (HSPA+) supports Multiple Input/Multiple Output (MIMO) antenna capability.
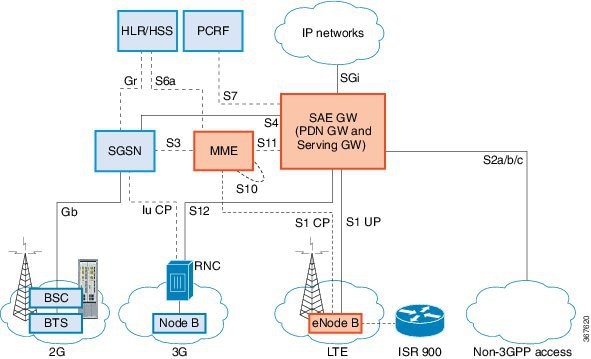
Figure 1 explains the 4G LTE packet core network architecture.
Figure 1 4G LTE Packet Core Network Architecture
Cisco 4G LTE Features
Cisco 4G LTE WWAN supports the following major features:
- 3G/4G Simple Network Management Protocol (SNMP) MIB
- Auto-switch failover between primary and backup link
- SIM lock and unlock capabilities
- PLMN Search
- Short Message Service (SMS)
- 3G backward compatible
- IPv4 and IPv6 addressing
- Auto SIM Firmware Switching
- Call History
- Cellular Backoff
- Modem reset, modem power cycle, radio on/off
- Modem crashdump collection
- Dialer
- DM Logging
- External Micro USB
- Firmware Upgrade
- Link Recovery
- Modem LED
- Multiple Profile
- PnP LTE WebUI Integration
- SIM OIR
- DMVPN
- CAT
Prerequisites for Configuring Cisco 4G LTE
- You must have 4G LTE network coverage where your router is physically placed. For a complete list of supported carriers, see the product data sheet.
- You must subscribe to a service plan with a wireless service provider and obtain a Subscriber Identity Module (SIM) card.
- You must install the SIM card before configuring the 4G LTE Wireless WAN Module. For instructions on how to install the SIM card, see the Configuring a SIM for Data Calls for more information.
Restrictions for Configuring Cisco 4G LTE
Follow these restrictions and usage guideline while configuring Cisco 4G LTE:
- Currently, cellular networks support only user initiated bearer establishment.
- Due to the shared nature of wireless communications, the experienced throughput varies depending on the number of active users or congestion in a given network.
- Cellular networks have higher latency compared to wired networks. Latency rates depend on the technology and carrier. Latency may be higher because of network congestion. Latency also depends on the signal conditions and can be higher because of network congestion.
- Any restrictions that are part of the terms of service from your carrier.
- For the router that runs the SNMP agent, you must configure appropriate access control (for example, SNMP-server community) using the Cisco IOS CLI for the NMS and agent to work properly.
- It is strongly recommended that you configure SNMP V3 with authentication/privacy when implementing SNMP SET operation.
How to Configure Cisco 4G LTE
This section explains how to configure 4G LTE on a Cisco 900 Series Router.
- Verifying Modem Signal Strength and Service Availability
- Creating, Modifying, or Deleting Modem Data Profiles
- Configuring a SIM for Data Calls
- Data Call Setup
- Configuring 4G SMS Messaging
- Enabling Modem Crashdump Collection
- Displaying Modem Log Error and Dump Information
Verifying Modem Signal Strength and Service Availability
Use the following show commands to verify the modem signal strength and service availability:
- show cellular unit network
- show cellular unit radio
- show cellular unit profile
- show cellular unit security
- show cellular unit all
Creating, Modifying, or Deleting Modem Data Profiles
You can create multiple profiles on a 4G LTE SKU. The following are the default Internet profile numbers for some of the modems:
Usage Guidelines for Creating, Modifying, or Deleting Data Profiles
Follow these guidelines while you configure a data profile:
- In most cases, you do not have to make any profile-related changes if your modem comes with a data profile.
- If any profile parameter changes are required for a connection type, the changes will most likely be carried out in the default profiles.
- To configure different profile types and use them for a different connection, you can create separate profiles with different parameters (for instance, APN names). Note that only one profile is active at a given time.
- Use the cellular 0 lte profile create 1 APN-name none ipv4v6 to create or modify profiles.
- Use the cellular 0 lte profile delete 1 APN-name none ipv4v6 or cellular 0 lte profile delete 1 to delete a profile.
- Use the show cellular <> profile command to view the data profile. An asterisk(*) is displayed against the data profile.
- The data profile is used to set up a data call. If you want to use a different profile, that profile needs to be made the default one. Use the lte sim data-profile number attach-profile number command to change the default profile.
Configuration Examples
This example shows how to change a default profile:
This example shows the output of the show cellular command:
Configuring a SIM for Data Calls
Locking and Unlocking a SIM Card Using a PIN Code
Use the cellular unit lte sim { lock | unlock } pin command to lock or unlock a SIM card given by your service provider.

Changing the PIN Code
Use the cellular unit lte sim change-pin pin new-pin command to change the PIN code of a SIM. This example shows how to change the PIN code:
Verifying the Security Information of a Modem
Use the show cellular unit security command to verify the security information of the modem. This example shows how to verify the security information:
Configuring Automatic Authentication for a Locked SIM
An unencrypted PIN can be configured to activate the Card Holder Verification (CHV1) code that authenticates a modem.

Note![]() Follow these procedures when using an unencrypted Level 0 PIN to configure CHV1. For instructions on how to configure CHV1 using an encrypted Level 7 PIN, see the Configuring an Encrypted PIN for a SIM.
Follow these procedures when using an unencrypted Level 0 PIN to configure CHV1. For instructions on how to configure CHV1 using an encrypted Level 7 PIN, see the Configuring an Encrypted PIN for a SIM.
Note![]() A SIM should be locked for SIM authentication to work. To verify the SIM’s status, use the show cellular unit security command.
A SIM should be locked for SIM authentication to work. To verify the SIM’s status, use the show cellular unit security command.
This example shows how to configure an automatic authentication for a locked SIM:
Configuring an Encrypted PIN for a SIM
To configure an encrypted PIN, the scrambled value of the PIN must be obtained. This example shows how to get the scrambled Level 7 PIN and configure the SIM CHV1 code for verification using the encrypted PIN:
Router(config)# service password-encryption
Router(config)# username SIM privilege 0 password 1111
Router(config)# do show run | i SIM
Router(config)# controller cellular 0
Router(config-controller)# lte sim authenticate 7 055A575E70
Router(config-controller)# exit
Note![]() When obtaining the encrypted PIN for a SIM, a username and password are created by configuring password encryption, defining the username and associated password, copying the resulting scrambled password, and using this scrambled password in the SIM authentication command. After the scrambled PIN has been obtained and used in SIM authentication, the username created can be deleted from the Cisco IOS configuration.
When obtaining the encrypted PIN for a SIM, a username and password are created by configuring password encryption, defining the username and associated password, copying the resulting scrambled password, and using this scrambled password in the SIM authentication command. After the scrambled PIN has been obtained and used in SIM authentication, the username created can be deleted from the Cisco IOS configuration.
Note![]() A SIM should be locked for SIM authentication to work. To verify the SIM’s status, use the show cellular unit security command.
A SIM should be locked for SIM authentication to work. To verify the SIM’s status, use the show cellular unit security command.
Applying a Modem Profile in a SIM Configuration
This example shows how to apply a modem profile:
Router(config)# controller cellular 0
Router(config-controller)# lte sim data-profile 2 attach-profile 2
For more information, see SIM Configuration: Examples
Data Call Setup
To set up a data call, use the following procedures:
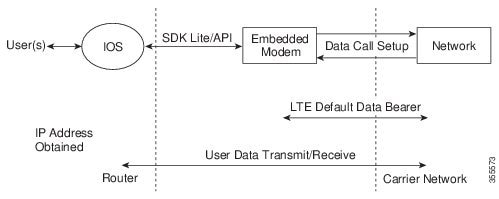
Figure 2 shows a typical data call setup.
Figure 2 Data Call Setup with WIM-LTE
Configuring the Cellular Interface
This example shows how to configure cellular interface:
Router(config)# interface cellular 0
Router(config-if)# ip address negotiated
Router(config-if)# encapsulation slip
Router(config-if)# dialer in-band
Router(config-if)# dialer string lte
Router(config-if)# dialer-group 1
Router(config)# chat-script lte"" "AT!CALL" TIMEOUT 60 "OK“
Router(config)# ip route 209.165.200.225 255.255.255.224 cellular 0
Configuring DDR
This example shows how to configure DDR:
Router(config)# interface cellular 0
Router(config-if)# ip address negotiated
Router(config-if)# encapsulation slip
Router(config-if)# dialer in-band
Router(config-if)# dialer pool-member 1
Router(config-if)# interface dialer 1
Router(config-if)# ip address negotiated
Router(config-if)# encapsulation slip
Router(config-if)# dialer pool 1
Router(config-if)# dialer idle-timeout 30
Router(config-if)# dialer string lte
Router(config-if)# dialer-group 1
Router(config)# dialer-list 1 protocol ip list 1
Router(config)# access-list 1 permit any
Configuring DDR Backup
To monitor the primary connection and initiate the backup connection when needed, the router can use one of the following methods:
- Backup Interface—The backup interface that stays in standby mode until the primary interface line protocol is detected as down and then is brought up.
- Floating Static Route—The route through the backup interface has an administrative distance that is greater than the administrative distance of the primary connection route and therefore would not be in the routing table until the primary interface goes down.
- Dialer Watch—Dialer watch is a backup feature that integrates dial backup with routing capabilities.
Configuring Interfaces to Use a Backup Interface
Note![]() You cannot configure a backup interface for the cellular interface and any other asynchronous serial interface.
You cannot configure a backup interface for the cellular interface and any other asynchronous serial interface.
This example shows how to configure an interface as a backup interface:
Router(config)# interface atm 0
AutoSim and Firmware Based Switching
The advantages of the AutoSim feature are:
- Ease of Ordering Carrier Specific SKUs
- Quicker failover times in dual-sim deployments
- Ease of switchover from other service providers to Telstra network
The modem in Auto-SIM mode selects the right carrier firmware after a SIM slot switch and an automatic modem reset. Auto-SIM is supported on the WP7607, WP7608, and WP7609 modems. During bootup, if the Auto-SIM configuration on the modem doesn’t match the IOS configuration, the corresponding Auto-SIM or manual mode is pushed to the modem.
The modem automatically resets after an Auto-SIM configuration change.The default is ‘auto-sim’ enabled.
This example shows how to enable Auto-SIM:
Note![]() After enabling auto-sim, wait for 5 minutes until the radio comes up. Once the radio is up, issue a modem power-cycle and wait for 3 minutes for the radio to come up again. Modem Power-Cycle is mandatory for auto-sim configuration to take effect.
After enabling auto-sim, wait for 5 minutes until the radio comes up. Once the radio is up, issue a modem power-cycle and wait for 3 minutes for the radio to come up again. Modem Power-Cycle is mandatory for auto-sim configuration to take effect.
This example shows how to disable Auto-SIM:
Configuring 4G SMS Messaging
This example shows how to specify an FTP server folder path to send all the incoming and outgoing SMS messages. After the folder path is identified, it is appended automatically with outbox and inbox folders for the path to which SMS messages are sent and received:
This example shows how to display the message contents of the incoming texts received by a modem:
This example shows how to display all the information in the text messages sent and received. The message information includes text messages sent successfully, received, archived, and messages pending to be sent. The LTE-specific information on errors, in case of a FAILED attempt, may also be displayed:
This example shows how to enable a user to send a 4G LTE band SMS message to other valid recipients, provided they have a text message plan:
Upgrading Modem Firmware
To upgrade the modem firmware, perform these steps:
Step 1![]() Go to the Cisco Software Download website at: https://software.cisco.com/download/home
Go to the Cisco Software Download website at: https://software.cisco.com/download/home
Step 2![]() On the download page, search ‘ 900 series integrated services router ’, and select ‘ 900 integrated services router ’ from the filtered list.
On the download page, search ‘ 900 series integrated services router ’, and select ‘ 900 integrated services router ’ from the filtered list.
Step 3![]() Select Routers> 900 Series Integrated Routers >900 Integrated Services Router
Select Routers> 900 Series Integrated Routers >900 Integrated Services Router
Step 4![]() Select the release from the left pane. Available firmwares will be listed on the right pane.
Select the release from the left pane. Available firmwares will be listed on the right pane.
Step 5![]() Select and download the appropriate firmware.
Select and download the appropriate firmware.
Step 6![]() Create a directory in the router flash to store the modem firmware.
Create a directory in the router flash to store the modem firmware.
Step 7![]() Copy the firmware to the flash directory.
Copy the firmware to the flash directory.
Step 8![]() Use the following command to initiate the upgrade process:
Use the following command to initiate the upgrade process:
Configuring Modem DM Log Collection
Diagnostic Monitor (DM) is a Qualcomm proprietary protocol. Diagnostic software tools, such as Sierra Wireless SwiLog and Qualcomm QXDM, are based on DM protocol. These tools can be used to capture data transactions between the modem and the network over the RF interface, which makes them useful tools for troubleshooting 3G and 4G data connectivity or performance issues.
This example shows how to enable DM log collection:
Router(config-controller)# lte modem dm-log enable
This example shows how to specify the maximum log file size:
This example shows how to specify the filter file:
This example shows how to specify the path where the DM log output files will be stored:
This example shows how to enable DM log rotation:
This example shows how to specify the maximum log size:
For sample output, see Example: Sample Output for the show cellular logs modem-crashdump Command
Enabling Modem Crashdump Collection
Modem crashdump collection is useful in debugging firmware crash. To collect crash data, the modem has to be pre-configured so that it will stay in memdump mode after a crash. Memdump mode is a special boot-and-hold mode for the memdump utility to collect crash data.
To enable modem crashdump collection, perform the following steps.
Prerequisites
Ensure that the following prerequisites are met before attempting to enable crashdump logging:
- The modem needs to be provisioned for modem crashdump collection—it needs to be configured to operate in test mode. It also requires a debug bootloader installed. Contact Cisco TAC for details.
- The modem should be in crash state. Run tests that will result in modem firmware crash. A “MODEM_DOWN” message on the router console or syslog is indicative of modem firmware crash.
Note![]() After the modem firmware crashes, the modem is available for crashdump log collection only. Data calls cannot be made.
After the modem firmware crashes, the modem is available for crashdump log collection only. Data calls cannot be made.
This example shows how to pre-configure the modem to stay in memdump mode after a crash:
Router# configure terminal
Router(config)# controller cellular 0
Router(config-controller)# lte modem crash-action boot-and-hold
Router(config-controller)# end
This example shows how to disable crashdump log collection:
This example shows how to enable crashdump log collection with the logs stored on an FTP server:
Displaying Modem Log Error and Dump Information
Use the following command to obtain the log error and dump information:
|
|
|
|
|---|---|---|
|
|
Shows modem log error and dump information. For sample output, see Example: Sample Output for the show cellular log error Command |
Configuration Examples for 4G LTE
- Example: Basic Cellular Interface Configuration
- Cellular Interface Configuration for Always-On Connection
- 4G-LTE Wireless WAN as Backup with NAT and IPSec
- SIM Configuration: Examples
- Configuration Examples for 4G Serviceability Enhancement
Example: Basic Cellular Interface Configuration
This example shows how to configure the cellular interface to be used as a primary and is configured as the default route:
Cellular Interface Configuration for Always-On Connection
Dialer-Watch Configuration without External Dialer Interface
This example shows how to configure dialer-watch without external dialer interface. The bold text is used to indicate important commands that are specific to dialer-watch.
Dialer-Persistent Configuration with External Dialer Interface
This example shows how to configure dialer-persistent with external dialer interface. The bold text is used to indicate important commands that are specific to dialer-persistent.
4G-LTE Wireless WAN as Backup with NAT and IPSec
This example shows how to configure the 4G-LTE wireless WAN on the router as backup with NAT and IPSec:
Note![]() The receive and transmit speeds cannot be configured. The actual throughput depends on the cellular network service.
The receive and transmit speeds cannot be configured. The actual throughput depends on the cellular network service.
Note![]() For service providers using a private IP address, use the crypto ipsec transform-set esp command (that is, esp-aes esp-sha256-hmac…).
For service providers using a private IP address, use the crypto ipsec transform-set esp command (that is, esp-aes esp-sha256-hmac…).
SIM Configuration: Examples
Locking the SIM Card: Example
This example shows how to lock the SIM. The italicized text in this configuration example is used to indicate comments and are not be seen when a normal console output is viewed.
Unlocking the SIM Card: Example
This example shows how to unlock the SIM. The italicized text throughout this configuration example is used to indicate comments and will not be seen when a normal console output is viewed.
Automatic SIM Authentication: Example
This example shows how to configure automatic SIM authentication. The italicized text throughout this configuration example is used to indicate comments and will not be seen when a normal console output is viewed.
Changing the PIN Code: Example
This example shows how to change the assigned PIN code. The italicized text throughout this configuration example is used to indicate comments and will not be seen when a normal console output is viewed.
Configuring an Encrypted PIN: Example
This example shows how to configure automatic SIM authentication using an encrypted PIN. The italicized text throughout this configuration example is used to indicate comments and will not be seen when a normal console output is viewed.
Configuration Examples for 4G Serviceability Enhancement
Example: Sample Output for the show cellular logs dm-log Command
This example shows a sample output of the show cellular logs dm-log command:
Example: Sample Output for the show cellular logs modem-crashdump Command
This example shows a sample output of the show cellular logs modem-crashdump command:
Example: Sample Output for the show cellular log error Command
This example shows a sample output of the show cellular log error command:
Example: Sample Output for the test cellular modem-error-clear Command
This example shows a sample output of the test cellular modem-error-clear command:
PLMN Search and Selection
This feature allows you to search for available Public Land Mobile Network (PLMN) and connect to one of the PLMN.
Restrictions
Commands
Searching the Network
You can use the cellular 0 lte plmn search command to search for available PLMNs. This example shows how to search for networks:
After the search, use the show cellular 0 network command to see the available networks:
Selecting the Network
There are three ways you can select an available network: Auto mode, Force Mode, and Manual mode. In Auto mode, your router will connect automatically to a network preferred by the SIM. In Force mode, the router is forced to select an available or known network without performing a network search. If a network is not available or the router is unable to attach to a network, then the router will remain in a ‘Not attached’ state. You can use the cellular x lte plmn select auto command to attach the router to a network preferred by the SIM. In Manual mode, you can select an available network from your search result.
This example shows how to select a network manually:
This example shows how to force a network selection:
Verifying PLMN Selection
Use show cellular 0 network command to verify the PLMN selection:
Note![]() Some networks may not allow the router to connect. In such cases, you have to choose a different network.
Some networks may not allow the router to connect. In such cases, you have to choose a different network.
Note![]() Restart your modem if the router is not able to connect to any network.
Restart your modem if the router is not able to connect to any network.
SNMP MIBs
The following Simple Management Network Protocol (SNMP) MIBs are supported on Cisco 4G LTE Module:
For the CISCO-WAN-3G-MIB, the following tables and sub-tables are supported for 3G and LTE technologies:
- ciscoWan3gMIB(661)
- ciscoWan3gMIBNotifs(0)
- ciscoWan3gMIBObjects(1)
- c3gWanCommonTable(1)
- c3gWanGsm(3)
- c3gGsmIdentityTable(1)
- c3gGsmNetworkTable(2)
- c3gGsmPdpProfile(3)
- c3gGsmPdpProfileTable(1)
- c3gGsmPacketSessionTable(2)
- c3gGsmRadio(4)
- c3gGsmRadioTable(1)
- c3gGsmSecurity(5)
- c3gGsmSecurityTable(1)
You can download the MIBs from the Cisco MIB Locator at http://www.cisco.com/go/mibs.
SNMP 4G LTE Configuration: Example
This example describes how to configure SNMP capability on the router:
This example describes how to configure an external host device to communicate with the router through SNMP:
Troubleshooting
This section provides the necessary background information and resources available for troubleshooting the Cisco 4G-LTE Wireless module.
- Verifying Data Call Setup
- Checking Signal Strength
- Verifying Service Availability
- Successful Call Setup
Verifying Data Call Setup
To verify the data call setup, follow these steps:
Step 1![]() After you create a modem data profile using the cellular profile create command and configuring DDR on the cellular interface, send a ping from the router to a host across the wireless network.
After you create a modem data profile using the cellular profile create command and configuring DDR on the cellular interface, send a ping from the router to a host across the wireless network.
Step 2![]() If the ping fails, debug the failure by using the following debug and show commands:
If the ping fails, debug the failure by using the following debug and show commands:
- debug chat
- debug modem
- debug dialer
- show cellular all
- show interface cellular
- show running-config
- show ip route
Step 3![]() Save the output from these commands and contact your system administrator.
Save the output from these commands and contact your system administrator.
Checking Signal Strength
If the Received Signal Strength Indication (RSSI) level is very low (for example, if it is less than
–110 dBm), follow these steps:
Step 1![]() Check the antenna connection. Make sure the SMA connector is correctly threaded and tightened.
Check the antenna connection. Make sure the SMA connector is correctly threaded and tightened.
Step 2![]() If you are using a remote antenna, move the antenna cradle and check if the RSSI has improved.
If you are using a remote antenna, move the antenna cradle and check if the RSSI has improved.
Step 3![]() Contact your wireless service provider to verify if there is service availability in your area.
Contact your wireless service provider to verify if there is service availability in your area.
Verifying Service Availability
This example shows a sample output for the show cellular all command for a scenario where the antenna is disconnected and a modem data profile has not been created. The errors in this case have been highlighted with >>>>>>>.
Successful Call Setup
This example shows a sample output when a call is set up using a chat script. It shows a received IP address from the network. Call setup is successful and data path is open.
 Feedback