OC3 POS Line Card
Bias-Free Language
The documentation set for this product strives to use bias-free language. For the purposes of this documentation set, bias-free is defined as language that does not imply discrimination based on age, disability, gender, racial identity, ethnic identity, sexual orientation, socioeconomic status, and intersectionality. Exceptions may be present in the documentation due to language that is hardcoded in the user interfaces of the product software, language used based on RFP documentation, or language that is used by a referenced third-party product. Learn more about how Cisco is using Inclusive Language.
- Updated:
- August 18, 2008
Chapter: Removing and Installing Line Cards
Removing and Installing Line Cards
This chapter describes how to remove the OC3 POS line card from its supported platform, how to install a new or replacement line card, and how to connect cables.
This chapter contains the following sections:
•![]() Line Card Removal and Installation
Line Card Removal and Installation
•![]() Connecting OC3 POS Line Card Interface Cables
Connecting OC3 POS Line Card Interface Cables
Installation Overview
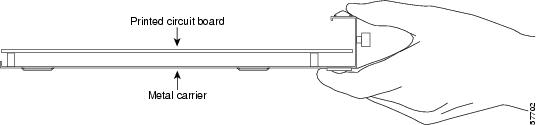
Each line card circuit board is mounted to a metal carrier and is sensitive to electrostatic discharge (ESD) damage.

Note ![]() When a slot is not in use, a blank line card must fill the empty slot to allow the router to conform to electromagnetic interference (EMI) emissions requirements and to allow proper airflow across the line cards. If you plan to install a new line card in a slot that is not in use, you must first remove the blank line card.
When a slot is not in use, a blank line card must fill the empty slot to allow the router to conform to electromagnetic interference (EMI) emissions requirements and to allow proper airflow across the line cards. If you plan to install a new line card in a slot that is not in use, you must first remove the blank line card.
Handling Line Cards

Figure 3-1 Handling a Line Card
Online Insertion and Removal
The Cisco 7304 router supports online insertion and removal (OIR) of line cards; therefore, you do not have to power down the router when removing and replacing an OC3 POS line card on a Cisco 7304 router. The Cisco 7304 router also supports CLI-controlled OIR (see the "CLI-Controlled OIR" section on page 4-13), which allows for the completion of data traffic before the active interfaces are shut down.
Note ![]() As you disengage the line card from the router, online insertion and removal (OIR) administratively shuts down all active interfaces in the line card.
As you disengage the line card from the router, online insertion and removal (OIR) administratively shuts down all active interfaces in the line card.
Note ![]() Before you begin installation, read Chapter 2, "Preparing for Installation," for a list of parts and tools required for installation.
Before you begin installation, read Chapter 2, "Preparing for Installation," for a list of parts and tools required for installation.
Warnings and Cautions
Observe the following warnings and cautions when installing or removing line cards.
Note ![]() If a line card lever or other retaining mechanism does not move to the locked position, the line card is not completely seated in the backplane. Carefully pull the line card halfway out of the slot, reinsert it, and move the line card lever to the locked position.
If a line card lever or other retaining mechanism does not move to the locked position, the line card is not completely seated in the backplane. Carefully pull the line card halfway out of the slot, reinsert it, and move the line card lever to the locked position.

Warning ![]() When performing the following procedures, wear a grounding wrist strap to avoid ESD damage to the card. Some platforms have an ESD connector for attaching the wrist strap. Do not directly touch the midplane or backplane with your hand or any metal tool, or you could shock yourself.
When performing the following procedures, wear a grounding wrist strap to avoid ESD damage to the card. Some platforms have an ESD connector for attaching the wrist strap. Do not directly touch the midplane or backplane with your hand or any metal tool, or you could shock yourself.
Line Card Removal and Installation
In this section, the illustration that follows give step-by-step instructions on how to remove and install line cards in the following supported platform:
Cisco 7304 Router—Removing and Installing a Line Card
Cisco 7304 Router—Removing and Installing a Line Card

Connecting OC3 POS Line Card Interface Cables
To continue your OC3 POS line card installation, you must connect the interface cables.
Note ![]() Optical fiber cables are not available from Cisco Systems; they are available from outside commercial cable vendors. (For more information on the cables you should use with this line card, see the "OC3 POS Line Card Optical Fiber Specifications" section on page 1-5 and the "Cables and Connectors" section on page 1-8.)
Optical fiber cables are not available from Cisco Systems; they are available from outside commercial cable vendors. (For more information on the cables you should use with this line card, see the "OC3 POS Line Card Optical Fiber Specifications" section on page 1-5 and the "Cables and Connectors" section on page 1-8.)
When you are connecting MT-RJ cables to the OC3 POS line card, make sure you firmly press the connector plug into the socket. The upper edge of the plug must snap into the upper front edge of the socket. You may or may not hear an audible click. Gently pull on the plug to confirm whether or not the plug is locked into the socket. To disconnect the plug from the socket, press down on the raised portion on top of the plug (releasing the latch). You should hear an audible click indicating the latch has released. Carefully pull the plug out of the socket.
When you disconnect the optical fiber cable from the line card, grip the body of the connector. Do not grip the connector jacket-sleeve. Gripping the sleeve can, over time, compromise the integrity of the optical fiber cable termination in the MT-RJ connector.
Always make sure that you insert the connector completely into the socket. This is especially important when you are making a connection between the OC3 POS line card and a long distance network (1.24 miles or 2 km) or a suspected highly attenuated network. If the CARRIER/ALARM LED does not light, try removing the network cable plug and reinserting it firmly into the module socket. It is possible that enough dirt or skin oils have accumulated on the plug faceplate (around the optical fiber openings) to generate significant attenuation, reducing the optical power levels below threshold levels so that a link cannot be made.
To clean the MT-RJ plug faceplate, perform these steps:
Step 1 ![]() Use a lint-free tissue soaked in 99 percent pure isopropyl alcohol to gently wipe the faceplate.
Use a lint-free tissue soaked in 99 percent pure isopropyl alcohol to gently wipe the faceplate.
Step 2 ![]() Carefully wipe the faceplate with a dry lint-free tissue.
Carefully wipe the faceplate with a dry lint-free tissue.
Step 3 ![]() Remove any residual dust from the faceplate with compressed air before installing the cable.
Remove any residual dust from the faceplate with compressed air before installing the cable.
Note ![]() Make sure that dust caps are installed on all unused module connectors and unused network optical fiber cable connectors.
Make sure that dust caps are installed on all unused module connectors and unused network optical fiber cable connectors.
Warning ![]() Because invisible radiation may be emitted from the aperture of the port when no fiber cable is connected, avoid exposure to radiation and do not stare into open apertures.
Because invisible radiation may be emitted from the aperture of the port when no fiber cable is connected, avoid exposure to radiation and do not stare into open apertures.
Warning ![]() Class 1 LED product.
Class 1 LED product.
Warning ![]() Because invisible laser radiation may be emitted from the aperture of the port when no fiber cable is connected, avoid exposure to laser radiation and do not stare into open apertures.
Because invisible laser radiation may be emitted from the aperture of the port when no fiber cable is connected, avoid exposure to laser radiation and do not stare into open apertures.
Warning ![]() Class 1 laser product.
Class 1 laser product.
 Feedback