- Preface
- Prime Provisioning GUI Overview
- Before Setting Up Prime Provisioning
- Managing Ethernet Virtual Circuit (EVC) Services
- Managing TDM-CEM Services (RAN Backhaul)
- Managing ATM Services (RAN Backhaul)
- Managing MPLS VPN Services
- Managing MPLS Transport Profile Services
- Customizing EVC and MPLS Policies
- Managing MPLS Traffic Engineering Services
- Managing Service Requests
- Managing Templates and Data Files
- Monitoring: Task Manager
- Using Inventory Manager
- Prime Provisioning XML Reference
- Terminating an Access Ring on Two N-PEs
- Repository Views
- Adding Additional Information to Services
- Deprecated Features: Layer 2 Legacy Services and Other Services
- Cisco Configuration Engine Server
- DCPL Property Settings
Cisco Prime Provisioning User Guide, 7.2
Bias-Free Language
The documentation set for this product strives to use bias-free language. For the purposes of this documentation set, bias-free is defined as language that does not imply discrimination based on age, disability, gender, racial identity, ethnic identity, sexual orientation, socioeconomic status, and intersectionality. Exceptions may be present in the documentation due to language that is hardcoded in the user interfaces of the product software, language used based on RFP documentation, or language that is used by a referenced third-party product. Learn more about how Cisco is using Inclusive Language.
- Updated:
- December 3, 2014
Chapter: Monitoring: Task Manager
Monitoring: Task Manager
This chapter explains how to use the Task Manager to monitor and perform various tasks in Prime Provisioning.
Task Manager allows you to view pertinent information about both current and expired tasks of all types, and to create and schedule new tasks, delete specified tasks, and delete the active and expired tasks.
Tasks
This section contains the following topics:
Starting Task Manager
To start Task Manager, click Operate > Tasks > Task Manager. The Tasks list page appears.
The Tasks window displays information about each task by Task Name, Type, Targets, Schedules date and time, the User Name who created those tasks, and the date Created on. To view, schedule, or delete the listed tasks, check the corresponding check box.
Create
To create a new task, follow these steps:
Step 1![]() From the Task Manager Window, click Create. From the resulting drop-down list, you can choose from the following and that choice becomes the Type in Figure 12-1.
From the Task Manager Window, click Create. From the resulting drop-down list, you can choose from the following and that choice becomes the Type in Figure 12-1.
- Collect Config —Collects configuration from devices.
- Collect Config From Files —Collects configurations from files.
- Enable Disable VFW Traps —Enable or disable the VFW traps.
- L2VPN (L2TPv3) Functional Audit —
- Password Management —Manages user passwords and SNMP community strings.
- SLA Collection —Collects data from SLA enabled devices.
- Service Deployment —Deploys an existing SR.
- TE Full Discovery —Performs discovery of all TE enabled devices. The discovery task runs without stopping until all devices have been discovered.
- TE Incremental Discovery —In TE Incremental Discovery, the discovery tasks are run in increments whenever changes occur in the network, such as when a new device or link is added, causing a much smaller memory overhead than a TE Full Discovery.
- TE Interface Performance —Calculates tunnel and interface bandwidth utilization using SNMP.
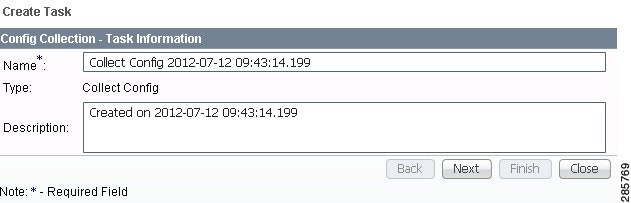
Step 2![]() Name —Enter the name of the task. You can accept the default value.
Name —Enter the name of the task. You can accept the default value.
Step 3![]() Type —Defined in Step 1
Type —Defined in Step 1![]() .
.
Step 4![]() Description (optional)—Enter a description.
Description (optional)—Enter a description.
Step 5![]() Task Configuration Method (default: Simplified)—Choose Simplified or Advanced (via wizard). If you choose Simplified, you can make many selections in one window. If you choose Advanced (via wizard), you navigate through many windows to make your selections.
Task Configuration Method (default: Simplified)—Choose Simplified or Advanced (via wizard). If you choose Simplified, you can make many selections in one window. If you choose Advanced (via wizard), you navigate through many windows to make your selections.
Step 6![]() Click Next to continue.
Click Next to continue.
Depending on what type of task you select, the Task Devices, Task Service Requests, or Configurations File Directory page appears with variations.
Step 7![]() Where appropriate, click Select/Deselect to add devices or service requests.
Where appropriate, click Select/Deselect to add devices or service requests.

Note![]() Step 7 to Step 10 do not apply for Collect Config From Files and TE Interface Performance.
Step 7 to Step 10 do not apply for Collect Config From Files and TE Interface Performance.
Step 8![]() In the resulting selection window, select the devices or service requests and click Select.
In the resulting selection window, select the devices or service requests and click Select.
The selected devices or service requests appears.
Step 9![]() Groups might or might not appear depending on the task you specify in the previous step. If it does appear, you can add groups of devices, similarly to Step 7
Groups might or might not appear depending on the task you specify in the previous step. If it does appear, you can add groups of devices, similarly to Step 7![]() and Step 8. If it does not appear or after you complete this device group selection, proceed to Step 10.
and Step 8. If it does not appear or after you complete this device group selection, proceed to Step 10.
If the Retrieve Interfaces check box is checked, Prime Provisioning uses Simple Network Management Protocol (SNMP) to retrieve device interface information, such as ifIndex, and so on. If the Retrieve Interfaces check box is unchecked, configuration collection information is still retrieved, but SNMP is not used. All scenarios other than doing IP Service Level Agreement (SLA) probes do not require SNMP or this option.
Step 11![]() If Configuration File Directory appears, enter the path to the directory on your Prime Provisioning server into the Configuration File Directory text box, to indicate the directory on the Prime Provisioning server where the offline configuration files are stored.
If Configuration File Directory appears, enter the path to the directory on your Prime Provisioning server into the Configuration File Directory text box, to indicate the directory on the Prime Provisioning server where the offline configuration files are stored.
Step 12![]() For Schedule, click Now, Later, or None. If you choose Later, a Later Schedule category appears. You are then required to click the Edit button and the Task Scheduler page appears.
For Schedule, click Now, Later, or None. If you choose Later, a Later Schedule category appears. You are then required to click the Edit button and the Task Scheduler page appears.
Step 13![]() Select information to schedule the task and click OK (default is to schedule Now).
Select information to schedule the task and click OK (default is to schedule Now).
Step 14![]() Click Submit to continue.
Click Submit to continue.
The new task is added to the list of tasks.
Audit
To get audit information, click Audit from the Tasks page. From the resulting drop-down list, you can choose from the following and that choice becomes the Type :
- Config Audit —Compares Prime Provisioning generated configlet against the one in the device.
- L2VPN (L2TPv3) Functional Audit —Audits L2TPv3 functionality.
- MPLS Functional Audit —Audits MPLS functionality.
- TE Functional Audit —Checks the Label-Switch Path (LSP) on a router against the LSP stored in the repository.
Details
To get details about a particular task, follow these steps:
Step 1![]() From the Tasks page, check a check box for one task for which you want to see a detailed list of information.
From the Tasks page, check a check box for one task for which you want to see a detailed list of information.
Schedules
To change the scheduling of an existing task, follow these steps:
Step 1![]() From the Tasks page, check a check box for the one task for which you want to reset the scheduling directions.
From the Tasks page, check a check box for the one task for which you want to reset the scheduling directions.
Step 3![]() If you want to delete this task, proceed to Step 4. If you want to reset the scheduling directions, proceed to Step 5.
If you want to delete this task, proceed to Step 4. If you want to reset the scheduling directions, proceed to Step 5.
Step 4![]() In the new window, check the check box for the task you want to delete and click the Delete button. Then proceed to Step 7
In the new window, check the check box for the task you want to delete and click the Delete button. Then proceed to Step 7![]() .
.
Step 5![]() In the new window, click Create.
In the new window, click Create.
Step 6![]() Make the new scheduling selections you want and click Save to reset the scheduling directions.
Make the new scheduling selections you want and click Save to reset the scheduling directions.
Step 7![]() Uncheck any check boxes and click OK to return.
Uncheck any check boxes and click OK to return.
Logs
This selection from the Tasks page, is another way of doing what is explained in the “Task Logs” section.
Delete
To delete one or more tasks, follow these steps:
Step 1![]() From the Tasks page, check one or more check boxes for the task(s) you want to delete.
From the Tasks page, check one or more check boxes for the task(s) you want to delete.
You receive a confirmation window.
Step 2![]() If you want to delete, click OK. If not, click Cancel.
If you want to delete, click OK. If not, click Cancel.
Collect Config from Files
To use this feature, you should have the following:
To collect configuration details from a file, perform the below steps:
Step 1![]() Click Operate > Tasks > Task Manager.
Click Operate > Tasks > Task Manager.
Step 2![]() In the Task Manager window, click Create.
In the Task Manager window, click Create.
Step 3![]() Choose Collect Config from Files from the dropdown list.
Choose Collect Config from Files from the dropdown list.
Step 4![]() In the Create Task window, you are able to modify the name and description details.
In the Create Task window, you are able to modify the name and description details.
Step 6![]() In Collect Config Task window, enter the directory details of the XML file in the Configuration File Directory field.
In Collect Config Task window, enter the directory details of the XML file in the Configuration File Directory field.
Note![]() The device should be available in the Inventory for the collect config task to run successfully.
The device should be available in the Inventory for the collect config task to run successfully.
Task Logs
Task Logs can be used to understand the status of a task, whether it completed successfully. You can also use the Task Logs to troubleshoot why a task has failed. To view the Task Logs, follow these steps:
Step 1![]() Click Operate > Tasks > Task Logs.
Click Operate > Tasks > Task Logs.
This window displays the task by Runtime Task Name, and the Action, Start Time, End Time, and the Status of the task. You can use this window to view or delete the logs.
Step 2![]() To view the log, check the check box for the row that represents the task and click the View Log button.
To view the log, check the check box for the row that represents the task and click the View Log button.
It is possible to set the types of log level you want to view. Specify the Log Level and click on the Filter button to view that information you want to view.
Step 3![]() Click Return to Logs to specify another log to view.
Click Return to Logs to specify another log to view.
 Feedback