Cisco Prime Network Gateway High Availability Guide, 5.1
Bias-Free Language
The documentation set for this product strives to use bias-free language. For the purposes of this documentation set, bias-free is defined as language that does not imply discrimination based on age, disability, gender, racial identity, ethnic identity, sexual orientation, socioeconomic status, and intersectionality. Exceptions may be present in the documentation due to language that is hardcoded in the user interfaces of the product software, language used based on RFP documentation, or language that is used by a referenced third-party product. Learn more about how Cisco is using Inclusive Language.
- Updated:
- July 18, 2017
Chapter: Installing and Maintaining Gateway Geographical Redundancy
- Steps for Installing the Geographical Redundancy Solution
- Installation Requirements for Geographical Redundancy
- Preparing to Install Geographical Redundancy
- Installing the Prime Network Gateway Geographical Redundancy Software
- Verifying the Geographical Redundancy Setup
- Maintaining Geographical Redundancy
- Uninstalling the Geographical Redundancy Software
- Installing and Configuring PN-IL for Local + Geographical Redundancy
- Installing and Configuring PN-IL for Geographical Redundancy Only
Installing and Maintaining Gateway Geographical Redundancy
The following topics provide procedures for setting up, installing, and maintaining the gateway geographical redundancy solution. Geographical redundancy is configured and monitored using Oracle Active Data Guard (ADG) for geographical redundancy. This chapter explains. how to install Prime Network Operations Reports and the Prime Network Integration Layer (PN-IL) with gateway geographical redundancy and the recommended procedures to upgrade Prime Network in Geographical redundancy setup without the downtime.

Note![]() Gateway high availability is supported only when the gateway software, Oracle database, and Infobright database (applicable for Operations Reports) are installed on the same server.
Gateway high availability is supported only when the gateway software, Oracle database, and Infobright database (applicable for Operations Reports) are installed on the same server.
Also, you can upgrade Prime Network in Geographical redundancy without the network downtime.
This chapter covers the following topics:
- Steps for Installing the Geographical Redundancy Solution
- Installation Requirements for Geographical Redundancy
- Preparing to Install Geographical Redundancy
- Installing the Prime Network Gateway Geographical Redundancy Software
- Verifying the Geographical Redundancy Setup
- Maintaining Geographical Redundancy
- Uninstalling the Geographical Redundancy Software
- Installing and Configuring PN-IL for Local + Geographical Redundancy
- Installing and Configuring PN-IL for Geographical Redundancy Only
- Upgrading Prime Network in Geographical Redundancy without Network Down Time
Before proceeding with this chapter, make sure you have read Geographical Redundancy Functional Overview.
Steps for Installing the Geographical Redundancy Solution
Table 4-1 lists the steps you must follow to prepare for an installation, perform an installation and verify an installation of the Prime Network gateway geographical redundancy solution. The standby P2 node is only relevant if you are installing geographical + local redundancy. An x means you must perform the step on that server.
Note The steps in the following table area based on these assumptions:
- For geographical redundancy only : Node P1 is the active node and has the primary database. (Installation prompts for geographical redundancy only are provided in Table 4-4.)
- For geographical + local redundancy: Node P1 has the primary database. The local site will also have a standby node (P2); it should be configured as described in is the local redundancy standby node. (The installation prompts for geographical + local redundancy are provided in Table 4-5.)
|
|
|
||||
|---|---|---|---|---|---|
|
|
|
|
|||
Collect the server details so that you have all information handy prior to installation. |
|||||
Configure the server hardware. Note If your setup contains primary and a remote site, make sure the remote site is the replica of the primary site. |
|
||||
Install the RHEL and all recommended patches on the servers. |
|||||
Install the RPMs required on Red Hat for Prime Network. If you are installing Operations Reports, be sure to check this section. |
|||||
Configure disk groups, volumes, and partitions. If you are installing Operations Reports, be sure to check the required volume sizes. |
|||||
Mount the installation files (in the same directory on both nodes). |
|||||
Verify that all nodes are ready for installation by checking disk access, Linux versions, and NTP synchronization. |
|||||
Mount the external shared storage, Oracle, and Prime Network mount points on the relevant directories. |
|||||
Back up the /etc/host and root cron jobs files (the installation software will modify them). |
|||||
(Local + geographical) For cluster node makes sure the specified resources are configured to start automatically each time the machine is rebooted. |
|||||
(Local + geographical) Stop the RHCS services. Note Except for RHEL 7.2 and above versions, all other earlier RHEL versions are supported. |
|||||
Install the server and Oracle database using install_prime_HA.pl. |
Installing the Prime Network Gateway Geographical Redundancy Software |
||||
Configure the embedded database (using the add_emdb_storage.pl -ha script). |
|||||
If desired, install any new device packages so that you have the latest device support. |
|||||
Installing and Configuring PN-IL for Local + Geographical Redundancy |
|||||
(Optional) Setup RHCS Web GUI if it is not configured during installation. |
|||||
(Local + geographical HA only) (Optional) Setup RHCS Web GUI if it is not configured during installation. |
|||||
|
1.P1 node has primary database (geographical redundancy only, or geographical + local redundancy). 2.P2 node is only relevant if local redundancy is also installed. |
Installation Requirements for Geographical Redundancy
These topics list the prerequisites for installing gateway geographical redundancy:
- Hardware and Software Requirements for Geographical Redundancy
- Ports Usage for Geographical Redundancy
Hardware and Software Requirements for Geographical Redundancy
Table 4-2 shows the core system requirements for geographical redundancy. All the hardware and software requirements are also applicable for virtual machines. Geographical redundancy requires a Prime Network embedded database and does not support IPv6 gateways or databases. If your high availability deployment differs from these requirements, please contact your Cisco account representative for assistance with the planning and installation of high availability.
Note![]() Geographical redundancy for PN-IL is only supported if the local redundancy solution is also installed.
Geographical redundancy for PN-IL is only supported if the local redundancy solution is also installed.
If you are installing both local and geographical redundancy, for the local redundancy site, refer to the requirements in Hardware and Software Requirements for Local Redundancy.
|
|
|
|---|---|
RHEL 6.7, RHEL 6.8, RHEL 6.9 and RHEL 7.4 64-bit Server Edition (English language). |
|
| Oracle 12.1.0.2 is included in the Prime Network embedded database installation. |
|
RHEL 6.7, RHEL 6.8, RHEL 6.9 and RHEL 7.4 certified platform. For recommended hardware for small, medium and large networks, see the Cisco Prime Network 5.1 Installation Guide. |
|
Note If you are using the network-conf script, when you are prompted for the IP address of units, use the floating IP address of the gateway.
If for some reason the necessary IP addresses are not updated after a switchover or failover, you can set them manually (which includes setting the necessary LDAP parameters). See Changing the Gateway IP Address on a Gateway and All Units (changeSite.pl). For more information on using LDAP for user authentication, see Using an External LDAP Server for Password Authentication in the Cisco Prime Network 5.1 Administrator Guide. |
|
Based on requirements determined by the Cisco Prime Network Capacity Planning Guide. To obtain a copy of Capacity Planning Guide, contact your Cisco representative. Geographical redundant storage should have the same capacity and mount points as the local site. |
|
The rsync utility must be installed on all servers that are part of the geographical redundant solution. |
|
The scp program must be installed on all servers that are part of the geographical redundant solution. |
|
3.Virtual machine and bare metal requirements for hard disk, memory, and processor are same. Refer to the Cisco Prime Network 5.1 Installation Guide for memory and processor requirements. |
Ports Usage for Geographical Redundancy
In addition to the ports listed in the Cisco Prime Network 5.1 Installation Guide, the following ports must be free.
You can check the status of the listed ports by executing the following command:
To free any ports, contact your system administrator.
|
|
|
|---|---|
Preparing to Install Geographical Redundancy
There are a number of pre installation steps you need to perform before you install the geographical redundancy solution. These steps are similar to those for local redundancy, except that you are performing them on the primary server (P1) and the remote DR server (S2). These steps include the following:
- Configuring the server hardware, disk groups, volumes, and partitions
- Installing RHEL and the recommended patches and RPMs
- Mounting the installation files, and creating the mount points for the external shared storage, Oracle, and Prime Network
- Backing up your deployment
Extra steps are included if you are using both geographical and local redundancy. The preparation procedures are in Table 4-1, starting with Steps 3. Some procedures will refer you to the instructions for local redundancy; this is because the steps are identical but are performed on the primary node (P1) and the remote DR node (S1) instead of the primary and secondary cluster nodes (P1 and P2).
Installing the Prime Network Gateway Geographical Redundancy Software
The geographical redundancy solution uses a remote site that contains a single server that provides failover in case of a failure at the primary site. It is installed using install_prime_HA.pl script that is available in RH_ha.zip file in the installation DVD as described in Installation DVDs.
You can use this procedure to:
- Install the geographical redundancy software only on a remote server (S1 in Figure 2-4)
- Install the geographical redundancy software on a deployment that is also using local redundancy (P1, P2, S1 in Figure 2-4)
You can run the installation in interactive or in non-interactive mode. Interactive mode installation prompts you to enter the gateway HA data values one at a time. The Prime Network installer then updates the auto_install_RH.ini file template, which populates the install_Prime_HA.pl script.
Note![]() It is recommended you run the installation in interactive mode first to populate the auto_install_RH.ini template with the user input. This gives you the ability to verify the input and run the installation again in non-interactive mode, if needed.
It is recommended you run the installation in interactive mode first to populate the auto_install_RH.ini template with the user input. This gives you the ability to verify the input and run the installation again in non-interactive mode, if needed.
Alternatively, you can enter all the installation values in the auto_install_RH.ini template, located in the RH_ha directory, then run the installation in non-interactive mode. The installation mode is determined by the presence or absence of the -autoconf flag.
Note![]() The geographic redundancy configuration takes time. Depending on the speed of the local and remote site connection and size of the database, the configuration can take several hours.
The geographic redundancy configuration takes time. Depending on the speed of the local and remote site connection and size of the database, the configuration can take several hours.
To set up and configure the geographical redundancy site:
Step 1![]() Change to root user, then unzip the RH_ha.zip file located on the installation DVD in the /tmp path.This is a mandatory process to unzip the RH_ha file in the /tmp/RH_ha directory.
Change to root user, then unzip the RH_ha.zip file located on the installation DVD in the /tmp path.This is a mandatory process to unzip the RH_ha file in the /tmp/RH_ha directory.
Note![]() If you are running the Korn shell (/bin/ksh) and the prompt is the hash tag (#), the installation will fail. Run the installation script using bash.
If you are running the Korn shell (/bin/ksh) and the prompt is the hash tag (#), the installation will fail. Run the installation script using bash.
Step 2![]() From the /tmp/RH_ha directory, run the install_Prime_HA.pl in interactive or non-interactive mode.
From the /tmp/RH_ha directory, run the install_Prime_HA.pl in interactive or non-interactive mode.
Step 3![]() If you are using Pacemaker Corosync cluster setup, you need to manually perform the pacemaker configuration for geographical + local redundancy first before you proceed with the Prime Network installation, else skip to step 4. For more information, see the Configuring Clusters for Pacemaker and Coresync Setup section in the Prime Network 5.1 Installation Guide.
If you are using Pacemaker Corosync cluster setup, you need to manually perform the pacemaker configuration for geographical + local redundancy first before you proceed with the Prime Network installation, else skip to step 4. For more information, see the Configuring Clusters for Pacemaker and Coresync Setup section in the Prime Network 5.1 Installation Guide.
Step 4![]() Depending on whether you want to configure geographical + local redundancy or geographical redundancy only, do one of the following for the prompts shown in Table 4-4 or Table 4-5 :
Depending on whether you want to configure geographical + local redundancy or geographical redundancy only, do one of the following for the prompts shown in Table 4-4 or Table 4-5 :
Step 5![]() Execute the install_Prime_HA.pl script in interactive or non-interactive method.
Execute the install_Prime_HA.pl script in interactive or non-interactive method.
For interactive installation, execute the following commands:
See Table 4-4 or Table 4-5 for descriptions of parameters you will be asked to enter at various stages of the interactive installation.
a.![]() Edit the auto_install_RH.ini file template found under the RH_ha directory with all of the installation details.
Edit the auto_install_RH.ini file template found under the RH_ha directory with all of the installation details.
Note![]() To prevent a security violation, it is highly recommended to remove the password in auto_install_RH.ini file after the successful installation.
To prevent a security violation, it is highly recommended to remove the password in auto_install_RH.ini file after the successful installation.
After the install_Prime_HA.pl script is completed, Prime Network gateway and embedded database are installed on the remote site.
The following tables describe the installation prompts, depending on your deployment:
- Table 4-4 , Installation Prompts for Geographical Redundancy Only (this deployment is not supported for PN-IL)
- Table 4-5 , Installation Prompts for Local and Geographical Redundancy
|
|
|
|
|---|---|---|
Enter no ; this procedure is for geographical redundancy alone. To install geographical redundancy with local redundancy, see Table 4-5 . To install local redundancy, see Installing and Maintaining Gateway Local Redundancy |
||
yes or no depending on whether NTP should be configured on two gateways. If not configured, first configure NTP and then continue with the installation. For more details on procedures, see configuring NTP in the Cisco Prime Network 5.1 Installation Guide. |
||
Location of the mount point given for the oracle-home / oracle-user. |
||
yes or no value indicating whether you want to use the default Oracle mount point or not. |
||
Location of the database redologs. Should be located under one of the Oracle mounts but not directly on the mount, and should be compliant with the storage requirements. |
||
Location of the database data files. Should be located under one of the Oracle mounts but not directly on the mount, and should be compliant with the storage requirements. |
||
Location of the database backup files. Should be located under one of the Oracle mounts but not directly on the mount, and should be compliant with the storage requirements. |
||
Location of the database archive files. Should be located under one of the Oracle mounts but not directly on the mount, and should be compliant with the storage requirements. |
||
User-defined Prime Network OS user ( pnuser). Username must start with a letter and contain only the following characters: [A-Z a-z 0-9]. |
||
Directory should be located under Prime Network file system mount point but not the mount point itself. |
||
Mount point of Prime Network installation. Should be the same for all relevant nodes. Example: For install.pl the path will be /dvd/Server. |
||
Directory containing the embedded Oracle zip files. Can be a temporary location where the files were copied from the installation DVDs; or directly specify the location on DVD. |
||
Root user password for the node running the installation. For local redundancy dual-node clusters, this node must be one of the cluster nodes. |
||
For geographic redundancy, hostname for the remote site (the value returned by the system call hostname). |
||
For geographic redundancy, root user password for the remote site. |
||
Password for Prime Network root, bosenable, bosconfig, bosusermngr, and web monitoring users (users for various system components). Passwords must contain: |
||
E-mail address to which embedded database will send error messages. |
||
Name of network interface to which logical IPs will be added. Must be identical on all servers (for example: eth0, bge0). |
Table 4-5 shows the installation prompts when setting up local and geographical redundancy.
|
|
|
|
|---|---|---|
Enter yes ; this procedure is for geographical redundancy + local redundancy. To install geographical only, see Table 4-4 . To install local redundancy, see Installing and Maintaining Gateway Local Redundancy |
||
yes or no depending on whether NTP should be configured on three gateways. If not configured, first configure NTP and then continue with the installation. For more details on procedures, see configuring NTP in the Cisco Prime Network 5.1 Installation Guide. |
||
Answer yes if the node is connected to storage with more than one connection (recommended). |
||
Location of the mount point given for the oracle-home / oracle-user. |
||
yes or no value indicating whether you want to use the default Oracle mount point or not. |
||
Location of the database redologs. Should be located under one of the Oracle mounts but not directly on the mount, and should be compliant with the storage requirements. |
||
Location of the database data files. Should be located under one of the Oracle mounts but not directly on the mount, and should be compliant with the storage requirements. |
||
Location of the database backup files. Should be located under one of the Oracle mounts but not directly on the mount, and should be compliant with the storage requirements. |
||
Location of the database archive files. Should be located under one of the Oracle mounts but not directly on the mount, and should be compliant with the storage requirements. |
||
User-defined Prime Network OS user ( pnuser). Username must start with a letter and contain only the following characters: [A-Z a-z 0-9]. |
||
Directory should be located under Prime Network file system mount point but not the mount point itself. |
||
The mount point of the Prime Network installation. The mount point should be the same for all relevant nodes. Example: For install.pl the path will be /dvd/Server. |
||
Directory containing the embedded Oracle zip files. Can be a temporary location where the files were copied from the installation DVDs; or directly specify the location on DVD. |
||
Root user password for the node running the installation. For local redundancy dual-node clusters, this node must be one of the cluster nodes. |
||
For geographic redundancy, hostname for the remote site. This is the value returned by the system call hostname. |
||
For geographic redundancy, root user password for the remote site. |
||
Password for Prime Network root, bosenable, bosconfig, bosusermngr, and web monitoring users (users for various system components). Passwords must contain: |
||
E-mail address to which embedded database will send error messages. |
||
An available multicast address accessible and configured for both cluster nodes. |
||
User-defined cluster name. Cannot be more than 15 non-NUL (ASCII 0) characters. For local redundancy, cluster name must be unique within the LAN. |
||
Type of fencing device configured for the node running the installation. (See Fencing Options.) |
||
Type of fencing device configured for the second cluster running the installation. (See Fencing Options.) |
||
| Port and the password for cluster web interface. LUCI_PORT must be available and should not be in Prime Network debug range: or in Prime Network AVM port range: 2224 <= x < 3000 or 8000 <= x < 9000) Password must contain at least 6 characters. Note LUCI_PORT is not supported in Pacemaker with RHEL 7.2 configuration. |
||
IP address of the node running the installation. Local redundancy dual-node clusters: Must be one of the cluster nodes. |
||
IP address of DR node at remote site (geographical redundancy). |
||
Name of network interface to which logical IPs will be added. Must be identical on all servers (for example: eth0, bge0). |
||
Hostname of fencing device configured for node running the installation (for some fencing devices, this can be an IP address). |
||
Login name for fencing device configured for node running the installation. |
||
Password for fencing device configured for node running the installation. |
||
Hostname of fencing device configured for second cluster node (for some fencing devices, this can be an IP address). |
||
Login name for fencing device configured for second cluster node. |
||
Password for fencing device configured for node second cluster node. |
Step 6![]() Configure the Embedded Database by running the add_emdb_storage.pl utility and you must include -ha flag while running this utility.
Configure the Embedded Database by running the add_emdb_storage.pl utility and you must include -ha flag while running this utility.
a.![]() Log in as prime network user
Log in as prime network user
b.![]() Change directories to NETWORKHOME /Main/scripts/embedded_db and enter the following command:
Change directories to NETWORKHOME /Main/scripts/embedded_db and enter the following command:
c.![]() Enter the number corresponding to the estimated database profile that meets your requirement.
Enter the number corresponding to the estimated database profile that meets your requirement.
d.![]() Insert the event and workflow archiving size in days.
Insert the event and workflow archiving size in days.
Step 7![]() Configure the remote site using the setup_Prime_DR.pl command in interactive or non-interactive mode. For more information on setup_Prime_DR.pl script, see Installation DVDs.
Configure the remote site using the setup_Prime_DR.pl command in interactive or non-interactive mode. For more information on setup_Prime_DR.pl script, see Installation DVDs.
Note![]() The setup_Prime_DR.pl script must run on the node running the primary database.
The setup_Prime_DR.pl script must run on the node running the primary database.
For interactive mode, enter the following commands:
a.![]() Edit the auto_install_RH.ini file template found under the RH_ha directory with all of the installation details.
Edit the auto_install_RH.ini file template found under the RH_ha directory with all of the installation details.
Example: perl setup_Prime_DR.pl -autoconf /tmp/RH_dr/ auto_install_RH.ini
Note![]() If the setup_Prime_DR.pl script is executed from the same node as the install_Prime_HA.pl script, and if all the parameters are same, you can use the same auto_install_RH.ini file. The prompts and outputs while executing this script are a subset of the install script prompts.
If the setup_Prime_DR.pl script is executed from the same node as the install_Prime_HA.pl script, and if all the parameters are same, you can use the same auto_install_RH.ini file. The prompts and outputs while executing this script are a subset of the install script prompts.
Step 8![]() Verify the setup as described in Verifying the Geographical Redundancy Setup.
Verify the setup as described in Verifying the Geographical Redundancy Setup.
Verifying the Geographical Redundancy Setup
Table 4-6 shows the geographical redundancy verification tests.
Note![]() The geographical redundancy verification tests are for the embedded database and must be performed by Cisco personnel only.
The geographical redundancy verification tests are for the embedded database and must be performed by Cisco personnel only.
Maintaining Geographical Redundancy
These topics provide information pertaining to ongoing management of an ADG geographical redundancy configuration. The utilities used for these operations are stored in /var/adm/cisco/prime-network/scripts/ha/util.
Checking Log Messages
Prime Network generates the following system events for geographical redundancy monitoring:
- Informational event to indicate that both ADG and GWSync monitoring is active. This is done on an hourly basis based on cron jobs.
- Critical events when the following occur:
–![]() An GWSync has not occurred in the last 10 minutes.
An GWSync has not occurred in the last 10 minutes.
–![]() The standby database is down.
The standby database is down.
–![]() The standby database is up but has been out of sync for 60 minutes.
The standby database is up but has been out of sync for 60 minutes.
The log files for data replication are described in the following table. To troubleshoot problems with the replication process, see Verifying the Geographical Redundancy Setup .
Monitoring Overall Status
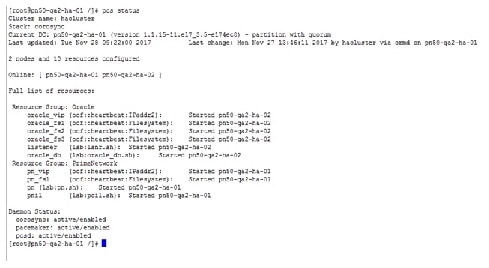
The primeha command is a central utility for checking the status of the high availability nodes, performing switchovers and failovers, and stopping and resuming data replication.
Use the following command to view the status of the cluster:
The below output is an example for a network that has both local and geographical redundancy.
- The first portion of the output as shown below, shows the status of the geographical redundancy configuration. The server hostname1.cisco.com is the remote gateway and database server. The server hostname2.cisco.com is the other node in the local redundancy cluster and is not running any service.
- The second portion of the output as shown below (that begins with Cluster Status) shows the status of the local redundancy configuration. (This is displayed because this setup also contains a local redundancy configuration.)
- In case of Pacemaker and Corosync setup, the output shown below (that begins with PCs Status) displays the status of the Pacemaker cluster. (This is displayed because this setup also contains a local redundancy configuration.)
Uninstalling the Geographical Redundancy Software
To uninstall geographical redundancy, use this procedure. If Operations Reports was also installed, this procedure will remove it.
If your deployment also has local redundancy, uninstall the software on the primary cluster server (P1) first using the procedure in Uninstalling Local Redundancy.
Step 1![]() If any RHCS services are running, log into the primary cluster server and freeze the relevant services (service can be ana, oracle, and, if Operations Reports is installed, ifb).
If any RHCS services are running, log into the primary cluster server and freeze the relevant services (service can be ana, oracle, and, if Operations Reports is installed, ifb).
Step 2![]() Log in as the root user and change to the following directory:
Log in as the root user and change to the following directory:
Step 3![]() Enter the following command:
Enter the following command:
Installing and Configuring PN-IL for Local + Geographical Redundancy
This section explains how to install the Prime Network Integration Layer (PN-IL) 1.2 for a local + geographical redundancy deployment. It also explains how to integrate the deployment with Cisco Prime Central. For information on the Prime Central releases with which you can integrate PN-IL 1.2, see the Cisco Prime Network 5.1 Release Notes.
These topics provide the information you will need to install and configure PN-IL geographical, and local redundancy:
- Installation DVD
- Steps for Installing PN-IL with Local + Geographical Redundancy
- Installing PN-IL on a Prime Network Server (Local + Geographical Redundancy)
- Configuring PN-IL on a Prime Network Gateway (Local + Geographical Redundancy)
- Disabling the PN-IL Health Monitor
If you want to migrate an existing standalone installations of PN-IL (local + geographical) to suite mode, you can use the procedure in Configuring and Migrating PN-IL with Prime Central (Suite Mode with Local + Geographical Redundancy).
Installation DVD
The PN-IL high availability files are provided on the Prime Network installation DVD named Disk 1: New Install DVD. Disk 2 contains the tar file sil-esb-1.2.0.tar.gz, which contains the PN-IL installation files and scripts, including:
Steps for Installing PN-IL with Local + Geographical Redundancy
Table 4-7 provides the basic steps you must follow to set up local + geographical redundancy for PN-IL. If you want to migrate an existing standalone installations of PN-IL (local + geographical) to suite mode, you can use the procedure in Configuring and Migrating PN-IL with Prime Central (Suite Mode with Local + Geographical Redundancy).
Note that you only have to install PN-IL on the primary cluster server (P1), not on the remote (DR) server (S2). However, you will have to do some configuration tasks on the remote server.
|
|
|
|
|
||
|---|---|---|---|---|---|
|
|
|
|
|||
Collect server details, so that you have all information handy prior to installation. |
|
||||
Installing PN-IL on a Prime Network Server (Local + Geographical Redundancy) |
|||||
Configure PN-IL (in standalone or suite mode) on both nodes, and unfreeze RHCS. |
Configuring PN-IL on a Prime Network Gateway (Local + Geographical Redundancy) |
||||
Installing PN-IL on a Prime Network Server (Local + Geographical Redundancy)
Use this procedure to install PN-IL with local + geographical redundancy on the primary cluster server (P1). The primary cluster node will copy the necessary files to the remote DR node (S1). For the remote DR node, you only have to perform some minor configurations.
Make sure Prime Network is installed and is up and running on the both the primary cluster node (P1) and the remote DR node (S2). In the following procedure, $ANAHOME is the pnuser environment variable for the Prime Network installation directory (/export/home/ pnuser by default).
Step 1![]() On the primary cluster node (P1), log in as root and freeze the ana service.
On the primary cluster node (P1), log in as root and freeze the ana service.
Note![]() The cluster server should be the active node where the ana service is running.
The cluster server should be the active node where the ana service is running.
Step 2![]() On the remote DR node (S1), log in as root and save your rsync settings so they are not overwritten during the PN-IL installation process.
On the remote DR node (S1), log in as root and save your rsync settings so they are not overwritten during the PN-IL installation process.
Step 3![]() On the primary cluster node (P1), log in as pnuser.
On the primary cluster node (P1), log in as pnuser.
Step 4![]() On the primary cluster node, create an installation directory for PN-IL.
On the primary cluster node, create an installation directory for PN-IL.
For example, if the Prime Network installation directory was /export/home/pn41, you would run this command to create an installation directory called pnil:
Step 5![]() On the primary cluster node (P1), copy the installation files from the installation DVD, extract them, and start the installation script. These examples use the PN-IL installation directory /pnil.
On the primary cluster node (P1), copy the installation files from the installation DVD, extract them, and start the installation script. These examples use the PN-IL installation directory /pnil.
a.![]() Copy the PN-IL installation tar file from Disk 2 to the directory you created in Step 4. In the following example, the installation directory is named pnil.
Copy the PN-IL installation tar file from Disk 2 to the directory you created in Step 4. In the following example, the installation directory is named pnil.
b.![]() Change to the directory you created in Step 4 and extract the files from the PN-IL installation tar:
Change to the directory you created in Step 4 and extract the files from the PN-IL installation tar:
c.![]() Change to directory where the installation tar files were extracted and run the installation script:
Change to directory where the installation tar files were extracted and run the installation script:
Step 6![]() On the primary cluster node (P1), reload the user profile.
On the primary cluster node (P1), reload the user profile.
Step 7![]() Log into the remote DR server (S1) as root and move the original rsync exclude file (that you moved in Step 2) back to its proper place.
Log into the remote DR server (S1) as root and move the original rsync exclude file (that you moved in Step 2) back to its proper place.
Step 8![]() Configure PN-IL as described in Configuring PN-IL on a Prime Network Gateway (Local + Geographical Redundancy).
Configure PN-IL as described in Configuring PN-IL on a Prime Network Gateway (Local + Geographical Redundancy).
Note![]() Do not unfreeze the ana service until PN-IL has been configured.
Do not unfreeze the ana service until PN-IL has been configured.
Note![]() You do not have to install the geographical redundancy files on the remote server (S1); the necessary files will be copied to the remote DR server by the primary cluster node.
You do not have to install the geographical redundancy files on the remote server (S1); the necessary files will be copied to the remote DR server by the primary cluster node.
Configuring PN-IL on a Prime Network Gateway (Local + Geographical Redundancy)
Configuration tasks must be performed on both the primary cluster node (P1) and the remote DR node (S1).
- For standalone mode (that is, Prime Network is not integrated with Prime Central), follow the instructions in Configuring PN-IL with Prime Network (Standalone Mode with Local + Geographical Redundancy).
- For suite mode (Prime Network is integrated with Prime Central), follow the instructions in Configuring and Migrating PN-IL with Prime Central (Suite Mode with Local + Geographical Redundancy).
Configuring PN-IL with Prime Network (Standalone Mode with Local + Geographical Redundancy)
In standalone mode, Prime Network is not integrated with Prime Central and can independently expose MTOSI and 3GPP web services to other OSS/applications. In the following procedure:
- $PRIMEHOME is the pnuser environment variable for the PN-IL installation directory you created in Installing PN-IL on a Prime Network Server (Local + Geographical Redundancy).
- $ANAHOME is the pnuser environment variable for the Prime Network installation directory (/export/home/ pnuser by default).
Step 1![]() From the primary cluster node (P1), log in as pnuser.
From the primary cluster node (P1), log in as pnuser.
Step 2![]() On the primary cluster node (P1), configure PN-IL in standalone mode.
On the primary cluster node (P1), configure PN-IL in standalone mode.
|
|
|
|---|---|
URL used to authenticate Prime Network calls (usually https://localhost:6081/ana/services/userman) |
itgctl config 1 --anaPtpServer 192.0.2.22 --anaPtpUser root --anaPtpPw myrootpassword --authURL https://192.0.2.22:6081/ana/services/userman
Step 3![]() On the primary cluster node (P1), start PN-IL.
On the primary cluster node (P1), start PN-IL.
Step 4![]() Open a new session on the remote DR server (S1) and log in as pnuser.
Open a new session on the remote DR server (S1) and log in as pnuser.
Step 5![]() On the remote DR server (S1), configure PN-IL in standalone mode but use the remote DR server’s IP address (--anaPtpServer remote-DR-ip).
On the remote DR server (S1), configure PN-IL in standalone mode but use the remote DR server’s IP address (--anaPtpServer remote-DR-ip).
Step 6![]() On the primary cluster node (P1), start PN-IL.
On the primary cluster node (P1), start PN-IL.
Note![]() To avoid the automatic start of PN-IL on the DR server, disable the PN-IL Health monitor, and stop the PN-IL service on that server, using the following command: $PRIMEHOME/local/scripts/il-watch-dog.sh disableandstop.
To avoid the automatic start of PN-IL on the DR server, disable the PN-IL Health monitor, and stop the PN-IL service on that server, using the following command: $PRIMEHOME/local/scripts/il-watch-dog.sh disableandstop.
Step 7![]() On the primary cluster node, log in as the operating system root user and unfreeze the ana service.
On the primary cluster node, log in as the operating system root user and unfreeze the ana service.
Step 8![]() To enable NBI, contact Cisco representative.
To enable NBI, contact Cisco representative.
Next, perform the necessary configuration steps that are described in Configuring PN-IL on a Prime Network Gateway (Local + Geographical Redundancy).
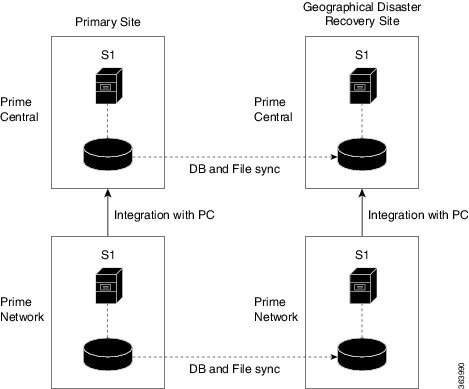
Configuring and Migrating PN-IL with Prime Central (Suite Mode with Local + Geographical Redundancy)
When Prime Network and PN-IL are running in suite mode, that means they are integrated with Prime Central. This procedure explains how to integrate PN-IL with a deployment of Prime Central that uses geographical redundancy. You can use this procedure for:
- New installations of PN-IL with geographical redundancy.
- Existing standalone installations of PN-IL with geographical redundancy, that you want to move from standalone to suite mode.
Figure 4-1 illustrates the deployment of both local and geographical redundancy in Suite Mode.
Note![]() PN-IL geographical redundancy is only supported when the deployment also has local redundancy. Therefore, Prime Central must also be using both local and geographical redundancy.
PN-IL geographical redundancy is only supported when the deployment also has local redundancy. Therefore, Prime Central must also be using both local and geographical redundancy.
Figure 4-1 Local Redundancy with Geographical Redundancy Suite Mode
In the following procedure, $PRIMEHOME is the pnuser environment variable for the PN-IL installation directory you created in Installing PN-IL on a Prime Network Server (Local + Geographical Redundancy).
Before you begin, verify the following:
- PN-IL is already installed. If it is not, install it as described in Installing and Configuring PN-IL for Local + Geographical Redundancy.
- Prime Network is running suite mode.
- Prime Central is using both local geographical redundancy.
To integrate PN-IL with Prime Central:
Step 1![]() From the Prime Network primary cluster node (P1), log in as pnuser.
From the Prime Network primary cluster node (P1), log in as pnuser.
Step 2![]() On the Prime Network primary cluster node (P1), configure PN-IL in suite mode, edit the necessary integration files, and run the integration script:
On the Prime Network primary cluster node (P1), configure PN-IL in suite mode, edit the necessary integration files, and run the integration script:
a.![]() Move to the PN-IL integration directory.
Move to the PN-IL integration directory.
b.![]() Edit the ILIntegrator.prop file and change the value of the ‘HOSTNAME’ property to ana-cluster-ana, which is the fixed name for the Prime Network cluster server.
Edit the ILIntegrator.prop file and change the value of the ‘HOSTNAME’ property to ana-cluster-ana, which is the fixed name for the Prime Network cluster server.
c.![]() Execute the following integration script to integrate PN-IL with Prime Central. Prime Central will assign an ID number to PN-IL. Note the ID number because you will need it later to integrate the remote DR server (S1) with Prime Central.
Execute the following integration script to integrate PN-IL with Prime Central. Prime Central will assign an ID number to PN-IL. Note the ID number because you will need it later to integrate the remote DR server (S1) with Prime Central.
Note![]() When you run DMIntegrator.sh, you must exactly follow the format below or the script will fail.
When you run DMIntegrator.sh, you must exactly follow the format below or the script will fail.
DMIntegrator uses these variables. You must enter them in this exact order.
Step 3![]() On the Prime Network primary cluster node (P1), reload the user profile:
On the Prime Network primary cluster node (P1), reload the user profile:
Step 4![]() On the Prime Network primary cluster node (P1), retrieve the ID that Prime Central assigned to Prime Network using itgctl list. You will need it in a future step.
On the Prime Network primary cluster node (P1), retrieve the ID that Prime Central assigned to Prime Network using itgctl list. You will need it in a future step.
Step 5![]() Open a new session to the Prime Network remote DR server (S1) as a root user and rename file as shown below.
Open a new session to the Prime Network remote DR server (S1) as a root user and rename file as shown below.
Step 6![]() On the Prime Network remote DR server (S1), configure PN-IL in suite mode as pnuser. Edit the necessary integration files, and run the integration script.
On the Prime Network remote DR server (S1), configure PN-IL in suite mode as pnuser. Edit the necessary integration files, and run the integration script.
b.![]() Move to the PN-IL integration directory.
Move to the PN-IL integration directory.
c.![]() Edit the ILIntegrator.prop file and change the value of the ‘HOSTNAME’ property to the Prime Network remote DR server (S1) hostname. For example:
Edit the ILIntegrator.prop file and change the value of the ‘HOSTNAME’ property to the Prime Network remote DR server (S1) hostname. For example:
d.![]() Execute the following integration script to integrate PN-IL into the deployment:
Execute the following integration script to integrate PN-IL into the deployment:
DMIntegrator uses these variables. You must enter them in this exact order.
|
|
|
|---|---|
Step 7![]() On the remote DR node (S1), reload the user profile:
On the remote DR node (S1), reload the user profile:
Step 8![]() Log out from Prime Network application user and as root user change the following file name
Log out from Prime Network application user and as root user change the following file name
Step 9![]() As the operating system root user, on the primary cluster node (P1), unfreeze the ana service.
As the operating system root user, on the primary cluster node (P1), unfreeze the ana service.
Next, disable the PN-IL health monitor as described in Disabling the PN-IL Health Monitor.
Disabling the PN-IL Health Monitor
When PN-IL is installed in a geographical redundancy deployment, the RHCS cluster service monitors PN-IL’s status. Therefore, you should disable the PN-IL health monitor.
To disable the PN-IL health monitor, execute the following command as pnuser :
Installing and Configuring PN-IL for Geographical Redundancy Only
This section explains how to install the Prime Network Integration Layer (PN-IL) 1.2 for a geographical redundancy only deployment. It also explains how to integrate the deployment with Cisco Prime Central. For information on the Prime Central releases with which you can integrate PN-IL 1.2, see the Cisco Prime Network 5.1 Release Notes.
Note![]() PN-IL geographical redundancy only has a primary server (P1) at the local site and remote server (S1) at a remote geographical site for a full disaster recovery.
PN-IL geographical redundancy only has a primary server (P1) at the local site and remote server (S1) at a remote geographical site for a full disaster recovery.
These topics provide the information you will need to install and configure PN-IL geographical only deployments:
- Installation DVD
- Steps for Installing PN-IL with Geographical Redundancy Only
- Installing PN-IL on a Prime Network Server (Geographical Redundancy Only)
- Configuring PN-IL on a Prime Network Gateway (Geographical Redundancy Only)
- Disabling the PN-IL Health Monitor
If you want to migrate an existing standalone installations of PN-IL (with geographical redundancy) to suite mode, you can use the procedure in Configuring and Migrating PN-IL with Prime Central (Suite Mode with Local + Geographical Redundancy).
Steps for Installing PN-IL with Geographical Redundancy Only
Table 4-7 provides the basic steps you must follow to set up geographical redundancy only for PN-IL. If you want to migrate an existing standalone installations of PN-IL (with geographical redundancy only) to suite mode, you can use the procedure in Configuring and Migrating PN-IL with Prime Central (Suite Mode with Local + Geographical Redundancy).
Note that you only have to install PN-IL on the primary server (P1), not on the remote (DR) server (S2). However, you will have to do some configuration tasks on the remote server.
|
|
|
|
|
||
|---|---|---|---|---|---|
|
|
|
|
|||
Collect server details, so that you have all information handy prior to installation. |
|
||||
Configure PN-IL (in standalone or suite mode) on both nodes. |
Configuring PN-IL on a Prime Network Gateway (Local + Geographical Redundancy) |
||||
Installing PN-IL on a Prime Network Server (Geographical Redundancy Only)
Use this procedure to install PN-IL with geographical redundancy on the primary server (P1). The primary node will copy the necessary files to the remote DR node (S1). For the remote DR node, you only have to perform some minor configurations.
Make sure Prime Network is installed and is up and running on the both the primary node (P1) and the remote DR node (S1). In the following procedure, $ANAHOME is the pnuser environment variable for the Prime Network installation directory (/export/home/ pnuser by default).
Step 1![]() On the remote DR node (S1), log in as root and save your rsync settings so they are not overwritten during the PN-IL installation process.
On the remote DR node (S1), log in as root and save your rsync settings so they are not overwritten during the PN-IL installation process.
Step 2![]() On the primary node (P1), log in as pnuser.
On the primary node (P1), log in as pnuser.
Step 3![]() On the primary node, create an installation directory for PN-IL.
On the primary node, create an installation directory for PN-IL.
For example, if the Prime Network installation directory was /export/home/pn41, you would run this command to create an installation directory called pnil:
Step 4![]() On the primary cluster node (P1), copy the installation files from the installation DVD, extract them, and start the installation script. These examples use the PN-IL installation directory /pnil.
On the primary cluster node (P1), copy the installation files from the installation DVD, extract them, and start the installation script. These examples use the PN-IL installation directory /pnil.
a.![]() Copy the PN-IL installation tar file from Disk 2 to the directory you created in Step 4. In the following example, the installation directory is named pnil.
Copy the PN-IL installation tar file from Disk 2 to the directory you created in Step 4. In the following example, the installation directory is named pnil.
b.![]() Change to the directory you created in Step 4 and extract the files from the PN-IL installation tar:
Change to the directory you created in Step 4 and extract the files from the PN-IL installation tar:
c.![]() Change to directory where the installation tar files were extracted and run the installation script:
Change to directory where the installation tar files were extracted and run the installation script:
Step 5![]() On the primary node (P1), reload the user profile.
On the primary node (P1), reload the user profile.
Step 6![]() Log into the remote DR server (S1) as root and move the original rsync exclude file (that you moved in Step 1) back to its proper place.
Log into the remote DR server (S1) as root and move the original rsync exclude file (that you moved in Step 1) back to its proper place.
Step 7![]() Configure PN-IL as described in Configuring PN-IL on a Prime Network Gateway (Local + Geographical Redundancy).
Configure PN-IL as described in Configuring PN-IL on a Prime Network Gateway (Local + Geographical Redundancy).
Note![]() Do not unfreeze the ana service until PN-IL has been configured.
Do not unfreeze the ana service until PN-IL has been configured.
Note![]() You do not have to install the geographical redundancy files on the remote server (S1); the necessary files will be copied to the remote DR server by the primary node.
You do not have to install the geographical redundancy files on the remote server (S1); the necessary files will be copied to the remote DR server by the primary node.
Configuring PN-IL on a Prime Network Gateway (Geographical Redundancy Only)
Configuration tasks must be performed on both the primary node (P1) and the remote DR node (S1).
- For standalone mode (that is, Prime Network is not integrated with Prime Central), follow the instructions in Configuring PN-IL with Prime Network (Standalone Mode with Local + Geographical Redundancy).
- For suite mode (Prime Network is integrated with Prime Central), follow the instructions in Configuring and Migrating PN-IL with Prime Central (Suite Mode with Local + Geographical Redundancy).
Configuring PN-IL with Prime Network (Standalone Mode with Geographical Redundancy Only)
In standalone mode, Prime Network is not integrated with Prime Central and can independently expose MTOSI and 3GPP web services to other OSS/applications. In the following procedure:
- $PRIMEHOME is the pnuser environment variable for the PN-IL installation directory you created in Installing PN-IL on a Prime Network Server (Local + Geographical Redundancy).
- $ANAHOME is the pnuser environment variable for the Prime Network installation directory (/export/home/ pnuser by default).
Step 1![]() From the primary node (P1), log in as pnuser.
From the primary node (P1), log in as pnuser.
Step 2![]() On the primary node (P1), configure PN-IL in standalone mode.
On the primary node (P1), configure PN-IL in standalone mode.
|
|
|
|---|---|
URL used to authenticate Prime Network calls (usually https://localhost:6081/ana/services/userman) |
itgctl config 1 --anaPtpServer 192.0.2.22 --anaPtpUser root --anaPtpPw myrootpassword --authURL https://192.0.2.22:6081/ana/services/userman
Step 3![]() On the primary node (P1), start PN-IL.
On the primary node (P1), start PN-IL.
Step 4![]() Open a new session on the remote DR server (S1) and log in as pnuser.
Open a new session on the remote DR server (S1) and log in as pnuser.
Step 5![]() On the remote DR server (S1), configure PN-IL in standalone mode but use the remote DR server’s IP address (--anaPtpServer remote-DR-ip).
On the remote DR server (S1), configure PN-IL in standalone mode but use the remote DR server’s IP address (--anaPtpServer remote-DR-ip).
Step 6![]() On the primary cluster node (P1), start PN-IL.
On the primary cluster node (P1), start PN-IL.
Next, perform the necessary configuration steps that are described in Configuring PN-IL on a Prime Network Gateway (Local + Geographical Redundancy).
Configuring and Migrating PN-IL with Prime Central (Suite Mode with Geographical Redundancy Only)
When Prime Network and PN-IL are running in suite mode, that means they are integrated with Prime Central. This procedure explains how to integrate PN-IL with a deployment of Prime Central that uses geographical redundancy only. You can use this procedure for:
- New installations of PN-IL with geographical redundancy.
- Existing standalone installations of PN-IL with geographical redundancy, that you want to move from standalone to suite mode.
In the following procedure, $PRIMEHOME is the pnuser environment variable for the PN-IL installation directory you created in Installing PN-IL on a Prime Network Server (Local + Geographical Redundancy).
Before you begin, verify the following:
- PN-IL is already installed. If it is not, install it as described in Installing and Configuring PN-IL for Local + Geographical Redundancy.
- Prime Network is running suite mode. For information on integrating Prime Network with Prime Central, see Cisco Prime Central Quick Start Guide, 2.0.
- Prime Central is using both local geographical redundancy.
To integrate PN-IL with Prime Central:
Step 1![]() From the Prime Network primary node (P1), log in as pnuser and stop prime network integration layer.
From the Prime Network primary node (P1), log in as pnuser and stop prime network integration layer.
Step 2![]() On the Prime Network primary node (P1), configure PN-IL in suite mode, edit the necessary integration files, and run the integration script:
On the Prime Network primary node (P1), configure PN-IL in suite mode, edit the necessary integration files, and run the integration script:
a.![]() Move to the PN-IL integration directory.
Move to the PN-IL integration directory.
b.![]() Execute the following integration script to integrate PN-IL with Prime Central. Prime Central will assign an ID number to PN-IL. Note the ID number because you will need it later to integrate the remote DR server (S1) with Prime Central.
Execute the following integration script to integrate PN-IL with Prime Central. Prime Central will assign an ID number to PN-IL. Note the ID number because you will need it later to integrate the remote DR server (S1) with Prime Central.
Note![]() When you run DMIntegrator.sh, you must exactly follow the format below or the script will fail.
When you run DMIntegrator.sh, you must exactly follow the format below or the script will fail.
DMIntegrator uses these variables. You must enter them in this exact order.
Step 3![]() On the Prime Network primary cluster node (P1), reload the user profile:
On the Prime Network primary cluster node (P1), reload the user profile:
Step 4![]() On the Prime Network primary node (P1), retrieve the ID that Prime Central assigned to Prime Network using itgctl list. You will need it in a future step.
On the Prime Network primary node (P1), retrieve the ID that Prime Central assigned to Prime Network using itgctl list. You will need it in a future step.
Step 5![]() Open a new session to the Prime Network remote DR server (S1) as a root user and rename file as shown below.
Open a new session to the Prime Network remote DR server (S1) as a root user and rename file as shown below.
Step 6![]() On the Prime Network remote DR server (S1), configure PN-IL in suite mode as pnuser. Edit the necessary integration files, and run the integration script.
On the Prime Network remote DR server (S1), configure PN-IL in suite mode as pnuser. Edit the necessary integration files, and run the integration script.
b.![]() Move to the PN-IL integration directory.
Move to the PN-IL integration directory.
c.![]() Edit the ILIntegrator.prop file and change the value of the ‘HOSTNAME’ property to the Prime Network remote DR server (S1) hostname. For example:
Edit the ILIntegrator.prop file and change the value of the ‘HOSTNAME’ property to the Prime Network remote DR server (S1) hostname. For example:
d.![]() Execute the following integration script to integrate PN-IL into the deployment:
Execute the following integration script to integrate PN-IL into the deployment:
DMIntegrator uses these variables. You must enter them in this exact order.
|
|
|
|---|---|
Prime Network Integration Layer Domain ID number assigned by Prime Central |
Step 7![]() On the remote DR node (S1), reload the user profile:
On the remote DR node (S1), reload the user profile:
Step 8![]() Log out from Prime Network application user and as root user change the following file name
Log out from Prime Network application user and as root user change the following file name
Next, disable the PN-IL health monitor as described in Disabling the PN-IL Health Monitor.
Upgrading Prime Network in Geographical Redundancy without Network Down Time
You can upgrade Prime Network 5.1 in Geographical redundancy setup without network down time.

In your setup, make sure to have the following setup:
- At least one Active Unit (AU) attached to the Primary Node (LG).
- One DR Node (RG).
- In case of multiple units (AUs) attached to the Primary Node (LG), equal number of dummy units with data must be available.
- Fresh unit that is not connected to any gateway.
- With PN versions less than PN50, you should initially upgrade to PN50 following the below steps and then proceed upgrading to PN51 accordingly.
Upgrading Prime Network 5.0 to 5.1 with RHEL 7.4
You can Upgrade Prime Network 5.0 with RHEL 6.7 to Prime Network 5.1 with RHEL 7.4 version. This procedure is described using the following topology example, with only 1 Unit (AU) attached to Primary Node (LG) and having DR Node (RG). If you have multiple units attached to primary node, you should have equal no. of dummy Units and accordingly follow similar steps based on your setup.
Figure 4-2 Single Unit Setup with Left Gateway and Right Gateway

- LG is the Primary Node
- RG is the DR Node
- AU is considered as Active Unit with data, which is connected to LG and DU is considered as a Fresh Unit, which is not connected to any gateway.
Step 1![]() As the root user, Log in to the Prime Network primary cluster node (LG).
As the root user, Log in to the Prime Network primary cluster node (LG).
If you use any Dummy Units with LG with no data, avm, vne’s and so on, disconnect and delete them completely from LG.
Step 2![]() Block the route (connectivity) between AU and RG. (This is to avoid AU moving to RG when fail_over is run on RG).
Block the route (connectivity) between AU and RG. (This is to avoid AU moving to RG when fail_over is run on RG).
For example, add the below route in RG
Step 3![]() Block the route (connectivity) between two gateways (LG and RG).
Block the route (connectivity) between two gateways (LG and RG).
Follow the steps to perform the post failover procedure in RG.:
1.![]() Copy the "authorized_keys", "id_dsa", "id_dsa.pub" files from Oracle ana_secured (ORACLE_Home/ana_secured) to PN ana_secured (PRIME_HOME/local/ana_secured).
Copy the "authorized_keys", "id_dsa", "id_dsa.pub" files from Oracle ana_secured (ORACLE_Home/ana_secured) to PN ana_secured (PRIME_HOME/local/ana_secured).
Make sure to overwrite these files by providing "yes" when asked. For example:
2.![]() Change the ownership of file to ana user and restart the SSH control.
Change the ownership of file to ana user and restart the SSH control.
For PN versions below PN50 and in PN50, if there is a delay in the visibility of the Compliance Engine in RG post failover, follow the additional steps that are required to bring the compliance engine up.
a.![]() Connect to RG : In "/export/home/PN<user>/Main/resources/compliance/product_profile.xml" file, make sure this line "<ConnectionURL>jdbc:oracle:thin:" has RG ip address.
Connect to RG : In "/export/home/PN<user>/Main/resources/compliance/product_profile.xml" file, make sure this line "<ConnectionURL>jdbc:oracle:thin:" has RG ip address.
b.![]() Now, perform “networkctl restart” in RG. This should bring up the Compliance Engine.
Now, perform “networkctl restart” in RG. This should bring up the Compliance Engine.
–![]() both gateways acting as Active-Active with AU are still attached to the LG
both gateways acting as Active-Active with AU are still attached to the LG
–![]() AU is moved to RG after Fail_over
AU is moved to RG after Fail_over
Note![]() Though AU is not moved to RG, it should still appear in RG after Fail_over with an unreachable state.
Though AU is not moved to RG, it should still appear in RG after Fail_over with an unreachable state.
Step 6![]() Disconnect AU and Delete from the RG. (If you miss this step, RG looks for AU during upgrade and it might fail).
Disconnect AU and Delete from the RG. (If you miss this step, RG looks for AU during upgrade and it might fail).
–![]() It won’t allow to delete any units directly, first you need to disconnect Unit, delete all VNE’s, AVM’s and then delete the unit. For multiple units attached to LG, follow the same process.
It won’t allow to delete any units directly, first you need to disconnect Unit, delete all VNE’s, AVM’s and then delete the unit. For multiple units attached to LG, follow the same process.
Step 7![]() Attach the DU to RG by running network-conf.
Attach the DU to RG by running network-conf.
Note![]() Make sure you select the same PN user name while installing, which the LG and RG have.
Make sure you select the same PN user name while installing, which the LG and RG have.
Step 8![]() Use Export to CSV to export all VNE’s of AU (attached to LG).
Use Export to CSV to export all VNE’s of AU (attached to LG).
Step 9![]() Import them to DU (attached to RG). Provide valid device credentials and telnet sequence columns for all VNE’s accordingly in the Import CSV file. Now, DU will have a replica of AU.
Import them to DU (attached to RG). Provide valid device credentials and telnet sequence columns for all VNE’s accordingly in the Import CSV file. Now, DU will have a replica of AU.
Step 10![]() Compare and verify if both units have same set of data. For example, AVM’s, VNE’s including Tickets, Alarms, Map’s and so on. CCM jobs will be available in the Gateways.
Compare and verify if both units have same set of data. For example, AVM’s, VNE’s including Tickets, Alarms, Map’s and so on. CCM jobs will be available in the Gateways.
Note![]() In case, the Export/Import CSV option becomes very difficult in scale environment, contact an Advance services representative to get access to the tool. This tool helps you to handle importing large number of VNE’s.
In case, the Export/Import CSV option becomes very difficult in scale environment, contact an Advance services representative to get access to the tool. This tool helps you to handle importing large number of VNE’s.
Step 11![]() Take the back-up in RG before upgrade.
Take the back-up in RG before upgrade.
Back up files will be copied to /ORACLE_Home/backup/.
Step 12![]() Copy the DR_disable_enable script (available in the image/upgrade.zip folder of PN50) to PN home directory, and run as PN user in RG as shown below.
Copy the DR_disable_enable script (available in the image/upgrade.zip folder of PN50) to PN home directory, and run as PN user in RG as shown below.
Prior to triggering Prime Network 5.1 upgrade in RG:
2.![]() Delete the known_hosts file under ssh.
Delete the known_hosts file under ssh.
3.![]() Connect SSH to self host, self ip, localhost one after other.This is to update the known_hosts entry with latest information.
Connect SSH to self host, self ip, localhost one after other.This is to update the known_hosts entry with latest information.
Note![]() After successful ssh to self host, you need to exit out and retry ssh to self ip. Follow the same for localhost. If you miss this step, upgrade the PN51 might fail.
After successful ssh to self host, you need to exit out and retry ssh to self ip. Follow the same for localhost. If you miss this step, upgrade the PN51 might fail.
Ensure to SSH all units connected to RG from PN user, so that RG will have a complete known_hosts updated list. This process will avoid units getting missed from upgrade to PN50 along with RG automatically
Step 13![]() Now, upgrade RG to PN50 using upgrade.pl script.
Now, upgrade RG to PN50 using upgrade.pl script.
Note![]() This upgrade takes care of DU upgrade as well.
This upgrade takes care of DU upgrade as well.
While executing Upgrade.pl, select this option as YES, as shown below:
Step 14![]() After a successful upgrade to PN50 in RG, upgrade the oracle. For more information, see Upgrading the Oracle 12.1.0.2 to Embedded Database.
After a successful upgrade to PN50 in RG, upgrade the oracle. For more information, see Upgrading the Oracle 12.1.0.2 to Embedded Database.
Upgrading the Oracle 12.1.0.2 to Embedded Database
After upgrading Prime Network 5.1 in RG, upgrade the oracle (embedded database) also to 122.
To upgrade Oracle 12.1.0.2, complete the following procedure:
1.![]() mkdir /tmp/upg12cunzip embedded_upgrade_12.1.zip to /tmp/upg12c (embedded_upgrade_12.1.zip should be taken from PN50)
mkdir /tmp/upg12cunzip embedded_upgrade_12.1.zip to /tmp/upg12c (embedded_upgrade_12.1.zip should be taken from PN50)
2.![]() Copy the two zip files to/tmp/upg12c:
Copy the two zip files to/tmp/upg12c:
3.![]() Create the staging directory by entering the following commands:
Create the staging directory by entering the following commands:
4.![]() Upgrade to Oracle 12.1.0.2 by entering the following command:
Upgrade to Oracle 12.1.0.2 by entering the following command:
5.![]() Verify if the oracle upgrade is successful using the following command:
Verify if the oracle upgrade is successful using the following command:
6.![]() After successful completion, start the Prime Network in RG.
After successful completion, start the Prime Network in RG.
Step 15![]() Start AVM’s in DU under RG. Now, RG and DU will start monitoring the n/w.
Start AVM’s in DU under RG. Now, RG and DU will start monitoring the n/w.
Step 16![]() Stop AVM’s in AU, as soon as the DU is ready to monitor the n/w.
Stop AVM’s in AU, as soon as the DU is ready to monitor the n/w.
Step 17![]() Upgrade RHEL in LG and AU.
Upgrade RHEL in LG and AU.
After the RHEL upgrade, LG will be fresh without PN.
Follow the below steps to upgrade:
1.![]() Install all the required RPM’s for RHEL 7.2, stop, and disable firewall all (this is to avoid RMAN issue in later steps).
Install all the required RPM’s for RHEL 7.2, stop, and disable firewall all (this is to avoid RMAN issue in later steps).
2.![]() Like a fresh install, create partitions, mounts, /etc/hosts, copy PN50 oracle zip files accordingly.
Like a fresh install, create partitions, mounts, /etc/hosts, copy PN50 oracle zip files accordingly.
3.![]() Unzip RH_ha.zip of PN50 under /tmp in LG.
Unzip RH_ha.zip of PN50 under /tmp in LG.
4.![]() Enable the “DR_disable_enable” script (available in /export/home/pn50/local/scripts/) by executing as PN user in RG, as shown below:
Enable the “DR_disable_enable” script (available in /export/home/pn50/local/scripts/) by executing as PN user in RG, as shown below:
5.![]() Unblock the route between Gateways.
Unblock the route between Gateways.
6.![]() As part of catastrophic recovery, (restore the redundancy configuration on the failed site after a catastrophic failure)
As part of catastrophic recovery, (restore the redundancy configuration on the failed site after a catastrophic failure)
This will install PN50 and latest oracle122 in LG. Make sure you select the same name for PN user, which RG have.
7.![]() Run "perl resumeFromFailOver.pl --setup_replication" from /tmp/RH_ha/ in RG. Wait for “Replication Success” event in RG.
Run "perl resumeFromFailOver.pl --setup_replication" from /tmp/RH_ha/ in RG. Wait for “Replication Success” event in RG.
Verifying Replication of Prime Network and Database
a.![]() LG – RHEL 7.2, PN50, oracle 12.1.0.2.
LG – RHEL 7.2, PN50, oracle 12.1.0.2.
b.![]() RG – RHEL 6.7, PN50, oracle 12.1.0.2 (RHEL still needs to upgraded). Same is the status of DU.
RG – RHEL 6.7, PN50, oracle 12.1.0.2 (RHEL still needs to upgraded). Same is the status of DU.
c.![]() RG is current Active which is monitoring the n/w with DU and LG is current standby.
RG is current Active which is monitoring the n/w with DU and LG is current standby.
Upgrading RHEL in RG
Step 1![]() Block the route between DU and LG. (This is to avoid DU moving to LG when fail_over is run on LG, resulting in a minimal downtime.).
Block the route between DU and LG. (This is to avoid DU moving to LG when fail_over is run on LG, resulting in a minimal downtime.).
Step 2![]() Block the route between Gateways.
Block the route between Gateways.
Step 3![]() Run this file as PN user /PRIME_HOME/.deploy/linux/fetch_ssh_daemon/deploy.cmd in LG.
Run this file as PN user /PRIME_HOME/.deploy/linux/fetch_ssh_daemon/deploy.cmd in LG.
Step 4![]() Run Fail_over ( perl primeha –fail) in LG. Now we have Active-Active Gateways. RG & DU still monitoring the network.
Run Fail_over ( perl primeha –fail) in LG. Now we have Active-Active Gateways. RG & DU still monitoring the network.
Step 5![]() Though DU is still with RG monitoring the n/w, it would show up in LG post fail_over (in LG) with state as unreachable. Disconnect DU and delete the entries of DU completely in LG.
Though DU is still with RG monitoring the n/w, it would show up in LG post fail_over (in LG) with state as unreachable. Disconnect DU and delete the entries of DU completely in LG.
Step 6![]() Pick AU which is already upgraded to RHEL 7.2, install PN50 and attach it to LG by running network-conf. Make sure to select the same PN user name which, LG and RG have.
Pick AU which is already upgraded to RHEL 7.2, install PN50 and attach it to LG by running network-conf. Make sure to select the same PN user name which, LG and RG have.
Step 7![]() Use Export/Import CSV to copy all the VNE’s from DU to AU.
Use Export/Import CSV to copy all the VNE’s from DU to AU.
Step 8![]() Start AVM’s in AU. Now monitoring of n/w should be taken care by LG and AU.
Start AVM’s in AU. Now monitoring of n/w should be taken care by LG and AU.
a.![]() Re-install all required RPM’s.
Re-install all required RPM’s.
Note![]() Make sure firewall is stopped and disabled.
Make sure firewall is stopped and disabled.
b.![]() As like fresh install - create partitions, mounts, /etc/hosts
As like fresh install - create partitions, mounts, /etc/hosts
c.![]() Copy PN51 oracle zip files.
Copy PN51 oracle zip files.
d.![]() Unzip RH_ha.zip of PN51 under /tmp.
Unzip RH_ha.zip of PN51 under /tmp.
Step 10![]() Unblock the route between Gateways, AU and RG.
Unblock the route between Gateways, AU and RG.
Step 11![]() As part of catastrophic recovery, execute perl resumeFromFailOver.pl -reinstall_setup from /tmp/RH_ha/ in RG. This will install PN50 and latest oracle122 in RG. Make sure you select the same name for PN user which, LG have.
As part of catastrophic recovery, execute perl resumeFromFailOver.pl -reinstall_setup from /tmp/RH_ha/ in RG. This will install PN50 and latest oracle122 in RG. Make sure you select the same name for PN user which, LG have.
Step 12![]() Run perl resumeFromFailOver.pl --setup_replication from /tmp/RH_ha/ in LG.
Run perl resumeFromFailOver.pl --setup_replication from /tmp/RH_ha/ in LG.
Step 13![]() Wait for “Replication Success” event in LG. Verify that the replication of PN and Database is successful.
Wait for “Replication Success” event in LG. Verify that the replication of PN and Database is successful.
Step 14![]() View the similar final setup that is being illustrated in the beginning. For example, LG (active) – AU: monitoring the network. RG will be standby g/w. Finally DU remain dummy, as before.
View the similar final setup that is being illustrated in the beginning. For example, LG (active) – AU: monitoring the network. RG will be standby g/w. Finally DU remain dummy, as before.
 Feedback