- Prime Network Customization Overview
- Modeling and Displaying Additional NE Properties
- Adding Support for New Devices, Software Versions and Modules Using the VCB
- Creating Commands and Command Scripts to Perform Device Configuration Operations
- Deploying Activation Workflows to Devices Using Transaction Manager
- Adding Support for New Events Using the VCB
- Adding New Threshold-Crossing Alarms
- Adding External Launch Points to the GUI Client
- Soft Properties: Supported Parsing Operators, Rules, and Regular Expressions
- VCB: CLI Commands and Template Reference
- Command Manager and Command Builder: Macro Language and Beanshell Reference
- How is Command Manager Different From Command Builder?
- Checking Global Command Settings Before You Begin Using Command Manager
- Using Command Manager to Create and Execute Device Configuration Command Scripts
- What is Command Manager?
- Steps for Creating and Deploying Commands with Command Manager
- Command Manager Window and Repository
- Creating and Testing a Command or Command Sequence
- Running Commands Using Input Stored in a File
- Controlling Command Manager Jobs
- Moving, Importing, and Exporting Commands and Packages
- Cancelling Command Manager Jobs
- Deleting Commands and Packages
- Using Command Builder to Create Device Configuration Command Scripts
Creating Commands and Command Scripts to Perform Device Configuration Operations
Prime Network provides two tools for creating commands and scripts that perform device configuration operations: Command Builder and Command Manager. Commands can range from simple show commands to command scripts that contains wizards with multiple pages and input methods, such as check boxes and drop-down lists. After you create command scripts, you can add them to the Vision GUI client. Users with the required privileges can run the command scripts by right-clicking an NE’s Commands menu. To get started, see these topics:
How is Command Manager Different From Command Builder?
Command Manager uses the Command Builder back-end, but unlike Command Builder, it also provides a command repository that contains all of the device-level commands and command scripts on the Prime Network gateway. Command Manager also allows you to execute commands on multiple devices at one time. You can organize commands by assigning versions to commands, or group commands into user-specified packages. For bulk configurations, you can do parameter substitution by importing data from a file.
Command Manager supports creating commands and command scripts at the network element level (IManagedElement). Therefore, the command repository only displays scripts that are available at the device level. To create commands at other levels, use Command Builder.
Checking Global Command Settings Before You Begin Using Command Manager
While Command Manager and Command Builder let you specify the required user access level for commands, Prime Network has some global settings which will also affect authentication and authorization:
- Whether users must enter their credentials before running command scripts
- Whether users can schedule device configuration jobs
- Whether a warning message is displayed when users run command scripts
These settings are controlled from the Administration GUI client and are described in the following sections.
Controlling Who Can Run Command Scripts
Users can execute commands from the Vision GUI client when a device is in their scope and they have sufficient privileges. You specify the required privileges when you create the command’s basic information. However, the following two settings in the Administration GUI client will also affect command operation. (These are in the Administration GUI client under Global Settings > Security Settings > User Account Settings.)
For more information on these global settings, see the Cisco Prime Network 5.1 Administrator Guide.
Displaying a Warning Message When Users Run Commands
Prime Network can be configured to display a warning message whenever users execute commands. This affects Command Manager jobs, and any commands that are executed using the device right-click Commands menu in the Vision GUI client.
Users must acknowledge the message before proceeding. This feature is disabled by default. To enable it and specify a message, choose Global Settings > Commands in the Administration GUI client, enable the feature, and enter the message text. When users run commands, they will have to acknowledge the warning message or Prime Network will not allow them to proceed.
Using Command Manager to Create and Execute Device Configuration Command Scripts
These topics describe how to use Command Manager to create device configuration commands and command scripts:
- What is Command Manager?
- Steps for Creating and Deploying Commands with Command Manager
- Command Manager Window and Repository
- Creating and Testing a Command or Command Sequence
- Running Commands Using Input Stored in a File
- Controlling Command Manager Jobs
- Moving, Importing, and Exporting Commands and Packages
- Deleting Commands and Packages
- Deleting Commands and Packages from the Prime Network Command Repository
What is Command Manager?
Like Command Builder, Command Manager provides a GUI framework for creating programmable SNMP or Telnet commands. Commands can include multiple input screens and multiple input methods—text fields, check boxes, drop-down lists, and so forth. Commands can include parameters that are fixed. You can also perform bulk configurations using XLS or CSV files to populate the parameter values
Command Manager uses the Command Builder back-end, but it provides the following additional features:
- View the command repository, which contains all device-level commands available on the system
- Execute commands on multiple devices
- Use input from files to provide parameter substitution
- Apply versions to individual commands
- Create command packages
However, Command Manager commands can only be applied at the network element (IManagedElement) level, while Command Builder commands can be associated with any existing object group (IMO), type, or instance. This is why only device-level commands are listed in the command repository.
Once a command is created, it is added to the central repository and can be made available to other NEs of the same family, NE type, or software version, and can be executed from the Vision GUI client by users according to their device scope and privileges. Users with Configurator privileges can also create simple command sequences, although command sequences can only be run from the command repository (not from the Vision GUI client).
Command information is stored in XML files that can be organized into packages. The Command Manager repository always contains these two packages:
- Default —Contains all commands that are provided with the Prime Network product. Out-of-the-box commands in the Default package cannot be moved or exported.
- Production —Contains any user-created commands that were migrated from another installation. For a new installation, the Production package will be empty.
As you create new commands, you can place them in new packages and reorganize them as needed. You can also export and import command packages. Commands installed from Device Packages are listed only if Prime Network is restarted.
Command Manager jobs are purged according to the Prime Network job purging settings. Commands information (including rules, parameters, and script implementations) are stored on the gateway and are not purged; only Command Manager jobs are purged.
Commands created with Command Manager can be used by Transaction Manager. Commands can also be integrated into external configuration applications using the Prime Network API. For information on how to do this, see the Cisco Prime Network Integration Developer Guide.
Steps for Creating and Deploying Commands with Command Manager
The following table lists the steps you must follow to create a command or command sequence.
|
|
|
|
|---|---|---|
Check the settings that may affect who can run commands you create, and whether a warning message is displayed when users run a command. |
Checking Global Command Settings Before You Begin Using Command Manager |
|
Create a package for the command, giving it a name that is meaningful for its contents (such as a device type). We recommend not using the Default package to keep user-created commands separate from out-of-the-box commands (for ease of management). |
||
Provide a name for the command (that will appear in the NE right-click menu) and specify the required user access level (this is the command’s basic information). |
||
Define the properties that determine the format and structure of the command input form. These are called the Execution Parameters. For each parameter, define the type of input the user must provide (a string, a choice from a drop-down list, a checked check box, and so forth). A command can have multiple parameters, or multiple input pages (tabs), each with their own parameters. If you use Bean Shell scripts in the next step, you can use the script logic to populate and validate the parameter values. |
||
Specify the devices and software versions that the command can be run on, along with the scripts that should run when a user executes the command. These are called Command Implementations. Scripts can use: You can also specify rollback scripts and the conditions that indicate the command has failed. |
||
Test the command to see how it will appear to the user, review the script execution, and execute the command (which deploys the command to applicable devices). |
Previewing a Command Script and Checking Command Job Results |
|
Command Manager Window and Repository
Launch the Command Manager from Change and Configuration Management, as shown in the following figure. You may have to expand the title bar by clicking the arrow at the top left.

When you select Command > Command Repository, Prime Network displays all of the device-level commands in the system. The Default package contains the out-of-the-box commands provided with Prime Network. The Production package is only populated in upgrade scenarios and contains the commands that were migrated from the older deployment. Commands can be executed from the repository or from the devices (in the Vision GUI client). Commands displayed in the repository are filtered according to the user’s access level.
The command repository only lists device-level commands (that is, commands at the IManagedElement level). For commands at other levels, use Command Builder.
Commands are indicated by a yellow lightning bolt and sequences by a blue lightning bolt. You can get the following information from the repository:
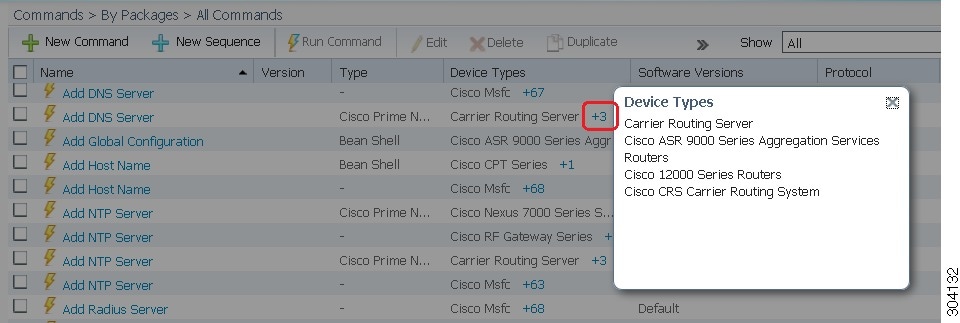
- Find out whether the command can be executed on different device types. This is indicated by a hyperlink in the Device Type column, as shown in the following figure. In this example, the Add DNS Server command can be executed on all CRS, ASR 9000, and 12000 routers. This also indicates that if those devices appear in a Vision GUI client map, the Add DNS Server command can be executed from the device’s right-click Commands menu.
Figure 4-1 Command Manager Repository Showing Applicable Device Types for a Command
- Find out if the command can be executed on multiple software versions (for a single device type). This is indicated by a hyperlink in the Software Version column. In the following example, the Create Lane command can be executed on a Cisco RF Gateway Series device that is running any of the software versions that are listed.
Figure 4-2 Command Manager Window Showing Applicable Software Versions for a Command

- Find out the number of jobs associated with the command. This is indicated by a hyperlink in the # Of Jobs column which displays the Command Manager Jobs page. Depending on the user access role the jobs are displayed for the selected command.
- Find out the last run result of the command. This is indicated by a hyperlink in the Last Run column, as shown in the following figure. In the following example, the details of each job and its result associated with the command Device Log is displayed.

Users with Administrator and Configurator privileges can perform all operations on all commands—editing, executing, deleting, moving, and so forth. All other users can perform these operations if they have the required privileges for the command, and the device is in their scope.
Creating and Testing a Command or Command Sequence
Commands and sequences must be created within a package. A best practice is to create a package with a name that describes the contents, such as the device series the command can be run on.
Commands can be duplicated and edited, but only if they are user-created commands. You cannot duplicate out-of-the-box commands that are packaged with Prime Network.
When you create a command (by clicking Create in the Command Implementations area), the command is saved to the database. It is not deployed to any NEs until you go to the repository, select the command, and click Run Command.
These topics provide the steps required to create, test, and deploy commands and command sequences:
Creating a New Package
Use the package mechanism to organize your command scripts. Naming packages by device type is a good practice, as shown in the following figure. If you need to create a new package, click the New Package icon on the upper left side of the window and provide a name and optional description.

If you delete any of the user-created packages (such as CRS-1 or Nexus7000 in the previous figure), all commands associated with package are moved to the Default package. This ensures that there will be no problems if the command is part of a scheduled job.
New commands that are installed from a Device Package are not listed in the command repository unless Prime Network is restarted. (Remember that the command repository only lists device-level commands; that is, commands at the IManagedElement level.)
To create a new command, proceed to the next section. To create a command sequence, see Creating a Command Sequence.
Creating a New Command
These are the steps for creating a new command script with Command Manager:
Defining a Command’s Basic Information
The basic information for a command includes the name that will appear in the Vision GUI client (in the NE right-click menu) the user authorization that is required to use the command.
Step 1 Select a package from the Commands Organization area.

Tip Do not use the Default package because it contains all commands provided by Prime Network. This makes it easier to your manage user-created commands.
Step 2 Click New Command to open the command wizard builder.
Step 3 Configure the command’s basic information in the Command Info area.
Step 4 Click Next to begin entering the command’s implementation parameters.
Defining Execution Parameters for a Command

Note If you are creating a command that requires no input—for example, a simple show command—skip this section and proceed to Defining the Implementations (Scripts) for a Command.
The Execution Parameters determine the structure and format of the input form and the data that users must supply. Each parameter has an associated input type which determines how information is entered (for example, typing in a number or string, checking a check box, choosing from a drop-down list). You can specify:
- Required parameters and optional parameters.
- Parameters with default values which can be visible or hidden in the input form.
A command can have one parameter, multiple parameters, and multiple input pages (tabs) with their own parameters.
Step 1 Define your first parameter by clicking New Parameter in the Execution Parameters area, and provide the basic information for the execution parameter.
Step 2 Define the input type for the parameter.
Tip Use TextArea for multi-line parameter values (e.g., license, banner, and so on). Do not use it to configure multiple commands in a single parameter. Doing so will download all commands to the device, but the command output will only be partial.
If you choose Combo, an Add button appears in the wizard. Click Add to create choices for the combo box.
The example in the previous table would create a combo box with the choices Up and Down.
Step 3 Define the rest of the execution parameter. The choices depend on what you specified in the Type field.
Step 4 If you want the input to be either validated or populated when the user runs the command, click the Validate tab.
– On Populate—When Run Command is clicked, the BeanShell script should populate the parameters values according the script logic.
– On Validate—When Preview or Execute Now is clicked, the BeanShell script should validate the parameters values according the script logic.
Note When creating or editing On Populate or On Validate BeanShell scripts, you must restart the Vision GUI client for the changes to take effect.
Step 5 Click OK, and the new parameter is added to the list of Execution Parameters.
Step 6 Create more parameters as needed by repeating Step 1 through Step 5.
Step 7 If you want to create additional pages (tabs) or adjust the order of parameters, use the tools illustrated in the following figure.

Step 8 When you have finished creating the parameters, click Next to begin entering the Command Implementations (the scripts that will be executed and the devices they can run on).
Defining the Implementations (Scripts) for a Command
Note All scripts are run at the network element level (IManagedElement).
The Command Implementations are the scripts that are run when the user executes the command. Implementations can use Bean Shell (Telnet or SNMP) or Cisco Prime Network Macro language (Telnet only). You can also specify a rollback script and the conditions that indicate the command has failed.
When you create an implementation you also define which device types the command applies to. You can choose different degrees of granularity:
- All devices
- Device family (such as routers)
- Device series (such as Cisco 7200 routers)
- Device model (Cisco 7207)
However, if you choose all devices, you cannot specify multiple software versions.
When a command is deployed, it overrides any inherited command from a higher level and automatically applies to elements below it. For example, the following tables shows how command versions can be overwritten:
|
|
|
||
|---|---|---|---|
|
|
|
|
|
Step 1 Define the scripts that will run by clicking New Implementation in the Implementations area.
Step 2 In the General tab, provide the following script information.
|
|
|
|---|---|
A meaningful name for the implementation, such as a device type, device series, or technology. For example, one profile could be command -AllDevices, another could be command -Cisco7600. Note A best practice is to associate the profile name with the devices you are choosing. |
|
The device software versions that are available for the chosen devices. If you select a device series or a non-Cisco device, this choice is disabled. If you subsequently update the software version on a device, you must also update the command. |
|
The scripting language to be used for the command:
|
|
The protocol to use. If the command has multiple profiles, they must use the same protocol. Currently TL1 protocol is applicable only for CPT devices. Note You can create commands using only those protocols that are enabled on the device type in the Vision GUI. |
|
The timeout value for the command, in milliseconds. If a timeout occurs, the command continues to run in the background and the result is displayed in the command execution result screen. |
Step 3 Click the Script tab to define the command script, using these guidelines:
Tip A best practice is to create the script in a text editor, then cut and paste it into the Script area of the Script tab.
- To view all user-defined and built-in parameters in the Command Builder application, position the cursor in the Script or Rollback field and press Ctrl-Spacebar. A dialog box is displayed that lists all available arguments (containing both the user-defined input argument and the built-in properties of the IMO context). Also see Supported Pragmas.
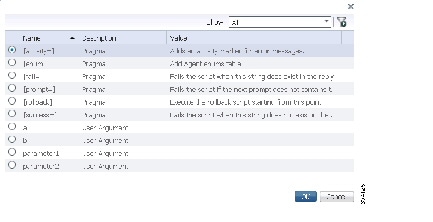
Select an entry from the list and then click OK to add it to the Script or Rollback field.
|
|
|
|---|---|
The Telnet or script lines to be sent to the NE. The script lines can contain optional inline directives (pragmas) for finer granularity control. For more information about the supported pragmas, see Supported Pragmas. |
|
(Optional) The rollback script that is used when the command fails. Note If the rollback script fails, no additional actions are performed. |
|
(Optional) A general failure condition that applies to all script lines. To specify a failure condition: 1. 2. |
Step 4 When you are finished with the implementation, click OK.
Step 5 Create more profiles as needed by repeating Step 2 through Step 4.
Step 6 Click Create when you are done. The newly created command is displayed in the command repository table. (It is not yet deployed to devices; that happens when you select Run Command.)
Step 7 Test the command locally before deploying it. See Testing the Command Locally Before Deploying It to Other NEs
Creating a Command Sequence
Users with Configurator privileges can create command sequences. Sequences can only be executed from the command repository (not from the Vision GUI client). You cannot specify different devices for the different commands in a sequence.
Step 1 Choose a package. If you need to create a new package, click the New Package icon on the upper left side of the window and provide a name and optional description.
Tip Do not use the Default package because it contains all commands provided by Prime Network. This makes it easier to your manage user-created commands.
Step 2 Click New Sequence to open the Create Command Sequence wizard.
Step 3 Configure the sequences’s basic information in the Command Sequence Info area. Note that there is no authorization level field; only users with Configurator privileges can create and run sequences. There is also no menu field because sequences can only be run from the command repository, not from the Vision GUI client.
Step 4 Add the commands to the sequence in the Define Sequence area by clicking Add Commands. A dialog opens that lists all device-level commands in the repository (from all packages, including the Default package).
Step 5 Select the commands you want to add to the sequence and click Add.
Step 6 Configure the commands in the sequence. (You cannot edit the command contents.)
Step 7 Click Create when you are done. The newly-created command is displayed in the command repository and can be executed from the repository.
Step 8 Test the command locally. See Previewing a Command Script and Checking Command Job Results.
Previewing a Command Script and Checking Command Job Results
When you preview a command, you can see how it will appear to users. The preview feature allows you to see the expected script output without performing any real command executions.
Once you execute a command with Create Execution Job (at the end of the following procedure) Prime Network creates a command job and displays a dialog that contains a hyperlink to the job details. To check the job status for completed and schedule jobs, select Command > Jobs from the Change and Configuration Management menu.
Step 1 Select the command or sequence in the repository and click Run Command.
Step 2 In the Select Device page, choose one of the following options:
- By Devices—Choose this option to select the device(s) that you want to run the command.
- By Groups—Choose this option to select the device group(s) that you want to run the command. There must be at least one device added to a device group for the command to run on that group. If a device is added to multiple device groups that are selected, the command will run only once on that device. For information on how to set up a device group, see the Setting Up CCM Device Groups” section.
Step 3 From the command input forms that are generated, enter the required input.
Step 4 To verify the parameters that you entered and see what the executed scripts will look like, click Preview.
Note Preview action is disabled for commands that use TL1 protocol.
Step 5 If the result is satisfactory, click Create Execution Job to:
Step 6 Click the job hyperlink to view the job results. To get job details, select the job and click the hyperlink under the Last Run Result column. If the job was for a command sequence, as in the following example, you can check the results of each command in the sequence.

Enabling E-mail Notification for Command Scripts
Command Manager enables you to send automatic e-mail notifications about the status of jobs to users while executing the command or job scripts. To enable email notifications for the Command Manager, you need to add the SMTP host name in E-mail Settings pane of the Configurations Settings page in CCM.
Step 1 Choose Commands > Command Repository, select the command, and click Run Command.
Step 2 In the Run Command window, click the Create Execution Job pane, select the Email Id(s) checkbox, and enter the email id of the recipient, for example, user1@cisco.com. You can enter comma separated email ids for multiple recipients.
Step 3 Click Create Job. The e-mail is sent to the recipient with the following information:
- Job ID and Job spec ID
- Job name and type
- Job schedule time
- Job completion time
- Name of the device on which the job is executed
- Command name
- Status of the job executed
Step 4 Choose Commands > Jobs, select the job in the Command Manager Jobs page, and click Edit.
Step 5 In the Edit Job window, click Create Execution Job.
Step 6 In the Email Id(s) text box, enter the email ids of the recipient and click Save. You can enter comma separated email ids for multiple recipients. The e-mail is sent to the recipient with the following information:
- Job ID and Job spec ID
- Job name and type
- Job schedule time
- Job completion time
- Name of the device on which the job is executed
- Command name
- Status of the job executed
Running Commands Using Input Stored in a File
For bulk configurations, you can create an XLS or CSV files with parameter values and import the file into the command.
Step 1 Create a file that contains the parameter values.
a. Select the command from the repository and click Run Command.
b. Select the devices you want to configure and click the Export icon at the top right of the screen.
c. In the Export Execution Parameters dialog, click OK to continue with the export operation.
d. When your browser displays its file management dialog, download the file. The file is created with the name command .csv.
Step 2 Populate the command.csv file with your desired attribute values. One column is dedicated to each attribute.
Step 3 Run the command using your command.csv file as input.
a. Select the command in the repository and click Run Command.
b. Select the devices you want to configure. They must match the devices in your spreadsheet.
c. In the Execution Parameters area, click the import icon.
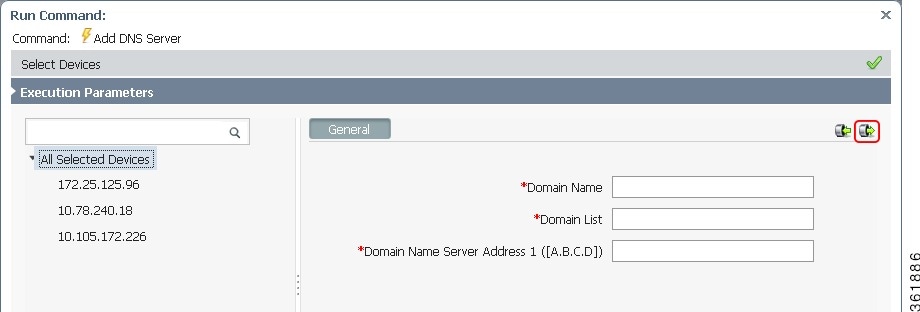
d. Navigate to the file that contains your input, and click OK.
e. In the Command Execution Job area, specify when the job needs to be executed (on daily, weekly, monthly, or on a specif time interval) and the e-mail ID(s) to which to send a notification after the scheduled job is complete. Click Create Job.
Controlling Command Manager Jobs
Users with Configurator privileges can perform all job actions from the Command Manager Jobs window. This includes cancelling jobs, suspending jobs, rescheduling jobs, and editing job properties (such as changing the selected devices). Other users can only manage jobs that they own.
Command Manager jobs are automatically deleted according to the Prime Network job purging settings. By default, these jobs are never purged.
For examples of how to view job results, see Previewing a Command Script and Checking Command Job Results.
Moving, Importing, and Exporting Commands and Packages
Command Manager allows you to move, export, and import user-created commands. User-created commands are any commands that do not reside in the Default repository (which contains all commands that were provided with the Prime Network product).
To move user-created commands to a different package, select the commands in the repository, click the Move To icon, and choose the package.
You can also export and import user-created commands and packages. Exporting commands is useful when you want to clean up the repository or if you create commands that you plan to use at a later time. Figure 4-4 shows from where you should launch an import or export operation, depending on whether you are working with packages or individual commands.
Figure 4-4 Importing and Exporting Commands and Packages

Exported items, whether they are individual commands or a package of commands, are saved in a zip file on the client machine or on the gateway server. On the gateway server, commands are stored in NETWORKHOME /Command_Archive. If you do not supply a name in the export dialog box, Command Manager uses the following naming scheme:
|
|
|
|---|---|
Files you export to your local system are saved in your browser’s download directory.
Import operations will query you for the location of the zip file that contains the commands or package. If you try to import a command that already exists in the command repository, you are prompted to overwrite the command or exit.
Cancelling Command Manager Jobs
To cancel the job that is in the running state:
Step 1 Select the job in the Command Manager Jobs window.
Step 2 Click Cancel.
The Job Status displays as Cancelled and the Lastrun Status displays as Cancelled with a hyperlink in the Command Manager Jobs window.
Step 3 Click the Cancelled hyperlink in the Lastrun Status field to display the Command Manager Job Result window.
The job result display the information about successful, unsuccessful, and cancelled tasks.
Deleting Commands and Packages
Removing a Command from the Vision GUI Client
If you want to remove a user-created command from the Vision GUI client, you can hide it without removing it from the repository. You cannot hide out-of-the-box commands that are provided with Prime Network.
Note This operation may take some time depending on the number of NEs that are will be affected.
To remove a command from the Vision GUI client:
Step 1 Select the command in the repository and click the Edit icon.
Step 2 In the Command Info page, deselect the Visible in Menu check box.
Step 3 Click Save. The command is hidden in the Vision GUI client.
Deleting Commands and Packages from the Prime Network Command Repository
You can only delete user-created commands and packages. Out-of-the-box commands cannot be deleted. In addition, user-created commands can only be deleted if they are not part of:
When a command is successfully deleted, it is removed from the repository and the Vision GUI client, and all related command data is deleted from the gateway and database.
When you delete a package, none of the user-created commands in the package are deleted. Instead, the commands are moved to the Default package, from where you can delete them.
To delete a command, make sure that you are working from the right package in the Commands Organization area. Then choose the command and click the Delete button above the commands table.
To delete a package, select the package and use the Delete button in the Commands Organization area.
Using Command Builder to Create Device Configuration Command Scripts
These topics explain how to use Command Builder to create commands and make them available to other NEs:
- What is Command Builder?
- Steps for Defining a New Command
- Command Builder Window
- Creating a Command Using Command Builder
- Testing and Publishing Commands
- Exporting Commands with Command Builder
- Importing Commands with Command Builder
- Deleting Commands
What is Command Builder?
Command Builder is an integral part of the Prime Network Vision GUI. It is used to create custom commands to be executed on specified devices. These commands can be tested and then published, which enables a wider scope of NEs to use them. You can publish commands to NEs of the same family, NE type, or software version.
Command Builder commands execute a programmable sequence of SNMP or Telnet command lines. Commands can be created using the BeanShell scripting language or the Prime Network Macro Language. Commands can be associated with any existing object group (IMO), type, or instance. This enables access to the live information of the network object with which the command is associated.
Only users with Administrator or Configurator privileges can create commands using Command Builder.
Commands can be used in a variety of ways:
- Using Command Builder, add the commands to the Prime Network Vision GUI client. Users will be able to run the commands by right-clicking an NE. When running the command, the user will be presented with a dialog for entering the input parameters that were defined during the command creation process.
- As building blocks in the creation of transactions (workflows) which can then be deployed to devices using Transaction Manager.
- Use the Prime Network API to integrate the commands into external configuration applications. For information on how to do this, see the Cisco Prime Network Integration Developer Guide.
Steps for Defining a New Command
These steps describe how to create a new command definition using Command Builder and the order in which the steps must be performed.
Figure 4-5 Steps for Defining a New Command

At any time after the command has been defined, it can be tested, executed, and published to a wider scope of managed elements and network elements.
For more information, see Creating a Command Using Command Builder.
Command Builder Window
Command Builder is launched by right-clicking a specific managed element or a selected object within a managed element and selecting Management > Command Builder.
The Command Builder window lists all existing commands that are available to the NE. (The technology-based commands that are packaged with Prime Network are not editable).
The commands that are listed depend on the NE type and the user’s access privileges.
Figure 4-6 Command Builder Window

Table 4-2 identifies the buttons that appear in the Command Builder window.


Creating a Command Using Command Builder
When you create a new command, you first create a local instance of the command. After you have tested the command, you can publish it to make it available to other NEs.
Step 1 Launch Command Builder by right-clicking a managed element and choose Management > Command Builder. The window lists all existing commands that are available to the NE. (The technology-based commands that are packaged with Prime Network are not editable).
Step 2 Click the New Element icon in the toolbar to open the New Command dialog box.
Step 3 Enter the following information for your new command:
|
|
|
|---|---|
Name for the new command (also the filename), such as ShowUsers. |
|
The title that will appear in the command’s GUI window when it is launched from an NE, such as List of Current Users. |
|
Indicates whether or not the command should appear in the Prime Network Vision GUI client. For example, if you only want to use execute the command via the API, do not check the check box. |
|
(If visible) The name that will appear in the NE’s right-click menu (such as Commands). |
|
The object associated with this command. The object is within a managed element. All subobjects that do not appear in the inventory tree (such as parameter groups of a port) are listed in a drop-down list. |
|
The timeout value for the command, in milliseconds. The default value is 120000 milliseconds (2 minutes). If a timeout occurs, the command continues to run in the background and the result is displayed on the Run Command screen. |
|
The scripting language to be used for the command:
|
|
This check box and its accompanying message text field appear only if the system is set to generate a message upon command execution warning the user that the command could potentially interrupt network services. You can deselect this check box to override this setting for the current command. When the user executes this command, no message will be shown. |
|
Shows the message that will be displayed to users upon command execution. You can change the message as required. The text field is disabled if the Warning Visible check box is deselected |
Step 4 Click Next. The Command Authorizations dialog box is displayed.
Step 5 Select the security access roles that are authorized to execute the command.
Step 6 Click Next. The User Input Arguments dialog box is displayed.
You can define any number of input parameters. These parameters determine the structure and format of the input form.The input form is automatically generated when the command is executed.
You can use either of two types of command parameters: built-in parameters and user-defined parameters, both of which are replaced in runtime. All parameters (both built-in and user-defined) are available during command editing via a selection list. For more information about Prime Network Macro Language, see Prime Network Macro Language.
Step 7 To add a new argument, click New. The Add/Edit User Argument dialog box is displayed (Figure 4-7).
Figure 4-7 Add/Edit User Argument for Command Dialog Box

Step 8 Enter the required information:
|
|
|
|---|---|
Parameter name. This entry must be unique and can contain only letters, numbers, hyphens (-), and underscores (_). |
|
Parameter display name. This entry is displayed in the Command Builder execution window. |
|
The type of input that will be required upon execution of the command. Only input values that are valid for the selected type are accepted. These values are validated during runtime.
Note |
|
Field width, in number of characters. Relevant for the Command Builder execution window. |
|
Indicates whether this parameter appears in the Command Builder execution window. Check this check box to display the parameter, or uncheck the check box to hide the parameter from the user. If the argument is hidden, it can still be used in the command (with its default value). Note When the parameter is not visible and has been assigned a default value, it can serve as a constant argument. |
|
Specifies a tooltip for the command parameter. This string is displayed for the parameter field in the input form (see Testing the Command Locally Before Deploying It to Other NEs). The tooltip can be a maximum of 256 characters. |
|
Indicates whether the argument is mandatory or optional. The mandatory arguments are displayed in bold font in the input form (see Testing the Command Locally Before Deploying It to Other NEs). |
Click the Advanced tab to open the Add Argument Advanced Controller dialog box.
The Advanced option enables you to do additional actions on the parameter values using BeanShell.
- On Populate—The BeanShell script, executed when you click Run Command, can be used to populate the parameters values according the script logic.
- On Validate—The BeanShell script, executed when you click Preview or Execute Now, can be used to validate the parameters values according the script logic.
Note When creating or editing On Populate or On Validate BeanShell scripts, you must restart the client for the changes to take effect.
Step 9 Click OK. The newly created argument is displayed in the User Input Arguments dialog box.
Step 10 To change sequence in which arguments appear in the input form, select an argument and click Move Up or Move Down.
Step 11 Click Next. The Tab Pages dialog box is displayed.
Use this feature if you want your input form to have different tabs. By default, all of the parameters are displayed in a single tab, General.
Step 12 If you want to use tabs, do the following:
a. Click New. The Add/Edit User Tab Page dialog box is displayed.
Figure 4-8 Add/Edit User Tab Page for Command Dialog Box

b. Enter a name for the Tab and select the required parameter.
You can define a maximum of 20 tabs for a command. The name of the tab can contain a maximum of 20 characters.
c. Repeat the steps for additional tabs.
Step 13 Click Next to define the command script, which can be either Prime Network Macro Language scripts or Beanshell scripts. For more information, see Command Manager and Command Builder: Macro Language and Beanshell Reference. The Script Lines dialog box is displayed, enabling you to add or edit a script line, as shown in Figure 4-9.
Note An efficient way to do this is to create the script in a text editor, then cut and paste it into the New Command dialog box.
Figure 4-9 Script Lines Dialog Box

Step 14 Enter the required information, using the following guidelines:
- To view all user-defined and built-in parameters in the Command Builder application, position the cursor in the Script or Rollback field and press Ctrl-Spacebar. A dialog box is displayed that lists all available arguments (containing both the user-defined input argument and the built-in properties of the IMO context). Select an entry from the list and then click OK to add it to the Script or Rollback field.
- Pragmas are enclosed with square brackets: […].
- It is possible to use multiple pragmas in a single line, in which case all pragmas are analyzed. If the same type of pragma is repeated, only the last one is used.
- If carriage returns are required in the command line, enter the escape sequence &cr.
|
|
|
|---|---|
The actual Telnet script lines sent to the NE. The script lines can contain optional inline directives (pragmas) for finer granularity control. For more information about the supported pragmas, see Supported Pragmas. |
|
(Optional) The rollback script that is used when the command fails. Note If the rollback script fails, no additional actions are performed. |
|
(Optional) A general failure condition that applies to all script lines. To specify a failure condition: 1. 2. |
Step 15 Click Finish. The Create Command dialog box is displayed.
A LED indicates the progress or status of the command as it is being saved to the registry:
Step 16 Click Close when the command has been successfully saved. The newly created command is displayed in the Command Builder table.
See Testing the Command Locally Before Deploying It to Other NEs to test the command.
See Publishing Commands to Other NEs to publish the command.
Note If you plan to publish the command to multiple network elements so you can work on commands in bulk, be sure to delete your local copy of the command after it is published. Otherwise, when you choose multiple managed elements, the command will not be listed.
Defining a Combo Field Type for a Command Builder Command
If you want to use a combo box in your input form, choose Combo in the Add/Edit User Argument dialog box (Step 8 of the previous procedure), a Browse button is enabled. Use it to create a selection list (drop-down list) of valid options that will be displayed.
This example creates a combo box with Up and Down choices.
Step 1 Select Combo in the Type field of the Add/Edit User Argument for x Command dialog box.
Step 2 Click Browse. The Selection List dialog box is displayed.
Step 3 Enter the required information:
|
|
|
|---|---|
A value that will be associated with the option; for example, 1. |
|
The description of the entry that is displayed in the selection list (drop-down list) of the input form, such as Up. |
Step 5 Repeat Steps 3 and 4 as needed until you have added all entries (such as 2 and Down).
End-to-End Example of Creating a Macro Language Command
This topic provides an example of how to create the command, addvrf, using Prime Network Macro Language.
Step 1 Select the element that you want to configure this command for in the Prime Network Vision tree pane, context pane, or Inventory window.
Step 2 Right-click the element, then choose Management > Command Builder. The Command Builder wizard is displayed.
Step 3 Click New. The New Command dialog box is displayed.
Step 4 Define the command identification information:
- Name—addvrf
- Caption—Add VRF
- Menu Visible—Checked
- Menu Path—VRF Commands
- Context IMO—Automatically displayed
- Timeout—180000
- Language—Prime Network Macro
- Protocol—Telnet is selected by default
Step 5 Click Next. The Command Authorizations dialog box is displayed.
Step 6 Select the security access role Administrator.
Step 7 Click Next. The User Input Arguments dialog box is displayed.
Step 8 Click New. The Add/Edit User Argument for addvrf Command dialog box is displayed.
Step 9 Using Table 4-3 , enter the information for the parameters.
|
|
|
|
|
|---|---|---|---|
Step 10 Click OK in the Add/Edit User Argument dialog box after each parameter. The new user-defined input parameters are displayed in the User Input Arguments dialog box (Figure 4-10).
Figure 4-10 User Input Arguments Dialog Box

Step 11 Click Next. The Tab Pages dialog box is displayed.
Step 12 Click New. The Add/Edit User Tab Page dialog box is displayed.
Step 13 Enter a VRF Name and select vrfname.
Step 14 Click OK. The newly added tab pages are displayed in Tab Pages dialog box.
Figure 4-11 Tab Pages Dialog Box

Step 15 Click Next. The Script Lines dialog box is displayed, enabling you to add the script lines.
Step 16 Add the script lines, as shown in Figure 4-12.
Figure 4-12 Script Lines Example
Step 17 Click Finish. The Create Command dialog box is displayed. LEDs indicate the progress or status of the command as it is being saved to the registry.
Step 18 Click Close when the command is complete. The newly created addvrf command is displayed in the Command Builder table.
Step 19 Select the addvrf command in the Command Builder table.
Step 20 Run the command in one of the following ways:
The input form is generated and displayed. The Route Distinguisher and Route Target are displayed in General tab and vrfname is displayed in a separate tab called VRF Name.
In the General tab, the Route Target is a mandatory field (bold font) and Route Distinguisher is an optional field.
Step 21 Enter values in the VRF Name, Route Distinguisher, and Route Target fields.
Step 22 Click Preview to see how the command, including variables, looks before it is executed.
Step 23 Click Execute Now to view the results of the addvrf command as it is being executed.
Step 24 Close the input form to return to the Command Builder window.
Testing and Publishing Commands
The following topics describe how to test and publish commands:
Testing the Command Locally Before Deploying It to Other NEs
Before you publish a command and apply it to other NEs, test it on your local NE using the following procedure. Once you have done this, you can apply it manually to multiple managed NEs, or publish it and make it available to a larger group of NEs (by family, NE type, or software version).
Step 1 From the Command Builder window, right-click the command and choose Run Command. Command Builder generates your input form.
Step 2 Complete the input form and click Preview.
Step 3 Click the Result tab to verify the command and variables before executing the command on the NE.
Step 4 If the command is successful and you want to execute it on the local NE, click Execute Now.
Note You might be prompted to enter your device access credentials. Once you have entered them, these credentials will be used for every subsequent execution of a command in the same GUI client session. If you want to change the credentials, click Edit Credentials. The Edit Credentials button will be disabled if the command is scheduled to run at a later time or if it is an SNMP command.
The queued commands can be terminated, if required, by clicking Abort.
Alternatively, if you are authorized by the Administrator to schedule jobs, you can use the Scheduling tab to schedule the command to run at a later time. You can check the job results by selecting Tools > Scheduled Jobs from the Prime Network Vision Tools menu.
Every command that is executed is logged in the Prime Network event database. The command’s execution history can be viewed using Prime Network Events. For more information about Prime Network Events, see the Cisco Prime Network 5.1 User Guide.
Publishing Commands to Other NEs
Publishing is the process of applying a command to a wider scope of managed NEs, so that the other NEs can use the new command. The Command Builder Hierarchy Manager dialog box controls the publishing of commands across the inheritance hierarchy. Figure 4-13 shows an example of an inheritance hierarchy. In this example, the top level of the hierarchy is All devices and the lowest level of the hierarchy is Device XYZ.
Figure 4-13 Inheritance Hierarchy Example

When a command is published to a node in the hierarchy, it overrides any inherited command from a higher level and automatically applies to all its children. For example, if a command is published to Cisco 7200, it overrides any variant of this command it inherited from a higher level and is assigned to all NEs of type Cisco 7200 in the system. NEs above the Cisco 7200 class are not affected.
Note A user with a Configurator role can add and publish commands on all NEs regardless of their assigned device scopes.
Step 1 From the Command Builder window, right-click the command and choose Hierarchy Manager.
Note The names displayed in the VNE Hierarchy Location column depends on the registry settings. It is determined by the VNE schema (which controls the NEs that are managed and modeled by Prime Network). For example, a user-friendly name is displayed if a hierarchy path has been defined in the registry.
Rows are displayed in descending order with the top row representing the highest level of the hierarchy and the bottom row representing the lowest level of the hierarchy. The following information is provided for each level:
Table 4-4 describes the tools that are displayed in the Hierarchy Manager dialog box.
|
|
|
|---|---|
Copies the command from a selected node in the hierarchy so that it can be pasted onto another node in the hierarchy. A copy icon is displayed to the left of the selected node. |
|
Cuts the command from a selected node in the hierarchy so that it can be moved to another node in the hierarchy. A cut icon is displayed to the left of the selected node. |
|
Pastes the command that was copied or cut from a selected node in the hierarchy onto another node in the hierarchy. A paste icon is displayed to the left of the selected node. |
|
Deletes the command from the selected node in the hierarchy. Note If the command has been deleted from all nodes, it is removed from the list in the Command Builder window. |
|
Saves a full command definition to a file that can later be imported to another managed element. For more information, see Exporting Commands with Command Builder. |
|
Performs one of the following actions, depending upon whether or not a version of the command definition already exists in Command Builder:
|


Step 2 Select the node in the hierarchy from where you want to Copy/Cut the command.
Step 3 Click Copy or Cut in the toolbar to copy or cut the command.
Step 4 Select the node in the hierarchy where you want to publish the command.
Step 5 Click Paste on the toolbar to paste the command. The command is published to the selected node in the hierarchy.
Note If you plan to publish the command to multiple network elements so you can perform commands in bulk, be sure to delete your local copy of the command after it is published. Otherwise when you choose multiple NEs, the command will not be listed.
If you select a group of network elements but the command is not listed, it is likely due to one of the following reasons:
- The command was not published to at least one of the network elements. You must publish the command to that network element using the hierarchy manager.
- One of the network elements has a local copy of the command. You must delete the local copy of the command using the hierarchy manager.
Note If a network element has more than one command instance, the command instance that is executed will be the one in the lowest hierarchy node.
Exporting Commands with Command Builder
When you export a command, a file containing the full command definition is created on the client machine. This is normally done when you want to manually import the command file to other NEs rather than use the Hierarchy Manager and the publishing procedure. The file is not copied to any other NEs; it is created so it can be imported by other NEs.
Step 1 In the Command Builder window, right-click the command and choose Export Element.
Step 2 Command Builder lists all versions of the command. In other words, if you have a 7206 NE with one version, but all other 7200 NEs have a different version, Command Builder would display both versions because both have been saved on your client machine. Check the version you want to export and click OK.
Step 3 Browse to the directory where you want to save the command.
Step 4 In the File name field, enter a name and click Save. The command is saved in XML format on the local client machine.
Importing Commands with Command Builder
Importing commands makes new commands available to an NE. For example, if you created a new command for NE 1, you could export the command from NE 1, and then import it to NE 2. The export is performed by launching Command Builder from NE 1, and the import is done by launching Command Builder from NE 2, as long as NE 2 is the same NE type.
If the import operation will overwrite a command that already exists, one of the following will happen:
- For a local command, Prime Network overwrites the existing definition.
- For a published command, Prime Network generates an error message which states that the command already exists. You must delete the existing command instance using the procedure described in Deleting Commands.
You can import multiple commands using this procedure as long as all of the commands are associated with the same VNE.
Step 1 In the Command Builder window, choose Tools > Import Element.
Step 2 Browse to the directory that contains the commands that you want to import.
Step 3 Select the commands that you want to import. To select multiple commands, press Shift or Ctrl while choosing the commands.
Step 4 Click Open. The Import Elements dialog box is displayed.
If you select multiple files, Command Builder presents an Import Element dialog box for each command.
Step 5 In the Import Element dialog box, select the VNE hierarchy location for the specified command.
Step 6 Click OK. The Command Builder window is displayed.
Step 7 Click Close. The commands are imported and displayed in the Command Builder window.
Deleting Commands
The procedure for deleting commands depends on whether the command is local or has been published.
- Local commands can be deleted from the Command Builder window by right-clicking the command and choosing Delete.
- Published commands must first be deleted from the applicable nodes using the Hierarchy Manager (right-click the command, then choose Hierarchy Manager). You must delete all instances from all applicable nodes.
You can delete multiple commands at a time as long as all of the commands are associated with the same VNE. You may want to keep a local copy of the command before you delete it.
 Feedback
