- Index
- About This Guide
- System Recommendations
- Installing and Logging into Prime Fulfillment
- Setting Up Oracle for Prime Fulfillment
- Setting Up Cisco CNS IE2100 Applicances with Prime Fulfillment
- Solaris Virtualization Support
- Backup and Restore of Prime Fulfillment Repository and Standby System
- Prime Fulfillment Runtime Configuration Information
- Troubleshooting
Cisco Prime Fulfillment Installation Guide 6.1
Bias-Free Language
The documentation set for this product strives to use bias-free language. For the purposes of this documentation set, bias-free is defined as language that does not imply discrimination based on age, disability, gender, racial identity, ethnic identity, sexual orientation, socioeconomic status, and intersectionality. Exceptions may be present in the documentation due to language that is hardcoded in the user interfaces of the product software, language used based on RFP documentation, or language that is used by a referenced third-party product. Learn more about how Cisco is using Inclusive Language.
- Updated:
- March 20, 2015
Chapter: Installing and Logging into Prime Fulfillment
- Packages Included with Prime Fulfillment
- Initial Configuration—Creating the Prime Fulfillment Owner
- Installing Prime Fulfillment
- Upgrading an Existing Installation to Prime Fulfillment 6.1
- Restoring Your Sybase Repository to a New Server
- Configuring HTTPS
- Logging In for the First Time
- Installing License Keys
- Launching Topology Tool
- Uninstalling Prime Fulfillment
Installing and Logging Into Cisco Prime Fulfillment
Use the information described in this chapter in the following order:

Note ![]() See Chapter 1 "System Recommendations," before installing Cisco Prime Fulfillment.
See Chapter 1 "System Recommendations," before installing Cisco Prime Fulfillment.
•![]() Packages Included with Prime Fulfillment
Packages Included with Prime Fulfillment
•![]() Initial Configuration—Creating the Prime Fulfillment Owner
Initial Configuration—Creating the Prime Fulfillment Owner
–![]() Installing Prime Fulfillment Using the Graphical User Interface
Installing Prime Fulfillment Using the Graphical User Interface
–![]() Installing Prime Fulfillment Using the Command Line Installer
Installing Prime Fulfillment Using the Command Line Installer
•![]() Upgrading an Existing Installation to Prime Fulfillment 6.1
Upgrading an Existing Installation to Prime Fulfillment 6.1
–![]() Locating the Cisco Prime Fulfillment 6.1 Upgrade Tool
Locating the Cisco Prime Fulfillment 6.1 Upgrade Tool
–![]() Using the Repository Upgrade Tool
Using the Repository Upgrade Tool
•![]() Restoring Your Sybase Repository to a New Server
Restoring Your Sybase Repository to a New Server
•![]() Logging In for the First Time
Logging In for the First Time
•![]() Uninstalling Prime Fulfillment
Uninstalling Prime Fulfillment
Packages Included with Prime Fulfillment
The Prime Fulfillment installer includes the following third party software:
•![]() ADCi® World Map Version 3.1
ADCi® World Map Version 3.1
•![]() AdventNet® SNMP Version 4.0
AdventNet® SNMP Version 4.0
•![]() Apache® Tomcat Version 5.5
Apache® Tomcat Version 5.5
•![]() ILOG® CPLEX Version 7.5
ILOG® CPLEX Version 7.5
•![]() JCraft® JSch Version 0.1.30
JCraft® JSch Version 0.1.30
•![]() Macrovision® FlexLM Version 7.2e
Macrovision® FlexLM Version 7.2e
•![]() SourceForge® Ehcache Version 1.2.4
SourceForge® Ehcache Version 1.2.4
•![]() Sun Microsystems® Java JRE Version 1.6.0_07
Sun Microsystems® Java JRE Version 1.6.0_07
•![]() Sybase® Adaptive Server Anywhere (ASA) Version 11.0.1
Sybase® Adaptive Server Anywhere (ASA) Version 11.0.1
•![]() TIBCO® Rendezvous Version 7.1.15
TIBCO® Rendezvous Version 7.1.15
Initial Configuration—Creating the Prime Fulfillment Owner
Note ![]() If you are planning to use an Oracle database, understand that Prime Fulfillment 6.1 has been tested with Oracle Database 11g, Enterprise Edition Release 11.2.0.1.0 - 64 bit Production. If you would like to use another version of Oracle 11g, see Oracle's compatibility information. If you are upgrading Prime Fulfillment and were using a version of Oracle other than 11g, you must transfer your Repository to Oracle 11g. This can be done using Oracle import/export utilities or other methods. Proceed to "Setting Up Oracle for Prime Fulfillment" before continuing with the Prime Fulfillment installation. After you complete the Oracle set up, return here.
If you are planning to use an Oracle database, understand that Prime Fulfillment 6.1 has been tested with Oracle Database 11g, Enterprise Edition Release 11.2.0.1.0 - 64 bit Production. If you would like to use another version of Oracle 11g, see Oracle's compatibility information. If you are upgrading Prime Fulfillment and were using a version of Oracle other than 11g, you must transfer your Repository to Oracle 11g. This can be done using Oracle import/export utilities or other methods. Proceed to "Setting Up Oracle for Prime Fulfillment" before continuing with the Prime Fulfillment installation. After you complete the Oracle set up, return here.
The first time you install Prime Fulfillment, create a UNIX user to own the software. This user is the default username when you log into Prime Fulfillment. Create the user and group using Solaris commands or the Solaris Admintool. This user must have a valid group ID and read and write permissions to the install directory.
To add a user to your server using the standard Solaris commands, follow these steps:
Step 1 ![]() At the Solaris prompt, log in as root.
At the Solaris prompt, log in as root.
Step 2 ![]() To create the user, enter:
To create the user, enter:
useradd -d /users/<username> -m -s /bin/<shell_type> <username>
passwd <username>
where:
-m creates the directory specified in -d
<shell_type> is sh for the Bourne shell. The Bourne shell is the only supported shell.
iscadm is recommended as the <username>.
Step 3 ![]() At the prompt, enter a password.
At the prompt, enter a password.
Installing Prime Fulfillment
Before installing Prime Fulfillment, configure the server to be able to perform hostname to IP address translations. Ensure that Domain Naming System (DNS) or an alternative is configured.
Prime Fulfillment accesses its database using a connection based on the hostname of the server. Ensure that you can reach the host via its hostname. For example, if the hostname is `pollux', set up hostname resolution such that you do not get an error response when entering `ping pollux'.
To add Prime Fulfillment to your system, either as a new Prime Fulfillment customer or a customer upgrading from an existing Prime Fulfillment release, you can choose one of the following two ways to install:
•![]() Installing Prime Fulfillment Using the Graphical User Interface
Installing Prime Fulfillment Using the Graphical User Interface
•![]() Installing Prime Fulfillment Using the Command Line Installer
Installing Prime Fulfillment Using the Command Line Installer
Note ![]() After installing Prime Fulfillment, the installation log can be found in <PRIMEF_HOME>/tmp, where <PRIMEF_HOME> is the directory specified for Prime Fulfillment to be installed to (see Step 13). Then, for example, if you installed in /opt/PrimeFulfillment, look for the installation log in /opt/PrimeFulfillment/tmp/PrimeInstallationLog.txt.
After installing Prime Fulfillment, the installation log can be found in <PRIMEF_HOME>/tmp, where <PRIMEF_HOME> is the directory specified for Prime Fulfillment to be installed to (see Step 13). Then, for example, if you installed in /opt/PrimeFulfillment, look for the installation log in /opt/PrimeFulfillment/tmp/PrimeInstallationLog.txt.
Note ![]() It is not possible to install Prime Fulfillment for use with an Oracle database using the Command Line Installer. Therefore, if you will be using Oracle, be sure to use the GUI installation method, explained in the "Installing Prime Fulfillment Using the Graphical User Interface" section.
It is not possible to install Prime Fulfillment for use with an Oracle database using the Command Line Installer. Therefore, if you will be using Oracle, be sure to use the GUI installation method, explained in the "Installing Prime Fulfillment Using the Graphical User Interface" section.
We recommend you install Prime Fulfillment using the Graphical User Interface (GUI) installer. This option provides more configuration options.
The installer checks for two kinds of disk space:
•![]() In the intended install location, you need 1.2 GB free for the binaries plus an extra 250 MB for log file growth and the installation of the Cisco Configuration Engine software.
In the intended install location, you need 1.2 GB free for the binaries plus an extra 250 MB for log file growth and the installation of the Cisco Configuration Engine software.
•![]() In the database directory, you need 1 GB free. For large systems, you should have 4 to 5 GB of space. If the directory has less than 1.2 GB free, you can still install Prime Fulfillment, but you might run out of space.
In the database directory, you need 1 GB free. For large systems, you should have 4 to 5 GB of space. If the directory has less than 1.2 GB free, you can still install Prime Fulfillment, but you might run out of space.
See Chapter 1 "System Recommendations" for more information about disk space and planning.
The complete installation for the Prime Fulfillment software requires 1.2 GB of free disk.
Installing Prime Fulfillment Using the Graphical User Interface
This section describes both a general installation procedure that applies to all upgrade path and specific details regarding individual upgrade paths.
After reviewing the information in the "Installing Prime Fulfillment" section, you can follow these steps to install the Prime Fulfillment software using the Graphical User Interface (GUI):
Note ![]() If an existing Prime Fulfillment installation is running, enter the ./prime.sh stop command. See the Cisco Prime Fulfillment User Guide 6.1 for information about all WatchDog commands.
If an existing Prime Fulfillment installation is running, enter the ./prime.sh stop command. See the Cisco Prime Fulfillment User Guide 6.1 for information about all WatchDog commands.
Step 1 ![]() Insert the Prime Fulfillment installation CD-ROM.
Insert the Prime Fulfillment installation CD-ROM.

Note ![]() If you choose to remotely install over a wide area network, you must add two spaces at the end of each field for which you modify the entry. This is to work around a potential problem that occurs when you have two or more SSH tunnels between your location and your installation machine's location.
If you choose to remotely install over a wide area network, you must add two spaces at the end of each field for which you modify the entry. This is to work around a potential problem that occurs when you have two or more SSH tunnels between your location and your installation machine's location.
Note ![]() You can install as root or as the user you will designate as the Prime Fulfillment owner. If you want Prime Fulfillment to automatically restart when you reboot a server, it is recommended to install as root. If you choose not to do this, then you must restart Prime Fulfillment manually when rebooting a server.
You can install as root or as the user you will designate as the Prime Fulfillment owner. If you want Prime Fulfillment to automatically restart when you reboot a server, it is recommended to install as root. If you choose not to do this, then you must restart Prime Fulfillment manually when rebooting a server.
Step 2 ![]() Open a terminal window and log in as the identified UNIX user.
Open a terminal window and log in as the identified UNIX user.
Step 3 ![]() Change to the CD ROM directory:
Change to the CD ROM directory:
$ cd /cdrom/cdrom0
Step 4 ![]() If you have an existing Prime Fulfillment installation with a database, you must back up your current database. See the instructions to back up and restore an Prime Fulfillment repository or create a standby system, as explained in "Backup and Restore of Prime Fulfillment Repository and Standby System".
If you have an existing Prime Fulfillment installation with a database, you must back up your current database. See the instructions to back up and restore an Prime Fulfillment repository or create a standby system, as explained in "Backup and Restore of Prime Fulfillment Repository and Standby System".
Note ![]() Do not run the installation script from the cdrom as it does not allow to create a .tmp file. Copy the installation files into your local system either in /var or /opt folder. After you copy the files in your local directory, check if you can create .tmp file and then run the installation script.
Do not run the installation script from the cdrom as it does not allow to create a .tmp file. Copy the installation files into your local system either in /var or /opt folder. After you copy the files in your local directory, check if you can create .tmp file and then run the installation script.
Step 5 ![]() Change to the path in the cdrom where the Solaris and Linux installation files are available, as follows:
Change to the path in the cdrom where the Solaris and Linux installation files are available, as follows:
cdrom> cd <path name>
where:
<path name> Specify the location of the directory where the Solaris and Linux installation files are
available.
Path for the Solaris installation files in cdrom is:
/Prime_Fulfillment_6_1_FCS/<Prime_Fulfillment_6_1_Solaris>
Path for the Linux installation files in cdrom is:
/Prime_Fulfillment_6_1_FCS/<Prime_Fulfillment_6_1_Linux>
Step 6 ![]() Copy the installation files from the cdrom to your local system (either in /opt or /var) and change to that directory:
Copy the installation files from the cdrom to your local system (either in /opt or /var) and change to that directory:
cdrom> cp * <directory_name>
where:
<directory_name> Specify the location of the directory where you want to copy the installation files
from the cdrom.
Step 7 ![]() Change to your local system directory where you have copied the installation files from cdrom:
Change to your local system directory where you have copied the installation files from cdrom:
cdrom> cd <directory_name>
where:
<directory_name> Specifies the location of the directory where you have copied the installation files
from the cdrom.
Note ![]() We recommend you to login or su as the isc owner to carry out the install and not as a root.
We recommend you to login or su as the isc owner to carry out the install and not as a root.
Step 8 ![]() Execute the Prime Fulfillment product installation script from the directory where you have copied the installation files:
Execute the Prime Fulfillment product installation script from the directory where you have copied the installation files:
./install.bin
The Prime Fulfillment software is installed by default in the /opt/PrimeFulfillment directory or a directory set up as follows.
If you are upgrading Prime Fulfillment from an existing version, make sure the existing Prime Fulfillment is shut down completely. Then do one of the following:
a. ![]() Install Prime Fulfillment 6.1 in the same directory with the same directory name as the existing Prime Fulfillment product, as follows:
Install Prime Fulfillment 6.1 in the same directory with the same directory name as the existing Prime Fulfillment product, as follows:
–![]() Save the Prime Fulfillment installation for possible uninstall purposes, as follows:
Save the Prime Fulfillment installation for possible uninstall purposes, as follows:
tar cvf <directory_name>.tar /opt/<directory_name>
–![]() Select this directory name in Step 11, Figure 2-3.
Select this directory name in Step 11, Figure 2-3.
-or-
b. ![]() Install Prime Fulfillment 6.1 in the same directory with a new name.
Install Prime Fulfillment 6.1 in the same directory with a new name.
For example, if you are upgrading from ISC 6.0 to Prime Fulfillment 6.1 and the ISC installation is under the directory /opt/isc-6.0, then install Prime Fulfillment 6.1 in the same directory and rename it to /opt/PrimeFulfillment, with steps like the following:
–![]() Save the ISC 6.0 installation for possible uninstall purposes, as follows:
Save the ISC 6.0 installation for possible uninstall purposes, as follows:
tar cvf isc-6.0.tar /opt/isc-6.0
–![]() Rename the directory, as follows:
Rename the directory, as follows:
mv /opt/isc-6.0 /opt/PrimeFulfillment
–![]() Select the directory /opt/PrimeFulfillment in Step 11, Figure 2-3.
Select the directory /opt/PrimeFulfillment in Step 11, Figure 2-3.
-or-
c. ![]() Install Prime Fulfillment 6.1 in a separate directory.
Install Prime Fulfillment 6.1 in a separate directory.
For example, if you are upgrading from ISC 6.0 to Prime Fulfillment 6.1 and the ISC 6.0 installation is under the directory /opt/isc-6.0, then install Prime Fulfillment 6.1 in a new directory /opt/PrimeFulfillment, with steps like the following.
–![]() Create the new Prime Fulfillment 6.0 directory, as follows:
Create the new Prime Fulfillment 6.0 directory, as follows:
mkdir /opt/PrimeFulfillment
–![]() Copy the Repository from the ISC 6.0 directory to the new Prime Fulfillment 6.1 directory, as follows:
Copy the Repository from the ISC 6.0 directory to the new Prime Fulfillment 6.1 directory, as follows:
cp -r /opt/isc-6.0/Repository /opt/PrimeFulfillment
–![]() Select the directory /opt/PrimeFulfillment in Step 11, Figure 2-3.
Select the directory /opt/PrimeFulfillment in Step 11, Figure 2-3.
Step 9 ![]() In the next window, as shown in Figure 2-1, choose either the default express option or the custom option, then click Next.
In the next window, as shown in Figure 2-1, choose either the default express option or the custom option, then click Next.
When you click express, you have a minimal number of choices to make. When you click custom, you can specify various ports and locations and you can change the watermark level for available disk space.
Figure 2-1 Choose Installation Type

Step 10 ![]() In the next window, shown in Figure 2-2, enter the username you created in Step 2 of the "Initial Configuration—Creating the Prime Fulfillment Owner" section.
In the next window, shown in Figure 2-2, enter the username you created in Step 2 of the "Initial Configuration—Creating the Prime Fulfillment Owner" section.
Note ![]() This field is only used when you are installing as a UNIX user who is not the Prime Fulfillment owner.
This field is only used when you are installing as a UNIX user who is not the Prime Fulfillment owner.
Figure 2-2 Choose Prime Fulfillment Owner

Note ![]() If you enter an invalid name, you will receive a message indicating the name is invalid.
If you enter an invalid name, you will receive a message indicating the name is invalid.
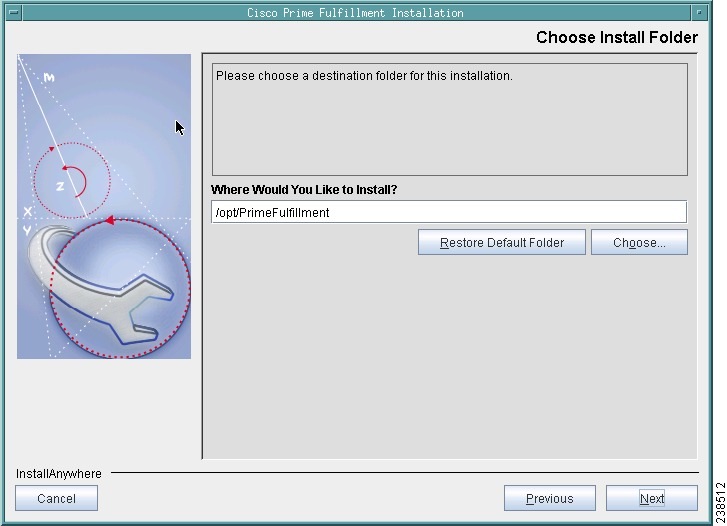
Step 11 ![]() Specify the location of the directory where you want to install, as shown in Figure 2-3, and then click Next. You can click Browse as an aid to finding an appropriate directory.
Specify the location of the directory where you want to install, as shown in Figure 2-3, and then click Next. You can click Browse as an aid to finding an appropriate directory.
Note ![]() If you are not installing as root, you must have write permission for this directory.
If you are not installing as root, you must have write permission for this directory.
Note ![]() In the intended install location, you need 1.2 GB free for the binaries plus an extra 250 MB for log file growth and the installation of the Cisco Configuration Engine software.
In the intended install location, you need 1.2 GB free for the binaries plus an extra 250 MB for log file growth and the installation of the Cisco Configuration Engine software.
In the database directory, you need 1 GB free. For large systems, you should have 4 to 5 GB of space. If the directory has less than 1.2 GB free, you can still install Prime Fulfillment, but you might run out of space.
Figure 2-3 Specify Directory Location
Step 12 ![]() If in Step 11 you chose a directory that already exists, you proceed as follows. If you chose a new directory to be created, you proceed to Step 13.
If in Step 11 you chose a directory that already exists, you proceed as follows. If you chose a new directory to be created, you proceed to Step 13.
In Figure 2-4, if the directory you chose already exists and you must click the default radio button Disapprove, you cannot proceed. You must click Back and return to Step 11.
Be very careful. If you click the radio button Approve, you will overwrite the contents in the existing directory. Click Next.
Figure 2-4 Confirm Directory Removal

Step 13 ![]() If in Step 9 you chose express, proceed to Step 32. If you chose custom, then you must enter the location where you want temporary files stored, as shown in Figure 2-5.
If in Step 9 you chose express, proceed to Step 32. If you chose custom, then you must enter the location where you want temporary files stored, as shown in Figure 2-5.
Note ![]() In the intended install location, you need 1.2 GB free for the binaries plus an extra 250 MB for log file growth and the installation of the Cisco Configuration Engine software.
In the intended install location, you need 1.2 GB free for the binaries plus an extra 250 MB for log file growth and the installation of the Cisco Configuration Engine software.
In the database directory, you need 1 GB free. For large systems, you should have 4 to 5 GB of space. If the directory has less than 1.2 GB free, you can still install Prime Fulfillment, but you might run out of space.
Figure 2-5 Choosing the Directory for Temporary Files

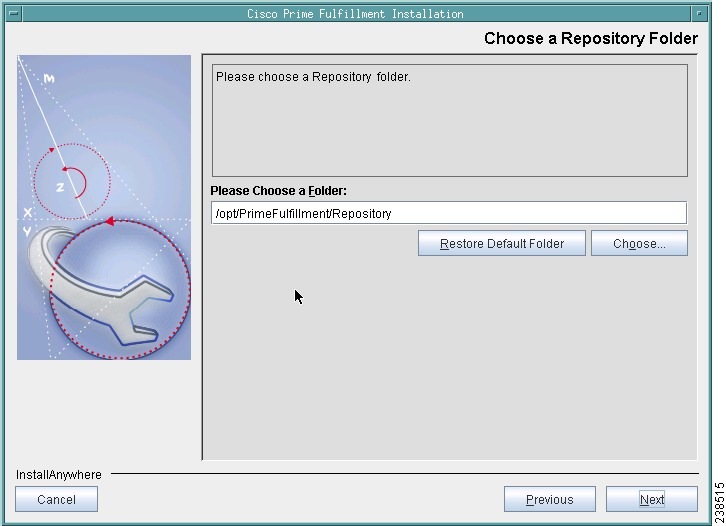
Step 14 ![]() Specify the Directory Name where you want database files to be stored, as shown in Figure 2-6, and then click Next.
Specify the Directory Name where you want database files to be stored, as shown in Figure 2-6, and then click Next.
Figure 2-6 Where to Store Database Files
Step 15 ![]() If in Step 14 you chose a directory that already contains a repository, you have three options, as shown in Figure 2-7; Keep existing ISC repository, Overwrite existing ISC repository, or Upgrade existing ISC repository. Then click Next to proceed. Otherwise proceed to Step 16.
If in Step 14 you chose a directory that already contains a repository, you have three options, as shown in Figure 2-7; Keep existing ISC repository, Overwrite existing ISC repository, or Upgrade existing ISC repository. Then click Next to proceed. Otherwise proceed to Step 16.
When you click Keep existing ISC repository, proceed to Step 16.
When you click Overwrite existing ISC repository, proceed to Step 17.
When you click Upgrade existing ISC repository, proceed to Step 18.
Figure 2-7 Repository Choices

Step 16 ![]() After choosing Keep existing ISC repository in Figure 2-7, you will be given the opportunity in Figure 2-8, to Disapprove (the default). If you choose Approve, you will keep your existing Prime Fulfillment repository, which could be incompatible with this version of Prime Fulfillment.
After choosing Keep existing ISC repository in Figure 2-7, you will be given the opportunity in Figure 2-8, to Disapprove (the default). If you choose Approve, you will keep your existing Prime Fulfillment repository, which could be incompatible with this version of Prime Fulfillment.
Note ![]() After you complete your installation and before you use Prime Fulfillment to upgrade your repository, you must follow the steps in the Upgrading an Existing Installation to Prime Fulfillment 6.1 and Using the Repository Upgrade Tool.
After you complete your installation and before you use Prime Fulfillment to upgrade your repository, you must follow the steps in the Upgrading an Existing Installation to Prime Fulfillment 6.1 and Using the Repository Upgrade Tool.
Click Next and proceed to Step 21.
Figure 2-8 Confirmation of Keeping Existing ISC Repository

Step 17 ![]() After choosing Overwrite existing ISC repository in Figure 2-7, you will be given the opportunity in Figure 2-9, to Disapprove (the default). If you choose Approve, you will overwrite the existing repository with an empty repository and your existing repository will be saved as $PRIMEF_HOME/Repository.save.<timestamp>.
After choosing Overwrite existing ISC repository in Figure 2-7, you will be given the opportunity in Figure 2-9, to Disapprove (the default). If you choose Approve, you will overwrite the existing repository with an empty repository and your existing repository will be saved as $PRIMEF_HOME/Repository.save.<timestamp>.
Click Next and proceed to Step 21.
Figure 2-9 Confirmation of Overwriting Existing Prime Fulfillment Repository

Step 18 ![]() After choosing Upgrade existing Prime Fulfillment repository in Figure 2-7, you will be given the opportunity in Figure 2-10, to Disapprove (the default). If you choose Approve, you will overwrite the existing repository with an empty repository and your existing repository will be saved as $PRIMEF_HOME/Repository.save.<timestamp>. Then your installation will proceed with a new empty repository.
After choosing Upgrade existing Prime Fulfillment repository in Figure 2-7, you will be given the opportunity in Figure 2-10, to Disapprove (the default). If you choose Approve, you will overwrite the existing repository with an empty repository and your existing repository will be saved as $PRIMEF_HOME/Repository.save.<timestamp>. Then your installation will proceed with a new empty repository.
Click Next and proceed to Step 21.
Figure 2-10 Confirmation of Upgrading Your Prime Fulfillment Repository After Installation

Step 19 ![]() After you Approve to upgrade your existing Repository, enter the location of the Upgrade Tool, as shown in Figure 2-11.
After you Approve to upgrade your existing Repository, enter the location of the Upgrade Tool, as shown in Figure 2-11.
Figure 2-11 Location of Upgrade Tool

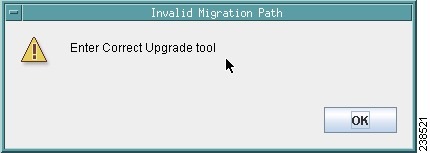
Step 20 ![]() If you inaccurately entered the location of the Upgrade Tool, you will receive a message as shown in Figure 2-12, and you must return to Step 19 and enter the correct Upgrade Tool location.
If you inaccurately entered the location of the Upgrade Tool, you will receive a message as shown in Figure 2-12, and you must return to Step 19 and enter the correct Upgrade Tool location.
Figure 2-12 Invalid location of Upgrade Tool
Step 21 ![]() Choose the database you will use, as shown in Figure 2-13. From the drop-down menu, choose either Embedded Sybase (Sybase ASA, 11.0.1 is embedded) or External Oracle. (Testing of Prime Fulfillment 6.1 has been done with Oracle Database 11g, Enterprise Edition Release 11.2.0.1.0 - 64 bit Production.) If you would like to use another version of Oracle 10g, see Oracle's compatibility information.) Then click Next.
Choose the database you will use, as shown in Figure 2-13. From the drop-down menu, choose either Embedded Sybase (Sybase ASA, 11.0.1 is embedded) or External Oracle. (Testing of Prime Fulfillment 6.1 has been done with Oracle Database 11g, Enterprise Edition Release 11.2.0.1.0 - 64 bit Production.) If you would like to use another version of Oracle 10g, see Oracle's compatibility information.) Then click Next.
Note ![]() If you are upgrading from a version of ISC before Prime Fulfillment 6.1, make sure your Prime Fulfillment repository has been imported to the Oracle Database 11g, Enterprise Edition Release 11.2.0.1.0 - 64 bit Production, as indicated in the "Initial Configuration—Creating the Prime Fulfillment Owner" section.
If you are upgrading from a version of ISC before Prime Fulfillment 6.1, make sure your Prime Fulfillment repository has been imported to the Oracle Database 11g, Enterprise Edition Release 11.2.0.1.0 - 64 bit Production, as indicated in the "Initial Configuration—Creating the Prime Fulfillment Owner" section.
Note ![]() The embedded Sybase database is used for service-level agreement (SLA), independent of whether you are using Oracle as your database.
The embedded Sybase database is used for service-level agreement (SLA), independent of whether you are using Oracle as your database.
Figure 2-13 Choosing a Database

Step 22 ![]() If you chose Embedded Sybase in Step 21, enter the Database server name, as shown in Figure 2-14. The Database Port number is automatically updated. If you choose to change the database port number, enter your choice in the Database Port field. Click Next, and then proceed directly to Step 25.
If you chose Embedded Sybase in Step 21, enter the Database server name, as shown in Figure 2-14. The Database Port number is automatically updated. If you choose to change the database port number, enter your choice in the Database Port field. Click Next, and then proceed directly to Step 25.
Note ![]() If you want to use the same Sybase repository from an original server on this new server you are now installing, see the "Restoring Your Sybase Repository to a New Server" section
If you want to use the same Sybase repository from an original server on this new server you are now installing, see the "Restoring Your Sybase Repository to a New Server" section
If you chose External Oracle in Step 21, proceed to Step 23.
Figure 2-14 Choosing a Database—Sybase

Step 23 ![]() If you chose External Oracle in Step 21, you must enter the Database server name, the Database Port number, and the Oracle server instance identifier (SID), as shown in Figure 2-15. Otherwise, proceed directly to Step 25.
If you chose External Oracle in Step 21, you must enter the Database server name, the Database Port number, and the Oracle server instance identifier (SID), as shown in Figure 2-15. Otherwise, proceed directly to Step 25.
Note ![]() If you are upgrading from a version of ISC before Prime Fulfillment 6.0, make sure your Prime Fulfillment Repository has been imported to the Oracle Database 11g, Enterprise Edition Release 11.2.0.1.0 - 64 bit Production, as indicated in the "Initial Configuration—Creating the Prime Fulfillment Owner" section.
If you are upgrading from a version of ISC before Prime Fulfillment 6.0, make sure your Prime Fulfillment Repository has been imported to the Oracle Database 11g, Enterprise Edition Release 11.2.0.1.0 - 64 bit Production, as indicated in the "Initial Configuration—Creating the Prime Fulfillment Owner" section.
Figure 2-15 Choosing a Database—Oracle

Step 24 ![]() Because you chose External Oracle in Step 21, you must set the Oracle database User and Password values, as shown in Figure 2-16.
Because you chose External Oracle in Step 21, you must set the Oracle database User and Password values, as shown in Figure 2-16.
Figure 2-16 Specifying Database Credentials

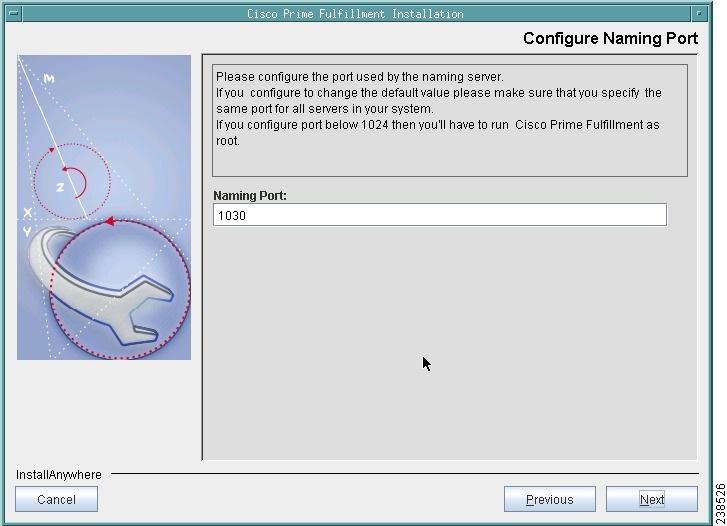
Step 25 ![]() Specify the port used by the Naming Server, as shown in Figure 2-17, then click Next.
Specify the port used by the Naming Server, as shown in Figure 2-17, then click Next.
Note ![]() If you enter a Naming Port value less than 1024, the owner of the installation must be root. The owner of the installation is the user identified in Figure 2-2.
If you enter a Naming Port value less than 1024, the owner of the installation must be root. The owner of the installation is the user identified in Figure 2-2.
Figure 2-17 Specify the Port Used by the Naming Server
Step 26 ![]() Specify the port used by the HTTP server, as shown in Figure 2-18, then click Next.
Specify the port used by the HTTP server, as shown in Figure 2-18, then click Next.
Note ![]() If you enter an HTTP Port value less than 1024, the owner of the installation must be root. The owner of the installation is the user identified in Figure 2-2.
If you enter an HTTP Port value less than 1024, the owner of the installation must be root. The owner of the installation is the user identified in Figure 2-2.
Figure 2-18 Choose HTTP Port

Step 27 ![]() Specify the port used by the HTTP Over Secure Socket Layer (SSL) (HTTPS) server, as shown in Figure 2-19, then click Next.
Specify the port used by the HTTP Over Secure Socket Layer (SSL) (HTTPS) server, as shown in Figure 2-19, then click Next.
Note ![]() If you enter an HTTPS Port value less than 1024, the owner of the installation must be root. The owner of the installation is the user identified in Figure 2-2.
If you enter an HTTPS Port value less than 1024, the owner of the installation must be root. The owner of the installation is the user identified in Figure 2-2.
Note ![]() To configure the web access to Prime Fulfillment, you must set up the HTTPS port as explained in Step 38 and the "Configuring HTTPS" section.
To configure the web access to Prime Fulfillment, you must set up the HTTPS port as explained in Step 38 and the "Configuring HTTPS" section.
Figure 2-19 Choose HTTPS Port

Step 28 ![]() Specify the port used by the Rendezvous™ Agent (RVA). You must specify the RVA HTTP Port server, a TIBCO™ bus port used by Prime Fulfillment processes to communicate with each other. You must also specify the RVA Client Port, as shown in Figure 2-20, then click Next.
Specify the port used by the Rendezvous™ Agent (RVA). You must specify the RVA HTTP Port server, a TIBCO™ bus port used by Prime Fulfillment processes to communicate with each other. You must also specify the RVA Client Port, as shown in Figure 2-20, then click Next.
Note ![]() If you enter an RVA HTTP Port or RVA Client Port value less than 1024, the owner of the installation must be root. The owner of the installation is the user identified in Figure 2-2.
If you enter an RVA HTTP Port or RVA Client Port value less than 1024, the owner of the installation must be root. The owner of the installation is the user identified in Figure 2-2.
Figure 2-20 Choose RVA Ports

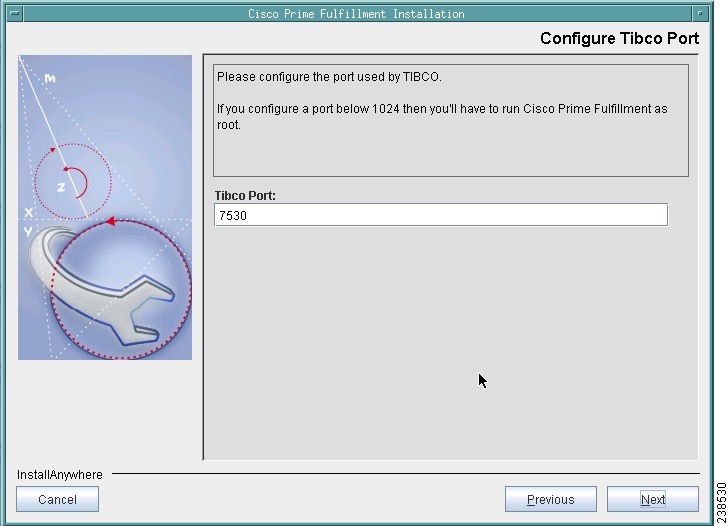
Step 29 ![]() Specify the port used by TIBCO, as shown in Figure 2-21, then click Next.
Specify the port used by TIBCO, as shown in Figure 2-21, then click Next.
Note ![]() If you enter a TIBCO Port value less than 1024, you must run Prime Fulfillment as root, the specification in Figure 2-2.
If you enter a TIBCO Port value less than 1024, you must run Prime Fulfillment as root, the specification in Figure 2-2.
Figure 2-21 Choose TIBCO Port
Step 30 ![]() When you click Next, the system checks whether any of the ports entered are duplicate port numbers. If duplicate port numbers are found, an error message indicates the two ports that have duplicate entries.
When you click Next, the system checks whether any of the ports entered are duplicate port numbers. If duplicate port numbers are found, an error message indicates the two ports that have duplicate entries.
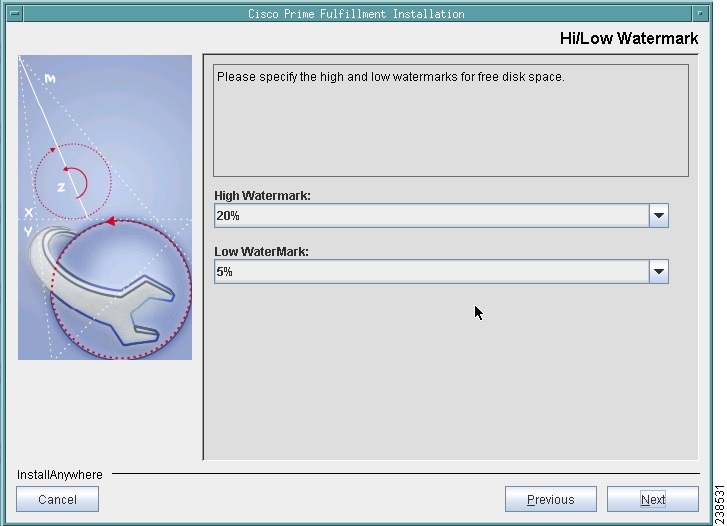
Step 31 ![]() You can reset the High and Low watermarks for available disk space, as shown in Figure 2-22. The defaults are 20% and 10% for High and Low respectively. Be sure the High watermark is a larger percentage than the Low watermark. When the High and Low watermarks are reached, you receive an e-mail indicating this, based upon setting your e-mail address correctly in Step 32.
You can reset the High and Low watermarks for available disk space, as shown in Figure 2-22. The defaults are 20% and 10% for High and Low respectively. Be sure the High watermark is a larger percentage than the Low watermark. When the High and Low watermarks are reached, you receive an e-mail indicating this, based upon setting your e-mail address correctly in Step 32.
Figure 2-22 Setting Watermarks for Available Disk Space
Step 32 ![]() In Figure 2-23, to receive e-mail you must specify the following:
In Figure 2-23, to receive e-mail you must specify the following:
•![]() In the first text field, specify the hostname of the Simple Mail Transfer Protocol (SMTP).
In the first text field, specify the hostname of the Simple Mail Transfer Protocol (SMTP).
•![]() In the second text field, specify the username to display in the "From" field.
In the second text field, specify the username to display in the "From" field.
•![]() In the third text field, specify the e-mail address to be notified when High and Low watermarks are reached, which indicates the specified disk space availability has been reached.
In the third text field, specify the e-mail address to be notified when High and Low watermarks are reached, which indicates the specified disk space availability has been reached.
•![]() In the fourth text field, specify the e-mail address to be notified when the Prime Fulfillment server restarts.
In the fourth text field, specify the e-mail address to be notified when the Prime Fulfillment server restarts.
Then click Next.
Figure 2-23 Setting E-mail Address for Receiving Watermark Information

Step 33 ![]() The installation continues and the files are installed. The list of installation processes appears.
The installation continues and the files are installed. The list of installation processes appears.
Step 34 ![]() If the installation failed, you receive a failed message.
If the installation failed, you receive a failed message.
To review the log message, click Back.
If there was truncation of data, reinstall and add two spaces at the end of each field for which you have modified the entry.
Step 35 ![]() If the installation was successful, you receive an Install Complete message. Even if you have a successful install, click Back to review the log to be sure there were no exceptions or failures. If data was truncated, reinstall and add two spaces at the end of each field for which you have modified the entry.
If the installation was successful, you receive an Install Complete message. Even if you have a successful install, click Back to review the log to be sure there were no exceptions or failures. If data was truncated, reinstall and add two spaces at the end of each field for which you have modified the entry.
Step 36 ![]() The Prime Fulfillment server is started automatically after the installation is successful.
The Prime Fulfillment server is started automatically after the installation is successful.
Step 37 ![]() Verify that Prime Fulfillment is properly installed, as follows:
Verify that Prime Fulfillment is properly installed, as follows:
a. ![]() Before logging in, repeat the following command until the servers are in the started mode. If any server is reported as disabled, Prime Fulfillment is not installed or configured correctly:
Before logging in, repeat the following command until the servers are in the started mode. If any server is reported as disabled, Prime Fulfillment is not installed or configured correctly:
./prime.sh status
Note ![]() The rgserver will not start when you install Prime Fulfillment in Linux.
The rgserver will not start when you install Prime Fulfillment in Linux.
For more information about WatchDog commands, see the Cisco Prime Fulfillment User Guide 6.1.
Step 38 ![]() If you want to set up secure web access by using HTTPS, see the "Configuring HTTPS" section. Then, proceed to Step 39.
If you want to set up secure web access by using HTTPS, see the "Configuring HTTPS" section. Then, proceed to Step 39.
Step 39 ![]() If you are logging in for the first time, proceed to the "Logging In for the First Time" section." Then, proceed to Step 40.
If you are logging in for the first time, proceed to the "Logging In for the First Time" section." Then, proceed to Step 40.
Step 40 ![]() Before you can use any of the licensed services, proceed to the "Installing License Keys" section. Then, proceed to Step 41.
Before you can use any of the licensed services, proceed to the "Installing License Keys" section. Then, proceed to Step 41.
Step 41 ![]() If you have an Prime Fulfillment repository, you must upgrade your repository to have access to it, as explained in the "Upgrading an Existing Installation to Prime Fulfillment 6.1" section.
If you have an Prime Fulfillment repository, you must upgrade your repository to have access to it, as explained in the "Upgrading an Existing Installation to Prime Fulfillment 6.1" section.
Note ![]() If you have an existing repository prior to ISC 6.0, see the references to the upgrade instructions for your version at Installing Prime Fulfillment.
If you have an existing repository prior to ISC 6.0, see the references to the upgrade instructions for your version at Installing Prime Fulfillment.
Step 42 ![]() If you want to eventually use the Inventory Manager or the Topology Tool, your client machine must be set up properly. Proceed to the "Launching Topology Tool" section. This section explains what occurs and leads you to the launching explanations in the Cisco Prime Fulfillment User Guide 6.1. Then, proceed to Step 43.
If you want to eventually use the Inventory Manager or the Topology Tool, your client machine must be set up properly. Proceed to the "Launching Topology Tool" section. This section explains what occurs and leads you to the launching explanations in the Cisco Prime Fulfillment User Guide 6.1. Then, proceed to Step 43.
Step 43 ![]() To uninstall Prime Fulfillment, proceed to the "Uninstalling Prime Fulfillment" section.
To uninstall Prime Fulfillment, proceed to the "Uninstalling Prime Fulfillment" section.
Note ![]() To determine if servers are installed correctly, use the WatchDog commands explained in the Cisco Prime Fulfillment User Guide 6.1.
To determine if servers are installed correctly, use the WatchDog commands explained in the Cisco Prime Fulfillment User Guide 6.1.
Installing Prime Fulfillment Using the Command Line Installer
Note ![]() It is not possible to install Prime Fulfillment for use with an Oracle database using the Command Line Installer. Therefore, if you will be using Oracle, be sure to use the GUI installation method, explained in the "Installing Prime Fulfillment Using the Graphical User Interface" section.
It is not possible to install Prime Fulfillment for use with an Oracle database using the Command Line Installer. Therefore, if you will be using Oracle, be sure to use the GUI installation method, explained in the "Installing Prime Fulfillment Using the Graphical User Interface" section.
After reviewing the information in the "Installing Prime Fulfillment" section, you can follow these steps to install the Prime Fulfillment software using the Command Line Installer:
Note ![]() The command line installer only allows you to configure the installation directory and Prime Fulfillment owner. All other configuration options use default values. For more configuration options, use the GUI installer, explained in the "Installing Prime Fulfillment Using the Graphical User Interface" section.
The command line installer only allows you to configure the installation directory and Prime Fulfillment owner. All other configuration options use default values. For more configuration options, use the GUI installer, explained in the "Installing Prime Fulfillment Using the Graphical User Interface" section.
Step 1 ![]() Insert the Prime Fulfillment product CD-ROM.
Insert the Prime Fulfillment product CD-ROM.
Note ![]() When you insert the CD-ROM, the File Manager is automatically invoked. Do not use the File Manager to install the Prime Fulfillment product. Run the installation script from a terminal window.
When you insert the CD-ROM, the File Manager is automatically invoked. Do not use the File Manager to install the Prime Fulfillment product. Run the installation script from a terminal window.
Note ![]() If you choose to remotely install over a wide area network, you must add two spaces at the end of each field for which you modify the entry. This is to work around a potential problem that occurs when you have two or more SSH tunnels between your location and your installation machine's location.
If you choose to remotely install over a wide area network, you must add two spaces at the end of each field for which you modify the entry. This is to work around a potential problem that occurs when you have two or more SSH tunnels between your location and your installation machine's location.
Step 2 ![]() Open a terminal window and log in as the identified UNIX user.
Open a terminal window and log in as the identified UNIX user.
Step 3 ![]() Change to the CD-ROM directory, as follows:
Change to the CD-ROM directory, as follows:
$ cd /cdrom/cdrom0
Step 4 ![]() If you are upgrading Prime Fulfillment from an existing version, use the ./prime.sh stop command to be sure the existing Prime Fulfillment is shut down completely. See the Cisco Prime Fulfillment User Guide 6.1 for information about all WatchDog commands.
If you are upgrading Prime Fulfillment from an existing version, use the ./prime.sh stop command to be sure the existing Prime Fulfillment is shut down completely. See the Cisco Prime Fulfillment User Guide 6.1 for information about all WatchDog commands.
Step 5 ![]() If you have an existing Prime Fulfillment installation with a database, you must back up your current database. See the instructions to back up and restore an Prime Fulfillment repository or create a standby system, as explained in "Backup and Restore of Prime Fulfillment Repository and Standby System."
If you have an existing Prime Fulfillment installation with a database, you must back up your current database. See the instructions to back up and restore an Prime Fulfillment repository or create a standby system, as explained in "Backup and Restore of Prime Fulfillment Repository and Standby System."
Note ![]() Do not run the installation script from the cdrom as it does not allow to create a .tmp file. Copy the installation files into your local system. After you copy the files in your local directory, check if you can create .tmp file and then run the installation script.
Do not run the installation script from the cdrom as it does not allow to create a .tmp file. Copy the installation files into your local system. After you copy the files in your local directory, check if you can create .tmp file and then run the installation script.
Step 6 ![]() Change to the path in the cdrom where the Solaris and Linux installation files are available, as follows:
Change to the path in the cdrom where the Solaris and Linux installation files are available, as follows:
cdrom> cd <path name>
where:
<path name> Specify the location of the directory where the Solaris and Linux installation files are
available.
Path for the Solaris installation files in cdrom is:
/Prime_Fulfillment_6_1_FCS/<Prime_Fulfillment_6_1_Solaris>
Path for the Linux installation files in cdrom is:
/Prime_Fulfillment_6_1_FCS/<Prime_Fulfillment_6_1_Linux>
Step 7 ![]() Copy the installation files from the cdrom to your local system.
Copy the installation files from the cdrom to your local system.
cdrom> cp * <directory_name>
where:
<directory_name> Specify the location of the directory where you want to copy the installation files
from the cdrom.
Step 8 ![]() Change to your local system directory where you have copied the installation files from cdrom:
Change to your local system directory where you have copied the installation files from cdrom:
cdrom> cd <directory_name>
where:
<directory_name> Specifies the location of the directory where you have copied the installation files
from the cdrom.
Note ![]() We recommend you to login or su as the isc owner to carry out the install and not as a root.
We recommend you to login or su as the isc owner to carry out the install and not as a root.
Step 9 ![]() Execute the Prime Fulfillment product installation script from the directory where you have copied the installation files, as follows
Execute the Prime Fulfillment product installation script from the directory where you have copied the installation files, as follows
./silent_install.sh <target_dir> <owner>
where:
<target_dir> Specify the location of the directory where you want to install Prime Fulfillment. If you are upgrading an existing Prime Fulfillment installation, see the options in this step.
<owner> Enter the username you created in Step 2 of the "Initial Configuration—Creating the Prime Fulfillment Owner" section.
If you are upgrading an existing Prime Fulfillment installation, use one of the following options to specify the target directory:
a. ![]() Install this version of Prime Fulfillment into the same directory as the existing Prime Fulfillment product.
Install this version of Prime Fulfillment into the same directory as the existing Prime Fulfillment product.
For example, if you are upgrading from ISC 6.0 to Prime Fulfillment 6.1 and the existing ISC 6.0 installation is under the directory /opt/isc-6.0, then install Prime Fulfillment 6.1 in the same directory, with steps like the following:
–![]() Save the Prime Fulfillment installation for possible uninstall purposes, as follows:
Save the Prime Fulfillment installation for possible uninstall purposes, as follows:
tar cvf isc-6.0.tar /opt/isc-6.0
–![]() Execute the Prime Fulfillment product installation script, specifying the existing Prime Fulfillment directory name as the <target_dir>.
Execute the Prime Fulfillment product installation script, specifying the existing Prime Fulfillment directory name as the <target_dir>.
cdrom> ./silent_install.sh /opt/PrimeFulfillment <owner>
-or-
b. ![]() Rename the existing ISC directory before installing this new version of Prime Fulfillment into this directory.
Rename the existing ISC directory before installing this new version of Prime Fulfillment into this directory.
For example, if you are upgrading from ISC 6.0 to Prime Fulfillment 6.1 and the existing ISC 6.0 installation is under the directory /opt/isc-6.0, rename this directory to /opt/PrimeFulfillment then install Prime Fulfillment 6.1 in the same directory, with steps like the following:
–![]() Save the ISC 6.0 installation for possible uninstall purposes, as follows:
Save the ISC 6.0 installation for possible uninstall purposes, as follows:
tar cvf isc-6.0.tar /opt/isc-6.0
–![]() Rename the directory, as follows:
Rename the directory, as follows:
mv /opt/isc-6.0 /opt/PrimeFulfillment
–![]() Execute the Prime Fulfillment installation script, specifying the renamed directory name as the <target_dir>.
Execute the Prime Fulfillment installation script, specifying the renamed directory name as the <target_dir>.
cdrom> ./silent_install.sh /opt/PrimeFulfillment <owner>
-or-
c. ![]() Install Prime Fulfillment in a new directory.
Install Prime Fulfillment in a new directory.
For example, if you are upgrading from ISC 6.0 to Prime Fulfillment 6.1 and the existing ISC 6.0 installation is under the directory /opt/isc-6.0, then install Prime Fulfillment 6.1 in a new directory /opt/PrimeFulfillment, with steps like the following:
–![]() Save the ISC 6.0 installation for possible uninstall purposes, as follows:
Save the ISC 6.0 installation for possible uninstall purposes, as follows:
tar cvf isc-6.0.tar /opt/isc-6.0
–![]() Specify a new directory such as /opt/PrimeFulfillment as the <target_dir>
Specify a new directory such as /opt/PrimeFulfillment as the <target_dir>
cdrom> ./silent_install.sh /opt/PrimeFulfillment <owner>
Step 10 ![]() If you upgraded from an existing Prime Fulfillment installation and want to retain the database from that installation, manually copy the database directory to the new installation before running the upgrade tool.
If you upgraded from an existing Prime Fulfillment installation and want to retain the database from that installation, manually copy the database directory to the new installation before running the upgrade tool.
a. ![]() The directory in which you installed this release contains a directory named Repository that contains an empty repository. Temporarily rename this directory before copying the old repository. For example, you might wish to rename this directory to Repository.empty, as follows:
The directory in which you installed this release contains a directory named Repository that contains an empty repository. Temporarily rename this directory before copying the old repository. For example, you might wish to rename this directory to Repository.empty, as follows:
mv $PRIMEF_HOME/Repository $PRIMEF_HOME/Repository.empty
b. ![]() If you installed Prime Fulfillment in a directory that contains an existing version of Prime Fulfillment by following either option a. or b. in Step 9, then the existing repository has been renamed to $PRIMEF_HOME/Repository.save.<timestamp>. To restore the original database, enter the following:
If you installed Prime Fulfillment in a directory that contains an existing version of Prime Fulfillment by following either option a. or b. in Step 9, then the existing repository has been renamed to $PRIMEF_HOME/Repository.save.<timestamp>. To restore the original database, enter the following:
mv $PRIMEF_HOME/Repository.save.<timestamp> $PRIMEF_HOME.Repository
c. ![]() If you installed Prime Fulfillment in a new directory, as explained in option c. of Step 9, copy the Repository directory and its contents from the old Prime Fulfillment installation directory to the new Prime Fulfillment installation directory. For example, if you are upgrading from ISC 6.0 to Prime Fulfillment 6.1, where the old installation directory is /opt/isc-6.0 and the new installation directory is /opt/isc-6.0, enter the following:
If you installed Prime Fulfillment in a new directory, as explained in option c. of Step 9, copy the Repository directory and its contents from the old Prime Fulfillment installation directory to the new Prime Fulfillment installation directory. For example, if you are upgrading from ISC 6.0 to Prime Fulfillment 6.1, where the old installation directory is /opt/isc-6.0 and the new installation directory is /opt/isc-6.0, enter the following:
cp -R /opt/isc-6.0/Repository /opt/PrimeFulfillment/Repository
Step 11 ![]() If you have upgraded a previous Prime Fulfillment installation and want to retain the database from this installation, you must run the upgrade tool. Run the upgrade tool as explained in the "Upgrading an Existing Installation to Prime Fulfillment 6.1" section.
If you have upgraded a previous Prime Fulfillment installation and want to retain the database from this installation, you must run the upgrade tool. Run the upgrade tool as explained in the "Upgrading an Existing Installation to Prime Fulfillment 6.1" section.
Upgrading an Existing Installation to Prime Fulfillment 6.1
If you want to migrate from an existing installation to Prime Fulfillment 6.1, your upgrade path depends on which release you are upgrading from. This process is described in the following.
This section contains the following:
•![]() Locating the Cisco Prime Fulfillment 6.1 Upgrade Tool
Locating the Cisco Prime Fulfillment 6.1 Upgrade Tool
•![]() Using the Repository Upgrade Tool
Using the Repository Upgrade Tool
Upgrade Matrix
The various possible upgrade paths are described in Table 2-1.
Procedure |
|
|
|
|
|---|---|---|---|---|
— |
Prior to 4.2.5 |
E-mail isc-mktg@cisco.com for upgrade instructions |
— |
— |
Direct |
4.2.5 |
<Prime Fulfillment installation directory>/upgradeTool |
Enterprise Oracle 11G 11.2.0.1.0 |
Solaris 10 and Linux (Red Hat) |
Direct |
5.0.1 |
<Prime Fulfillment installation directory>/upgradeTool |
Enterprise Oracle 11G 11.2.0.1.0 |
Solaris 10 and Linux (Red Hat) |
Direct |
5.1.1 |
<Prime Fulfillment installation directory>/upgradeTool |
Enterprise Oracle 11G 11.2.0.1.0 |
Solaris 10 and Linux (Red Hat) |
Direct |
5.2.2 |
<Prime Fulfillment installation directory>/upgradeTool |
Enterprise Oracle 11G 11.2.0.1.0 |
Solaris 10 and Linux (Red Hat) |
Direct |
6.0.1 |
<Prime Fulfillment installation directory>/upgradeTool |
Enterprise Oracle 11G 11.2.0.1.0 |
Solaris 10 and Linux (Red Hat) |
If you have an existing ISC repository, you must upgrade it to be able to use it with Prime Fulfillment 6.1, using the upgrade tool as stated in Table 2-1.
Note ![]() Understand that the only Sybase version to which you can upgrade is the embedded Sybase ASA, 11.0.1. Also, understand that Oracle testing of Prime Fulfillment 6.1 has been done with Oracle Database 11g, Enterprise Edition Release 11.2.0.1.0 - 64 bit Production. If you would like to use another version of Oracle 11g, see Oracle's compatibility information.
Understand that the only Sybase version to which you can upgrade is the embedded Sybase ASA, 11.0.1. Also, understand that Oracle testing of Prime Fulfillment 6.1 has been done with Oracle Database 11g, Enterprise Edition Release 11.2.0.1.0 - 64 bit Production. If you would like to use another version of Oracle 11g, see Oracle's compatibility information.
Locating the Cisco Prime Fulfillment 6.1 Upgrade Tool
The location for Cisco Prime Fulfillment 6.1 upgrade tool can be accessed from the directory structure <Prime Fulfillment installer directory>/upgradetool after the successful installation of Prime Fulfillment 6.1 (Prime Fulfillment 6.1 Upgrade Tool used as an example):
/cdrom/cdrom0/<Prime Installation directory>/upgradeTool
Using the Repository Upgrade Tool
The upgrade procedure steps for the repository from earlier version to Prime Fulfillment 6.1 remains the same for both Sybase and Oracle repositories.
Note ![]() Before you upgrade your repository, you must have followed the steps in the "Installing Prime Fulfillment" section. You must have backed up your database, as explained in Step 4, and you must have followed all the steps and reached this section from Step 41. A repository can be upgraded only once. If there is any problem during upgrade, a new copy of the backed up repository is needed for subsequent upgrade attempts.
Before you upgrade your repository, you must have followed the steps in the "Installing Prime Fulfillment" section. You must have backed up your database, as explained in Step 4, and you must have followed all the steps and reached this section from Step 41. A repository can be upgraded only once. If there is any problem during upgrade, a new copy of the backed up repository is needed for subsequent upgrade attempts.
Note ![]() See "Backup and Restore of Prime Fulfillment Repository and Standby System," before upgrading your repository.
See "Backup and Restore of Prime Fulfillment Repository and Standby System," before upgrading your repository.
Upgrade your repository as follows (using the Prime Fulfillment 6.1 Upgrade Tool as an example):
Step 1 ![]() Get the upgrade package <Prime Installation directory>/upgradeTool from your CD-ROM:
Get the upgrade package <Prime Installation directory>/upgradeTool from your CD-ROM:
/cdrom/cdrom0/<Prime Installation directory>/upgradeTool
and place it on the Prime Fulfillment Master machine in a directory where you can access the Prime Fulfillment environment.
Step 2 ![]() The upgradeTool would be untarred automatically during the installation either by invoking the ./silent_install.sh or install.bin
The upgradeTool would be untarred automatically during the installation either by invoking the ./silent_install.sh or install.bin
Step 3 ![]() Stop Prime Fulfillment.
Stop Prime Fulfillment.
./prime.sh stop
Step 4 ![]() Run the upgrade script.
Run the upgrade script.
cd upgradeTool
./upgradeISCSchema.sh <Prime Fulfillment home>
where: <Prime Fulfillment home> is the full pathname of the Prime Fulfillment home directory.
Step 5 ![]() Check for a success or error message.
Check for a success or error message.
Note ![]() After upgrading between Prime Fulfillment versions, you should ensure that the cache of the Prime Fulfillment client browser has been cleared or that your browser does not use the cache. This will ensure the latest Prime Fulfillment images and pages are returned.
After upgrading between Prime Fulfillment versions, you should ensure that the cache of the Prime Fulfillment client browser has been cleared or that your browser does not use the cache. This will ensure the latest Prime Fulfillment images and pages are returned.
Step 6 ![]() Proceed to Step 42 in the "Installing Prime Fulfillment Using the Graphical User Interface" section.
Proceed to Step 42 in the "Installing Prime Fulfillment Using the Graphical User Interface" section.
Restoring Your Sybase Repository to a New Server
If you are restoring your Sybase repository from your original server to a new server, you must first do the following:
Step 1 ![]() Run the Prime Fulfillment command ./prime.sh stop
Run the Prime Fulfillment command ./prime.sh stop
Step 2 ![]() cd /var/tmp and remove (or save, if needed) all the files under these directories.
cd /var/tmp and remove (or save, if needed) all the files under these directories.
Step 3 ![]() Backup the $PRIMEF_HOME/Repository on the new server, using the command:
Backup the $PRIMEF_HOME/Repository on the new server, using the command:
mv Repository Repository.bkp
Step 4 ![]() Run the Prime Fulfillment command ./prime.sh stop.
Run the Prime Fulfillment command ./prime.sh stop.
Step 5 ![]() cd $PRIMEF_HOME/Repository
cd $PRIMEF_HOME/Repository
Step 6 ![]() Copy the Repository directory from the original server onto the Prime Fulfillment repository on the new server. You can tar up the full Repository directory and untar in the same location on the new server.
Copy the Repository directory from the original server onto the Prime Fulfillment repository on the new server. You can tar up the full Repository directory and untar in the same location on the new server.
Step 7 ![]() On the new server, run the Prime Fulfillment command ./prime.sh startdb as the Prime Fulfillment installation owner.
On the new server, run the Prime Fulfillment command ./prime.sh startdb as the Prime Fulfillment installation owner.
Step 8 ![]() Run the Prime Fulfillment command ./prime.sh initdb.sh as the Prime Fulfillment installation owner.
Run the Prime Fulfillment command ./prime.sh initdb.sh as the Prime Fulfillment installation owner.
Step 9 ![]() Run the Prime Fulfillment command ./prime.sh startwd as the Prime Fulfillment installation owner.
Run the Prime Fulfillment command ./prime.sh startwd as the Prime Fulfillment installation owner.
Configuring HTTPS
To configure the secure web access to Prime Fulfillment, set up the Hypertext Transfer Protocol (HTTP) Over Secure Socket Layer (SSL) (HTTPS) port, as follows:
Note ![]() If you configure HTTPS, it does not disable HTTP. If you want to only allow HTTPS, then you need to block HTTP (default port: 8030) by a firewall.
If you configure HTTPS, it does not disable HTTP. If you want to only allow HTTPS, then you need to block HTTP (default port: 8030) by a firewall.
Step 1 ![]() Run the command: configSecurePort.sh <PRIMEF_home> <https_port> <hostname>
Run the command: configSecurePort.sh <PRIMEF_home> <https_port> <hostname>
where:
<PRIMEF_home> is the home directory for Prime Fulfillment, for example: /opt/PrimeFulfillment
<https_port> is the secure HTTPS port you want to use, for example: 8443.
<hostname> is the name of the machine that Prime Fulfillment is installed on, for example: machinename.cisco.com
Step 2 ![]() Copy the certificate server.cer from $PRIMEF_HOME to all client Prime Fulfillment machines. Configure the browser on your client to store this certificate as trusted. For information on how to do this, see your browser documentation.
Copy the certificate server.cer from $PRIMEF_HOME to all client Prime Fulfillment machines. Configure the browser on your client to store this certificate as trusted. For information on how to do this, see your browser documentation.
Note ![]() If you specify an IP address instead of a hostname, you must then use this IP address for all HTTPS sessions. If you attempt to use the hostname after configuring with an IP address, you will receive hostname mismatch warnings and might see unexpected behavior while using Prime Fulfillment.
If you specify an IP address instead of a hostname, you must then use this IP address for all HTTPS sessions. If you attempt to use the hostname after configuring with an IP address, you will receive hostname mismatch warnings and might see unexpected behavior while using Prime Fulfillment.
Note ![]() If you do not implement Step 2 correctly, your browser might warn you that it is unable to verify or trust the security of the Prime Fulfillment server. Always accept Prime Fulfillment's digital certificates when prompted. Additional security precautions might be generated by your browser but should not affect the performance of Prime Fulfillment.
If you do not implement Step 2 correctly, your browser might warn you that it is unable to verify or trust the security of the Prime Fulfillment server. Always accept Prime Fulfillment's digital certificates when prompted. Additional security precautions might be generated by your browser but should not affect the performance of Prime Fulfillment.
Logging In for the First Time
To log into Prime Fulfillment for the first time, follow these steps:
Step 1 ![]() In the browser, enter the following URL:
In the browser, enter the following URL:
http://server:port/isc/
Note ![]() If you are using HTTP, the default for server:port is <HOSTNAME>:8030.
If you are using HTTP, the default for server:port is <HOSTNAME>:8030.
If you are using secure HTTPS access, as explained in the "Configuring HTTPS" section, enter https://server:port/isc/ instead. The default for server:port in this case is <HOSTNAME>:8443.
In both of the above cases: <HOSTNAME> is the UNIX workstation name (or IP address) of the server to which you installed Prime Fulfillment.
See the "Installing Prime Fulfillment" section for information about the installation log.
Step 2 ![]() Enter the default administrative login name, admin, and password, cisco, then click Login.
Enter the default administrative login name, admin, and password, cisco, then click Login.
This default user provides administrative access to Prime Fulfillment. You cannot delete this user.
Step 3 ![]() We highly recommend you change the password for admin from cisco to something secure for you. To do this, click the Administration tab, then click Security, then click Users. Select the admin check box and then click Edit.
We highly recommend you change the password for admin from cisco to something secure for you. To do this, click the Administration tab, then click Security, then click Users. Select the admin check box and then click Edit.
The window appears which allows you to change the password and other details.
Step 4 ![]() Enter the Security and Personal Information, then click Save.
Enter the Security and Personal Information, then click Save.
Installing License Keys
To install license keys, do the following:
Note ![]() For detailed instructions, see the Licensing section in the Cisco Prime Fulfillment User Guide 6.1.
For detailed instructions, see the Licensing section in the Cisco Prime Fulfillment User Guide 6.1.
Step 1 ![]() From the Home page of the installed Prime Fulfillment product, navigate as follows: Administration > Control Center > Licensing.
From the Home page of the installed Prime Fulfillment product, navigate as follows: Administration > Control Center > Licensing.
Step 2 ![]() From the Installed Licenses table, click Install.
From the Installed Licenses table, click Install.
Step 3 ![]() In the resulting window, enter a License Key that you received on your Right to Use paperwork with your product.
In the resulting window, enter a License Key that you received on your Right to Use paperwork with your product.
Step 4 ![]() Click Save. Your newly installed license appears in an updated version of the Installed Licenses table.
Click Save. Your newly installed license appears in an updated version of the Installed Licenses table.
Step 5 ![]() Repeat Step 2, Step 3, and Step 4 for each of the Right to Use documents shipped with your product.
Repeat Step 2, Step 3, and Step 4 for each of the Right to Use documents shipped with your product.
Launching Topology Tool
Prime Fulfillment provides a downloadable version of Version 1.6.0_07 of Java Runtime Environment (JRE) for various operating systems when you launch the Topology Tool. Ensure that your client machine is configured to use this version of the JRE for launching Java applications and Applets. This can be done via Java's Control Panel.
Specific instructions to launch the Topology Tool are explained in the Cisco Prime Fulfillment User Guide 6.1.
Uninstalling Prime Fulfillment
Note ![]() It is advised to uninstall using the same user who performed the installation of Prime Fulfillment.
It is advised to uninstall using the same user who performed the installation of Prime Fulfillment.
If you attempt to uninstall Prime Fulfillment as root, but root is not the Prime Fulfillment owner, if you attempt to use the ./prime.sh stop command to halt all Prime Fulfillment processes, the processes will remain running. If you did not install as root, use the ./prime.sh stop command before following the next steps, but be sure to execute ./prime.sh stop only as the Prime Fulfillment owner.
If you installed as root, files were created to automatically restart Prime Fulfillment when rebooting the server. To remove these files, uninstall Prime Fulfillment as root.
Next, uninstall the server, as follows:
Step 1 ![]() Log into the server.
Log into the server.
Step 2 ![]() At the Solaris prompt, log in as the identified UNIX user.
At the Solaris prompt, log in as the identified UNIX user.
Step 3 ![]() Go to the Prime Fulfillment installation directory.
Go to the Prime Fulfillment installation directory.
Step 4 ![]() Remove Prime Fulfillment by entering the following command from a location outside the <PRIMEF_HOME directory>:
Remove Prime Fulfillment by entering the following command from a location outside the <PRIMEF_HOME directory>:
<PRIMEF_HOME directory>/bin/uninstall.sh
This command removes all files from the installation directory. This command also removes the database and its contents. Database backups are not removed if they reside in a different directory from the installation directory.
 Feedback