Cisco Prime Cable Provisioning 5.3.1 Quick Start Guide
Bias-Free Language
The documentation set for this product strives to use bias-free language. For the purposes of this documentation set, bias-free is defined as language that does not imply discrimination based on age, disability, gender, racial identity, ethnic identity, sexual orientation, socioeconomic status, and intersectionality. Exceptions may be present in the documentation due to language that is hardcoded in the user interfaces of the product software, language used based on RFP documentation, or language that is used by a referenced third-party product. Learn more about how Cisco is using Inclusive Language.
- Updated:
- September 15, 2016
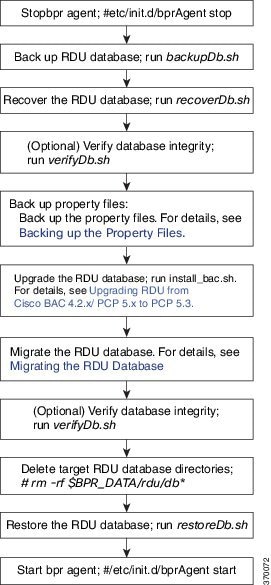
Chapter: Upgrading Prime Cable Provisioning
- Upgrade Cisco BAC 4.2.x/PCP 5.x to Prime Cable Provisioning 5.3.1
- About Backward Compatibility
- Licensing After Migration
- Database Migration
- Backing Up the RDU Database
- Recovering the Backed Up RDU Database
- Verify Database Integrity of Cisco BAC 4.2.x/ PCP 5.x
- Backing up the Property Files
- Upgrading RDU from Cisco BAC 4.2.x to PCP 5.3.1
- Upgrading RDU from Cisco PCP 5.x to PCP 5.3.1
- Upgrading PCP along with HA
- Migrating the RDU Database
- DPE Cache Backup and Restore Tool
- Upgrading DPE from Cisco BAC 4.2.x/ PCP 5.x to PCP 5.3.1
- DPE Rollback
- Upgrading Cisco Prime Network Registrar Extensions
- Upgrading KDC from Cisco PCP 5.x to Prime Cable Provisioning 5.3.1
Upgrading
Prime Cable
Provisioning
Prime Cable Provisioning 5.3.1 can be upgraded from PCP 4.2.x/ 5.x. Prime Cable Provisioning 5.3.1supports only 64-bit servers. If you are running any earlier 4.2.x version of Prime Cable Provisioning (referred to as Cisco BAC) on 32-bit servers, you should first upgrade to 64-bit servers and then upgrade to Prime Cable Provisioning 5.3.1.
All components of Prime Cable Provisioning 4.2.x/ 5.x can be upgraded to Prime Cable Provisioning 5.3.1. You need to migrate the database, irrespective of whether you upgrade to Prime Cable Provisioning 5.3.1 from Cisco BAC 4.2.x or from Prime Cable Provisioning 5.x.
See Cisco for more details about which components can be auto-upgraded to Prime Cable Provisioning 5.3.1 and which need fresh installation.
Prime Cable Provisioning supports inline migration, using which you can migrate one server at a time without disrupting the entire Prime Cable Provisioning deployment.
This chapter contains the following sections:
Upgrade Cisco BAC 4.2.x/PCP 5.x to Prime Cable Provisioning 5.3.1
You can upgrade all components of Cisco BAC 4.2.x/ PCP 5.x by running the Prime Cable Provisioning 5.3.1 installer. The installer automatically upgrades the installed components to Prime Cable Provisioning 5.3.1. However, for RDU, you will first need to complete the upgrade, and then migrate the database.
The main points to be considered for this upgrade are :
-
Back up the 4.2.x/5.x RDU database and verify the same.
-
Install the Prime Cable Provisioning 5.3.1 RDU. After the fresh installation, you need to migrate the database either using the migration tool or the migration script.
-
Auto-upgrade is not supported for KDC on both Linux and Solaris. Though you can manually upgrade KDC, we recommend fresh installation to avoid any installation issues.
-
You can upgrade RDU, DPE, CPNR-EP and PWS from Cisco BAC 4.2.x or above to Prime Cable Provisioning 5.3.1 .
-
In case of Prime Network Registrar and its extension points you will need to first upgrade from the earlier version of Prime Network Registrar to Prime Network Registrar 8.x and then upgrade the Prime Network Registrar Extension Points to Prime Cable Provisioning 5.3.1. For the Prime Network Registrar upgrade to 8.x see the Cisco Prime Network Registrar 8.x Installation Guide and for the extension points upgrade, see Upgrading Cisco Prime Network Registrar Extensions.
| Components | 5.x | 4.2.x |
|---|---|---|
| RDU | Y (After upgrade, migrate the database) | Y |
| RDU HA | Y | NA |
| PWS | Y | NA |
| DPE | Y | Y |
| CPNR Extension point | Y | Y |
| KDC | Y | N |
See Cisco Prime Cable Provisioning Compatibility Matrix for more details about which components can be auto-upgraded to Prime Cable Provisioning 5.3.1 and which need fresh installation.
 Note | It is recommended to backup the database before upgrading any of the Prime Cable Provisioning components. |
- About Backward Compatibility
- Licensing After Migration
- Database Migration
- DPE Cache Backup and Restore Tool
- Upgrading DPE from Cisco BAC 4.2.x/ PCP 5.x to PCP 5.3.1
- DPE Rollback
- Upgrading Cisco Prime Network Registrar Extensions
- Upgrading KDC from Cisco PCP 5.x to Prime Cable Provisioning 5.3.1
About Backward Compatibility
Prime Cable Provisioning 5.3.1 RDU can interoperate with 4.x, 5.x versions of Provisioning Group components (DPE and PNR EP).
Migration preserves the device record revision numbers used in DPE synchronization. As a result, DPE repopulation is not triggered after the RDU database upgrade, ensuring the least disruption until you upgrade the specific DPE.
Note |
|
Licensing After Migration
To configure Prime Cable Provisioning licensing, you must obtain the license files via a license claim process and install them using the Admin UI. For details, see the Cisco Prime Cable Provisioning User Guide and Licensing Prime Cable Provisioning.
Database Migration
The Prime Cable Provisioning database migration procedure requires that you migrate the components in the sequence recommended in below-mentioned sections. Performing the migration in any other sequence may result in error during provisioning.
- Backing Up the RDU Database
- Recovering the Backed Up RDU Database
- Verify Database Integrity of Cisco BAC 4.2.x/ PCP 5.x
- Backing up the Property Files
- Upgrading RDU from Cisco BAC 4.2.x to PCP 5.3.1
- Upgrading RDU from Cisco PCP 5.x to PCP 5.3.1
- Upgrading PCP along with HA
- Migrating the RDU Database
Backing Up the RDU Database
Note | We recommend you to take two backup of RDU Database. This is to ensure that when something goes wrong, or when there is a need to roll back the upgrade process, you can revert the database to previous version. |
Before upgrading Prime Cable Provisioning components, ensure that you back up the RDU database files. Throttling limits the I/O bandwidth used by the database with backup utility. Throttle option specifies the rate at which the backup tool reads the files it copies. While using this option, if the reading rate is high, the tool goes to sleep mode till the rate comes down.
Note | We recommend that you use the throttle option always since it is not an I/O intensive operation. The throttle option is supported in Prime Cable Provisioning 5.3.1. |
To back up the RDU database, run the backupDb.sh script in the $BPR_HOME/rdu/bin directory.
For example:
# $BPR_HOME/rdu/bin/backupDb.sh -throttle 500 /var/backup
where, /var/backup—identifies the database backup directory.
In this example, all the backed up database files are stored in a directory called /var/backup/rdu-backup-20130829-031028. The last subdirectory (rdu-backup-20130829-031028) is automatically created with a current time stamp.
Note | The time-stamped subdirectory format is rdu-backup-yyyyMMdd-HHmmss. In this example, the subdirectory would be rdu-backup-20130829-031028, meaning that the directory contains a backup that was started at 3:10:28 a.m. on August 29, 2013. |
For additional information on using the backupDb.sh tool, see the Cisco Prime Cable Provisioning User Guide.
Recovering the Backed Up RDU Database
After taking the backup, you need to recover the database by using the command:
# $BPR_HOME/rdu/bin/recoverDb.sh /var/backup/rdu-backup-20130829-031028
Verify Database Integrity of Cisco BAC 4.2.x/ PCP 5.x
We recommend that you perform a dry run of the migration process on a staging (nonproduction) system, instead of on a live system during RDU downtime. These steps may not be practical during live migration, because in the case of a large database, verification can take an extended length of time.
To verify the database, run the verifyDb.sh tool on a backup snapshot.
Note | To verify the database before migration, use the verifyDb.sh tool from the Cisco PCP 5.x installation corresponding to the version of the database. You cannot verify a non-migrated database with the Prime Cable Provisioning 5.3.1 version of verifyDb.sh. |
For example, enter:
# $BPR_HOME/rdu/internal/db/bin/verifyDb.sh -dbdir /var/backup/rdu-backup-20130829-031028
This pathname is specific to the Cisco BAC installation version before migration.
For details on the verifyDb.sh tool, see the Cisco Prime Cable Provisioning User Guide.
Backing up the Property Files
If you have customized any of the property files during your current installation (BAC 4.2.x, PCP 5.x), you will need to first back them up and then copy them manually to the Prime Cable Provisioning 5.3.1 database.
To back up the property files:
Upgrading RDU from Cisco BAC 4.2.x to PCP 5.3.1
Use this procedure to upgrade the RDU of Cisco BAC 4.2.x to PCP 5.3.1:
| Step 1 |
| ||
| Step 2 | Continue performing from step 1 mentioned in the section Upgrading RDU from Cisco PCP 5.x to PCP 5.3.1, to proceed with the RDU upgrade process. |
Upgrading RDU from Cisco PCP 5.x to PCP 5.3.1
Use this procedure to upgrade the RDU of Cisco BAC PCP 5.x to PCP 5.3.1:
| Step 1 | Unpack the
Prime Cable
Provisioning
5.3.1
install package with .gtar extension using the following command:
On Solaris: gtar -zxpf BAC_531_SolarisK9.gtar.gz On Linux: gtar -zxpf BAC_531_LinuxK9.gtar.gz | ||
| Step 2 | To start the
upgrade process for RDU, select the RDU component after running the install
script of
Prime Cable
Provisioning
5.3.1
using the following command:
On Solaris: # <install-path>/BAC_531_SolarisK9/install_bac.sh On Linux: # <install-path>/BAC_531_LinuxK9/install_bac.sh The installation program prompts you to confirm if you want to proceed with the upgrade. | ||
| Step 3 | To confirm that
you want to upgrade, enter
y and press
Enter.
The installation program prompts you to enter the backup directory location. | ||
| Step 4 | To accept the
default backup directory location for properties file,
/tmp, press
Enter; or
enter another backup directory location.
The installation program prompts you to remove the Cisco PCP 5.x package. | ||
| Step 5 | Enter
y and press
Enter to
continue.
The installation program will take the required backup, and remove Cisco PCP 5.x RDU. The installation program also prompts you to proceed with the installation of Prime Cable Provisioning 5.3.1 RDU. To continue with the installation see, Installing the RDU in Interactive Mode.
| ||
| Step 6 | To verify if the
output information indicates
Prime Cable
Provisioning
5.3.1,
enter:
On Solaris: # pkgparam CSCObac VERSION On Linux: # # rpm -qa CSCObac |
Upgrading PCP along with HA
Before Upgrading PCP along with HA, please go through the below mentioned points and the upgrade scenarios carefully.
-
Geo HA is available only from 5.2.x. Fresh Installation and PCP 5.3.1 Geo HA setup works only on RHEL / CENTOS 6.5.
-
PCP 5.3.1 also works on existing installation of RDU Local / GEO HA that is already available on RHEL / CENTOS 6.3 OS. But, we recommend you to upgrade to the latest HA components that runs on RHEL/CENTOS 6.5.
If you are upgrading from any one of the scenario mentioned below, please follow the steps mentioned in Upgrading PCP along with HA - Procedure 1.
Note | Below scenarios doesn't require an OS upgrade to RHEL 6.5 / CentOS 6.5 |
-
Upgrading from PCP 5.2.x RDU GEO HA Cluster to 5.3.1 RDU GEO HA Cluster.
-
Upgrading from PCP 5.2.x RDU Local HA Cluster(RHEL6.5/ CentOS 6.5) to 5.3.1 RDU GEO HA Cluster.
If you are upgrading from any one of the scenario mentioned below, please follow the steps mentioned in Upgrading PCP along with HA - Procedure 2.
Note | Below scenarios need OS upgrade to RHEL 6.5 / CentOS 6.5. |
-
Upgrading from PCP 5.x RDU to 5.3.1 RDU Local / Geo HA Cluster.
-
Upgrading from PCP 5.x RDU Local HA Cluster to 5.3.1 RDU Local HA Cluster with OS Upgrade
-
Upgrading from PCP 5.x RDU Local HA Cluster to 5.3.1 RDU GEO HA Cluster.
If you are upgrading from 5.x RDU Local HA Cluster to 5.3.1 RDU on Local HA Cluster, please follow the steps mentioned in Upgrading PCP along with HA - Procedure 3.
Note | In this scenario, the 5.x Local HA runs on RHEL 6.3 / CentOS 6.3. The procedure 3 discusses only the upgrade steps of PCP RDU component and not the HA components. Also, the OS upgrade to RHEL 6.5 / CentOS 6.5 is not described as PCP 5.3.1 RDU can also run on 6.3 OS Local HA setup. |
- Upgrading PCP along with HA - Procedure 1
- Upgrading PCP along with HA - Procedure 2
- Upgrading PCP along with HA - Procedure 3
- Upgrading Quagga
Upgrading PCP along with HA - Procedure 1
| Step 1 | Back up the 5.2.x RDU database and property files as described in section Backing Up the RDU Database and Backing up the Property Files. |
| Step 2 | If you are
upgrading from Prime Cable Provisioning
5.2.x RDU GEO HA
Cluster to
5.3.1 RDU GEO HA Cluster, execute the below steps:
|
| Step 3 | If you are
upgrading from Prime Cable Provisioning
5.2.x RDU Local
HA Cluster to
5.3.1 RDU GEO HA Cluster, execute the below steps:
|
| Step 4 | Migrate backed up DB as described in section Migrating the RDU Database. |
| Step 5 | Stop the bprAgent using the command: /bprHome/CSCObac/agent/HA/bin/manage_ha_resources.sh stop res_bprAgent_1 |
| Step 6 | Verify if the bprAgent has stopped using the command: /etc/init.d/bprAgent status |
| Step 7 | Run the restoreDB.sh on the newly copied directory. |
| Step 8 | Merge the backed up property files and MIB files in the 5.3.1 RDU HA setup. |
| Step 9 | Start the bprAgent using the command: /bprHome/CSCObac/agent/HA/bin/manage_ha_resources.sh start res_bprAgent_1 |
| Step 10 | Check the status of bprAgent using the command: /etc/init.d/bprAgent status |
| Step 11 | Check the RDU HA cluster status using the command: /bprHome/CSCObac/agent/HA/bin/monitor_ha_cluster.sh |
Upgrading PCP along with HA - Procedure 2
| Step 1 | Back up the 5.x RDU database and property files as described in section Backing Up the RDU Database and Backing up the Property Files. |
| Step 2 | Uninstall PCP 5.x as described in section Uninstalling Prime Cable Provisioning. |
| Step 3 | Upgrade OS from CentOS / RHEL 6.3 to CentOS / RHEL 6.5 |
| Step 4 | Install 5.3.1 RDU HA as described in Setting Up RDU Redundancy |
| Step 5 | Migrate backed up DB as described in section Migrating the RDU Database |
| Step 6 | Stop the bprAgent using the command: /bprHome/CSCObac/agent/HA/bin/manage_ha_resources.sh stop res_bprAgent_1 |
| Step 7 | Verify if the bprAgent has stopped using the command: /etc/init.d/bprAgent status |
| Step 8 | Run the
restoreDB.sh on the newly copied directory. Merge the backed up property files
and MIB files in the
5.3.1
RDU HA setup.
Note: While restoring the files, make sure that you merge the changes without overwriting the newly installed files. |
| Step 9 | Start the bprAgent using the command: /bprHome/CSCObac/agent/HA/bin/manage_ha_resources.sh start res_bprAgent_1 |
| Step 10 | Check the status of bprAgent using the command: /etc/init.d/bprAgent status |
| Step 11 | Check the RDU HA cluster status using the command: /bprHome/CSCObac/agent/HA/bin/monitor_ha_cluster.sh |
Upgrading PCP along with HA - Procedure 3
| Step 1 | Back up the 5.x RDU database and property files as described in section Backing Up the RDU Database and Backing up the Property Files. |
| Step 2 | Upgrade the RDU as described in Upgrade from Prime Cable Provisioning 5.x to 5.3.1. |
| Step 3 | Migrate backed up DB as described in section Migrating the RDU Database. |
| Step 4 | Stop the bprAgent using the command: /bprHome/CSCObac/agent/HA/bin/manage_ha_resources.sh stop res_bprAgent_1. |
| Step 5 | Verify if the bprAgent has stopped using the command: /etc/init.d/bprAgent status. |
| Step 6 | Run the restoreDB.sh on the newly copied directory. |
| Step 7 | Merge the backed up property files and MIB files in the 5.3.1 RDU HA setup. |
| Step 8 | Start the bprAgent using the command: /bprHome/CSCObac/agent/HA/bin/manage_ha_resources.sh start res_bprAgent_1 |
| Step 9 | Check the status of bprAgent using the command: /etc/init.d/bprAgent status |
| Step 10 | Check the RDU HA cluster status using the command: /bprHome/CSCObac/agent/HA/bin/monitor_ha_cluster.sh |
Upgrading Quagga
You can use the old Quagga version bundled with PCP 5.2.x in 5.3.1 as well. But, there is vulnerability with the Old Quagga version. For details, refer to Vulnerability details.
So, we have upgraded Quagga to the latest version and bundled with 5.3.1. We strongly recommend you to upgrade Quagga to the latest version using the below steps:
Migrating the RDU Database
- Cisco BAC 4.2.x/ PCP 5.x on Solaris to PCP 5.3.1 on Solaris, use the migration tool (BAC_531_MigrationTool.tar.gz) only.
- Cisco BAC 4.2.x/ PCP 5.x on Solaris to PCP 5.3.1 on Linux, use the migration tool (BAC_531_MigrationTool.tar.gz) only.
- Cisco BAC 4.2.x/ PCP 5.x on Linux to PCP 5.3.1 on Linux, use the migration script (migrateDb.sh) only.
Options for the In-line Migration Script - migrateDb.sh
To migrate the database, you must run the migrateDb.sh shell script which is located under $BPR_HOME/migration. The following table describes the arguments of the migrateDb.sh script to carry out the migration operation.
|
Argument |
Description |
Required |
Optional |
Default |
|---|---|---|---|---|
| -dbdir dir | Specifies the location of the database backup that is to be migrated. |
✓ |
None | |
| -dblogdir dir | Specifies the location of the database logs that are to be migrated. |
✓ |
The directory that the -dbdir option specifies | |
| -cachesize value | Specifies, in MB, the size of the memory cache.
If you use this parameter, you must not exceed the 100-MB limit, unless you reduce the value of the -Xmx variable in the migrateDb.sh script by double the increase in the cache size. For example, if you set cache size to 200 MB, you must reduce the value of -Xmx to: (200-100)*2 = 200 MB |
✓ |
100 MB | |
| -help | Specifies usage for the tool |
✓ |
- Migrating to Prime Cable Provisioning 5.3.1 Using In-line Migration Script
- Migrating to Prime Cable Provisioning 5.3.1 Using Migration Tool
- Migrating Using a RAM Disk (for Solaris only)
- Verifying Database Integrity of Prime Cable Provisioning 5.3.1
Migrating to Prime Cable Provisioning 5.3.1 Using In-line Migration Script
Migrating the RDU database to Prime Cable Provisioning 5.3.1, using the in-line migration script - migrateDb.sh, consists of five main steps:
-
Install/ Upgrade the Prime Cable Provisioning 5.3.1 RDU.
-
Stop the bprAgent.
-
Run the migrateDb.sh script (which is located under $BPR_HOME/migration) on the backed up database.
-
Restore the migrated database.
-
Start the bprAgent. After the migration is complete, a message is displayed indicating the same. You cannot launch the Admin UI until this step is completed.
The migration script (migrateDb.sh) is available in the Prime Cable Provisioning installation package. Migration is accomplished by reading from the original database and writing it into a new database. For this purpose, you must allocate additional disk space for accommodating the newly created database.
The status of the first two steps is recorded in a migration log file, which is stored in the migrated database directory. The migration.log file identifies the version of the database that is being migrated and provides status messages for the migration process.
Note | Migration deletes any outstanding jobs stored in the database, such as reliable batches that did not finish execution or pending Configuration Regeneration Service (CRS) jobs. |
The following table describes the process of migration from Cisco BAC 4.2.x/ PCP 5.x Linux to Prime Cable Provisioning 5.3.1 Linux using examples that assume that:
-
Cisco BAC 4.2.x/ PCP 5.x is installed in the default home directory /opt/CSCObac.
-
The migration from Cisco BAC 4.2.x/ PCP 5.x to 5.3.1 is an inline migration where the source and the target database are the same and a separate target database need not be created. The source database is restored once the migration is complete.
-
The backup of the previous version of the RDU database is located in the /var/backup directory.
| Step | Task | See | ||
|---|---|---|---|---|
| 1 |
Stop the bprAgent using the following command: # /etc/init.d/bprAgent stop |
|
||
| 2 |
Run PCP 5.3.1 migrateDb.sh on the backed up database. The migrateDb.sh script resides in the $BPR_HOME/migration directory. For a description of all arguments that this tools supports, see Migrating Using a RAM Disk (for Solaris only). For example: # $BPR_HOME/migration/migrateDb.sh -dbdir /var/backup/rdu-backup-20130829-031028 -dbdir—Specifies the location of the database backup that is to be migrated; in this case, /var/backup. |
|||
| 3 |
Observe the migration progress using the migration.log file. For example: # tail -f /var/backup/rdu-backup-20130829-031028/migration.log |
|||
| 4 |
Verify if the migration is complete using the migration.log file. If you find any warnings or notices, use the grep command-line tool to search them. For example: # tail /var/backup/rdu-backup-20130829-031028/migration.log |
Cisco Prime Cable Provisioning User Guide | ||
| 5 |
After migrating the database, verify it by running the command: For example: # $BPR_HOME/rdu/internal/db/bin/verifydb.sh -dbdir /var/backup/rdu-backup-20130829-031028
|
|
||
| 6 |
Delete the target RDU database directories. For example: # rm –rf /var/CSCObac/rdu/db* |
|
||
| 7 |
Restore the migrated database into the RDU $BPR_DATA and $BPR_DBLOG directories. For example: # $BPR_HOME/rdu/bin/restoreDb.sh /var/backup/rdu-backup-20130829-031028 |
Cisco Prime Cable Provisioning User Guide | ||
| 8 |
Start the bprAgent using the following command: # /etc/init.d/bprAgent start This also starts the RDU process. Check the rdu.log file for messages on successful initialization, which also indicate that RDU will be up and running. |
Cisco Prime Cable Provisioning User Guide | ||
| 9 | Also, you can check if the $BPR_DATA/rdu/db/DB_VERSION file indicates the database version as 5.3.1. | Cisco Prime Cable Provisioning User Guide | ||
|
|
|
|||
| 10 | Verify the RDU operations by logging into the Admin UI. From Servers > RDU, you can check if the RDU version is 5.3.1 and if the device count statistics is correct (same number of devices as before and all the devices are in the same state as they were earlier) | Cisco Prime Cable Provisioning User Guide | ||
- About Migration Performance
- Migration of Duplicate Class of Service and Node Name
- RDU Extension Migration
- Enabling Password Encryption
About Migration Performance
A large RDU database can be several gigabytes in size, and may take an extended length of time to migrate. This depends largely on your hardware. Using faster disks improves the time significantly.
Migration automatically compacts your database that may be fragmented. However, this Prime Cable Provisioning release stores additional data for every device. You can expect the size of the database to increase after migration by as much as 10 percent.
The migration process is optimized for speed and database compactness. As a result, migration requires a large amount of process heap size (memory). For example, migrating a 7-million device database requires approximately 1,024 MB of process heap size.
The -Xmx parameter in the migrateDb.sh script determines the maximum process heap size for migration. The default setting of 3,072 MB for this parameter is sufficient for migrating a 20-million device database. You may need to fine-tune this setting to suit your environment. For example, to migrate smaller databases running on low-end systems with less memory, you can reduce the value of the maximum heap size setting. For databases that exceed the maximum supported scale, you may need to increase this setting.
To change the heap size parameter, in the migrateDb.sh script edit the value for the -Xmx parameter.
Migration of Duplicate Class of Service and Node Name
Prime Cable Provisioning does not support duplicate names across technologies for Class of Service and nodes. If Prime Cable Provisioning detects duplicate names during database migration, the duplicate entries are automatically renamed in the following format:
For example, if Prime Cable Provisioning encounters a gold Class of Service for a computer and a DOCSIS modem, either the computer Class of Service is renamed as Computer_gold or the DOCSIS modem Class of Service is renamed as DOCSISModem_gold. The appropriate warnings are issued to the console and migration log, and all properties containing the specific Class of Service value are automatically updated.
RDU Extension Migration
During database migration, custom extensions are retained for using it after the migration process. For details, see the Cisco Prime Cable Provisioning User Guide.
Enabling Password Encryption
Prime Cable Provisioning uses SHA1 digest algorithm for password encryption. However, when you migrate from Cisco BAC 4.2.x/ PCP 5.x to PCP 5.3.1, it continues to use the encryption algorithms used in Cisco BAC 4.2.x/ PCP 5.x. After successful migration, you can enable SHA1 digest algorithm for password encryption using the script passwordEncryption.sh available in BPR_HOME/rdu/bin.
Migrating to Prime Cable Provisioning 5.3.1 Using Migration Tool
The migration tool used for migrating toPrime Cable Provisioning 5.3.1 is BAC_531_MigrationTool.tar.gz.
Note | Before you start with the migration task, ensure you carry out the steps explained in Database Migration section. |
Note | The following procedure is for migrating the database from Cisco PCP 5.x Solaris to PCP 5.3.1 Linux. In the procedure, steps 1 to 10 must be carried out on the Solaris server which has the earlier version of Cisco PCP and steps 11 to 13 must be carried out on the Linux server where Prime Cable Provisioning 5.3.1 needs to be installed. |
To perform a database migration:
| Step 1 | Stop the brpAgent. | ||
| Step 2 | Back up the
existing RDU database, using the
backupDb.sh
tool. For details, see the
Cisco Prime Cable
Provisioning User Guide.
For example: # $BPR_HOME/rdu/bin/backupDb.sh -nosubdir /disk1/backup where,
| ||
| Step 3 | Back up the
necessary files.
For the recomended files to be backed up, see Backing up the Property Files. | ||
| Step 4 | Verify if the database has been backed up by checking the history.log file, which resides in the $BPR_DATA directory. | ||
| Step 5 | Recover the
database that you have backed up to a consistent state, using the recoverDb.sh
tool. For details, see the
Cisco Prime Cable
Provisioning User Guide.
For example: # $BPR_HOME/rdu/bin/recoverDb.sh /disk1/backup where, /disk1/backup identifies the location of the database backup files. | ||
| Step 6 | After recovering
the database, verify it by running the command:
For example: # $BPR_HOME/rdu/internal/db/bin/verifydb.sh -dbdir /disk1/backup
| ||
| Step 7 | Copy the BAC_531_MigrationTool.tar.gz from Cisco.com location. | ||
| Step 8 | Go to the directory BAC_531_MigrationTool /migration. | ||
| Step 9 | Run migrationTool.sh > help and follow the help instructions. | ||
| Step 10 | After the migration is complete, copy the whole database directory and backed-up files to the Linux server where Prime Cable Provisioning 5.3.1 is being installed. | ||
| Step 11 | Merge the files backed up in Step 3. | ||
| Step 12 | Run the
restoreDB.sh
on the newly copied directory.
| ||
| Step 13 | Start the bprAgent. |
Migrating Using a RAM Disk (for Solaris only)
The RAM disk is a Solaris feature that allows you to mount a portion of the RAM as a disk volume. Disk I/O operations on such volumes are considerably faster and can be useful when you have large databases on systems with sufficient memory.
The procedures described in this section are optional and describe how to create and use different RAM disks to migrate your database instead of a regular disk volume, such as a fast RAID array with battery-backed write cache:
Creating RAM Disk Volumes for Migration
The following procedure creates three volumes for migration and assumes that the size of the original database is 9 GB. Adjust the volume sizes as required for your database and according to what the available memory permits.
Using the following procedure, you can create three RAM disks that you could use for migration:
/ram-disk1—To contain the source database
/ram-disk2—To contain the migrated database directory
/ram-disk3—To contain the temporary migration transaction logs
To create RAM Disk volumes for migration:
Using the RAM Disk Volumes for Migration
To use the RAM-disk volumes that you have created for migration:
| Step 1 | Copy the backup
of your database to
/ram-disk1.
For example: # mkdir /ram-disk1/backup # cp /disk1/backup/* /ram-disk1/backup/. |
| Step 2 | Perform the
first phase of migration according to the procedure that
Table 2
describes. Remember to use a command similar to the one described here instead
of the one mentioned in Step 1 of the table.
For example: # $BPR_HOME/migration/migrateDb.sh -dbdir /ram-disk1 /ram-disk2/ram-disk3/target &> /var/run/migration-console.log & |
| Step 3 | To ensure that
the second phase of migration is executed with the database of the RAM disk:
|
Verifying Database Integrity of Prime Cable Provisioning 5.3.1
We recommend that you perform a dry run of the migration process on a staging (nonproduction) system, instead of on a live system during RDU downtime. These steps may not be practical during live migration, because in the case of a large database, verification can take an extended length of time.
After migration, run the verifyDb.sh tool on the migrated database.
For example, enter:
# $BPR_HOME/rdu/internal/db/bin/verifyDb.sh -dbdir /disk2/target
If any optimization is needed during this process, it will be mentioned in the log file bpr-verify-db-log.xml that is generated in the path $BPR_HOME/rdu/internal/db/bin.
Note | You cannot verify a nonmigrated database with the Prime Cable Provisioning 5.3.1 version of verifyDb.sh. |
For details on the verifyDb.sh tool, see the Cisco Prime Cable Provisioning User Guide.
DPE Cache Backup and Restore Tool
The DPE Cache Backup and Restore Tool supports populating the DPE cache from Cisco BAC 4.2.x or above to Prime Cable Provisioning 5.3.1. This reduces the time required for the synchronization with RDU while porting all the devices to the new DPE.
While upgrading from 4.2.x, it is recommended to synchronize DPE with the RDU and create a new cache. For example, if there are five DPEs in a provisioning group, then instead of synchrozing each DPE with RDU, you can synchronize one DPE and create a new cache. You can further copy this DPE cache to the remaining four DPEs.
Upgrading DPE from Cisco BAC 4.2.x/ PCP 5.x to PCP 5.3.1
Use this procedure to upgrade the DPE of Cisco BAC 4.2.x/ PCP 5.x to PCP 5.3.1:
Note | PCP 5.3.1 RDU is compatible with Cisco BAC 4.x DPE. |
| Step 1 | Unpack the
Prime Cable
Provisioning
5.3.1
install package with .gtar extension using the following command:
On Solaris: gtar -zxpf BAC_531_SolarisK9.gtar.gz On Linux: gtar -zxpf BAC_531_LinuxK9.gtar.gz | ||
| Step 2 | To start the
upgrade process for DPE, select the DPE component after running the install
script of
Prime Cable
Provisioning
5.3.1
using the following command:
On Solaris: # <install-path>/BAC_531_SolarisK9/install_bac.sh On Linux: # <install-path>/BAC_531_LinuxK9/install_bac.sh The installation program prompts you to confirm if you want to proceed with the upgrade. | ||
| Step 3 | To confirm that
you want to upgrade, enter
y and press
Enter.
The installation program prompts you to enter the backup directory location. | ||
| Step 4 | To accept the
default backup directory location,
/tmp, press
Enter; or
enter another backup directory location.
The installation program prompts you to remove the Cisco BAC 4.2.x/ PCP 5.x package. | ||
| Step 5 | Enter
y and press
Enter to
continue.
The installation program will take the required backup, and remove Cisco BAC 4.2.x/ PCP 5.x DPE. The installation program also prompts you to proceed with the installation of Prime Cable Provisioning 5.3.1 DPE. To continue with the installation see, Installing DPE in Interactive Mode.
| ||
| Step 6 | To verify if the
output information indicates
Prime Cable
Provisioning
5.3.1,
enter:
On Solaris: # pkgparam CSCObac VERSION On Linux: # # rpm -qa CSCObac |
DPE Rollback
If you want to perform DPE rollback due to the issues faced while upgrading Prime Cable Provisioning to higher version, you need to first uninstall the upgraded version and perform the below steps for DPE rollback:
Note | You must have taken a backup of DPE Cache before upgrading it for an effective rollback. If you have not taken the backup then the synchronisation time between RDU and DPE will increase, thereby overloading both the components. |
| Step 1 | Uninstall PCP 5.3.1 DPE, as described in the section Uninstalling Prime Cable Provisioning |
| Step 2 | Install the DPE version that you used for rollback, as described in the section Installing Prime Cable Provisioning. |
| Step 3 | Copy the
created database tar to the Cisco BAC 4.2.x/ PCP 5.x DPE and then run the
script:
# $BPR_HOME/dpe/internal/bin/extractDbTar.sh <tarfile> |
| Step 4 | Verify if the cache data is copied properly to $BPR_DATA/dpe/cache/ directory. |
| Step 5 | Copy the dpe.properties file. |
| Step 6 | Start the Cisco
BAC 4.2.x/ PCP 5.x DPE.
If the cache is successful, there should not be any more synchronization. |
Upgrading Cisco Prime Network Registrar Extensions
Before upgrading Prime Network Registrar extensions, we recommend that you archive your files in the $BPR_HOME/cnr_ep/conf directory. Also disable the Prime Network Registrar extensions point and then stop the DHCP server by using following commands:
# /opt/nwreg2/local/usrbin/nrcmd -s < /opt/CSCObac/cnr_ep/bin/bpr_cnr_disable_extpts.nrcmd
# /etc/init.d/nwreglocal Stop
The Prime Network Registrar extensions can be upgraded from Cisco BAC 4.2.x/ PCP 5.x version to Prime Cable Provisioning 5.3.1 version.
Note | Prime Cable Provisioning 5.3.1 supports only Prime Network Registrar 8.x or higher. |
- Upgrading Prime Network Registrar-EP from Cisco BAC 4.2.x/ PCP 5.x to PCP 5.3.1
- Enabling eRouter Capabilities
Upgrading Prime Network Registrar-EP from Cisco BAC 4.2.x/ PCP 5.x to PCP 5.3.1
Use this procedure to upgrade the Prime Network Registrar extension points of Cisco BAC 4.2.x/ PCP 5.x to PCP 5.3.1:
Note | Upgrade from 32-bit to 64-bit CNR-EP:
|
| Step 1 | Back up the
file:
<BAC_HOME>/cnr_ep/conf/cnr_ep.properties |
| Step 2 | Unpack the
Prime Cable
Provisioning
5.3.1
install package with .gtar extension using the following command:
On Solaris: gtar -zxpf BAC_531_SolarisK9.gtar.gz On Linux: gtar -zxpf BAC_531_LinuxK9.gtar.gz |
| Step 3 | To start the
upgrade process for
Prime Network Registrar
extensions, select the CPNR-EP component after running the install script of
Prime Cable
Provisioning
5.3.1
version using the following command:
On Solaris: # <install-path>/BAC_531_SolarisK9/install_bac.sh On Linux: # <install-path>/BAC_531_LinuxK9/install_bac.sh The installation program prompts you to confirm if you want to proceed with the upgrade. |
| Step 4 | To confirm that
you want to upgrade, enter
y and press
Enter.
The installation program prompts you to enter the backup directory location. |
| Step 5 | To accept the
default backup directory location,
/tmp, press
Enter; or
enter another backup directory location.
The installation program prompts you to remove the Cisco BAC 4.2.x/ PCP 5.x package. |
| Step 6 | Enter
y and press
Enter to
continue.
The installation program removes the Cisco BAC 4.2.x/ PCP 5.x package, and prompts you to proceed with Prime Cable Provisioning 5.3.1 installation. To continue with the installation, see Installing Prime Network Registrar Extension Points in Interactive Mode. |
| Step 7 | Enable the
Prime Network Registrar
extension points and restart the DHCP server using following commands
respectively:
/opt/nwreg2/local/usrbin/nrcmd -s < /opt/CSCObac/cnr_ep/bin/bpr_cnr_enable_extpts.nrcmd /opt/nwreg2/local/usrbin/nrcmd dhcp reload The upgrade script automatically copies the upgraded extension point files to the required directories. When complete, it prompts you to restart the Prime Network Registrar Server Agent. |
| Step 8 | To verify if the
output information indicates
Prime Cable
Provisioning
5.3.1,
enter:
On Solaris: # pkgparam CSCObac VERSION On Linux: # rpm -qa CSCObac |
| Step 9 | Go to the
$BPR_HOME/lib directory. If the upgrade was successful, the
directory content appears similar to the list of installed files for the DPE
upgrade with the addition of the
libbprextensions.so file. The date shown should be the
current date. To check this, run the command:
# ls -l $BPR_HOME/lib |
| Step 10 | If a second
check is required to verify if the upgrade was successful, go to the
CNR_HOME/extensions/dhcp/dex directory and verify the
libbprextensions.so file with the current date. To check this, run the command:
# ls -l /opt/nwreg2/local/extensions/dhcp/dex Depending on the components installed, the directory content shown in this procedure may differ from the output featured above. |
Enabling eRouter Capabilities
| Command or Action | Purpose | |
|---|---|---|
| Step 1 | Enable
eRouter1.0 IPv4 registered capability in CNR using the script
/opt/CSCObac/cnr_ep/bin/changeNRProperties.sh
Example: ./changeNRProperties.sh -ee "enabled" | |
| Step 2 | Enable
eRouter1.0 IPv6 registered capability in CNR using the script
/opt/CSCObac/cnr_ep/bin/changeNRProperties.sh
Example: ./changeNRProperties.sh -eev6 "enabled" | |
| Step 3 | Run the script
/opt/CSCObac/cnr_ep/bin/changeNRProperties.sh with option -edns to initialize
the /eRouter/dns/server property with the DNS Server details. The DNS Server
can be a single IP Address or a list of comma separated IP addresses. This will
ensure that "domain-name-servers" mandatory Option is sent from PCP during the
eRouter provisioning process.
Example: ./changeNRProperties.sh -edns DNS-Server-IP ./changeNRProperties.sh -edns 192.168.4.3 ./changeNRProperties.sh -edns 192.168.4.3,192.168.5.2,192.168.3.1 | |
| Step 4 | Restart the DHCP server using the command /opt/nwreg2/local/usrbin/nrcmd dhcp reload. | |
| Step 5 | Enable the eRouter Feature global flag by navigating through the path: Configuration > Defaults > ERouter Defaults. Please note that the eRouters will be discovered as computers, when this feature is in disabled state. | |
| Step 6 | Enable the eRouter IPv4 and IPv6 capabilities in the Provisioning Group associated with the CNR Server. |
Upgrading KDC from Cisco PCP 5.x to Prime Cable Provisioning 5.3.1
Prime Cable Provisioning does not support automatic upgrade for KDC on both Linux and Solaris. We recommend fresh installation of Prime Cable Provisioning 5.3.1 KDC. Here is the manual procedure to upgrade the KDC of Cisco PCP 5.x to Prime Cable Provisioning 5.3.1:
| Step 1 | Back up the following files: |
| Step 2 | Uninstall the 5.x KDC. |
| Step 3 | Install the Prime Cable Provisioning 5.3.1 KDC. See Installing KDC in Interactive Mode. |
| Step 4 | After the upgrade is complete, restore: |
eRouter Migration tool
The help option (eRouterMigrationTool.sh -help) of the eRouter Migration Tool will provide the different options available for the tool.
| -cachesize | An optional parameter that specifies cache size in MB. The default cache size is 100MB. |
| -dbdir | An optional parameter to specify the database directory path.
If not specified, RDU database will be used by default. |
| -dblogdir | An
optional parameter for database log directory path, if
-dbdir
is used.
If not specified the directory specified with - dbdir option is used by default. |
| -detecterouterdevices | An optional parameter for directory path to write MAC/DUID
address.
If specified, tool will find MAC address of the device which are detected as computer and write to a file in the specified directory. If MAC address is not available, it will print DUID address to a file. |
| -inputmacfile | An optional parameter to read MAC address.
If specified, tool reads MAC address from this file for migration and convert as eRouter. Cannot be used with - detecterouterdevices or -inputduidfile option. |
| -inputduidfile | An optional parameter to read DUID address.
If specified, tool reads the DUID address from this file for migration and converts it as eRouter. Cannot be used with - detecterouterdevices or - inputmacfile option. |
SAMPLE USAGE:
Migrating the eRouter devices which are detected as Computer is a two-step process
-
To get the MAC address/DUID of the eRouter devices which are detected as Computer, the following command shall be used.
./eRouterMigrationTool.sh -dbdir <db_dir_path> -detecterouterdevices <dir_to_write_address>
By running the above command, MAC address of the eRouter devices which are detected as Computer will be written to the file <dir_to_write_address>/eRouterDevicesMAC.
If MAC address does not exist for the device, DUID will be written to the file <dir_to_write_address>/ eRouterDevicesDUID.
-
To convert as eRouter , the following commands shall be used.
./eRouterMigrationTool.sh -dbdir <db_dir_path> -inputmacfile <dir_to_write_address>/ eRouterDevicesMAC
./eRouterMigrationTool.sh -dbdir <db_dir_path> -inputduidfile <dir_to_write_address>/ eRouterDevicesDUID
Note | After migration, Class of Service associated with eRouter devices will remain unchanged. Since the default Class of Service associated with eRouter devices detected as computer was unprovisioned-computer in previous releases, it needs to be manually changed to a eRouter type Class of Service (such as unprovisioned-erouter). This enables the PCP to send domain-name-servers DHCP option (property eRouter/dns/server configured in cnr_ep.properties) during eRouter provisioning. |
 Feedback