![]()
Enabling Multiple Subscriptions for a Tenant
Multiple orderings of a service allow service providers to customize the same service to meet different needs of a subscriber. For example, multiple WAN networks can be instantiated separately for security reasons to provide an air gap in the network by configuring a red network and a green network using WAN network.
As a user with an administrator role, you can enable this feature at the service definition time. Upon installing service packs, you need to do the necessary configuration at the service pack level to enable this feature on Cisco MSX Portal. To configure this feature, enable the multipleInstance metadata using the POST request in the Catalog Service API. For more information on this API, refer the Swagger documentation that can be accessed from Cisco MSX portal > Account Settings > Swagger > Cisco MSX Platform Catalog Service API. By default, only a single instance of a service can be ordered. After this feature is enabled, tenants can order more than one instance of a service.
{
"id": "f3e326cc-6545-11e7-6547-be2e65b06b65",
"name": "vbranch",
"label": "cisco.consume.service.vbranch.name",
"activeFlag": true,
"version": 1,
"displayOrder": 1,
"description": "cisco.consume.service.vbranch.description",
"image": "/services/vbranch/images/icons/image_vbranch_service.svg",
"multipleInstanceAllowed": true,
"configuration": {
"device": "false",
"parts": "2",
"showOffers": "true"
  },
 Note |
Multiple Service instance is supported for both Create and Update Subscription. |
Assigning Offers to Tenants
Using the Cisco MSX platform, you can hide or show service offerings to a tenant or a group of tenants. You can enable this feature from the Cisco MSX portal or by using the Cisco MSX Platform Catalog Services API. Only tenants with required permissions can subscribe to the service offerings visible to them. The Cisco MSX Platform Catalog Service API provides an extended capability to set labels or tags such as Preview on the service offer that is available on the Tenant Workspace > Offer Catalog window.
Use Cisco MSX Platform Catalog Services API to create, update, cancel, close, and delete service offerings.
You can manage the configurations of services and offers using Cisco MSX Platform Catalog Services API:
-
Manage the services configuration, use the Service Controller section of the Cisco MSX Platform Catalog Services API.
-
Manage the offers configuration and provide labels on the service offer, use the Service Offer Controller section of the Cisco MSX Platform Catalog Services API.
From the Services, Configurations, and Devices category, assign the following permissions for the user to run this API.
-
Subscribed Services (View)
-
Import Service and Offer Definitions (Manage)
For more information on this API, refer to the Swagger documentation that can be accessed from Cisco MSX portal > Account Settings > Swagger > Cisco MSX Platform Catalog Services API.
The service providers can assign the service offers to a specific or all tenants from the Cisco MSX portal.
Using this procedure, you can assign service offer to the tenant.
Procedure
| Step 1 |
Log in to the Cisco MSX portal using your credentials. |
||
| Step 2 |
From the left pane, click Offer Management. The Offer Management window is displayed. |
||
| Step 3 |
Select an offer. The service offer details window displays both the Variant Details pane and Tenant Assignments pane. The Variant Details pane allows you to view the details of the service offers. The Tenant Assignments pane allows you to restrict the service offers to the specific tenants. |
||
| Step 4 |
Edit the service offer or variants in the Variant Details pane.
|
||
| Step 5 |
Assign service offer to tenant from the Tenant Assignments pane.
|
What to do next
Tenants can view the assigned offers by clicking Tenant Workspace > Offer Catalog. The list of all the assigned service offers are displayed on the Offer Catalog window for the tenants to subscribe to the available offers. For more information, see Subscribing to a Service Offer from Tenant Workspace.
Unassigning offers From Tenant
Using this procedure, you can unassign service offer from tenant.
Procedure
| Step 1 |
Log in to the Cisco MSX portal using your credentials. |
||
| Step 2 |
From the left pane, click Offer Management. The Offer Management window is displayed with all the available service pack offers. |
||
| Step 3 |
Select a service pack offer. The Offer Details window is displayed. The Variant Details pane lists the available variants and the Tenants Assignments pane that lists the tenant to whom the service pack offer was assigned. |
||
| Step 4 |
Select the tenant to unassign the service pack offer. |
||
| Step 5 |
Click the X icon in the Unassign column of the Tenants Assignment pane.
The Unassign Tenant dialog box is displayed. |
||
| Step 6 |
Click Unassign. The Tenant Unassigned dialog box is displayed. |
||
| Step 7 |
Click Close to exit. |
||
| Step 8 |
(Optional) Click View Tenants to view the tenants list in the Tenants Assignment pane. |
Subscribing to a Service Offer from Tenant Workspace
Using this procedure, tenants can subscribe to a service offer.
Procedure
| Step 1 |
Log in to the Cisco MSX portal using your credentials. |
| Step 2 |
Select the tenant. The tenant dashboard is displayed. |
| Step 3 |
Click View Offer Catalog. The Offer Catalog window is displayed with all the available service offers assigned by the service provider for the tenants. |
| Step 4 |
Select a service offer. |
| Step 5 |
Click Subscribe. The Confirm Subscription dialog box is displayed to confirm the subscription. |
| Step 6 |
Click Subscribe. The confirmation dialog box is displayed. |
| Step 7 |
Click Continue. The service offer is subscribed to the tenant. This service offer is displayed on the tenant dashboard. 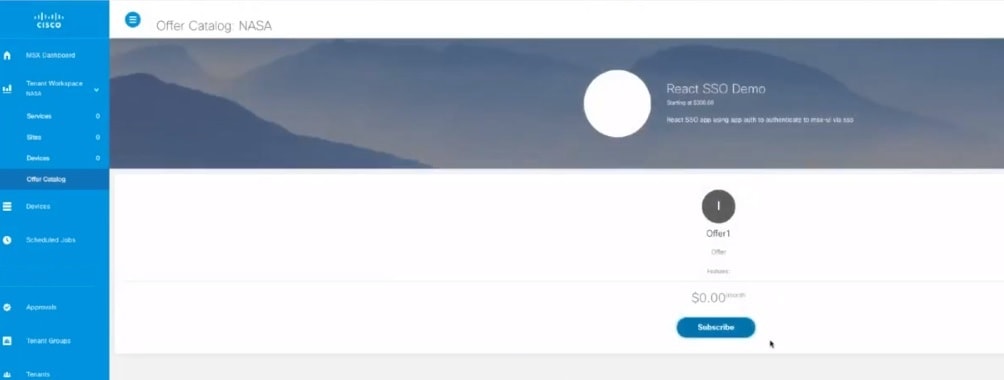
|
Unsubscribing to a Service Offer from Tenant Workspace
Using this procedure, tenants can unsubscribe a service offer from Tenant Workspace.
Procedure
| Step 1 |
Log in to the Cisco MSX portal using your credentials. |
| Step 2 |
From the left pane, choose Tenant Workspace. |
| Step 3 |
Select the tenant. The tenant dashboard is displayed. |
| Step 4 |
To unsubscribe from a service offer, select the service offer and click the ellipses (...). |
| Step 5 |
Click Unsubscribe. The Unsubscribe dialog box is displayed. |
| Step 6 |
Click Unsubscribe. |
Defining Terms and Conditions for a Service
Using this procedure, you can define and maintain the terms for a service.
Procedure
| Step 1 |
Log in to the Cisco MSX portal using your credentials. |
| Step 2 |
From the left pane, choose Settings > Service Configuration. The Service Configuration window is displayed. Select the service pack. |
| Step 3 |
Click Terms & Conditions. |
| Step 4 |
Select one of the service packs offers from the Offers drop-down list. |
| Step 5 |
Select the desired format for the font. |
| Step 6 |
Enter details required for acceptance by a consumer while purchasing a service. This information is displayed while the consumer places an order for the service. The terms and conditions are defined specific to an offer in a service. |
| Step 7 |
Click Save. |
Building New Services Using Cisco MSX Platform SDK
Cisco MSX Platform SDK allows you to build new services for Cisco MSX. These new services can be:
-
Platform extensions that add functionality to the platform.
-
Service packs that implement new products apart from the service packs provided by Cisco MSX. Cisco MSX provides SD-Branch, SD-WAN, Cloud UTD, Managed Devices, and Enterprise Access service packs. For more information on the service packs available with Cisco MSX, see Cisco Managed Services Accelerator (MSX) 4.3 Solution Overview Documentation.
The Cisco MSX supports the following APIs integrated as part of the platform SDK:
-
User Management Service
-
Catalog Service
-
Manage Service
-
Monitor Service
-
Workflow Service
The Cisco MSX SDK documentation is available here: https://developer.cisco.com/site/msx.
Onboarding and Deploying Component into Cisco MSX
The Cisco MSX allow service providers to develop the third-party services or components using the Software Development Kit (SDK). These new services can be onboarded, deployed, and published into Cisco MSX. You can enable this functionality from the Cisco MSX portal or by using the Service Lifecycle Management (SLM) API. The new service can be any service, including platform extension, which can run within the Cisco MSX infrastructure after the platform is deployed.
Each component can provide one or more APIs and applications.The component is a configuration file that contains all the information required to onboard and deploy a service. Applications must be published to the Cisco MSX Offer Catalog before users can subscribe to the applications.
The capabilities of the SLM API include:
-
Uploading a third-party component (in parts, if required)
-
Getting component details
-
Getting the deployment status of component Kubernetes
-
Getting a list of components
-
Deleting a component
To deploy a new service using API, use the Service Lifecycle Management Controller section of the SLM API.
From the Services, Configurations, and Devices category, assign the Service Lifecycle Management (View and Manage) permission to a user to run this API.
For more information on this API, see the Swagger documentation that can be accessed from Cisco MSX portal > Account Settings > Swagger > Service Lifecycle Management API.
Process involved in onboarding a new service into the Cisco MSX:
-
Deploying the Component
-
Publishing the Application
-
Creating an Offer
Deploying the Component
Using this procedure, the service providers can deploy the service or components in Cisco MSX from the Cisco MSX portal.
Procedure
| Step 1 |
Log in to the Cisco MSX portal using your credentials. |
||
| Step 2 |
From the left pane, click Settings > Component Management. |
||
| Step 3 |
Click the Upload Component icon that is located on the far right on the Component Management window. The Upoad Component dialog box is displayed.
|
||
| Step 4 |
Choose the component tar file from your local storage. |
||
| Step 5 |
Click Upload to upload and install the component into Cisco MSX. The confirmation dialog box is displayed to confirm the new component upload. |
||
| Step 6 |
Click Upload.
|
||
| Step 7 |
After the successful completion of the new component upload, the confirmation dialog box appears, click Close. The Component Management window displays the newly uploaded component. The component details such as Name, Description, Product, Version, Endpoint, State, and Action are displayed on this window. Specify the endpoint value to display both the Delete and Publish Application options on clicking the ellipses (...) icon that is located on the same row of every component. If the endpoint values are not included only Delete option is displayed. The newly uploaded service component is now readily available as a part of the Cisco MSX Microservices API list. You can use this new API to manage the new component. 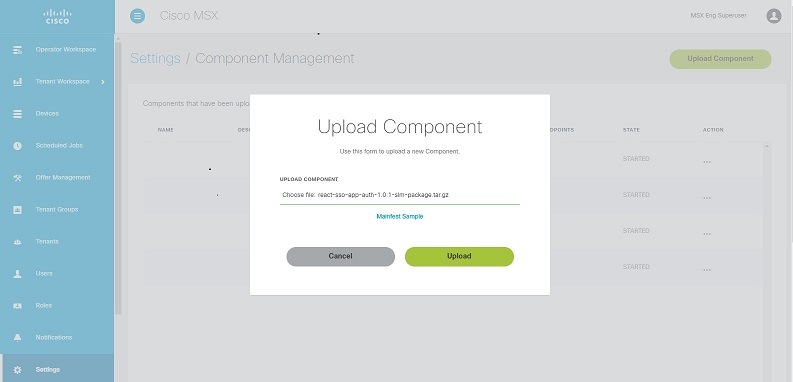
|
Publishing an Application
After deploying a component, it should be published to make it available on the Cisco MSX. On publishing this new application, a tile is created on the Offer Management window. A tenant cannot subscribe to the application until it has been published, and an offer is created.
Using this procedure, you can publish an application into the Cisco MSX.
Procedure
| Step 1 |
Log in to the Cisco MSX portal using your credentials. |
||
| Step 2 |
From the left pane, click Settings > Component Management. |
||
| Step 3 |
Click the ellipses (...) icon that is located on the same row of the component and click Publish Application. The Add Application dialog box is displayed. In the Add Application dialog box, specify the following details:
|
||
| Step 4 |
Click Save. The newly-added application is displayed on the Application window. 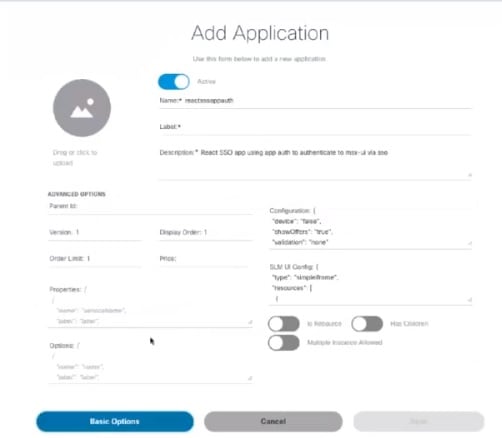
|
Creating an Offer
Using this procedure, you can create an offer that has pricing and terms and conditions details.
Procedure
| Step 1 |
Log in to the Cisco MSX portal using your credentials. |
| Step 2 |
From the left pane, click Settings > Component Management. |
| Step 3 |
Click the ellipsis (...) on the far right in the same row of the application and then click Offer. The Add Offer dialog box is displayed. |
| Step 4 |
Enter the Name, Label, Description, Terms and Conditions, and Price Plan of the offer. |
| Step 5 |
Click Save. The newly-added offer is displayed on the Offer window. You can create as many offers as you want. The offers can be edited, duplicated, or deleted. For more information on managing offers, see Managing an Offer. 
|
What to do next
-
From the left pane, choose Offer Management.
The Offer Management window displays the deployed service component tile. Click the new component tile to see the offers.
-
The Cisco MSX service providers can assign service offer to the tenant from the Offer Management window. For more information, see Assigning Offers to Tenants.
-
The tenants can subscribe to the assigned offers. For more information, see Subscribing to a Service Offer from Tenant Workspace.
Managing an Offer
Using this procedure, the service providers can manage the service offers from the Cisco MSX portal.
Procedure
| Step 1 |
Log in to the Cisco MSX portal using your credentials. |
| Step 2 |
From the left pane, choose Settings > Component Management. |
| Step 3 |
Click the ellipsis (...) on the far right in the same row of the application that needs to be edited or duplicated. |
| Step 4 |
Choose Offer. The Offer window is displayed. |
| Step 5 |
Edit an offer. |
| Step 6 |
Duplicate an offer. |
Deleting the Component from Cisco MSX
Using this procedure, service providers can delete the service or component from Cisco MSX.
Procedure
| Step 1 |
Log in to the Cisco MSX portal using your credentials. |
||
| Step 2 |
From the left pane, choose Settings > Component Management. The Component Management window is displayed.
|
||
| Step 3 |
Click the ellipsis (...) on the far right in the same row of the component that you need to delete and then choose Delete. The Delete Component confirmation dialog box is displayed. Confirm the deletion of the component from Cisco MSX. |
||
| Step 4 |
Click Delete. The component is deleted. |
Uploading a New Network Element Driver Package
The NED is uploaded to Cisco Network Services Orchestrator (NSO) to enable network connectivity of different device types and services. Cisco MSX allows you to add, replace, and delete NED for device management.
You can add a new NED at any time after the Cisco MSX is installed and deployed into production.
To support this feature for all the service packs, you must have the ability to upload a NED package to NSO, and NSO must appropriately get restarted to take on that new NED.
Using this procedure, you can upload a new NED package using the Cisco MSX portal.
Before you begin
-
Download the Network Element Driver (NED) from the URL. Use your Cisco credentials to log in.
-
The downloaded NED package contains the following files:
README.signature
cisco_x509_verify_release.py
ncs-4.7.6-juniper-junos-4.5.13.signed.bin
ncs-4.7.6-juniper-junos-4.5.13.tar.gz
ncs-4.7.6-juniper-junos-4.5.13.tar.gz.signature
tailf.cer
|
Downloaded NED Package Files |
Name of Each NED files |
|---|---|
|
ncs-4.7.6-juniper-junos-4.5.13.tar.gz |
Main NED file |
|
ncs-4.7.6-juniper-junos-4.5.13.tar.gz.signature |
Signature File |
|
tailf.cer |
Certificate File |
Procedure
| Step 1 |
Log in to the Cisco MSX portal using your credentials. |
||||||
| Step 2 |
From the left pane, choose Settings > NED Management. The NED Management window is displayed with a table. All the NEDs installed in different service packs are displayed in this table. |
||||||
| Step 3 |
Click Add NED. The Upload NED File dialog box is displayed. |
||||||
| Step 4 |
Upload the downloaded NED package files in their respective fields:
|
||||||
| Step 5 |
Click Upload. The Upload NED confirmation dialog box is displayed for you to confirm the upload. |
||||||
| Step 6 |
Click Upload again.
The Validating and Installing NED file popup is displayed. The installation process takes a few minutes to complete. After a while, the popup message Success appears if the validation is successful, else the popup message An Error Occurred is dispayed if the validation is not successful. |
||||||
| Step 7 |
Click Close. Now you can see the NED in the NED Management window. |
Deleting a NED Package
You can delete an uploaded NED package at any time after the Cisco MSX is installed and deployed into production.
Using this procedure, you can delete a NED package using the Cisco MSX portal.
Before you begin
-
Ensure to delete all the sites that are using the NED.
-
On deleting NED, the device models that use NED namespace cannot be used in the service pack anymore.
Procedure
| Step 1 |
Log in to the Cisco MSX portal using your credentials. |
||
| Step 2 |
From the left pane, choose Settings > NED Management. The NED Management window is displayed with a table. This table displays all the NEDs installed in different service packs. |
||
| Step 3 |
Select the NED, and click ellipsis (…) > Delete. The Delete NED confirmation dialog box is displayed for you to confirm the delete. |
||
| Step 4 |
Click Delete.
The Deleting and Uninstalling NED file dialog box is displayed. The deletion process takes a few minutes to complete. Then the popup message Success is displayed. |
||
| Step 5 |
Click Close. |
Replacing a NED Package
Cisco MSX allows you to replace NED for device management. The replace option is used to upgrade or change an existing version of the NED package.
Using this procedure, you can replace a NED package using the Cisco MSX portal.
Procedure
| Step 1 |
Log in to the Cisco MSX portal using your credentials. |
||||
| Step 2 |
From the left pane, choose Settings > NED Management. The NED Management window is displayed with a table. This table displays all the NEDs that are currently installed in different service packs. |
||||
| Step 3 |
Select the NED, and click ellipsis (…) > Replace. The Replace NED File dialog box is displayed. |
||||
| Step 4 |
Upload the downloaded NED package files in their respective fields:
|
||||
| Step 5 |
Click Replace. The Replace NED confirmation dialog box is displayed for you to confirm the replace. |
||||
| Step 6 |
Click Replace again.
The Validating and Replacing NED file pop-up is displayed. The replacement process takes a few minutes to complete. After a while, the pop-up message Success is displayed, if the validation is successful, else the pop-up message An Error Occurred is dispayed, if the validation is not successful. |
||||
| Step 7 |
Click Close. |
![]()
 Feedback