Other Platform Capabilities
This section covers details on configuring change management approval workflow between Cisco MSX and ServiceNow. This section also includes information on integrating the ServiceNow ticketing system, managing device compliance vulnerability, and so on.
Integrating Incident Tracking System (ServiceNow) with Cisco MSX
The Cisco MSX platform provides Incident Microservice API that enables you to integrate an incident tracking system (ServiceNow) with MSX platform and extends to all the MSX tenants. Using this API, you can create, update, cancel, close, and delete an incident using the access token. While deploying MSX, incident system is also onboarded during the installation. The service providers should have a ServiceNow account to create and manage incident tickets.
The prerequisites to create tickets and change request is to configure an incident service after deploying the MSX. Using V8 configurations, multiple ServiceNow login accounts are mapped to tenants.
Sample API configurations
Create new incident
v1/incident
{
  "attributes": {
    "additionalProp1": {}
  },
  "category": "inquiry",
  "description": "string",
  "impact": "Low",
  "priority": "Planning",
  "severity": "Low",
  "state": "New",
  "subcategory": "string",
  "tenant": "3fa85f64-5717-4562-b3fc-2c963f66afa6",
  "urgency": "Low"
}
V8 Configuration
{
  "clientId": "b5c011a8db00301040ecb0b86b63b7b3",
  "clientSecret": "Cisco@123",
  "domain": "dev64108.service-now.com",
  "password": "Cisco@123",
  "userName": "admin",
  "criticalEvent": true,
  "tenantId": "70ef3a35-d23e-482e-a31d-0f568cc02ab3",
  "proxy":"http://proxy.esl.cisco.com:80"
}
Note |
The tenantId is optional. By default, tenantId global ServiceNow instance is mapped to a internal global tenantId. |
The use cases of integrating ServiceNow with MSX are:
-
Vulnerability: To monitor or detect device vulnerability in MSX.
-
Software device compliance: To track the device software compliance in MSX.
-
MSX creates tickets automatically when any critical event log occurs.
Incident services are capable of managing tickets that are created on service now. Users can directly create an incident on the ServiceNow and later use the incident ID to track services in the MSX. It is referred to as bidirectional flow for managing incident services, change requests, and approvals.
Use the Incident Microservice API for the following:
-
Provide the authentication settings that helps to establish handshake with an incident tracking system, use the Configuration Controller section of the Incident Microservice API.
-
Manage the incident, use the Incident Controller section of the Incident Microservice API.
-
Manage the change request, use the Change Requests Controller section of the Incident Microservice API.
-
Manage the approvals of the change request, use the Change Requests Approvals Controller section of the Incident Microservice API.
-
Manage several tasks involved in the change request, use the Change Requests Tasks Controller section of the Incident Microservice API.
From the Integrations, Settings, and Logs category, assign the Incidents (View and Manage) permission to a user to run this API.
For more information on this API, refer to the Swagger documentation that can be accessed from MSX portal > Account Settings > Swagger > Incident Microservice API.
Configuring Change Management Approvals
The Cisco MSX platform provides an approval process for configuration change requests made by a user. When the approval feature is enabled on MSX, change request for any user action on MSX will be subjected to approval. If there is a change request on MSX, the request is forwarded to ServiceNow through the Change Request service. The changes will take effect once the user approves the request through the ServiceNow portal.
Note |
Only tenants with a ServiceNow account can use this functionality. For more information on integrating ServiceNow, see Integrating ServiceNow with Cisco MSX. |
The following are some examples of the types of change requests on MSX that can use the approval functionality from ServiceNow:
-
Device configuration applied through template application.
-
Removal of a device from MSX management.
-
Add, Update, Delete of Standard Configuration definitions and values.
Note |
In 4.2, change management approval functionality is only implemented for the following device configuration operations.
|
Enabling the ServiceNow Change Management Approval Functionality
When the approval feature is enabled, any change request for any action will go through the ServiceNow change management approval flow. When the user modifies configurations on MSX, it generates a change request with a "Pending Approval" status. The changes will take effect on MSX once the tenant approves the request through the ServiceNow portal. Use the steps below to enable the approval workflow between Cisco MSX and ServiceNow.
MSX Portal-Specific Configurations
ServiceNow administrator need to configure custom role and associate that role to a user using MSX Portal.
Procedure
| Step 1 |
Create a custom role for approving the change requests from MSX. Only user role with Change Request Approval (Manage) permission under Service Configuration and Devices category section can approve a change request from MSX. For more information on creating a new role, see Adding a User Role.
|
||
| Step 2 |
Create a user and associate the approver role to this new user. For more information, see Adding a User.
|
||
| Step 3 |
Reset the password for created user. |
||
| Step 4 |
Create a custom API client for the ServiceNow application to access MSX APIs. To create a custom MSX API client, use the POST
API ( For more information on this API, see the Swagger documentation, which is accessible from the MSX portal > Account Settings > Swagger > IDM Microservice. In the above content for the custom MSX API client, make sure to specify the following details:
|
||
| Step 5 |
Enter ServiceNow account Details. |
||
| Step 6 |
Enable Change Management functionality on MSX. To enable, do the following steps: |
ServiceNow Portal-Specific Configurations
Register MSX as OAuth Provider on ServiceNow and create a business rule for approval and rejection notification flow.
Note |
Only a user with an administrator role must perform these steps. |
Procedure
| Step 1 |
Log into the ServiceNow portal, and select Application Registry from the left pane. |
||
| Step 2 |
Select New from the Application Registry page to create a new application registry. |
||
| Step 3 |
From the list, select Configure to a third-party OAuth Provider. |
||
| Step 4 |
Create API Client Security, including the Name, ClientID, and Client Secret. While configuring, provide the following values:
|
||
| Step 5 |
Create an OAuth Entity Profile by giving information such as a name, an OAuth Provider Grant type with read and write permissions. |
||
| Step 6 |
Create two system properties to store the Username and the Password of the CR Approver.
|
||
| Step 7 |
Create a business rule for the MSX approval and rejection process. For more information, see Creating Business Rule for Approval and Rejection Notification from ServiceNow to MSX |
Creating Business Rule for Approval and Rejection Notification from ServiceNow to MSX
Procedure
| Step 1 |
Create two business rules for the approval and the rejection notifications. For detailed procedure on creating business rules, see the ServiceNow documentation. |
| Step 2 |
For the approval and rejection notifications to work on MSX, ensure that you update the following details when you create the business rules for approval and rejection.
|
Managing Change Request
The following steps describe the approval flow between Cisco MSX and ServiceNow for a device configuration change request:
Procedure
| Step 1 |
Log in to the Cisco MSX portal. |
||||||||||||
| Step 2 |
From the left pane, choose Tenant Workspace > Devices. The Devices tile is displayed with the list of devices. |
||||||||||||
| Step 3 |
Click Details to display the Devices page and scroll down to the Device Template Details section. |
||||||||||||
| Step 4 |
Perform one of the device configuration action such as Apply, Update, or Remove Device Template to initiate a change request approval flow.
|
||||||||||||
| Step 5 |
Click on the blue Pending Approval link from the device template list to display the Change Request Details dialog box. For pending request, all the fields are disabled until the request is approved, and the user will not be able to make any further changes. Alternatively, you can hover over the hourglass icon on device template to view the details in the Change Request Details dialogue box.
|
||||||||||||
| Step 6 |
Click the Change Request ID in the Change Request Details dialogue box to view the the pending change requests in the Tenant Workspace > Service Control > Change Requests. |
||||||||||||
| Step 7 |
Approve/Reject the change request from the ServiceNow application.
|
||||||||||||
| Step 8 |
To view the status of the change request on MSX, choose Tenant Workspace > Service Controls > Change Requests. You can use filter the change request by status and click on Details for detailed information about the change request. The following table lists the color codes used for tracking the change request status:
|
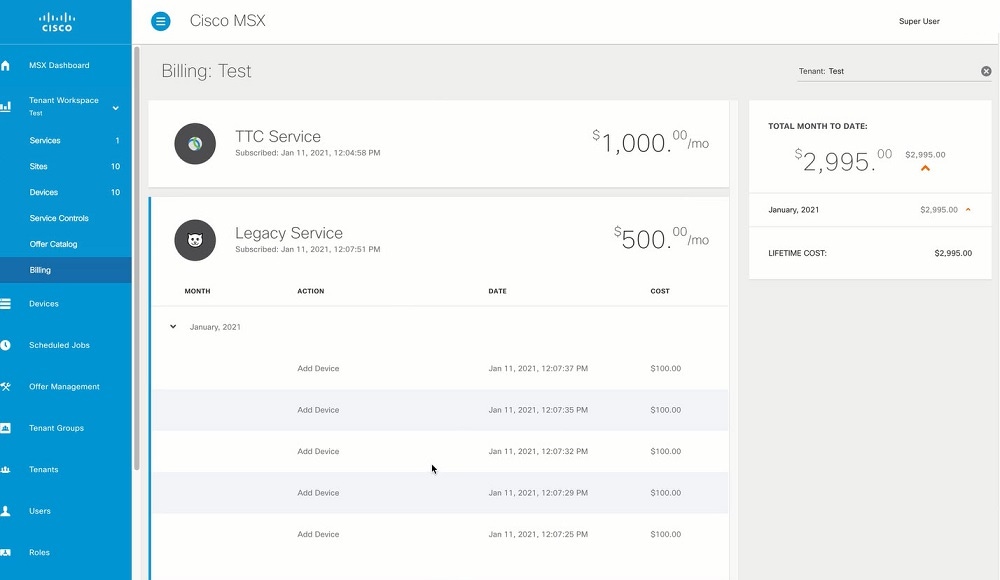
Managing Billing
The Cisco MSX platform has the ability to identify, track, and report the various subscription billing activities that happen across the MSX system using Billing Services API. Using Billing Services API, inventory reports can also be generated. You can manage the billing for several items such as devices, sites, control plane, general purpose events and services.
Note |
By default, the only Service Pack that has currently implemented a price/cost model using the Billing Service is SD WAN. Other Service Packs may implement this functionality in the future. |
The Billing Service API also provides event-based billing capabilities for the tenants. The events that are registered from the service pack are determined as billable and monetary values are assigned by operators for different service pack-based events in the Cisco MSX. The event generation and billing calculation are scheduled as per the pre-configured interval (either monthly or yearly).
You can manage the billing cycle and price definition for services using the Billing Services API. For more information on these API, refer to the Swagger documentation that can be accessed from MSX portal > Account Settings > Swagger > Billing Services API
-
To filter the billing events by services and to define a prorated price, use Billing Events (Billing Event Controller) section of the Billing Services API.
-
To manage the pricing definition for the service pack, use Billing Prices (Billing Price Controller) section of the Billing Services API. For example, to define a price definition for a service, use POST /api/v8/prices API.
{
"name": "Device Price"
"description": "Pricing Details for Device Types",
"type": "Device"
"subtype": "Cisco CSR 1000V"
"source": "customer_name"
"service": "sdbranch"
"billing period": "-1/daily/monthly/yearly/minute" millis
"price": 250.0
"tenantID": "tenant id value"
}
Where:
-
Set the billing period attribute to:
-
-1, to set a non-recurring/single billing instance.
-
Monthly/yearly/minute values in milliseconds. For example, for monthly the value is 2629800000 milliseconds.
-
-
Set the service value as the name of the Service Pack for which the price definition must be applied.
-
-
To manage a billing cycle, use the Billing Cycle (Billing Cycle Controller) section of the Billing Services API.
From the Billing/Metering category, assign the following permissions to a user to run this API.
-
Event (View)
-
Price (View and Manage)
Using this procedure, you can view the various billing activities across Cisco MSX system. To manage these billing activities, use the APIs described above.
Procedure
| Step 1 |
Log in to the Cisco MSX portal using your credentials. |
||
| Step 2 |
From the left pane, choose Tenant Workspace > Billing. The Billing window is displayed. |
||
| Step 3 |
Select a tenant.
|
||
| Step 4 |
View the billing summary of the assigned service pack offers.
|
Managing Device Compliance Vulnerability Using API
The Cisco MSX platform now detects and reports the software compliance vulnerabilities for both the Cisco devices and third-party software devices using the Vulnerability Service API.
Note |
The Cisco Product Security Incident Response Team (PSIRT) manages the investigation and public reporting of security vulnerability information of the Cisco products and networks. |
To register a product for vulnerability inspection, use the POST API in the Registration section of the Vulnerability Service API.
For more information on this API, see the Swagger documentation that can be accessed from MSX portal > Account Settings > Swagger > Vulnerability Service API.
Note |
Only users with the following permissions from the Integrations, Settings, and Logs category will be able to run this API:
|
The Cisco Vulnerability Service ingests vulnerability data feed (available in the JSON format) from National Vulnerability Database (NVD) or Common Vulnerabilities and Exposures (CVE) to the Cisco MSX. The Vulnerability Service monitors the existing Cisco MSX device inventory table on a scheduled basis.
When a device is monitored for vulnerabilities, a registration is created in vulnerability service automatically, and the service will watch for vulnerabilities for those devices, publishing messages with vulnerability details that the platform uses to update the vulnerability state of devices.
You can add a device and enable compliance monitoring capability to ensures that the device that is configured to a set of standards remains in that state until it is changed. For more information about adding a device and configuring the compliance for devices, see the "Device Compliance" section in the Cisco Managed Services Accelerator (MSX) 4.2 Managed Device Service Pack Documentation.
To monitor the device vulnerablity status, click Tenant Workspace > Devices. The Vulnerablity section displays the list of all the vulnerability information of the selected device. For more information, see the "Viewing Device Vulnerabilities" section in the Cisco Managed Services Accelerator (MSX) 4.2 Managed Device Service Pack Documentation.
The Cisco MSX platform sends an email notification to all the tenants regarding the captured vulnerability information of the registered devices. The tenant's email addresses are stored and vulnerabilities are tracked as events in the Notification window. Update the notification services to handle the tenant-based emails. For more information, see Enabling Notifications for Events.
The Cisco MSX fetches the email address of the tenant that is available as a part of the payload and builds an email. This email will contain the list of discovered vulnerabilities of the devices with URL and severity level of the devices is also mentioned for the users to know the status of the devices.
To enable the Vulnerability Service to monitor the device vulnerability, onboard and publish the Vulnerability Service component on the Cisco MSX platform to detect and report the existing software compliance vulnerability. For more information about onboarding new services, see Onboarding and Deploying Component into Cisco MSX.
Validating the Smart Account License Using API
The tenants can log into MSX using the Cisco.com SSO credentials and select a service offer for a subscription. The Cisco MSX platform provides Licensing Service API to validate the list of smart accounts, virtual accounts, and licenses associated with the Cisco.com user's account. Only based on the authentication the users are allowed to proceed with the offer subscription process.
You can manage the configurations of the Licensing Service API as follows:
-
To manage the service configuration required for licensing and smart account, use the Configuration Controller section of the Licensing Service API.
-
To fetch the smart account list or virtual account list, use the Account Controller section of the Licensing Service API.
-
To fetch the smart account list, use the Licenses Controller section of the Licensing Service API.
From the Service, Configurations, and Devices category, assign the Licensing (View and Manage) permission to a user to run this API.
For more information on these APIs, refer to the Swagger documentation that can be accessed for MSX portal > Account Settings > Swagger > Licensing Service API.
 Feedback