Cisco Prime Service Catalog 12.1 Administration and Operation Guide
Bias-Free Language
The documentation set for this product strives to use bias-free language. For the purposes of this documentation set, bias-free is defined as language that does not imply discrimination based on age, disability, gender, racial identity, ethnic identity, sexual orientation, socioeconomic status, and intersectionality. Exceptions may be present in the documentation due to language that is hardcoded in the user interfaces of the product software, language used based on RFP documentation, or language that is used by a referenced third-party product. Learn more about how Cisco is using Inclusive Language.
- Updated:
- January 9, 2018
Chapter: Structuring the Organization
- Structuring the Organization
- Overview
- Organizational Units
- Groups
- Queues
- General Role Information
- Role Hierarchies
- Assigning Role Capabilities
- Capabilities for My Services, Service Catalog, and Order Management
- Capabilities for Service Designer
- Capabilities for Service Link
- Capabilities for Reporting
- Capabilities for Service Manager
- Capabilities for Organization Designer
- Capabilities for Administration
- Capabilities for Catalog Deployer
- Capabilities for Service Item Manager
- Capabilities for Portal Designer
- Capabilities for Localization
- Capabilities for Integrations
- Capabilities for Tenant Management
- Capabilities for User Management
- Capabilities for Web Services
- Capabilities for SOAP-based Services through API
- Assigning Permissions
- Modifying an Existing Role
- Assigning Permissions to People with Custom Roles
Structuring the
Organization
This chapter contains the following topics:
Structuring the Organization
Overview
Organization Designer is the primary tool for structuring your service organization. In this module, you set up and maintain the following components of a Service Catalog implementation:
 Note | The Service Portal module prior to version 10.0 contained the My Workspace and System module page groups by default. These pages were obsolete in 10.x and will appear if Prime Service Catalog was upgraded from 9.x versions. As an administrator, you can disable these pages by removing the read permission of the page from the Organization Designer > Roles > Anyone role and the pages will be hidden from all users. |
- Accessing Organization Designer
- Organization Designer Home Page
- Navigation
- Search
- Maintaining Organizational Entities
- Organizational Entities and their Relationships
- Directory Integration and Organizational Entities
Accessing Organization Designer
The Organization Designer module is available with all installations of Service Catalog. It appears in the module drop-down menu for all users who have been granted the capability to use Organization Designer.
Organization Designer Home Page
The Organization Designer Home page is divided into the following areas:
- The Navigation pane shows the options available in this module, as well as the current page. As you navigate through various options, a trail of “breadcrumbs” is left (starting from the Home page), so you can easily return to any page you previously visited.
- The Common Tasks pane groups the most frequently used tasks into one location, primarily to make the creation of new entities easier. Entities can also be created by clicking Add on the component-specific page.
- The Organization Summary pane displays the number of entries for organizational units, groups, people, and queues.
- The Content pane allows you to search for an organizational entity, create a new entity, or modify an existing entity.
Navigation
The navigation bar, located at the top of the browser window, enables you to quickly navigate from one Organization Designer component to another, or return to the Organization Designer Home page.
Each time you view a particular organizational unit, group, person, queue, or role, a navigation trail displays what you are viewing, and within what component, in Organization Designer. This trail is created in the top of your browser window, and makes it easy for you to know where you are and where you have been in Organization Designer.
Another way to navigate to a different component of Organization Designer is to use the Home page search, described below. Once you search for a particular entity type and choose an entity of that type, control is transferred to the corresponding component.
Search
Organization Designer offers two search methods to help navigate and locate different organizational components.
- Home page search
- Component-specific search
Home Page Search
The Home page allows you to conduct a simple search for different components in one location. Use the Search area on the Home page to quickly locate an entity by type and optionally by name as well.
- Start by choosing the entity type to display. Once you have made your choice all entities of the specified type are shown in the content pane, below the search box. Search results display in alphabetical order.
- You can browse the list of entities in the content pane. As you move the mouse over each entity name, a hyperlink appears. You can click that link to go to the Organization Designer page where you can view or modify details of the entity definition.
- To narrow the list of entities, choose the entity type, then enter all or part of the entity name in the text field, and click Search. All objects that meet the search criteria appear— for example, entities whose names match a complete or full word entered. You can then browse those entities and choose one for a more detailed view.
Component-Specific Search
Component-specific searches allow you to view search results within the specific component, without having to go back to the Home page. This allows you to remain within the component, and continue your work, without having to navigate away.

Maintaining Organizational Entities
Each type of organizational entity has its own home page, accessible by clicking the corresponding tab from the Organization Designer home page or by searching for and then choosing an entity of the corresponding type. The home page displays the “General” properties of the entity. Additional pages are listed to the right of the content pane, as shown in the sample Group below. These pages may vary according to the type of entity.
Creating an Entity
There are two ways to create an entity through Organization Designer:
- From the Common Tasks page of the Organization Designer home page, click the Create link.
- Click the tab in the navigation pane corresponding to the type of entity to be created. Once the entity’s home page appears, click Add.
In either case, a create page for the chosen entity type appears.
This page typically includes all of the required attributes for creating the entity. Once you supply data for these attributes and click Create, the entity is created. The standard set of pages is then available, to allow you to maintain additional aspects of the entity definition.
Copying an Existing Entity
You can copy an organizational entity as a means of cloning that entity. Copying an entity copies all of the properties of the entity, including its members, except those properties that uniquely identify the identity, such as the organization name or a person's name and login ID.
To copy an entity, display its definition and click Copy on the General page. You then assign it a new name and save the entity. All pages of the new entity definition are then available for edit.
Deactivating an Entity
Organization Designer allows you to “hide” an entity from view within other modules, such as Service Manager or Service Designer, without deleting it from the system. An inactive entity will not appear in any Search windows. For example, when a service designer attempts to assign a task to a particular queue, only active queues appear. When you change the status of the entity, you will be asked to confirm this change.
Deleting an Entity
You can delete an entity only if it is not active and in use. For example, you cannot delete a queue which is used in a delivery plan. You must first deactivate the queue before you can delete it.
Administration
All organizational entities have an Administration page. The Administration portion of an entity allows you to specify who can view or edit the records created for the entity.
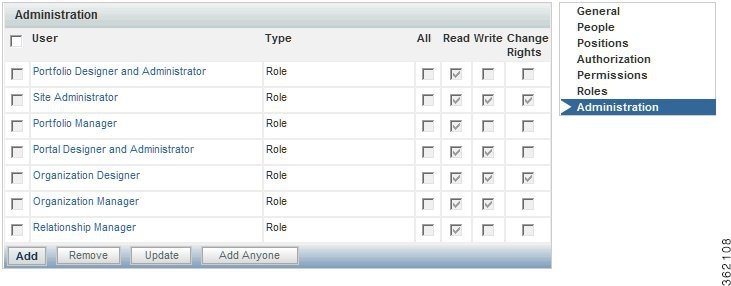
Administrative rights on an entity may be assigned to a specified organizational unit (hence inherited by all people in that organization unit), functional position, queue, group, or role. In addition, rights may be assigned to “Anyone” which means, any user who has the capability of accessing Organization Designer would be able to act on information on that entity. “Anyone”. Anyone role with only read privileges will not be allowed to modify but just to read. This role should be added sparingly, if at all.
The following rights may be assigned:
|
Right |
Description |
|---|---|
|
All |
User has permission to read (view information), write (modify and update information) and Change Rights (change read/write access) this entity. |
|
Read |
User has permission to only view information for the entity, but cannot modify information. |
|
Write |
User has permission to view and modify information for this entity. |
|
Change Rights |
User has the ability to change the read/write access for the entity. Permissions are dimmed when the user does not have permission to change the rights. |
System-defined entities are automatically granted predetermined sets of administrative rights. These entities are dimmed, and cannot be deleted or modified. However, additional organizational units, people, roles, groups, or functional positions can be assigned administrative rights.
Organizational Entities and their Relationships
Understanding how organizational entities are related is critical to setting up a well functioning implementation. For example:
- Every user must be represented as a Person, viewable and maintainable via Organization Designer.
- All People must belong to at least one Organization. To be able to request services, people belong to a Business Unit (a type of organization). People who perform service delivery tasks also belong to one or more Service Teams.
- People and Organizations are granted Roles, which determine which modules they are able to access, and what capabilities they have within each module. Granting a role to an organization ensures that all members of that organization inherit that role. For example, people who work for the same business unit can typically order the same set of services.
- In addition to Organizations, ad-hoc Groups of People can be set up. The Groups can then be assigned Roles. For example, perhaps one or two people on several service teams, not the entire team, should be able to run Service Catalog reports and create custom reports. Setting up a group makes it easier to ensure that the proper set of people has the proper capabilities.
The dependencies between entities influence the ways you can work with these entities in Organization Designer. The sections on the individual entity types explain these dependencies in more detail.
Directory Integration and Organizational Entities
In principle, the following organizational entities can be created and refreshed via directory integration:
- People, including their membership in roles, groups, and organizations
- Organizations, including both business units (departments or divisions of the company whose members are allowed to order services) and service teams (those company employees who perform tasks within Service Catalog)
In many installations, business units are automatically created as part of Directory Integration. This is logical, since the business unit corresponds to a real-life division of a corporate entity, and should be part of most enterprise-based directories. Users of Organization Designer can freely create additional business units, for example, for testing purposes or modify aspects of the organizational unit not maintained via the directory integration.
Although directory integration capabilities support automatically creating service teams, this is less common. A service team may be completely a Service Catalog artifact, created so that a customized set of people are authorized to work on specific tasks. Therefore, the enterprise outside of the Service Catalog need have no knowledge of such an organization, and it would be the responsibility of administrators to create and maintain such a service team/business unit.
Similarly, directory integration allows the assignment of roles and groups to people to be imported into Service Catalog from the directory. However, the directory in many cases does not hold such information, since roles and groups are typically Service Catalog artifacts, created expressly to facilitate usage of Service Catalog, and with no applicability to other enterprise activities. Therefore, users of Organization Designer will typically have to maintain both the role definition and the assignment of the role to people, as well as to organizations and groups.
Organizational Units
An organizational unit, or OU, represents the organizational structure of your company.
Maintaining Organizational Units
There are two types of organizational units:
- Service teams, comprised of people who deliver services
- Business units, comprised of people who request and receive services
Organizational units can contain members of the unit, or people, and can be linked with queues. In fact, when adding a new person to the system, you are required to choose a default, or Home, organizational unit.
Service Teams
Service teams deliver the services requested. Service teams are linked to queues created in Organization Designer as well as service groups created in Service Designer. While service teams consist of the people who deliver services, or service performers, service groups represent both the teams and the system processes for service delivery. Service teams can “own” the group of services, and thus be responsible for managing the work related to delivering those services.
A service performer can belong to one or more service team OUs. It is recommended that you create service teams based on skill sets of your performers.
Business Units
Business units have as members those people who request and receive services. Only business units are billable, and appear in My Services in Bill To fields when placing a request for a service. Therefore business units are often organized based on a company's cost center structure.
Though a service performer can belong to many service teams, it is recommended that you assign a business unit as the person's Home organizational unit, rather than a service team. Because only business units are billable, assigning business units as the Home OU allows for proper tracking of costs and charges when performers request services for themselves.
Note | Every user must be assigned to one “Home” Organizational Unit (OU). Users may be assigned additional Organizational Units but only one can be set as “Home”. |
Maintaining an Organizational Unit
Once you create an organizational unit, the organizational unit is available for modification and entry of additional data as outlined below.
|
Page |
Description |
|---|---|
|
General |
General information about the organizational unit, including suborganizational units assigned to a parent OU. |
|
People |
Members of the organizational unit, including both people and queues. |
|
Position |
People and queues assigned to functional positions specified for organizations. |
|
Authorization |
Authorization and review structure for the organizational unit. |
|
Permissions |
Entities with permission to order on behalf of the organizational unit, or manage the service team. |
|
Roles |
Roles currently assigned to the organizational unit. |
|
Administration |
Entities with permission to view or modify organizational unit information within Organization Designer. |
Deactivating Organizational Units
If directory integration is in place and is configured to refresh people and organizations, you must also ensure that the organizational unit to be deactivated is not associated with any valid, active user in the enterprise directory. If that user were to log in, the organizational unit would be reactivated. Also, deactivating an organizational unit does not deactivate any queues associated with that OU.
Configuring Organizational Units
The General page of an organizational unit allows you to edit information provided when creating the OU. You can make the unit active or inactive, as well as further develop the hierarchical structure by adding or removing suborganizational units.
General information about an organizational unit is summarized below.
- Organizational Unit Hierarchies
- Organizational Unit Members
- Functional Positions
- Organization-Level Authorization
- Permissions
- Viewing Permissions
Organizational Unit Hierarchies
Service Catalog allows you to create a hierarchical structure of parent and child organizational units. Each organizational unit can have a parent OU and one or more child, or subOUs.
Organization unit structure has the following effects:
- Statistics (such as SLA compliance or the volume of tasks or requests processed) can be consolidated for a parent OU, for accounting or reporting purposes, within the Advanced Reporting modules.
- Different styles (governing the appearance of the screens) can be associated with parent or child organizational units, allowing designers to customize the user experience.
- Suborganizational units can inherit roles and permissions from the parent, facilitating the assignment of responsibilities.
Suborganizational units, and therefore the members of that subOU, inherit all the roles and permissions assigned to its parent organizational unit. Because of this inheritance rule, you must make sure you set up role-based access carefully. An example would be using a bottom-up approach, in which the lowest child Organizational Unit is assigned the greatest number of roles, and therefore greatest responsibilities, and the higher up the parent Organizational Unit, the fewer roles are assigned.
Because you are adding suborganizational units to a parent, a helpful way to order your work is to:
- Create the suborganizational units.
- Create the parent organizational units.
- Add the suborganizational units to the parent OU.
Organizational Unit Members
You can specify the people who belong to an organizational unit. A person may be assigned to multiple OUs, but must have one Home OU. The process of associating an organizational unit with a person consists of the following:
- Create the organizational unit.
- Create the person.
- Associate the person with
the organizational unit – There are two ways you can create a person/OU
relationship:
- Assign a person to an organizational unit – Adding a person via the Org Units page of the People component allows you to assign multiple people to an OU.
- Assign OUs to a person – Adding an organizational unit via the Members page of the People component allows you to assign multiple OUs to a particular person at once.
For service teams, you can specify which queues the team is responsible for. The process of associating an organizational unit with a person consists of the following:
- Create the service team organizational unit.
- Create the queue – When you create a service team, you need to create a queue for the service team to receive work.
- Associate the queue with the organizational unit – There are two
ways you can create a queue/OU relationship:
- Assign a queue to an organizational unit – Adding a queue within organizational unit information allows you to assign multiple queues to an OU.
- Assign OUs to a queue – Adding an organizational unit within a person's information allows you to assign multiple OUs to a particular person all at once.
The check box to the left of the queue/person’s name is dimmed if the current organization is home for that entity. You cannot remove a person who has the OU assigned as the Home OU. If you wish to remove the person from the OU, you must first reassign a new Home OU for the person by maintaining the Person entry. You can then remove the person as a member of the nonhome OU.
To change the home affiliation for the entity, check the check box to the left of the queue/person name, then click Assign as Home. To change the entity home affiliation once it has been established, you will need to go to the Organizations page of Person or Queue component of Organization Designer.
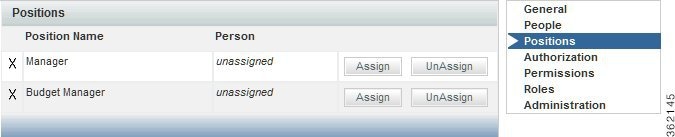
Functional Positions
Any queue or person that is associated with an organizational unit may be assigned to any functional position for the organization. Before you can assign an entity to a functional position, the functional position must exist. Organization Designer has several predefined functional positions, or you can create a functional position and relate it to organizational units.
The order for creating a functional position/assigned person relationship is:
- If necessary, List-Bullet-Char1>create a new functional position.
- If necessary, create the organizational unit.
- On the Positions page of the Organizational unit, assign an entity (person or queue) who is a member of that organization unit to fill the position.
An “X” to the left of a position name indicates that the position has not been filled.
To assign a person or queue to a functional position, click Assign. A popup window appears allowing you to search for and choose the person or queue to be assigned.
An entity can be removed from a functional position by clicking UnAssign. If the functional position is responsible for performing tasks or performing other duties, functional positions should not be left unfilled.
Organization-Level Authorization
You use Organization Designer to establish the authorization structure for an organizational unit, that is “Departmental Authorization” and “Departmental Review”. Configuration abilities are similar to those available at the site level and at the service group level. They are described in the Setting up Site-Wide Authorizations.
Permissions
Permissions allow you to control which entities have permission to do something to the organizational unit. You can set up the following permissions:
- Order on Behalf – Designates who can order on behalf of other members of a Business Unit OU using My Services.
- Manage Service Team – Designates who can view a Service Team OU in the navigation pane tree view in Service Manager.
To assign permissions for an OU, click Add Permission to display the Add Permission window. You then indicate which permissions to add, and the entity to which it should be added.
In general, it is more efficient and more easily maintainable to grant permissions to an organizational unit, group, or role rather than to individual people.
Viewing Permissions
The Administration options show the permissions granted to users to read, write, or change rights for the current organization and allows administrators to assign these permissions to custom roles. The prebuilt roles grant the associated permissions to all organizations; adding a custom role or a specific person, OU or position, allows you to assign permission to read and write organizational data at the object level, that is, on an organization by organization basis.
Organization Designer does not “hide” selected OUs or queues using permissions, but prevents a user from reading or modifying a particular OU or queue. You can perform the following:
- Create a role with the Access Organizational Unit Configuration and Access Queues Configuration capabilities.
- Go to the Permissions page for the role.
-
Set the Read/Write permissions for the role using the wizard as follows:
- OUs: All Service Teams of which user is a member
- Queues: All queues associated with service teams of which user is a member
Groups
A group is an organizational and management tool to enhance your ability to organize services, allocate costs, assign permissions, and grant access rights at your site. Groups allow you to consolidate OUs and people with some shared characteristics into a single entity. Roles can then be assigned to a group, rather than to multiple organizations or people.
A group can have multiple subgroups. The subgroups inherit the members and roles assigned to the parent group.
Configuring Groups
Group configuration includes the following pages.
|
Page |
Description |
|---|---|
|
General |
General information about the group |
|
Members |
Organizational units and people who are members of the group |
|
Roles |
Roles assigned to the group |
|
Administration |
Access control within Organization Designer |
Configuring General Group Information
The General portion of group information allows you to edit information provided when creating the group. You can make the group active or inactive, as well as further develop the hierarchical structure by adding or removing subgroups.
Adding or Removing Subgroups
Subgroups allow you to create a hierarchical structure of parent and child groups. Each group can have both a parent group and one or more child, or subgroups. subgroups are grouped within a parent group.
Subgroups, and therefore the members of that subgroup, inherit all the roles and permissions assigned to its parent group. Because of this inheritance rule, you must make sure you set up your role and permission system carefully. An example would be using a bottom-up approach, in which the lowest child group is assigned the greatest amount of roles, and therefore greatest responsibilities, and the higher up the parent group, the fewer roles assigned to it.
Because you are adding subgroups to a parent, a helpful way to order your work is to:
- Create the subgroups.
- Create the parent groups.
- Add the subgroups to the parent group.
Members
Group members consist of a combination of organizational units and individual people. You can specify the people and organizational units that belong to the group. The process of associating a group with a person or OU consists of the following:
- Create the group.
- Create the person or organizational unit before you can assign a person or OU to a group, you must first create the person or create the OU within the system.
- Associate the person or OU with the group.
A member may be removed from the group at any time by checking the check box to the left of the member name and then clicking Remove.
Using Groups in Service Design
Permissions can be assigned to groups, rather than being assigned to individual people or to organizations. It is a way to group disparate people or organizations and give them the same permissions.
Within Service Designer, a Group can be used directly when granting object-level permissions related to service groups, services and form groups. Those object-level permissions are:
|
Object |
Permission |
|---|---|
|
Service Group |
Design services and change data in this service group |
|
Service Group |
View services and other information in this service group |
|
Service Group |
Order service group services |
|
Service Group |
Assign rights |
|
Service |
Order service |
|
Active Form Group |
View forms |
|
Active Form Group |
Design forms |
Groups can also be used as an Additional Participant when assigning Access Control for dictionaries.
In addition, because a group can be a member of a role, you can also use groups indirectly wherever you can use a role. For instance, conditional rules include a User Role and Customer Role condition type. In this case, you could create a group, make it a member of a role, and use it in defining conditions for conditional rules.
Within Organization Designer, anyplace where you are working with roles, you can use a group to collect together the people/OUs to whom you wish to grant that role.
Finally, when assigning object-level permissions for OUs and people in Organization Designer, you can also use a group.
Users and User Groups Imported from UCS Director
Note | In a single pane of glass, where Prime Service Catalog, UCS Director are connected to LDAP:
|
When Prime Service Catalog connects to a UCS Director for the first time, Prime Service Catalog creates a:
Where <ID> is the 3-letter identifier of the UCS Director server. This group will be the parent group for all groups imported from this UCS Director server.
Where <ID> is the 3-letter identifier of the UCS Director server. There will be group for each group in the UCS Director. All such groups are grouped under the parent group. Users belonging to various groups in the UCS Director are imported to the respective groups in Prime Service Catalog.
- Default group. The default group is grouped under the parent group. Users without a group in the UCS Director are imported to this group.
All the imported users from the UCS Director are assigned an Organizational Unit (OU) in Prime Service Catalog. During the subsequent connections, Prime Service Catalog checks for group membership changes and updates the records accordingly.
Note | For container templates, container catalogs, standard catalogs, and advance catalogs services created in Prime Service Catalog for UCS Director:
For those users who are not imported from UCSD, the user must be manually be added to any one of the UCSD imported groups to be able to order UCSD services. Also in order to perform life cycle operations on the VMs that is provisioned by the user, the user must be granted UCSD End User role.
|
Queues
A queue is a repository, or “Inbox,” for tasks that need to be performed. Work is assigned to queues so that tasks are not dependent on any one individual.
After creating a queue, you use the Access Queue object-level permission to specify who can access the tasks sent to the queue. People are not “members” of a queue. They simply staff a queue by having permission to access it. Anyone with access to the queue can perform the tasks assigned to the queue. Members of the service team that is the Home OU for a queue automatically receive the Access Queue permission.
Service Catalog comes with one preconfigured queue, the Default Service Delivery Queue. If a task is not assigned to a task performer, or if a namespace used to dynamically assign a task does not evaluate to a valid queue, the task is placed in the Default Service Delivery Queue.
Defining a queue consists of entering the information on the Queue pages summarized below.
|
Page |
Description |
|---|---|
|
General |
General information about the queue |
|
Org Units |
Organizational units assigned to the queue |
|
Contact |
Contact phone numbers and email address |
|
Calendar |
Work hours and days, as well as holidays |
|
Permissions |
Assign who has permission to access queue information within Service Manager |
|
Administration |
Entities with permission to view or modify queue information within Organization Designer |
Tips for Working with Queues
- Queues are mapped to service teams. Only use service teams as the Home OU for queues.
- Every service delivery task should be mapped to a queue for execution of tasks.
- Ensure that queue calendars and time zones are set correctly. Service Catalog calculates due dates and times for tasks based on the calendar and time zone settings of queues to which the tasks are assigned.
Configuring Queues
This section describes about how to configure the queues.
- Configuring General Queue Information
- Associating Queues and Organizational Units
- Setting Work Hours
- Queue Permissions
Configuring General Queue Information
The General page of a queue allows you to edit information provided when creating the queue. You can deem the queue active or inactive, as well as set the time zone for the queue.
The queue's general properties are summarized below.
|
Page |
Description |
|---|---|
|
Name |
Name of the new queue. The name may be identical to the name of the service team (organizational unit) is the Home OU for the queue. When the queue name appears, it will have “Queue” appended to the specified name. The maximum length of a queue name is 100 characters. The name can contain alphanumeric characters and the underscore; it should not contain special characters such as the ampersand (&). |
|
Time Zone |
Time zone for the queue's primary location. The queue time zone, as well as calendar, is critical for estimating the due dates of tasks assigned to the queue. |
|
Notes |
Any text describing the queue. |
Associating Queues and Organizational Units
You can specify the service teams assigned to a queue. When you create a new queue, you must assign a default, or Home, organizational unit. Though several service team OUs can be responsible for a queue, a queue can only have one Home OU.
To make an association between an organizational units and queue, use one of the following methods:
- Open the service team information and assign queues.
- Open the queue and assign service teams.
Administrators may refer to queue contact information if a problem arises with delivery of tasks assigned to a particular queue. Different contact types (email, phone numbers, and so on) are provided. Multiple email addresses can be entered in the Email field in Queue Contact. The email addresses need to be delimited by a semicolon (with no spaces); for example, joe@cisco.com;dave@cisco.com.
All contact types except Email can be deleted from the queue contact information.
Setting Work Hours
Use the Calendar page to set the work hours and days, and assign nonwork days and holidays. Calendar information is used to compute due dates for tasks and services according to the queue’s work hours.
For a new queue, the work schedule defaults to five days a week, from 8am to 6pm, in the time zone specified for the queue (specified on the General page), as shown in the “Time Schedule” portion of the Calendar page. You may make any necessary changes to the work hours.
- Enter times for the From and To fields, using a HH:MM AM/PM format.
- Enter the same time in both the From and To fields, for example 12:00 AM and 12:00 AM, to designate days that you do not work.
- Click Update to save changes.
You can use the
“Additional Dates” portion of the Calendar page to tag a specific day as either
a holiday or working day. Click
Add New to add a
new date. Enter the date by choosing from the calendar icon ( ),
specify a Name for the date (for internal documentation), designate the type as
either a Holiday or Working Day, and then click Update. These additional dates
will also be taken into account when computing task and service due dates.
),
specify a Name for the date (for internal documentation), designate the type as
either a Holiday or Working Day, and then click Update. These additional dates
will also be taken into account when computing task and service due dates.
Queue Permissions
Permissions allow you to control who or what has permission to access the queue. Accessing the queue allows the user to see and perform tasks for a particular queue within Service Manager.
By default, some preconfigured roles automatically can access any queue. Consequently, any entity (person, organization, or group) granted one of those roles is able to access the queue. In addition, members of any OUs associated with the queue automatically are allowed to access the queue.
People
People are all the individuals who either receive services via Service Catalog or provide services via Service Manager, as well as all the administrators, managers, and users of all other application modules.
You must set up all individuals who are system users, whether they are within or external to your organization. The following two statements are important to remember:
Users can also be added and managed from the User Management module > Users. For more information, see User Management.
Adding a Person
Service Catalog provides three mechanisms for adding people:
- Organization Designer allows administrators to create a person, using the pages described in this section.
- The Import Person event in Directory Integration can create a person and his/her home OU. For more information, see the Cisco Prime Service Catalog Integration Guide.
- The Directory Task available in the service workflow (delivery plan) can create a person based on service form data. For more information, see the Cisco Prime Service Catalog Designer Guide.
No matter how a person is created, their personnel information can be maintained using Organization Designer.
When creating a new person, you must assign a default, or Home, organizational unit to the person. Therefore make sure you create the organizational unit before you create the new person.
To add a new person the following fields are required (marked with an asterisk (*)):
|
Page |
Description |
|---|---|
|
First Name |
First name of the person. |
|
Last Name |
Last name of the person. |
|
|
Contact email address. |
|
Time Zone |
The time zone associated with the person's primary address. If not provided, the default server time zone is used. |
|
Language |
The language that appears on the user interface for the person. If not provided, English is used. |
|
Home OU |
The person's default organizational unit. It is recommended that you choose a business unit as a person's Home OU, rather than a service team. |
|
Login |
A unique login identifier. |
|
Password |
A password used to log on to the system. If using Organization Designer, reenter the password to confirm. Any character in the character set supported by the application can be used in the password. |
Configuring People
The following pages allow you to configure information about people:
|
Page |
Description |
|---|---|
|
General |
General information about the person. |
|
Org Units |
Organizational units to which the person belongs. |
|
Address |
Company or personal address information. |
|
Contact |
Contact phone numbers and email address. |
|
Extensions |
Extended information about a person. |
|
Calendar |
Work hours and days, as well as holidays. |
|
Permissions |
Entities with permission to order on behalf of the person, or assign an authorization delegate. |
|
Roles |
Roles available to the person. |
|
Administration |
Entities with permission to view or modify information about a particular person within Organization Designer. |
- General Person Information
- Assigning Organizational Units to People
- Adding Additional Information using Extensions
- Configuring a Person's Calendar
- Assigning Permissions to a Person
- Deactivating a Person
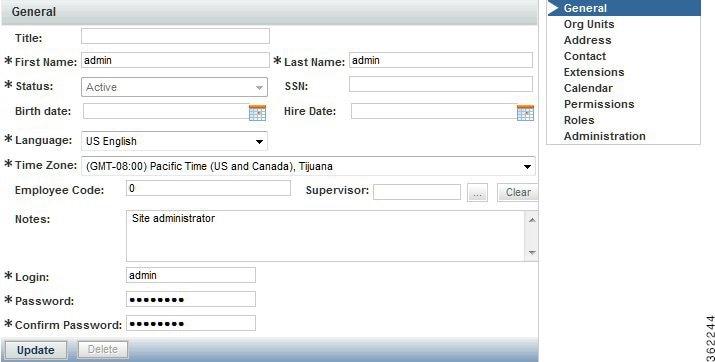
General Person Information
The General page of a person's information allows you to edit the following information:
|
Field |
Description |
||
|---|---|---|---|
|
Title |
Abbreviation used when addressing correspondence to the person; Ms. or Mr., for example. |
||
|
IsLocked |
If a user’s account is locked due to password expiration or retry policy violation, the IsLocked field is enabled automatically. To unlock the user account, disable the IsLocked field and then reset user password. For more information about resetting a user’s password, see LoggedIn User Password field in General Person Information. |
||
|
First Name |
First name of the person. |
||
|
Last Name |
Last name of the person. |
||
|
Status |
Active or Inactive. |
||
|
SSN |
Social security number. |
||
|
Birth Date |
Date of birth. |
||
|
Hire Date |
Person's hire date. |
||
|
Time Zone |
The time zone associated with the person's primary address. This is used to calculate and display the proper due dates for tasks and services according to the person's time zone. |
||
|
Language |
The language that appears on the user interface for the person. |
||
|
Employee Code |
Company-derived employee code, if any. |
||
|
Supervisor |
The supervisor for the employee. This is used in “supervisor” tasks such as certain authorizations. You use Service Designer to create these tasks. |
||
|
Notes |
Any additional descriptive information about the person. |
||
|
Authenticate Yourself Before Changing Password |
A user's password must be reset if the account is locked due to the violation of one of the following policies: The administrator has the privileges to reset a user’s password. To do so, the application ensures that the logged in user is authenticated to change the password of another user. After the logged in user credentials are authenticated, the logged in user, that is the administrator can change the user password using the Login, Password, and Confirm Password fields.
For more information about password policies, see Password Policies. |
||
|
Login |
A unique login identifier. |
||
|
New Password |
The password used to log on to the system. |
||
|
Confirm Password |
Reenter the password. |
Assigning Organizational Units to People
When you create a person, you must assign a default, or Home, organizational unit to the person. Though a person can have only one Home OU, they can be a member of several organizational units. To make an organizational units and people association, use one of the following methods:
- Open the organizational unit and assign people.
- Open the Org Units page of an individual person's information and assign organizational units to the person.
These methods are functionally equivalent, so choose whichever one is more convenient.
In addition, people may be assigned to organizational units via the Org Units attribute mapping in Directory Integration.
Assigning an organization as the person's home OU automatically removes the home OU designation from the previous home.
Address Information
You can enter company and personal addresses, as well as specific location information, for each person.
Having valid address information for a person may be critical to ensure:
- Task performers can find the person when a service needs to be performed in person, for example, changing the hardware configuration of a workstation
- Delivery plans can use expressions that are dynamically evaluated to route work to a queue that serves the area where the service requester is located. Such “location-based queues” are common in geographical distributed organizations.
Contact Information
You can enter multiple means of contacting a person, each one identified by a contact type, such as email, telephone, and so on.
Adding Additional Information using Extensions
The main reason for extensions is to load LDAP attributes into “extensions to the person record” so that conditional workflow can be driven from these attributes. Extensions allow you to add additional information about a person. This information can be tailored to your company's business and financial codes and structure. For example, you can enter a person's department and cost center numbers or names. In addition, you can upload a person's picture, which appears whenever viewing a person's profile information, such as in a search.
Most of the fields on the person profile are used in application processing, and the mapping should ensure that source attributes provide a value appropriate for the field; that is, do not try to overload these fields with more information than would be suggested by the field name, or with information that does not match the field name.
Service Catalog also includes fields which provide an extension to the standard personnel data. These fields appear on the Extensions page of the Person information. Some of the most frequently required extended fields have been assigned meaningful names (such as Company Code and Division), but others have the names Custom 1 through Custom 10, and are intended to be freely used, with no preconceived semantics. If you have additional personnel information in the LDAP directory that needs to be exposed in Service Catalog, map the attributes containing that information to one of the personnel extended fields.
You cannot change “Custom” to another field name. However, if these fields are included in a service form, a label can be assigned which correctly reflects the field contents.
Configuring a Person's Calendar
Calendar information sets a person's availability. You can enter a person's work schedule, detailing the hours of work for each day of the week. In addition, you can specify holidays and other days in which the person is not available. For service group members, this information is used to compute the work hours spent on a task and to determine whether the task was delivered on time or late.
The local time and time zone reflects the time zone assigned to the person in the General page.
Make any necessary changes to the work hours.
- For Time Schedule, enter times for the From and To fields, using a HH:MM AM/PM format.
- Enter the same time in both the From and To fields, for example 12:00 AM, to designate days that are not workdays.
If a holiday falls on a day of the week that is normally a work day, specify that date as an “Additional Date”, with a type of “Holiday”. Conversely, if a work day falls on a day of the week that is usually not a work day, specify that date as an “Additional Date” and assign a type of “Working Day”.
A person can access his/her own calendar via the Profile link that appears alongside the module menu:
Assigning Permissions to a Person
Permissions define an object’s capability to affect a chosen person. These objects can be organizational units, groups, other people , roles, and functional positions. For people, you can set up permissions to define who can order on behalf of the chosen person:
The Permissions page also designates the Authorization Delegate for the chosen person in the event that an authorizer cannot fulfill authorization duties, for example if the authorizer is on vacation. The delegate can perform authorizations for the person during the time period specified using the Delegation Start Date and Delegation End Date fields.
A person may assign their own Authorization Delegate using the Preferences page of the Profile option. Since delegates may be designated many times, for different periods, it is recommended that individuals be responsible for designating their own delegates, rather than using Organization Designer to do this.
To assign a person's Authorization Delegate supply the information summarized below.
|
Page |
Description |
|---|---|
|
Authorization Delegate |
Click Select Person to search for and choose the person responsible for authorizations in the event that the original authorizer is unavailable. |
|
Delegate Start Date |
Choose a start
date, using a MM/DD/YYYY format, for the delegate to take over authorization
responsibilities. You can click
|
|
Delegate End Date |
Choose an end
date, using a MM/DD/YYYY format, for the delegate to end authorization
responsibilities. You can click
|
If you are using the delegation functionality, you should keep in mind:
- The delegate does not automatically receive notification for an upcoming authorization. To notify the delegate, the appropriate namespace (#Alternate...#) must be used in the To: field of the email. If no delegation is in effect, the namespace value will be blank in the notification.
- Once the delegate clicks an action button (Approve, Reject, or OK) for the delegated approval task, they become its owner. Ownership of that task is actually transferred to the user who clicks the action button.
- After this ownership transfer, the original approver's ability to “see” the task is determined by their role and by OU membership. In order to see the completed approval task (in My Services), the original approver would need to have the My Services Professional role (or at least a role with the “View Authorizations for My Units” capability) and would need to be in the same OU as the person who actually performed the approval.
Deactivating a Person
If directory integration is in place and is configured to refresh people and organizations, or to perform a Single Sign-On, you must also ensure that the person to be deactivated is not longer an active user in the enterprise directory. If that user were to log in, the person entry would be reactivated.
Once a person has performed any activities within Service Catalog, the person entry cannot be deleted. The person can be made Inactive to prevent them from logging on or performing further activities.
Functional Positions
Functional positions can add flexibility to configuring a service's delivery plan and assigning responsibilities for various aspects of the Service Catalog application. A task within the system can be assigned to a functional position. A person, queue or role can then be assigned to fill that functional position. The functional position can be referenced in tasks (assigned as a task performer) or in namespaces (included in an email sent to the appropriate person or people.)
Functional positions can be associated with one of the four entity types:
Service Catalog provides several standard functional positions, which cannot be modified. In the illustration below, the check boxes to the left of the system-defined functional positions are dimmed, indicating that these positions cannot be deleted or updated. The “Manager” and “Tester” positions were created at this site.
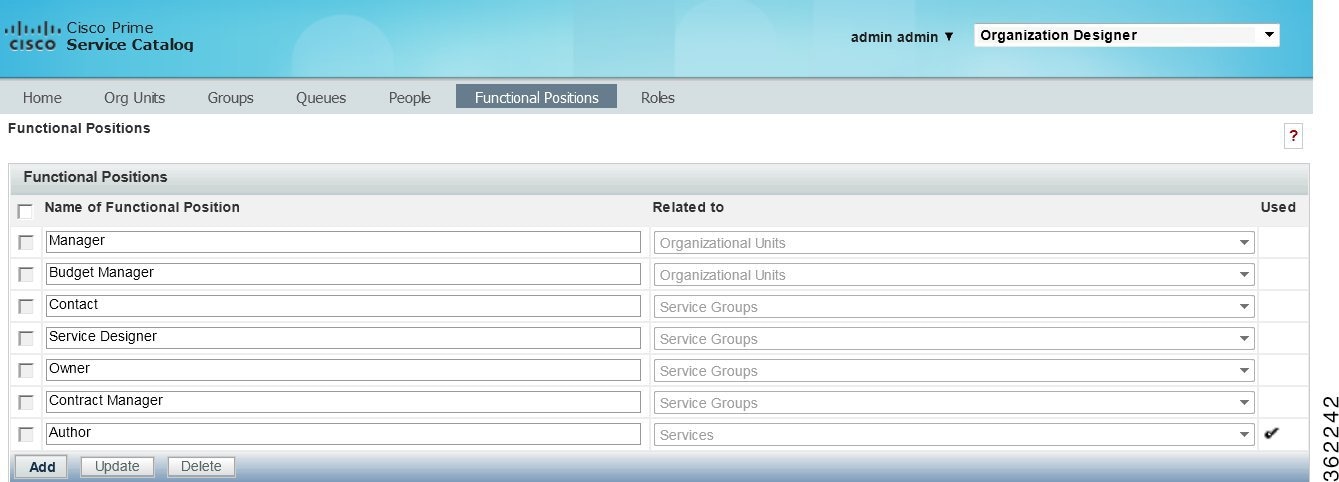
Functional positions associated with each type of entity appear on the Positions page for organizational units in Organization Designer, or on the General tab for services or service groups in Service Designer. For example, with just the standard functional positions associated with an organization, the account functional positions page for maintaining Organizations would look like this:
Creating a Functional Position
If the system-defined functional positions do not meet your company's requirements, you can create functional positions. To add a new functional position:
| Step 1 | Click Add on the Functional Position page, a new line will appear at the bottom of the list of positions. |
| Step 2 | Enter a name for the functional position and choose its Type from the drop-down menu on the right. |
| Step 3 | Click Update to save the new functional position. The name cannot be the same name as a previously defined functional position even if it has a different Type. Also, the name should not contain spaces, even though this is permitted. A name with embedded spaces cannot be used as a namespace variable. |
| Step 4 | By choosing the
Type, you associate the position with an organizational unit,
service group, or service. New functional positions associated with each type
of entity are automatically added to the Positions page for organizational
units in Organization Designer, or on the General tab for services or service
groups in Service Designer.
Once the functional position has been defined, you may assign a person to the position through the Positions page for the organizational unit in Organization Designer, or on the General tab for the service or service group in Service Designer. |
Modifying a Functional Position
When attempting to update a functional position, keep in mind:
- The standard positions display a disabled (dimmed) check box next to the position name and cannot be deleted, even if they are not in use.
- You can only update a created functional position name.
-
You cannot update a position association (Type). If you need to change an association, such as changing from Service Groups to Services, then you must delete the position, and create a new position. You cannot delete a position that is in use, indicated by a checkmark
Deleting a Functional Position
You cannot delete standardized, system-defined functional positions, which are indicated by a dimmed check box. Nor can you delete one in use, indicated by a checkmark in the Used column. You should, however, delete any functional positions that are no longer in use. To remove unnecessary functional positions simply check them and click Delete.
Roles
Service Catalog provides “Role-Based Access Control” (RBAC). This allows administrators to control which people, organizational units, or groups can access certain modules, and what capabilities they can perform within each module. Further, those permissions can be allowed to operate on all entities (objects) of a particular type, or restricted to a set of named entities.
A role, therefore, combines access to a module with one or more capabilities, and in some cases, one or more object-level permissions.
- Permissions – grants rights to act upon an object
- Capabilities – provides the means to perform certain functions within a module
Service Catalog provides several system-defined roles, which group capabilities into sets of responsibilities that might typically be assigned to participants in a Service Catalog implementation. Site administrators can supplement these roles with custom roles, to better suit the division of responsibilities on a particular implementation team.
All members of the organizational unit inherit the roles assigned to the organizational unit. In addition, suborganizational units inherit roles from their parent organizational unit.
When an organization is created, it is automatically granted the My Services Consumer role. This allows any members of the organization (or suborganizations) to access My Services and to order any services for which they have been granted ordering permission. (Permission to order a service is granted via the service or service group.)
Any role defined in Service Catalog, both default roles provided by Service Catalog and custom roles created in each installation can be granted to an organization. Users should typically not change aspects of the organization's definition that are refreshed via directory integration. If a change is needed, it must be applied to the contents of the directory that is the source of the data.
Roles and permissions can also be configured from the User Management module > Roles. For more information see section Managing Roles.
Any administrative privileges allowing changes to organizations are overridden by entity protections that are applied to an entity at any non home sites. See the Cisco Prime Service Catalog Designer Guide for more information on setting entity protection levels.
You can download the complete list of all out-of-box RBAC roles and capabilities from Cisco Prime Service Catalog RBAC Roles Capabilities and Permissions.
- Role Hierarchy
- Searching for Roles
- Roles with Object-Level Permissions
- Custom Roles
- Usage Scenarios to Create Sample Custom Roles
Role Hierarchy
Roles are organized using a hierarchical structure of containers, much like folders. This structure allows you to create parent-child relationships between roles, in which child roles inherit the capabilities, permissions, and members from parent roles.
Containers and roles are distinguished by their name. A name ending with “Roles” is a container. The orange icon indicates a system-defined role.
System-Defined Roles
Service Catalog provides system-defined roles which reflect the majority of use cases an average company may require for their users. In general, these roles should meet most companies' role requirements. Those roles which are categorized and assigned capabilities in accordance with ITIL (IT Infrastructure Library) guidelines are noted.
In the event that one of these system-defined roles does not meet your needs, you can create a new role, or, better yet, copy an existing role and modify it to meet your needs.
The following lists the hierarchical structure of the system-defined roles. Click the role name for a brief description of the role and list of associated capabilities. You can also see a list of capabilities by module.
|
Role Containers |
Description |
Roles |
|
|---|---|---|---|
|
Financial Management Roles |
Roles supporting the ITIL process of Financial Management, within the Solution Area of Service Strategy and Design. |
||
|
Request Fulfillment Roles |
Roles supporting the ITIL process of Request Fulfillment, within the Solution Area of Service Operations, including Request Self-Service, Request Governance, and the management and automation of fulfillment activities. |
||
|
Subcontainers |
Description |
||
|
Fulfillment Automation Roles |
Roles supporting the automation of service request fulfillment and delivery. |
||
|
Fulfillment Management Roles |
Roles supporting the fulfillment of service requests. |
||
|
Request Governance Roles |
Roles supporting the governance of service requests. |
||
|
Request Self-Service Roles |
Roles supporting the initiation and tracking of service requests |
||
|
Service Catalog Management Roles |
Roles supporting the ITIL area of Service Catalog Management, within the Solution Area of Service Strategy and Design. |
||
|
Service Level Management Roles |
Roles supporting the ITIL process of Service Level Management, within the Solution Area of Service Strategy and Design. |
||
|
Service Lifecycle Management Roles |
Roles supporting the processes of defining and managing service items in the context of the Service Catalog and in service delivery. |
||
|
Service Catalog Management Roles |
Roles supporting the processes of defining and managing the Service Catalog. |
||
|
Service Portfolio Management Roles |
Roles supporting the ITIL process of Service Portfolio Management, within the Solution Area of Service Strategy and Design. |
||
|
Service Reporting Roles |
Roles supporting the ITIL process of Service Reporting, within the Solution Area of Continual Service Improvement. |
||
|
Team Management Roles |
Roles supporting the processes of defining and managing the project teams. |
Team Administrator |
|
|
Integrations Roles |
Roles supporting the processes of creating and managing the internal and custom integrations. |
||
Integration Administrator and Integrations Administrator are two separate roles with different capabilities. Ensure that before you assign this role to a user review the latest RBAC roles and capabilities document Cisco Prime Service Catalog RBAC Roles Capabilities and Permissions.
”Anyone” and “Site Administrator” Roles
The “Anyone” and “Site Administrator” roles listed at the bottom of the chart above do not fit into an ITIL role structure. These roles provide access control capabilities unique to Service Catalog.
The “Anyone” role is (quoting the description of the role): “Special Role created to support the assignment of capabilities and object-based permissions to the logical anyone, which represents all People.” Every person is automatically a member of the Anyone role, you cannot modify the list of members.
In small installations it is sometimes useful to assign to Anyone the capability to order all services. Think twice (or more) before assigning any other permissions or capabilities; any person with access to Service Catalog would be able to perform the functions provided by those roles and capabilities.
The “Site Administrator” role, quoting from the role description, is a “Role automatically assigned to any user who is a member of the Site Administration organizational unit; provides all capabilities and permissions within Service Catalog and Demand Center.” The “admin” user is automatically a member of the Site Administrator role. Other members should be assigned sparingly, because of the power conferred by the role.
Prime Service Catalog System Defined Roles for UCS Director Integration
Prime Service Catalog creates the following system-defined roles for the UCS Director roles it discovers. The following table lists the mapping of the UCS Director to Prime Service Catalog system-defined roles.
|
UCS Director Roles |
Prime Service Catalog System Defined Roles |
Description |
|---|---|---|
|
System Admin |
UCSD Sys Admin |
UCSD Sys Admin user can view the details of Containers, vDC's and VM's as service items in My Products and Services based on the Group permissions assigned to each of the UCS Director Service Item in Service Item Manager. Only users with this role can order Container Template Services. |
|
All Policy Admin |
||
|
Computing Admin |
||
|
Service End-User, Group Admin, Operation roles |
UCSD End User |
UCSD End User can view the details of Containers, vDC's and VM's as service items in My Stuff based on the Group permissions assigned to each of the UCS Director Service Item in Service Item Manager. Users with this role can order services based on the group to which user belongs and catalogs which are assigned to a group in UCS Director. |
|
All other roles |
UCSD Operator |
Users with this role can only view and use the self-service portal but cannot order the services. |
Note | In a single pane of glass, where Prime Service Catalog, UCS Director are connected to LDAP:
|
Searching for Roles
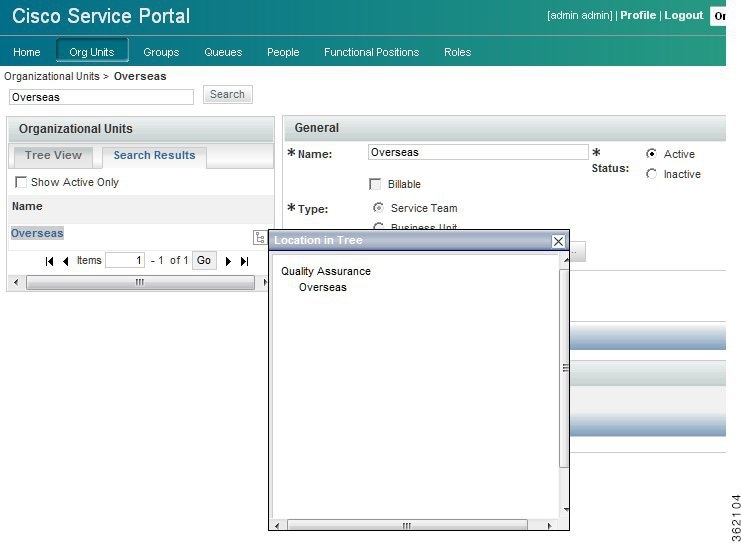
You can search for a role by typing all or part of its name in the Search box on the Roles tab.
In the Search Results list, click the Item Hierarchy icon to view its exact location in the roles Tree View.
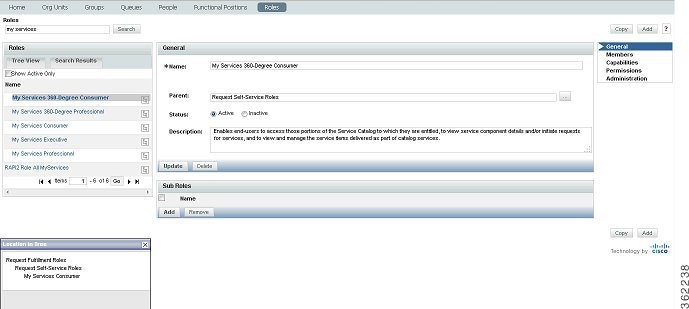
In the example above, “My Services Consumer” was entered into the Search field. The role was found and listed on the Search Results tab. You can see, by clicking the hierarchy icon, that this role resides in the Request Fulfillment Roles container, which resides in the Request Self-Service Roles container.
Click the role name to view general details such as the name and description, the entities that have been assigned to this role, included capabilities, object-level permissions, and to configure which entities have access to this role.
Configuring Roles
You use the Roles tab to search for and to view, create, modify, deactivate, or delete roles. Once you locate the role you wish to work with, there are five sections with which to become familiar:
|
Page |
Description |
|---|---|
|
General |
General information about the role, including the role name and description, its place in the role hierarchy, as well as its status (Active or Inactive). |
|
Members |
People, groups, and organizational units assigned this role. |
|
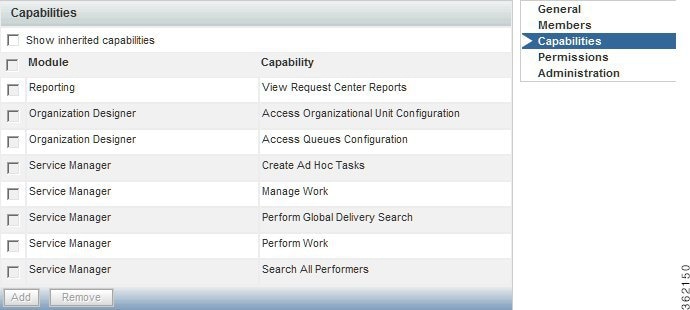
Capabilities |
Capabilities included in a role. You cannot add or delete capabilities in a system-defined role, although you can add subroles/child roles to a system-defined role. |
|
Permissions |
Object-level permissions, if any, for the role. Not every module contains objects with object-level permissions. You can choose to select all objects or specific objects. |
|
Administration |
Entities with permission to view or modify role information. |
Assigning Members to a Role
Members of a role consist of individual people, groups, and organizational units that have been assigned the role. If groups or organizational units are assigned, all members of the group or organizational unit inherit the role. In addition, suborganizational units and subgroups inherit roles from their parent. The Show inheriting members option allows you to choose whether to show those members who have inherited the role from a parent organizational unit or group. If not checked, only organizational units and groups directly assigned to the role appear.
Before you can assign person, group, or organizational unit to the role, you must first make sure the entity exists.
There are two ways to create a role/member association:
- Go to the individual person, group, or organizational unit, and assign the role.
- Go to the role and add members.
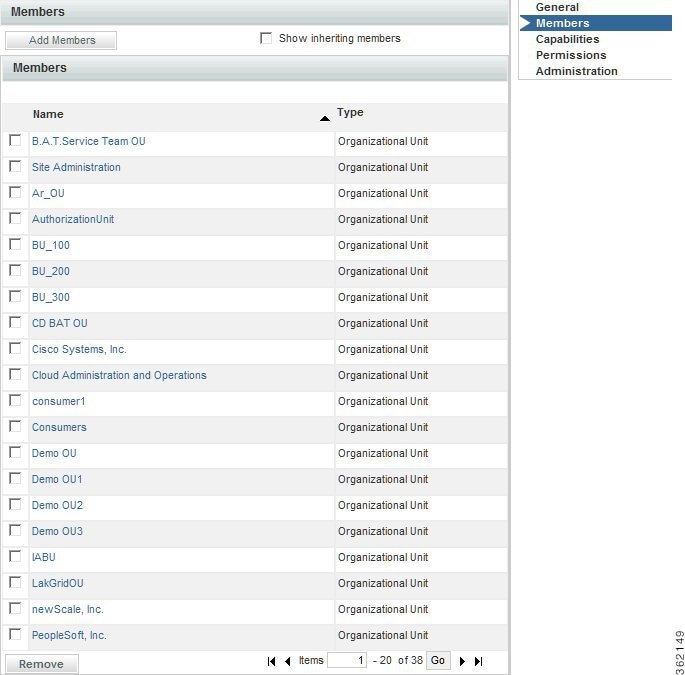
The screen above is for the My Services Consumer role, which is automatically granted to every OU, and by inheritance, to every person in every OU.
Roles with Object-Level Permissions
Not every module contains objects with object-level permissions. Thus, not every role has object-level permissions assigned. An example of a role that does include object-level permissions is the “Service Team Administrator” role, which resides in the Request Fulfillment Roles > Fulfillment Management Roles container. The “Service Team Administrator” role includes capabilities across two modules:
If the purpose of this role is to enable the full range of management actions in Service Manager and the ability to create and manage service teams and queues in Organization Designer, then this role must grant object-level permissions to Organizational Units, People, and Queues, as shown below.

Custom Roles
Organization Designer provides a large number of predefined roles. These roles should be suitable for most use cases an average company may encounter for their users. If, however, you need additional roles, you can create custom roles by either creating a new role from scratch or copying an existing role and modifying it to meet your needs.
Because of the numerous combinations of capabilities and permissions available, keeping track of these combinations can be a challenge. Therefore, you should create a new role by identifying a system-defined role that has most or all of the capabilities you need. You should not use a system-defined role with more capabilities than you need is because you cannot remove capabilities from a child; it inherits all of the capabilities of its parent.
| Step 1 | Create this role by doing one of the following:
|
| Step 2 | Make the user-defined role a child of a system-defined role. |
| Step 3 | Define the new role by adding capabilities and permissions as needed. |
| Step 4 | Assign members to the role. |
General Role Information
Enter the following information:
|
Page |
Description |
|---|---|
|
Name |
Name of the new role. |
|
Parent |
 |
|
Description |
Any text describing the new role. |
For custom roles, the General page allows you to edit information provided when the role was created. You can assign a parent role, set the role to be active or inactive, or add to the roles description, logging any changes as they occur. You can also develop the hierarchical structure by adding or removing sub roles.
Role Hierarchies
Sub roles allow you to create a hierarchical structure of parent and child roles. Each role can have both a parent role and one or more child, or sub roles. Only custom roles can be used when creating a sub role hierarchy. The hierarchical structure of system-defined roles cannot be changed.
Sub roles, and therefore the members of that sub role, inherit all the capabilities assigned to its parent role. Because of this inheritance rule, you must make sure you set up your role system carefully.
You can create a parent/child relationship using two methods:
- Assign a parent role on the General page.
- Assign child, or sub roles to the parent.
Assigning Role Capabilities
A “capability” is the ability to perform certain functions within Prime Service Catalog. It is critical to review the capabilities that are available and how they are combined in the predefined roles in order to be able to assign the predefined roles to appropriate users and potentially to recognize the need to create a custom role.
The easiest way to review the available capabilities online is to “pretend” to create a custom role, click Add Capabilities, and browse through the list that appears. Capabilities are divided by module, since each capability confers rights to perform functions within a particular module.
To disable the access provided to the roles, remove the role from the selected person or remove the capabilities that was assigned.
Capabilities for each module are summarized below.
- Capabilities for My Services, Service Catalog, and Order Management
- Capabilities for Service Designer
- Capabilities for Service Link
- Capabilities for Reporting
- Capabilities for Service Manager
- Capabilities for Organization Designer
- Capabilities for Administration
- Capabilities for Catalog Deployer
- Capabilities for Service Item Manager
- Capabilities for Portal Designer
- Capabilities for Localization
- Capabilities for Integrations
- Capabilities for Tenant Management
- Capabilities for User Management
- Capabilities for Web Services
- Capabilities for SOAP-based Services through API
Capabilities for My Services, Service Catalog, and Order Management
My Services capabilities pertain to the abilities to order services; view requisitions; and access tabs and links available in the Service Catalog, Order Management module, and My Services.
|
Capability |
Description |
||
|---|---|---|---|
|
View Requisitions |
This capability controls whether the user can see the “Requisitions” link and portlet. Users with this capability can also drill down to Requisition details and track the current status. |
||
|
View Percentage Completion of Requisitions |
This capability allows the user to see the requisitions completion percentage. You can enable the percentage display in Service Catalog > My Products & Services > Orders page by setting the servicecatalog.display.req.percentage.completion property in the newscale.properties file to true.
|
||
|
See Requisitions for My Business Units |
Users with this capability can see all requisitions for their business units in the My Stuff view. |
||
|
View and Perform Authorizations |
This capability controls whether users can see the “Authorizations” link in the top navigation bar. |
||
|
See Authorizations for My Business Units |
Users with this capability can see all authorizations for their business unit in the Authorizations view. |
||
|
Order on Behalf |
Users will see the Order on Behalf link in the top level navigation bar if you they are using the My Services module. Simply having any Order On Behalf object permission will also cause the Order on Behalf link to appear. |
||
|
Order My Services for Others |
Users can order any service they have ordering permissions for on behalf of other users, in addition to the services that those other users can order for themselves. |
||
|
View KPIs |
The KPI portlet appears in the My Services, My Services Executive, Relationship Manager, and Service Level Manager home pages (this capability is effective only if the Show KPI Portlet global setting is turned On). |
||
|
Browse for Services |
This capability controls if the user can see the Browse Services portlet. |
||
|
Search for Services |
This capability controls the Search Services portlet. |
||
|
Order Services |
This capability controls whether the user receives the “Order” link next to services that are orderable. |
||
|
Copy Requisitions |
This capability controls if the user sees the “Copy Requisition” link in the top navigation bar and all associated functionality for Copy Requisitions. |
||
|
Manage Profile |
This capability controls whether users can manage their profile which is available via the “Profile” link. |
||
|
Access Service Item Instance |
This capability enables the user with this role to view the My Products &Services section in Service Catalog module. users who use My Services will be able to access “Service Items” tab in My Services module. |
Capabilities for Service Designer
The Service Designer capabilities allow different sets of users to work on different aspects of a service definition. Coupled with the ability to assign permissions to different sets of users to work on different sets of services and service groups, this provides robust support for a distributed development environment
Most of these same capabilities govern the equivalent functionality in the Service Catalog and Order Management modules. The only exception is "View KPIs" which is not available outside of My Services. There are also some differences in how some of these capabilities work in Service Catalog. Users who have chosen Service Catalog as their catalog view will have implicit capabilities for service browse and search, and use the "Order for others" action buttons to order services on behalf of another person.
|
Capability |
Description |
||
|---|---|---|---|
|
Access Services |
This capability grants access to the Service Catalog option within Service Designer. Any user with this capability has access to all of the services in any of the service groups to which he has the “Design Services...” or “View Services...” permission. This capability provides access to all tabs within the service definition. |
||
|
Access Service Presentation |
This capability grants access only to the General, Offer, and Presentation tabs for a service. A user with this capability has access to those tabs on all services in any of the service groups to which he has the “Design services ...” or “View services...” permission. |
||
|
Access Service Forms |
This capability grants access only to the Service Form tab for a service. A user with this capability has access to that tab on all services in any of the service groups to which he has the “Design services...” or “View services...” permission. |
||
|
Access Service Delivery |
This capability grants access only to the Plan and Authorization tabs for a service. A user with this capability has access to those tabs on all services in any of the service groups to which he has the “Design services...” or “View services...” permission. |
||
|
Access Service Groups |
Grants access to service groups. A user with this capability has access to all service groups to which he has the Read or Read/Write permission. |
||
|
Access Active Form Components |
Grants access to Active Form Components. A user with this capability has access to all form groups to which he has the Read or Read/Write permission. |
||
|
Manage Service Dictionaries |
Grants Read/Write access to all dictionaries, at all system moments. Supports the ability to test and debug services. |
||
|
View Dictionaries |
Grants read-only access to dictionaries.
|
||
|
Manage Dictionaries |
Grants permissions to edit and create dictionaries. |
||
|
Access Dictionaries |
Grants access to only permitted dictionaries for the logged in user. |
||
|
Manage Scripts |
Grant permissions to all functionality of Scripts, including functions and libraries. |
||
|
Manage Categories |
Grant permissions to all functionality of Categories. |
||
|
Manage Keywords |
Grant permissions to all functionality of Keywords. |
||
|
Manage Objectives |
Grant permissions to all functionality of Objectives. |
||
|
Import Services |
Enables the Import feature of Service Designer, allowing the user to import an XML formatted service definition. |
||
|
Create Service Group |
Grants ability to create a new service group. |
Capabilities for Service Link
The Service Link capabilities allow different sets of users to be designated as integration developers as opposed to Administrators, responsible for monitoring the status of integrations in a production environment.
|
Capability |
Description |
|---|---|
|
Manage Adapters |
This capability grants access to the Adapters tab and permissions to view, edit, create, and delete Adapters. |
|
Manage Agents |
This capability grants access to the Agents tab and permissions to view, edit, create, and delete Agents. |
|
Manage Transformations |
This capability grants access to the Transformation tab and permissions to view, edit, create, and delete Transformations. |
Capabilities for Reporting
Reporting capabilities allow grantees to access the Reporting and Advanced Reporting modules and to develop reports.
|
Capability |
Description |
|---|---|
|
Reports Designer |
This capability grants access to all functionality available in the Report Designer section in Advanced Reporting. |
|
KPI Administration |
This capability grants all access to the KPI Administration function as well as the capability to manage the KPIs and create/modify KPIs. |
|
Ad-Hoc Reports |
This capability grants access to the functionality available in the Ad-Hoc Reports section in Advanced Reporting. |
|
Reporting - Administration |
This capability grants access to all reporting capabilities such as manage Reporting folders, dashboard, IBM Cognos Administration, schedule reports, save reports, permissions administration, and create reports. |
|
View Service Catalog Reports |
This capability grants access to the Reporting module and the ability to view the KPI dashboard and run Service Catalog reports. |
Capabilities for Service Manager
The Service Manager module allows task performers to view and update internal tasks assigned to them. Task Managers can view or update tasks, as well as managing task allocation and scheduling.
|
Capability |
Description |
|---|---|
|
Search All Performers |
Users can query any Performer in the system from the search box in the Navigation Pane. |
|
Perform Work |
Users have access to the following system behaviors:1. Check In/Out Tasks2. Close Out Tasks3. Standard Views4. Cancel Tasks for which they are the Task Supervisor |
|
Manage Work |
Users have access to the following system behaviors:1. Assign Work2. Set Task Priorities 3. Reschedule Task Due Dates4. Administration View5. Service Teams View |
|
Perform Global Delivery Search |
Users can see all requisitions. In Service Manager, this capability enables a “Global Search Option” that allows searching through all requisitions and tasks in the system, regardless of the user's Queue access rights. The capability also enables the user to save public Service Manager views. |
|
Create Ad-Hoc Tasks |
Users have access to the Ad-Hoc Task creation feature in Service Manager. Once granted this capability, the “New Ad-Hoc Task” form section on the Ad-Hoc Task page is available to the user. |
Capabilities for Organization Designer
Organization Designer capabilities allow access to the options for maintaining people, organizations, queues, roles, and functional positions. These options supplement the ability to maintain these objects provided through Directory Integration (described in the Cisco Prime Service Catalog Integration Guide and performing Directory Tasks (described in the Cisco Prime Service Catalog Designer Guide ). Together with object-level permissions, allowing users to read and write specific organizational entities, the capabilities provide granular control over a multi tenant environment.
|
Capability |
Description |
|---|---|
|
Manage Basic Service Deployments |
Allows the ability to create, transmit and manage Basic Service deployment packages. |
|
Access Organizational Unit Configuration |
Users see the Organizational Units tab and entity type in a homepage search within Organization Designer and can access the OU's they have rights to. |
|
Access Groups Configuration |
Users see the Groups tab and entity type in a homepage search within Organization Designer and can access the Groups they have rights to. |
|
Access Role Configuration |
Users see the Roles tab and entity type in a homepage search within Organization Designer and can access the Roles they have rights to. |
|
Access Person Configuration |
Users see the People tab and entity type in a homepage search within Organization Designer and can access the Persons they have rights to. |
|
Access Queues Configuration |
Users see the Queues tab and entity type in a homepage search within Organization Designer and can access the Queues they have rights to. |
|
Access Functional Position Configuration |
Users see the Functional Position tab within Organization Designer. |
Capabilities for Administration
Individual capabilities are not available for all options within the Administration module. For options not covered by a capability (for example, access to the Debugging page), users must be granted the Site Administrator role.
|
Capability |
Description |
|---|---|
|
Manage Directory Integration Configuration |
Users see the Directories option and can configure Directory Integration settings. |
|
Manage Authorization Structure |
Users see the Authorizations option and can configure site level Authorizations. |
|
Manage Global Settings |
Users see the Global Settings option and can configure site level application settings that alter system behavior. |
|
Manage Email Templates |
Users see the Email Templates option and can view, create, or disable email templates. |
|
Manage Lists |
Users see the Lists option and can view and modify system reference lists. |
|
Use Support Utilities |
Users see the Utilities tab and Use Support Utilities link. |
|
Access Log and Property Files |
Users see the Log and Property tab and can view and download log and property files. |
|
Access Purge Utilities |
Users see the Purge Utilities tab and can use purge utilities. |
|
Access Version History |
Users see the Version History tab and can view version history. |
|
Access Form Data Viewer |
Users see the Form Data Viewer tab and can use the Form Data Viewer. |
|
SAML SSO Settings |
User see the SAML SSO Settings tab and can perform the CRUD operations for IDP Mappings, SAML Configuration and perform the Refresh Metadata. |
Capabilities for Catalog Deployer
Catalog Deployer capabilities allow grantees to build and deploy packages within the Catalog Deployer module.
|
Capability |
Description |
|---|---|
|
Manage Basic Service Deployments |
Allows the ability to create, transmit and manage Basic Service deployment packages. |
|
Manage Advanced Service Deployments |
Allows the ability to create, transmit and manage Advanced Service deployment packages. |
|
Manage Custom Deployments |
Allows the ability to create, transmit and manage Custom deployment packages. |
|
Import Deployments |
Allows for the import and export of deployment packages. |
|
Deploy Deployment Packages |
Allows the deployment of a new or updated content into the site. |
|
Manage Basic Offering Deployments |
Allows the ability to create transmit and manage Basic Offering deployment packages. |
|
Manage Advanced Offering Deployments |
Allows the ability to create transmit and manage Advanced Offering deployment packages. |
Capabilities for Service Item Manager
Standard roles relating to Service Item Manager and the capabilities included in each are summarized in the table below.
|
Capability |
Description |
|---|---|
|
Manage Standards Definitions |
This capability enables the user assigned to this role to define and manage standards, including adding and deleting entries |
|
Manage Service Item Definitions |
This capability enables the user assigned to this role to define new service items and their attributes |
|
Import Service Item and Standards Data |
This capability enables the user assigned to this role to access the import options to import service item and standards data and definitions |
|
Access Service Item Instance Data |
This capability enables the user assigned to this role to access “Manage Service Items” tab in Service Item Manager module. |
|
Access Service Item Definition |
This capability enables the user assigned to this role to access “Design Service Items” tab in Service Item Manager module. |
|
Access Standard Data |
This capability enables the user assigned to this role to access “Manage Standards” tab in Service Item Manager module. |
|
Access Standard Definition |
This capability enables the user assigned to this role to access “Design Standards” tab in Service Item Manager module. |
|
Create Service Item Group |
This capability enables the user assigned to this role to create a new service item group. |
Capabilities for Portal Designer
Capabilities for using Portal Designer are described in detail in the ‘Designing Portals’ chapter, of the Cisco Prime Service Catalog Designer Guide.
Capabilities for Localization
Adding the Localization Management capability allows a user role to access the Localization module.
Capabilities for Integrations
Integrations capabilities allow the user to access the Integrations module and create integrations.
|
Capability |
Description |
|---|---|
| Create Integrations | Grants permissions to create and edit integrations. |
| Access Integrations | Grants read-only permissions to integrations. |
Capabilities for Tenant Management
Adding the Access to Tenant Management capability allows a user role to access the Tenant Management module.
Capabilities for User Management
User Management capabilities allow grantees to access the User Management module and Service Role tab.
|
Capability |
Description |
|---|---|
| Access User Management | Grants read-only access to the user management module. |
| Access Service Roles | Grants read-only access to service roles. |
Capabilities for Web Services
The web services can be accessed by users who have a role which includes appropriate capabilities for the Web Services module. No prebuilt roles include these capabilities, so administrators will need to use Organization Designer to create one or more custom roles. Once the role is created, you can add Web Services capabilities.
|
Capability |
Description |
|---|---|
|
Service Catalog Access |
Users having this capability can access the Service catalog for web services. |
|
Demand Management Access |
Users having this capability can access the Demand Management web service for themselves. |
|
NSAPI Access |
Users having this capability can access NSAPI web service.. |
|
Requisition Access |
Users having this capability alone can access the RequisitionService web service requests for themselves. The authenticated user and the initiator will have to be the same. If not, an appropriate fault response is thrown. |
|
Requisition System Account |
Users having this capability can access the RequisitionService web service requests for themselves as well as anybody else. The authenticated user and the initiator can be different. |
|
REX API Access |
User having this capability can access the Catalog Deployer Functions. |
|
Task Access |
Users having this capability alone can access the ServiceManagerTaskService web service requests for themselves. This is a required capability. |
|
Task System Account |
Users having this capability can access the ServiceManagerTaskService web service requests for themselves as well as anybody else. The authenticated user and the initiator can be different. |
Capabilities for SOAP-based Services through API
In addition, users will be able to submit requisitions through Service Catalog, which provides the ability for external systems to submit requisitions through a web service request, using the SOAP-based version of Requisition API (RAPI). Users can also request using the REST-based API. Such requests, bypassing the Service Catalog module, would never have a service form appear in the ordering moment. Consequently, their design would need to differ from that of a corresponding service that is ordered interactively. For example, no rules or Java Script functions could provide default values; and multi option fields, such as check boxes or drop-down lists, could not be used.
As a result of those limitations, designers sometimes choose to create a set of parallel services that can only be ordered through RAPI. Such services should never appear in the Service Catalog of nonadministrative users. Instead, ordering permissions should be granted only to administrative users. The RAPI service is always ordered by such a user who has been assigned the critical capability to “Order my services for others”, with the “other” specified as the customer for the request.
Assigning Permissions
Permissions grant the rights to an object, such as an organizational unit or group, within a particular module. These include read/write access to other modules, as well as object-specific permissions. These include:
|
Module |
Objects |
Permission |
||||
|---|---|---|---|---|---|---|
|
Service Designer |
Service Group |
|
||||
|
Service |
||||||
|
Form Group |
|
|||||
|
Reusable Form |
||||||
|
Dictionary Group |
|
|||||
|
Dictionary |
||||||
|
Organization Designer |
|
|
||||
|
Portal Designer |
|
|
||||
|
|
Portal Page Group
|
|
||||
|
|
Custom Content |
|
||||
|
Custom Content Group |
|
|||||
|
Demand Management |
Billing |
Maintain Billing Rates: Allows the user to manage billing rates. |
||||
|
Service Item Manager |
|
|
||||
|
Service Item Instance Data |
|
|||||
|
|
Standard Table Data |
|
To add a new object-level permission to a custom role, use the table above to choose the following:
|
Page |
Description |
|---|---|
|
Object Type |
Choose an object (entity) type from the list box. |
|
Permission for this type |
Based on the object type selected, choose the permission. |
|
Assign permission to |
Choose one of the following: All objects of this type – For example, if you choose organizational unit, then all organizational units are assigned this permission. Selected Objects – Search for and choose the objects to which you wish to assign this permission. The following additional permissions are applicable for person - object type and for read and read/write permission types only:
The following additional permissions are applicable for organization unit- object type:
|
Modifying an Existing Role
For system-defined roles, you can only modify the members assigned to the role, as well as read/write access to the role. Custom roles are fully modifiable, including capabilities and permissions, for those users with the correct administrative rights to do so.
Assigning Permissions to People with Custom Roles
You can assign read or read/write permissions to people with custom-defined roles such that he could view or make changes to a limited set of people. In this scenario, you configure permission for a user such that, the person with the defined custom role will be able to view accounts of all people who belong to the same account as he is.
To add permissions to people with custom roles:
You can view the people with access permission you provided in the following modules:
Usage Scenarios to Create Sample Custom Roles
This section describes the various scenarios for the custom roles.
- Support Team
- Organization-Specific Service Team Administrator
- Support Team for an External Application
- Distributed Service Design
Support Team
We have a support team that handles issues faced by clients. That team must be able to view every requisition but not modify the requisition in any way. This role needs read access to all requisitions.
To create a role for the support team:
| Step 1 | Create a new role. |
| Step 2 |
Add the
capability
Perform Global
Delivery Search listed in the Service Manager module. This will allow
any member of this role to access the Service Manager module and search for all
tasks/requisitions.
|
| Step 3 | Assign your support team as members of this role. For more information, see Assigning Members to a Role. |
Organization-Specific Service Team Administrator
The “Service Team Administrator” preconfigured role, described in the section above on Object-Level permissions, allows members of the role to manage any service team and to modify information on any organizational units and queues.
This role is an excellent candidate to be copied to a custom role which provides the same capabilities but limits its members to working on specific organizational units, and queues, rather than “All Objects” of each type. Responsibility for maintaining the service teams in an organization could be divided between multiple Service Team Administrator roles, each of whom has control over a different set of organizations and their queues. If the organizations were structured hierarchically, only a parent organization would need to be specified as the object of a particular permission, all child objects would also be subject to the same permission.
Support Team for an External Application
Assume that many, but not all, requisitions have an integration to an external system such as Remedy. Analysts who work on the Remedy application may need to review any Service Catalog requisition that includes an integration to Remedy, and may need, for example, to add attachments or comments to such requisitions.
| Step 1 | Create an OU of type = Service Team, named, for example, Remedy Team. |
| Step 2 | Make all the people who need access to these requisitions members of this OU. |
| Step 3 | Create a queue homed to the Remedy Team OU; name it Remedy Team. The Remedy Team OU now automatically gets the Access Queue permission to the queue of the corresponding name. |
| Step 4 | For any service for which the Remedy integration is part of the
delivery plan, add a task.
|
Distributed Service Design
In an implementation of Service Catalog that spans multiple divisions within an organization, it is sometimes desirable to distribute the responsibilities for service design to multiple groups of developers. Ideally, these developers should be able to leverage each others’ work, reusing a service or service component created and tested by another group. However developers must ensure that they do not accidentally or on purpose change a design component maintained by another group.
Such an environment can be established via the use of Permissions associated with Service Designer components. You could set up a custom role for each development group. (Members may be assigned either directly or indirectly, via membership in a service team or group.) In Service Designer that role is able to:
- Design services ... in this service group (service groups containing services maintained by the team)
- Order services in this service group
- View services in possibly related services groups, or groups that might have interesting techniques for them to see
- Design forms in their own form groups
- View forms in the reserved group
- View forms in any other (common?) groups that they might need to include in their services
Rather than giving the custom role a preexisting Service Designer role, it would be preferable to grant appropriate Service Designer capabilities to the role. This option may be more work to set up, but gives you more flexibility. One thing to be careful about is in granting the group the right to import services. You could import a service and overwrite components (dictionaries or forms) that you do not normally have the ability to modify. The Import Service option does not check object-level permissions, it just overwrites (or creates) everything.
 Feedback