About PowerOn Auto Provisioning
PowerOn Auto Provisioning (POAP) automates the process of upgrading software images and installing configuration files on devices that are being deployed in the network for the first time.
When a device with the POAP feature boots and does not find the startup configuration, the device enters POAP mode, locates a DHCP server, and bootstraps itself with its interface IP address, gateway, and DNS server IP addresses. The device also obtains the IP address of a TFTP server and downloads a configuration script that enables the switch to download and install the appropriate software image and configuration file.
 Note |
The DHCP information is used only during the POAP process. |
Network Requirements for POAP
POAP requires the following network infrastructure:
-
A DHCP server to bootstrap the interface IP address, gateway address, and Domain Name System (DNS) server.
-
A TFTP server that contains the configuration script used to automate the software image installation and configuration process.
-
One or more servers that contains the desired software images and configuration files.
-
If you use USB, then no DHCP server or TFTP server are required for POAP.
Disabling POAP
POAP is enabled when there is no configuration in the system. It runs as a part of bootup. However, you can bypass POAP enablement during initial setup. If you want to disable POAP permanently (even when there is no configuration in the system), you can use the 'system no poap' command. This command ensures that POAP is not started during the next boot (even if there is no configuration). To enable POAP, use the 'system poap' command or the 'write erase poap' command. The 'write erase poap' command erases the POAP flag and enables POAP.
-
Example: Disabling POAP
switch# system no poap switch# sh boot Current Boot Variables: sup-1 NXOS variable = bootflash:/nxos.9.2.1.125.bin Boot POAP Disabled POAP permanently disabled using 'system no poap' Boot Variables on next reload: sup-1 NXOS variable = bootflash:/nxos.9.2.1.125.bin Boot POAP Disabled POAP permanently disabled using 'system no poap' switch# sh system poap System-wide POAP is disabled using exec command 'system no poap' POAP will be bypassed on write-erase reload. (Perpetual POAP cannot be enabled when system-wide POAP is disabled) -
Example: Enabling POAP switch# system poap switch# sh system poap System-wide POAP is enabled -
Example: Erase POAP
switch# write erase poap
This command will erase the system wide POAP disable flag only if it is set.
Do you wish to proceed anyway? (y/n)  [n] y
System wide POAP disable flag erased.

switch# sh system poap
System-wide POAP is enabled
POAP Configuration Script
We provide a sample configuration script that is developed using the Python programming language. We recommend using the provided script and modifying it to meet the requirements of your network environment.
The POAP script can be found at https://github.com/datacenter/nexus9000/blob/master/nx-os/poap/poap.py.
To modify the script using Python, see the Cisco NX-OS Python API Reference Guide for your platform.
Using the POAP Script and POAP Script Options
Before using the POAP script, perform the following actions:
-
Edit the options dictionary at the top of the script to ensure that all relevant options for your setup are included in the script. Do not change the defaults (in the default options function) directly.
-
Update the MD5 checksum of the POAP script as shown using shell commands.
f=poap_nexus_script.py ; cat $f | sed '/^#md5sum/d' > $f.md5 ; sed -i "s/^#md5sum=.*/#md5sum=\"$(md5sum $f.md5 | sed 's/ .*//')\"/" $f -
If the device has a startup configuration, perform a write erase and reload the device.
The following POAP script options can be specified to alter the POAP script behavior. When you download files from a server, the hostname, username, and password options are required. For every mode except personality, the target_system_image is also required. Required parameters are enforced by the script, and the script aborts if the required parameters are not present. Every option except hostname, username, and password has a default option. If you do not specify the option in the options dictionary, the default is used.
-
username
The username to use when downloading files from the server.
-
password
The password to use when downloading files from the server.
-
hostname
The name or address of the server from which to download files.
-
mode
The default is serial_number.
Use one of the following options:
-
personality
A method to restore the switch from a tarball.
-
serial_number
The serial number of the switch to determine the configuration filename. The format for the serial number in the configuration file is conf.serialnumber. Example: conf.FOC123456
-
hostname
The hostname as received in the DHCP options to determine the configuration filename. The format for the hostname in the configuration file is conf_hostname.cfg. Example: conf_3164-RS.cfg
-
mac
The interface MAC address to determine the configuration filename. The format for the hostname in the configuration file is conf_macaddress.cfg. Example: conf_7426CC5C9180.cfg
-
raw
The configuration filename is used exactly as provided in the options. The filename is not altered in any way.
-
location
The CDP neighbors are used to determine the configuration filename. The format for the location in the configuration file is conf_host_intf.cfg, where host is the host connected to the device over the POAP interface, and intf is the remote interface to which the POAP interface is connected. Example: conf_remote-switch_Eth1_8.cfg
-
-
required_space
The required space in KB for that particular iteration of POAP. The default is 100,000. For multi-step upgrades, specify the size of the last image in the upgrade path of the target image.
-
transfer_protocol
Any transfer protocol such as http, https, ftp, scp, sftp, or tftp that is supported by VSH. The default is scp.
-
config_path
The path to the configuration file on the server. Example: /tftpboot. The default is /var/lib/tftpboot.
-
target_system_image
The name of the image to download from the remote server. This is the image you get after POAP completes. This option is a required parameter for every mode except personality. The default is "".
-
target_image_path
The path to the image on the server. Example: /tftpboot. The default is /var/lib/tftpboot.
-
destination_path
The path to which to download images and MD5 sums. The default is /bootflash.
-
destination_system_image
The name for the destination image filename. If not specified, the default will be the target_system_image name.
-
user_app_path
The path on the server where the user scripts, agents, and user data are located. The default is /var/lib/tftpboot.
-
disable_md5
This is True if MD5 checking should be disabled. The default is False.
-
midway_system_image
The name of the image to use for the midway system upgrade. By default, the POAP script finds the name of any required midway images in the upgrade path and uses them. Set this option if you prefer to pick a different midway image for a two-step upgrade. The default is "".
-
source_config_file
The name of the configuration file when raw mode is used. The default is poap.cfg.
-
vrf
The VRF to use for downloads and so on. The VRF is automatically set by the POAP process. The default is the POAP_VRF environment variable.
-
destination_config
The name to use for the downloaded configuration. The default is poap_replay.cfg.
-
split_config_first
The name to use for the first configuration portion if the configuration needs to be split. It is applicable only when the configuration requires a reload to take effect. The default is poap_1.cfg.
-
split_config_second
The name to use for the second configuration portion if the configuration is split. The default is poap_2.cfg.
-
timeout_config
The timeout in seconds for copying the configuration file. The default is 120. For non-legacy images, this option is not used, and the POAP process times out. For legacy images, FTP uses this timeout for the login process and not for the copy process, while scp and other protocols use this timeout for the copy process.
-
timeout_copy_system
The timeout in seconds for copying the system image. The default is 2100. For non-legacy images, this option is not used, and the POAP process times out. For legacy images, FTP uses this timeout for the login process and not for the copy process, while scp and other protocols use this timeout for the copy process.
-
timeout_copy_personality
The timeout in seconds for copying the personality tarball. The default is 900. For non-legacy images, this option is not used, and the POAP process times out. For legacy images, FTP uses this timeout for the login process and not for the copy process, while scp and other protocols use this timeout for the copy process.
-
timeout_copy_user
The timeout in seconds for copying any user scripts and agents. The default is 900. For non-legacy images, this option is not used, and the POAP process times out. For legacy images, FTP uses this timeout for the login process and not for the copy process, while scp and other protocols use this timeout for the copy process.
-
personality_path
The remote path from which to download the personality tarball. Once the tarball is downloaded and the personality process is started, the personality will download all files in the future from locations specified inside the tarball configuration. The default is /var/lib/tftpboot.
-
source_tarball
The name of the personality tarball to download. The default is personality.tar.
-
destination_tarball
The name for the downloaded personality tarball after it is downloaded. The default is personality.tar.
Setting up the DHCP Server without DNS for POAP
Beginning with Cisco NX-OS Release 7.0(3)I6(1), the tftp-server-name can be used without the DNS option. To enable POAP functionality without DNS on earlier releases, a custom option of 150 must be used to specify the tftp-server-address.
To use the tftp-server-address option, specify the following at the start of your dhcpd.conf file.
option tftp-server-address code 150 = ip-address;
For example:
host MyDevice {
    option dhcp-client-identifier "\000SAL12345678";
    fixed-address 2.1.1.10;
    option routers 2.1.1.1;
    option host-name "MyDevice";
    option bootfile-name "poap_nexus_script.py";
    option tftp-server-address 2.1.1.1;
}
The below example shows Configuring DHCPv6 for POAP over IPv6:
default-lease-time 3600;
max-lease-time 3600;
log-facility local7;
subnet6 2003::/64 {

        # This statement configures actual values to be sent
        # RTPREFIX option code = 243, RTPREFIX length = 22
        # Ignore value 22. It is something related to option-size RT_PREFIX option length.
        # lifetime = 9000 seconds
        # route ETH1_IPV6_GW/64
        # metric 1
        option dhcp6.next-hop-rt-prefix 2003::2222 243 22 9000 0 1 ::;
        #ipv6 ::/0 2003::2222
        #Another example - support not there in NXOS - CSCvs05271:
        #option dhcp6.next-hop-rt-prefix 2003::2222 243 22 9000 112 1 2003::1:2:3:4:5:0;
        #ipv6 2003::1:2:3:4:5:0/112 2003::2222

        # Additional options
        #option dhcp6.name-servers fec0:0:0:1::1;
        #option dhcp6.domain-search "domain.example";

        range6 2003::b:1111 2003::b:9999;
        #range6 2003::c:2222 2003::c:2222;
        option dhcp6.bootfile-url "tftp://2003::1111/poap_github_v6.py";
Downloading and Using User Data, Agents, and Scripts as part of POAP
Under the options dictionary, you can find the download_scripts_and_agents function. If you choose to download user scripts and data, uncomment the first poap_log line and then use a series of download_user_app function calls to download each application. Since older Cisco NX-OS versions do not support recursive copy of directories, such directories must be put into a tarball (TAR archive) and then unpacked once on the switch. The parameters for the download_scripts_and_agents function are as follows:
-
source_path - The path to where the file or tarball is located. This is a required parameter. Example: /var/lib/tftpboot.
-
source_file - The name of the file to download. This is a required parameter. Example: agents.tar, script.py, and so on.
-
dest_path - The location to download the file on the switch. Any directories that do not exist earlier will be created. This is an optional parameter. The default is /bootflash.
-
dest_file - The name to give the downloaded file. This is an optional parameter. The default is unchanged source_file.
-
unpack - Indicates whether a tarball exists for unpacking. Unpacking is done with tar -xf tarfile -C /bootflash . This is an optional parameter. The default is False.
-
delete_after_unpack - Indicates whether to delete the downloaded tarball after unpack is successful. There is no effect if unpack is False. The default is False.
Using the download functionality, you can download all the agents and files needed to run POAP. To start the agents, you should have the configuration present in the running configuration downloaded by POAP. Then the agents, scheduler, and cron entry, along with EEM, can be used.
POAP Process
The POAP process has the following phases:
-
Power up
-
USB discovery
-
DHCP discovery
-
Script execution
-
Post-installation reload
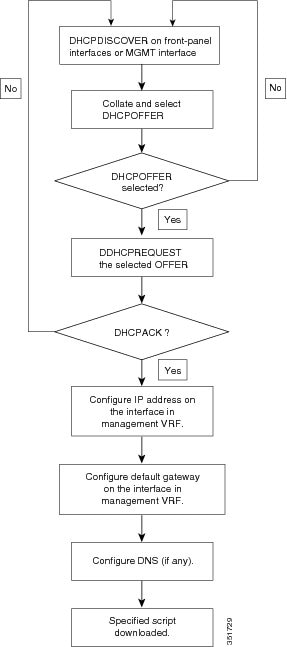
Within these phases, other process and decision points occur. The following illustration shows a flow diagram of the POAP process.

Power-Up Phase
When you powerup the device for the first time, it loads the software image that is installed at manufacturing and tries to find a configuration file from which to boot. When a configuration file is not found, POAP mode starts.
During startup, a prompt appears asking if you want to abort POAP and continue with a normal setup. You can choose to exit or continue with POAP.
Note |
No user intervention is required for POAP to continue. The prompt that asks if you want to abort POAP remains available until the POAP process is complete. |
If you exit POAP mode, you enter the normal interactive setup script. If you continue in POAP mode, all the front-panel interfaces are set up in the default configuration.
USB Discovery Phase
When POAP starts, the process searches the root directory of all accessible USB devices for the POAP script file (the Python script file, poap_script.py), configuration files, and system and kickstart images.
If the script file is found on a USB device, POAP begins running the script. If the script file is not found on the USB device, POAP executes DHCP discovery. (When failures occur, the POAP process alternates between USB discovery and DHCP discovery, until POAP succeeds or you manually abort the POAP process.)
If the software image and switch configuration files specified in the configuration script are present, POAP uses those files to install the software and configure the switch. If the software image and switch configuration files are not on the USB device, POAP does some cleanup and starts DHCP phase from the beginning.
DHCP Discovery Phase
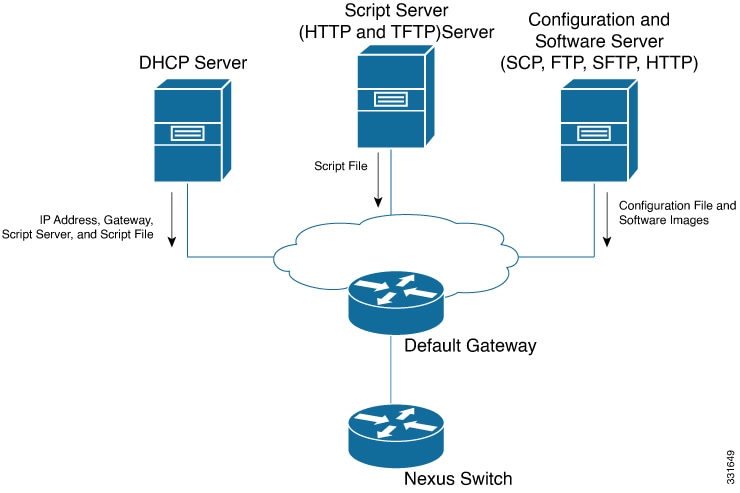
The switch sends out DHCP discover messages on the front-panel interfaces or the MGMT interface that solicit DHCP offers from the DHCP server or servers. (See the following figure.) The DHCP client on the Cisco Nexus switch uses the switch serial number in the client-identifier option to identify itself to the DHCP server. The DHCP server can use this identifier to send information, such as the IP address and script filename, back to the DHCP client.
POAP requires a minimum DHCP lease period of 3600 seconds (1 hour). POAP checks the DHCP lease period. If the DHCP lease period is set to less than 3600 seconds (1 hour), POAP does not complete the DHCP negotiation.
-
TFTP server name or TFTP server address—The DHCP server relays the TFTP server name or TFTP server address to the DHCP client. The DHCP client uses this information to contact the TFTP server to obtain the script file.
-
Bootfile name—The DHCP server relays the bootfile name to the DHCP client. The bootfile name includes the complete path to the bootfile on the TFTP server. The DHCP client uses this information to download the script file.
When multiple DHCP offers that meet the requirement are received, the one arriving first is honored and the POAP process moves to next stage. The device completes the DHCP negotiation (request and acknowledgment) with the selected DHCP server, and the DHCP server assigns an IP address to the switch. If a failure occurs in any of the subsequent steps in the POAP process, the IP address is released back to the DHCP server.
If no DHCP offers meet the requirements, the switch does not complete the DHCP negotiation (request and acknowledgment) and an IP address is not assigned.
POAP Dynamic Breakout
Beginning with Cisco NX-OS Release 7.0(3)I4(1), POAP dynamically breaks out ports in an effort to detect a DHCP server behind one of the broken-out ports. Previously, the DHCP server used for POAP had to be directly connected to a normal cable because breakout cables were not supported.
POAP determines which breakout map (for example, 10gx4, 50gx2, 25gx4, or 10gx2) will bring up the link connected to the DHCP server. If breakout is not supported on any of the ports, POAP skips the dynamic breakout process. After the breakout loop completes, POAP proceeds with the DHCP discovery phase as normal.
Note |
For more information on dynamic breakout, see the interfaces configuration guide for your device. |
Script Execution Phase
After the device bootstraps itself using the information in the DHCP acknowledgement, the script file is downloaded from the TFTP server.
The switch runs the configuration script, which downloads and installs the software image and downloads a switch-specific configuration file.
However, the configuration file is not applied to the switch at this point, because the software image that currently runs on the switch might not support all of the commands in the configuration file. After the switch reboots, it begins running the new software image, if an image was installed. At that point, the configuration is applied to the switch.
Note |
If the switch loses connectivity, the script stops, and the switch reloads its original software images and bootup variables. |
Post-Installation Reload Phase
The switch restarts and applies (replays) the configuration on the upgraded software image. Afterward, the switch copies the running configuration to the startup configuration.
 Feedback