New and Changed Information
The following table provides an overview of the significant changes up to this current release. The table does not provide an exhaustive list of all changes or of the new features up to this release.
|
Cisco ACI CNI plug-in Release Version |
Feature |
|---|---|
|
6.0(4) |
Support for Agent-based Red Hat OpenShift 4.14 on VMware vSphere 7. |
Agent-based Openshift 4.14 on VMware vSphere
Cisco ACI supports Red Hat OpenShift 4.14 on VMware vSphere 7. This document provides the instructions on using Ansible playbooks to provision OpenShift 4.14 on VMware vSphere with the Container Network Interface (CNI) plug-in.
Prerequisites for Installing OpenShift 4.14 on VMware vSphere
To install OpenShift Container Platform (OCP) 4.14 on VMware vSphere, fulfill the following prerequisites:
Cisco ACI
-
Download the acc-provision tool version 6.0.4.1 or later.
Specify the “--flavor” option value as “openshift-4.14-agent-based-esx,” and use the “-z” option. The tool creates a .tar archive file as specified by the “-z” option value. You need this archive file during installation.
Make sure that the Cisco ACI container images that are specified as input to the acc-provision tool are version 6.0.4.1 or later.
VMware vSphere
Obtain user credentials with privileges to create virtual machines (VMs).
OpenShift
Obtain the following from the Red Hat website:
-
OCP4 client tools - navigate to the mirror page on the OpenShift website where the installation and client tool versions are listed, and select the required version. Download the
openshift-client-linux.tar.gzandopenshift-install-linux.tar.gzfiles. -
Pull Secret
Installing OpenShift 4.14 on VMware vSphere
Configuring ACI Infra and CNI
Use this procedure for configuring ACI infra and CNI using acc-provision.
Before you begin
Complete the tasks in the Prerequisites section.
It is recommended to see the RedHat OpenShift documentation for prerequisites and other details about Installing a Cluster on vSphere.
Procedure
|
Step 1 |
Provision the Cisco ACI fabric using the acc-provision utility. Customize the sample acc-provision input file as per your requirements. Then, install the latest acc-provision package from here and run pip install acc-provision . Run the acc-provision as follows: This generates a new
|
||
|
Step 2 |
After the Cisco ACI fabric is provisioned, verify that a port group with the name system_id_vlan_kubeapi_vlan is created under the distributed switch. This document refers to this port group as api-vlan-portgroup.
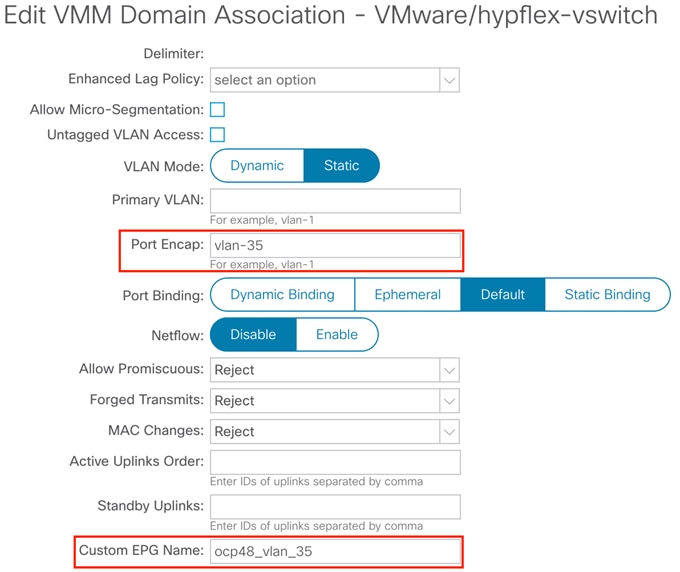
Kube_api VLAN is added to the dynamic VLAN pool associated with the VMware VMM Domain. Allocation mode will be set to Static.  |
||
|
Step 3 |
(Optional) Provision a Red Hat Enterprise orchestrator VM with the network interface that is connected to the api-vlan-portgroup. Configure this VM as a DNS server for the OpenShift cluster. |
Preparing Custom Network Configuration for OpenShift Nodes
ACI CNI requires additional VLANs to be extended towards each OpenShift node. Additional VLANS are required for master and worker nodes, but not required for the bootstrap node.
You can configure additional VLANs on the interface that will be configured with the node network subnet, or can be configured on an additional physical interface on the hosts.
The available option to configure network interface of a host is to provide the configuration in agent-config.yaml in NMState format. See Sample agent-config file section.
Modifying the agent-config file
Use this procedure to modify the agent-config.yaml file.
Before you begin
The agent-config file, with additional NIC configuration, needs to extend the Cisco ACI internal network (Infra VLAN) up to the server level. This interface is used to carry VxLAN traffic from OVS towards the ACI leaf switch with an appropriate tag for the pod network. To achieve the separation between the OpenShift node traffic and pod traffic, use the Single Sub interface for both node and infra networks approach.
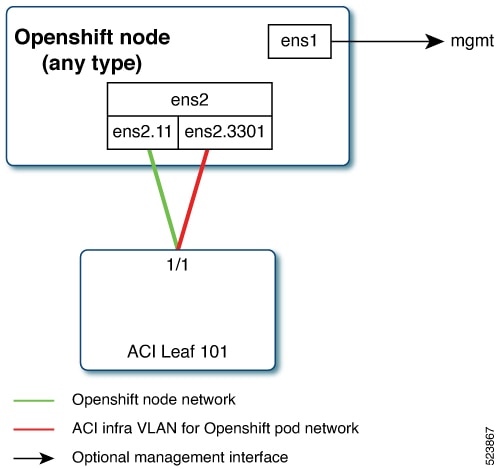
Node network is configured as VLAN subinterface of either bond0 or Virtual machine NIC. You can configure the server with additional VLAN(s) for management purpose or use the node network for management network. The design might be dependent on the server provisioning method (PXE or manual ISO boot).
The sample YAML snippet below, outlines an AgentConfig for OpenShift deployment on VMware. It includes essential details like rendezvous IP, host configurations, and network interface settings for a streamlined deployment.
apiVersion: v1alpha1
kind: AgentConfig
metadata:
  name: ocpvmw11
rendezvousIP: 192.168.12.3. -> A
AdditionalNTPSources:
  - time.cisco.com
hosts: -> B
  - hostname: ocpvmw11-master1 -> C
    role: master
    interfaces:
    - name: ens192
      macAddress: 00:50:56:97:2a:d6
    networkConfig: -> D
      interfaces:
        - name: ens192
          mtu: 9000
          ipv4:
            enabled: false
          ipv6:
            enabled: false
        - name: node
          type: vlan
          mtu: 9000
          state: up
          vlan:
            base-iface: ens192
            id: 131
          ipv4:
            enabled: true
            address:
              - ip: 192.168.12.3
                prefix-length: 24
            dhcp: false
          ipv6:
            enabled: false
        - name: infra
          type: vlan
          mtu: 9000
          state: up
          vlan:
            base-iface: ens160
            id: 3301
          ipv4:
            enabled: true
            dhcp: true
          ipv6:
            enabled: false
        - name: infra
          type: vlan
          mtu: 9000
          state: up
          vlan:
            base-iface: ens192
            id: 3301
           ipv4:
            enabled: true
            dhcp: true
          ipv6:
            enabled: false
      dns-resolver:
        config:
          server:
            - 192.168.12.2
      routes:
        config:
          - destination: 0.0.0.0/0
            next-hop-address: 192.168.12.1
            next-hop-interface: node
          - destination: 224.0.0.0/4
            next-hop-interface: infra
In the above sample, sections have been marked as A, B, C, D. Here are the details for better understanding.
-
A: This IP address is used to determine which node performs the bootstrapping process as well as running the assisted-service component. You must provide the rendezvous IP address when you do not specify at least one host’s IP address in the
networkConfigparameter. If this address is not provided, one IP address is selected from the provided hosts'networkConfig. -
B: Host configuration. The number of hosts defined must not exceed the total number of hosts defined in the
install-config.yamlfile, which is the sum of the values of thecompute.replicasandcontrolPlane.replicasparameters. -
C: Overrides the hostname obtained from either the Dynamic Host Configuration Protocol (DHCP) or a reverse DNS lookup. Each host must have a unique hostname supplied by one of these methods.
-
D: Configures the network interface of a host in NMState format.
Procedure
|
Step 1 |
Create a root folder for your cluster. |
|
Step 2 |
Copy the See the sample install-config and agent-config sections. |
|
Step 3 |
Create the openshift directory. |
|
Step 4 |
Extract all the ACI manifest files in upi/openshift/. |
|
Step 5 |
Create the iso image. |
|
Step 6 |
Boot the agent.x86_64.iso image on the bare metal machines The |
|
Step 7 |
Create the VMs ( see the Sample agent-config file for naming reference).
|
What to do next
Sample Files for Installing Agent-based OpenShift 4.14 on VMware vSphere
This section contains sample files that you need for installing agent-based OpenShift 4.14 on VMware vSphere.
Sample acc-provision-input File
The following is a sample acc-provision-input.yaml.
#
# Configuration for ACI Fabric
#
aci_config:
  system_id: ocp4aci
  #apic-refreshtime: 1200
  apic_hosts:
  - 1.1.1.1
  vmm_domain:
    encap_type: vxlan
    mcast_range:                # Every opflex VMM must use a distinct range
      start: 225.28.1.1
      end: 225.28.255.255
    nested_inside:
      type: vmware
      name: my-vswitch
	elag_name: <eLAG_name>   # Beginning Cisco APIC 5.0(1), you can configure VMware teaming policy
                               # when link aggregation groups (LAGs) are used.


  # The following resources must already exist on the APIC.
  # They are used, but not created, by the provisioning tool.
  aep: my-aep
  vrf:                          # This VRF used to create all kubernetes EPs
    name: myl3out_vrf
    tenant: common
  l3out:
    name: myl3out
    external_networks:
    - myl3out_net
agent_based_installer:
  enable: true
#
# Networks used by ACI containers
#
net_config:
  node_subnet: 192.168.18.1/24
  pod_subnet: 10.128.0.1/16     # Subnet to use for Kubernetes # Pods/CloudFoundry containers
  extern_dynamic: 10.3.0.1/24   # Subnet to use for dynamic external IPs
  extern_static: 10.4.0.1/24    # Subnet to use for static external IPs
  node_svc_subnet: 10.5.0.1/24  # Subnet to use for service graph
  kubeapi_vlan: 131
  service_vlan: 132
  infra_vlan: 3301
#interface_mtu: 1600
#service_monitor_interval: 5  # IPSLA interval probe time for PBR tracking
                                # default is 0, set to > 0 to enable, max: 65535
#pbr_tracking_non_snat: true  # Default is false, set to true for IPSLA to
                                # be effective with non-snat services

#
# Configuration for container registry
# Update if a custom container registry has been setup
#
kube-config:
  image_pull_policy: Always
  ovs_memory_limit: 1Gi
registry:
  image_prefix: quay.io/noiro
Sample agent-config File
The following is a sample agent-config.yaml.
apiVersion: v1alpha1
kind: AgentConfig
metadata:
  name: ocpvmw11
rendezvousIP: 192.168.12.3
AdditionalNTPSources:
  - time.cisco.com
hosts:
  - hostname: ocpvmw11-master1
    role: master
    interfaces:
    - name: ens192
      macAddress: 00:50:56:97:2a:d6
    networkConfig:
      interfaces:
        - name: ens192
          mtu: 9000
          ipv4:
            enabled: false
          ipv6:
            enabled: false
        - name: node
          type: vlan
          mtu: 9000
          state: up
          vlan:
            base-iface: ens192
            id: 131
          ipv4:
            enabled: true
            address:
              - ip: 192.168.12.3
                prefix-length: 24
            dhcp: false
          ipv6:
            enabled: false
        - name: infra
          type: vlan
          mtu: 9000
          state: up
          vlan:
            base-iface: ens192
            id: 3301
          ipv4:
            enabled: true
            dhcp: true
          ipv6:
            enabled: false
      dns-resolver:
        config:
          server:
            - 192.168.12.2
      routes:
        config:
          - destination: 0.0.0.0/0
            next-hop-address: 192.168.12.1
            next-hop-interface: node
          - destination: 224.0.0.0/4
            next-hop-interface: infra
  - hostname: ocpvmw11-master2
    role: master
    interfaces:
    - name: ens192
      macAddress: 00:50:56:97:f6:65
    networkConfig:
      interfaces:
        - name: ens192
          mtu: 9000
          ipv4:
            enabled: false
          ipv6:
            enabled: false
        - name: node
          type: vlan
          mtu: 9000
          state: up
          vlan:
            base-iface: ens192
            id: 131
          ipv4:
            enabled: true
            address:
              - ip: 192.168.12.4
                prefix-length: 24
            dhcp: false
          ipv6:
            enabled: false
        - name: infra
          type: vlan
          mtu: 9000
          state: up
          vlan:
            base-iface: ens192
            id: 3301
          ipv4:
            enabled: true
            dhcp: true
          ipv6:
            enabled: false
      dns-resolver:
        config:
          server:
            - 192.168.12.2
      routes:
        config:
          - destination: 0.0.0.0/0
            next-hop-address: 192.168.12.1
            next-hop-interface: node
          - destination: 224.0.0.0/4
            next-hop-interface: infra
  - hostname: ocpvmw11-master3
    role: master
    interfaces:
    - name: ens192
      macAddress: 00:50:56:97:07:42
    networkConfig:
      interfaces:
        - name: ens192
          mtu: 9000
          ipv4:
            enabled: false
          ipv6:
            enabled: false
        - name: node
          type: vlan
          mtu: 9000
          state: up
          vlan:
            base-iface: ens192
            id: 131
          ipv4:
            enabled: true
            address:
              - ip: 192.168.12.5
                prefix-length: 24
            dhcp: false
          ipv6:
            enabled: false
        - name: infra
          type: vlan
          mtu: 9000
          state: up
          vlan:
            base-iface: ens192
            id: 3301
          ipv4:
            enabled: true
            dhcp: true
          ipv6:
            enabled: false
      dns-resolver:
        config:
          server:
            - 192.168.12.2
      routes:
        config:
          - destination: 0.0.0.0/0
            next-hop-address: 192.168.12.1
            next-hop-interface: node
          - destination: 224.0.0.0/4
            next-hop-interface: infra
  - hostname: ocpvmw11-worker1
    role: worker
    interfaces:
    - name: ens192
      macAddress: 00:50:56:97:b5:07
    networkConfig:
      interfaces:
        - name: ens192
          mtu: 9000
          ipv4:
            enabled: false
          ipv6:
            enabled: false
        - name: node
          type: vlan
          mtu: 9000
          state: up
          vlan:
            base-iface: ens192
            id: 131
          ipv4:
            enabled: true
            address:
              - ip: 192.168.12.6
                prefix-length: 24
            dhcp: false
          ipv6:
            enabled: false
        - name: infra
          type: vlan
          mtu: 9000
          state: up
          vlan:
            base-iface: ens192
            id: 3301
          ipv4:
            enabled: true
            dhcp: true
          ipv6:
            enabled: false
      dns-resolver:
        config:
          server:
            - 192.168.12.2
      routes:
        config:
          - destination: 0.0.0.0/0
            next-hop-address: 192.168.12.1
            next-hop-interface: node
          - destination: 224.0.0.0/4
            next-hop-interface: infra
  - hostname: ocpvmw11-worker2
    role: worker
    interfaces:
    - name: ens192
      macAddress: 00:50:56:97:44:9b
    networkConfig:
      interfaces:
        - name: ens192
          mtu: 9000
          ipv4:
            enabled: false
          ipv6:
            enabled: false
        - name: node
          type: vlan
          mtu: 9000
          state: up
          vlan:
            base-iface: ens192
            id: 131
          ipv4:
            enabled: true
            address:
              - ip: 192.168.12.7
                prefix-length: 24
            dhcp: false
          ipv6:
            enabled: false
        - name: infra
          type: vlan
          mtu: 9000
          state: up
          vlan:
            base-iface: ens192
            id: 3301
          ipv4:
            enabled: true
            dhcp: true
          ipv6:
            enabled: false
      dns-resolver:
        config:
          server:
            - 192.168.12.2
      routes:
        config:
          - destination: 0.0.0.0/0
            next-hop-address: 192.168.12.1
            next-hop-interface: node
          - destination: 224.0.0.0/4
            next-hop-interface: infra
Sample install-config File
The following is a sample install-config.yaml.
apiVersion: v1
baseDomain: ocplab.local
proxy:
  httpsProxy: <http-proxy>
  httpProxy: <https-proxy>
  noProxy: <no-proxy>
compute:
- name: worker
  replicas: 2
controlPlane:
  name: master
  replicas: 3
metadata:
  name: ocpvmw11
networking:
  machineNetwork:
  - cidr: 192.168.12.0/24
  clusterNetwork:
  - cidr: 10.2.0.0/16
    hostPrefix: 23
  networkType: CiscoACI
  serviceNetwork:
  - 172.30.0.0/16
platform:
  vsphere:
    failureDomains:
    - topology:
        datacenter: k8s-scale
        datastore: "/k8s-scale/datastore/k8s-scale-ds-esxi-3-raid5"
    vcenters:
    - datacenters:
      - k8s-scale
      password: xxx
      port: 443
      server: myvsphere.local.lab
      user: administrator@vsphere.local
    apiVIPs:
    - 192.168.12.30
    ingressVIPs:
    - 192.168.12.29
fips: false
pullSecret: <RH-account-pull-secret>
sshKey: <host-ssh-key>
Decommissioning OpenShift
Use this procedure to decommission OpenShift and remove the ACI-provisioned configuration from ACI.
 Note |
Starting with Cisco APIC release 5.2, VMM domains for OpenShift cannot be removed from the APIC GUI. It is only possible using
REST API, therefore, it is convenient to use the acc-provision tool to remove the VMM domain, and other related objects used
by the decommissioned OpenShift cluster. Ensure you have the |
Before you begin
In case of decommissioning or removing Openshift cluster, ACI configuration provisioned for that cluster should be removed from ACI. The acc-provision tool can be used to remove that configuration.
Procedure
|
Use the following command from the machine and folder which was used to provision the ACI infrastructure, to delete the pre-provisioned configurations and the VMM domain. acc-provision -d -f openshift-4.14-agent-based-esx -c acc-input-file -u user -p password Example: |
Known Issues
Known issues which could impact the installation process:
-
Installation is hindered due to node taints - see case number: 03682671 on the RedHat support cases website.
-
Storage Cluster Operator Degraded – Solution in progress - see case number: 5926951 on the RedHat solutions cases website.
-
Modify vSphere configuration of the OCP cluster - When utilizing the Assisted Installer with platform integration enabled, updating the vSphere configuration for the installed cluster must be done manually. This action should occur only after the installation is completed entirely and the cluster is linked to console.redhat.com. Refer solution number 6677901 on the RedHat solutions website.
 Feedback