Cisco Crosswork Situation Manager 7.3.x Implementer Guide
Available Languages
Cisco Crosswork Situation Manager 7.3.x Implementer Guide
Powered by Moogsoft AIOps 7.3
Contents
Cisco Crosswork Situation Manager 7.3.0 Supported Environments
Scale Your Cisco Crosswork Situation Manager Implementation
High Availability Configuration Hierarchy
High Availability for Third Party Component Dependencies
HA Control utility command reference
Install Cisco Crosswork Situation Manager
Pre-installation for Cisco Crosswork Situation Manager v7.3.x
System Setup for Cisco Crosswork Situation Manager
Control Cisco Crosswork Situation Manager Processes
Encrypt Database Communications
Configure External Authentication
Configure Historic Data Retention
Change passwords for default users
Upgrade Cisco Crosswork Situation Manager
RPM upgrade to Cisco Crosswork Situation Manager v7.3.x
Tarball upgrade to Cisco Crosswork Situation Manager v7.3.x
RPM - Upgrade database components
RPM - Upgrade data ingestion components
RPM - Migrate from MySQL to Percona
Tarball - Upgrade UI components
Tarball - Upgrade Core components
Tarball - Upgrade database components
Tarball - Upgrade data ingestion components
Tarball - Migrate from MySQL to Percona
Configuration Migration Utility
Finalize and validate the upgrade
Uninstall Cisco Crosswork Situation Manager
Stop Core Cisco Crosswork Situation Manager and Supporting Services
Uninstall Core Cisco Crosswork Situation Manager Packages and Remove Directories and Users
Uninstall Supporting Applications
Uninstall Remaining Packages and Remove Yum Repositories
Monitor and Troubleshoot Cisco Crosswork Situation Manager
Monitor Component CPU and Memory Usage
Monitor Moogfarmd Data Processing Performance
Monitor RabbitMQ Message Bus Performance
Monitor System Performance Metrics
Troubleshoot Installation and Upgrade
Troubleshoot Integrations Controller
Troubleshoot Required Services for a Functional Production System
Troubleshoot Slow Alert/Situation Creation
Obtaining Documentation and Submitting a Service Request
Implementer Guide
The Implementer Guide contains instructions to help you install and configure Cisco Crosswork Situation Manager.
To install the system and handle common post-installation setup, see Install Cisco Crosswork Situation Manager and System Setup for Cisco Crosswork Situation Manager.
After you have the base system up and running, you can begin to ingest event data from your monitoring sources. Integrations covers most integrations topics. You can find some detail on some common configuration tasks for data ingestion under Configure Data Ingestion.
Much of the value of Cisco Crosswork Situation Manager comes from its ability to process your raw event data, deduplicate the events, and transform the data into alerts that comprise Situations. It is critical to configure the system to create meaningful Situations for you and to present the Situations to the right teams. Figuring out your needs for your Situation design will help you make decisions about the right data processing choices for you.
Based upon your Situation design choices and the type of data available from your monitoring sources, you can follow the Clustering Algorithm Guide to choose the correct clustering algorithms for your system. Then you have several options to Configure Data Processing to achieve your goals. See also the Administrator Guide.
To keep your system running and healthy, see Monitor and Troubleshoot Cisco Crosswork Situation Manager.
Plan Your Implementation
Cisco Crosswork Situation Manager 7.3.0 Supported Environments
The following operation systems, browsers and third-party software are either supported or are required in order to run Cisco Crosswork Situation Manager.
Any operating systems and browsers not listed in the sections below are not officially recommended or supported.
Operating Systems
You can run Cisco Crosswork Situation Manager on the following versions of Red Hat Enterprise Linux®(RHEL) and CentOS Linux:
| OS |
Versions |
|
|
v7 |
|
|
v7 |
Note: No other Linux distributions are currently supported
Browsers
You can use the following browsers for the Cisco Crosswork Situation Manager UI:
|
|
Version |
|
|
Latest |
|
|
Latest |
|
|
Latest |
|
|
Latest |
|
|
v11 |
Supported Third-Party Software
The latest default installation of Cisco Crosswork Situation Manager comes with the following third-party applications:
| Application |
Version |
| Apache Tomcat® |
v9.0.22 |
| Elasticsearch |
v6.8.1 (LTS version) |
| Percona |
v5.7.26 |
| Nginx |
v1.14.0 or above |
| RabbitMQ |
v3.7.4 |
Other supported application packages include:
| Application |
Version |
| Erlang |
v20.1.7 |
| JDK |
OpenJDK 11.0.2.7-0.el7_6 |
| Apache Tomcat® Native |
v1.2.23 or above |
Integration Support
The following table outlines the vendor supported integrations for the current version of Cisco Crosswork Situation Manager alongside the corresponding supported software versions.
Integrations support IPv6 connectivity.
| Integration Version |
Supported Software / Version |
| Ansible Tower Integration v1.10 |
Ansible Tower v3.0, 3.1 |
| Apache Kafka Integration v1.12 |
Apache Kafka v0.9, 1.1, 2.2 |
| AppDynamics Integration v2.2 |
AppDynamics v4.0, 4.1 |
| AWS CloudWatch Integration v2.0 |
aws-java-sdk v1.11 |
| AWS SNS Integration v1.2 |
AWS SNS v2016-06-28 |
| BMC Remedy Integration v1.8 |
Remedy v9.1 |
| CA UIM Integration v1.8 |
CA Nimsoft UIM v8.4 |
| CA Spectrum Integration v2.2 |
CA Spectrum v10.2 |
| Catchpoint Integration v1.0 |
Catchpoint v2019 |
| Cherwell Service Management Integration v1.5 |
Cherwell v9.3 |
| Datadog Polling Integration v1.3 |
Datadog v2018 |
| Datadog Webhook Integration v1.11 |
Datadog v5.21 |
| Dynatrace APM Plugin Integration v1.8 |
Dynatrace v6.5, 7.0 |
| Dynatrace APM Polling Integration v2.2 |
Dynatrace v6.5, 7.0 |
| Dynatrace Notification Integration v1.5 |
Dynatrace v6.5 |
| Dynatrace Synthetic Integration v1.12 |
Dynatrace Synthetic v2017 |
| Email Integration v2.5 |
IMAP, IMAPS, POP3, POP3S |
| EMC Smarts Integration v1.3 |
RabbitMQ v3.7.4 and Smarts v9.5 |
| ExtraHop Integration v1.2 |
ExtraHop v2018 |
| FluentD Integration v1.10 |
FluentD v0.12 |
| Grafana Integration v1.2 |
Grafana v5.2.4 |
| HP NNMi Integration v2.5 |
HP NNMi v10.2 |
| HP OMi Plugin Integration v1.8 |
HP OMi v10.1 |
| HP OMi Polling Integration v2.5 |
HP OMi v10.1 |
| JIRA Service Desk Integration v1.10 |
JIRA Service Desk v7.6 |
| JIRA Software Integration v1.10 |
JIRA Software v7, JIRA Cloud |
| JMS Integration v1.11 |
ActiveMQ v5.14, JBoss v10, WebLogic v12.0 |
| Microsoft Azure Integration v1.2 |
Microsoft Azure Monitor v2018 |
| Microsoft Azure Classic Integration v1.2 |
Microsoft Azure Classic v2018 |
| Microsoft SCOM Integration v2.6 |
Microsoft SCOM v2012, 2016 |
| Microsoft Teams Integration v1.0 |
Microsoft Teams v1.2.00.3961 |
| Nagios Integration v2.10 |
Nagios vXI |
| New Relic Integration v1.10 |
New Relic v2016 |
| New Relic Polling Integration v2.0 |
New Relic v2.3 |
| New Relic Insights Polling Integration v1.0 |
New Relic v2.3 |
| Node.js Integration v1.9 |
Node.js v1.6 |
| NodeRED Integration v1.9 |
Nagios Red v016, 017 |
| OEM Integration v2.3 |
Oracle Enterprise Manager v12c, 13c |
| Office 365 Email Integration v1.0 |
|
| Pingdom Integration v1.9 |
Pingdom v2017 |
| Sensu Integration v1.0 |
Sensu Core v1.8 |
| ServiceNow Integration v4.3 |
ServiceNow vNew York, Madrid, London, Kingston |
| SevOne Integration v1.5 |
SevOne v5.7.2.0 |
| Site24x7 Integration v1.0 |
Site24x7 v17.4.3, 17.4.4 |
| Slack Integration v1.7 |
Slack v3.1 |
| SolarWinds Integration v3.2 |
SolarWinds v11.5, 12.2 |
| Splunk Integration v2.5 |
Splunk v6.5, 6.6, 7.0 |
| Splunk Streaming Integration v1.0 |
Splunk v7.2, 7.3 |
| Sumo Logic Integration v1.1 |
Sumo Logic v2018 |
| VMware vCenter Integration v2.3 |
VMware vCenter v6.0, 6.5 |
| VMware vROps Integration v2.3 |
VMware vROps v6.6 |
| VMware vSphere Integration v2.4 |
VMware vSphere v6.0, 6.5 |
| VMware vRealize Log Insight Integration v2.4 |
VMware vRealize Log Insight v4.3 |
| WebSphere MQ Integration v1.12 |
WebSphere MQ v8 |
| xMatters Integration v1.6 |
xMatters v5.5 |
| Zabbix Integration v1.0 |
Zabbix v3.4 |
| Zabbix Polling Integration v3.4 |
Zabbix v3.2 |
| Zenoss Integration v2.4 |
Zenoss v4.2 |
Sizing Recommendations
The sizing recommendations below are guidelines for small, medium and large Cisco Crosswork Situation Manager systems based on input data rate and volume.
In the context of this guide, Managed Devices (MDs) are all of the components in the network infrastructure that generate and emit events:
Small
| Environment |
CPU |
File System |
| 1000 to 5000 Managed Devices (MDs) Less than 20 users Up to 5 integrations Less than 20 Alerts per second |
8 Cores 32GB RAM 2 x 1GB Ethernet Physical or Virtual Server |
1 TB Local or SAN See retention policy. |
Medium
| Environment |
CPU |
File System |
| 5000 to 20,000 MDs Between 20 and 40 users Between 6 and 10 integrations Between 20 and 100 Alerts per second |
16 Cores 64GB RAM 2 x 1GB Ethernet Physical or Virtual Server |
1 TB Local or SAN Seeretention policy. |
Large
| Environment |
CPU |
File System |
| More than 20,000 MDs More than 40 users More than 10 integrations More than100 Alerts per second |
24+ Cores 128GB RAM 2 x 1GB Ethernet Physical or Virtual Server |
1 TB Local or SAN Seeretention policy. |
Virtualization Restrictions
Consider the following restrictions for virtual environments:
· Ideally all Moog servers (guests) should be on the same compute node (host) sharing a hypervisor or virtual machine monitor. This minimizes latency between Moog guests.
· If servers are liable to automated resource balancing (e.g. vMotion) and liable to move compute nodes, then all Moog servers should be moved at the same time. If this is not possible, then Moog servers should be constrained to movements that minimize the resulting network distance.
· If Moog servers are distributed amongst compute nodes then the network “distance” (logical hops) between the nodes should be minimized.
· Network latency between components may affect Event processing throughput. This is especially true of the core to db servers.
Shared Storage
On any shared compute platform Cisco makes the following recommendations:
· The minimum resource requirements are multiplied by at least 33% to account for shared resource usage and allocation.
· Storage latency will reduce effective throughput at the core processing layer and should be minimised within the available constraints of a SAN.
· Cisco Crosswork Situation Manager should be treated as a highly transactional system and not placed on the same compute node as other highly transactional applications that may cause SAN resource contention.
· SAN port and array port contention should be minimized
· Storage medium should be as fast as possible to minimize the transaction times to the database.
Retention Policy
You can calculate the amount of disk space in GB required for the database server using the following calculation:
(es x eps x d x 86,400) x 1.2 / 1,000,000
For this calculation: es = average event size in KB, eps = average events per second, d = number of days of retention and 86,400 represents the number of seconds per day.
For the majority of event sources, you can reasonably estimate a 2KB event size. However, some sources have larger than average events. For example, Microsoft SCOM. A 2KB base takes account of the other event and alert based storage such as an alert's Situation membership and Situation room thread sizes.
The average event rate is across all LAMs and integrations.
Note:
If you do not enable the Archiver tool, the historic database will grow indefinitely. See Archive Situations and Alerts for more information.
For example, the following calculation represents a 400 day retention period with an average event size of 2KB at 300 events per second:
(2 x 300 x 400 x 86,400) x 1.2 / 1,000,000 = 24,883.2 GB.
Server Roles
In order to plan your Cisco Crosswork Situation Manager deployment, it helps to understand the different components of Moogsoft AIOps and the options for distributing them among multiple physical or virtual machines.
A server role within an Cisco Crosswork Situation Manager installation is a functional entity containing components that must be installed on the same machine. You can distribute different roles to different machines.
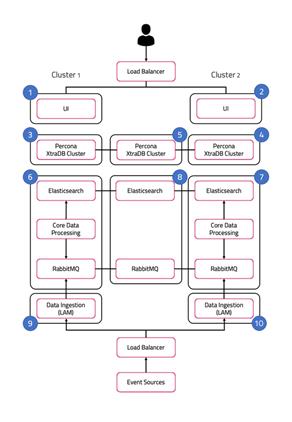
The following diagram illustrates the typical deployment strategy for the components of Cisco Crosswork Situation Manager in an Highly Available configuration:
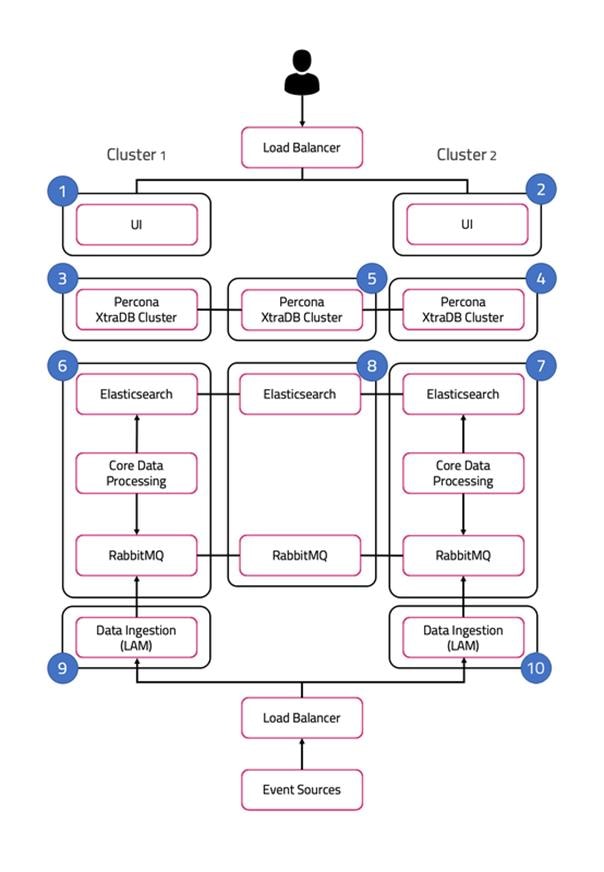
The architecture is built upon two clusters with software components that serve several roles. See also HA Reference Architecture.
In the case of a single-server installation, you install all the roles on one machine.
UI role
The UI role comprises Nginx and Apache Tomcat, represented in the diagram as numbers 1 and 2. The Cisco Crosswork Situation Manager servlets groups run in active / active configuration.
Ngnix is the proxy for the web application server and for integrations.
Tomcat is the web application server. It reads and writes to the Message Bus and the database.
Database role
Percona XtraDB Cluster serves the database role, represented in the diagram as numbers 3, 4, and 5. The cluster runs in active / active standby / active standby mode.
Percona Xtra Db Cluster is the system datastore that handles transactional data from other parts of the system: LAMs (integrations), data processing, and the web application server.
HA Proxy handles database query routing and load balancing.
See /document/preview/120574#UUID816c7d74d05ed359780616a54d06a4d4 for more information.Database Strategy
Core role
The Core role, represented by numbers 6 and 7 in the diagram comprises the following:
· Moogfarmd, the Cisco Crosswork Situation Manager data processing component. Moogfarmd consumes messages from the Message Bus. It processes event data in a series of servlet-like modules called Moolets.
· Moogfarmd reads and writes to the database and publishes messages to the bus.
· RabbitMQ which provides the message queue. It receives published messages from integrations. It publishes messages destined for data processing (Moogfarmd) and the web application server.
· Elasticsearch which provides the UI search capability. It indexes documents from the indexer Moolet in the data processing series. It returns search results to Tomcat.
In HA deployments, Moogfarmd automatically runs in active / passive mode. See #section5d02a6f594ecfidm45764278084720 for more information.
In concert with the the Redundancy Role server, RabbitMQ and Elasticsearch run in active / active / active mode.
Redundancy role
The redundancy role, represented by number 8 in the diagram, provides the third node required for true HA for RabbitMQ and Elasticsearch.
Data ingestion role
Link Access Modules (LAMs) make up the data ingestion role represented by numbers 9 and 10 in the diagram. Receiving LAMs listen for events from monitoring sources and Polling LAMs poll monitoring sources for events. Both parse and encode raw events into discrete events, and then write the discrete events to the Message Bus.
In HA deployments, receiving LAMs run in active / active mode, but polling LAMs run in active / passive mode.
Load balancers
The load balancers in front of the UI server role and the data ingestion server role are the customer's responsibility.
Scale Your Cisco Crosswork Situation Manager Implementation
Cisco Crosswork Situation Manager supports several options to help you scale your implementation to meet your performance needs. Monitor and Troubleshoot Cisco Crosswork Situation Manager to monitor your system for signs that it is time to scale.
For information on the performance tuning capabilities of individual Cisco Crosswork Situation Manager components, see Monitor Component Performance.
Horizontal Scaling
Cisco Crosswork Situation Manager currently supports horizontal scaling at the integration (LAM) and visualization (Ngnix + Tomcat) layers.
· You can add more LAMs, either on additional servers or on the same server, to achieve higher event rates. In this case, you have the option to configure event sources to send to the parallel LAMs separately or to implement a load balancer in front of the LAMs.
· You can add Nginx/Tomcat UI "stacks" behind a load balancer to increase performance for UI users. Adding UI stacks does not always provide better performance. It can degrade performance by adding more connection pressure to the database.
The following are typical horizontal scaling scenarios:
· You can add an additional LAM to process incoming events if you see that, despite attempts to tune the number of threads for an individual LAM, its event rate hits a plateau. This is a sign that the LAM is the bottleneck, so adding other instances of the LAM behind a load balancer will allow a higher event processing rate.
· You can add an additional UI stack if database pool diagnostics for Tomcat suggest that all or most of the database connections are constantly busy with long running connections, but the database itself is performing fine.
The data processing layer (moogfarmd) is not currently well suited to horizontal scaling. Moolets of the same type cannot currently share processing. Adding more Moolets like the AlertBuilder in an attempt to increase the event processing rate is likely to lead to database problems.
Vertical Scaling
All Cisco Crosswork Situation Manager components ultimately benefit from being run on the best available hardware, but the data processing layer (moogfrarmd) benefits most from this approach. Depending on the number and complexity of Moolets in your configuration, you will see performance benefits in data processing on servers having the fastest CPUs with numerous cores and a large amount of memory. This enables you to increase the number of threads for moogfarmd to improve processing speed. You should also locate the database on the most feasibly powerful server (clock speed, number of cores and memory) with the biggest/fastest disk.
Distributed Installations
In some cases you distribute Cisco Crosswork Situation Manager components among different hosts to gain performance because it reduces resource contention on a single server: The most common distribution is to install the database on a separate server, ideally within the same fast network to minimize risk of latency. An additional benefit of this move is that it allows you to run a clustered or master/slave database for redundancy.
Another common distribution is to install the UI stack (Nnginx) on a separate server within the same fast network.
Some integrations (LAMs) benefit in being closer to the source so are a candidates for distribution.
See Server Roles and Distributed HA Installation for more information.
High Availability Overview
Cisco Crosswork Situation Manager supports high availability (HA) architectures to improve the fault tolerance of Cisco Crosswork Situation Manager. Each component supports a multi-node architecture to enable redundancy, failover, or both to minimize the risk of data loss, for example, in the case of a hardware failure
This topic covers the architectures you can use to achieve HA with Cisco Crosswork Situation Manager. For an example of how to set up a single site HA system, see Distributed HA Installation. See HA Reference Architecture for a detailed diagram of the components in a single site HA configuration.
Distributed HA architectures
Cisco Crosswork Situation Manager supports high availability in distributed architectures where different machines host a subset of the stack. You can run one or more of the server roles on its own machine.
See Server Roles for details of the HA architecture server roles in Cisco Crosswork Situation Manager.
If you run more than one server role on a machine, choose a primary role for the server. The primary role dictates which additional roles are supported on the machine as follows:
| Primary Role |
Supported Secondary Roles |
| Core |
UI, Data ingestion and Database |
| UI |
Data ingestion |
| Data Ingestion |
UI |
| Database |
Redundancy |
| Redundancy |
Database |
See Scale Your Cisco Crosswork Situation Manager Implementation for information on how to increase capacity within the HA architecture, you can.
Contact your Cisco technical representative to discuss scaling your deployment.
See Sizing Recommendations for more information on hardware sizes and capacity.
After you decide on the best HA architecture for your environment, you can plan your implementation.
Resilience and failover
Cisco Crosswork Situation Manager provides support for automatic failover between the two nodes within an HA pair. For example from one instance of Moogfarmd to another, or from one instance of a LAM to another. However there is no automatic failover between multiple HA pairs. For example, there is no failover from a primary site to a second site, such as a disaster recovery replica.
Cisco Crosswork Situation Manager does not support automated fail-back for any architecture. For example, consider an HA pair of Moogfarmd instances. When the instance of Moogfarmd in cluster 1 becomes unavailable, the instance in cluster 2 enters an active state. When the instance from cluster 1 recovers and becomes available, the instance in cluster 2 remains active.
High Availability Configuration Hierarchy
Cisco Crosswork Situation Manager deployments use a tiered hierarchy of clusters, groups, and instances to achieve High Availability.
A cluster is a collection of Cisco Crosswork Situation Manager components. To achieve HA you need at least two clusters that include all the Cisco Crosswork Situation Manager components. You need an additional, third machine, for message queue and search components.
A group comprises a single component or two identical components that provide resilience over two or more clusters. Cisco Crosswork Situation Manager automatically controls the active or passive behavior and failover of the instances within a group.
An example of a group is a Socket LAM configured for the same source in two separate clusters. Other groups include the following;
· Servlets for the UI.
· Moogfarmd for data processing.
· Individual LAMs for data ingestion. For example the REST LAM.
An instance is an individual component running within a group. Each instance in a group provides resilience for the other instance. For example the primary instance of a Socket LAM pairs with a secondary instance in the second cluster to make a group.
HA Reference Architecture
The diagram in this topic represents a Cisco Crosswork Situation Manager High Availability deployment to a single site: one datacenter, LAN, or availability zone. To support this architecture, all servers must have sufficient connection speed amongst themselves so that latency between hosts does not exceed 5 ms.
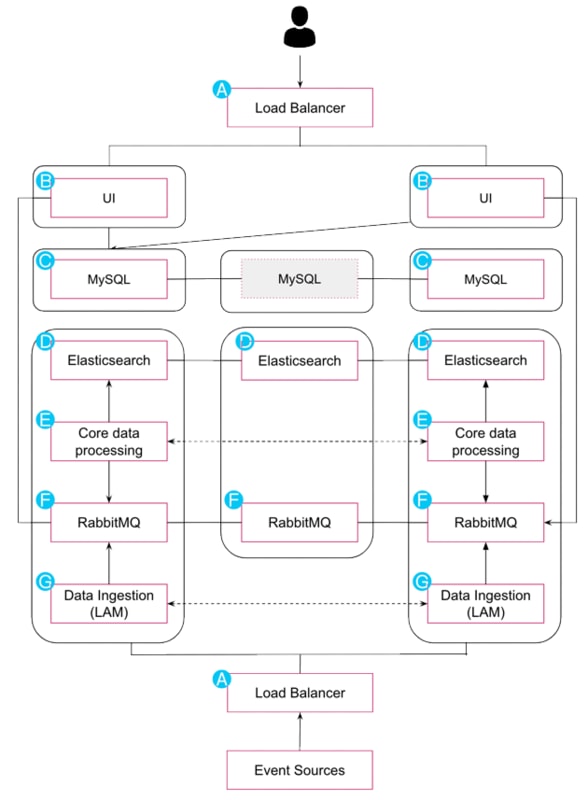
A) Load balancers / VIPs
All Cisco Crosswork Situation Manager components have their own HA mechanism that provides failover capabilities , but it is also a best practice to use a load balancer or load balancers. You can use either software or hardware load balancers with the following requirements and recommendations:
· Load balancers must use TCP.
· You must implement health checks using your preferred approach to remove unhealthy servers from the cluster.
· The load balancer should provide load balancing capabilities and a VIP for each server role. For example: one UI VIP per site, one LAM VIP per site.
· Sticky sessions are recommended.
· You can choose your preferred load balancing approach. For example, round robin or least-connection.
B) User interface
The Cisco Crosswork Situation Manager UI comprises the following components:
· Nginx: The web server that provides static UI content and acts as a proxy for the application server. For HA deployments, install a minimum of two Nginx instances on separate servers and optionally cluster the Nginx instances.
· Apache Tomcat: The web server that provides servlet and API support. For HA deployments, install a minimum of two Tomcat instances on separate servers and optionally cluster the instances.
The UI components run in active/active configuration, so configure servlet instances to run in separate groups.
Required Ports: 80, 443
C) Database
Cisco Crosswork Situation Manager uses Percona XtraDB as the system database. HA requires a minimum of three server nodes configured in each cluster with latency between them not exceeding 5 ms.
Required Ports: 3306
D) Search and indexing
Cisco Crosswork Situation Manager uses Elasticsearch to store active alert and Situation data to provide search functionality within the product. For HA deployments install a cluster of a minimum of three data servers with one active master server.
Required Ports: 9200, 9300
E) Core data processing
Moogfarmd is the core data processing application that controls all other services in Cisco Crosswork Situation Manager. It manages the clustering algorithms and other applets (Moolets) that run as part of the system. For HA deployments, install a minimum of two Moogfarmd services on separate servers. Moogfarmd can only run as a two-instance group in an active/passive mode.
Required Ports: 5701, 8901 for Hazelcast: the in-memory data grid that provides fault tolerance.
F) Message Bus
Cisco Crosswork Situation Manager uses RabbitMQ as the system Message Bus. It requires a minimum of three servers for HA. RabbitMQ relies on its native clustering functionality and mirrored queues to handle failover; it does not use the Cisco Crosswork Situation Manager load balancing feature.
Required Ports: 5672, 4369, 15672
G) Data ingestion
Cisco Crosswork Situation Manager uses the following types of Link Access Modules (LAMs) to ingest data:
· Polling LAMs that periodically connect to a data source using an integration API to collect event data.
· Receiving LAMs that provide an endpoint for data sources to post event data.
· For HA deployments:
· Install two instances of each LAM. When both instances are in the same group, they run in active/passive mode.
· For LAMs deployed over an unreliable link such as a WAN, or across data centers, you should deploy a caching LAM strategy that includes a database and message queue on the LAM Servers.
· You can load balance receiving LAMs and configure them as active/active to increase capacity.
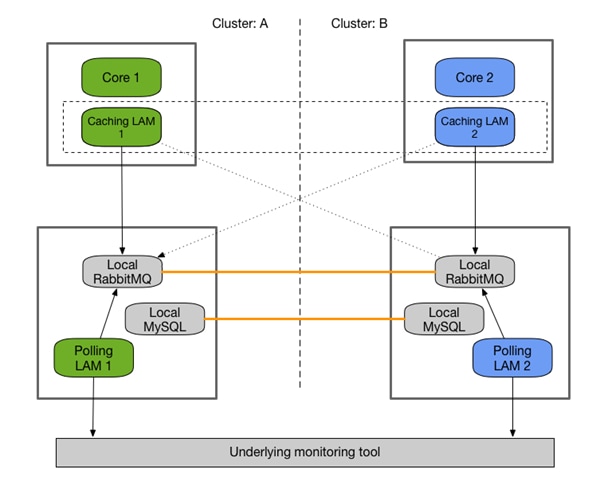
HA Architecture for LAMs
The Cisco Crosswork Situation Manager HA architecture provides increased resilience against LAM and server restarts by caching ingested data to the disk. It requires installing a local RabbitMQ cluster which is used by LAMs for publishing.
A remote caching LAM, located next to the Core role, connects to the local RabbitMQ cluster, picks the events from the queue and publishes them to the central RabbitMQ cluster for Moogfarmd to process.
If no caching LAM is available to consume the events from the local RabbitMQ cluster, the data is cached to disk until the server runs out of memory.
HA architecture
This architecture is recommended for hybrid installations, where the core processing is located in the cloud and LAMs are on-premise, or for a full on-premise configuration where LAMs are housed remotely to the core components.
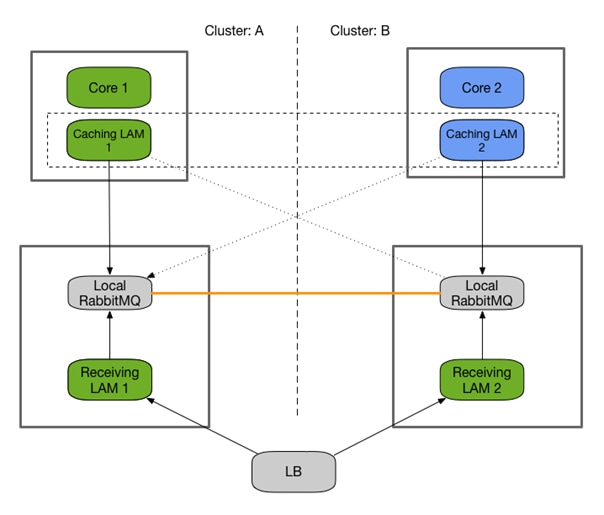
Polling LAMs run in an active / passive mode and must connect to a local database in order to negotiate their state. This requires a local MySQL instance that runs with master / master replication.
Installation steps
If you are setting up the Store and Forward architecture, perform the following steps:
· Setup LAM 1 and 2 Roles (see Install with Caching LAM)
· Setup Caching LAM 1 and 2 Roles (see Caching LAM)
Otherwise, perform the standard installation steps:
· Setup LAM 1 and 2 Roles (see Install without Caching LAM)
High Availability for Third Party Component Dependencies
You can configure Cisco Crosswork Situation Manager dependencies such as Percona XTraDB Cluster, Elasticsearch, RabbitMQ, and Grafana to work effectively in highly available deployments.
See High Availability for details on high availability deployments of Cisco Crosswork Situation Manager and deployment scenarios.
Configure Percona XtraDB Cluster for HA
For information on Percona XtraDB Cluster in Cisco Crosswork Situation Manager, see /document/preview/120574#UUID816c7d74d05ed359780616a54d06a4d4. For an example configuration, see Set Up the Database for HA For further information, refer to the documentation about Percona XtraDB Cluster.Database Strategy
Configure RabbitMQ for HA
You can improve the performance and reliability of your Cisco Crosswork Situation Manager deployment by:
· Distributing your RabbitMQ brokers on different hosts.
· Clustering your multiple RabbitMQ brokers.
· Mirroring your message queues across multiple nodes.
See Set Up the Core Role for HA and Set Up the Redundancy Server Role for an example configuration. For more information see See Message System Deployment. Refer to the RabbitMQ documentation on Clustering and Mirrored Queues for more information.
Configure Elasticsearch for HA
There are different ways to configure Elasticsearch for distributed installations. See Set Up the Core Role for HA and Set Up the Redundancy Server Role for an example configuration.
Refer to the Elasticsearch documentation on Clustering for more details.
Configure Grafana for HA
To set up Grafana for distributed installations, you should configure each Grafana instance to connect to a Cisco Crosswork Situation Manager UI load balancer such as HA Proxy rather than the Cisco Crosswork Situation Manager UI stack.
Alternatively you can point it at the Apache Tomcat server or Nginx server. Refer to the Grafana documention on Setting Up Grafana for High Availability.
HA Control utility command reference
The Cisco Crosswork Situation Manager HA Control Utility ha_cntl is a command line utility to:
· Control instance, process group, or cluster failover. For example, to switch from passive to active mode.
· View the current status of all clusters, process groups, and instances. See High Availability Configuration Hierarchy for more information.
Normally you should configure groups in HA to use automatic failover in production. Use the HA Control utility to check the status of the HA system or to initiate failover in non-production scenarios.
Usage
ha_cntl [ --activate cluster[.group[.instance]] | --deactivate cluster[.group[.instance]] | --diagnostics cluster[.group[.instance]] [ --assumeyes ] | --view ] [ --loglevel (INFO|WARN|ALL) ] [ --time_out <seconds> ] | --help
| Argument |
Input |
Description |
| -a, --activate |
String <cluster[.group[.instance_name]]> |
Activate all groups within a cluster, a specific group within a cluster, or a single instance. |
| -d, --deactivate |
String <cluster[.group[.instance_name]]> |
Deactivate all groups within a cluster, a specific group within a cluster or a single instance. |
| -i, --diagnostics |
String <arg> |
Print additional diagnostics where available to process log file. |
| -l,--loglevel |
String, one of INFO | WARN | ALL |
Log level controlling the amount of information logged by the utility. |
| -t,--time_out |
String <number of seconds> |
Amount of time in seconds to wait for the last answer. Defaults to 2. |
| -v,--view |
- |
View the current status of all instances, process groups, and clusters. |
| -y,--assumeyes |
- |
Answer "yes" for all prompts. |
Example
$MOOGSOFT_HOME/bin/ha_cntl -v
Getting system status
Cluster: [SECONDARY] passive
Process Group: [UI] Passive (no leader - all can be active)
Instance: [servlets] Passive
Component: moogpoller - not running
Component: moogsvr - not running
Component: toolrunner - not running
Process Group: [moog_farmd] Passive (only leader should be active)
Instance: FARM Passive Leader
Moolet: AlertBuilder - not running (will run on activation)
Moolet: AlertRulesEngine - not running (will run on activation)
Moolet: Cookbook - not running (will run on activation)
Moolet: Speedbird - not running (will run on activation)
Moolet: TemplateMatcher - not running
Process Group: [rest_lam] Passive (no leader - all can be active)
Instance: REST2 Passive
Process Group: [socket_lam] Passive (only leader should be active)
Instance: SOCK2 Passive Leader
Cluster: [PRIMARY] active
Process Group: [UI] Active (no leader - all can be active)
Instance: [servlets] Active
Component: moogpoller - running
Component: moogsvr - running
Component: toolrunner - running
Process Group: [moog_farmd] Active (only leader should be active)
Instance: FARM Active Leader
Moolet: AlertBuilder - running
Moolet: AlertRulesEngine - running
Moolet: Cookbook - running
Moolet: Default Cookbook - running
Moolet: Speedbird - running
Moolet: TemplateMatcher - not running
Process Group: [rest_lam] Active (no leader - all can be active)
Instance: REST1 Active
Process Group: [socket_lam] Active (only leader should be active)
Instance: SOCK1 Active Leader
Install Cisco Crosswork Situation Manager
Use this guide to learn how to install Cisco Crosswork Situation Manager:
If you are installing another version, see Welcome to the Cisco Docs! for more information. Refer to the following topics to help choose the right environment for your Cisco Crosswork Situation Manager deployment:
· The Cisco Crosswork Situation Manager Cisco Crosswork Situation Manager 7.3.0 Supported Environments topic details supported operating systems and system requirements.
· The Sizing Recommendations topic will help you make sure you select hardware to support your data ingestion and user requirements.
If you are upgrading Cisco Crosswork Situation Manager, see Upgrade Cisco Crosswork Situation Manager.
Deployment options
You have the option to install all Cisco Crosswork Situation Manager packages on a single machine. However, the modular approach of the Cisco Crosswork Situation Manager distribution means fewer dependencies between individual packages. This means you have the flexibility to install different components to different machines. See Server Roles for a description of how you can distribute the different components amongst multiple machines.
· For smaller deployments, you can run all the components in on a single machine.
— If you have root access to the machine and want to use Yum to install, see v7.3.x - RPM installation.
— If you do not have root access to the machine where you are installing and you want more control over where you install Cisco Crosswork Situation Manager, see v7.3.x - Tarball installation.
· For most production deployments, you may install different components to different machines in order to distribute the workload. See High Availability Overview for more information.
Pre-installation for Cisco Crosswork Situation Manager v7.3.x
Before you start to install Cisco Crosswork Situation Manager v7.3.x, you must perform certain pre-installation tasks.
The instructions to follow depends on your preferred mode of deployment:
· RPM: Use this method if you have root access to your Cisco Crosswork Situation Manager server(s) and you do not want to change the default installation locations.
· Tarball: Use this method if you need to run the process as a non-root user, or you want the ability to deploy to a non-default location and install all components under one directory.
The Tarball installer is hosted on the Cisco "speedy" Yum repository: https://speedy.moogsoft.com/installer/. Contact Cisco Support for access if you do not already have an account.
· Use the Offline RPM instructions if you have root access but your Cisco Crosswork Situation Manager server(s) do not have access to the internet.
For pre-installation instructions, refer to one of the following topics:
· RPM pre-installation for 7.3.x
· Tarball pre-installation for 7.3.x
· Offline RPM pre-installation for 7.3.x
Cisco Crosswork Situation Manager v7.3.x - RPM pre-installation steps
You must perform certain preparatory tasks before you install Cisco Crosswork Situation Manager v7.3.x.
Follow these steps if you have root access to the machine or machines on which you will install Cisco Crosswork Situation Manager, and you can connect to Yum repositories outside your network from those machines.
For Offline RPM pre-installation steps, see v7.3.x - Offline RPM pre-installation steps.
For Tarball pre-installation steps, see v7.3.x - Tarball pre-installation steps.
Before you begin
Before you begin to prepare for the installation, verify the following:
· You have root access to the system where you plan to install Cisco Crosswork Situation Manager.
· You have credentials to connect to the Cisco "speedy" Yum repository.
· You are familiar with the supported versions of third party software, as outlined in Cisco Crosswork Situation Manager 7.3.0 Supported Environments.
Pre-installation steps
Complete the following steps before you perform a RPM installation of Cisco Crosswork Situation Manager v7.3.x:
1. Create the Cisco Crosswork Situation Manager Yum repository as a new file /etc/yum.repos.d/aiops.repo with the following contents. Replace the login and password in the baseurl property with your Cisco "speedy" Yum repository credentials.
[moogsoft-aiops]
name=moogsoft-aiops
baseurl=https://<username>:<password>@speedy.moogsoft.com/repo/aiops/esr
enabled=1
gpgcheck=0
sslverify=0
2. Optional: GPG key validation of the RPMs
For users wishing to validate the RPMs before installation, the following steps must be followed:
a. Download the key from this site:
https://keys.openpgp.org/vks/v1/by-fingerprint/2529C94A49E42429EDAAADAEC7A2253BFC50512A
b. Copy the key to the server onto which the RPMs or tarball will be installed (it will be an .asc file)
c. Import the key:
gpg --import 2529C94A49E42429EDAAADAEC7A2253BFC50512A.asc
d. Download all the '7.3.0' RPMs and .sig files from the speedy yum repository using a browser, providing speedy credentials when asked by the browser:
https://<speedyusername>:<speedypassword>@speedy.moogsoft.com/repo/aiops/esr/x86_64
e. Move the RPMs and .sig files into the same folder. For example, /tmp, as used in the example below.
f. Copy the following code into a bash terminal and run it to perform the validation:
while read RPM
do
echo "Current RPM: $RPM"
gpg --verify ${RPM}.sig ${RPM} 2>&1
done < <(find /tmp -name '*.rpm');
g. Confirm that all the commands for each RPM report:
Good signature from "Moogsoft Information Security Team "<security@moogsoft.com>"
h. You can now remove the RPMs and .sig files. Yum will download the packages from the online repository for the actual installation.
3. Create an Elasticsearch Yum repository as a new file /etc/yum.repos.d/elasticsearch.repo with the following contents:
[elasticsearch-6.x]
name=Elasticsearch repository for 6.x packages
baseurl=https://artifacts.elastic.co/packages/6.x/yum
gpgcheck=1
gpgkey=https://artifacts.elastic.co/GPG-KEY-elasticsearch
enabled=1
autorefresh=1
type=rpm-md
4. Install the RabbitMQ Erlang el7 package. For example:
yum -y install https://github.com/rabbitmq/erlang-rpm/releases/download/v20.1.7/erlang-20.1.7-1.el7.centos.x86_64.rpm
Alternatively you can find the file at https://github.com/rabbitmq/erlang-rpm/releases/tag/v20.1.7.
5. Install the RabbitMQ Yum repository. For example:
curl -s https://packagecloud.io/install/repositories/rabbitmq/rabbitmq-server/script.rpm.sh | sudo bash
Verify that the /etc/yum.repos.d/rabbitmq_rabbitmq-server.repo file has been created.
6. Install the Elasticsearch public key. For example:
rpm --import https://artifacts.elastic.co/GPG-KEY-elasticsearch
7. Create a Bash script named create_nginx_repo.sh with the following contents:
#!/bin/bash
echo '[nginx]' > /etc/yum.repos.d/nginx.repo
echo 'name=nginx repo' >> /etc/yum.repos.d/nginx.repo
echo 'baseurl=http://nginx.org/packages/OS/OSRELEASE/$basearch/' >> /etc/yum.repos.d/nginx.repo
echo 'gpgcheck=0' >> /etc/yum.repos.d/nginx.repo
echo 'enabled=1' >> /etc/yum.repos.d/nginx.repo
OS_VERSION=$(cat /etc/system-release)
case "$OS_VERSION" in
CentOS*release\ 7* )
sed -i -e 's/OS/centos/' -e 's/OSRELEASE/7/' /etc/yum.repos.d/nginx.repo;;
Red\ Hat*release\ 7* )
sed -i -e 's/OS/rhel/' -e 's/OSRELEASE/7/' /etc/yum.repos.d/nginx.repo;;
esac
8. Execute the create_nginx_repo.sh script to create the Nginx Yum repo. For example:
bash create_nginx_repo.sh
9. Refresh the local Yum repo cache and verify that the NSS and OpenSSL packages are up to date on your system. For example:
yum clean all
yum -y update nss openssl
10. Install Java 11:
yum -y install java-11-openjdk-headless-11.0.2.7 java-11-openjdk-11.0.2.7 java-11-openjdk-devel-11.0.2.7
11. Install the Extra Packages for Enterprise Linux (EPEL) Yum repository and enable the optional packages:
yum install https://dl.fedoraproject.org/pub/epel/epel-release-latest-7.noarch.rpm
Verify that the /etc/yum.repos.d/epel.repo file has been created.
12. If the Operating System is RHEL, enable the 'extras' repos:
subscription-manager repos --enable "rhel-*-optional-rpms" --enable "rhel-*-extras-rpms" --enable "rhel-ha-for-rhel-*-server-rpms"
13. Install Percona on all servers that will house a database node. The script configures multiple nodes to run as a cluster. A single node is also supported. This command should be run on an internet-connected host in order to download the installer. If this host does not have internet access, download the script on a different host before copying it to this host. Substitute your "speedy" Yum repo user credentials:
cat > aiops_repo.sh << _EOF_
#!/bin/bash
clear
echo "Please provide access credentials for the 'speedy' yum repository in order to download the Percona setup script"
echo
read -p "AIOps Repository Username: " AIOPS_USER
export AIOPS_USER
read -p "AIOps Repository Password: " -s AIOPS_PASS
export AIOPS_PASS
curl -L -O https://\$AIOPS_USER:\$AIOPS_PASS@speedy.moogsoft.com/repo/aiops/install_percona_nodes.sh 2>/dev/null
echo
_EOF_
bash aiops_repo.sh;
Now run the script:
bash install_percona_nodes.sh
The script guides you through the installation process. To configure a single database node on the same server as Cisco Crosswork Situation Manager, use these settings:
— Configure Percona as "Primary".
— Do not set the server to "DB only".
— Set the first database node IP address to the server IP address.
— When prompted to enter the IP addresses of the second and third nodes, press Enter to skip these settings.
14. Set SELinux to permissive mode or disable it completely. For example, to set SELinux to permissive mode:
setenforce 0
If you want to disable SELinux at boot time, edit the file /etc/sysconfig/selinux.
After you have completed these steps, proceed with your offline installation or upgrade. See Upgrade Cisco Crosswork Situation Manager for the instructions relevant to your deployment.
Cisco Crosswork Situation Manager v7.3.x - Offline RPM pre-installation steps
You must perform certain preparatory tasks before you install Cisco Crosswork Situation Manager v7.3.x.
Follow these steps if you have root access to the machine or machines on which you will install or upgrade Cisco Crosswork Situation Manager, but you cannot connect to Yum repositories outside your network from those machines.
For RPM pre-installation steps, see v7.3.x - RPM pre-installation steps.
For Tarball pre-installation steps, see v7.3.x - Tarball pre-installation steps.
Before you begin
Before you begin to prepare for the installation, verify the following:
· You have root access to the system where you plan to install Cisco Crosswork Situation Manager.
· You are familiar with the supported versions of third party software, as outlined in Cisco Crosswork Situation Manager 7.3.0 Supported Environments.
Download the installation files
Complete the following steps before you perform an offline RPM installation of Cisco Crosswork Situation Manager v7.3.x:
1. Download the two archives required for the offline installation, using the following links:
— The BASE repository containing the dependent packages to install for RHEL/CentOS 7:
https://speedy.moogsoft.com/offline/aiops/2019-10-03-1570143328-MoogsoftBASE7_offline_repo.tar.gz
— The ESR repository containing the standard RPMs and ancillary packages (Apache Tomcat, RabbitMQ, JRE, etc):
2. Copy the downloaded Tarball files to your offline system.
3. Download the Percona and dependency packages using cURL on an internet-connection host:
curl -L -O http://repo.percona.com/percona/yum/release/7/RPMS/x86_64/Percona-XtraDB-Cluster-shared-57-5.7.26-31.37.1.el7.x86_64.rpm;
curl -L -O http://repo.percona.com/percona/yum/release/7/RPMS/x86_64/Percona-XtraDB-Cluster-client-57-5.7.26-31.37.1.el7.x86_64.rpm;
curl -L -O http://repo.percona.com/percona/yum/release/7/RPMS/x86_64/Percona-XtraDB-Cluster-server-57-5.7.26-31.37.1.el7.x86_64.rpm;
curl -L -O http://repo.percona.com/percona/yum/release/7/RPMS/x86_64/Percona-XtraDB-Cluster-shared-compat-57-5.7.26-31.37.1.el7.x86_64.rpm;
curl -L -O http://repo.percona.com/percona/yum/release/7/RPMS/x86_64/percona-xtrabackup-24-2.4.15-1.el7.x86_64.rpm;
Prepare the local Yum repositories
Follow these steps to create local Yum repositories to house the installation packages. If you are running a distributed installation, perform these steps on each machine that will run Cisco Crosswork Situation Manager components.
1. Create two directories to house the repositories. For example:
sudo mkdir -p /media/localRPM/BASE/
sudo mkdir -p /media/localRPM/ESR/
2. Extract the two Tarball files into separate directories. For example:
tar xzf *-MoogsoftBASE7_offline_repo.tar.gz -C /media/localRPM/BASE/
tar xzf *-MoogsoftESR_7.3.0_offline_repo.tar.gz -C /media/localRPM/ESR/
3. Back up the existing /etc/yum.repos.d directory. For example:
mv /etc/yum.repos.d /etc/yum.repos.d-backup
4. Create an empty /etc/yum.repos.d directory. For example:
mkdir /etc/yum.repos.d
5. Create a local.repo file ready to contain the local repository details:
vi /etc/yum.repos.d/local.repo
6. Edit local.repo and configure the baseurl paths for BASE and ESR to point to the your directories. For example:
[BASE]
name=MoogCentOS-$releasever - MoogRPM
baseurl=file:///media/localRPM/BASE/RHEL
gpgcheck=0
enabled=1
[ESR]
name=MoogCentOS-$releasever - MoogRPM
baseurl=file:///media/localRPM/ESR/RHEL
gpgcheck=0
enabled=1
7. Clean the Yum cache:
yum clean all
8. Verify that Yum can detect the newly created repositories. For example:
yum info "moogsoft-*"
Available Packages
Arch : x86_64
Version : 7.3.0
Release : XYZ
Size : 76 M
Repo : ESR
Summary : Algorithmic Intelligence for IT Operations
URL : https://www.moogsoft.com
License : Proprietary
Description : Moogsoft AIOps (7.3.0) - Build: XYZ - (Revision: XYZ)
The results should include the following packages:
Name : moogsoft-db
Name : moogsoft-integrations
Name : moogsoft-integrations-ui
Name : moogsoft-mooms
Name : moogsoft-search
Name : moogsoft-server
Name : moogsoft-ui
Name : moogsoft-utils
Name : moogsoft-common
9. Install Percona on all servers that will house a database node. The script configures multiple nodes to run as a cluster. A single node is also supported. This command should be run on an internet-connected host in order to download the installer. If this host does not have internet access, download the script on a different host before copying it to this host.
Ensure that any host Percona will be installed on has the Percona RPMs (detailed above) in the current directory, and the offline yum repository has also been deployed
Substitute your "speedy" Yum repo user credentials:
cat > aiops_repo.sh << _EOF_
#!/bin/bash
clear
echo "Please provide access credentials for the 'speedy' yum repository in order to download the Percona setup script"
echo
read -p "AIOps Repository Username: " AIOPS_USER
export AIOPS_USER
read -p "AIOps Repository Password: " -s AIOPS_PASS
export AIOPS_PASS
curl -L -O https://\$AIOPS_USER:\$AIOPS_PASS@speedy.moogsoft.com/repo/aiops/install_percona_nodes.sh 2>/dev/null
echo
_EOF_
bash aiops_repo.sh;
Now run the script:
bash install_percona_nodes.sh;
The script guides you through the installation process. To configure a single database node on the same server as Cisco Crosswork Situation Manager, use these settings:
— Configure Percona as "Primary".
— Do not set the server to "DB only".
— Set the first database node IP address to the server IP address.
— When prompted to enter the IP addresses of the second and third nodes, press Enter to skip these settings.
10. Install Java 11:
yum -y install java-11-openjdk-headless-11.0.2.7 java-11-openjdk-11.0.2.7 java-11-openjdk-devel-11.0.2.7
11. Set SELinux to permissive mode or disable it completely. For example, to set SELinux to permissive mode:
setenforce 0
If you want to disable SELinux at boot time, edit the file /etc/sysconfig/selinux.
12. Optional: GPG key validation of the RPMs
For users wishing to validate the RPMs before installation, the following steps must be followed:
a. Download the key from this site:
https://keys.openpgp.org/vks/v1/by-fingerprint/2529C94A49E42429EDAAADAEC7A2253BFC50512A
b. Copy the key to the server onto which the RPMs or tarball will be installed (it will be an .asc file)
c. Import the key:
gpg --import 2529C94A49E42429EDAAADAEC7A2253BFC50512A.asc
d. Download all the '7.3.0' RPMs and .sig files from the speedy yum repository using a browser, providing speedy credentials when asked by the browser:
https://<speedyusername>:<speedypassword>@speedy.moogsoft.com/repo/aiops/esr/x86_64
e. Move the RPMs and .sig files into the same folder. For example, /tmp, as used in the example below.
f. Copy the following code into a bash terminal and run it to perform the validation:
while read RPM
do
echo "Current RPM: $RPM"
gpg --verify ${RPM}.sig ${RPM} 2>&1
done < <(find /media/localRPM/ESR/RHEL/ -name '*.rpm');
g. Confirm that all the commands for each RPM report:
Good signature from "Moogsoft Information Security Team "<security@moogsoft.com>"
Your local Yum repositories are now ready. Proceed with your offline installation or upgrade. See Upgrade Cisco Crosswork Situation Manager for the instructions relevant to your deployment.
Cisco Crosswork Situation Manager v7.3.x - Tarball pre-installation steps
You must perform certain preparatory tasks before you install Cisco Crosswork Situation Manager v7.3.x.
Follow these steps if you do not have root access to the machine or machines on which you will install Cisco Crosswork Situation Manager.
For RPM pre-installation steps, see v7.3.x - RPM pre-installation steps.
For Offline RPM pre-installation steps, see v7.3.x - Offline RPM pre-installation steps.
Before you begin
Before you begin to prepare for the installation, verify the following:
· You have a CentOS 7 / RHEL 7 system on which to install Cisco Crosswork Situation Manager.
· You have removed any existing environment variables such as $MOOGSOFT_HOME from previous installations.
· You have identified the Linux user you will use to perform the installation.
· Optional: Ask an administrator to set the ulimit maximum for open files and max user processes for the installation user. This requires root privileges. For example, on a busy system you could increase both to 65535.
· You have selected a working directory in which to run the installation. The installation directory requires a minimum of 7Gb, and more if you are storing the Percona database in the installation directory, to allow for database and Elasticsearch artefacts and log file growth.
· You have credentials to connect to the Cisco "speedy" Yum repository.
· You are familiar with the supported versions of third party software, as outlined in Cisco Crosswork Situation Manager 7.3.0 Supported Environments.
· Ports 8443 and 8080 are open on your server.
· You are running OpenSSL v1.0.2 or later.
Pre-installation steps
Before you perform a Tarball installation of Cisco Crosswork Situation Manager v7.3.x, complete the following tasks on the server on which you will install Cisco Crosswork Situation Manager:
1. Install Kernel Asynchronous I/O (AIO) Support for Linux and libgfortran. For example:
mkdir -p ~/install/libraries/ && cd ~/install/libraries/
for PACKAGE in libquadmath-4.8.5-39.el7.x86_64.rpm libgfortran-4.8.5-39.el7.x86_64.rpm; do
curl -L -O http://mirror.centos.org/centos/7/os/x86_64/Packages/$PACKAGE && \
rpm2cpio $PACKAGE | cpio -idmv && \
rm -f $PACKAGE
done
echo "export LD_LIBRARY_PATH=$(pwd)/usr/lib64:\$LD_LIBRARY_PATH" >> ~/.bashrc && \
source ~/.bashrc
cd -
2. Install Percona dependencies. This step requires root privileges:
curl -L -O http://repo.percona.com/percona/yum/release/7/RPMS/x86_64/qpress-11-1.el7.x86_64.rpm;
curl -L -O http://mirrors.vooservers.com/centos/7.6.1810/extras/x86_64/Packages/libev-4.15-7.el7.x86_64.rpm;
curl -L -O http://mirrors.clouvider.net/CentOS/7.6.1810/updates/x86_64/Packages/perl-5.16.3-294.el7_6.x86_64.rpm;
curl -L -O http://mirrors.clouvider.net/CentOS/7.6.1810/updates/x86_64/Packages/perl-Pod-Escapes-1.04-294.el7_6.noarch.rpm;
curl -L -O http://mirrors.clouvider.net/CentOS/7.6.1810/updates/x86_64/Packages/perl-libs-5.16.3-294.el7_6.x86_64.rpm;
curl -L -O http://mirrors.clouvider.net/CentOS/7.6.1810/updates/x86_64/Packages/perl-macros-5.16.3-294.el7_6.x86_64.rpm;
curl -L -O http://centos.serverspace.co.uk/centos/7.6.1810/os/x86_64/Packages/xinetd-2.3.15-13.el7.x86_64.rpm;
curl -L -O http://mirror.as29550.net/mirror.centos.org/7.6.1810/os/x86_64/Packages/perl-Carp-1.26-244.el7.noarch.rpm;
curl -L -O http://mirror.as29550.net/mirror.centos.org/7.6.1810/os/x86_64/Packages/perl-Compress-Raw-Bzip2-2.061-3.el7.x86_64.rpm;
curl -L -O http://mirror.as29550.net/mirror.centos.org/7.6.1810/os/x86_64/Packages/perl-Compress-Raw-Zlib-2.061-4.el7.x86_64.rpm;
curl -L -O http://mirror.as29550.net/mirror.centos.org/7.6.1810/os/x86_64/Packages/perl-DBD-MySQL-4.023-6.el7.x86_64.rpm;
curl -L -O http://mirror.as29550.net/mirror.centos.org/7.6.1810/os/x86_64/Packages/perl-DBI-1.627-4.el7.x86_64.rpm;
curl -L -O http://mirror.as29550.net/mirror.centos.org/7.6.1810/os/x86_64/Packages/perl-Data-Dumper-2.145-3.el7.x86_64.rpm;
curl -L -O http://mirror.as29550.net/mirror.centos.org/7.6.1810/os/x86_64/Packages/perl-Digest-1.17-245.el7.noarch.rpm;
curl -L -O http://mirror.as29550.net/mirror.centos.org/7.6.1810/os/x86_64/Packages/perl-Digest-MD5-2.52-3.el7.x86_64.rpm;
curl -L -O http://mirror.as29550.net/mirror.centos.org/7.6.1810/os/x86_64/Packages/perl-Encode-2.51-7.el7.x86_64.rpm;
curl -L -O http://mirror.as29550.net/mirror.centos.org/7.6.1810/os/x86_64/Packages/perl-Exporter-5.68-3.el7.noarch.rpm;
curl -L -O http://mirror.as29550.net/mirror.centos.org/7.6.1810/os/x86_64/Packages/perl-File-Path-2.09-2.el7.noarch.rpm;
curl -L -O http://mirror.as29550.net/mirror.centos.org/7.6.1810/os/x86_64/Packages/perl-File-Temp-0.23.01-3.el7.noarch.rpm;
curl -L -O http://mirror.as29550.net/mirror.centos.org/7.6.1810/os/x86_64/Packages/perl-Filter-1.49-3.el7.x86_64.rpm;
curl -L -O http://mirror.as29550.net/mirror.centos.org/7.6.1810/os/x86_64/Packages/perl-Getopt-Long-2.40-3.el7.noarch.rpm;
curl -L -O http://mirror.as29550.net/mirror.centos.org/7.6.1810/os/x86_64/Packages/perl-HTTP-Tiny-0.033-3.el7.noarch.rpm;
curl -L -O http://mirror.as29550.net/mirror.centos.org/7.6.1810/os/x86_64/Packages/perl-IO-Compress-2.061-2.el7.noarch.rpm;
curl -L -O http://mirror.as29550.net/mirror.centos.org/7.6.1810/os/x86_64/Packages/perl-Net-Daemon-0.48-5.el7.noarch.rpm;
curl -L -O http://mirror.as29550.net/mirror.centos.org/7.6.1810/os/x86_64/Packages/perl-PathTools-3.40-5.el7.x86_64.rpm;
curl -L -O http://mirror.as29550.net/mirror.centos.org/7.6.1810/os/x86_64/Packages/perl-PlRPC-0.2020-14.el7.noarch.rpm;
curl -L -O http://mirror.as29550.net/mirror.centos.org/7.6.1810/os/x86_64/Packages/perl-Pod-Perldoc-3.20-4.el7.noarch.rpm;
curl -L -O http://mirror.as29550.net/mirror.centos.org/7.6.1810/os/x86_64/Packages/perl-Pod-Simple-3.28-4.el7.noarch.rpm;
curl -L -O http://mirror.as29550.net/mirror.centos.org/7.6.1810/os/x86_64/Packages/perl-Pod-Usage-1.63-3.el7.noarch.rpm;
curl -L -O http://mirror.as29550.net/mirror.centos.org/7.6.1810/os/x86_64/Packages/perl-Scalar-List-Utils-1.27-248.el7.x86_64.rpm;
curl -L -O http://mirror.as29550.net/mirror.centos.org/7.6.1810/os/x86_64/Packages/perl-Socket-2.010-4.el7.x86_64.rpm;
curl -L -O http://mirror.as29550.net/mirror.centos.org/7.6.1810/os/x86_64/Packages/perl-Storable-2.45-3.el7.x86_64.rpm;
curl -L -O http://mirror.as29550.net/mirror.centos.org/7.6.1810/os/x86_64/Packages/perl-Text-ParseWords-3.29-4.el7.noarch.rpm;
curl -L -O http://mirror.as29550.net/mirror.centos.org/7.6.1810/os/x86_64/Packages/perl-Time-HiRes-1.9725-3.el7.x86_64.rpm;
curl -L -O http://mirror.as29550.net/mirror.centos.org/7.6.1810/os/x86_64/Packages/perl-Time-Local-1.2300-2.el7.noarch.rpm;
curl -L -O http://mirror.as29550.net/mirror.centos.org/7.6.1810/os/x86_64/Packages/perl-constant-1.27-2.el7.noarch.rpm;
curl -L -O http://mirror.as29550.net/mirror.centos.org/7.6.1810/os/x86_64/Packages/perl-parent-0.225-244.el7.noarch.rpm;
curl -L -O http://mirror.as29550.net/mirror.centos.org/7.6.1810/os/x86_64/Packages/perl-podlators-2.5.1-3.el7.noarch.rpm;
curl -L -O http://mirror.as29550.net/mirror.centos.org/7.6.1810/os/x86_64/Packages/perl-threads-1.87-4.el7.x86_64.rpm;
curl -L -O http://mirror.as29550.net/mirror.centos.org/7.6.1810/os/x86_64/Packages/perl-threads-shared-1.43-6.el7.x86_64.rpm;
curl -L -O http://mirror.as29550.net/mirror.centos.org/7.6.1810/os/x86_64/Packages/socat-1.7.3.2-2.el7.x86_64.rpm;
curl -L -O http://mirror.sov.uk.goscomb.net/centos/7.6.1810/updates/x86_64/Packages/rsync-3.1.2-6.el7_6.1.x86_64.rpm;
curl -L -O http://mirror.sov.uk.goscomb.net/centos/7.6.1810/os/x86_64/Packages/lsof-4.87-6.el7.x86_64.rpm
yum install *.rpm
3. Install Percona on all servers that will house a database node. The script configures multiple nodes to run as a cluster. A single node is also supported. Substitute your "speedy" Yum repo user credentials:
cat > aiops_repo.sh << _EOF_
#!/bin/bash
clear
echo "Please provide access credentials for the 'speedy' yum repository in order to run the Percona setup script"
echo
read -p "AIOps Repository Username: " AIOPS_USER
export AIOPS_USER
read -p "AIOps Repository Password: " -s AIOPS_PASS
export AIOPS_PASS
curl -L -O https://\$AIOPS_USER:\$AIOPS_PASS@speedy.moogsoft.com/repo/aiops/install_percona_nodes_tarball.sh 2>/dev/null
echo
_EOF_
bash aiops_repo.sh
Now run the script:
bash install_percona_nodes_tarball.sh
The script guides you through the installation process. To configure a single database node on the same server as Cisco Crosswork Situation Manager, use these settings:
— Configure Percona as "Primary".
— Do not set the server to "DB only".
— Set the first database node IP address to the server IP address.
— When prompted to enter the IP addresses of the second and third nodes, press Enter to skip these settings.
4. Execute the .bashrc file:
source ~/.bashrc
The pre-installation steps are now complete. To continue with the Cisco Crosswork Situation Manager installation, see v7.3.x - Tarball installation.
RPM installation
This topic describes how to install Cisco Crosswork Situation Manager v7.3.x on a single host.
Follow these steps if you have root access to the machine or machines on which you will install Cisco Crosswork Situation Manager, and you can connect to Yum repositories outside your network from those machines.
To install Cisco Crosswork Situation Manager in a highly available distributed environment, see Distributed HA Installation.
For Tarball installation steps, see v7.3.x - Tarball installation.
Before you begin
Before you start to install Cisco Crosswork Situation Manager, complete all steps in one of the following documents:
· v7.3.x - RPM pre-installation steps: If you have root access to the machine or machines on which you will install Cisco Crosswork Situation Manager, and you can connect to Yum repositories outside your network from those machines.
· v7.3.x - Offline RPM pre-installation steps: If you have root access to the machine or machines on which you will install or upgrade Cisco Crosswork Situation Manager, but you cannot connect to Yum repositories outside your network from those machines.
Install Cisco Crosswork Situation Manager
To complete an RPM installation of Cisco Crosswork Situation Manager v7.3.x, perform the following steps:
1. Download and install the Cisco Crosswork Situation Manager RPM packages, using one of the following methods according to your deployment type:
— If you are performing an RPM installation:
yum -y install moogsoft-server-7.3.0 \
moogsoft-db-7.3.0 \
moogsoft-utils-7.3.0 \
moogsoft-search-7.3.0 \
moogsoft-ui-7.3.0 \
moogsoft-common-7.3.0 \
moogsoft-mooms-7.3.0 \
moogsoft-integrations-7.3.0 \
moogsoft-integrations-ui-7.3.0
— If you are performing an offline RPM installation, navigate to the location where you copied the RPM files and install them:
yum install *.rpm
2. Edit your ~/.bashrc file to contain the following lines:
export MOOGSOFT_HOME=/usr/share/moogsoft
export APPSERVER_HOME=/usr/share/apache-tomcat
export JAVA_HOME=/usr/java/latest
export PATH=$PATH:$MOOGSOFT_HOME/bin:$MOOGSOFT_HOME/bin/utils
Initialize Cisco Crosswork Situation Manager
When the installation process is complete, initialize Cisco Crosswork Situation Manager as follows:
1. Run the initialization script moog_init (replace <zone name> with your desired RabbitMQ VHOST):
$MOOGSOFT_HOME/bin/utils/moog_init.sh -qI <zone_name> -u root
The script prompts you to accept the End User License Agreement (EULA) and guides you through the initialization process.
The zone_name sets up a virtual host for the Message Bus. If you have multiple systems sharing the same bus, set a different zone name for each.
2. If you are deploying more than one database, configure HA Proxy to load-balance the database nodes. The following script requires root privileges. Run this script on any host running any Cisco Crosswork Situation Manager components. Provide your "speedy" Yum repo user credentials when prompted:
cat > aiops_repo.sh << _EOF_
#!/bin/bash
clear
echo "Please provide access credentials for the 'speedy' yum repository in order to run the haproxy setup script"
echo
read -p "AIOps Repository Username: " AIOPS_USER
export AIOPS_USER
read -p "AIOps Repository Password: " -s AIOPS_PASS
export AIOPS_PASS
echo
bash <(curl -s -k https://\$AIOPS_USER:\$AIOPS_PASS@speedy.moogsoft.com/repo/aiops/haproxy_installer.sh)
_EOF_
bash aiops_repo.sh
3. Restart Moogfarmd and Apache Tomcat:
service moogfarmd restart
Run an unattended installation
The moog_init script provides the ability to run a 'quiet' installation and to automatically accept the terms of the EULA. This means that you can write a bash script to automatically execute both the installation script and the initialization script on the same host. For example:
~/moogsoft-aiops-install-7.3.0.sh \
-d ~/moogsoft &&
~/moogsoft/bin/utils/moog_init.sh \
-qI MoogsoftAIOps -p MySQLpasswd -u root --accept-eula
Run moog_init.sh -h for a description of all options.
Verify the installation
To verify that the installation has completed successfully, follow the steps outlined in Validate the installation.
Change passwords for default users
When the installation is complete, it is critical that you change the passwords for the default users created during the installation process. See Change passwords for default users for more information.
Tarball installation
This topic describes how to install Cisco Crosswork Situation Manager on a single host using the tarball archives, previously known as the non-root install.
Follow these steps if you do not have root access to the machine or machines on which you will install Cisco Crosswork Situation Manager.
To install Cisco Crosswork Situation Manager in a highly available distributed environment, see Distributed HA Installation.
For RPM installation steps, see /document/preview/11638#UUIDc3421ecf858260d943609c8ad4af0f4c.Prepare for an RPM Installation
Before you begin
Before you start to install Cisco Crosswork Situation Manager, complete all steps in the following document:
v7.3.x - Tarball pre-installation steps.
Install Cisco Crosswork Situation Manager
To complete a Tarball installation of Cisco Crosswork Situation Manager v7.3.x, perform the following steps:
1. Download the tarball installer, using one of the following options:
— Download via a web browser from https://speedy.moogsoft.com/installer and user the Yum user credentials provided by Cisco support.
— Use the following cURL command, substituting your "speedy" Yum repo user credentials:
curl -L -O "https://<username>:<password>@speedy.moogsoft.com/installer/moogsoft-aiops-7.3.0.tgz"
2. Optional: GPG key validation of the Tarball
For users wishing to validate the Tarball before installation, the following steps must be followed:
a. Download the key from this site:
https://keys.openpgp.org/vks/v1/by-fingerprint/2529C94A49E42429EDAAADAEC7A2253BFC50512A
b. Copy the key to the server onto which the Tarball will be installed (it will be a .asc file)
c. Import the key:
gpg --import 2529C94A49E42429EDAAADAEC7A2253BFC50512A.asc
d. Download the moogsoft-aiops-7.3.0.tgz.sig file from the same 'speedy' path:
curl -L -O "https://<username>:<password>@speedy.moogsoft.com/installer/moogsoft-aiops-7.3.0.tgz.sig"
e. Ensure both the tgz and the .sig file are both in the same folder, then copy the following command into a bash terminal and run it to perform the validation:
gpg --verify moogsoft-aiops-7.3.0.tgz.sig moogsoft-aiops-7.3.0.tgz
f. Confirm that the report states:
Good signature from "Moogsoft Information Security Team "<security@moogsoft.com>"
3. Unzip and untar the Cisco Crosswork Situation Manager distribution archive in your working directory:
tar -xf moogsoft-aiops-7.3.0.tgz
The distribution archive contains the following files:
— A README.txt file
— The installation script: moogsoft-aiops-install-7.3.0.sh
— The distribution archive: moogsoft-aiops-dist-7.3.0.tgz
4. Execute the installation script moogsoft-aiops-install-7.3.0.sh in your working directory to install Cisco Crosswork Situation Manager.
bash moogsoft-aiops-install-7.3.0.sh
The script guides you through the installation process. The installation directory defaults to <working-directory>/Cisco. You can change this if you wish.
5. Set the $MOOGSOFT_HOME environment variable to point to your installation directory, and add $MOOGSOFT_HOME/bin/utils to the path. For example:
echo "export MOOGSOFT_HOME=~/moogsoft" >> ~/.bashrc
echo "export PATH=$PATH:\$MOOGSOFT_HOME/bin/utils" >> ~/.bashrc && \
source ~/.bashrc
Initialize Cisco Crosswork Situation Manager
When the installation process is complete, initialize Cisco Crosswork Situation Manager as follows:
1. Configure the Toolrunner to execute locally by setting "execute_locally: true" in $MOOGSOFT_HOME/config/servlets.conf:
sed -i 's/# execute_locally: false,/,execute_locally: true/1' $MOOGSOFT_HOME/config/servlets.conf
2. Run the initialization script moog_init:
$MOOGSOFT_HOME/bin/utils/moog_init.sh -qI <zone_name> -u root
The script prompts you to accept the End User License Agreement (EULA) and guides you through the initialization process.
The zone_name sets up a virtual host for the Message Bus. If you have multiple systems sharing the same bus, set a different zone name for each.
To set processes to restart when the system is rebooted (Percona, RabbitMQ, Moogfarmd etc) use the -k flag. For example:
$MOOGSOFT_HOME/bin/utils/moog_init.sh -k
For more information see Configure Services to Restart.
3. If you are deploying more than one database, configure HA Proxy to load-balance the database nodes. The following script requires root privileges. Run this script on any host running any Cisco Crosswork Situation Manager components. Provide your "speedy" Yum repo user credentials when prompted:
cat > aiops_repo.sh << _EOF_
#!/bin/bash
clear
echo "Please provide access credentials for the 'speedy' yum repository in order to download the Percona setup script"
echo
read -p "AIOps Repository Username: " AIOPS_USER
export AIOPS_USER
read -p "AIOps Repository Password: " -s AIOPS_PASS
export AIOPS_PASS
curl -L -O https://\$AIOPS_USER:\$AIOPS_PASS@speedy.moogsoft.com/repo/aiops/install_percona_nodes_tarball.sh 2>/dev/null
echo
_EOF_
bash aiops_repo.sh;
Then run the script:
bash install_percona_nodes_tarball.sh
4. Restart Moogfarmd and Apache Tomcat:
$MOOGSOFT_HOME/bin/utils/process_cntl moog_farmd restart
$MOOGSOFT_HOME/bin/utils/process_cntl apache-tomcat restart
Run an unattended installation
The moog_init script provides the ability to run a 'quiet' installation and to automatically accept the terms of the EULA. This means that you can write a bash script to automatically execute both the installation script and the initialization script on the same host. For example:
~/moogsoft-aiops-install-7.3.0.sh \
-d ~/moogsoft &&
~/moogsoft/bin/utils/moog_init.sh \
-qI MoogsoftAIOps -p MySQLpasswd -u root --accept-eula
Run moog_init.sh -h for a description of all options.
Verify the installation
To verify that the installation has completed successfully, follow the steps outlined in Validate the installation.
Change passwords for default users
When the installation is complete, it is critical that you change the passwords for the default users created during the installation process. See Change passwords for default users for more information.
Distributed HA Installation
The following includes the installation steps for a fully distributed system running with HA, as illustrated in the following diagram.
Note that prior to performing a distributed HA installation, you must complete Pre-installation for Cisco Crosswork Situation Manager v7.3.x.
To view a list of connectivity ports for a fully distributed HA architecture see Distributed HA system Firewall.
The installation assumes a HA configuration across 2 clusters called Cluster1 and Cluster2.
Note that both Core instances and polling LAMs are part of the same respective Cisco Crosswork Situation Manager process group since they run in an active / passive configuration with auto-failover enabled.
UI stacks, as well as receiving LAMs, should run as part of two distinct Cisco Crosswork Situation Manager process groups as both instances in the HA pair are active.
Install a fully distributed HA system
1. Set up Percona XTRA DB Cluster. See Set Up the Database for HA for more information.
2. Set up Core 1 and 2 roles. See Set Up the Core Role for HA for more information.
3. Set up UI 1 and 2 roles. See Set Up the User Interface Role for HA for more information.
4. Set up LAM 1 and 2 roles. See Install without Caching LAM for more information.
5. (Optional) set up Caching LAM 1 and 2 roles.
Install a minimally distributed HA system
For any other minimally distributed HA setup, follow the same high level installation steps as described above.
The instructions list the steps for a specific role installation. If you need to collocate multiple roles on the same server according to a minimally distributed installation of your choice, you may need to run multiple sets of instructions on the same server for the corresponding collocated roles. There might be an overlap in terms of steps and if this is the case you only need to perform those steps once. For instance, if you collocate Core 1 and UI 1 roles, you only need to configure HA Proxy once.
Distributed HA system Firewall
Connectivity within a fully distributed HA architecture:
| Source |
Destination |
Ports |
Bi-directional |
| UI 1, UI 2 |
Core 1, Core 2 |
5672,9200 |
- |
| UI 1, UI 2 |
RedServ |
5672,9200 |
- |
| UI 1, UI 2 |
DB 1, DB 2, DB 3 |
3306,9198 |
- |
| Core 1 |
Core 2 |
5701,9300,4369,5672 |
Yes |
| Core 1, Core 2 |
RedServ |
9300, 4369, 5672 |
Yes |
| Core 1, Core 2 |
DB 1, DB 2, DB 3 |
3306, 9198 |
- |
| LAM 1, LAM 2 |
Core 1, Core 2, RedServ |
5672 |
- |
| LAM 1, LAM 2 |
DB 1, DB 2, DB 3 |
3306, 9198 |
- |
| DB 1 |
DB 2, DB 3 |
3306, 4567, 4444, 5468 |
Yes |
If any of the default ports are changed then substitute it in the tables above. The ports are responsible for the following:
| 9200 |
Used for inbound Elastic Search REST API |
| 9300 |
Used for Elastic nodes communication within a cluster |
| 5672 |
Access to mooms bus (RabbitMQ) |
| 15672 |
Access to mooms (RabbitMQ) console |
| 4369 |
Required for mooms (RabbitMQ) cluster |
| 5701 |
Required for Hazelcast cluster |
| 8091 |
Access the Hazelcast cluster info via Hazelcast's |
| 3306 |
Regular MySQL port |
| 4567 |
For group communication in Percona XtraDB Cluster |
| 4444 |
For State Snapshot Transfer in Percona XtraDB Cluster |
| 4568 |
For Incremental State Transfer in Percona XtraDB Cluster |
| 9198 |
Allows HAProxy to check the node's Percona XtraDB Cluster status via http |
See Distributed HA Installation for the full installation steps for a fully distributed system running with HA.
Set Up the Database for HA
The database layer Cisco Crosswork Situation Manager for HA uses the Percona XtraDB Cluster mechanism.
See /document/preview/120574#UUID816c7d74d05ed359780616a54d06a4d4 for more information about the supported database platform.Database Strategy
HA architecture
In our distributed HA installation, the database components are installed on servers 3, 4, and 5:

The roles are installed as follows:
Server 3: DB 1.
Server 4: DB 2.
Server 5: DB 3.
Fully distributed installation
See Distributed HA Installation for a reference diagram and steps to achieve a fully distributed installation.
Minimally distributed installation
For a minimally distributed installation follow the instructions below, replacing server 3, server 4 and server 5 with the relevant values for your architecture.
Build a Percona cluster
The sections below detail how to build a Percona XtraDB cluster.
Install Cisco Crosswork Situation Manager components on DB 1, DB 2, DB 3
On servers 3, 4 and 5, install the following Cisco Crosswork Situation Manager components:
yum -y install moogsoft-utils-7.3* \
moogsoft-db-7.3*
Set up Percona on DB 1
On server 3, run install_percona_nodes.sh to install, configure and start Percona Cluster node 1:
install_percona_nodes.sh -p -d -i <server 3 ip address>,<server 4 ip address>,<server 5 ip address> -u sstuser -w passw0rd
Cisco advises that you provide the IP addresses instead of hostnames for servers running the Percona Cluster in order to reduce network latency. The “sstuser“, in the command above, is the user that will be used by the Percona nodes to communicate with each other. The script performs the following tasks:
· Disables SELinux and sets the vm.swappiness property to 1.
· Installs the Percona Yum repository.
· Installs the Percona compatibility package.
· Installs Percona XtraDB cluster.
· Installs the Extended Internet Service Daemon (xinetd).
· Creates a my.cnf configuration file based on the server's hardware.
· Configures a mysqlchk service on port 9198 and restarts the xinetd service.
· Starts the first Percona node in bootstrap mode.
· Reconfigures my.cnf to ensure the node will restart in non-bootstrap mode.
Initialize the Cisco Crosswork Situation Manager database
On server 3, run the following commands to create the Cisco Crosswork Situation Manager databases (moogdb, moog_reference, historic_moogdb, moog_intdb), and populate them with the required schema:
$MOOGSOFT_HOME/bin/utils/moog_init_db.sh -qIu root --accept-eula <<-EOF
EOF
Note:
You do not need to run this command on any of the other nodes. The new schema is replicated automatically around the cluster.
Set up Percona on DB 2
On server 4, run install_percona_nodes.sh for DB 2. The script will perform the same actions, only this time starting the second Percona node to join the first node as a cluster:
install_percona_nodes.sh -d -i <server 3 ip address>,<server 4 ip address>,<server 5 ip address> -u sstuser -w passw0rd
Set up Percona on DB 3
On server 5, run install_percona_nodes.sh as you did for DB 1 and DB 2. The script will perform the same actions, only this time starting the third Percona node to join the first and second nodes as a cluster.
install_percona_nodes.sh -d -i <server 3 ip address>,<server 4 ip address>,<server 5 ip address> -u sstuser -w passw0rd
Verify Percona cluster status
To verify the replication status of each node, run the following commands from a remote server:
curl http://<server3 ip address/hostname>:9198
curl http://<server4 ip address/hostname>:9198
curl http://<server5 ip address/hostname>:9198
A successful response is shown below:
[root@ldev01]# curl -v http://server3:9198
* About to connect() to ldev03 port 9198 (#0)
* Trying 10.99.1.24...
* Connected to server3 (10.99.1.24) port 9198 (#0)
> GET / HTTP/1.1
> User-Agent: curl/7.29.0
> Host: ldev03:9198
> Accept: */*
>
< HTTP/1.1 200 OK
< Content-Type: text/plain
< Connection: close
< Content-Length: 40
<
Percona XtraDB Cluster Node is synced.
Set Up HA Proxy for the Database Role
This topic details the installation and configuration of HA Proxy on a Cisco Crosswork Situation Manager server, for connection to a remote Percona XtraDB Cluster.
Percona XtraDB Cluster must be run as a 3-node (minimum) cluster distributed across the database roles.
HA architecture
Before you install and configure HA Proxy, configure PerconaXtraDB as described in Set Up the Database for HA, with the components installed as follows:
Server 3: DB 1 (Percona Node 1).
Server 4: DB 2 (Percona Node 2).
Server 5: DB 3 (Percona Node 3).
Fully distributed installation
See Distributed HA Installation for a reference diagram and steps to achieve a fully distributed installation.
Minimally distributed installation
For a minimally distributed installation follow the instructions below, replacing server 3, server 4 and server 5 with the relevant values for your architecture.
Configure HA Proxy for connection to Percona XtraDB Cluster
On the relevant server, run the following command to configure and start HA Proxy:
$MOOGSOFT_HOME/bin/utils/haproxy_installer.sh -l 3307 -c -i <server 3 ip address>:3306,<server 4 ip address>:3306,<server 5 ip address>:3306
Note:
Cisco advises providing IP addresses instead of host names for servers running the Percona Cluster, in order to reduce the network latency.
The script performs the following tasks:
· Installs HA Proxy v1.5.
· Configures HA Proxy to listen on 0.0.0.0:3306 and route connections to one of three MySQL back ends (as specified by the -i properties).
Verify HA Proxy connection status
On the required server, run the following command:
$MOOGSOFT_HOME/bin/utils/check_haproxy_connections.sh
A successful response is as follows:
HAProxy Connection Counts
Frontend:
0.0.0.0:3306 : 13
Backend:
mysql_node_1 10.99.1.24:3306 : 13
mysql_node_2 10.99.1.23:3306 : 0
mysql_node_3 10.99.1.18:3306 : 0
Press Ctrl-C to quit
Set Up the Core Role for HA
In Cisco Crosswork Situation Manager HA architecture, Core 1 and Core 2 run in an active / passive HA pair.
HA architecture
In our distributed HA installation, the Core components are installed on servers 6, 7, and 8:
Server 6: Core 1 (Moogfarmd), Elastic Node 1, RabbitMQ Node 1.
Server 7: Core 2 (Moogfarmd), Elastic Node 2, RabbitMQ Node 2.
Server 8: Elastic Node 3, RabbitMQ Node 3.
Fully distributed installation
See Distributed HA Installation for a reference diagram and steps to achieve a fully distributed installation.
Minimally distributed installation
For a minimally distributed installation follow the instructions below, replacing server 6, server 7 and server 8 with the relevant values for your architecture.
Install Core 1
1. Initialize RabbitMQ Cluster Node 1 on the Core Primary Server.
On server 6 initialize RabbitMQ. Set the zone:
moog_init_mooms.sh -pz <ZONE>
2. Initialize, configure and start Elasticsearch Cluster Node 1 on the Core Primary Server.
a. Initialize Elasticsearch on server 6:
moog_init_search.sh
b. Edit the /etc/elasticsearch/elasticsearch.yml file, replacing its contents with the following.
Substitute the values as appropriate, for example <server 6 hostname> :
cluster.name: aiops
node.name: <server 6 hostname>
network.host: 0.0.0.0
http.port: 9200
discovery.zen.ping.unicast.hosts: [ "<server 6 hostname>","<server 7 hostname>","<server 8 hostname>" ]
discovery.zen.minimum_master_nodes: 1
gateway.recover_after_nodes: 1
node.master: true
3. Configure system.conf on the Core Primary server.
a. On server 6 edit the $MOOGSOFT_HOME/config/system.conf file and set the mooms.zone and mooms.brokers properties as follows:
"zone" : "<ZONE>",
"brokers" : [ { "host" : "<server 6 hostname>", "port" : 5672 },
{ "host" : "<server 7 hostname>", "port" : 5672 },
{ "host" : "<server 8 hostname>", "port" : 5672 }
],
a. In the same file, edit the search.nodes property as follows:
"nodes" : [ { "host" : "<server 6 hostname>", "port" : 9200 },
{ "host" : "<server 7 hostname>", "port" : 9200 },
{ "host" : "<server 8 hostname>", "port" : 9200 }
]
Note:
The brokers object must list all hostnames that form the RabbitMQ cluster and nodes must list the hostnames that form the Elasticsearch cluster.
c. In the same file, set the ha section as follows:
"ha": { "cluster": "PRIMARY" },
d. Restart Elasticsearch:
systemctl restart elasticsearch
4. Install and configure HA Proxy on the Core Primary server for connection to Percona XtraDB Cluster.
On server 6 install, configure and start HAProxy.
Install Core 2
1. Install Cisco Crosswork Situation Manager components on the Core Secondary server.
On server 7 install the following Cisco Crosswork Situation Manager components:
yum -y install moogsoft-common-7.3* \
moogsoft-mooms-7.3* \
moogsoft-search-7.3* \
moogsoft-server-7.3* \
moogsoft-utils-7.3* \
moogsoft-integrations-7.3*
2. Initialize RabbitMQ Cluster Node 2 on the Core Secondary server and create the cluster.
a. On server 7 initialize RabbitMQ. Set a zone name:
moog_init_moos.sh -pz <ZONE>
b. Copy and replace the /var/lib/rabbitmq/.erlang.cookie file from server 6 to the same location on this server.
c. Restart the rabbitmq-server service:
systemctl restart rabbitmq-server
d. Run the following commands to create the cluster:
rabbitmqctl stop_app
rabbitmqctl join_cluster rabbit@<server 6 hostname>
rabbitmqctl start_app
e. Apply HA mirrored queues policy:
rabbitmqctl set_policy -p <ZONE> ha-all ".+\.HA" '{"ha-mode":"all"}'
Note:
Replace <ZONE> with the zone name you used earlier.
f. Verify the cluster status and queue policy. For example:
rabbitmqctl cluster_status
Cluster status of node rabbit@ldev02 ...
[{nodes,[{disc,[rabbit@ldev01,rabbit@ldev02]}]},
{running_nodes,[rabbit@ldev01,rabbit@ldev02]},
{cluster_name,<<"rabbit@ldev02">>},
{partitions,[]},
{alarms,[{rabbit@ldev01,[]},{rabbit@ldev02,[]}]}]
[root@ldev02 rabbitmq]# rabbitmqctl -p <ZONE> list_policies
Listing policies for vhost "MOOG" ...
<ZONE> ha-all .+\.HA all {"ha-mode":"all"} 0
3. Initialize, configure and start Elasticsearch Cluster Node 2 on the Core Secondary server.
a. On server 7 initialize Elasticsearch:
moog_init_search.sh
b. Edit the /etc/elasticsearch/elasticsearch.yml file, replacing its contents with the following:
cluster.name: aiops
node.name: <server 7 hostname>
network.host: 0.0.0.0
http.port: 9200
discovery.zen.ping.unicast.hosts: [ "<server 6 hostname>","<server 7 hostname>","<server 8 hostname>" ]
discovery.zen.minimum_master_nodes: 1
gateway.recover_after_nodes: 1
node.master: true
4. Configure system.conf on the Core Secondary server.
a. On server 7 edit the $MOOGSOFT_HOME/config/system.conf and set the mooms.zone and mooms.brokers properties as follows:
"zone" : "<ZONE>",
"brokers" : [ { "host" : "<server 6 hostname>", "port" : 5672 },
{ "host" : "<server 7 hostname>", "port" : 5672 },
{ "host" : "<server 8 hostname>", "port" : 5672 }
],
b. In the same file, edit the search.nodes property as follows:
"nodes" : [ { "host" : "<server 6 hostname>", "port" : 9200 },
{ "host" : "<server 7 hostname>", "port" : 9200 },
{ "host" : "<server 8 hostname>", "port" : 9200 }
]
Note:
The brokers object must list all hostnames that form the RabbitMQ cluster and nodes must list the hostnames that form the Elasticsearch cluster.
c. In the same file, set the ha section as follows:
"ha": { "cluster": "SECONDARY" }
d. Restart Elasticsearch:
systemctl restart elasticsearch
On server 7 edit the $MOOGSOFT_HOME/config/system.conf and set the mooms.zone and mooms.brokers properties as follows:
and the search.nodes property as follows:
5. Install and configure HA Proxy on the Core Secondary server for connection to Percona XtraDB Cluster.
On server 7 install, configure and start HAProxy.
Enable failover
1. Stop the Moogfarmd service on both Primary, server 6 and Secondary, server 7:
systemctl stop moogfarmd
2. On server 6 and server 7 edit the $MOOGSOFT_HOME/config/system.conf file and set the failover.automatic_failover:
"automatic_failover" : true,
3. Start the Moogfarmd service on both Primary, server 6 and Secondary, server 7:
systemctl start moogfarmd
Set Up the User Interface Role for HA
The UI role includes the Nginx and Apache Tomcat components. There are also a number of Cisco Crosswork Situation Manager webapps (servlets) installed and running within Tomcat, responsible for the following processes:
· graze: Graze API
· moogpoller: Dynamic updates to UI
· moogsvr: Services HTTP requests
· situation_similarity: Calculates the situation similarity and pushes to UI
· toolrunner: Services Server Tools
HA architecture
In our distributed HA installation, the UI components are installed on servers 1, 2, 6, 7 and 8.

• Server 1: UI 1
• Server 2: UI 2
· Server 6: Elasticsearch Node 1
· Server 7: Elasticsearch Node 2
· Server 8: Elasticsearch Node 3
· Server 6: RabbitMQ Node 1
· Server 7: RabbitMQ Node 2
· Server 8: RabbitMQ Node 3
Fully distributed installation
See Distributed HA Installation for a reference diagram and steps to achieve a fully distributed installation.
Minimally distributed installation
For a minimally distributed installation follow the instructions below, replacing servers 1, 2, 6, 7 and 8 with the relevant values for your architecture.
Install UI primary
1. Install Cisco Crosswork Situation Manager components on the UI Primary server.
On server 1 install the following Cisco Crosswork Situation Manager components:
yum -y install moogsoft-common-7.3* \
moogsoft-integrations-ui-7.3* \
moogsoft-ui-7.3* \
mooogsoft-utils-7.3*
2. On server 1 install, configure and start HA Proxy.
3. Initialize the UI stack:
moog_init_ui.sh -twfz <ZONE> -c <server 6 hostname>:15672 -m <server 6 hostname>:5672 -s <server 6 hostname>:9200 -n
Note:
<server 6 hostname> is the server where the Core Primary is configured.
4. On server 1 edit the $MOOGSOFT_HOME/config/system.conf file and set the mooms.zone and mooms.brokers properties as follows:
"zone" : "<ZONE>",
"brokers" : [ { "host" : "<server 6 hostname>", "port" : 5672 },
{ "host" : "<server 7 hostname>", "port" : 5672 },
{ "host" : "<server 8 hostname>", "port" : 5672 }
],
5. In the same file, edit the search.nodes property as follows:
"nodes" : [ { "host" : "<server 6 hostname>", "port" : 9200 },
{ "host" : "<server 7 hostname>", "port" : 9200 },
{ "host" : "<server 8 hostname>", "port" : 9200 }
]
Note: The brokers object must list all hostnames that form the RabbitMQ cluster and nodes must list the hostnames that form the Elasticsearch cluster.
6. In the same file, set the ha section as follows:
"ha": { "cluster": "PRIMARY" },
7. Edit servlets.conf.
On server 1, edit the $MOOGSOFT_HOME/config/servlets.conf file and uncomment the ha section at the bottom of the file. Set the content of the ha section as follows (note the leading comma):
,ha :
{
cluster: "PRIMARY",
group: "ui1",
instance: "primary",
start_as_passive: false
}
8. On server 1, restart the Apache Tomcat service:
systemctl restart apache-tomcat
Install UI secondary
1. Install Cisco Crosswork Situation Manager components on the UI Secondary server.
On server 2 install the following Cisco Crosswork Situation Manager components:
yum -y install moogsoft-common-7.3* \
moogsoft-integrations-ui-7.3* \
moogsoft-ui-7.3* \
mooogsoft-utils-7.3*
2. Install and configure HA Proxy on the UI Secondary server for connection to Percona XtraDB Cluster.
On server 2 install, configure and start HAProxy.
3. Initialize the UI stack.
On server 2, run the following command to initialize the UI stack:
moog_init_ui.sh -twfz <ZONE> -c <server 7 hostname>:15672 -m <server 7 hostname>:5672 -s <server 7 hostname>:9200 -n
Note:
<server 7 hostname> is the server where the Core Secondary is set up.
4. Reconfigure system.conf on the UI Secondary server.
On server 2 edit the $MOOGSOFT_HOME/config/system.conf file and set the mooms.zone and mooms.brokers properties as follows:
"zone" : "<ZONE>",
"brokers" : [ { "host" : "<server 7 hostname>", "port" : 5672 },
{ "host" : "<server 6 hostname>", "port" : 5672 },
{ "host" : "<server 8 hostname>", "port" : 5672 }
],
5. In the same file, edit the search.nodes property as follows:
"nodes" : [ { "host" : "<server 7 hostname>", "port" : 9200 },
{ "host" : "<server 6 hostname>", "port" : 9200 },
{ "host" : "<server 8 hostname>", "port" : 9200 }
]
6. In the same file, se the ha section as follows:
"ha": { "cluster": "SECONDARY" },
7. Edit servlets.conf.
On server 2, edit the $MOOGSOFT_HOME/config/servlets.conf file. Uncomment the ha section at the bottom of the file and set the content as follows (note the leading comma):
,ha :
{
cluster: "SECONDARY",
group: "ui2",
instance: "secondary",
start_as_passive: false
}
8. On server 2, restart the Apache Tomcat service:
systemctl restart apache-tomcat
Configure the UI load balancer
A user session needs to be served from the same UI stack, ie. they need to stay connected to the same UI server for the duration of their session, or until that UI server becomes unavailable (in which case the load balancer will redirect the user to the secondary). This is because requests are routed via moogsvr and data is received from moogpoller (web sockets).
Configure the UI load balancer with the following attributes:
· Since both UI stacks are active you can choose to implement the round robin or least connection balancing method.
· Route web traffic only to the Nginx behind which there is an active UI. The decision for this is based on a moogsvr servlet check via the ‘hastatus’ Tomcat endpoint. It will return a 204 if the UI stack is UP. It does not however report on the health of other roles, ie. Core (Moogfarmd, RabbitMQ and Elasticsearch clusters), Database (Percona Cluster), LAMs.
· Sticky sessions are preferred. Traffic needs to be routed to the same backend server based on the same MOOGSESS cookie.
You can send the following example cURL command from the command line to check moogsvr servlet status:
curl -k https://server1/moogsvr/hastatus -v
Set Up NFS Shared Storage
When you upload files to the Cisco Crosswork Situation Manager UI, it writes them to the disk on the UI Server. For example, Situation Room thread entry attachments and User Profile Pictures.
In an HA configuration running multiple UI roles, the files reside on the disk for the UI server where the user is connected. To ensure attachments are available to users on any UI servers as part of an HA/Load Balancer setup, configure the location of these attachments on a shared disk (NFS) available to all UI servers.
The following example below demonstrates a sample configuration.
· The configuration below assume that /mnt/nfs/shared is the shared location exposed by the NFS Server called NFS_Server
· Ensure that the moogsoft:moogsoft user/group has the same uid/gid across all 3 servers and has ownership of the shared directory. If not then the following commands can be run on all 3 servers to ensure that they are the same. The gid can be be verified on all 3 servers via: cat /etc/group | grep moogsoft command
groupmod -g <gid> moogsoft
usermod -u <gid> moogsoft
NFS Server
Run the following commands, replacing <ServerA> and <ServerE> with the hostnames of the servers
service apache-tomcat stop
chown -R moogsoft:moogsoft /usr/share/apache-tomcat
chown -R moogsoft:moogsoft /var/run/apache-tomcat
mkdir /shared
chown moogsoft:moogsoft /shared/
chmod 755 /shared/
yum install -y nfs-utils nfs-utils-lib
chkconfig nfs on
service rpcbind start
service nfs start
service apache-tomcat start
Edit /etc/exports and set: /shared <ServerA>(rw,sync,no_subtree_check,insecure) <ServerE>(rw,sync,no_subtree_check,insecure)
Then run: exportfs -a
Server 1
Run the following commands to configure Server 1:
service apache-tomcat stop
chown -R moogsoft:moogsoft /usr/share/apache-tomcat
chown -R moogsoft:moogsoft /var/run/apache-tomcat
yum install -y nfs-utils nfs-utils-lib
mkdir -p /mnt/nfs/shared
mount NFS_Server:/shared /mnt/nfs/shared
Edit $MOOGSOFT_HOME/config/servlets.conf and set cache_root: "/mnt/nfs/shared",
service apache-tomcat start
Server 2
Run the following commands to configure Server 2:
service apache-tomcat stop
chown -R moogsoft:moogsoft /usr/share/apache-tomcat
chown -R moogsoft:moogsoft /var/run/apache-tomcat
yum install -y nfs-utils nfs-utils-lib
mkdir -p /mnt/nfs/shared
mount NFS_Server:/shared /mnt/nfs/shared
Edit $MOOGSOFT_HOME/config/servlets.conf and set cache_root: "/mnt/nfs/shared",
service apache-tomcat start
Set Up the Redundancy Server Role
In Cisco Crosswork Situation Manager HA architecture, both RabbitMQ and ElasticSearch run as three-node clusters. The three-node clusters prevent issues with ambiguous data state, such as a "split-brain".
RabbitMQ is the Message Bus used by Cisco Crosswork Situation Manager. Elasticsearch delivers the search functionality.
The three nodes are distributed across the two Core roles and the redundancy server.
HA architecture
In our distributed HA installation, the RabbitMQ and Elasticsearch components are installed on servers 6, 7 and 8.
· Server 6: RabbitMQ Node 1 (part of Core 1)
· Server 7: RabbitMQ Node 2 (part of Core 2)
· Server 8: RabbitMQ Node 3 (part of Redundancy Server)
· Server 6: Elasticsearch Node 1 (part of Core 1)
· Server 7: Elasticsearch Node 2 (part of Core 2)
· Server 8: Elasticsearch Node 3 (part of Redundancy Server)
Fully distributed installation
See Distributed HA Installation for a reference diagram and steps to achieve a fully distributed installation.
Minimally distributed installation
For a minimally distributed installation follow the same instructions below, replacing server 8 with the relevant value for your architecture.
Install Redundancy server
1. Install the Cisco Crosswork Situation Manager components on the Redundancy server.
On server 8 install the following Cisco Crosswork Situation Manager components:
yum -y install moogsoft-common-7.3* \
moogsoft-mooms-7.3* \
moogsoft-search-7.3* \
moogsoft-utils-7.3*
2. Initialize RabbitMQ Cluster Node 3 on the Redundancy server and join the cluster.
a. On server 8 initialise RabbitMQ. Set a zone name:
moog_init_mooms.sh -pz <ZONE>
b. Copy and replace the /var/lib/rabbitmq/.erlang.cookie file from server 6 to the same location on this server.
c. Restart the rabbit-mq server service:
systemctl restart rabbitmq-server
d. Run the following commands to form the cluster:
rabbitmqctl stop_app
rabbitmqctl join_cluster rabbit@<server 6 hostname>
rabbitmqctl start_app
e. Apply the HA mirrored queues policy:
rabbitmqctl set_policy -p <ZONE> ha-all ".+\.HA" '{"ha-mode":"all"}'
Note:
Replace <ZONE> with the zone name you used earlier.
f. Verify the cluster status and queue policy. For example:
cluster_status
Cluster status of node rabbit@ldev02 ...
[{nodes,[{disc,[rabbit@ldev01,rabbit@ldev02]}]},
{running_nodes,[rabbit@ldev01,rabbit@ldev02]},
{cluster_name,<<"rabbit@ldev02">>},
{partitions,[]},
{alarms,[{rabbit@ldev01,[]},{rabbit@ldev02,[]}]}]
[root@ldev02 rabbitmq]# rabbitmqctl -p MOOG list_policies
Listing policies for vhost "MOOG" ...
MOOG ha-all .+\.HA all {"ha-mode":"all"} 0
3. Initialise, configure and start Elasticsearch Cluster Node 3 on the Redundancy server.
a. On server 8 initialize Elasticsearch:
moog_init_search.sh
b. Edit the /etc/elasticsearch/elasticsearch.yml file, replacing its contents with the following:
cluster.name: aiops
node.name: <server 8 hostname>
network.host: 0.0.0.0
http.port: 9200
discovery.zen.ping.unicast.hosts: [ "<server 6 hostname>","<server 7 hostname>","<server 8 hostname>" ]
discovery.zen.minimum_master_nodes: 1
gateway.recover_after_nodes: 1
node.master: true
c. Restart Elasticsearch:
systemctl restart elasticsearch
Install without Caching LAM
In HA architecture, LAM 1 and LAM 2 run in an active / passive mode for a HA polling pair, and in active / active mode for a HA receiving pair.
HA architecture
In our distributed HA installation, the LAM components are installed on servers 6, 7, 8, 9 and 10:
· LAM 1: Server 9
· LAM 2: Server 10
· RabbitMQ Node 1: Server 6
· RabbitMQ Node 2: Server 7
· RabbitMQ Node 3: Server 8
Fully distributed installation
See Distributed HA Installation for a reference diagram and steps to achieve a fully distributed installation.
Minimally distributed installation
For a minimally distributed installation follow the instructions below, replacing server 6, 7, 8, 9 and 10 with the relevant values for your architecture.
Install LAM 1
1. Install Cisco Crosswork Situation Manager components on the LAM 1 server.
On server 9 install the following Cisco Crosswork Situation Manager components:
yum -y install moogsoft-common-7.3* \
moogsoft-integrations-7.3* \
moogsoft-utils-7.3*
2. Configure system.conf on the LAM 1 server.
a. On server 9 edit the $MOOGSOFT_HOME/config/system.conf file and set the mooms.zone and mooms.brokers properties as follows:
"zone" : "<ZONE>",
"brokers" : [ { "host" : "<server 6 hostname>", "port" : 5672 },
{ "host" : "<server 7 hostname>", "port" : 5672 },
{ "host" : "<server 8 hostname>", "port" : 5672 }
],
b. In the same file, set the ha section as follows:
"ha": { "cluster": "PRIMARY" },
3. Install and configure HA Proxy on the LAM 1 server for connection to Percona XtraDB Cluster.
On server 9 install, configure and start HAProxy.
Install LAM 2
1. Install Cisco Crosswork Situation Manager components on the LAM 2 server.
On server 10 install the following Cisco Crosswork Situation Manager components:
yum -y install moogsoft-common-7.3* \
moogsoft-integrations-7.3* \
moogsoft-utils-7.3*
2. Configure system.conf on the LAM 2 server.
a. On server 10 edit the $MOOGSOFT_HOME/config/system.conf file and set the mooms.zone and mooms.brokers properties as follows:
"zone" : "<ZONE>",
"brokers" : [ { "host" : "<server 7 hostname>", "port" : 5672 },
{ "host" : "<server 6 hostname>", "port" : 5672 },
{ "host" : "<server 8 hostname>", "port" : 5672 }
],
b. In the same file, set the ha section as follows:
"ha": { "cluster": "SECONDARY" },
3. Install and configure HA Proxy on the LAM 2 server for connection to Percona XtraDB Cluster.
On server 7 install, configure and start HAProxy.
Configure a new backend LAM integration as HA on LAM 1 and LAM 2
Folllow the instructions in Set Up LAMs for HA.
Install with Caching LAM
In HA architecture, LAM 1 and LAM 2 run in an active / passive mode for a HA polling pair, and in active / active mode for a HA receiving pair.
Your backend LAM integrations connect to a local two-node RabbitMQ cluster; receiving LAM pairs additionally connect to a local MySQL two-node cluster. The Caching LAM does not require any outbound connectivity; remotely configuring inbound connectivity allows you to connect to the local RabbitMQ cluster to fetch messages from the bus.
HA architecture
In our distributed HA installation, the LAM components are installed on servers 9 and 10:
· LAM 1: Server 9
· LAM 2: Server 10
· Local RabbitMQ Node 1: Server 9
· Local RabbitMQ Node 2: Server 10
· Local MySQL Node 1: Server 9
· Local MySQL Node 2: Server 10
Fully distributed installation
See Distributed HA Installation for a reference diagram and steps to achieve a fully distributed installation.
Minimally distributed installation
For a minimally distributed installation follow the instructions below, replacing server 9 and 10 with the relevant values for your architecture.
Install LAM 1
1. Install Cisco Crosswork Situation Manager components on the LAM 1 server.
On server 9 install the following Cisco Crosswork Situation Manager components:
yum -y install moogsoft-common-7.3* \
moogsoft-db-7.3* \
moogsoft-mooms-7.3*
moogsoft-integrations-7.3* \
moogsoft-utils-7.3*
2. Initialize the local Cisco Crosswork Situation Manager RabbitMQ cluster node on the LAM 1 server.
On server 9 initialize RabbitMQ:
Note:
For zone pick a value that is different from the one chosen for the main RabbitMQ cluster.
3. Initialize the Cisco Crosswork Situation Manager database.
On server 9, run the following commands to create the Cisco Crosswork Situation Manager databases and populate them with the required schema:
moog_init_db.sh -Iu root
4. Configure system.conf on the LAM 1 server.
a. On server 9 edit the $MOOGSOFT_HOME/config/system.conf file and set the mooms.zone and mooms.brokers properties with the following. Substitute the values as appropriate, for example <server 9 hostname>:
"zone" : "<ZONE>",
"brokers" : [ { "host" : "<server 9 hostname>", "port" : 5672 },
{ "host" : "<server 10 hostname>", "port" : 5672 }
],
b. In the same file, set the ha section as follows:
"ha": { "cluster": "PRIMARY" },
Install LAM 2
1. Install Cisco Crosswork Situation Manager components on the LAM 2 server.
On server 10 install the following Cisco Crosswork Situation Manager components:
yum -y install moogsoft-common-7.3* \
moogsoft-db-7.3* \
moogsoft-mooms-7.3* \
moogsoft-integrations-7.3* \
moogsoft-utils-7.3*
2. Initialize the local RabbitMQ cluster node 1 on the LAM 2 server.
a. On server 10 initialize RabbitMQ:
moog_init_mooms.sh -pz <ZONE>
Note:
For zone pick a value that is different from the one chosen for the main RabbitMQ cluster.
b. Copy and replace the /var/lib/rabbitmq/.erlang.cookiefile from server 9 to the same location on this server.
c. Restart the rabbitmq-server service:
systemctl restart rabbitmq-server
d. Run the following commands to form the cluster:
rabbitmqctl stop_app
rabbitmqctl join_cluster rabbit@<server 9 hostname>
rabbitmqctl start_app
e. Apply the HA mirrored queues policy:
rabbitmqctl set_policy -p <ZONE> ha-all ".+\.HA" '{"ha-mode":"all"}'
Note:
Replace <ZONE> with the zone name you used earlier.
You can then verify cluster status and zone policy:
[root@ldev02 rabbitmq]# rabbitmqctl cluster_status
Cluster status of node rabbit@ldev02 ...
[{nodes,[{disc,[rabbit@ldev01,rabbit@ldev02]}]},
{running_nodes,[rabbit@ldev01,rabbit@ldev02]},
{cluster_name,<<"rabbit@ldev02">>},
{partitions,[]},
{alarms,[{rabbit@ldev01,[]},{rabbit@ldev02,[]}]}]
[root@ldev02 rabbitmq]# rabbitmqctl -p MOOG list_policies
Listing policies for vhost "MOOG" ...
MOOG ha-all .+\.HA all {"ha-mode":"all"} 0
3. Initialize the Cisco Crosswork Situation Manager database for polling LAMs on the LAM 2 server.
On server 10, run the following commands to create the Cisco Crosswork Situation Manager databases, and populate them with the required schema:
moog_init_db.sh -Iu root
4. Configure system.conf on the LAM 2 server.
On server 10, edit the $MOOGSOFT_HOME/config/system.config and set the mooms.zone and mooms.brokers properties as follows. Substitute the values as appropriate, for example <server 9 hostname>:
"zone" : "<ZONE>",
"brokers" : [ { "host" : "<server 9 hostname>", "port" : 5672 },
{ "host" : "<server 10 hostname>", "port" : 5672 }
],
For polling LAMs you must also populate mysql.failover_connections with the following:
"mysql" :
{
"host" : "<server 9 hostname>",
"failover_connections" :
[
{ "host" : "<server 10 hostname>", "port" : 3306 }
]
In the same file, set the ha section as follows:
"ha": { "cluster": "SECONDARY" },
5. Set up Master-Master replication for the database for polling LAMs.
Set up a backend LAM HA configuration on LAM 1 and LAM 2
See Set Up LAMs for HA for instructions.
Caching LAM
In our HA architecture, Caching LAM 1 and 2 run in an active / passive HA pair. The LAM components are installed on servers 6 ,7, 9 and 10:
· Core 1: Server 6
· Core 2: Server 7
· Caching LAM 1: Server 6
· Caching LAM 2: Server 7
· Local RabbitMQ Node 1 on LAM 1: Server 9
· Local RabbitMQ Node 2 on LAM 2: Server 10
Install Caching LAM 1 and LAM 2
1. Make a copy of the corresponding Config LAM file and rename it accordingly. The default config file is $MOOGSOFT_HOME/config/mooms_cache_lam.conf.
2. Edit the config file to populate the brokers and virtual_host properties:
brokers:
[
{ host : "<server 9 hostname>", port : 5672 },
{ host : "<server 10 hostname>", port : 5672 }
}
],
virtual_host : "<local RabbitMQ ZONE name>",
3. Configure the ha section of the same file according to the type of LAM and its corresponding HA setup.
4. Create the service script pointing to the file.
Set Up LAMs for HA
To configure a new backend LAM integration for HA on LAM 1 and LAM 2:
1. Make a copy of the corresponding LAM configuration file and rename it accordingly.
2. Make a copy of the corresponding LAMbot LAM file and rename it accordingly.
3. If applicable, amend the LAM configuration file to point to the LAMBot file (under the Presend section).
4. Create the service script pointing to the configuration file.
5. Configure the ha section of the configuration file according to the type of LAM and its corresponding HA setup.
Configure a Polling LAM for HA
To configure a polling LAM for HA, you must set the LAMs as active / passive, and therefore in the same Cisco Crosswork Situation Manager process group. If the system detects an issue with the active LAM, the passive instance will automatically take over.
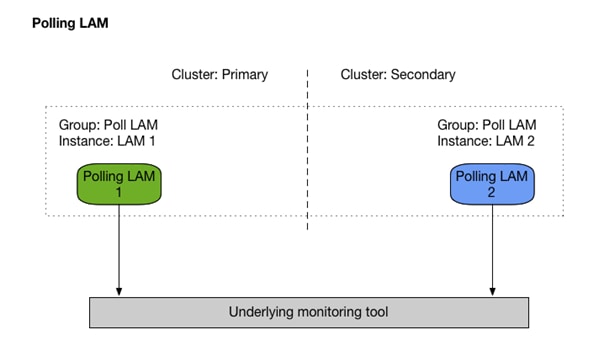
To enable automatic failover:
1. On LAM 1 and LAM 2, edit the $MOOGSOFT_HOME/config/system.conf file and set the automatic_failover property to true:
# Allow a passive process to automatically become active if
# no other active processes are detected in the same process group
"automatic_failover" : true,
2. Restart the polling LAMs to finish enabling automatic failover.
Configure a Receiving LAM for HA
For a HA configuration, the receiving LAMs must always run as active / active, meaning a load balancer (of your choice) places them in different Cisco Crosswork Situation Manager process groups.
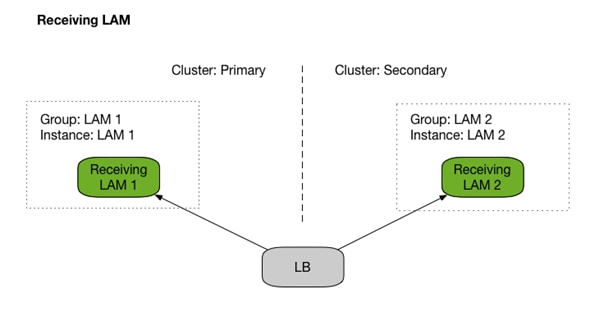
There are two methods you can use to implement your load balancer: chained failover or multiplexing (which sends to both active receiving LAMs.
If you choose to implement using multiplexing, ensure the following:
· The duplicate_event_source parameter in the LAM config is set to true. The parameter lets Moogfarmd know to silently drop any event duplicates arriving within a configurable period.
· The configuration files for both active Receiving LAMs, running as an HA pair, are identical, apart from their ha sections. This ensures that Moogfarmd is able to detect the event duplicates correctly.
The following example cURL command is a call from the command line to check on the status of the LAM instance:
[root@server1 moogsoft]# curl -X GET "http://server9:8888"
{"success":true,"message":"Instance is active","statusCode":0}
Validate the installation
Follow the steps below to validate that the installation was successful.
Elasticsearch requires Java11. Java 11 is included with the installation of the RPM packages as a dependency.
If Elasticsearch fails to start due to an incorrect Java/JDK version, follow these steps.
1. Run the following command to configure the system to use the new Java version:
alternatives --config java
This command prompts you to select which 'java' should be in the system PATH. At the prompt, type the number which corresponds with the Java 11 installation. For example, if the prompt includes:
Selection Command
-----------------------------------------------
*+ 1 java-8-openjdk.x86_64 (/usr/lib/jvm/java-8-openjdk-8.1.0.7-0.el7_6.x86_64/bin/java)
+ 2 java-11-openjdk.x86_64 (/usr/lib/jvm/java-11-openjdk-11.0.2.7-0.el7_6.x86_64/bin/java
Press 2 and hit Enter. To confirm the change has taken effect, run the following command:
java -version
The output should show openjdk version "11.0.2" 2019-01-15 LTS.
2. Restart Elasticsearch:
service elasticsearch restart
Perform the following steps to ensure that Cisco Crosswork Situation Manager v7.3.x has been successfully installed or upgraded:
1. Check that the UI login page displays "Version 7.3.x" at the bottom.
2. Log into the UI and click the Help icon (question mark) > Support Information. Check that the System Information shows version 7.3.x and the correct schema upgrade history if you have performed an upgrade.
Note:
If you have already completed this step previously (as part of this upgrade process) on the current host, you can skip this step.
Run the Install Validator utility to ensure that all Cisco Crosswork Situation Manager files were deployed correctly in $MOOGSOFT_HOME:
$MOOGSOFT_HOME/bin/utils/moog_install_validator.sh
Run this utility to confirm that all Apache Tomcat files were deployed correctly in $MOOGSOFT_HOME:
$MOOGSOFT_HOME/bin/utils/tomcat_install_validator.sh
If there are webapp differences, run the following command to extract the webapps with the correct files:
$MOOGSOFT_HOME/bin/utils/moog_init_ui.sh -w
Note:
If you have already completed this step previously (as part of this upgrade process) on the current host, you can skip this step.
Run the Database Validator utility to validate the database schema:
$MOOGSOFT_HOME/bin/utils/moog_db_validator.sh
Note:
Some schema differences are valid, for example those related to custom_info (new columns added etc).
An additional required schema upgrade step is documented on the Post-upgrade steps page. Until this has been run, you should expect to see the following differences in the output of the Database Validator utility:
Differences found in 'historic_moogdb' tables:
41,49c41,43
< primary key (`alert_id`),
< unique key `idx_signature` (`signature`),
< key `idx_first_event_time` (`first_event_time`),
< key `idx_state_last` (`state`,`last_state_change`),
< key `idx_severity` (`severity`,`state`),
< key `idx_agent` (`agent`(12)),
< key `idx_source` (`source`(12)),
< key `idx_type` (`type`(12)),
< key `idx_manager` (`manager`(12))
---
> primary key (`signature`),
> key `alert_id` (`alert_id`),
> key `first_event_time` (`first_event_time`,`alert_id`)
93,94c87
< key `timestamp` (`timestamp`,`type`),
< key `idx_type_time` (`type`,`timestamp`)
---
> key `timestamp` (`timestamp`,`type`)
241,242c234
< key `sig_id` (`sig_id`,`action_code`,`timestamp`),
< key `idx_action_sig` (`action_code`,`sig_id`)
---
> key `sig_id` (`sig_id`,`action_code`,`timestamp`)
The differences above will not have any functional impact, but you must complete the rest of the upgrade to ensure the system is performant and the schema is ready for future upgrades.
If you have performed an upgrade and you see errors similar to the following:
Differences found in 'moogdb' tables:
57a58
> key 'filter_id' ('filter_id'),
194a196
> key 'enrichment_static_mappings_ibfk_1' ('eid'),
1196a1199
> key 'sig_id' ('sig_id'),
1325a1329
> key 'filter_id' ('filter_id'),
Run the following commands to resolve these index-related problems:
mysql moogdb -u root -e "alter table alert_filters_access drop key filter_id"
mysql moogdb -u root -e "alter table situation_filters_access drop key filter_id"
mysql moogdb -u root -e "alter table enrichment_static_mappings drop key enrichment_static_mappings_ibfk_1"
mysql moogdb -u root -e "alter table sig_stats_cache drop key sig_id"
System Setup for Cisco Crosswork Situation Manager
Shortly after you install the Cisco Crosswork Situation Manager packages and the system is running, you can configure additional components per your organizations needs:
· Apply Valid SSL Certificates
· Configure External Authentication
· Configure Search and Indexing
· Configure Services to Restart
· Enable Situation Room Plugins
If you need to troubleshoot Cisco Crosswork Situation Manager:
· Monitor and Troubleshoot Moogsoft AIOpsMonitor and Troubleshoot Moogsoft AIOps
After your system has been running for some time:
· Configure Historic Data Retention
· Archive Situations and Alerts
System Configuration
You can configure the various components of Cisco Crosswork Situation Manager using the system configuration file. These include:
· Message Bus
· Databases
· Search
· Failover
· Process monitoring
· Web host address
· Logging
Configure your System
Edit the configuration file to control the behavior of the different components in your Cisco Crosswork Situation Manager system. You can find the file at $MOOGSOFT_HOME/config/system.conf.
See the System Configuration Reference for a full description of all properties. Some properties in the file are commented out by default. Uncomment properties to configure and enable them.
Message Bus
You can edit your Message Bus and RabbitMQ configuration in the mooms section of the file. It allows you to:
· Configure your Message Bus zones and brokers.
· Control and minimize message loss during a failure.
· Control how senders handle Message Bus failures.
· Control what happens during periods of extended Message Bus unavailability.
· Configure the SSL protocol you want to use.
· Specify the number of connections to use for each message sender pool.
For more information see the Message Bus documentation.
Database
You can edit your database configuration in the mysql section of the file:
1. Configure your host name, database names and database credentials:
— host: Name of your host.
— moogdb_database_name: Name of the Moogdb database.
— referencedb_database_name: Name of the Cisco Crosswork Situation Manager reference database.
— intdb_database_name: Name of the Cisco Crosswork Situation Manager integrations database.
— username:Username for the MySQL user that accesses the database.
— encrypted_password: Encrypted password for the MySQL user.
— password: Password for the MySQL user.
— port: Default port that Cisco Crosswork Situation Manager uses to connect to MySQL.
2. Configure the port, deadlock retry attempts and multi-host connections:
— maxRetries: Maximum number of retries in the event of a MySQL deadlock.
— retryWait: Number of milliseconds to wait between each retry attempt.
— failover_connections: Hosts and ports for the different servers that are connected to the main host.
3. Configure the SSL connections to the MySQL database:
— trustStorePath: Path to location that stores the server certificate.
— trustStoreEncryptedPassword: Path to location that stores your encrypted trustStore password.
— trustStorePassword: Path to location that stores your trustStore password.
Elasticsearch
You can edit your search configuration in the search section of the file:
1. Configure the Elasticsearch connection timeouts:
— connection_timeout: Length of time in milliseconds before the connection times out.
— request_timeout: Length of time in milliseconds before the request times out.
2. Configure the Elasticsearch limit and nodes:
— limit: Maximum number of search results that Elasticsearch returns from a search query.
— nodes: Hosts and ports for the different Elasticsearch servers connected in a cluster.
Failover
You can edit failover configuration in the failover section of the file:
1. Configure persistence in the event of a failover:
a. persist_state: Enable or disable the persistence of the state of all Moolets in the event of a failover.
2. Configure the Hazelcast cluster, this is Cisco Crosswork Situation Manager implementation of persistence:
— network_port: Port to connect to on each specified host.
— auto_increment: Enable for Hazelcast to attempt to the next incremental available port number if the configured port is unavailable.
— hosts: List of hosts that can participate in the cluster.
— man_center: Configures the cluster information that you can view in the Hazelcast Management Center UI.
— cluster_per_group: Enable the stateful information from each process group to persist in a dedicated Hazelcast cluster.
3. Configure failover options that apply to Moogfarmd and the LAMs:
— keepalive_interval: Time interval in seconds at which processes report their active/passive status and check statuses of other processes.
— margin: Amount of time in seconds after keepalive_intervalbefore Cisco Crosswork Situation Manager considers processes that do not report their status to be dead.
— failover_timeout: Number of seconds to wait for previously active process to become passive during a manual failover.
— automatic_failover: Allow a passive process to automatically become active if no other active processes are detected in the same process group.
— heartbeat_failover_after: Number of consecutive heartbeats that a process fails to send before Moogfarmd considers it inactive.
Process Monitor
You can edit the process monitor configuration in the process_monitor section of the file:
1. Configure the heartbeat interval and delay:
— heartbeat: Interval in milliseconds between heartbeats sent by processes.
— max_heartbeat_delay: Number of milliseconds to wait before declaring heartbeat as missing.
2. Configure the Moogfarmd and which processes you can control from the UI:
— group: Name of the group of processes and subcomponent processes that you want to control from the UI.
— instance: Name of the instance of Cisco Crosswork Situation Manager you want to configure.
— service_name: Name of the service you want to control.
— process_type: Type of process you want to control.
— reserved: Determines if Cisco Crosswork Situation Manager considers the process as critical in process monitoring.
Encryption
You can edit the encryption configuration in the encryption section of the file:
— encryption_key_file: Default location of the encryption key file.
High Availability
You can edit the high availability configuration in the ha section of the file.
— cluster: Default HA cluster name.
Service Port Range
You can edit the port range that Cisco Crosswork Situation Manager services use when they look for open ports.
— port_range_min: Minimum port number in the range.
— port_range_max: Maximum port number in the range.
Example
The following example shows system.conf with the default configuration and all available properties enabled:
{
"mooms": {
"zone": "",
"brokers": [{
"host": "localhost",
"port": 5672
}],
"username": "moogsoft",
"password": "m00gs0ft",
"encrypted_password": "e5uO0LY3HQJZCltG/caUnVbxVN4hImm4gIOpb4rwpF4=",
"threads": 10,
"message_persistence": false,
"message_prefetch": 100,
"max_retries": 100,
"retry_interval": 200,
"cache_on_failure": false,
"cache_ttl": 900,
"connections_per_producer_pool": 2,
"confirmation_timeout": 2000,
"ssl": {
"ssl_protocol": "TLSv1.2",
"server_cert_file": "server.pem",
"client_cert_file": "client.pem",
"client_key_file": "client.key"
}
},
"mysql": {
"host": "localhost",
"moogdb_database_name": "moogdb",
"referencedb_database_name": "moog_reference",
"intdb_database_name": "moog_intdb",
"username": "ermintrude",
"encrypted_password": "vQj7/yom7e5ensSEb10v2Rb/pgkaPK/4OcUlEjYNtQU=",
"password": "m00",
"port": 3306,
"maxRetries": 10,
"retryWait": 50,
"failover_connections": [
{
"host": "193.221.20.24",
"port": 3306
},
{
"host": "143.47.254.88",
"port": 3306
},
{
"host": "234.118.117.132",
"port": 3306
}
],
"ssl": {
"trustStorePath": "etc/truststore",
"trustStoreEncryptedPassword": "vQj7/yom7e5ensSEb10v2Rb/pgkaPK/4OcUlEjYNtQU=",
"trustStorePassword": "moogsoft"
}
},
"search": {
"connection_timeout": 1000,
"request_timeout": 10000,
"limit": 1000,
"nodes": [{
"host": "localhost",
"port": 9200
}]
},
"failover": {
"persist_state": false,
"hazelcast": {
"network_port": 5701,
"auto_increment": true,
"hosts": ["localhost"],
"man_center":
{
"enabled": false,
"host": "localhost",
"port": 8091
},
"cluster_per_group": false
},
"keepalive_interval": 5,
"margin": 10,
"failover_timeout": 10,
"automatic_failover": false,
"heartbeat_failover_after": 2
},
"process_monitor": {
"heartbeat": 10000,
"max_heartbeat_delay": 1000,
"processes": [{
"group": "moog_farmd",
"instance": "",
"service_name": "moogfarmd",
"process_type": "moog_farmd",
"reserved": true,
"subcomponents": [
"AlertBuilder",
"Default Cookbook",
"TeamsMgr",
"Housekeeper",
"AlertRulesEngine",
"SituationMgr",
"Notifier"
]},
{
"group": "servlets",
"instance": "",
"service_name": "apache-tomcat",
"process_type": "servlets",
"reserved": true,
"subcomponents": [
"moogsvr",
"moogpoller",
"toolrunner",
"situation_similarity"
]},
{
"group": "logfile_lam",
"instance": "",
"service_name": "logfilelamd",
"process_type": "LAM",
"reserved": false
},
{
"group": "rest_lam",
"instance": "",
"service_name": "restlamd",
"process_type": "LAM",
"reserved": false
},
{
"group": "socket_lam",
"instance": "",
"service_name": "socketlamd",
"process_type": "LAM",
"reserved": false
},
{
"group": "trapd_lam",
"instance": "",
"service_name": "trapdlamd",
"process_type": "LAM",
"reserved": false
},
{
"group": "rest_client_lam",
"instance": "",
"service_name": "restclientlamd",
"process_type": "LAM",
"reserved": false
}
]
},
"encryption": {
"encryption_key_file": "/location/of/.key"
},
"ha": {
"cluster": "MOO"
},
"port_range_min": 50000,
"port_range_max": 51000
}
Start and Stop Moogfarmd
Restart the Moogfarmd service to activate any changes you make to the system configuration file.
The service name is moogfarmd.
See Control Moogsoft AIOps Processes for further details.
System Configuration Reference
This is a reference for the system configuration file located at $MOOGSOFT_HOME/config/system.conf. It contains the following sections and properties:
Message Bus (MooMs)
connections_per_producer_pool
The number of connections to use for each message sender pool. For example, if a message sender pool has 20 channels and this property is set to 2, the channels are split across both connections so that each has 10 channels. To configure this property, you must manually add it to the mooms section.
| Type |
Integer |
| Required |
No |
| Default |
2 |
zone
Name of the zone.
| Type |
String |
| Required |
No |
| Default |
N/A |
brokers
Hostname and port number of the RabbitMQ broker.
| Type |
Array |
| Required |
No |
| Default |
"host" : "localhost", "port" : 5672 |
username
Username of the RabbitMQ user. This needs to match the RabbitMQ broker configuration. If commented out, it uses the default "guest" user.
| Type |
String |
| Required |
No |
| Default |
guest |
password
Password for the RabbitMQ user. You can choose to either have a password or an encrypted password, you cannot use both.
| Type |
String |
| Required |
Yes. If you are not using encrypted password. |
| Default |
guest |
encrypted_password
Encrypted password for the RabbitMQ user. You can choose to either have a password or an encrypted password, you cannot use both. See Moog Encryptor if you want to encrypt your password.
| Type |
String |
| Required |
Yes. If you are not using password. |
| Default |
N/A |
threads
Number of threads a process can create in order to consume the messages from the Message Bus. If not specified, the thread limit = (Number of processors x 2) + 1. Altering this limit affects the performance of Cisco Crosswork Situation Manager processes such as Moogfarmd and Moogpoller.
If your logs indicate an issue in creating threads, Cisco advises that you increase the ulimit, the maximum number of file descriptors each process can use, for the Cisco Crosswork Situation Manager user. You can set this limit in /etc/security/limits.conf.
| Type |
Integer |
| Required |
No |
| Default |
10 |
message_persistance
Controls whether RabbitMQ persists importance messages or not. Message queues are durable by default and data is replicated between nodes in High Availability mode. Setting this value to false, means that replicated data is not stored to disk.
| Type |
Boolean |
| Required |
No |
| Default |
true |
message_prefetch
Controls how many messages a process can take from the Message Bus and store in memory as a buffer for processing. This configuration allows processes to regulate message consumption which can ease backlog and memory consumption issues. The higher the number, the more messages held in the process's memory.
| Type |
Integer |
| Required |
No |
| Default |
0 |
max_retries
Maximum number of attempts to resend a message that failed to send. Cisco Crosswork Situation Manager only attempts a retry when there is a network outage or if cache_on_failure is enabled.
You can use this in conjunction with the retry_interval property. For example, a combination of 100 maximum retries and 200 milliseconds for retry interval leads to a total of 20 seconds. The combined default value for these properties was chosen to handle the typical time for a broker failover in a clustered environment.
| Type |
Integer |
| Required |
No |
| Default |
100 |
retry_interval
Maximum length of time to wait in milliseconds between each attempt to retry and send a message that failed to send.
You can use this in conjunction with the max_retries property. The combined value for these properties was chosen to handle the typical time for broker failover in a clustered environment.
| Type |
Integer |
| Required |
No |
| Default |
200 |
cache_on_failure
Controls whether Cisco Crosswork Situation Manager caches the message internally and resends it if there is an initial retry failure. The system attempts to resend any cached messages in the order they were cached until the time-to-live value, defined by the cache_ttl property, is reached.
| Type |
Boolean |
| Required |
No |
| Default |
false |
cache_ttl
Length of time in seconds that Cisco Crosswork Situation Manager keeps cached messages in the cache list before discarding them. If a message is not successfully resent within this timeframe it is still discarded.
This defaults to 900 seconds (15 minutes). Increasing this value has a direct impact on sender process memory.
| Type |
Integer |
| Required |
No |
| Default |
900 |
confirmation_timeout
Length of time in milliseconds to wait for the Message Bus to confirm that a broker has received a message. Cisco does not advise changing this value.
| Type |
Integer |
| Required |
No |
| Default |
2000 |
Message Bus SSL
ssl_protocol
SSL protocol you want to use. JRE 8 supports "TLSv1.2", "TLSv1.1", "TLSv1" or "SSLv3".
| Type |
String |
| Required |
No |
| Default |
TLSv1.2 |
server_cert_file
Path to the directory that contains the SSL certificates. You can use a relative path based upon the $MOOGSOFT_HOME directory. For example, config indicates $MOOGSOFT_HOME/config.
| Type |
String |
| Required |
No |
| Default |
server.pem |
client_cert_file
Enables client authentication if you provide a client certificate and key file.
| Type |
String |
| Required |
No |
| Default |
client.pem |
client_key_file
Enables client authentication if you provide a client key file. The file must be in PKCS#8 format.
| Type |
String |
| Required |
No |
| Default |
client.key |
MySQL
host
Host name or server name of the server that is running MySQL.
| Type |
String |
| Required |
No |
| Default |
localhost |
moogdb_database_name
Name of the primary Cisco Crosswork Situation Manager database.
| Type |
String |
| Required |
No |
| Default |
moogdb |
referencedb_database_name
Name of the Cisco Crosswork Situation Manager reference database.
| Type |
String |
| Required |
No |
| Default |
moog_reference |
intdb_database_name
Name of the integrations database.
| Type |
String |
| Required |
No |
| Default |
moog_intdb |
username
Username of the MySQL user.
| Type |
String |
| Required |
No |
| Default |
ermintrude |
password
Password for the MySQL user. You can choose to either have a password or an encrypted password, you cannot use both.
| Type |
String |
| Required |
Yes, if you are not using encrypted password. |
| Default |
m00 |
encrypted_password
Encrypted password for the MySQL user. You can choose to either have a password or an encrypted password, you cannot use both. See Moog Encryptor if you want to encrypt your password.
| Type |
String |
| Required |
Yes, if you are not using password. |
| Default |
N/A |
port
Port that MySQL uses.
| Type |
Integer |
| Required |
No |
| Default |
3306 |
maxRetries
Maximum number of MySQL query retries to attempt in the event of a deadlock.
| Type |
Integer |
| Required |
No |
| Default |
10 |
retryWait
Length of time in milliseconds to wait between retry attempts.
| Type |
Integer |
| Required |
No |
| Default |
50 |
failover_connections
Hosts and ports for the different servers that are connected to the main host. For example, master-master, master-slave. In the event of connection failover, the connection cannot be read-only (slave).
| Type |
List |
| Required |
No |
| Default |
N/A |
MySQL SSL
trustStorePath
Path to tNohe directory that contains the trustStore you want to use for SSL connections to your MySQL database. You can use a relative path based upon the $MOOGSOFT_HOME directory. For example, config indicates $MOOGSOFT_HOME/config/truststore.
| Type |
String |
| Required |
No |
| Default |
etc/truststore |
trustStoreEncryptedPassword
Your encrypted trustStore password. You can choose to either have a password or an encrypted password, you cannot use both. See Moog Encryptor if you want to encrypt your password.
| Type |
String |
| Required |
Yes, if you are not using trustStorePassword. |
| Default |
N/A |
trustStorePassword
Your trustStore password. You can choose to either have a password or an encrypted password, you cannot use both.
| Type |
String |
| Required |
No, if you are not using trustStoreEncryptedPassword. |
| Default |
moogsoft |
connection_timeout
Length of time in milliseconds before the connection to the Elasticsearch server times out.
| Type |
Integer |
| Required |
No |
| Default |
1000 |
nodes
Hosts and ports for the different Elasticsearch servers connected in a cluster.
| Type |
Array |
| Required |
No |
| Default |
"host" : "localhost", "port" : 9200 |
Failover
persist_state
Enable or disable the persistence of the state of all Moolets in the event of a failover.
| Type |
Boolean |
| Required |
No |
| Default |
false |
network_port
Port to connect to on each specified host in your Hazelcast cluster.
| Type |
Integer |
| Required |
No |
| Default |
5701 |
auto_increment
Enable for Hazelcast to attempt to connect to the next incremental available port number if the configured port is unavailable.
| Type |
Boolean |
| Required |
No |
| Default |
true |
hosts
List of hosts that can participate in the cluster.
| Type |
Array |
| Required |
No |
| Default |
localhost |
man_center
Specifies the cluster information that you can view in the Hazelcast Management Center UI.
| Type |
List |
| Required |
No |
| Default |
"enabled" : false, "host" : "localhost", "port" : 8091 |
cluster_per_group
Enable the stateful information from each process group to persist in a dedicated Hazelcast cluster.
| Type |
Boolean |
| Required |
No |
| Default |
false |
Moogfarmd Failover
keepalive_internal
Time interval in seconds at which processes report their active or passive status and check statuses of other processes.
| Type |
Integer |
| Required |
No |
| Default |
5 |
margin
Amount of time in seconds after keepalive_interval before Cisco Crosswork Situation Manager considers processes that do not re_port their status to be dead.
| Type |
Integer |
| Required |
No |
| Default |
10 |
failover_timeout
Amount of time in seconds to wait for previously active process to become passive during manual failover.
| Type |
Integer |
| Required |
No |
| Default |
10 |
automatic_failover
Allow a passive process to automatically become active if no other active processes are detected in the same process group.
| Type |
Boolean |
| Required |
No |
| Default |
false |
Process Monitor
heartbeat
Interval in milliseconds between heartbeats sent by processes.
| Type |
Integer |
| Required |
Yes |
| Default |
10000 |
max_heartbeat_delay
Number of milliseconds to wait before declaring heartbeat as missing. Defaults to 10% of the heartbeat.
| Type |
Integer |
| Required |
No |
| Default |
1000 |
Processes
Groups of processes that you want to be able to stop, start and restart from Self Monitoring in the Cisco Crosswork Situation Manager UI. For each group you can configure the following options:
group
Name of the process group that Cisco Crosswork Situation Manager uses when it starts and stops the service.
| Type |
String |
| Required |
Yes |
| Default |
N/A |
instance
Name of the instance for the process.
| Type |
String |
| Required |
Yes |
| Default |
N/A |
display_name
Additional identification label that appears in the UI.
| Type |
String |
| Required |
No |
| Default |
N/A |
cluster
Name of the process's cluster. This overrides the default cluster for a process. If left empty, the Cisco Crosswork Situation Manager uses the process's default cluster.
| Type |
String |
| Required |
No |
| Default |
N/A |
service_name
Name of the service script that Cisco Crosswork Situation Manager uses to control the process. If you do not configure a service name, Cisco Crosswork Situation Manager uses the group name, removing underscores and appending a 'd'. For example, "traplam" becomes "traplamd".
| Type |
String |
| Required |
No |
| Default |
N/A |
process_type
Type of process. If left empty, Cisco Crosswork Situation Manager calculates the type based on the group name.
| Type |
String |
| Required |
No |
| Default |
N/A |
| Valid Values |
moog_farmd, servlet, LAM |
reserved
Determines if the process produces a warning in the UI when it is running. Processes that are unreserved do not produce a warning.
| Type |
Boolean |
| Required |
No |
| Default |
true |
subcomponents
Specifies which Moolets are reserved for the Moogfarmd process. If left empty, no Moolets are reserved for the Moogfarmd process.
| Type |
Array |
| Required |
No |
| Default |
N/A |
Encryption
encryption_key_file
Default location of the encryption key file.
| Type |
String |
| Required |
No |
| Default |
/location/of/.key |
High Availability (HA)
cluster
Default HA cluster name.
| Type |
String |
| Required |
No |
| Default |
MOO |
Port Range
port_range_min
Minimum port number in the range that the Cisco Crosswork Situation Manager services use when they look for open ports.
| Type |
String |
| Required |
No |
| Default |
50000 |
port_range_max
Maximum port number in the range that the Cisco Crosswork Situation Manager services use when they look for open ports.
| Type |
String |
| Required |
No |
| Default |
51000 |
Configure Data Ingestion
Integrations and LAMs handle data ingestion from your event sources into Cisco Crosswork Situation Manager.
Many monitoring and ticketing systems can be configured by using an integration in the UI. Go to the Integrations tab to see what is available.
If you want to set properties that are not visible in the integration, or configure for high availability, modify the LAM configuration file instead. For each data source you can configure either the integration or the LAM, not both. A UI integration is independent from a LAM and you cannot edit it outside the UI.
You can find information about specific integrations and LAMs in the Integrations Guide.Integrations
Custom Info
Custom_info fields are customizable fields relating to either an Alert or a Situation that can be added to Cisco Crosswork Situation Manager during configuration.
These will be displayed in the UI as columns in the Alerts and Situations Views and can be configured with optional sorting and filtering.
Note:
Please Note:: Custom_Info commands can be found in the usr/share/moogsoft/bin/utils folder
Adding Custom_Info Fields
The following commands can be used to add either Alert or Situation custom_info fields:
| Command |
Description |
| moog_add_alert_custom_field |
This adds a new Alert custom_info field |
| moog_add_sitn_custom_field |
This adds a new Situation custom_info field |
To configure the display name, the field name and indexing, there are a number of options that can be used:
| Option |
Description |
| -d, --display_name <arg> |
The display name of the field in the UI |
| -f, --field <arg> |
The custom_info field name |
| -i, --index |
This indicates the field is indexed for filtering and sorting Note Note: This cannot be used with display only fields If you are planning to use this custom_info field in Alert or Situation filters or you are planning to sort using this column we recommend you use the --index option to aid filter loading performance Too many indexed columns may affect the performance of additions |
| -l, --loglevel <arg> |
Specify (INFO| WARN| ALL) to select the amount of debug output |
| -o, --display_only |
This indicates the field is for display only and cannot be used to filter, sort or search |
| -s, --size <arg> |
The index size (the number of characters). This is valid for indexed text fields only. The default is 50 |
| -t, --type <arg> |
The type of field (number or text). The default is number |
The example below shows how to add an alert custom_info text field which is also an indexed so will be filterable:
[root@moogsoft ~]# moog_add_alert_custom_field -d newfield -f new_field -i -t TEXT
Adding Custom Info Example
The addition of the new custom info field is confirmed with a message similar to the following:
Field newfield was added to UI successfully
Filterable field custom_info.new_field was added successfully
Filling Custom Info Fields
There is a utility that allows you to fill the Alerts or Situations filterable custom info fields using retrospective data:
| Command |
Description |
| moog_fill_alert_custom_fields |
This fills the filterable Alert custom info fields using retrospective data |
| moog_fill_sitn_custom_fields |
This fills the filterable Situation custom info fields using retrospective data |
The amount of time the fill utility goes back and the log level can be configured using the following options:
| Option |
Description |
| -b, --back <arg> |
This defines how far back the fill utility will go back, with 's' for seconds, 'm' for minutes, 'h' for hours, 'd' for days and 'w' for weeks E.g. -b 2w for two weeks Note Please note: You can leave empty for all but this might take some time |
| -l, --loglevel <arg> |
Specify (INFO| WARN| ALL) to choose the amount of debug output |
Filling Custom_Info Example
The example below shows how to fill Situation custom info fields with retrospective data from the past three days:
[root@centos7 ~]# moog_fill_sitn_custom_fields -b 3d
Filterable custom info data was filled successfully
Removing Custom_Info Fields
The following commands can be used to remove previously configured Alert or Situation custom info fields:
| Command |
Description |
| moog_remove_alert_custom_field |
This removes Alert custom info field |
| moog_remove_sitn_custom_field |
This removes a Situation custom info field |
After entering the command, type -f and enter the custom info field name to select the field you want to remove.
Removing Custom_Info Example
The example below shows how to remove a custom info field called 'new_field'.
[root@moogsoft ~]# moog_remove_alert_custom_field -f new_field
Field custom_info.new_field was removed successfully
Configure Custom Info Search
You must run a utility if custom info columns are added and existing Alerts or Situations contain values in that column for them to be filterable in the UI. Alert or Situations which are new or updated after the new column has been added will be filterable automatically.
If an alert custom info field has been added, run $MOOGSOFT_HOME/bin/utils/moog_fill_alert_custom_fields.
If a Situation custom info field has been added, run $MOOGSOFT_HOME/bin/utils/moog_fill_sitn_custom_fields.
Data Parsing
Cisco Crosswork Situation Manager divides incoming data into tokens (tokenised) and then assembles the tokens into an event. You can control how tokenising works.
Start and End Characters
The first two are a start and end character. The square brackets [] are the JSON notation for a list. You can have multiple start and end characters. The system considers an event as all of the tokens between any start and end character.
start : [],
end : ["\n"],
The above example specifies:
• There is nothing defined in start; however, a carriage return (new line) is defined as the end character
In the example above, the LAM is expecting an entire line to be written followed by a return, and it will process the entire line as one event.
Carefully set up, you can accept multi-line events.
Regular Expressions
Regular expressions can be used to extract relevant data from the input data. Here's an example definition:
parsing:
{
type: "regexp",
regexp:
{
pattern : "(?m)^START: (.*?)$",
capture_group: 1,
tokeniser_type: "delimiters",
delimiters:
{
ignoreQuotes: true,
stripQuotes: true,
ignores: "",
delimiter: ["||","\r"]
}
}
}
Delimiters
Delimiters define how string are split into tokens for processing. To process a comma-separated file, where a comma separates each value, define the comma as a delimiter.
Token are referenced from the start position starting at one (not zero).
For example, for the input string “the,cat,sat,on,the,mat” where the delimiter is a comma, token 1 is “the”, token 2 “cat” and so on.
Combining tokenization and parsing can be complex. For example, if you use a comma delimiter and the token contains a comma, the token is split into two. To avoid this you can quote strings. You can then define whether to strip or ignore quotes.
An example delimiters section in a configuration file is as follows:
delimiters:
{
ignoreQuotes : true,
stripQuotes : false,
ignores : "",
delimiter : [",","\r"]
}
When ignoreQuotes is set to true, all quotes are ignored and inputs are tokenised on the delimiters only.
When ignoreQuotes is false, delimiting does not occur until the matching end quote is found. This allows tokens to include delimiters. For example, given the following input when the delimiter is a comma:
hello world, "goodbye, cruel world".
Found tokens when ignoreQuotes is true: [hello world, goodbye, cruel world] (3).
Found tokens when ignoreQuotes is false: [hello world, "goodbye, cruel world"] (2).
Set stripQuotes to true to remove start and end quotes from tokens. For example, "hello world" results in a single token: [hello world].
Ignores is a list of characters to ignore. Ignored characters are never included in tokens.
Delimiter is the list of valid delimiters used to split strings into tokens.
Mapping
For each event in the file, there is a positioned collection of tokens. Cisco Crosswork Situation Manager enables you to name these positions so if you have a large number of tokens in a line, of which you are interested in only five or six, instead of remembering it is token number 32, you can call token 32 something meaningful.
variables:
[
{ name: "Identifier", position: 1 },
{ name: "Node", position: 4 },
{ name: "Serial", position: 3 },
{ name: "Manager", position: 6 },
{ name: "AlertGroup", position: 7 },
{ name: "Class", position: 8 },
{ name: "Agent", position: 9 },
{ name: "Severity", position: 5 },
{ name: "Summary", position: 10 },
{ name: "LastOccurrence",position: 1 }
]
The above example specifies:
• position 1 is assigned to Identifier; position 4 is assigned to node and so on
• Positions start at 1, and go up rather than array index style counting from 0
This is important because at the bottom of the file, socket_lam.conf there is a mapping object that configures how Cisco Crosswork Situation Manager assigns to the attributes of the event that is sent to the message bus, values from the tokens that are parsed. For example, in mapping there is a value called rules, which is a list of assignments.
mapping:
{
catchAll: "overflow",
rules:
[
{ name: "signature", rule: "$Node:$Serial" },
{ name: "source_id", rule: "$Node" },
{ name: "external_id", rule: "$Serial" },
{ name: "manager", rule: "$Manager" },
{ name: "source", rule: "$Node" },
{ name: "class", rule: "$Class" },
{ name: "agent", rule: "$LamInstanceName" },
{ name: "agent_location", rule: "$Node" },
{ name: "type", rule: "$AlertGroup" },
{ name: "severity", rule: "$Severity", conversion: "sevConverter" },
{ name: "description", rule: "$Summary" },
{ name: "first_occurred", rule: "$LastOccurrence" ,conversion: "stringToInt"},
{ name: "agent_time", rule: "$LastOccurrence",conversion: "stringToInt"}
]
}
In the example above, the first assignment name: "signature",rule:"$Node:$Serial" ( "$Node:$Serial is a string with $ syntax) means for signature take the tokens called Node and Serial and form a string with the value of Node followed by a colon followed by the value of Serial and call that signature in the event that is sent to the Cisco Crosswork Situation Manager.
You define a number of these rules covering the base attributes of an event. For reference, Cisco Crosswork Situation Manager expects a minimum set of attributes in an event that are shown in this particular section.
Using braces within mapping definitions allows you to include URLs and special characters. For example:
mapping:
{
[
{ name: "type", rule: "${https://url}" },
{ name: "type", rule: "${https://url} customText" },
{ name: "type", rule: "${https://url}${keyA\\b\\c}" }
]
}
Escape backslashes (\\) and note that you cannot embed variables.
If you have an attribute that is never referenced in a rule, for example “enterprise trap number” which is never mapped into the attribute of an event, they are collected and placed as a JSON object in a variable defined in catchAll and passed as part of the event.
Custom Info Mapping
You can define custom_info mapping in LAM configuration files. This allows you to configure a hierarchical structure. An example mapping configuration is:
mapping:
{
rules:
[
{ name: "custom_info.eventDetails.branch", rule: "$branch" },
{ name: "custom_info.eventDetails.location", rule: "$location" },
{ name: "custom_info.ticketing.id", rule: "$incident_id" }
]
}
This produces the following custom_info structure:
"custom_info": {
"eventDetails": {
"branch":"Kingston",
"location":"KT1 1LF"
},
"ticketing": {
"id":94111
}
}
You can use braces within mapping definitions. This allows you to include URLs and special characters. For example:
{ name: "type", rule: "${https://url}" },
{ name: "type", rule: "${https://url} customText" },
{ name: "type", rule: "${https://url}${keyA.b.c}" }
Note that you must escape backslashes and you cannot embed variables.
Polling LAMs with multiple target support
For information on LAMs with multiple target support, see Polling LAMs With Multiple Target Support.
Filtering
The filter defines whether a LAM uses a LAMbot. A LAMbot moves overflow properties to custom info and performs any actions that are configured in its LAMbot file. The LAMbot processing is defined in the presend property in the filter section of the LAM configuration file.
For example, the SolarWinds LAM configuration file contains this filter section:
filter:
{
modules : ["CommonUtils.js"],
presend : "SolarWindsLam.js"
}
This indicates that SolarWindsLam.js processes the events and then sends them to the Message Bus.
If you don’t want to map overflow properties, you can comment out the presend property to bypass the LAMbot and send events straight to the Message Bus. This speeds up processing if you have a high volume of incoming alerts. Alternatively, you can define a custom stream to receive events. See Alert Builder for details.
See LAMbot Configuration for more information on the presend function.LAMbot Configuration
The optional modules property can be used to provide a list of JavaScript files that are loaded into the context of the LAMbot and executed. It allows LAMs to share modules. For example, you can write a generic Syslog processing module that is used in both the Socket LAM and the Logfile LAM. This reduces the need for duplicated code in each LAMbot.
Conversion Rules
Conversion rules are used by Cisco Crosswork Situation Manager to convert received data into a usable format, including severity levels and timestamps.
Severity
The following example looks up the value of severity and returns the mapped integer.
conversions:
{
sevConverter:
{
lookup : "severity",
input : "STRING",
output : "INTEGER"
},
},
constants:
{
severity:
{
"CLEAR" : 0,
"INDETERMINATE" : 1,
"WARNING" : 2,
"MINOR" : 3,
"MAJOR" : 4,
"CRITICAL" : 5,
moog_lookup_default : 3
}
}
In the above example:
· conversions receives a text value for severity.
· sevConverter uses a lookup table "severity" to reference a table named severity defined in the constants section.
· The integer value matching the text value is returned.
· moog_lookup_default is used to specify a default value when a received event does not map to a listed value.
For example, the text value "MINOR" is received and the integer value 3 is returned.
If moog_lookup_default is not used and a received event severity does not map to a specifically listed value, the event is not processed.
See Severity Reference for more information about the severity levels in Cisco Crosswork Situation Manager.
Time
Time conversion in Cisco Crosswork Situation Manager supports the Java platform standard API specification. See Simple Date Format for more information.
Some Unix time formats are indirectly supported and LAM logging indicates any automatic conversion that occurred at startup.
The only PCRE/Perl modifier automatically converted is the lone 'U' ungreedy modifier, PCRE's '-U' is not supported. If the pattern contains a -U it should be removed manually.
You can specify a time zone configuration so the LAM parses the incoming timestamps with the expected time zone. For example:
conversions:
{
timeUnitConverter:
{
timeUnit : "MILLISECONDS",
input : "STRING",
output : "INTEGER"
},
timeConverter:
{
timeFormat : "%Y-%m-%dT%H:%M:%S",
timeZone : "UTC",
input : "STRING",
output : "INTEGER"
}
}
You can specify the timezone name or abbreviation. See List of TZ Database Time Zones for the full list.
JSON Events
The other capability of all LAMs is the native ability to consume JSON events. You must have a start and end carriage return as it is expecting a whole JSON object following the carriage return.
Under parsing you have:
end: ["\n"],
For the delimiter you have:
delimiter: ["\r"]
JSON is a sequence of attribute/value, and the attribute is used as a name. Under mapping, you must define the following attribute builtInMapper: "CJsonDecoder". It automatically populates, prior to the rules being run, all of the values contained in the JSON object.
For example if the JSON object to be parsed was:
{"Node" : "acmeSvr01","Severity":"Major"...}\n
The attributes available to the rules in the mapping section would be xNode="acmeSvr01", $Severity="Major" and so on.
Polling LAMs With Multiple Target Support
Polling LAMs that support multiple targets contain the targets proper in the configuration file. The following Polling LAMs have multiple target support:
· CA Spectrum
· DataDog Client
· Dynatrace APM
· HP NNMi
· HP OMi
· JDBC
· New Relic
· New Relic Insight
· Rest Client
· SevOne
· SolarWinds
· VMware vCenter
· VMware vRealize Log Insight
· VMware vSphere
· Zabbix
· Zenoss
For these LAMs, the event payload includes the target name and target URL. These are written to custom_info.eventDetails.moog_target_name and custom_info.eventDetails.moog_target_url:
var overflow = commonUtils.getOverflow(event);
event.set("overflow", null);
var eventDetails = {
"moog_target_name": overflow.moog_target_name,
"moog_target_url": overflow.moog_target_url
};
event.setCustomInfoValue("eventDetails", eventDetails);
These may be available in the LAMbot functions, and can be enabled or disabled if required.
Severity Reference
Severity is a measure of the seriousness of an event and indicates how urgently it requires corrective action.
Cisco Crosswork Situation Manager LAMs and integrations use six industry standard severity levels as follows:
· 0: Clear - One or more events have been reported but then subsequently cleared, either manually or automatically.
· 1: Indeterminate - The severity level could not be determined.
· 2: Warning - A number of faults with the potential to affect services have been detected.
· 3: Minor - A fault that is not affecting services has been detected. Action may be required to prevent it from becoming a more serious issue.
· 4: Major - A fault is affecting services and corrective action is required urgently.
· 5: Critical - A serious fault is affecting services and corrective action is required immediately.
The severity mapping is set in each LAM configuration file:
severity:
{
"CLEAR" : 0,
"INDETERMINATE" : 1,
"WARNING" : 2,
"MINOR" : 3,
"MAJOR" : 4,
"CRITICAL" : 5,
}
The LAM takes the severity string in a received event and translates it into one of the above integer values using the mapping in its configuration file:
sevConverter:
{
lookup : "severity",
input : "STRING",
output : "INTEGER"
},
mapping:
rules:
[
{ name: "severity", rule: "$severity",conversion:"sevConverter"},
]
You can customize the severity section of the LAM configuration file according to the severities used in the system sending events to Cisco Crosswork Situation Manager. In the following example, events sent to the LAM with non-standard severities 'info' and 'Information' are mapped to 'INDETERMINATE' in Cisco Crosswork Situation Manager:
severity:
{
"info" : 1,
"Information" : 1,
"user" : 1,
"warning" : 2,
"Warning" : 2,
"error" : 5,
moog_lookup_default : 1
}
The moog_lookup_default property specifies a default value to use when the severity does not match any of the defined strings. If you do not set a default, events with an unmapped severity are not processed. For more information on mapping see "Conversion Rules" in Data Parsing.
Cisco Crosswork Situation Manager determines a Situation's severity from the member alert with the highest severity level.
Configure Data Processing
Moogfarmd is the core system application that runs all of the algorithms and automation relevant to Cisco Crosswork Situation Manager. It is responsible for the following:
· Creating alerts.
· Analyzing alerts to determine their significance.
· Clustering alerts into Situations.
· Performing automation relating to the automated response such as escalation, routing, notification, invitation of either alerts or Situations.
The topics in this guide help you configure the data processing components of Moogfarmd:
You can run one or many instances of Moogfarmd on your Cisco Crosswork Situation Manager system.
Services
The Cisco Crosswork Situation Manager installation installs Moogfarmd as a service:
/etc/init.d/moogfarmd
A backup Moogfarmd service script is located at $MOOGSOFT_HOME/etc/service-wrappers/moogfarmd.
If you run multiple instances of Moogfarmd on the same host, copy and modify the default Moogfarmd service script for each Moogfarmd running on the host:
1. Copy $MOOGSOFT_HOME/etc/service-wrappers/moogfarmd to /etc/init.d/mymoogfarmd.
2. Edit the following parameters in the /etc/init.d/mymoogfarmd file:
SERVICE_NAME=mymoogfarmd
CONFIG_FILE=$PROCESS_HOME/config/my_moog_farmd.conf
3. You now have a new service to be used to start your own specific Moogfarmd:
service mymoogfarmd start
For information on starting, stopping and configuring Moogfarmd, see the Moogfarmd Reference.
Alert Processing
Cisco Crosswork Situation Manager processes alerts using the following backend components. For alert processing capabilities using Workflow Engine in the Cisco Crosswork Situation Manager UI, see /document/preview/110725#UUID3bd5018041a19de941d95733dffc3e37 and its related topics.Workflow Engine
These components are responsible for performing analysis, adding information to alerts, and noise reduction techniques.
· Events Analyser: A standalone process that analyses tokens in events and assigns each token an entropy value. The Events Analyser can use any text field in an event but, by default, it uses the event's description. This process runs periodically and does not form a part of the alert processing workflow.
· Alert Builder: Processes events from the Message Bus. It:
— Deduplicates events into alerts.
— Calculates the entropy of alerts.
· Enricher: Enriches alerts with additional information.
· Maintenance Window Manager: Marks alerts as 'In maintenance' if they match a scheduled maintenance window filter. You can set up maintenance windows for planned maintenance, such as scheduling a fix or regular maintenance of a system.
· Alert Rules Engine: Allows conditional processing of alerts, such as managing link up/link down processing. Before you configure the Alert Rules Engine, read about the /document/preview/110725#UUID3bd5018041a19de941d95733dffc3e37 which is a powerful and flexible tool for data processing available in the Cisco Crosswork Situation Manager UI.Workflow Engine
· Empty Moolet: An optional component that enables further processing of alerts or Situations. It usually runs as a standalone process but it can also be embedded in the processing chain. Cisco Crosswork Situation Manager provides an example Empty Moolet in the form of an Alert Manager.
The following diagram shows the alert processing components in a typical implementation of a workflow chain in Cisco Crosswork Situation Manager:
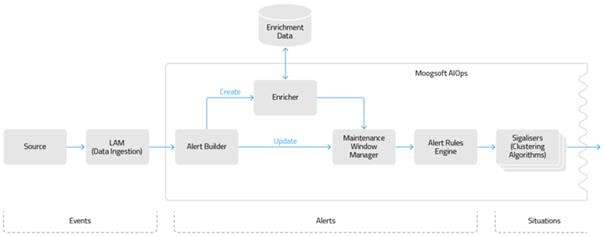
Each component comprises a Moolet supplemented by Moobots.
Events Analyser
· Stream and Partition-based Analysis
· Natural Language Processing Analysis
— Language Processing Techniques
The Events Analyser utility is a standalone process. It uses Natural Language Processing (NLP) techniques to analyze inbound event data. The Events Analyser divides text fields within the events into tokens. Based on the frequency of these tokens appearing in other events, it assigns an entropy value to the tokens and to the alerts in Cisco Crosswork Situation Manager. See the Entropy Overview for more information on how Cisco Crosswork Situation Manager evaluates entropy and uses entropy thresholds to reduce the level of 'noise' from incoming event data.
Stream and partition-based analysis
You can configure Cisco Crosswork Situation Manager so that the Events Analyser calculates the entropy values for events from different streams for Cisco Crosswork Situation Manager as a whole, even though those streams have no relationship with each other.
You can also configure the Events Analyser so that it calculates the entropy values for events for different partitions. As an example, you may want to run separate entropy calculations for different regions. In this case, you should specify the alert field that identifies the region in the partition_by field in the Events Analyser configuration file. In this type of configuration, the same token can be given multiple entropy values within the same Moogfarmd deployment based on its frequency in the events within each partition. You can set up different configuration options for the different partitions. For example, in a particular partition, IP addresses may be masked whilst for another partition that may be unnecessary. In general, if a deployment uses the “pre-partition” method in Moogfarmd, that deployment benefits from partition-based entropy calculations.
See Multiple Streams and Partitions for more information on running the Events Analyser with different streams and partitions. See Configure Events Analyser for further information on non-partitioned and partitioned configurations.
Natural language processing analysis
The Events Analyser utility performs a number of linguistic analyses on events. It then uses this linguistic analysis to calculate an entropy value for each token and then for every alert. See the Entropy Overview for more information.
Tokenization of text
The Events Analyser splits a text string at word boundaries, such as spaces or punctuation marks, into blocks. Each block of text is known as a token. For example, the following description has five tokens:
Link down on port 2/32
Token type identification
Commonly used word boundaries are often integral to the meaning of a token, for example, dots in IPV4 addresses. The Events Analyser identifies complete tokens of the following types within the structure of an event:
· IP addresses:
— v4
— v6
· MAC addresses
· OIDs
· Dates: Most standard formats.
· Numbers:
— Integers
— Real numbers
— With and without unit suffixes, for example, 99%, 12kb, 345ms.
· File paths:
— Forward slashes
— Backward slashes
· GUIDs
· Hexadecimal numbers: With the 0x prefix.
· URLs
· Email addresses: Most standard formats.
Identifying token types in arbitrary text is not an exact science and so, occasionally, the algorithms may identify tokens as a certain type which seems incorrect to a human.
After the Events Analyser has identified the token types, it can use them for masking and to identify tokens with high variation in a given alert.
Token masking
Tokens that change between events for the same alert can cause that alert to be assigned an incorrectly high entropy value. The most obvious example involves dates and times. If the description of an event is to be analyzed but each event contains a different timestamp, that timestamp will have a high entropy and skew the entropy for that alert as a whole. For other token types that change frequently, such as URLs or IP addresses, it may be desirable to retain the higher entropy associated with that token type because the changing value is significant.
You can configure the Events Analyser to include or exclude specific token types in the entropy analysis for each event partition.
You should consider masking dates, times and numbers from the entropy calculation.
Language processing techniques
The Events Analyser uses many standard techniques in language processing:
— Tokens that differ only by case, for example, 'WORD', 'Word' or 'word', are converted to the same case and considered equal.
— Case folding is applied to all token types.
— You can add common or meaningless words, such as 'a', 'be', 'not', to a stop words file so that they are removed from the entropy calculation.
— You can define a universal 'length' parameter so that any word at or below a certain length is treated as a stop word. For example, if set to '2', any words of one or two characters are ignored.
— Stop words are applied to all token types.
· Stemming
— A technique used to reduce a word to its root to remove plurals or different tenses in verbs. Words with the same root are considered equal.
— Note that some words, when stemmed, look unusual. For example, 'priority', 'priorities', prioritize, get stemmed to 'priorit'.
— If stemming is enabled, the stemmed form is stored in the reference database.
— Stemming is only applied to tokens of type 'word', that is, it is not applied to numbers, GUIDs, IP addresses, etc.
Priority words
Priority words are similar in concept to stop words but, rather than removing that word from the analysis as occurs with stop words, a priority word is assigned an entropy value of 1. For example, if ‘reboot’ is defined as a priority word, any tokens containing the word ‘reboot’ are given an entropy value of 1 regardless of how frequently the word appears in events.
Note:
Priority words are analyzed after stop words. If a token satisfies the criteria of a stop word, it is removed from the analysis and so cannot subsequently be considered as a priority word.
The reference database contains the calculated entropies for all tokens regardless of whether they are classed as priority words.
Token variation threshold
Token variation threshold analysis involves the different forms of each field and how the tokens in those different forms vary between events in the same alert. This is most easily explained by an example. Assume that all token masking is off and that an alert consists of the following six events:
QDepth beyond 90% threshold on host = 22222
QDepth beyond 90% threshold on host = 44444
QDepth beyond 90% threshold on host = 44444
QDepth beyond 90% threshold on host = 11111
QDepth beyond 90% threshold on host = 44444
The value for the host is changing between events, there are three occurrences of 44444 and one occurrence of each of the other values. Values that appear infrequently can skew the entropy value for the alert. In order to prevent this skewing, you can apply a threshold. The threshold is a ratio between 0 and 1, where 0 implies that a token can appear only once and still contributes to the entropy calculation, while a value of 1 implies that the value must be the same in every event before it is considered. If the threshold is set to 0.5, the value 44444 would contribute to the entropy, but the values 11111 and 22222 would not, because only the value 44444 appears in half of the events in the alert.
The Events Analyser performs this analysis for each form of each field within each event of every alert.
This configuration option has no effect unless the Events Analyser uses the EntropyClassic algorithm. The EntropyV2 algorithm is more robust to small variations in the wording, and variations in the metadata such as IP addresses and timestamps, so there is no need to have a manual parameter to tune this.
Entropy Overview
Entropy is defined as the degree of disorder or randomness in a system. In Cisco Crosswork Situation Manager, entropy is a measure of how unexpected or unpredictable an event or an alert is. According to information theory, the more unpredictable or unexpected an event is, the more information it is deemed to carry. Therefore, entropy is a measure of the amount of information contained in an event.
The Events Analyser utility is a standalone process that assigns an entropy value to an event token based on its uniqueness. The Alert Builder assigns an entropy value to each alert based on the token entropies. The entropy value is a numeric value between 0 and 1 (accurate to 16 decimal places). It provides an indication of how important an alert is. An entropy value of 0 means that the alert is just ‘noise’ and a value of 1 means that the alert is significant. You can configure the clustering algorithms to ignore common alerts with a low entropy value; this reduces ‘noise’ in Cisco Crosswork Situation Manager. See the /document/preview/11776#UUID78f3c171ff4093b4dce3b6750fd89e09 for more information.Clustering Algorithm Guide
How Cisco Crosswork Situation Manager evaluates entropy
The Events Analyser utility analyzes the text attributes of events to assign a semantic entropy value. In the default Cisco Crosswork Situation Manager implementation, the Events Analyser uses the description field but you can configure it to use other text fields. The Events Analyser divides the text in between spaces into tokens. For example, the following description has five tokens:
Link down on port 2/32
The Events Analyser calculates the entropy of each token and stores the token in the Cisco Crosswork Situation Manager reference database with its associated entropy value. Initially, a new token has a value of 1. The Events Analyser reduces this entropy value as more events occur which contain the same token.
You can configure the Events Analyser to mask volatile token types, such as dates, times, numbers, URLs or IP addresses, so that they are not included in the tokens. See the Events Analyser for further details of the analysis it performs.
The Alert Builder uses the entropy value of the tokens within an alert to calculate the entropy of that alert.
The Events Analyser uses the EntropyV2 calculation method in the default Cisco Crosswork Situation Manager implementation. The EntropyV2 method calculates entropy values in real-time based on any tokens it has encountered before. The Alert Builder assigns the entropy of an alert based on the entropy value of the tokens within the alert rather than the entire database. Tokens within an alert which occur frequently contribute negatively to the entropy of an alert, indicating that the alert may not be as significant as an alert with tokens that are seen less frequently. This is in contrast to the EntropyClassic algorithm where the entropy of each alert takes into consideration the significance of tokens in the entire database.
Note:
Cisco recommends using the EntropyV2 algorithm to produce better alert entropy values than with the EntropyClassic algorithm.
If the Alert Builder receives an event with a token that it has encountered before, from a previous run of the Events Analyser, it sets the alert entropy to match the value saved in the reference database. If the Alert Builder receives an event with a token that it has not encountered before, it calculates the entropy value in real-time and applies this value to the alert. The Alert Builder also saves the entropy value in the reference database for future retrieval.
The Events Analyser stores data in memory while it calculates entropy values. It is important that the Events Analyser runs frequently to ensure that it does not fail with a memory outage. See Run Events Analyser for more information on running the Events Analyser.
Set an entropy threshold
You can set an entropy threshold in each Sigaliser so that only alerts with a higher entropy value are included in Situations. To decide on the value of your entropy threshold, consider the distribution of entropy values in the alerts. A typical entropy value distribution is show in the following diagram:
Cisco recommends that you set your entropy threshold to a value on the downward slope of the peak to exclude the majority of alerts. In this example, the entropy threshold is set at 0.21. This reduces the level of ‘noise’ so that you are only clustering the important alerts, with an entropy value greater than the threshold, into Situations.
You can define entropy thresholds in the clustering algorithms to exclude alerts which have an entropy value that is lower than the threshold. This prevents Cisco Crosswork Situation Manager from including unimportant 'noisy' alerts in Situations. See the /document/preview/11776#UUID78f3c171ff4093b4dce3b6750fd89e09 for more information.Clustering Algorithm Guide
Vertex Entropy
Vertex Entropy uses a different form of entropy, topological entropy, to establish how critical the nodes are in your network topology. You can use Vertex Entropy calculations within Cookbook to create Situations which cluster alerts from important nodes. See /document/preview/11796#UUID8635a39b79fdd302137e104ae42562e8 for more information.Vertex Entropy
Configure Events Analyser
You can configure the Events Analyser to analyze all the event data received by Cisco Crosswork Situation Manager together or to analyze event data by partitions or streams. See the Events Analyser for more information on these options.
· #UUID20fd71956d14cf891fc4155392b9a706_id_ConfigureEventsAnalyserPartitionedExampleofPartitionedData
· #UUID20fd71956d14cf891fc4155392b9a706_id_ConfigureEventsAnalyserDisablingEntropyCalculations
Edit the configuration file at $MOOGSOFT_HOME/config/events_analyser.conf to control the behavior of the Events Analyser.
See the Events Analyser Reference for a full description of all properties. Some properties in the file are commented out by default. Uncomment the properties to enable them.
To configure the Events Analyser:
1. The default configuration uses the EntropyV2 calculation method. Cisco recommends using the default EntropyV2 calculation method for calculating entropy values because it has improved modelling of alert probabilities. However, if you want to, you can change the setting to use the EntropyClassic calculation method. Entropy data for EntropyClassic and EntropyV2 calculation methods are not compatible. If you switch between the two calculation methods, you must execute a full priming run of the Events Analyser after you have changed the setting to ensure that all the entropy data matches the same configuration. See Run Events Analyser for further details on executing a full priming run of the Events Analyser.
2. Use the default values for the priming_source_data.
3. Configure whether or not the Events Analyser partitions the entropy data. See the #UUID20fd71956d14cf891fc4155392b9a706_id_ConfigureEventsAnalyserNon_PartitionedExampleofNonPartitionedData and the #UUID20fd71956d14cf891fc4155392b9a706_id_ConfigureEventsAnalyserPartitionedExampleofPartitionedData for further details.
4. Configure the "default" Events Analyser behavior. See the #UUID20fd71956d14cf891fc4155392b9a706_id_ConfigureEventsAnalyserNon_PartitionedExampleofNonPartitionedData for further details.
5. If using partitioned data, configure the Events Analyser for any partitions that you want to behave differently. If you do not add a separate configuration for a partition, the Events Analyser uses the "default" configuration for that partition. The Events Analyser also uses the "default" configuration for any properties that are not defined in a partition configuration. See the #UUID20fd71956d14cf891fc4155392b9a706_id_ConfigureEventsAnalyserPartitionedExampleofPartitionedData for further details.
Example of non-partitioned data
The default configuration file at $MOOGSOFT_HOME/config/events_analyser.conf, similar to the example shown below, contains a non-partitioned configuration. The "partition_by" property has been set to null to show that the entropy data is not to be partitioned. The "default" settings have been configured for all entropy values. See the Events Analyser Reference for further information on these properties.
{
"entropy_calc": "EntropyV2",
"priming_source_data" :
{
"alerts_table" : "alerts",
"events_table" : "events",
"snapshots_table" : "snapshots",
"timestamp_column" : "last_event_time"
},
"partition_by" : null,
"default" :
{
"fields" :
[
"description"
],
"mask" :
{
"ip_address" : false,
"mac_address" : false,
"oid" : false,
"date_time" : true,
"number" : true,
"path" : false,
"guid" : false,
"hex" : false,
"url" : false,
"email" : false,
"word" : false,
"stop_word" : false
},
"casefold" : true,
"stop_words" : true,
"stop_word_length" : 0,
"stop_word_file" : "stopwords",
"priority_words" : false,
"priority_word_file" : "prioritywords",
"stemming" : false,
"stemming_language" : "english"
}
Example of partitioned data
The example below shows additional configuration of the Events Analyser for two partitions "san_francisco" and "new_york". These settings override the "default" configuration in the example of non-partitioned data above.
In this example, the source field is used to partition the entropy data:
"partition_by" : "source",
The configuration for the "san_francisco" partition uses the description, agent and source fields for calculating entropy values and does not use stop words. The "new_york" partition uses different masking properties to the "default" configuration: date_time is not masked but ip_address, email, and url are masked. This partition also uses stemming for calculating entropy values. Since the language is not specified, the default of English is used. All other properties that have not been configured in these partitions will use the properties in the "default" configuration.
If there are any other partitions, for example, "los_angeles", that do not have any properties specified in the configuration file, they will use the "default" configuration.
See the Events Analyser Reference for further information on these properties.
, "partition_overrides" :
{
"san_francisco" :
{
"fields" :
[
"description", "agent", "source",
],
"stop_words" : false
},
"new_york" :
{
"mask" :
{
"date_time" : false,
"ip_address" : true,
"email" : true,
"url" : true
},
"stemming" : true
}
}
Disabling entropy calculations
Cisco recommends that you configure the clustering algorithms to use entropy thresholds so that they exclude 'noisy' alerts which contain low levels of important information. This allows operators to concentrate on Situations containing important alerts. See the /document/preview/11776#UUID78f3c171ff4093b4dce3b6750fd89e09 for more information. However, if you do not intend to use entropy calculations, you should:Clustering Algorithm Guide
· Set the 'entropy_calc' property to 'EntropyClassic'.
· Set the 'properties_from_db' property to 'false' for all running Alert Builder Moolets.
Run Events Analyser
The Events Analyser is responsible for analysing the tokens within alerts and calculating their entropy values. The Events Analyser updates the alerts with the calculated entropy value and also updates the reference database with all the tokens and their associated entropy values.
— Run Events Analyser Manually
· Multiple Streams and Partitions
Command line options
The events_analyser command line executable accepts the following options:
| Option |
Input |
Description |
| --config <arg> |
String: <file path/name> |
Name and path of the configuration file specific to running the Events Analyser. The default is events_analyser.conf. Example: --config=$MOOGSOFT_HOME/etc/events_analyser.conf |
| -l, --loglevel <arg> |
One of: ALL, INFO, WARN, NONE |
Specifies the amount of logging information. Defaults to WARN, which is the recommended level in all production implementations. |
| --incremental |
- |
Analyzes only new event data that was received since the last time the Events Analyser was run. |
| --readage <arg> |
Number, followed by one of: s (seconds) m (minutes) h (hours) d (days) w (weeks) |
Amount of data to analyse, in seconds, minutes, hours, days or weeks. Example: --readage 2w |
| --keepage <arg> |
Number, followed by one of: s (seconds) m (minutes) h (hours) d (days) w (weeks) |
Amount of data to keep, in seconds, minutes, hours, days or weeks. Example: --keepage 30d |
| --stream <arg> |
String: <alert stream name> |
Stream name to be given to the current analysis. Example: --stream "PRIMARY" |
| --partition <arg> |
String: <partition value> |
Name of the partition to be analyzed. It must be a valid value of the partition_by field. Example: --partition "SanFrancisco" |
Run Events Analyser
Cisco recommends that you run the Events Analyser regularly as follows:
· Daily: analyzes the last two weeks of data.
· Hourly: in incremental mode which analyses all new event data since the last time the Events Analyser was run.
These default settings are specified in moog_init_server.sh.
You can also run the Events Analyser manually on an ad hoc basis.
Daily run
To initiate a daily run, that is, where all entropy values are calculated for the last two weeks of event data, you should specify the Events Analyser to run with the following command line options:
./events_analyser --readage 2w
In this case, the Events Analyser:
· Uses the default configuration file $MOOGSOFT_HOME/etc/events_analyser.conf.
· Analyzes all data received in the last two weeks, based on the timestamp_column property in the events_analyser.conf file.
· Adds all analyzed data to the reference database for the default stream.
· Leaves any data for other, named streams unchanged.
Hourly run
The Events Analyser utility provides the ability for incremental priming. When the Events Analyser utility is run repeatedly with the --incremental option, each subsequent run of the utility analyses the event data starting from the last analyzed event. For example, if the first run analyzes data up to event ID = 666, the next incremental run of the utility analyzes data from 667 to say 999, the third incremental run reads in data from event ID 1000, and so on.
To initiate an hourly run, that is, where all entropy values are calculated since the last analyzed event, you should specify the Events Analyser to run with the following command line options:
./events_analyser --incremental
In this case, the Events Analyser:
· Uses the default configuration file $MOOGSOFT_HOME/etc/events_analyser.conf.
· Analyzes all data since the last incremental run, based on the timestamp_column property in the events_analyser.conf file.
· Adds all analyzed data to the reference database for the default stream.
· Leaves any data for other, named, event streams unchanged.
Run Events Analyser manually
To run the Events Analyser manually, you can run it without any command line options. This command runs the Events Analyser for all new event data received in the last two weeks or since the last analysis, whichever is most recent.
./events_analyser
In this case, the Events Analyser:
· Uses the default configuration file $MOOGSOFT_HOME/etc/events_analyser.conf.
· Analyzes all event data received in the last two weeks or since the last time the Events Analyser was run, whichever is most recent, based on the timestamp_column property in the event_analyser.conf file.
· Adds all analyzed data to the reference database for the default stream.
· Leaves any data for other, named, event streams unchanged.
To run the Events Analyser to analyze event data over a longer period, you should include the --readage option. In this example, the --readage option is set to 13 weeks:
./events_analyser --readage 13w
In this case, the Events Analyser:
· Uses the default configuration file $MOOGSOFT_HOME/etc/events_analyser.conf.
· Analyzes all event data received in the last 13 weeks.
· Adds all analyzed data to the reference database for the default stream.
· Leaves any data for other, named, event streams unchanged.
Note:
If you use a large value in the--readageoption, you may find that the Events Analyser fails to complete the analysis. If this occurs, rerun it using a shorter period of time.
Multiple streams and partitions
You can run the Events Analyser for specific streams or partitions. In this example, the --stream option is specified to add the analyzed data to the "SECONDARY" event stream. The --readage option restricts the data analyzed to the last eight weeks of event data.
./events_analyser --stream “SECONDARY” --readage 8w
In this case, the Events Analyser:
· Uses the default config file $MOOGSOFT_HOME/etc/events_analyser.conf.
· Analyzes all event data received in the last eight weeks, based on the timestamp_column property in the event_analyser.conf file.
· Adds all analyzed data to the reference database for the “SECONDARY” event stream.
· Leaves data for all other, named, event streams unchanged.
You can use the --partition option to limit the data that is analysed to a specified partition. In this example, the --readage option restricts the data analyzed to the last four weeks of event data:
./events_analyser --stream “SECONDARY” --partition “SanFrancisco” --readage 4w
In this case, the Events Analyser:
· Uses the default config file $MOOGSOFT_HOME/etc/events_analyser.conf.
· Analyzes all event data received in the last four weeks for the “SanFrancisco” partition only.
· Adds all analyzed data to the reference database for the “SanFrancisco” partition in the “SECONDARY” event stream.
· Leaves data for all other event streams and partitions unchanged.
Note:
Cisco recommends that you always use the --readage option when analyzing streams or partitions to ensure that the Events Analyser processes the required amount of data. If the --readage option is not specified, the Events Analyser only analyzes new event data received in the last two weeks or since the last analysis, whichever is the most recent, regardless of whether this was for a different stream or partition.
Usage examples
There are many combinations of command line options. Some common usage scenarios include:
| Command Line Options |
Typical Use Case |
| <none> |
Events analysis to be run incrementally. Uses the default configuration for all new event data in the last two weeks or since the last analysis, whichever is most recent. Updates the reference database with the new data for the default stream. |
| --readage 4w |
Events analysis to be run nightly. Uses the default configuration for the last four weeks of event data. Updates the reference database with the new data for the default stream. |
| --incremental |
An incremental events analysis to be run hourly. Uses the default configuration for the all new event data since the last run. Updates the reference database with the new data for the default stream. |
| --incremental --keepage 2w |
An incremental events analysis to be run hourly. Uses the default configuration for all new event data received since the last run. Removes all data from the reference database for the default stream that is more than two weeks old. |
| --stream “PRIMARY” --partition “London” --readage 13w |
Performs an events analysis analyzing only those events in the “London” partition. The data is written to the “PRIMARY” event stream. Data for all other streams remains unchanged. Data for all other partitions in the “PRIMARY” stream remains unchanged. |
Events Analyser Reference
This is a reference for the Events Analyser utility. The Events Analyser configuration properties are found in $MOOGSOFT_HOME/config/events_analyser.conf.
entropy_calc
Entropy calculation method. Cisco recommends using the EntropyV2 calculation method for more accurate entropy values.
Type: String
Required: Yes
One of: EntropyV2, EntropyClassic
Default: "EntropyV2"
priming_source_data
Source data to use when priming the entropy value database table, that is, running the Events Analyser to calculate entropy values. By default, the priming source data is taken from tables in the main database schema called moogdb. timestamp_column is a column in the snapshots_table.
Type: String
Required: Yes
Default:
{
"alerts_table" : "alerts",
"events_table" : "events",
"snapshots_table" : "snapshots",
"timestamp_column" : "last_event_time"
}
partition_by
Identifies the properties in each event that is used to partition them so that they are grouped separately by the Sigalisers. If partitioning is enabled, the following properties can be configured independently for each partition. See Configure Events Analyser for further details on partitions and configuration examples.
Type: String
Required: Yes
Default: null
Example: "partition_by" : "source"
fields
Properties in each event that contribute to the entropy value calculation.
Type: List of strings
Required: Yes
Default: "description"
mask
Token types to be included or excluded from entropy calculations. If a token type is set to false, the entropy calculation includes it. If it is set to true, the entropy calculation excludes the token type. Masking token types, such as dates or numbers, ensures that tokens are not given a higher entropy value than they should have because of unique numbers or dates.
Type: Boolean
Required: No
Default:
{
"ip_address" : false,
"mac_address" : false,
"oid" : false,
"date_time" : true,
"number" : true,
"path" : false,
"number" : false,
"path" : false,
"guid" : false,
"hex" : false,
"url" : false,
"email" : false,
"word" : false,
"stop_word" : false
}
casefold
Whether tokens that differ only by case should be considered the same in entropy calculations.
Type: String
Required: Yes
Default: true
stop_words
Whether specific tokens should be ignored in entropy calculations. Stop words are small common words such as 'about', 'at' or 'the'.
Type: String
Required: Yes
Default: true
stop_word_length
Any token of this length or shorter is considered a stop word and is excluded from entropy calculations. The default of 0 means that no words are considered as stop words.
Type: Number
Required: Yes
Default: 0
stop_word_file
Path (optional) and name of the file containing a list of stop words to be excluded from entropy calculations. If you provide a file name only, the Events Analyser assumes the path $MOOGSOFT_HOME/config/. The Events Analyser uses the full path if you provide it. The default Cisco Crosswork Situation Manager implementation provides a file named stopwords in $MOOGSOFT_HOME/config/, which contains a list of common stop words.
Type: String
Required: Yes
Default: "stopwords"
priority_words
Whether priority words are included in entropy calculations. Alerts containing priority words are automatically given a maximum entropy value of 1.
Type: String
Required: Yes
Default: false
priority_word_file
Path (optional) and name of the file containing a list of stop words to be excluded from entropy calculations. If you provide a file name only, the Events Analyser assumes the path $MOOGSOFT_HOME/config/. The Events Analyser uses the full path if you provide it. The file prioritywords in $MOOGSOFT_HOME/config/ is empty in the default Cisco Crosswork Situation Manager implementation.
Type: String
Required: Yes
Default: "prioritywords"
stemming
Whether words with the same word stem are to be considered as the same word in entropy calculations. For example, should 'fail', 'failed' and 'failing' all be considered as the same word.
Type: String
Required: Yes
Default: false
stemming_language
Language used in the events.
Type: String
Required: Yes
Default: "english"
Alert Builder
The Alert Builder Moolet assembles alerts from incoming events, sent by the LAMs across the Message Bus. These alerts are visible through the Alert View in the User Interface (UI). The Alert Builder Moolet is also responsible for:
· Updating all the necessary data structures.
· Ensuring copies of the old alert state are stored in the snapshot table in MoogDb, relevant events are created and the old alert record is updated to reflect the new events arriving into Cisco Crosswork Situation Manager.
Configure Alert Builder
Edit the configuration file at $MOOGSOFT_HOME/config/moolets/alert_builder.conf.
See Alert Builder Reference for a full description of all properties. Some properties in the file are commented out by default.
Example Configuration
The following example demonstrates a simple Alert Builder configuration:
{
name : "AlertBuilder",
classname : "CAlertBuilder",
run_on_startup : true,
moobot : "AlertBuilder.js",
event_streams : [ "AppA" ],
threads : 4,
metric_path_moolet : true,
events_analyser_config : "events_analyser.conf",
priming_stream_name : null,
priming_stream_from_topic : false
}
Alert Builder Moobot
The Moobot, AlertBuilder.js, is associated with the Alert Builder Moolet. It undertakes most of the activity of the Alert Builder. When the Alert Builder Moolet processes an event, it calls the JavaScript function, newEvent:
events.onEvent ( "newEvent" , constants.eventType( "Event" )).listen();
The function newEvent contains a call to create an alert. The newly created alert is broadcast on the Message Bus.
See Moobot Modules for further information about Moobots.Moobot Modules
Alert Builder Reference
This is a reference for the Alert Builder Moolet.
You can change the behavior of the Alert Builder by editing the configuration properties in the $MOOGSOFT_HOME/config/moolets/alert_builder.conf configuration file. It contains the following properties:
name
Name of the Alert Builder Moolet. Do not change.
Type: String
Required: Yes
Default: "AlertBuilder"
classname
Moolet class name. Do not change.
Type: String
Required: Yes
Default: "CAlertBuilder"
run_on_startup
Determines whether the Alert Builder runs when Cisco Crosswork Situation Manager starts. By default, it is set to true, so that when Moogfarmd starts, it automatically creates an instance of the Alert Builder. In this case you can stop it using farmd_ctrl.
Type: Boolean
Required: Yes
Default: true
moobot
Specifies a JavaScript file found in $MOOGSOFT_HOME/moobots, which defines the Alert Builder Moobot, which creates alerts.
Type: String
Required: Yes
Default: AlertBuilder.js
metric_path_moolet
Determines whether or not Cisco Crosswork Situation Manager includes the Alert Builder in the Event Processing metric for Self Monitoring.Self Monitoring
Type: Boolean
Required: Yes
Default: true
event_streams
A list of event streams, which the Alert Builder Moolet processes in this instance of Moogfarmd. The LAMs can be configured to send events on different streams. Moogfarmd, as specified in the Alert Builder configuration, then decides whether or not to process them. If Cisco Crosswork Situation Manager runs multiple Moogfarmds, you can have different event streams being processed by different Alert Builder Moolets.
You can comment out event_streams, or provide an empty list. Then, the Alert Builder processes every event that is published on the default /Events topic on the Message Bus.
You configure the Alert Builder Moolet by giving it a list of strings, for example, [ “App A”, “App B” ]. The result is that the Alert Builder listens for events published on /Events/AppA, and /Events/AppB, and processes that data. Importantly, in this example, events published to /Events or any other stream are ignored. You can have Moogfarmds that process completely separate event streams, or, multiple Moogfarmds that process some different event streams and some common event streams. You would do this when some of the alerts are common to all the applications that are being processed, but some are specific only to a given application. In this way, you can cluster alerts separately for each application by configuring the Sigalisers to only processes alerts from a specific upstream Alert Builder Moolet.
For example, if you have two separate applications that share the same network infrastructure: in Moogfarmd 1, you can have as the event streams, application A and networks, and, in Moogfarmd 2, you can have application B and networks. With this configuration, you can detect alerts and then create Situations that are relevant for just application A and similarly just for application B; however, if there is common networking infrastructure and problems occur with network failures across applications A and B, the Alert Builder can cluster these into Situations.
Type: String
Required: No
Default: [ "AppA" ]
threads
Specifies the number of threads in the Alert Builder. Choose a value to match the event rate experienced by your system that allows time for alert creation.
Type: String
Required: Yes
Default: 4
events_analyser_config
Allows you to specify a different Events Analyser configuration, for tokenizing and analysis rules, for each Alert Builder Moolet. If no configuration file is specified, the system default events_analyser.conf is used.
Type: String
Required: No
Default: "events_analyser.conf"
priming_stream_name
Stream name under which the Events Analyser runs in order to calculate token and alert entropies. If set to null, all alerts from all streams are included in the entropy calculations.
Type: String
Required: Yes
Default: null
priming_stream_from_topic
If set to true, Moogfarmd extracts the priming stream name from the event's stream. If set to false, Moogfarmd uses the stream configured in priming_stream_name.
Type: Boolean
Required: Yes
Default: false
Alert Builder Fields and Requirements
Alert and Event Field Reference
This is a reference guide for alert and event fields, input types, field descriptions and output examples.
| Field |
Type |
Description |
Example Output |
| active_situations |
Array |
Situation IDs of any Situations the alert is associated with. |
1, 6, 8 |
| agent_host |
Text |
Host machine or physical location of the agent that created the event. |
OEM Monitor 1 |
| agent_name |
Text |
Name of the agent that created the event. |
NAGIOS SOCKET |
| agent_location |
Text |
Host machine or physical location of the agent that created the event. |
London Data Centre (51.4167,-0.2833) |
| agent_time |
Integer |
Timestamp of when the event occurred in epoch time. Use $moog_now in the mapping to set agent time to the time the event arrived at Cisco Crosswork Situation Manager. |
1516183437 |
| alert_id |
Integer |
Internal identifier generated by Cisco Crosswork Situation Manager. |
101 |
| class |
Text |
Level of classification for an event. This follows the hierarchy; class then type. |
CISCO-IF-Extension-MIB |
| count |
Integer |
Number of events in the alert. |
2 |
| custom_info |
Text |
Custom information added as a JSON encoded string. |
custom_info.myNodeList=[ "node1" , "node2" , "node3" ] |
| description |
Text |
Text description of the alert. |
Network Interface (ifIndex = 512479388 ) Up (ifEntry.52683483) |
| entropy |
Integer |
Measure of uncertainty of an outcome between 0 and 1 (0 meaning very certain and 1 meaning very uncertain). |
0.4 |
| external_id |
Integer |
Unique identifier from the event source. |
7622183 |
| first_event_time |
Integer |
Earliest event time for the alert. This is calculated from the agent_time of the events that constitute the alert. |
14:08:14 16/01/2018 |
| host |
Text |
Name of the source machine that generated the event. |
OEM Server 2 |
| internal_last_event_time |
Integer |
Time that the latest event for the Alert was received by the Moog server. |
10:24:03 19/01/2018 |
| last_change |
Integer |
Time that the alert was last updated in the Cisco Crosswork Situation Manager UI. |
12:38:06 19/01/2018 |
| last_event_time |
Integer |
Latest event time for the alert. This is calculated from the agent_timeof the events that constitute the alert. |
10:24:03 19/01/2018 |
| manager |
Text |
General identifier of the event generator or intermediary. |
NAGIOS, SCOM. |
| owned_by |
Text |
Alert owner's username. |
John Smith |
| severity |
Integer |
Severity level of the alert between 0 and 5. |
4 |
| significance |
Integer |
Relative significance of an alert is calculated based on its entropy. See /document/preview/108771#UUIDb247c4a60150eaf02c5e8807ee4ac21eGlossary for more information. |
3 |
| situations |
Array |
Any situations the alert is associated with, including those that have been resolved or closed. |
24, 01 |
| source |
Text |
Name of the source machine that generated the event. If there is no source machine or application, the source is the name of the instance (database name, cluster node, container name). |
A hostname or fully qualified domain name (FQDN). |
| source_id |
Text |
Identifier for the source machine that generated the event. |
5dc68d65-532c-4918-be12-21e1cbcf7af2 |
| status |
Text |
Status of the alert. |
Assigned |
| type |
Text |
Level of classification for an event. This follows the hierarchy; class then type. |
CISCO-IF-Extension-MIB Notification |
Event and Alert Field Best Practice
This best practice is an attempt to offer consistency and reuse of configurations including the mapping from a source to an inbound event. The fields exposed in the alert/event are:
|
|
Field |
Required |
Data Type |
Size |
Description |
Example |
Comment |
| 1 |
signature |
Yes |
VARBINARY(binary) |
767 |
This is a special attribute used to determine when Cisco Crosswork Situation Manager deduplicates events into Alerts. It can be any combination of one or more of the attributes listed below To be constructed as a subset of events from a source, also see existing guidance Constructed fields should be separated by “::” avoiding any possible issues with concatenation providing misleading results. e.g. NodeA event id 12 would concatenate as NodeA12, which would be the same as NodeA1 event 2. NodeA::12 and NodeA1::2 would therefore differentiate Signatures do not need to be human readable, so clarity isn’t a concern. If length is becoming an issue - remove whitespace or other extraneous characters (via a lambot) |
host1::nagios::cpu |
|
| 2 |
alert_id |
Yes |
BIGINT(binary) |
20 |
An auto-assigned incremental number. Internally generated DO NOT CHANGE |
|
|
| 3 |
source_id |
Yes |
TEXT(utf8) |
65535 |
Source and Source_ID refer to the generating source of the event, primarily focused on the host environment. The Source should be any unique human readable name (FQDN, Hostname, etc) and the source_id should be any identifier for the source machine generated ( IP, MAC, CI Number, etc.) If the event has no machine identification such as Application or other software generated events, then the Source should be some unique identifier of the instance (database name, cluster node, container name etc.). Again source_id should be any other unique identifier that is available (container UUID, cluster node UUID etc.) This attribute can be used for any additional identification attribute of the CI |
192.168.1.107 |
|
| 4 |
external_id |
No |
TEXT(utf8) |
65535 |
Any unique identifier provided in the source event (event ID, Incident ID etc.) This is typically set to the CI's ID in the CMDB, or where the event is emitted from an underlying element management system, and may hold the unique source event identifier |
12345 |
Returns Null if blank |
| 5 |
manager |
No |
TEXT(utf8) |
65535 |
A general identifier of the event generator or intermediary (NAGIOS, SCOM, etc.) In hub-and-spoke and/or relay architectures this typically is the name of the agent manager that pre-aggregates events prior to sending to Cisco Crosswork Situation Manager. For example, there may be an BMC Patrol manager that manages all San Francisco data center alerts. This field is also sometimes used simply to track the name of the Cisco Crosswork Situation Manager LAM that received the alerts in multi-LAM deployments |
Nagios |
Returns Null if blank |
| 6 |
source |
Yes |
TEXT(utf8) |
65535 |
Source and Source ID refer to the generating source of the event, primarily focused on the host environment. The source should be any unique human readable name (FQDN, Hostname, etc) and the source_id should be any identifier for the source machine generated ( IP, MAC, CI Number, etc.) If the event has no machine identification such as Application or other software generated events, then the Source should be some unique identifier of the instance (database name, cluster node, container name etc.). Again source_id should be any other unique identifier that is available (container UUID, cluster node UUID etc.) |
host1 |
|
| 7 |
class |
Yes |
TEXT(utf8) |
65535 |
Class and Type are generic classifications for the event in a hierarchy that allow you to maintain a simple event ontologies; class then type. (Disk space: free space, Memory: max used...total available, etc.) |
cpu |
|
| 8 |
agent |
Yes |
TEXT(utf8) |
65535 |
The specific agent that created the event, (SCOM REST, NAGIOS SOCKET, SNMP TRAP NATIVE, etc.). This is typically the name of the agent that facilitates the event from the CI e.g. "nagios-agent-london-7" A simple way to provide this is in the lam.conf by setting the agent:name and then mapping $LamInstanceName to agent, this is the default { name: "agent",rule: "$LamInstanceName" }, |
Linux |
|
| 9 |
agent_location |
Yes |
TEXT(utf8) |
65535 |
This is typically the geographic location of the agent and/or CI such as "London". Should be used consistently for all sources, either as the host machine that the agent is executed from (BEM Server 1, OEM Monitor cluster, etc.) OR the physical location that the agent is executing (NYC Data Centre, Stuttgart Main Station, (51.407139, -0.307321) etc.) |
New York, NY |
|
| 10 |
agent_time |
Yes |
|
|
This is the timestamp in epoch seconds when the event occurred. This should be set across all event sources to provide a common time reference. Timezones should be nullified - all events should be presented in the same time context. If an event source does not provide a suitable time in the payload then use the ingestion time at the LAM. Note: polled event sources (rest_client_lam, SCOM, Netcool) may skew the event time in line with the poll cycle. If an event is being generated in a different timezone and is manipulated into the Cisco Crosswork Situation Manager server time - add the origin time to the custom_info for the event. This can be operationally useful. e.g. custom_info.originalEventTime : agent_time should be in epoch seconds - convert as necessary. Miscalculated event times will cause unpredictable results across the system. Also see 4.1.2 Release note. [MOOG-2278] - Enhanced Alert Times If the agent_time is not defined, it should be set to the current epoch time using Javascript functions such as: Math.round(Date.now() / 1000); |
|
|
| 11 |
type |
Yes |
TEXT(utf8) |
65535 |
Class and Type are generic classifications for the event in a hierarchy that allow you to maintain a simple event ontologies; class then type. (Disk space: free space, Memory: max used...total available, etc.) |
DOWN |
|
| 12 |
severity |
Yes |
INT(binary) |
11 |
Standard 0-5 but be mindful of the significance across all event sources if possible. A low value event source could produce critical events that in the wider context would be considered minor Use the Cisco Crosswork Situation Manager LAM config file built in "sevMapper" to map your incoming severity values to a number between 0 and 5 : 0 = Clear 1 = Indeterminate 2 = Warning 3 = Minor 4 = Major 5 = Critical |
5 |
0 clear - 5 critical |
| 13 |
significance |
No |
INT(binary) |
11 |
This value is calculated by Cisco Crosswork Situation Manager Events Analyser. Internally generated DO NOT CHANGE |
|
|
| 14 |
count |
No |
INT(binary) |
11 |
The reference count of deduplicated Events for each Alert. Internally generated DO NOT CHANGE |
|
|
| 15 |
description |
Yes |
TEXT(utf8) |
65535 |
The main text payload of the event. Add as much textual detail as possible. Remember a human operator will look at the detail and the entropy calculation works best with detailed narratives. |
CPU Threshold exceeded: 99% |
|
| 16 |
first_event_time |
No |
BIGINT(binary) |
20 |
If you set agent_time in the LAM/LAMbot to the actual epoch seconds timestamp of each event, Cisco Crosswork Situation Manager will automatically keep track of the first and last occurrence of multiple instances of the same event. Internally generated DO NOT CHANGE |
|
|
| 17 |
last_event_time |
No |
BIGINT(binary) |
20 |
|
|
|
| 18 |
int_last_event_time |
No |
BIGINT(binary) |
20 |
Internally generated DO NOT CHANGE |
1411134582 |
Fromagent_time |
| 19 |
last_state_change |
No |
BIGINT(binary) |
20 |
Internally generated DO NOT CHANGE |
|
|
| 20 |
state |
No |
INT(binary) |
11 |
1 | Opened 2 | Unassigned 3 | Assigned 4 | Acknowledged 5 | Unacknowledged 6 | Active 7 | Dormant 8 | Resolved 9 | Closed 10 | SLA Exceeded Internally generated DO NOT CHANGE |
|
|
| 21 |
owner |
No |
INT(binary) |
11 |
Set when an operator right-clicks on an alert in the Cisco Crosswork Situation Manager UI and assigns ownership. Internally generated DO NOT CHANGE |
|
|
| 22 |
entropy |
No |
DOUBLE(binary) |
22 |
Internally generated DO NOT CHANGE |
|
|
| 23 |
custom_info |
No |
TEXT(utf8) |
65535 |
Custom_info is a special field that is the mechanism for extending the Cisco Crosswork Situation Manager alert schema. This is a JSON encoded string that should contain key value pairs for each data element not supplied in the initial event or having been enriched via alert transformation. Be consistent with key names so they can be used in Sigalisers and filters. Consider using a LAMBot module that sets a base set of custom_info across all lams - this provides a single point of administration for the customer. Care should be taken when setting custom_info in a LAM to ensure that it does not overwrite downstream additions (e.g. enrichment via a moobot) when the Event is de-duplicated. You can store simple or arbitrarily complex hierarchical JSON attributes in this field. They are basically serialized for use in the standard JSON.parse/stringify manner and Cisco Crosswork Situation Manager UI is written to display JSON hierarchies of any complexity in a tree-view format |
|
Returns Null if blank |
Maintenance Window Manager
The Maintenance Window Manager Moolet compares alerts against active maintenance windows. If the alerts match an active Maintenance Schedule filter, then they are not forwarded onto the next part of the chain. This prevents a Sigaliser Moolet clustering these alerts into Situations.
Configure Maintenance Window Manager
Edit the configuration file at $MOOGSOFT_HOME/config/moolets/maintenance_window_manager.conf.
Refer to Maintenance Window Manager Reference to see all available properties.
Example configuration
The following example demonstrates a simple Maintenance Window Manager configuration:
{
name : "MaintenanceWindowManager",
classname : "CMaintenance",
run_on_startup : true,
metric_path_moolet : true,
process_output_of : "AlertBuilder",
maintenance_status_field : "maintenance_status",
maintenance_status_label : "In maintenance",
update_captured_alerts : true
}
Maintenance windows
You can use the Maintenance Schedule functionality to schedule outages when you do not want new Situations to be created from these alerts. You can configure the Maintenance Manager Moolet to ensure that alerts are not passed along to Sigalisers and clustered into Situations during that time period. You can set up maintenance windows using:
· UI: See Schedule Maintenance Downtime for more information on how to set up maintenance windows.Schedule Maintenance Downtime
· Graze API.Graze API
Updating captured alerts
In addition to implementing the maintenance windows, the Maintenance Window Manager Moolet updates the following custom_info fields in each alert affected by a maintenance window. Because the Maintenance Window Manager uses these custom_info fields within the alerts, Moobots must not overwrite these custom_info fields or completely empty the custom_info object within alerts.
| Field |
Description |
| custom_info.maintenance_status |
Configurable text label. Set to "In maintenance" by default. |
| custom_info.maintenance_id |
Numerical ID of the maintenance window that captured the alert. |
| custom_info.maintenance_name |
Name of the maintenance window that captured the alert. |
| custom_info.forward_Alerts |
Whether the alert is forwarded to clustering algorithms or not. Set to false by default. |
Maintenance Window Manager Reference
This is a reference for the Maintenance Window Manager Moolet.
Cisco recommends you do not change any properties that are not in this reference guide.
You can change the behavior of the Maintenance Window Manager by editing the configuration properties in the $MOOGSOFT_HOME/config/moolets/maintenance_window_manager.conf configuration file. It contains the following properties:
name
Name of the Maintenance Window Manager Moolet. Do not change.
Type: String
Required: Yes
Default: "MaintenanceWindowManager"
classname
Moolet class name. Do not change.
Type: String
Required: Yes
Default: "CMaintenance"
run_on_startup
Determines whether the Maintenance Window Manager runs when Cisco Crosswork Situation Manager starts. By default, it is set to true, so that when Moogfarmd starts, it automatically creates an instance of the Maintenance Window Manager.
Type: Boolean
Required: Yes
Default: true
metric_path_moolet
Determines whether or not Cisco Crosswork Situation Manager factors the Maintenance Window Manager into the Event Processing metric for Self Monitoring.Self Monitoring
Type: Boolean
Required: Yes
Default: true
process_output_of
Defines the input source for the Maintenance Window Manager. This determines the Maintenance Window Manager's place in the alert processing workflow.
Type: List
Required: Yes
One of: AlertBuilder, AlertRulesEngine, Enricher
Default: "AlertBuilder"
maintenance_status_field
Name of the custom_info field or key used to indicate the alert's maintenance status.
Type: String
Required: Yes
Default: "maintenance_status"
maintenance_status_label
Value of the custom_info.maintenance_status field used to indicate that an alert is in maintenance.
Type: String
Required: Yes
Default: "In maintenance"
update_captured_alerts
If enabled, ensures the maintenance status of an alert is set to null once the Maintenance Window that captured it has expired. If disabled, the maintenance status field of a captured alert remains as the text value set in the maintenance_status_label property, unless that alert reoccurs when all custom_info maintenance fields are set to null.
Type: Boolean
Required: Yes
Default: true
It is possible to add a column in the alert view displaying the 'Maintenance Status' for each alert and the text visible in this column can be controlled by editing the maintenance_status_label in the MaintenanceWindowManager Moolet configuration in $MOOGSOFT_HOME/config/moolets/maintenance_window_manager.conf.
For the feature to function, you must place the Maintenance Window Manager Moolet before a Sigalising Moolet in a forwarding chain. It is also appropriate for you to locate it before the Alert Rules Engine in the processing chain.
Alert Rules Engine
The Alert Rules Engine uses business logic to process alerts based on certain conditions.
Note:
Cisco recommends using /document/preview/110725#UUID3bd5018041a19de941d95733dffc3e37 to enable custom logic and data processing for events, alerts and Situations. Consider carefully if you can implement your logic with the Workflow Engine before you implement and configure the Alert Rules Engine.Workflow Engine
The conditions that the Alert Rules Engine works with generally involve a time-based analysis so that it can process an event in the context of events that happen later. You can define rules in the Alert Rules Engine to hold alerts for a period of time, identify missing alerts or change the state of alerts. For example, common uses of the Alert Rules Engine include:
· Link Up-Link Down: Delays an alert to see if a link recovers.
· Heartbeat Monitor: Detects any missing network health signals.
· Closing Events: Closes events of a particular type or severity.
· Merging: Merges the state of two distinct alerts.
Configure Alert Rules Engine
Edit the configuration file at $MOOGSOFT_HOME/config/moolets/alert_rules_engine.conf.
Refer to Alert Rules Engine Reference to see all available properties.
Example Configuration
The following example demonstrates a simple Alert Rules Engine configuration:
{
name : "AlertRulesEngine",
classname : "CAlertRulesEngine",
run_on_startup : false,
metric_path_moolet : true,
moobot : "AlertRulesEngine.js",
process_output_of : "MaintenanceWindowManager"
}
Define Action States and Transitions
The Alert Rules Engine uses Action States and transitions and their properties, to process alerts through business logic defined in the AlertRulesEngine.js Moobot. After you have configured the Alert Rules Engine, set up Action States and transitions in the Cisco Crosswork Situation Manager UI under Settings > Automation:
· Action States: Determine the length of time Cisco Crosswork Situation Manager retains alerts before forwarding them to a Sigaliser or closing them.
· Transitions: Defines the set of conditions an alert must meet before it moves from one state to another in the Alert Rules Engine. Higher priority transitions take precedence over those with lower priorities.
See Action States and Transitions for further information on how to define them and the properties available.Action StatesTransitions
The initial state for all alerts is the 'Ground' state. After an alert enters 'Ground' state, the Alert Rules Engine transitions it to another state or forwards it to a Sigaliser. If the Action State has a 'Remember Alerts For' set to a positive number, the Alert Rules Engine retains an alert in that state for this period of time.
If you enable 'Cascade on Expiry' and nothing happens to an alert within that period, the Alert Rules Engine returns it to 'Ground' state before forwarding it to a Sigaliser. This is because the 'Ground' state has “Forward Alerts" enabled. If an alert does not match any transitions, the Alert Rules Engine does not return it to 'Ground' state and it is closed.
Note:
Action States are not enabled until you have defined a transition.
Alert Rules Engine Examples
The Alert Rules Engine can be set up to process Link Up-Link Down events. It can also be set up to act as a Heartbeat Monitor.
Link Up-Link Down Example
This example demonstrates how to configure the Alert Rules Engine so that when a Link Down alert arrives at Moogfarmd, the Alert Rules Engine holds it for a period of time to provide an opportunity for the Link Up alert to arrive. If nothing arrives, the Alert Rules Engine forwards it to a Sigaliser.
If the Link Up alert arrives, the Alert Rules Engine closes and discards both alerts without sending anything to the Sigaliser. This ensures that neither the Link Down nor the Link Up alert appear in Situations.
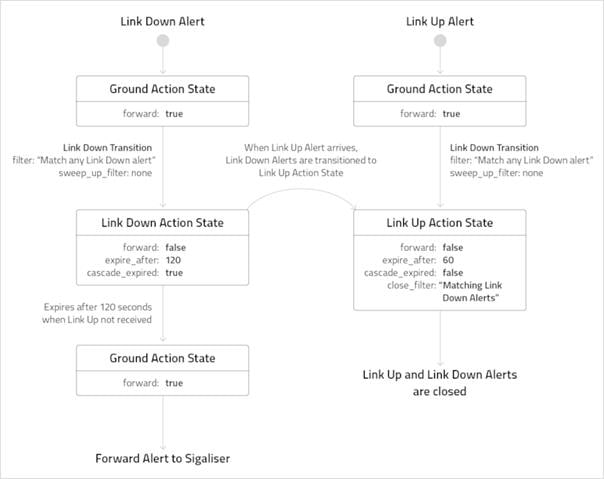
To try out this example, set up the following:
1. Create three Action States: 'Ground' (default), 'Link Up' and 'Link Down'.
2. Create two transitions: 'Link Down Transition' and 'Link Up Transition'.
In this scenario, if a 'Link Down' alert arrives at the Alert Rules Engine and no 'Link Up' alert arrives within 120 seconds, the 'Link Down' alert returns 'Ground State' and the Alert Rules Engine passes it to a Sigaliser.
Heartbeat Monitor
You can configure the Alert Rules Engine Moolet in Cisco Crosswork Situation Manager to detect missing heartbeat events from monitoring tools such as CA Spectrum and Microsoft SCOM. Both of these tools send regular heartbeats to indicate normal operation.
After you configure the Alert Rules Engine, Cisco Crosswork Situation Manager creates a Situation when an event source does not send a heartbeat after a given time period. The Alert Rules Engine holds each heartbeat alert for a period of time, subsequent alerts from the same heartbeat source reset the timer. If the timer expires, a heartbeat has been missed and the alert is forwarded to a Sigaliser (clustering algorithm).
Before You Begin
Before you set up the heartbeat monitor in Alert Rules Engine, ensure you have met the following requirements:
· You have an understanding of Alert Rules Engine, Action States and transitions. See the Alert Rules Engine Moolet, Action States and Transitions for further details.Action StatesTransitions
· You can identify heartbeat alerts in the integration by description, class or another configurable field. These must be specific, regular events that arrive at consistent intervals to indicate normal operation. If these are not available, the Heartbeat Monitor will not work.
· You have edited the alerts so they contain the same attribute, via the integration source or through enrichment. In the example below, 'type' is 'heartbeat' in the Alert Rules Engine trigger filter and 'class' is 'heartbeat' in the Cookbook Recipe trigger filter.
Create a Heartbeat Monitor
To create a heartbeat monitor in Alert Rules Engine, follow these steps:
1. Edit $MOOGSOFT_HOME/bots/moobots/AlertRulesEngine.js and add the heartBeatSeverity exit action. This function changes the alert severity to critical and ensures alerts that are closed are not forwarded to the Cookbook. See Status ID Reference for a list of status IDs.
function heartBeatSeverity(alert,associated) {
var currentAlert = moogdb.getAlert(alert.value("alert_id"));
if ( currentAlert && currentAlert.value("state") !== 9 ) {
alert.set("severity",5);
var alertDescr = currentAlert.value("description");
// Update the description to "MISSED", a successful heartbeat will reset this.
if ( !/^MISSED/i.test(alertDecr) ) {
alert.set("description", "MISSED: " + alertDescr)
}
moogdb.updateAlert(alert);
currentAlert.forward("HeartbeatCookBook");
}
}
2. Navigate to Settings > Action States in the Cisco Crosswork Situation Manager UI. Create a new Action State called "Heartbeat" as follows:Action States
| Setting Name |
Input |
Value |
| Name |
String |
Heartbeat |
| Remember alerts for |
Integer (seconds) |
30 * |
| Cascade on expiry |
Boolean |
True |
| Exit Action |
String |
heartBeatSeverity |
Warning
* The Remember alerts for setting is the timer. Set this to two or three times your heartbeart interval time.
3. Go to Settings > Transitions in the Cisco Crosswork Situation Manager UI. Set up a transition to move your heartbeat alerts to the 'Heartbeat' State. Configure the settings as follows:Transitions
| Setting Name |
Value |
| Name |
Heartbeat |
| Priority |
10 |
| Active |
True |
| Trigger Filter |
(type = "heartbeat") AND ((((agent = "SPECTRUM") OR (manager= "SCOM")) OR (agent = "MONITOR1")) OR (agent = "MONITOR2")) |
| Start State |
Ground |
| End State |
Heartbeat |
Edit the 'Trigger Filter' to meet your requirements. In this example, the transition is triggered by alerts with the type of 'heartbeat' and that come from either 'SPECTRUM' or 'SCOM' or 'MONITOR1' or 'MONITOR2':
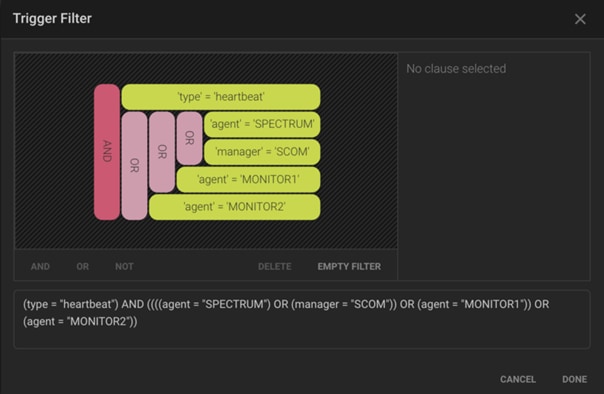
4. Ensure Alert Rules Engine is enabled. To do this, edit the $MOOGSOFT_HOME/config/moolets/alert_rules_engine.conf file and set run_on_startup to true.
5. Create a heartbeat.conf configuration file in $MOOGSOFT_HOME/config/moolets to add a Heartbeat Cookbook for heartbeat alerts. This only works with these alerts:
# Moolet
name:"HeartbeatCookBook",
classname:"CCookbook",
run_on_startup:true,
metric_path_moolet : true,
moobot:"Cookbook.js",
process_output_of:"[]",
# Algorithm
membership_limit:5,
scale_by_severity:false,
entropy_threshold:0.0,
single_recipe_matching:false,
recipes:[
# Any heartbeat class for the same agent.
{
chef:"CValueRecipe",
name:"ScomHeartbeatErrors",
description:"SCOM Heartbeat: Missing heartbeat",
recipe_alert_threshold:0,
exclusion:"state = 9",
trigger:"class = 'heartbeat' AND agent = 'SCOM'",
rate:0,
# Given in events per minute
min_sample_size:5,
max_sample_size:10,
matcher:{
components:[
{
name:"agent",
similarity:1.0
}
]
}
},
{
chef:"CValueRecipe",
name:"ScomHeartbeatChange",
description:"SCOM Heartbeat: Cluster host change",
recipe_alert_threshold:0,
exclusion:"state = 9",
trigger:"class = 'heartbeatRoleChange' AND agent = 'SCOM'",
rate:0,
# Given in events per minute
min_sample_size:5,
max_sample_size:10,
matcher:{
components:[
{
name:"agent",
similarity:1.0
}
]
}
}
],
cook_for:20000
}
Save heartbeat.conf.
6. Edit the Moogfarmd configuration file $MOOGSOFT_HOME/config/moog_farmd.conf to add a new merge group that references the HeartBeatCookbook Moolet. Configure this merge group to have an alert_threshold of 1 to allow a single alert to create a Situation (by default, a minimum of 2 alerts are required to create a Situation):
merge_groups:
[
{
name: "Heartbeat",
moolets: ["HeartbeatCookBook"],
alert_threshold : 1,
sig_similarity_limit : 1
}
],
7. Include the Moolet configuration by adding the following in $MOOGSOFT_HOME/config/moog_farmd.conf:
{
include : "heartbeat.conf"
},
Save the changes to moog_farmd.conf.|
8. Restart Moogfarmd:
service moogfarmd restart
After the heartbeat monitor configuration is complete, heartbeat alerts should start to arrive in Cisco Crosswork Situation Manager.
Heartbeat Monitor Process
The process flow for a heartbeat alert is as follows:
· Heartbeat alert arrives at the Alert Rules Engine.
· The alert is transitioned from 'Ground' to 'Heartbeat' action state and starts the timer.
· The alert sits in the 'Heartbeat' state waiting for the timer to expire.
· Any subsequent heartbeat alert resets the timer.
· If the timer expires the exit action changes the alert severity to '5' (critical) and cascades it to 'Ground' state.
· Any subsequent heartbeat updates the severity to '0' (clear) and restarts the timer.
· You could also add an entry action to close any missed heartbeat situations the event is part of.
This example also updates the alerts with the times of the missing heartbeats for an easy audit trail.
The status of alerts and Situations is determined by their status ID. These statuses are used within the Heartbeat Monitor.
The different status_id values are as follows:
| Status ID |
Name |
| 1 |
Opened |
| 2 |
Unassigned |
| 3 |
Assigned |
| 4 |
Acknowledged |
| 5 |
Unacknowledged |
| 6 |
Active |
| 7 |
Dormant |
| 8 |
Resolved |
| 9 |
Closed |
| 10 |
SLA Exceeded |
Alert Rules Engine Reference
This is a reference for the Alert Rules EngineMoolet.
Cisco recommends you do not change any properties that are not in this reference guide.
You can change the behavior of the Alert Rules Engine by editing the configuration properties in the $MOOGSOFT_HOME/config/moolets/alert_rules_engine.conf configuration file. It contains the following properties:
name
Name of the Alert Rules Engine Moolet. Do not change.
Type: String
Required: Yes
Default: "AlertRulesEngine"
classname
Moolet class name. Do not change.
Type: String
Required: Yes
Default: "CAlertRulesEngine"
run_on_startup
Determines whether the Alert Rules Engine runs when Cisco Crosswork Situation Manager starts. By default, it is set to false, so it does not start when Moogfarmd starts. You can change this property to true so that, when Moogfarmd starts, it automatically creates an instance of the Alert Rules Engine.
Type: Boolean
Required: Yes
Default: false
metric_path_moolet
Determines whether or not Cisco Crosswork Situation Manager includes the Alert Rules Engine in the Event Processing metric for Self Monitoring.Self Monitoring
Type: Boolean
Required: Yes
Default: true
moobot
Specifies a JavaScript file found in $MOOGSOFT_HOME/moobots, which defines the Alert Rules Engine Moobot. The default, AlertRulesEngine.js, provides the standard modules. You can customize it to meet your needs.
Type: String
Required: Yes
Default: "AlertRulesEngine.js"
mooms_event_handler
Determines whether or not the Alert Rules Engine listens for messages on the message bus. If set to true, the Alert Rules Engine processes messages on the Alerts topic on the message bus. This property should not be included in the configuration file, or should be commented out, if the process_output_of property is defined.
Type: Boolean
Required: No
Default: false
process_output_of
Defines the input source for the Alert Rules Engine. This determines the Alert Rules Engine's place in the alert processing workflow. If this property is defined, the mooms_event_handler property should be omitted or commented out in the configuration file.
Type: List
Required: No
One of: AlertBuilder, MaintenanceWindowManager, Enricher
Default: "MaintenanceWindowManager"
Empty Moolet
The Empty Moolet enables Cisco Crosswork Situation Manager integrators to intercept and handle Message Bus events without impacting upon the existing alert flow logic and processing. This provides a mechanism for you to implement your own alert processing rules. The Empty Moolet can also be used to provide general augmentation of alert and Situation details, for example, enrichment.
An Empty Moolet can be passed an alert or a Situation by one of the following mechanisms:
· Process output of: The Empty Moolet exists in the alert processing chain.
· Event handler: The Empty Moolet listens for specific message types on the bus.
· Direct forwarding: The Empty Moolet is handed an object by another Moolet, for example, Moolet A forwards an alert to Moolet B.
A single Empty Moolet uses one or more of these mechanisms.
Configure Empty Moolet
The Empty Moolet takes messages off the Message Bus according to message type and passes them to a Moolet. The configuration includes the message types to register interest for and the name of the Moolet to pass them to. For example, to integrate with an incident management system such as ACMEIncidentManager, the Empty Moolet must:
· Listen to NewThreadEntry events (the topic on Message Bus is /sig/thread/entry/new) and SigStatus events (the topic on Message Bus is /sigs/status topic).
· Interrogate the events to select only those in which the incident management system has registered an interest via the Graze API addSigCorrelationInfo request.
· Filter out those events which were originated by the incident management system via the Graze API to avoid sending duplicate information.
· Extract relevant information from the event including the incident management system entity reference.
· Send the information to the incident management system via the REST.V2 Moobot module which supports the sending of simple RESTful POST requests using basic HTTP authentication.REST.V2
The following example demonstrates an Empty Moolet configuration for this scenario:
{
name : "ACMEIncidentManager",
classname : "CEmptyMoolet",
run_on_startup : true,
moobot : "ACMEIntegration.js",
event_handlers : [
"NewThreadEntry".
"SigStatus"
]
}
This example shows one way of integrating Cisco Crosswork Situation Manager with another system. Each integration is dependent upon the individual use cases and systems being integrated.
See Alert Manager for a further example of an Empty Moolet configuration.
Note:
Not all event handlers are required for every integration. Only specify required handlers.
Customize Empty Moolet
To invoke custom javascript for a particular set of actions related to Situations, you can leverage the Empty Moolet to listen for these actions and use the data within the Situations involved. For example, when a Situation is closed you may want to notify an external entity via the REST.V2 module.REST.V2
Edit the configuration file moog_farmd.conf to associate the CustomTaskRunner Moobot with the Empty Moolet, and listen for SigAction events:
{
name : "CustomTaskRunner",
classname : "CEmptyMoolet",
run_on_startup : true,
metric_path_moolet : false,
moobot : "CustomTaskRunner.js",
event_handlers : [
"SigAction"
]
}
This is an example of Moobot code that runs a function when a supported Situation action occurs in Cisco Crosswork Situation Manager:
CustomTaskRunner.js
var events = MooBot.loadModule('Events');
var logger = MooBot.loadModule('Logger');
var constants = MooBot.loadModule('Constants');
logger.debug("Empty Moolet Started.");
/**
* ### situationAction
*
* Listen for specific "sigAction"
*
* @param {object} situation - A situation object from Events
*/
function situationAction(situation) {
logger.warning("Checking Action event...");
var sitn_id = situation.value("situation_id");
var action = situation.payload().valueOf("action");
if (action !== null) {
var details = situation.getActionDetails();
// The name of the URL Tool has to match to trigger action
if (action == "Ran Tool") {
if (details.tool == urlToolName) {
runFunction(sitn_id);
}
}
}
}
/**
* ### runFunction
*
* Run some function
*
* @param {number} sitn_id - The Situation Id
*/
function runFunction(sitn_id) {
logger.info('Run some function for Situation Id ' + sitn_id);
}
//
// Listen for SigAction event to see if certain URL tool has been run
//
events.onEvent("situationAction",constants.eventType("SigAction")).listen();
The urlToolName must match the name of the Situation URL tool. The Situation ID is available in the event payload, because the tool is run in the context of a particular Situation.
Alert Manager
The Alert Manager uses the Empty Moolet to enable Cisco Crosswork Situation Manager administrators or implementers to incorporate additional alert processing not handled by the Alert Builder, Maintenance Window Manager or Alert Rules Engine. You can use the Alert Manager in standalone mode or as part of the alert processing workflow.
Configure Alert Manager
Edit the configuration file at $MOOGSOFT_HOME/config/moolets/alert_manager.conf.
See /document/preview/11749#UUIDb629fde3285184a3f889b16159903705 for a full description of all properties. Some properties in the file are commented out by default.Empty Moolet Reference
You can use the following mechanisms to determine Alert Manager behavior:
· If standalone_moolet = true: The Alert Manager picks up alerts, specified by the event_handlers property, on the Message Bus and processes them.
· If you set process_output_of to Maintenance Window Manager or Alert Rules Engine: The Alert Manager uses the output of that component.
Example Configuration
The default configuration file contains an example implementation of the Empty Moolet functionality in the form of the Alert Manager Moolet. For example:
{
name : "AlertMgr",
classname : "CEmptyMoolet",
run_on_startup : false,
metric_path_moolet: false,
moobot : "AlertMgr.js",
standalone_moolet : true,
# Listens for alerts events (on the /alerts topics)
event_handlers : [
"AlertClose",
"AlertUpdate",
"Alert"
]
}
Alert Manager Moobot
Cisco provides a Moobot for the Alert Manager Moolet named AlertMgr.js. An example use case for this Moolet is to enable a specific action on different alert types. For example, to update a Situation's services when an alert is updated which contains certain attributes.
Empty Moolet
For further information on customizing Cisco Crosswork Situation Manager using the Empty Moolet, see Empty Moolet.
Empty Moolet
The Empty Moolet enables Cisco Crosswork Situation Manager integrators to intercept and handle Message Bus events without impacting upon the existing alert flow logic and processing. This provides a mechanism for you to implement your own alert processing rules. The Empty Moolet can also be used to provide general augmentation of alert and Situation details, for example, enrichment.
An Empty Moolet can be passed an alert or a Situation by one of the following mechanisms:
· Process output of: The Empty Moolet exists in the alert processing chain.
· Event handler: The Empty Moolet listens for specific message types on the bus.
· Direct forwarding: The Empty Moolet is handed an object by another Moolet, for example, Moolet A forwards an alert to Moolet B.
A single Empty Moolet uses one or more of these mechanisms.
Configure Empty Moolet
The Empty Moolet takes messages off the Message Bus according to message type and passes them to a Moolet. The configuration includes the message types to register interest for and the name of the Moolet to pass them to. For example, to integrate with an incident management system such as ACMEIncidentManager, the Empty Moolet must:
· Listen to NewThreadEntry events (the topic on Message Bus is /sig/thread/entry/new) and SigStatus events (the topic on Message Bus is /sigs/status topic).
· Interrogate the events to select only those in which the incident management system has registered an interest via the Graze API addSigCorrelationInfo request.
· Filter out those events which were originated by the incident management system via the Graze API to avoid sending duplicate information.
· Extract relevant information from the event including the incident management system entity reference.
· Send the information to the incident management system via the REST.V2 Moobot module which supports the sending of simple RESTful POST requests using basic HTTP authentication.REST.V2
The following example demonstrates an Empty Moolet configuration for this scenario:
{
name : "ACMEIncidentManager",
classname : "CEmptyMoolet",
run_on_startup : true,
moobot : "ACMEIntegration.js",
event_handlers : [
"NewThreadEntry".
"SigStatus"
]
}
This example shows one way of integrating Cisco Crosswork Situation Manager with another system. Each integration is dependent upon the individual use cases and systems being integrated.
See Alert Manager for a further example of an Empty Moolet configuration.
Note:
Not all event handlers are required for every integration. Only specify required handlers.
Customize Empty Moolet
To invoke custom javascript for a particular set of actions related to Situations, you can leverage the Empty Moolet to listen for these actions and use the data within the Situations involved. For example, when a Situation is closed you may want to notify an external entity via the REST.V2 module.REST.V2
Edit the configuration file moog_farmd.conf to associate the CustomTaskRunner Moobot with the Empty Moolet, and listen for SigAction events:
{
name : "CustomTaskRunner",
classname : "CEmptyMoolet",
run_on_startup : true,
metric_path_moolet : false,
moobot : "CustomTaskRunner.js",
event_handlers : [
"SigAction"
]
}
This is an example of Moobot code that runs a function when a supported Situation action occurs in Cisco Crosswork Situation Manager:
CustomTaskRunner.js
var events = MooBot.loadModule('Events');
var logger = MooBot.loadModule('Logger');
var constants = MooBot.loadModule('Constants');
logger.debug("Empty Moolet Started.");
/**
* ### situationAction
*
* Listen for specific "sigAction"
*
* @param {object} situation - A situation object from Events
*/
function situationAction(situation) {
logger.warning("Checking Action event...");
var sitn_id = situation.value("situation_id");
var action = situation.payload().valueOf("action");
if (action !== null) {
var details = situation.getActionDetails();
// The name of the URL Tool has to match to trigger action
if (action == "Ran Tool") {
if (details.tool == urlToolName) {
runFunction(sitn_id);
}
}
}
}
/**
* ### runFunction
*
* Run some function
*
* @param {number} sitn_id - The Situation Id
*/
function runFunction(sitn_id) {
logger.info('Run some function for Situation Id ' + sitn_id);
}
//
// Listen for SigAction event to see if certain URL tool has been run
//
events.onEvent("situationAction",constants.eventType("SigAction")).listen();
The urlToolName must match the name of the Situation URL tool. The Situation ID is available in the event payload, because the tool is run in the context of a particular Situation.
Enrichment
· Situations in Cisco Crosswork Situation Manager are built from data ingested from your monitoring systems. You may have use cases for your Situations that require more information than is contained in the raw data. If this is the case, you can use a process called enrichment to add supplemental data to alerts or Situations. Enrichment can:
· Improve accuracy for clustering alerts into Situations.
· Improve readability of alerts for operators.
· Aid operators in investigating Situations.
· Provide critical reporting data.
The first step is to identify whether your existing data is sufficient. If it is lacking, identify the type of enrichment data that meets your requirements and the data source that can provide it. You can then choose the most effective and efficient method of enrichment for your specific needs.
Do You Need To Enrich?
The need to enrich depends on whether the data from your data source or monitoring system fulfils your requirements. Examine the use cases for your data to identify any omissions.
For example, an organization sets up Cisco Crosswork Situation Manager to ingest the following event data:
"node_name" : "U0039-router01"
"description" : "Router down"
The data must fulfil these use cases:
1. Operators need the site name to understand where they need to take action to fix the problem.
2. Management needs the region for reporting requirements.
For this company, the node names are all based on the site name <site>-<component> so "U0039" reflects the site. There is no need to enrich for this use case.
The site name is not enough to determine the region, and the event data does not include region data. To satisfy the second use case, the company needs to enrich the event data.
Identify the Enrichment Purpose
The purpose of the enrichment indicates whether to enrich at alert or Situation level. Enrichment is expensive in terms of processing time and resource use. Inefficient enrichment can slow the processing of alerts, so it is important to enrich at the appropriate level.
Enrichment data can be broadly categorized to fulfil one of the following purposes:
· Operational: Functionally modifies behavior within Cisco Crosswork Situation Manager to drive processes such as clustering. Ideally performed on alert creation.
· Informational: Assists a consumer (operator or external system) to differentiate between Situations. Typically performed at Situation level. Includes updates to Situation description, services and processes.
· Diagnostic: Assists operators to investigate Situations and can be performed at either alert or Situation level. Examples include updates to alert and Situation custom_info and updates to Situation discussion threads.
The region data in our example is informational.
Identify the Enrichment Source
If the required data exists externally, identify its type:
· Static: Data that changes infrequently, for example a country code lookup to a country name.
· Dynamic: Data that may be subject to change, for example a database query to match a hostname to a service.
In our example, the company database stores the site number and relates it to the site address and region. The data is static:
site address city state region
U0039 1265 Battery St San Francisco CA US-WEST
Dynamic enrichment on every de-duplication has a greater performance impact that enrichment on alert creation. If the enrichment data is unlikely to change during the lifetime of an alert, enrich once on alert creation. See Enrich on Alert Creation for more details.
You can enrich from a static file in a LAMbot. All other enrichment is performed in a Moobot.
Select an Enrichment Method
Some enrichment methods are available in the UI:
· /document/preview/24302#UUIDac981c90c4fe0f1501ee8f29b1fc0d28 using a static data file.UI Enrichment
· Link Definitions.Create Link Definitions
· Other methods are manually configured or accessed via the command line. The most common are:
· /document/preview/11822#UUIDfa98e34fe3aa2a239dd4c23084dc9bff module to retrieve data through HTTP.REST.V2
· /document/preview/11813#UUID20e2a0d16a5dbf0903916ee39987fb94 module to retrieve data from supported SQL databases.ExternalDb
· /document/preview/11801#UUIDbbd065f08f0e5c57e94aa0e16ab2524b to update Situations and alerts statically.Graze API
· /document/preview/11765#UUIDc4af40424b534331ee84a3540f81f44e to update Situations and alerts dynamically.Situation Manager Labeler
In our example, depending on the database specification, the company might use JDBC to add the region data into alert custom_info and the Situation Manager Labeller to add the region data to Situations.
Enrich on Alert Creation
If your enrichment data is unlikely to change during the lifetime of an alert, enrich once on alert creation.
To enrich on alert creation:
· Create a custom alert enricher Moolet.
· Configure your alert enricher to use caching.
· Configure the Alert Builder to send data to your custom Moolet on alert creation.
· Define your custom Moolet in Moogfarmd.
See Enrichment for more information on enrichment methods and processes.
Create an Alert Enricher Moobot
Create an Alert Enricher Moobot to obtain enrichment data from your external source, for example via JDBC.JDBC
Use Caching
The Bot utility is included with the Situation Manager Labeler available from Cisco Support. See /document/preview/11766#UUID0c0fc0065899be370748b7c208a496ad for more information.Install the Situation Manager Labeler
You can configure your Alert Enricher Moobot to use the caching facilities in the Bot utility. This is optional but good practice if the data is relatively static. It reduces the time required to repeatedly process data from a third party system. For example:
var USE_CACHE = false;
var CMDB_CACHE_RETENTION = 3600;
if (USE_CACHE && cmdb_cache_exists && cmdb_cache_exists.enrichment)
{
customInfo.enrichment = cmdb_cache_exists.enrichment;
}
else
{
botUtil.addObject(customInfo, "enrichment", ci_enrichment, false);
var cmdb_cache = {};
cmdb_cache.enrichment = customInfo.enrichment;
botUtil.setCacheValue(botModules.constants, "CMDB"+host, cmdb_cache, CMDB_CACHE_RETENTION);
}
Configure the Alert Builder
In the following example the Alert Builder sends newly created alerts to the Alert Enricher Moolet and updated alerts to the Maintenance Window Manager:
if(alert)
{
var alertAction=alert.payload().getAction() === "Alert Created" ? "create" : "update";
if ( alertAction === "create" ) {
logger.info("createAlert: Created Alert Id: " + alert.value("alert_id"));
alert.forward("AlertEnricher");
}
else {
logger.info("createAlert: Updated Alert Id: " + alert.value("alert_id"));
alert.forward("MaintenanceWindowManager");
}
}
Configure Moogfarmd
Define the Alert Enricher Moobot in Moogfarmd. For example:
{
name : "AlertEnricher",
classname : "CEmptyMoolet",
run_on_startup : true,
persist_state : true,
metric_path_moolet : false,
moobot : "AlertEnricher.js",
standalone_moolet : true,
threads : 5
}
Enricher Moolet
Enable the Enricher Moolet to update alerts with Enrichment data. See UI Enrichment for further information.UI Enrichment
Configure Enricher
You can define the behavior of the Enricher Moolet by editing the $MOOGSOFT_HOME/config/moolets/enricher.conf configuration file.
Enricher Parameters
The parameters that relate to the Enricher Moolet are as follows:
run_on_startup
Determines whether Enricher runs when Cisco Crosswork Situation Manager starts. If enabled, Enricher updates alerts with enrichment data from the moment the system starts, without you having to configure or start it manually.
Type: Boolean
Default: false
metric_path_moolet
Determines whether or not Enricher is included in the the Event Processing metric for Self Monitoring.Self Monitoring
Type: Boolean
Default: false
description
Describes the Moolet.
Type: String
Default: Alert Enrichment
The default Enricher parameters are as follows:
{
name : "Enricher",
classname : "com.moogsoft.farmd.moolet.enricher.CEnricherMgr",
run_on_startup : true,
persist_state : false,
metric_path_moolet : true,
process_output_of : "AlertBuilder",
description : "Alert Enrichment"
}
Note:
nameandclassnameare hardcoded and should not be changed.
Output Parameters
These parameters control the output processed by the Moolet:
process_output_of
Defines the source of the alerts that Enricher processes. By default, the Moolet connects directly to the Alert Builder.
Type: List
One of: AlertBuilder, AlertRulesEngine Default: AlertBuilder
Moogfarmd Reference
Moogfarmd controls all other services in Cisco Crosswork Situation Manager and manages which algorithms and Moolets are running.
Services
We advise that you start Moogfarmd as a service. A service script is provided out of the box for the default Moogfarmd configuration and is located here:
/etc/init.d/moogfarmd
A backup Moogfarmd service script is located at $MOOGSOFT_HOME/etc/service-wrappers/moogfarmd.
If using multiple instances of Moogfarmd on the same host, we advise that you copy and modify the default Moogfarmd service script for each Moogfarmd running on the host.
Run the Moogfarmd Service Daemon
Moogfarmd is a command line executable that can be run as a service daemon.
To execute the daemon and view available arguments run:
moog_farmd --help
By default, you do not need either 'config' or 'instance'. If you run the system without configuring either of these, the moogfarmd instance loads the default configuration file for moogfarmd, and responds to farmd_ctrl with no instance specified. See High Availability Overview for more information on High Availability.
The moog_farmd command line executable accepts the following arguments:
| Option |
Input |
Description |
| --clear_state |
- |
Clears any persisted state information associated with Moogfarmd on startup. |
| --cluster <arg> |
String: <cluster name> |
Name of the High Availability (HA) cluster. Overwrites the value in the configuration file. |
| --config <arg> |
String: <file path/name> |
Name and path of the configuration file specific to the running Moogfarmd instance. |
| --group <arg> |
String: <group name> |
Name of the HA group. Overwrites the value in the configuration file. |
| -h, --help |
- |
Displays all command line options. |
| --instance <arg> |
String: <instance name> |
Enables you to name the Moogfarmd instance. You can refer to this name in the farmd_ctrl utility, which allows you to start, restart and reload the various Moolets. |
| --logconsole |
- |
Instructs Moogfarmd to write logs to the console only. |
| --logfilename <arg> |
String: <file path/name> |
Name and path of the Moogfarmd log file. |
| -l, --loglevel <arg> |
INFO|WARN|ALL |
Specifies the debug level. Defaults to WARN, which is the recommended level in all production implementations. |
| --mode <arg> |
String: active/passive |
Starts the process in passive or active mode. The default is active. |
| --service_instance <arg> |
String: <service suffix> |
Suffix for the service name. |
| -v, --version |
- |
Displays the Moogfarmd version number. |
Configuration
You can control Moogfarmd behavior through the following files:
· system.conf: the general Cisco Crosswork Situation Manager system configuration file is located in $MOOGSOFT_HOME/config/system.conf. See System Configuration.
· moog_farmd.conf: configuration specific to Moogfarmd operation. If you run multiple instances of Moogfarmd, each needs it own configuration file. All instances of Moogfarmd which do not specify a different --config use the default configuration file located in $MOOGSOFT_HOME/config/moog_farmd.conf.
Moogfarmd runs individual isolated applications called Moolets inside the Moogfarmd app container. Moolets are a parallel concept to servlets in a traditional enterprise application container such as Tomcat. Moogfarmd controls the flow of data through the Moolets where the data can come via the Message Bus or from other Moolets.
You can configure the following properties in the Moogfarmd configuration files:
file_only_config
This setting serves two purposes related to the Configuration Migration Utility introduced in release 7.3:
· Setting the property to true before upgrading prevents the configuration migration utility from running.
· Setting the property to true after upgrading causes Cisco to ignore all database configurations for Cookbook and Tempus clustering algorithms as well as merge groups, and only load their file configurations instead.
| Type |
Boolean |
| Required |
Yes |
| Default |
false |
threads
Global number of Moobots (threads) per Moolet. Override this setting by using the threads property in individual Moolet configurations.
| Type |
Integer |
| Required |
Yes |
| Default |
10 |
Note:
Do not change this setting unless instructed by Cisco Support.
db_connections
Specifies the number of database connections for Moogfarmd independently of the number of threads.
| Type |
Integer |
| Required |
Yes |
| Default |
30 |
Note:
Do not change this setting count unless instructed by Cisco Support.
moobot_optimization
The optimization level to use for Moobots.
| Type |
Integer |
| Required |
Yes |
| One of |
-1: Moobots are interpreted. 0-9: Moobots are precompiled. 0 is minial optimization and 9 is maximum optimization. See Mozilla optimization documentation for more information. |
| Default |
0 |
maximum_rest_requests
The maximum allowed number of concurrent asynchronous REST tasks. Increasing the value consumes more system resources.
| Type |
Integer |
| Required |
Yes |
| Default |
200 |
bus_thread_pool_queue_limit
The maximum number of Message Bus messages to store in memory.
| Type |
Integer |
| Required |
Yes |
| Default |
0 (unlimited) |
Note:
If you reduce this value, message data may be lost.
moolet_queue_size_limit
The maximum number of messages from each Moolet to store in memory. You can overwrite this setting in individual Moolet configurations.
| Type |
Integer |
| Required |
Yes |
| Default |
0 (unlimited) |
Note:
If you reduce this value, message data may be lost.
sig_resolution
Section of the file containing properties related to Situation resolution.
| Type |
Object |
| Required |
Yes |
| Default |
N/A |
alert_threshold
The minimum number of alerts that must be present in a cluster before it can become a Situation.
| Type |
Integer |
| Required |
Yes |
| Default |
2 |
sig_similarity_limit
The percentage of alerts two Situations must share before they are merged.
| Type |
Number |
| Required |
Yes |
| Default |
0.7 (70%) |
retention_period
Length of time in seconds to keep unchanged closed/superseded Situations in memory.
| Type |
Integer |
| Required |
Yes |
| Default |
86400 (1 day) |
ha
The moog_farmd.conf file includes settings you can use to specify the cluster, group, and instance for an HA configuration hierarchy. See High Availability Configuration Hierarchy.
Note:
Do not change any other HA settings in this file unless instructed by Cisco Support.
Moolets
A Moolet is an intelligence module that is used to perform specific services in Cisco Crosswork Situation Manager. Some Moolets have an accompanying Moobot, a Javascript file that controls or customizes Moolet behavior.
Events can trigger a Moolet in Moogfarmd as follows:
· process_output_of: The Moolet listens for events from another named Moolet. You can use this method to chain Moolets together to form an automated workflow pipeline.
· mooms_event_handler: The Moolet listens for events on the Message Bus, for example actions triggered by a user or within another instance of moogfarmd.
· standalone_moolet: The Moolet listens for events generated by other Moolets within the same Moogfarmd instance without being part of the same process chain.
· scheduler: A unique Moolet type that allows time based task execution.
Refer to the documentation on individual Moolets to learn about how to configure their behavior:
Housekeeper Moolet
The Housekeeper Moolet performs the periodic background tasks required for the Auto Close feature and for the moving of data to the historic database. Refer to the Configure Historic Data Retention document and the Historic Data Utility Command Reference for information on configuring the retention of historic data.Auto Close
The Housekeeper Moolet is also responsible for gathering statistics from the system, for example Team Insights.
To verify the Housekeeper Moolet is running, use the following command:
ha_cntl -v
Configure Housekeeper
You can define the behavior of the Housekeeper Moolet by editing the $MOOGSOFT_HOME/config/moolets/housekeeper.conf configuration file.
Moolets are capable of supporting multiple Moobots. By configuring a Moolet to run multiple Moobots, you can customise the functions of the default Moobot. You can use this feature to customise the actions for Workflow Engine. To do this, locate the Moobot property in the Moolet configuration file and add a comma-separated list of the Moobots you want to run. See the extract Housekeeper parameters below and notice the default "moobot" property which contains one Moobot: "Housekeeper.js".
Housekeeper Parameters
run_on_startup
Determines whether Housekeeper runs when Cisco Crosswork Situation Manager starts. If enabled, Housekeeper performs its background tasks from the moment the system starts, without you having to configure or start it manually.
Type: Boolean
Default: true
metric_path_moolet
Determines whether Housekeeper is factored into the event processing metric for Self Monitoring or not. See Moogfarmd Reference for more information.Self Monitoring
Type: Boolean
Default: false
standalone_moolet
Determines whether the Housekeeper can listen for events generated by other Moolets within the same moogfarmd instance without being in a processing chain.
Type: Boolean
Default: true
The default Housekeeper parameters are as follows:
{
name : "Housekeeper",
classname : "com.moogsoft.farmd.moolet.housekeeper.CHousekeeper",
run_on_startup : true,
metric_path_moolet : false,
standalone_moolet : true
moobot : "Housekeeper.js"
}
Note:
name and classname are hardcoded and should not be changed.
Notifier Moolet
Introduction
The Notifier Moolet enables Cisco Crosswork Situation Manager to act on invite MooMS Bus messages and optionally send an email.
For example, to send an email when a user is invited to a Situation via the UI, the Notifier Moolet must:
· Listen to Invite Events
· Interrogate the Events to identify Situation invitations
· Filter out Events for Situations we are not interested in notifying
· Extract relevant information from the Event including the Situation Id and User Id
· Send an email message containing a customized body to a recipient using the Mailer Moobot module
Moogfarmd Configuration
The Notifier Moolet is designed to take messages off the MooMS bus according to message type.
You can edit the Notifier in the $MOOGSOFT_HOME/config/moolets/notifier.conf configuration file.
Moolets are capable of supporting multiple Moobots. By configuring a Moolet to run multiple Moobots, you can customise the functions of the default Moobot. You can use this feature to customise the actions for Workflow Engine. To do this, locate the Moobot property in the Moolet configuration file and add a comma-separated list of the Moobots you want to run. See the extract Notifier Moolet parameters below and notice the default "moobot" property which contains one Moobot: "Notifier.js".
The default configuration is as follows:
{
name : "Notifier",
classname : "CNotifier",
run_on_startup : false,
metric_path_moolet : false,
moobot : "Notifier.js"
}
Scheduler Moolet
You can schedule jobs at regular intervals by editing the $MOOGSOFT_HOME/config/moolets/scheduler.conf configuration file:
# The Scheduler is used to run scheduled jobs at regular
# intervals throughout the lifetime of moog_farmd. Only this
# moolet, which cannot subscribe to the MooMS bus and
# listen to events, is allowed to submit scheduled jobs.
#
# To start up successfully it must have the name and threads
# values set to "Scheduler" and 1 respectively.
{
name : "Scheduler",
classname : "CScheduler",
run_on_startup : false,
metric_path_moolet : false,
moobot : "Scheduling.js",
threads : 1
}
Moolets are capable of supporting multiple Moobots. By configuring a Moolet to run multiple Moobots, you can customise the functions of the default Moobot. You can use this feature to customise the actions for Workflow Engine. To do this, locate the Moobot property in the Moolet configuration file and add a comma-separated list of the Moobots you want to run. See the extract Scheduler parameters above and notice the default "moobot" property which contains one Moobot.
To load the scheduler module:
var scheduler =MooBot.loadModule('Scheduler');
Run jobs using, for example:
// A job that fails and does not restart.
scheduler.scheduleJob(this, "knockOnce", 5, 5, false);
This calls a method in the same js file called knockOnce:
function knockOnce()
{
logger.warning("Knock knock");
throw new Error("Failed to knock.");
}
The scheduledJob method has two possible parameter sets:
· scheduleJob(this, functionName, start_delay , interval );
· scheduleJob(this, functionName, start_delay, interval, true | false) ;
| Parameter |
Description |
| first |
always this |
| second |
the name of the function to call to run the job |
| third |
is the delay from starting farmd to the first run (in seconds) |
| fourth |
the interval between runs (in seconds) |
| fifth |
decides whether the job will run again if it failed previously |
Scheduling Frequency
When executing multiple jobs we recommend that you try and offset potential workload, by for example staggering the initial run of multiple jobs a few seconds apart or scheduling jobs at slightly offset frequencies.
Constraints
1. Must be single threaded.
2. Only one per Moogfarmd process.
3. Has to be called Scheduler.
4. Use a Moobot module function as a scheduled job - which involves some rarer JavaScript as the scheduler won’t recognise function names from modules (it can’t find them)
For example, in your scheduler moobot you might have:
MooBot.loadModule('AutoClose.js');
var autoClose=new AutoClose();
// Bind the module function locally to the module function.
var autoCloseAlertFunction = autoClose.closeAgedAlerts.bind(autoClose);
// Schedule execution
scheduler.scheduleJob(this, "autoCloseAlertFunction" , 60, autoCloseAlertFrequency , true);
Situation Manager
The Situation Manager listens for Situation creation, update, or closure actions and passes the Situation to an associated Moobot. It runs as a standalone Moolet by default.
You can define the algorithms for which the Situation Manager processes output, the Moobot it passes Situations to and the actions performed on those Situations.
When a Moobot receives a Situation, you can configure it to perform functions such as data enrichment, auto-assignment to a user or notifying a third-party tool to raise a ticket.
Configure the Situation Manager
The Situation Manager configuration file is located here: $MOOGSOFT_HOME/config/moolets/situation_manager.conf. You can define the following properties:
Determines whether Situation Manager starts when Cisco Crosswork Situation Manager starts.
| Type |
Boolean |
| Required |
No |
| Default |
False |
Determines whether Situation Manager is included in the events processing metric for Self Monitoring.
| Type |
Boolean |
| Required |
No |
| Default |
False |
Determines which Moobot receives Situations from the Situation Manager. The Moobot JavaScript files are located here: $MOOGSOFT_HOME/bots/moobots.
Moolets are capable of supporting multiple Moobots. By configuring a Moolet to run multiple Moobots, you can customise the functions of the default Moobot. You can use this feature to customise the actions for Workflow Engine. To do this, locate the Moobot property in the Moolet configuration file and add a comma-separated list of the Moobots you want to run. See the extract Situation Manager parameters below and notice the default "moobot" property which contains one Moobot: "SituationMgrLabeller.js".
| Type |
String |
| Required |
Yes |
| Default |
SituationMgr.js |
Determines whether Situation Manager runs as a standalone Moolet.
| Type |
Boolean |
| Required |
No |
| Default |
True |
An example Situation Manager Moolet configuration as as follows:
{
name : "SituationMgr",
classname : "CSituationMgr",
run_on_startup : true,
metric_path_moolet : false,
moobot : "SituationMgrLabeller.js",
standalone_moolet : true
}
Note:
Do not change the name and classname properties.
Situation Manager listens for three event types by default:
· Sig: Situation creation.
· SigClose: Situation closure.
· SigUpdate: Situation update.
If you want to listen for other events, create an Empty Moolet and define the events in the event_handler. See the eventType method in /document/preview/11808#UUID6b4b0c79434fb6f809e6f469b83f2c03 for a full list of event types.Constants
You can listen for specific Situation actions using the SigAction event. It can filter our the following actions:
| Assigned Moderator |
Deacknowledged Situation Moderator |
Described Situation |
The Situation Manager can send Situations to one of three Moobots. You can customize these to meet your requirements:
· Situation Manager: Situation Manager's default associated Moobot. The configuration file is SituationManager.js. For information on how to configure it, see /document/preview/11806#UUID6bab0ad2c31ebc11baa54398f49507e9.Moobot Modules
· Situation Manager Labeler: You can use the Situation Manager Labeler to enrich Situations by dynamically adding alert properties to the Situation description. The configuration file is SituationMgrLabeller.js. See Situation Manager Labeler for more information.
· Situation Manager Netcool: This Moobot is required for the Netcool legacy LAM. The configuration file is SituationMgrNetcool.js. For more information see /document/preview/26848#UUID43300de7462c0adb67a8c4f25a62cc51.Netcool Legacy LAM
Template Matcher Moolet
Warning
Template Matcher was deprecated from the release of Cisco Crosswork Situation Manager V7.0.0. See Deprecation Notice: Template Matcher for more information.Deprecation Notice: Template Matcher
The Situation Templates enable users to provide feedback to Cisco Crosswork Situation Manager that indicates the quality of the Situations produced and consequently what Cisco Crosswork Situation Manager should do if it detects a similar situation in the future.
Moogfarmd
The TemplateMatcher Moolet should be activated in Moogfarmd if you wish your system to discover “Priority Templates”. By default, Moogfarmd always suppresses the creation of SPAM templates, regardless of the Moolet they are generated by.
You can configure the Teams Manager Moolet in the $MOOGSOFT_HOME/config/moolets/teams_manager.conf configuration file.
Moolets are capable of supporting multiple Moobots. By configuring a Moolet to run multiple Moobots, you can customise the functions of the default Moobot. You can use this feature to customise the actions for Workflow Engine. To do this, locate the Moobot property in the Moolet configuration file and add a comma-separated list of the Moobots you want to run. See the extract Template Matcher Moolet parameters below and notice the default "moobot" property which contains one Moobot: "TemplateMatcher.js".
There is no special configuration required for the Moolet; it is either “on” or “off”. TemplateMatcher should run after the Alert Builder or Alert Rules Engine depending upon the system configuration. The default configuration for the TemplateMatcher is shown below:
{
name : "TemplateMatcher",
classname : "CTemplateMatcher",
run_on_startup : false,
#process_output_of : "AlertRulesEngine",
process_output_of : "AlertBuilder",
threads : 4
moobot : "TemplateMatcher.js"
}
Standalone Execution
The TemplateMatcher Moolet can be executed in a “stand-alone” mode via the moog_primer/sigaliser utility using the following command:
sigaliser --moolet=TemplateMatcher
Teams Manager Moolet
The Teams Manager Moolet is triggered by Cisco Crosswork Situation Manager when a Situation is created, updated and deleted, and also when a team is created and updated. You can assign teams to Situations using the filters in the UI under Settings > Teams > General. If there are no filters for a team, it is assigned all new Situations by default.
If you use the "assignTeamsToSituation" Graze API endpoint or MoogDb method to assign teams to a Situation, Cisco Crosswork Situation Manager marks the Situation as overridden. The Teams Manager Moolet can no longer act on it even if that Situation matches a filter.Graze APIMoogDb V2
You can alter the behavior of the Teams Manager Moolet by changing the "Situation Update Policy" in the UI under Settings > Teams.
One Teams Manager Moolet is run for every instance of Cisco Crosswork Situation Manager.
Configure Teams Manager
You can configure the Teams Manager Moolet in the $MOOGSOFT_HOME/config/moolets/teams_manager.conf configuration file.
Moolets are capable of supporting multiple Moobots. By configuring a Moolet to run multiple Moobots, you can customise the functions of the default Moobot. You can use this feature to customise the actions for Workflow Engine. To do this, locate the Moobot property in the Moolet configuration file and add a comma-separated list of the Moobots you want to run. See the extract Teams Manager Moolet parameters below and notice the default "moobot" property which contains one Moobot: "SituationMgr".
Teams Manager Properties
The properties that relate to the Teams Manager Moolet are:
run_on_startup
Determines whether Teams Manager runs when Cisco Crosswork Situation Manager starts. If you enable it, Teams Manager processes Moolet output from the moment the system starts, without you having to configure or start it manually.
Type: Boolean
Default: true
metric_path_moolet
Determines whether or not Cisco Crosswork Situation Manager includes Teams Manager in the Event Processing metric for Self Monitoring.Self Monitoring
Type: Boolean
Default: false
moobot
JavaScript program that controls and customizes the behavior of Teams Manager.
Type: String
Default: "TeamsMgr.js"
The default Teams Manager configuration is:
name : "TeamsMgr",
classname : "CTeamsMgr",
run_on_startup : true,
metric_path_moolet : false,
moobot : "TeamsMgr.js",
#
# Specifies the list of all the moolet that can change
# or create situations. Remove this section if the
# TeamsMgr is running in its own instance.
#
process_output_of : [
"Speedbird",
"Cookbook",
"Default Cookbook",
"SituationMgr"
]
Note:
name and classname are hardcoded and should not be changed.
Output Parameters
These parameters control the output the Moolet processes:
process_output_of
The Moolets that perform actions that trigger the Teams Manager:
Type: Array
Valid Moolets : Sigaliser, Speedbird, Cookbook, Default Cookbook, SituationMgr
Default: [ "Sigaliser", "Speedbird", "Cookbook", "Default Cookbook", "SituationMgr" ]
Workflow Engine Moolets
The Workflow Engine Moolets perform tasks on events, alerts, and Situations as specified in a user-defined workflow. See /document/preview/110725#UUID3bd5018041a19de941d95733dffc3e37 for more information.Workflow Engine
The following files define the actions that are available when you define a workflow in the Cisco Crosswork Situation Manager UI:
· A Workflow Engine Moobot specifies a set of actions that are available when you define a workflow in the Cisco Crosswork Situation Manager UI.
· The $MOOGSOFT_HOME/config/moolets/ folder has one default config file for each workflow engine:
— event_workflows.conf: Event workflows process event data after data ingestion from a LAM and before the Alert Builder.
— enrichment_workflows.conf: Enrichment workflows process alert data after the Alert Builder but before the Maintenance Window Manager.
— alert_workflows.conf: Alert workflows process alert data after the Maintenance Window Manager and before they pass to a clustering algorithm.
— situation_workflows.conf: Situation workflows process Situation data after the Teams Manager. For example, you can use a Situation workflow when you want to integrate with a ticketing system.
· Each configuration file has a moobot field that specifies the set of supported Moobots. The default Moobot for all four Moolet types is $MOOGSOFT_HOME/bots/moobots/WorkflowEngine.js. Do NOT modify the Cisco supplied WorkflowEngine.js.
You can add and update Workflow Engine functionality. See Update the Workflow Engine for more information.
The Workflow Engine Moolets include the following properties:
If set to true, the Moolet runs automatically on startup.
| Type |
Boolean |
| Default |
true |
Set of Moobots to load into the Moolet.
| Type |
String for one Moobot. Array for multiple Moobots. For example: ["WorkflowEngine.js", "CustomWorkflowEngine.js"] |
| Default |
"WorkflowEngine.js" |
Specifies the source for the objects to route through the Workflow Engine as a Moolet. Defines the engine's location in the the data processing flow.
| Type |
String |
| Default |
• Enrichment workflows: AlertBuilder • Alert workflows: MaintenanceWindowManager • Situation workflows: SituationMgr |
Configure the engine to receive the specified event types from any Moolet. See /document/preview/11808#UUID6b4b0c79434fb6f809e6f469b83f2c03 for information on event types.Constants
| Type |
Array |
| Default |
• Event workflows: ["Event"] • Situation workflows: ["Sig", "SigUpdate", "SigStatus", "SigClose", "ArchivedSig"] |
Defines the type of object to process in the workflow.
| Type |
String |
| Default |
• Event workflows: event • Enrichment workflows: alert • Alert workflows: alert • Situation workflows: situation |
Cisco periodically provides updates to the Workflow Engine for Cisco Crosswork Situation Manager. This topic tells you how to replace the core workflow engine files and any supporting files.
Before you update the Workflow Engine:
· Verify you have SSH access to to your Cisco Crosswork Situation Manager machines. For distributed or Highly Available installations, update the Workflow Engine on all core role machines where you run Moogfarmd. See Server Roles.
· Download the latest WorkflowEngine bundle and transfer them to the machines where you are performing the update. For information on the latest Workflow Engine, see /document/preview/128869#UUIDcb2b9d66a2b9ac878d629d22504ee728.Updates for v7.3.0
· Verify you know the operating system user that runs Moogfarmd and perform all steps as that same user.
You can download the current workflow engine from the following location: https://speedy.moogsoft.com/contrib/WorkflowBundle-v1.0.tar.gz.
For example to download and untar the Workflow Engine bundle:
curl https://speedy.moogsoft.com/contrib/WorkflowBundle-v1.0.tar.gz --output WorkflowBundle-v1.0.tar.gz.
To untar the bundle:
tar -xf WorkflowBundle-v1.0.tar.gz
Install a Workflow Engine update
To install an update for the Workflow Engine, you replace the Workflow Engine Moobot and add or replace any supporting files for the Moobot to all machines running Moogfarmd.
1. Create a backup of the original Workflow Engine Moobot on the instance. For example:
cp $MOOGSOFT_HOME/bots/moobots/WorkflowEngine.js \
$MOOGSOFT_HOME/bots/moobots/WorkflowEngine.ORIG.js
2. Copy the new WorkflowEngine.js file to $MOOGSOFT_HOME/bots/moobots. For example from the directory where you extracted the bundle:
cp moogsoft/bots/moobots/WorkflowEngine.73.js \
$MOOGSOFT_HOME/bots/moobots/WorkflowEngine.js
3. For bundles with updates in the config directory, make a backup of $MOOGSOFT_HOME/config. For example (change to tar check init):
cp -r $MOOGSOFT_HOME/config \
$MOOGSOFT_HOME/config.backup
4. Copy the files from the bundle config directory to $MOOGSOFT_HOME/config. For example from the directory where you extracted the bundle:
cp -r moogsoft/config/* $MOOGSOFT_HOME/config/
5. For bundles with updates in the contrib directory, make a backup of $MOOGSOFT_HOME/contrib. For example:
cp -r $MOOGSOFT_HOME/contrib $MOOGSOFT_HOME/contrib.backup
6. Copy the files from the bundle contrib directory to the $MOOGSOFT_HOME/contrib directory. For example from the directory where you extracted the bundle:
cp -r moogsoft/contrib/* $MOOGSOFT_HOME/contrib/
7. Restart Moogfarmd.
Services
In Cisco Crosswork Situation Manager a service represents a supportable unit that provides a set of related functionality. A service may relate to a single application or it may incorporate multiple applications. Example services may include web application, web service, data management, database, network.
This document outlines how to create services, assign them to Situations, associate them with teams and monitor affected services in the Cisco Crosswork Situation Manager UI.
Before You Begin
Before you begin to create services in Cisco Crosswork Situation Manager, ensure you have met the following requirements:
1. Identify the services in your environment. A third party tool or external system may be useful for this task, for example the list of business services, applications or assignment groups in ServiceNow.
2. If your service data is held externally to Cisco Crosswork Situation Manager, identify the data source.
3. Choose one or more methods that you will use to create and assign services:
· Graze API: Useful when you have a known list of services that change infrequently.
· Situation Manager Labeller: Useful when your services are likely to change and you want to avoid the overhead associated with manual creation and assignment.
· Moobot: Useful when you are already using a custom Moobot for enrichment. See Enrichment for more information.
· Another Enrichment method: Another method may be suitable depending on the source of your service data, for example a static data file. See Enrichment for more information.
· Cisco Crosswork Situation Manager UI: An administrator can assign services to individual Situations in the UI.
Create Services and Assign Services to Situations
You can use one of the following methods, or a combination of these, to add services and assign them to Situations.
Graze API Endpoints
The addService endpoint enables you to create a single service or script the creation of multiple services. You can use setSituationServices to add one or more services to a Situation and getSituationServices to return a list of impacted services for a specified Situation.
See Graze API for details on the command syntax and examples.Graze API
Situation Manager Labeller
This utility allows you to create services from your custom data as it is ingested into Cisco Crosswork Situation Manager and assign those services to Situations.
See Create Services With Situation Manager Labeller for more information and an example.
Moobot
If you are using a custom Moobot to enrich on Situation creation, you can use the MoogDb addService and setSituationServices methods to create services as part of this process. See Enrichment for further information.
Another Enrichment Method
See Enrichment for further information on other enrichment methods.
Cisco Crosswork Situation Manager UI
In the UI, go into a Situation Room. Click Services Impacted at the top of the screen to add or remove services from the Situation. You will need administrator rights to perform this function.
Assign Services to Teams
Cisco Crosswork Situation Manager can automatically assign Situations to teams based upon the service data. You can also automatically create teams based on the service data in Situations.
See Manage Teams for details.Manage Teams
Monitor Affected Services
The Services Overview in the UI Workbench Summary allows you to view the impacted services with the highest severity Situations. You can use this information to prioritize which Situations to address first.
See Check Impacted Services for details.Check Impacted Services
Situation Manager Labeler
You can use the Situation Manager Labeler to set Situation descriptions and fields dynamically, based on the alert data in each Situation. For example, suppose you are defining a correlation based on the custom_info.services alert field. To generate descriptions for the resulting Situations, you can specify a label string in the description field such as:
$$COUNT(custom_info.services) services affected including $$CITED(custom_info.services,3)
Given this string, the resulting descriptions include the three most-cited services and the number of times each service is cited by a member alert:
5 services affected including cust-login(7), verify-login(6), update-login-info(4), ...
Note:
The Situation Manager Labeler is installed by default with Cisco Crosswork Situation Manager v7.3 and higher. For previous releases, contact Cisco Customer Support to obtain installers and instructions.
Usage
Given a macro operation and an alert data field, the operation iterates through the relevant values in the Situation alerts and returns a string derived from these values.
The usage for fields with single values (prefix is one $): $macro(alert-field, max-alerts-to-include)
The usage for fields with lists (prefix is two $’s): $$macro(alert-field, max-alerts-to-include)
The max-alerts-to-include field is optional. This value limits the number of alert values to include in the description.
Consider the following example. You want to create a label with a count of all the affected services (custom_info.services) cited in all alerts. A Situation has two alerts:
· Alert 1 - custom_info.services = [ a, b, c ];
· Alert 2 - custom_info.services = [ d, e, f ];
$COUNT treats the fields as individual values and returns a count of 2.
$$COUNT treats the fields as lists of individual values and returns a count of 6.
Update Situation descriptions
You can use the following macros to generate Situation descriptions. These macros are supported for single values ($macro) and lists ($$macro):
· COUNT(alert-field)— Return the count of alert-field citations, including duplicates.
· UCOUNT(alert-field) — Return the count of unique alert-field citations, excluding duplicates.
· CRITICAL(alert-field)— Return the string CRITICAL : if any alerts have a severity of critical, or 5. This macro is only useful for the severity field.
· UNIQ(alert-field)— Return a list of all cited alert-field values.
· TOP(alert-field)— Return the alert-field value cited by the most alerts in the Situation.
· CITED(alert-field)— Return a list of the unique alert-field values cited by alerts in the Situation along with the number of times they are cited -- for example, source1 (10), source5 (7), source3 (4).
· CITEDLIST(alert-field)— Same as $CITED but returns a string instead of a JSON list.
· BOOLEAN(alert-field)— Return false if all values are “falsy:” 0, null, undefined, "", and so on.
· TOLIST(alert-field)— Creates a comma-separated string from the elements of alert-field.
Note:
UI list-based filtering is now native, so $TOLIST() should no longer be required.
Numeric fields only
The following macros are supported for numeric fields only, such as time, severity, or event-count.
· MIN(alert-field)— Return the minimum cited value of alert-field.
· MAX(alert-field)— Return the maximum cited value of alert-field.
· AVE(alert-field)— Return the average of all cited values of aalert-field.
· SUM(alert-field)— Return the average of all cited values of alert-field.
· NUM(alert-field)— Return the set of alert-field values sorted numerically from low to high, including duplicates.
· UNUM(alert-field)— Return the set of unique alert-field values sorted numerically from low to high, excluding duplicates.
Text fields only
The following macros are supported for text fields only, such as service, source, or description.
· ALPHA(alert-field)— Return the set of alert-field values sorted alphabetically, including duplicates.
· UALPHA(alert-field) — Return the set of unique alert-field values sorted alphabetically, excluding duplicates.
List values only
The following macros are supported for array values only.
· $$INTERSECT(alert-field)— Return the list of intersections -- that is, alert-field values cited by multiple alerts. This macro parses the alert-field array values and returns a list of the items with multiple citations.For example, support a Situation has two alerts. The service field of alert 1 is [a, b, c]. The service field of alert 2 is [b, c, d]. $$INTERSECT(service) would return the list [b, c].
· $$NINTERSECT(alert-field)— Return the number of intersections. Given the previous example, $$NINTERSECT(service) would return the number 2.
· $$CINTERSECT(alert-field) — Return the list of common intersections -- that is, values cited by all alerts in the Situation. This macro is useful for identifying a possible root cause that caused all the alerts to get correlated together.
Limiting the number of alerts to consider
By default, each macro considers all alerts in a Situation up to a maximum of 200. You might want to specify a lower threshold to ensure that labeling does not become a bottleneck in systems with large or frequently-updated Situations. To lower the threshold, append the $FETCH modifier at the start of the Labeler string:
$FETCH(max-alerts-to-consider)Labeler-string
For example, the following macro considers the first alert in each Situation based on alert ID:
$FETCH(1) Application Situation for: $UNIQ(custom_info.application) at DataCentre $UNIQ(custom_info.location)
You should specify the maximum number of alerts needed to ensure an accurate description. If you are correlating based on a specific field such that all alerts have the same value for that field, you only need to fetch 1 alert.
Warning
Do not specify a fetch value higher than 20.
Update other Situation fields
You can use the following macros to update columns and fields in a Situation with values contained in its member alerts.
· $$SERVICES(alert-field)— Update the Services Impacted column in the Situation with all unique alert-field values cited in the member alerts.
· $$ISERVICES(alert-field) — Update the Services Impacted column in the Situation with all unique alert-field values cited in 2 or more member alerts.
· $$PROCESSES(alert-field)— Update the Processes Impacted column in the Situation with all unique alert-field values cited in the member alerts.
You can also use the $MAP[ ] macro to update a custom_info field in the Situation with data from the member alerts. The usage is as follows:
$MAP[ $MACRO(source alert field, destination custom_info field) ]
You can include multiple macros in the same MAP macro, as shown in the following example:
$MAP[ $UNIQ(source, hosts) $UCOUNT(source, num_hosts) ]
Example
For instructions on how to use the Situation Manager Labeler to automatically create services based on custom_info data, see Create Services Labeler.
Create Services Labeler
You can add Situation Manager Labeler macros to the Situation description in a Sigaliser. When Cisco Crosswork Situation Manager creates a Situation based upon the Sigaliser configuration, it automatically creates services based on the function and the alert data.
Before You Begin
Before you start to create services with Situation Manager Labeler, ensure you have met the following requirements:
· You have the Situation Manager Labeler installed on your Cisco Crosswork Situation Manager system. The utility is installed by default with Cisco Crosswork Situation Manager v7.3 and higher. For previous releases, contact Cisco Customer Support to obtain installers and instructions.
· You have identified the service data in your alerts or set up an Enrichment method to import the data into custom_info. See Enrichment for further information.
For example, an alert contains the following custom_info data:
{"services":["WinTel","Lync"]}
Configure a Recipe to Automatically Create Services
The following example demonstrates how to use labeler utility macros in a Cookbook Recipe to create services.
1. In the Cisco Crosswork Situation Manager UI, go to Settings > Cookbook Recipes.
2. Create a new Recipe, completing the mandatory fields such as name, type and clustering information. See /document/preview/99613#UUIDd8d753baf29bcb92bf7909ae7f498685 for more information.Configure a Cookbook Recipe
3. Add a Situation Description that utilizes labeler macros. See the example below.
4. Activate the Recipe. See /document/preview/99613#UUIDd8d753baf29bcb92bf7909ae7f498685 for further information.Configure a Cookbook Recipe
An example Situation description is as follows:
Issue affecting the service: $$UNIQUE(custom_info.services). $$SERVICES(custom_info.services)
This instructs to perform the following actions as it ingests data:
· Parse the data in the custom_info.services field of incoming events.
· Obtain unique service names for the alerts the system adds to a Situation.
· Preface the Situation's "Description" field with the text "Issue affecting the service: ".
· Create a service in the Cisco Crosswork Situation Manager database.
· Assign the service to the Situation.
· Append the Situation's Description field with the names of the impacted services.
When you are parsing a list of values stored as a JavaScript array, use $$ to prefix the macro. If the data is a string use the prefix $.
Once configured, Cisco Crosswork Situation Managert processes alerts using the Situation Description and the resulting Situation appears in the Cisco Crosswork Situation Manager UI.
For example:
![]()
Control Cisco Crosswork Situation Manager Processes
This topic describes the commands for starting, stopping or restarting individual Cisco Crosswork Situation Manager processes.
To configure process startup when Cisco Crosswork Situation Manager fails or restarts see Configure Services to Restart.
Dependencies
Integrations (LAMs), Moogfarmd, and Tomcat depend on the system processes: MySQL RabbitMQ, Nginx, and Elasticsearch. So when starting Cisco Crosswork Situation Manager processes:
1. Start or verify the following are started:
— MySQL
— RabbbitMQ
— Nginx
— Elasticsearch
2. Start or restart integrations (LAMs), Moogfarmd, or Tomcat.
Similarly, if you plan to stop any one of MySQL, RabbitMQ, Nginx, or Elasticsearch, stop integrations (LAMs), Moogfarmd, and Tomcat first.
Init scripts for RPM installs
If you performed an RPM installation as root, use the service init script to start and stop Cisco Crosswork Situation Manager processes:
service <service-name> start|stop|restart
The service names are as follows:
· MySQL: mysqld
· RabbitMQ: rabbitmq-server
· Nginx: nginx
· Elasticsearch: elasticsearch
· Tomcat: apache-tomcat
· moogfarmd
· For LAMs , refer to the individual LAM references for the service names.
For more information, see the documentation on managing system services for your operating system.
Process control for tarball installation
For customers who follow the procedure Tarball installation Cisco Crosswork Situation Manager includes a process control utility to let you:
· Start a process
· Stop a process
· Restart a process
· Check the status, running or stopped, of a process.
The process control utility resides at $MOOGSOFT_HOME/bin/utils/process_cntl .
When you install Moogsoft AIOps as a user other than root, you choose a user to run the installation and initialize the system. Use the same user credentials when controlling Cisco Crosswork Situation Manager components to ensure that you have the proper permissions and access .
Process Control Utility Reference
The Process Control utility uses the following syntax:
process_cntl [ [--process_name] <name>] [--loglevel] <loglevel>] [--service_instance <instance>] {start|stop|status|restart|help} ]
The arguments for the utility are as follows:
| Argument |
Input |
Description |
| -h,--help |
- |
Display the process_cntlsyntax and option descriptions. |
| --loglevel |
DEBUG | INFO | WARN |
Log level controlling the amount of information that process control logs. Defaults to WARN. This flag only works for Cisco Crosswork Situation Manager processes. |
| --process_name |
process name |
The name of the process to control. You can specify one of the core processes: rabbitmq - RabbitMQ message broker mysql - MySQL database nginx - Nginx web server. elasticsearch - Elasticsearch search engine. apache-tomcat - Apache Tomcat servlet container. moog_farmd - Cisco Crosswork Situation Manager event processing process. Alternatively specify an integration (LAM). Run process_cntl -h for a full list of integrations and syntax. See Implementer Guide for a brief description of the packages. |
| --service_instance |
instance name |
The name of the process instance if there is more than one running on the system. |
| start |
- |
Start a stopped process. |
| stop |
- |
Stop a running process. |
| status |
- |
Display the status of the process: running or stopped. |
| restart |
- |
Restart a running process. |
Encrypt Database Communications
You can enable SSL to encrypt communications between all Cisco Crosswork Situation Manager components and the MySQL database.
For information on creating SSL keys and certificates for MySQL, see Creating SSL and RSA Certificates and Keys using MySQL.
Establish Trust for the MySQL Certificate
To establish trust for the MySQL database certificate, create a truststore to house the root certificate for the Certificate Authority that signed the MySQL Server certificate.
1. If you upgraded from a previous version of Cisco Crosswork Situation Manager, run the following command to extract the certificate for the root CA for MySQL:
mysql_ssl_rsa_setup
The command generates new keys and writes them to the /var/lib/mysql directory.
2. Run the java keytool command to create a trust store containing the certificate for the root CA for MySQL.
keytool -import -alias mysqlServerCACert -file /var/lib/mysql/ca.pem -keystore $MOOGSOFT_HOME/etc/truststore
— When keytool prompts you, enter a password for the keystore. You will need this password to configure Cisco Crosswork Situation Manager.
— Answer 'yes' to "Trust this certificate."
Keytool creates a truststore at the path $MOOGSOFT_HOME/etc/truststore.
Configure Cisco Crosswork Situation Manager to use SSL for Database Communications
After you have created the truststore, edit the Cisco Crosswork Situation Manager configuration to enable SSL.
1. Edit $MOOGSOFT_HOME/config/system.conf.
2. Inside the MySQL property, uncomment the SSL property and the properties that comprise it. Make sure to uncomment the opening "{" and closing braces "}". For example:
,“ssl” :
{
# # The location of the SSL truststore.
# #
# # Relative pathing can be used, i.e. ‘.’ to mean current directory,
# # ‘../truststore’ or ‘../../truststore’ etc. If neither relative
# # nor absolute (using ‘/’) path is used then $MOOGSOFT_HOME is
# # prepended to it.
# # i.e. “config/truststore” becomes “$MOOGSOFT_HOME/config/truststore”
# #
# #
# # Specify the server certificate.
# #
“trustStorePath” : “etc/truststore”,
# “trustStoreEncryptedPassword” : “vQj7/yom7e5ensSEb10v2Rb/pgkaPK/4OcUlEjYNtQU=“,
“trustStorePassword” : “moogsoft”
}
3. Provide the path to the truststore you created. For example:
"trustStorePath" : "etc/truststore",
4. Edit the password for the truststore. For example:
"trustStorePassword" : "moogsoft"
See Moog Encryptor if you want to use an encrypted password. Uncomment trustStoreEncryptedPassword and provide the encrypted password for the value. For example:
“trustStoreEncryptedPassword” : “vQj7/yom7e5ensSEb10v2Rb/pgkaPK/4OcUlEjYNtQU=“
5. Save your changes and restart the following components:
— Moogfarmd
— Apache Tomcat
— All LAMs
After you restart, all Cisco Crosswork Situation Manager components encrypt communications with the MySQL database.
Apply Valid SSL Certificates
Cisco Crosswork Situation Manager includes a self-signed certificate by default. If you want to add your own certificates to Nginx, follow the instructions below.
A valid SSL certificate is required if you want to use Cisco Crosswork Situation Manager for Mobile on an iPhone. This is because WebSockets do not work on iOS with self-signed certificates. If a valid root CA certificate is not added, a 'Connection Error' appears at login and Cisco Crosswork Situation Manager for Mobile does not work.
For more information, see the Nginx documentation.
Add a Valid Certificate
To apply a valid certificate to Nginx, go to the nginx config folder and edit /etc/nginx/conf.d/moog-ssl.conf :
vi /etc/nginx/conf.d/moog-ssl.conf
Change the default self-signed certificate and key locations to point to the valid root certificate and key:
#ssl_certificate /etc/nginx/ssl/certificate.pem;
#ssl_certificate_key /etc/nginx/ssl/certificate.key;
ssl_certificate /etc/certificates/your_company_certificate.crt;
ssl_certificate_key /etc/certificates/your_company_certificate.key;
Reload Nginx with the command:
systemctl reload nginx
Moog Encryptor
Cisco Crosswork Situation Manager includes an encryptor utility so you can encrypt passwords stored in the system.conf configuration file. Encrypted passwords in configuration files are more secure because someone with access to the configuration cannot necessarily gain access to integrated systems.
If you run in a distributed environment, run the encryptor utility on one host to create an encryption key (.key). Then copy the key to the $MOOGSOFT_HOME/etc/ directory on the remaining hosts.
Encrypt a Password
To encrypt a password, execute the moog_encryptor command as follows:
$MOOGSOFT_HOME/bin/moog_encryptor -p <password>
For example, to encrypt a password "Abacus":
/usr/share/moogsoft/bin/moog_encryptor -p Abacus
The moog_encryptor displays the encrypted password:
The encrypted password is:
KfFJGilmGGJP/qTrJV6SBs0HTTy3NpCqvGaYKviDbLQ=
When using within Javascript code or JSON file, use:
{"encrypted_password":"KfFJGilmGGJP/qTrJV6SBs0HTTy3NpCqvGaYKviDbLQ="}
Note:
Each time you run moog_encryptor, it generates a different encrypted password.
Configure Cisco Crosswork Situation Manager to use Encrypted Passwords
You can use passwords encrypted with moog_encryptor in the system.conf file as follows:
1. Edit $MOOGSOFT_HOME/config/system.conf.
2. Identify the password you want to replace and uncomment the encrypted_password property. Comment out the password property. For example:
"username" : "moogsoft",
#"password" : "Abacus",
"encrypted_password" : "e5uO0LY3HQJZCltG/caUnVbxVN4hImm4gIOpb4rwpF4=",
3. Set the value of the encrypted_password property to the value returned from themoog_encryptor. For instance:
"encrypted_password":"KfFJGilmGGJP/qTrJV6SBs0HTTy3NpCqvGaYKviDbLQ=",
4. Change the value of the password property so that it does not match the unencrypted value of the password.
Change the Location of the Encryption Key
By default, the encryptor utility uses a key at the following location:
$MOOGSOFT_HOME/etc/.key
The encryptor utility creates a new key if one does not already exist.
If you want to use a different location for the key, uncomment the encrpytion section insystem.conf. Set the value of the encryption_key_file property to a new path for the key. For example:
# Uncomment the encryption section if you want to specify the location
# for the encryption key file.
,
"encryption" :
{
# Use this to change the default location of the encryption key file
"encryption_key_file" : "/usr/share/example/.key"
}
#
Note:
You must configure Cisco Crosswork Situation Manager to use the same .key file you used to encrypt passwords. If you encrypt a password using one key and then change the configuration to use another key, decryption fails.
Configure External Authentication
You can configure different login authentication and security methods with Cisco Crosswork Situation Manager. For more information see:
· Configure Single Sign-On with LDAP
· Configure Single Sign-On with SAML
· Security Configuration Reference
Configure Single Sign-On with SAML
You can configure Cisco Crosswork Situation Manager so users from an external directory can log in by Single Sign-On (SSO) using Security Assertion Markup Language (SAML).
When you enable the SAML integration, your SAML identity provider (IdP) can exchange authorization and authentication data securely with your service provider (SP), Cisco Crosswork Situation Manager. The integration redirects you from Cisco Crosswork Situation Manager' standard login page to the IdP's login page. You can log in to Cisco Crosswork Situation Manager if you provide the IdP with valid authentication details.
Cisco Crosswork Situation Manager implements SAML 2.0 using the SAML v3 Open Library. SAML 2.0 supports the following bindings:
· HTTP-Artifact
· HTTP-POST
· HTTP-POST-SimpleSign
· HTTP-Redirect
· SOAP
See Open SAML v3 for more information.
Before You Begin
Before you start to set up SAML, ensure you have met the following requirements:
· You have an active SAML Identity Provider account with administrator privileges.
· Ensure the webhost URL in $MOOGSOFT_HOME/config/servlets.conf is the same as your Cisco Crosswork Situation Manager instance URL:
webhost: "https://example.moogsoftaiops.com"
Configure SAML Identity Provider
You can configure your IdP to integrate with Cisco Crosswork Situation Manager and enable SSO. Refer to your IdP's documentation for instructions.
Configuration differs for each IdP but common settings include:
• SSO URL: The Cisco Crosswork Situation Manager URL that sends a SAML login request to the IdP:
https://example.moogsoftaiops.com/moogsvr/mooms?request=samlRequest
· Assertion Consumer Service URL: The Cisco Crosswork Situation Manager URL that receives the IdP response to each SAML assertion:
https://example.moogsoftaiops.com/moogsvr/mooms?request=samlResponse
· Entity ID: A unique identifier for the SP SAML entity:
https://example.moogsoftaiops.com/moogsvr/mooms
After you complete the IdP configuration, it generates an IdP metadata file in .xml format. Some IdPs also allow you to generate an X509 self-signed certificate. Save the certificate and add it to your SP metadata file if you want your IdP to encrypt SAML assertions.
Copy the Identity Provider Metadata File
You create the IdP metadata file as part of the IdP configuration. This .xml file provides Cisco Crosswork Situation Manager with a security certificate, endpoints and other processing requirements.
To add this file to your SAML configuration:
1. Save the IdP metadata file to your local machine.
2. Copy the metadata file to $MOOGSOFT_HOME/etc/saml.
3. Grant the Apache Tomcat user read permissions to the metadata file. For example:
chmod 644 my_idp_metadata.xml
Create the Service Provider Metadata File
You must create an SP metadata file and send it to the IdP you want to integrate with Cisco Crosswork Situation Manager.
Some IdPs offer an SP metadata generator. If your IdP does not generate the SP metadata file, you can create one manually. See Build a Service Provider Metadata File for information.
After you have generated your SP metadata file:
1. Copy the file to $MOOGSOFT_HOME/etc/saml.
2. Grant the Apache Tomcat user read permissions to the metadata file. For example:
chmod 644 my_sp_metadata.xml
Configure the SAML Realm
You enable SAML authentication in Cisco Crosswork Situation Manager by creating and configuring a SAML realm. You can only configure and use one SAML Realm at a time. See Security Configuration Reference for full descriptions of the available properties.
To configure your SAML realm:
1. Uncomment the "my_saml_realm" section in the $MOOGSOFT_HOME/config/security.conf configuration file. Rename the realm to meet your requirements.
2. Configure the locations of your metadata files:
— idpMetadataFile: Location of the identity provider's metadata file.
— spMetadataFile: Location of the service provider's metadata file.
3. Configure the roles, teams and primary group mappings for new users that log in to Cisco Crosswork Situation Manager using SAML. These are all required:
— defaultRoles: Default roles that Cisco Crosswork Situation Manager assigns to new users at first login.
— defaultTeams: Default teams that Cisco Crosswork Situation Manager assigns to new users at first login.
— defaultGroup: Default primary group that Cisco Crosswork Situation Manager assigns to new users at first login.
4. Configure the mappings for existing users that log in to Cisco Crosswork Situation Manager using SAML. You can choose either username or email:
— existingUserMappingField: Defines the field that Cisco Crosswork Situation Manager uses to map existing users to your IdP users.
5. Configure the mapping of the IdP's provided attributes. These are all required:
— username: Defines the IdP user attribute that maps to username in Cisco Crosswork Situation Manager.
— email: Defines the IdP user attribute that maps to email in Cisco Crosswork Situation Manager.
— fullname: Defines the IdP user attribute that maps to full name in Cisco Crosswork Situation Manager.
6. Optionally configure additional IdP attribute mappings:
— contactNumber: Defines the IdP attribute that maps to contact number in Cisco Crosswork Situation Manager.
— department: Defines the IdP attribute that maps to department in Cisco Crosswork Situation Manager.
— primaryGroup: Defines the IdP attribute that maps to primary group in Cisco Crosswork Situation Manager.
— timezone: Defines the IdP attribute that maps to timezone in Cisco Crosswork Situation Manager.
— teamAttribute: Defines the IdP attribute that maps to teams in Cisco Crosswork Situation Manager.
— teamMap: Defines the IdP attribute or custom attribute that maps to team names in MCisco Crosswork Situation Manager.
— createNewTeams: Creates a team or teams if they did not exist in Cisco Crosswork Situation Manager.
— roleAttribute: Defines the IdP attribute containing role information.
— roleMap: Defines the IdP attribute that maps to Cisco Crosswork Situation Manager roles.
7. Optionally configure your keystore and private key passwords if you want to use encryption with SAML. See Optional SAML Security Features:
— keystorePassword: Your keystore password.
— privateKeyPassword: Your private key password.
8. Optionally configure the lifetime of each SAML assertion. See Optional SAML Security Features:
— maximumAuthenticationLifeTime: Maximum time in seconds for Cisco Crosswork Situation Manager to receive an IdP's SAML assertion before it becomes invalid.
9. Optionally configure the Service Provider Entity Id. See Optional SAML Security Features:
— serviceProviderEntityId: Service Provider Entity ID assertion number.
10. Restart the Apache Tomcat service:
service apache-tomcat restart
Enable Encrypted Assertion
To enable encrypted assertion for SAML with Cisco Crosswork Situation Manager:
1. Copy the location of your KeyStore file. This defaults to $MOOGSOFT_HOME/etc/saml/<name of realm>_keystore. Cisco Crosswork Situation Manager generates this file when you create the realm.
2. Log in to your SAML IdP and enable encrypted assertions. Refer to your IdP's documentation for information.
3. Provide your KeyStore password and import your KeyStore file if required to do so.
Once enabled, the Idp encrypts all SAML assertions made with Cisco Crosswork Situation Manager.
Set an Assertion Time Limit
You can set the assertion time limit for Cisco Crosswork Situation Manager. The assertion time limit is the duration between the IdP providing the SAML assertion and when Cisco Crosswork Situation Manager accepts it.
Cisco Crosswork Situation Manager accepts a delay of up to an hour by default. You can specify a different time to meet your requirements.
"maximumAuthenticationLifetime": 3600
Enable Entity ID Assertion
You can enable enable entity ID assertion, also known as audience restriction, to restrict SAML assertions to Cisco Crosswork Situation Manager.
You configure the unique SP entity ID in $MOOGSOFT_HOME/config/security.conf. You must also configure this in your IdP. The values must match for successful SAML authorization:
"serviceProviderEntityId": "MoogsoftAIOps"
Map User Attributes
When you create your realm, you can configure the attributes your Identity Provider passes to Cisco Crosswork Situation Manager at SAML authentication.
By default, the IdP email attribute maps to both the Cisco Crosswork Situation Manager username and email. The Cisco Crosswork Situation Manager full name maps to First Name and Last Name from the IdP:
"username" : "$Email",
"email" : "$Email",
"fullname" : "$FirstName.$LastName"
You may see errors indicating failure to configure an attribute mapping or indicating the IdP's failure to provide a configured attribute if something goes wrong at login.
You can map other IdP user attributes such contact number, department, primary group and time zone:
"contactNumber" : "phone",
"department" : "department",
"primaryGroup" : "primaryGroup",
"timezone" : "timezone",
If you already have users in Cisco Crosswork Situation Manager you can map the user attributes to the IdP using the existingUserMappingField:
"existingUserMappingField": "username",
When a user logs in via the IdP for the first time but does not map with an existing user entry, Cisco Crosswork Situation Manager creates a new user.
You can define which primary group, roles and teams to assign users to using thedefaultRoles,defaultTeamsanddefaultGroupproperties in the SAML realm configuration.
You can map the IdP's attribute for team names using teamAttribute. You can configure which IdP attribute maps to Cisco Crosswork Situation Manager team names using teamMap:
"assignTeams": {
"teamAttribute": "groups",
"teamMap": {
"IdP Team": "Moogsoft AIOps Team",
"Another IdP Team": "Another AIOps team"
}
}
To create a team that does not exist already, enable thecreateNewTeamsproperty:
"createNewTeams": true
If you enable createNewTeams, Cisco Crosswork Situation Manager assigns users to the teams it creates as part of the SAML login instead of the default SAML teams.
You can map the IdP attribute for roles using roleAttribute. You can map the IdP roles to Cisco Crosswork Situation Manager roles using roleMap:
"assignRoles": {
"roleAttribute": "groups",
"roleMap": {
"IdP Standard User" : "Operator",
"IdP Manager User" : "Manager"
}
}
Note:
You must map both roles and teams through IdP to prevent users being assigned to the default role and team.
Configure SAML Logout URL
After you enable SAML, you can configure a different logout page to display when a Cisco Crosswork Situation Manager user ends their session.
To configure a different logout page:
1. Edit the $MOOGSOFT_HOME/ui/web.conf configuration file:
"authentication": {
"pages": {
"login" : "/login/",
"logout" : "/logout/",
"failedLogin" : "/login/?error=true",
"sessionTimeout" : "/logout/?error=session",
"dbFailure" : "/login/?error=dbfailure"
},
"paramNames": {
"userId" : "userid",
"password" : "password"
}
}
2. Change the sub URL for "logout" to meet your requirements.
3. Save the changes.
After you have completed the change, Cisco Crosswork Situation Manager displays the new logout path when a session expires or if you log out.
Example SAML Realm
You can use the default SAML realm in $MOOGSOFT_HOME/config/security.conf for reference:
"my_saml_realm": {
"realmType": "SAML2",
"idpMetadataFile": "/usr/share/moogsoft/etc/saml/my_idp_metadata.xml",
"spMetadataFile": "/usr/share/moogsoft/etc/saml/my_sp_metadata.xml",
"defaultRoles": [ "Operator" ],
"defaultTeams": [ "Cloud DevOps" ],
"defaultGroup": "End-User",
"existingUserMappingField": "username",
"username": "$Email",
"email": "$Email",
"fullname": "$FirstName $LastName"
"contactNumber": "phoneNumber",
"department": "dept",
"primaryGroup": "group",
"timezone": "timezone",
"assignTeams": {
"teamAttribute": "groups",
"createNewTeams": true,
"teamMap": {
"Cloud Team": "Cloud DevOps",
"Database Team": "Database DevOps"
}
},
"assignRoles" : {
"roleAttribute": "groups",
"roleMap" : {
"Standard User": "Operator",
"Manager User": "Manager"
}
},
"keystorePassword": "my_realm_secret",
"privateKeyPassword": "my_realm_secret",
"maximumAuthenticationLifetime": 60,
"serviceProviderEntityId": "MoogsoftAIOps"
}
Build a Service Provider Metadata File
You must build a Service Provider (SP) metadata file in order to configure SAML-based Single Sign-On with Cisco Crosswork Situation Manager.
The SP metadata .xml file contains all of the keys, services and URLs defining the SAML endpoints. You can use your IdP's SP metadata file generator if it has one. If not you can create the file manually.
Build Your Metadata File
To manually create your SP metadata file:
1. Copy the .xml template from the code block:
<md:EntityDescriptor xmlns:md="urn:oasis:names:tc:SAML:2.0:metadata"
entityID="https://localhost/moogsvr/mooms"
<md:SPSSODescriptor AuthnRequestsSigned="true" WantAssertionsSigned="true" protocolSupportEnumeration="urn:oasis:names:tc:SAML:2.0:protocol">
<md:KeyDescriptor>
<ds:KeyInfo xmlns:ds="http://www.w3.org/2000/09/xmldsig#">
<ds:X509Data>
<ds:X509Certificate>
MIIC/jCCAeagAwIBAgIQCGehfcnv6r5My/fnrbfDejANBgkqhkiG9w0BAQsFADAV
MRMwEQYDVQQDEwp3d3cuc3AuY29tMB4XDTEzMTEyMjA4MjMyMVoXDTQ5MTIzMTE0
MDAwMFowFTETMBEGA1UEAxMKd3d3LnNwLmNvbTCCASIwDQYJKoZIhvcNAQEBBQAD
ggEPADCCAQoCggEBAMPm/ew9jaGWpQS1C7KtpvgzV4nSOIFPgRt/nlRYR+pUWdDE
fSKmyjK28nkQ1KKujRJTnvnmZydmUrmEFpVv+giBiUkvCJY3PxZ/EDSsF3R/OzWh
kUv5nfAXPnqkX9x22b6+vUof6WiLGyAW6lOYMCVADjTSl9pSaUtIaANdx9maERcT
9eQbGSnjim0WurFRYs9ZE8ttErrMH9+Su4246YDqOPAkz6La4cHHMPQdcFQT5p/c
uXBfU1vl1tWdBEgAY3xHYZE8u5TTJ/vp9UxyU1MwfeO2g9VDRcokLQHrj6wFxtvu
fA+WtUKYJGUu2p/qSuaw7eS6UFjUn49aVqg9OacCAwEAAaNKMEgwRgYDVR0BBD8w
PYAQ1/S0ibdvfdFkJ9T9oIPluKEXMBUxEzARBgNVBAMTCnd3dy5zcC5jb22CEAhn
oX3J7+q+TMv35623w3owDQYJKoZIhvcNAQELBQADggEBAAHlmVoAZUt6paeFvtQb
c/iaJe/Fhd+JG1U0jyjlFDcCn8erLihEbhb3mFBBMF25oO67gfA1JJXZrmHry3Nl
OZuovqRqm8v7wg8n0nQa1HUWkUC2TBgfg1HE8/2rmSF2PngiEi18VOxRDxx0WXMN
ZX6JebJ1kCOCpT/x7aupS7T1GrIPmDLxjnC9Bet7pRynfomjP/6iU21/xOIF6xB9
Yf1a/kQbYdAVt2haYKIfvaF3xsq1X5tCXc9ijhBMgyaoqA+bQJD/l3S8+yCmMxEY
ZjAVLEkyGlU4Uwo01cKEYbXIG/YVq+4CaIRxIfMvV+j8gzTLHTXI+pHEMfMhyYa0
pzM=
</ds:X509Certificate>
</ds:X509Data>
</ds:KeyInfo>
</md:KeyDescriptor>
<md:SingleLogoutService Binding="urn:oasis:names:tc:SAML:2.0:bindings:HTTP-Redirect"
Location="https://localhost:44360/SAML/SingleLogoutService"/>
<md:AssertionConsumerService index="0" isDefault="true"
Binding="urn:oasis:names:tc:SAML:2.0:bindings:HTTP-POST"
Location="https://localhost/moogsvr/mooms?request=samlResponse" index="0"/>
</md:SPSSODescriptor>
</md:EntityDescriptor>
2. Configure the mandatory elements in the metadata file:
— entityID:Unique identifier or name for the SP. This should be a URL or a URN.
— AssertionConsumerService: URL or endpoint that receives SAML responses from the IdP.
3. Add the X509 self-signed certificate you create when you configure your IdP.
4. Configure the other elements to meet your requirements. See Service Provider Metadata Reference for full descriptions of the available elements.
5. Save the SP metadata file to a path on your local machine.
After you have created the metadata file, you must copy it to your Cisco Crosswork Situation Manager machine to continue with the SAML configuration. See Configure Single Sign-On with SAML.
Service Provider Metadata Reference
This is a reference for Build a Service Provider Metadata File. Each SP metadata .xml file accepts the following elements:
entityID
Unique identifier or name for the service provider. The ID should be a URN or a URL.
Type: String
Required: Yes
Example: https://example.moogsoftaiops.com/moogsvr/mooms
ID
Unique identifier for the root metadata element.
Type: String
Required: No
Example: TW9vZ3NvZnRBSU9wcw==
validUntil
Defines the expiration date of the metadata file. The date should be in ISO 8601 format.
Type: String
Required: No
Example: 2018-08-10T07:47:41+00:00
AuthnRequestsSigned
If enabled, Cisco Crosswork Situation Manager signs SAML authentication requests as part of the Single Sign-On.
Type: Boolean
Required: No
Default: false
WantAssertionsSigned
If enabled, Cisco Crosswork Situation Manager expects IdPs to sign any SAML assertions it sends.
Type: String
Required: No
Default: false
KeyDescriptor
Defines the type of signing or the type of encryption that Cisco Crosswork Situation Manager uses.
Type: String
Required: No
One of: use = "signing", use = "encryption"
X509Certificate
Self-signed certificate that allows Cisco Crosswork Situation Manager to sign and encrypt each SAML assertion. The certificate should be in DER format and base-64 encoded.
Type: String
Required: No
Example: MIIDijCCAnICCQD[...]+6SBfDCrWFsw==
AssertionConsumerService
Defines the URL or endpoint that receives the SAML assertions. The Location is for the URL and the Binding identifies the method. Supported bindings include: HTTP-Artifact, HTTP-POST, HTTP-POST-SimpleSign, HTTP-Redirect and SOAP.
Type: String
Required: Yes
Example: Binding="urn:oasis:names:tc:SAML:2.0:bindings:HTTP-POST Location="https://localhost/moogsvr/mooms?request=samlResponse"
Configure Single Sign-On with LDAP
You can configure Cisco Crosswork Situation Manager so users from an external directory can log in by Single Sign-On (SSO) using Lightweight Directory Access Protocol (LDAP).
See LDAP version 3 for more information.
Before You Begin
Before you start to set up LDAP, ensure you have met the following requirements:
· You have the URL for your LDAP server.
· If you want to use a "lookup" DN (Distinguished Name) resolution method, you have the credentials for the LDAP user who has rights to look up other users and determine their roles.
· If you want to use SSL encryption, you have a valid SSL certificate.
Configure LDAP for Cisco Crosswork Situation Manager
Edit the configuration file to configure and enable LDAP for Cisco Crosswork Situation Manager. You can find the file at $MOOGSOFT_HOME/config/security.conf.
See the Security Configuration Referencefor a full description of all properties. Some properties in the file are commented out by default. Uncomment properties to enable them.
1. Configure the properties for the LDAP connection:
— url: URL of your LDAP server. This is required.
— connectionTimeout: Connection timeout in milliseconds.
— readTimeout: Read timeout in milliseconds.
— predefinedUser: Determines if user must exist in the local database or not.
2. Configure the user resolution and attribute search section:
— resolutionType: Type of DN resolution method. Valid options are "direct" and "lookup".
— attributeSearchFilter: Defines an optional attribute filter to retrieve all user attributes.
— attributeMap: Defines an attribute map between the LDAP user attributes and the user attributes in the Cisco Crosswork Situation Manager database.
3. Configure the LDAP group search section:
— systemUser: Username of the system user to bind and search for user group information.
— systemPassword: Password of the system user to bind and search for user group information.
— groupBaseDn: Defines a group base DN to search for LDAP groups.
— memberAttribute: Attribute used look for group members. Defaults to "member".
— groupNameAttribute: Attribute used to look for group name.
— roleMap: Defines the role mappings between the user directory and Cisco Crosswork Situation Manager.
— assignTeams: Sychronizes team assignment between the user directory and the teams in Cisco Crosswork Situation Manager.
4. Optionally configure SSL if you want to enable TLS authentication:
— ssl_protocol: Defines the SSL protocol you want to use. Defaults to TLSv1.2.
— server_cert_file: SSL server certificate.
— client_cert_file: Client certificate file.
— client_key _file: Client key file.
When you have finished your configuration, restart Apache Tomcat to activate any changes you made to the configuration file:
service apache-tomcat restart
See Control Moogsoft AIOps Processes for further details.
Configuration Example
An example of an LDAP configuration that uses direct DN resolution and SSL without client authentication:
"Example_Ldap" : {
"realmType": "LDAP",
"url": "ldap://moogsaml:389",
"userDnResolution":
{
"resolutionType" : "direct",
"direct" : {
"usernameAttribute": "uid",
"userDnPostfix": "ou=People,dc=moogsoft,dc=com"
}
},
"attributeMap": {
"fullname": "cn",
"email": "mail"
},
"groupBaseDn": "ou=Group,dc=moogsoft,dc=com",
"memberAttribute": "member",
"groupNameAttribute": "cn",
"roleMap": {
"role-admin": "Super User",
"OperatorRole": "Operator"
},
assignTeams :{
teamMap: {
CloudDevOps: "Cloud DevOps team",
DBDevOps: "Database DevOps team"
},
useGroupName : true,
createNewTeams: true
}
,"ssl":
{
"server_cert_file" : "/usr/share/moogsoft/config/example.crt"
}
},
Security Configuration Reference
This is a reference for security configuration in Cisco Crosswork Situation Manager. You can edit $MOOGSOFT_HOME/config/security.conf to configure security features such as LDAP and SAML.
LDAP Connection Properties
You can configure the LDAP connection using the following properties:
url
The protocol (LDAP or LDAPS) along with the host and port of your LDAP server. For example: ldap://172.16.124.169:389.
Type: String
Required: Yes
Default: N/A
connectionTimeout
Defines the connection timeout in milliseconds.
Type: String
Required: Yes
Default: 30000
readTimeout
Defines the read timeout in milliseconds.
Type: String
Required: Yes
Default: 30000
predefinedUser
If enabled, the user account information must exist in the local database as well as the LDAP server and predefined user details are used to populate created or updated user accounts.
If disabled, Cisco Crosswork Situation Manager creates or updates user accounts with the LDAP information.
Type: String
Required: Yes
Default: False
LDAP Attribute Search Properties
You can configure the authentication bind, DN resolution method and attribute search with the following properties:
resolutionType
Defines the method to look up the DN (Distinguished Name), a unique path to any object in the active directory.
Type: String
Required: Yes
One of: direct, lookup
Default: N/A
There are two methods to choose from:
· direct: If using this method, the user DN is created using the usernameAttribute and userDnPostfix properties. These properties are required. For example:
"userDnResolution": {
"resolutionType" : "direct",
"direct" : {
"usernameAttribute": "uid",
"userDnPostfix": "ou=People,dc=moogsoft,dc=com"
}
},
For a user called John Smith, the user DN is:
uid=john.smith,ou=People,dc=moogsoft,dc=com
· lookup: If using this method, Cisco Crosswork Situation Manager searches for the user in the LDAP server using a combination of usernameAttribute and userBaseSearchFilter as a filter and userBaseDn as a base to find the DN. These properties are required. For example:
"userDnResolution": {
"resolutionType" : "lookup",
"lookup" : {
"usernameAttribute": "sAMAccountName",
"userBaseDn" : "ou=People,dc=moogsoft,dc=com",
"userBaseSearchFilter" : "(objectclass=person)",
}
},
Optionally for both "direct" and "lookup" methods, you can use the userDnLookupUser, userDnLookupPassword and encryptedUserDnLookupPasswordproperties to define the user to look up each DN in your directory. See Moog Encryptor for more information if you want to use password encryption.
If you leave the userDnLookupUser property empty, LDAP uses the systemUser defined in the LDAP Group Search section instead.
attributeSearchFilter
Defines an optional LDAP attribute filter to search for user attributes.
Type: String
Required: No
Default: (objectclass=*)
attributeMap
Defines an attribute map between the LDAP user attributes and the user attributes in the Cisco Crosswork Situation Manager database.
Type: String
Required: No
Default: N/A
This property uses the format:
"attributeMap": {
"db_column_5": "ldap_attribute_1",
"db_column_2": "ldap_attribute_8",
"db_column_3": "ldap_attribute_8",
}
LDAP Group Search and Mapping
You can configure the following properties in the LDAP group search section:
systemUser
Username of the system user to bind and search for user group information. LDAP uses this user if you leave the userDnLookupUser property empty. The system sends two bind requests and two search requests with LDAP. If you do not configure a system user, the user bind chosen for authentication is also used for the LDAP group search.
Type: String
Required: No
Default: N/A
systemPassword
Password of the system user to bind and search for user group information.
Type: String
Required: No
Default: N/A
groupBaseDn
DN for the part of the LDAP structure that contains the user groups. This is used in conjunction with the memberAttribute to find any LDAP groups the user belongs to. These groups are then mapped to a local role using the roleMap property.
Type: String
Required: No
Default: N/A
memberAttribute
Attribute used to look for group members.
Type: String
Required: No
Default: member
groupNameAttribute
Attribute used to look for group name.
Type: String
Required: No
Default: CN
roleMap
Defines the role mappings between the user directory and Cisco Crosswork Situation Manager.
Type: String
Required: No
Default: N/A
LDAP AssignTeams Properties
You can configure the following sub-properties of assignTeams to synchronize team assignment between the user directory and the teams in Cisco Crosswork Situation Manager.
assignTeams
Sychronizes team assignment between the user directory and the teams in Cisco Crosswork Situation Manager.
Type: String
Required: No
Default: N/A
teamMap
Defines the LDAP attribute or custom attribute that maps to team names in Cisco Crosswork Situation Manager. You can provide the mapping as a JSON object. For example:
{ "LDAP Team" : "Moogsoft Team", "Another LDAP Team" : "Another Moogsoft team" }
Type: JSON Object
Required: No
Default: N/A
useGroupName
Enable to use the LDAP group name as the team name in Cisco Crosswork Situation Manager.
Type: Boolean
Required: No
Default: false
createNewTeams
Creates a team or teams if they do not exist in Cisco Crosswork Situation Manager. If you leave teamMap empty, the teams adopt their LDAP teams names.
Type: Boolean
Required: No
Default: false
LDAP SSL Properties
You can optionally configure SSL to enable TLS authentication:
ssl_protocol
Defines the SSL protocol you want to use.
Type: String
Required: No
Default: TLSv1.2
server_cert_file
SSL server certificate.
Type: String
Required: No
Default: N/A
client_cert_file
SSL client certificate.
Type: String
Required: No
Default: N/A
client_key_file
Client key file.
Type: String
Required: No
Default: N/A
SAML Service Provider Properties
You can configure a SAML realm by giving it a name and editing the following properties:
idpMetadataFile
Location of the identity provider's metadata file. The metadata file provides information on how to connect to the IdP. Cisco Crosswork Situation Manager requires the file to be in .xml format.
Type: String
Required: Yes
Default: "/usr/share/moogsoft/etc/saml/my_idp_metadata.xml"
spMetadataFile
Location of the service provider's metadata file. Cisco Crosswork Situation Manager writes the SP metadata information to this file. This location must be accessible and editable by the Apache Tomcat user. Cisco Crosswork Situation Manager requires the file to be in .xml format. If your IdP does not have an SP metadata file generator, you can create one manually. See Build a Service Provider Metadata File for instructions.
Type: String
Required: No
Default: "/usr/share/moogsoft/etc/saml/my_sp_metadata.xml"
defaultRoles
Default roles that Cisco Crosswork Situation Manager assigns to new users upon first login using SAML. If the user already has a role mapping, Cisco Crosswork Situation Manager uses that instead.
Type: Array
Required: Yes
Default: [ "Operator" ]
defaultTeams
Default teams that Cisco Crosswork Situation Manager assigns to new users upon first login using SAML. You can create an empty list if you do not want to assign new users to a team.
Type: Array
Required: No
Default: [ "Cloud DevOps" ]
defaultGroup
Default primary group that Cisco Crosswork Situation Manager assigns to new users upon first login using SAML.
Type: Array
Required: Yes
Default: [ "End-User" ]
SAML User Mapping Properties
You can configure how to map IdP user fields to existing Cisco Crosswork Situation Manager users and how to map user fields for new users. All mappings are case sensitive. Each mapping follows the format:
"MoogsoftAttribute" : "IdPAttribute"
existingUserMappingField
Defines the field that Cisco Crosswork Situation Manager uses to map existing users to your IdP users.
Type: String
Required: No
One of: username, email
Default: "username"
username
Defines the IdP's attribute that maps to username in Cisco Crosswork Situation Manager.
Type: String
Required: Yes
Default: "$Email"
Defines the IdP's attribute that maps to email in Cisco Crosswork Situation Manager.
Type: String
Required: Yes
Default: "$Email"
fullname: Defines the IdP attributes that map to full name in Cisco Crosswork Situation Manager.
Type: String
Required: Yes
Default: "$FirstName $LastName"
SAML Optional Properties
You can customize your SAML realm with a number of optional properties:
contactNumber
Defines the IdP attribute that maps to contact number in Cisco Crosswork Situation Manager.
Type: String
Required: No
Default: "phone",
department
Defines the IdP attribute that maps to department in Cisco Crosswork Situation Manager.
Type: String
Required: No
Default: "department",
primaryGroup
Defines the IdP attribute that maps to primary group inCisco Crosswork Situation Manager.
Type: String
Required: No
Default: "primaryGroup",
timezone
Defines the IdP attribute that maps to timezone in Cisco Crosswork Situation Manager.
Type: String
Required: No
Default: "timezone",
SAML assignTeams Properties
You can configure the following sub-properties of assignTeams to synchronize team assignment between the SAML user directory and the teams in Cisco Crosswork Situation Manager:
teamAttribute
Defines the IdP attribute that maps to teams in Cisco Crosswork Situation Manager.
Type: String
Required: No
Default: "groups"
teamMap
Defines the IdP attribute or custom attribute that maps to team names in Cisco Crosswork Situation Manager.
Type: JSON Object
Required: No
Default: { "IdP Team" : "Moogsoft AIOps Team", "Another IdP Team" : "Another AIOps team" }
createNewTeams
Creates a team or teams if they do not exist in Cisco Crosswork Situation Manager. If you leave teamMap empty, the teams adopt their IdP teams names.
Type: Boolean
Required: No
Default: false
SAML assignRoles Properties
roleAttribute
Defines the IdP attribute containing role information.
Type: String
Required: No
Default: "groups"
roleMap
Defines the IdP attribute that maps to Cisco Crosswork Situation Manager roles.
Type: JSON Object
Required: No
Default: { "IdP Standard User" : "Operator", "IdP Manager User" : "Manager" }
SAML Security Properties
keystorePassword
Your keystore password. Any whitespace in the name is replaced with an underscore.
Type: String
Required: No
Default: "<my_realm>_secret"
privateKeyPassword
Your private key password. Any whitespace in the name is replaced with an underscore.
Type: String
Required: No
Default: "<my_realm>_secret"
maximumAuthenticationLifetime
Maximum time in seconds for Cisco Crosswork Situation Manager to receive an IdP's SAML assertion before it becomes invalid.
Type: Integer
Required: No
Default: 2592000 (720 hours)
serviceProviderEntityId
Service Provider Entity ID assertion number. Some IdPs require this ID.
Type: String
Required: No
Default: "MoogsoftAIOps"
Service Provider Metadata Reference
This is a reference for Build a Service Provider Metadata File. Each SP metadata .xml file accepts the following elements:
entityID
Unique identifier or name for the service provider. The ID should be a URN or a URL.
Type: String
Required: Yes
Example: https://example.moogsoftaiops.com/moogsvr/mooms
ID
Unique identifier for the root metadata element.
Type: String
Required: No
Example: TW9vZ3NvZnRBSU9wcw==
validUntil
Defines the expiration date of the metadata file. The date should be in ISO 8601 format.
Type: String
Required: No
Example: 2018-08-10T07:47:41+00:00
AuthnRequestsSigned
If enabled, Cisco Crosswork Situation Manager signs SAML authentication requests as part of the Single Sign-On.
Type: Boolean
Required: No
Default: false
WantAssertionsSigned
If enabled, Cisco Crosswork Situation Manager expects IdPs to sign any SAML assertions it sends.
Type: String
Required: No
Default: false
KeyDescriptor
Defines the type of signing or the type of encryption that Cisco Crosswork Situation Manager uses.
Type: String
Required: No
One of: use = "signing", use = "encryption"
X509Certificate
Self-signed certificate that allows Cisco Crosswork Situation Manager to sign and encrypt each SAML assertion. The certificate should be in DER format and base-64 encoded.
Type: String
Required: No
Example: MIIDijCCAnICCQD[...]+6SBfDCrWFsw==
AssertionConsumerService
Defines the URL or endpoint that receives the SAML assertions. The Location is for the URL and the Binding identifies the method. Supported bindings include: HTTP-Artifact, HTTP-POST, HTTP-POST-SimpleSign, HTTP-Redirect and SOAP.
Type: String
Required: Yes
Example: Binding="urn:oasis:names:tc:SAML:2.0:bindings:HTTP-POST Location="https://localhost/moogsvr/mooms?request=samlResponse"
Configure the Message Bus
The Moogsoft Messaging System (MooMS) is the Message Bus component of Cisco Crosswork Situation Manager and shares event data. This is subscribed to by the various Moolets.
The Message Bus is a publish-subscribe message brokering system implemented with RabbitMQ which uses AMQP, an open standard for message-orientated middleware, over TCP.
Message Handling
The Message Bus handles the data it receives (e.g. raw event data, new alerts, Situation activity etc) by placing it in queues, which are lines of messages waiting to be handled.
Cisco Crosswork Situation Manager does not enforce any size or time limits on queues, so the maximum number of messages in a queue is limited by the available RAM and disk space on the server. It also depends on the size of the alerts and Situations being generated. The size limit is 128kb for Alerts and 64kb for Situations.
Once the maximum number of messages has been reached, the broker drops messages from the front of the queue to make room for new messages. By default, Cisco Crosswork Situation Manager applications use exclusive transient queues. For example, if Cisco Crosswork Situation Manager or the broker shuts down or dies then the queue and all of its messages are lost. Durable queues can be enabled using the message_persistence setting in $MOOGSOFT_HOME/config/system.conf (see Message Persistence).
For more information see the RabbitMQ docs on queues and queue length.
Default Configuration
Cisco Crosswork Situation Manager is installed with a single RabbitMQ broker by default, running on the same machine as the other components (LAMs, Moogfarmd, the Moolets, etc).
The out-of-the-box configuration in $MOOGSOFT_HOME/config/system.conf is as follows:
port: 5672
zone: <none>
username: moogsoft
password: m00gs0ft
The username and password must match the Message Bus broker configuration. If commented out, a default "guest" user will be used (guest: guest).
Zones
You can use zones, or virtual hosts, to share a single RabbitMQ broker cluster among multiple instances of Cisco Crosswork Situation Manager.
If multiple instances of Cisco Crosswork Situation Manager share a single RabbitMQ broker then each instance uses a different zone name to prevent message interference. In RabbitMQ, a zone is called a virtual host (vhost). Clients connecting to one vhost cannot see messages sent to a different vhost.
The default deployment does not use zones. If you specify a zone name, you must also configure a vhost with the same name in the RabbitMQ broker.
By default, Cisco Crosswork Situation Manager clients connect to the vhost specified during moog-init.sh setup with the moogsoft username and the password.
For distributed installations using multiple RabbitMQ brokers, this must be configured. A zone (vhost) name is required by the moog-init.sh setup script. See Message System Deployment.
Message Persistence
You can control and minimize message loss during a shutdown or failure using the following settings in $MOOGSOFT_HOME/config/system.conf.
message_persistence
Controls whether the Message Bus persists important messages in the event of an application or message broker restart. This affects how the Message Bus handles messages.
Type: Boolean
Default: False
max_retries
The number of attempts to re-send a failed message, used in conjunction withretry_interval.
Type: Number
Default: 100
retry_interval
The time to wait in milliseconds between each resend attempt. The combination of 100 retries and a 200 msec retry_interval gives a total of 20 seconds, which is typical duration for broker failover in a high availability environment.
Type: Number
Default: 200
cache_on_failure
Controls whether the message is cached internally and resent. If enabled, a message is cached is an initial retry, controlled by max_retry andretry_interval, is a failure.
Type: Boolean
Default: False
cache_ttl
Specifies how many seconds a cached message lives in the cache list. The system attempts to resend any cached messages in the order in which they were put on the cache until their cache time-to-live (cache_ttl) value has been reached. Any messages not sent successfully sent is discarded. This value has a direct impact on sender process memory.
Type: Number
Default: 900
connections_per_producer_pool
The number of connections to use for each message sender pool. For example, a message sender pool with 20 senders (channels) splits the channels across the number of connections for the pool. If connections_per_producer_pool is set to 2, each connection has 10 channels.
Type: Number
Default: 2
confirmation_timeout
Defines the time to wait for confirmation from a RabbitMQ Broker that it has received the sent message.
Warning
Cisco advises you do not change this value.
Type: Number
Default: 2000
Message System Deployment
The Message Bus is the message system for Cisco Crosswork Situation Manager, implemented with RabbitMQ. By default, the Cisco Crosswork Situation Manager installation includes with a single RabbitMQ broker running on the same server as the other Cisco Crosswork Situation Manager components (LAMs, moogfarmd, the Moolets, etc.). You can also configure Cisco Crosswork Situation Manager as a distributed system with multiple RabbitMQ broker hosts.
If you encounter any errors or issues with your deployment see Troubleshooting.
Distributed Deployment
Depending on the systems you monitor, you can increase the performance and reliability of your Cisco Crosswork Situation Manager deployment with distributed RabbitMQ brokers running on different hosts. Execute the following procedure on each RabbitMQ broker host to install a distributed messaging system:
1. Install the Erlang package built by RabbitMQ:
yum -y install https://github.com/rabbitmq/erlang-rpm/releases/download/v20.1.7/erlang-20.1.7-1.el7.centos.x86_64.rpm
2. Set up RabbitMQ yum repository:
curl -s https://packagecloud.io/install/repositories/rabbitmq/rabbitmq-server/script.rpm.sh | sudo bash
3. Install RabbitMQ:
yum -y install rabbitmq-server-3.7.4
4. Copy rabbitmq.config from $MOOGSOFT_HOME/etc/cots/rabbitmq/rabbitmq.config and add it to the following location on each RabbitMQ broker host:
/etc/rabbitmq/rabbitmq.config
5. Run the following commands:
chkconfig rabbitmq-server on
service rabbitmq-server start
6. Create a new zone (a RabbitMQ "vhost") on each remote RabbitMQ broker and set the permissions for the default user:
rabbitmqctl add_vhost <zone>
Creating vhost "<zone>" ...
rabbitmqctl add_user moogsoft <password>
Creating user "moogsoft" ...
rabbitmqctl set_permissions -p <zone> moogsoft ".*" ".*" ".*"
Setting permissions for user "moogsoft" in vhost "<zone>" ...
7. Edit the "mooms" section in system.conf on the Cisco host system, to point to the correct IP addresses and ports (two specified in the example below):
"mooms" :
{
"zone" : "<zone>",
"brokers" : [
{
"host" : "172.16.87.131",
"port" : 5678
},
{
"host" : "172.16.87.135",
"port" : 5672
}
]
,"username" : "moogsoft",
"password" : "<password>"
},
Cluster Message Bus Brokers
The Message Bus broker is a logical grouping containing one or more Erlang nodes each running RabbitMQ and sharing vhosts, users, queues etc. If you have multiple RabbitMQ brokers running, you should cluster them.
For more information about broker clustering, refer to the RabbitMQ documentation.
Enable Queue Mirroring
As part of a Cisco Crosswork Situation Manager High Availability (HA) deployment that employs message persistence, you must set up mirroring for the relevant durable queues across all nodes in a RabbitMQ cluster.
To enable queue mirroring, run the following command from any host running a broker in the RabbitMQ cluster:
rabbitmqctl set_policy -p <zone> ha-all ".+\.HA" '{"ha-mode":"all"}'
For the <zone>, specify the zone you used when you initialized your system. For example, if the zone is set to Cisco Crosswork Situation Manager:
rabbitmqctl set_policy -p MoogsoftAIOps ha-all ".+\.HA" '{"ha-mode":"all"}'
This command configures mirroring for all the *.HA queues across all RabbitMQ brokers in the cluster.
Run the following command from any host running a broker in the RabbitMQ cluster to verify the policy is enabled:
rabbitmqctl -p <zone> list_policies
For example:
rabbitmqctl -p MoogsoftAIOps list_policies
Listing policies for vhost "MoogsoftAIOps" ...
MoogsoftAIOps ha-all .+\.HA all {"ha-mode":"all"} 0
For more information about queue mirroring, refer to the RabbitMQ docs.
Message System Troubleshooting
· RabbitMQ Broker Fails to Start
· First startup of RabbitMQ broker
· LAMs fail to start from command line
· Manually configure IP address and port
· Manually set up a user or zone (vhost)
The Message Bus (sometimes called MooMs) is the message system for Cisco Crosswork Situation Manager, implemented with RabbitMQ.
This guide outlines some common issues with the Message Bus deployment and offers alternative solutions.
Open the Management Console
You can launch the RabbitMQ management console directly from the Cisco Crosswork Situation Manager UI. This provides useful statistics when debugging.
To open the console, go to Settings > Self Monitoring > Message Bus and click Launch Message Bus Console ... You can log in using the default credentials:
Username: moogsoft
Password: m00gs0ft
These are defined in system.conf. If commented out, a default 'guest' user can be used.
Examine the Log Files
Troubleshooting your Message Bus deployment often requires examining log files. The default locations of log files are as follows:
· moog_farmd and LAMs - /usr/log/moogsoft/$SERVICE_NAME.log where $SERVICE_NAME is the process, for example socketlamd for the Socket LAM
· Tomcat -/usr/share/apache-tomcat/logs/catalina.out
· RabbitMQ - $RABBITMQ_HOME/var/log/rabbitmq
RabbitMQ Broker Fails to Start
If RabbitMQ broker fails to start and Security-Enhanced Linux (SELinux) is enabled, it may be related to this. SELinux and similar mechanisms such as firewalls may prevent RabbitMQ from binding to a port and starting up.
If SELinux is enabled, check that the following ports can be opened:
— 4369 (Erlang port mapper daemon)
— 25672 (Erlang distribution)
— 5672, 5671 (AMQP 0-9-1 without and with TLS)
— 15672 (if management plugin is enabled)
You may need to configure RabbitMQ to use different ports.
For more information, refer to the RabbitMQ installation documentation.
If the RabbitMQ broker fails to start it may be due to file permissions, you may see errors such as:
{error_logger,{{2015,9,1},{21,26,14}},"Failed to create cookie file '/home/moogsoft/.erlang.cookie': eacces",[]}
{error_logger,{{2015,9,1},{21,26,14}},crash_report,[[{initial_call,{auth,init,['Argument__1']}},{pid,<0.21.0>},{registered_name,[]},{error_info,{exit,{"Failed to create cookie file '/home/moogsoft/.erlang.cookie': eacces",[{auth,init_cookie,0,[{file,"auth.erl"},{line,286}]},{auth,init,1,[{file,"auth.erl"},{line,140}]},{gen_server,init_it,6,[{file,"gen_server.erl"},{line,328}]},{proc_lib,init_p_do_apply,3,[{file,"proc_lib.erl"},{line,239}]}]},[{gen_server,init_it,6,[{file,"gen_server.erl"},{line,352}]},{proc_lib,init_p_do_apply,3,[{file,"proc_lib.erl"},{line,239}]}]}},{ancestors,[net_sup,kernel_sup,<0.10.0>]},{messages,[]},{links,[<0.19.0>]},{dictionary,[]},{trap_exit,true},{status,running},{heap_size,610},{stack_size,27},{reductions,975}],[]]}...
When the RabbitMQ broker is running as a service, use the following command to check that it is running:
service rabbitmq-server status
Typical Error Messages
The section below will outline examples and solutions to typical error messages with RabbitMQ.
Connection refused/ Unable to create RabbitMQ connection
If the RabbitMQ broker appears to be down or unreachable, trying to start an Cisco Crosswork Situation Manager component gives warnings such as:
WARN : [main ][20150812 16:09:54.792 +0100] [CMoomsFactory.java]:707 +|Unable to create RabbitMQ connection : [amqp://localhost:5672/ZONE]|+
WARN : [main ][20150812 16:09:54.792 +0100] [CMoomsFactory.java]:256 +|Unable to create RabbitMQ connection : [java.net.ConnectException: Connection refused]|+
WARN : [main ][20150812 16:09:54.793 +0100] [CMoomsFactory.java]:707 +|Unable to create RabbitMQ connection : [amqp://localhost:5672/ZONE]|+
WARN : [main ][20150812 16:09:54.793 +0100] [CJNIMoomsWrapper.java]:253 +|Problem during mooms setup, retrying|+
The structure of the amqp url is: amqp://<hostname>:<port>/<zone>
Solution:
Check if the RabbitMQ broker is running:
service rabbitmq-server status
If it isn't running, see RabbitMQ broker fails to start (above).
If it is running, check the Message Bus configuration in the 'mooms' section of system.conf.
AlreadyClosedException/broker forced connection closure
If Cisco Crosswork Situation Manager components are running, the RabbitMQ broker going down or becoming unreachable gives warnings such:
WARN : [Thread-][20150812 16:15:42.295 +0100] [CLogger.java]:337 +|Problem sending message id : [4115e512-aa63-44d5-bdc9-8ed164cd75e5]
com.rabbitmq.client.AlreadyClosedException: connection is already closed due to connection error; protocol method: #method<connection.close>(reply-code=320, reply-text=CONNECTION_FORCED - broker forced connection closure with reason 'shutdown', class-id=0, method-id=0)
at com.rabbitmq.client.impl.AMQChannel.ensureIsOpen(AMQChannel.java:195)
at com.rabbitmq.client.impl.AMQChannel.transmit(AMQChannel.java:309)
at com.rabbitmq.client.impl.ChannelN.basicPublish(ChannelN.java:657)
at com.rabbitmq.client.impl.ChannelN.basicPublish(ChannelN.java:640)
at com.rabbitmq.client.impl.ChannelN.basicPublish(ChannelN.java:631)
at com.rabbitmq.client.impl.recovery.AutorecoveringChannel.basicPublish(AutorecoveringChannel.java:168)
at com.moogsoft.mooms.CMoomsMessageSender.send(CMoomsMessageSender.java:530)
at com.moogsoft.mooms.CMoomsMessageSender.send(CMoomsMessageSender.java:448)
at com.moogsoft.mooms.CMoomsMessageSender.send(CMoomsMessageSender.java:264)
at com.moogsoft.mooms.CMoomsMessageSenderPool.send(CMoomsMessageSenderPool.java:378)
at com.moogsoft.mooms.CJNIMoomsWrapper.sendEvent(CJNIMoomsWrapper.java:288)
|+
Note:
If Cisco Crosswork Situation Manager is configured to connect to RabbitMQ brokers in a high availability environment, during a RabbitMQ broker fail-over, warning messages may be logged for a short time
Solution:
If the problem is not temporary, check if the RabbitMQ broker is running:
service rabbitmq-server status
Problem during mooms setup, retrying
A Cisco Crosswork Situation Manager component trying to connect to a non-existent zone (vhost) in a RabbitMQ broker gives warnings such as:
DEBUG: [main ][20150812 16:24:00.764 +0100] [CMoomsFactory.java]:206 +|Setting factory zone to : [fish]|+
WARN : [main ][20150812 16:24:03.825 +0100] [CMoomsFactory.java]:707 +|Unable to create RabbitMQ connection : [amqp://localhost:5672/fish]|+
WARN : [main ][20150812 16:24:03.825 +0100] [CMoomsFactory.java]:256 +|Unable to create RabbitMQ connection : [java.io.IOException]|+
WARN : [main ][20150812 16:24:06.373 +0100] [CMoomsFactory.java]:707 +|Unable to create RabbitMQ connection : [amqp://localhost:5672/fish]|+
WARN : [main ][20150812 16:24:06.373 +0100] [CJNIMoomsWrapper.java]:253 +|Problem during mooms setup, retrying|+
Solution:
Check you have the correct zone configured in the 'mooms' section of system.conf and that the zone (vhost) has been created in the RabbitMQ broker.
The best way to check that the zone (vhost) has been created in the RabbitMQ broker is to use the RabbitMQ management console.
If the zone (vhost) has not been created, manually create it via the command line, or via the RabbitMQ Management console.
Once the zone has been created, the user defined in system.conf must be given permissions to access the new zone.
AuthenticationFailureException: ACCESS_REFUSED
A Cisco Crosswork Situation Manager component trying to connect to a valid zone (vhost) in a RabbitMQ broker, but with wrong authentication details gives warnings such as:
WARN : [main ][20150812 16:20:29.760 +0100] [CMoomsFactory.java]:707 +|Unable to create RabbitMQ connection : [amqp://jimmy@localhost:5672/null]|+
WARN : [main ][20150812 16:20:29.760 +0100] [CMoomsFactory.java]:256 +|Unable to create RabbitMQ connection : [com.rabbitmq.client.AuthenticationFailureException: ACCESS_REFUSED - Login was refused using authentication mechanism PLAIN. For details see the broker logfile.]|+
WARN : [main ][20150812 16:20:29.805 +0100] [CMoomsFactory.java]:707 +|Unable to create RabbitMQ connection : [amqp://jimmy@localhost:5672/null]|+
WARN : [main ][20150812 16:20:29.805 +0100] [CJNIMoomsWrapper.java]:253 +|Problem during mooms setup, retrying|+
Solution:
Check you have the correct username and password in the 'mooms' section of system.conf and that they match those defined in the RabbitMQ broker. If they are correct in system.conf then you must correct it in the RabbitMQ broker. Do this either via the command line, or via the RabbitMQ management console.
Also see RabbitMQ broker fails to start (above).
First startup of RabbitMQ broker
The first time a RabbitMQ broker is started, it creates an 'account' with the default user and password from rabbitmq.config.
If this information is subsequently edited in rabbitmq.config, and the RabbitMQ broker is restarted, the 'account' is not created, which can be confusing.
If the RabbitMQ broker has been started before, then the 'account' will need to be added manually (see Manually set up a user) rather than by defining a default user in the rabbitmq.config file.
LAMs fail to start from command line
If LAMs run from the command line or as a service result in the following error:
[root@moogbox2 bin]# ./socket_lam
./socket_lam: error while loading shared libraries: libjvm.so: cannot open shared object file: No such file or directory
...it may be because /usr/java/jdk1.8.0_20/jre/lib/amd64/server has not been added to the LD_LIBRARY_PATH.
· To run the LAMs via a command line, a change the LD_LIBRARY_PATH to be as follows (the default initd files have this modification made):
export LD_LIBRARY_PATH=$MOOGSOFT_HOME/lib:/usr/GNUstep/Local/Library/Libraries:/usr/GNUstep/System/Library/Libraries:$JAVA_HOME/jre/lib/amd64/server
Manually configure IP address and port
In some environments (such as SELinux) you may need to configure a RabbitMQ broker to listen on a different IP address and port.
To do this:
1. Configure the contents of /etc/rabbitmq/rabbitmq-env.conf, for example:
RABBITMQ_NODE_IP_ADDRESS="172.168.87.131
RABBIT_NODE_PORT="5678"
2. Restart the rabbitmq-server service:
service rabbitmq-server restart
Manually set up a user or zone (vhost)
To help troubleshoot an existing RabbitMQ broker, you may want to manually set up a user or zone (vhost).
· To manually set up a new user in the RabbitMQ broker, run the following command (using your own user, password and zone):
rabbitmqctl add_user <user> <password>
rabbitmqctl set_permissions -p <zone> <user> ".*" ".*" ".*"
Also ensure the username, password and zone in the 'mooms' section of system.conf match those defined in the RabbitMQ broker with the above commands.
· To manually set up a new zone in the RabbitMQ broker, run the following command (using your own user and zone):
rabbitmqctl add_vhost <zone>
rabbitmqctl set_permissions -p <zone> <user> ".*" ".*" ".*"
Also ensure the username and zone in the 'mooms' section of system.conf match those defined in the RabbitMQ broker with the above commands.
Message System SSL
The Message Bus system (MooMs) can be configured to operate using SSL connections to provide secure and authorized connectivity.
The message system for Cisco Crosswork Situation Manager is implemented with RabbitMQ. By default, Cisco Crosswork Situation Manager provides rabbitmq.config which does not start RabbitMQ in SSL mode.
To enable RabbitMQ to run in SSL mode, see the Rabbit MQ documentation.
Configure Cisco Crosswork Situation Manager to use SSL with the Message Bus
Once RabbitMQ has been configured to use SSL, Cisco Crosswork Situation Manager needs to be configured to use the RabbitMQ broker's SSL port, as well as the SSL certificates and keys to enable secure and authorized connection to these brokers if required by the SSL configuration set on RabbitMQ.
Below is an example of full SSL Message Bus configuration in system.conf:
system.conf
########################################################################
# SSL configuration can be used to provide a means of secure #
# communication between a Moog process and MooMS. MooMS can be setup #
# with options to accept SSL connections with or without providing #
# the relevant certificates and keys. #
# Three modes of SSL are available: #
# 1. No SSL - SSL configuration is not specified #
# 2. Express SSL - This is where SSL configuration is specified, but #
# empty or only the SSL protocol is set and specific #
# certificates do not need to specified. #
# 3. Custom SSL - This is where all the SSL configuration and #
# certificates needed are specified to enable secure #
# and authorised communication to MooMS. #
# Note that Client key and certificate are optional. #
# If neither of those are specified, then client #
# certification verification will not be performed. #
########################################################################
"ssl" :
{
# Specify the SSL Protocol to use.
# If the configuration is not specified, "TLSv1.2" will be used
# by default.
# JRE 8 supports "TLSv1.2", "TLSv1.1", "TLSv1", "SSLv3"
#
"ssl_protocol" : "TLSv1.2",
#
# The location of the SSL certificate, key files.
#
# Relative pathing can be used, i.e. '.' to mean current directory,
# '../server.pem' or '../../server.pem' etc. If neither relative
# nor absolute (using '/') path is used then $MOOGSOFT_HOME is
# prepended to it.
# i.e. "config/server.pem" becomes "$MOOGSOFT_HOME/config/server.pem"
#
# Specify the server certificate.
#
"server_cert_file" : "server.pem",
#
# Enable client authentication by specifying the client certificate
# and key files below.
# The key file has to be in PKCS#8 format.
#
"client_cert_file" : "client.pem",
"client_key_file" : "client.key"
}
Express SSL
Cisco Crosswork Situation Manager can be configured to connect to the RabbitMQ server without validating any certificates or attempting to authorize the client.
If the RabbitMQ server has been configured to reject clients that do not present valid certificates then this SSL mode will not work, Cisco Crosswork Situation Manager will need to be configured with the correct certificates and keys to establish connectivity. To enable express SSL mode simply uncomment "ssl" configuration block, optionally specify the "ssl_protocol" configuration:
Express SSL
"ssl" :
{
# Specify the SSL Protocol to use.
# If the configuration is not specified, "TLSv1.2" will be used
# by default.
# JDK 8 supports "TLSv1.2", "TLSv1.1", "TLSv1", "SSLv3"
#
"ssl_protocol" : "TLSv1.2"
}
Custom SSL
Cisco Crosswork Situation Manager can be configured to connect to the RabbitMQ server using a specific server certificate, and if RabbitMQ has been enabled with Client Authentication then Cisco Crosswork Situation Manager can be configured with the client key and client certificate to authenticate with RabbitMQ.
Client Authentication is optional functionality, to run Cisco Crosswork Situation Manager with just a specific server certificate simply comment out the client_cert_file and client_key_file entries.
Note:
If Client Authentication is used, the "client_key_file" must be in a PKCS#8 Format. The following command can be run to convert a private key in to PKCS#8 format:
openssl pkcs8 -topk8 -inform PEM -outform PEM -nocrypt -in key.pem -out client.key
An example of Cisco Crosswork Situation Manager specifying full SSL configuration, connecting to a RabbitMQ which requires Client Authentication. The example also shows how you can organise the server and client SSL files in sub-folders:
Custom SSL
"ssl" :
{
# Specify the SSL Protocol to use.
# If the configuration is not specified, "TLSv1.2" will be used
# by default.
# JRE 8 supports "TLSv1.2", "TLSv1.1", "TLSv1", "SSLv3"
#
"ssl_protocol" : "TLSv1.2",
#
# The location of the SSL certificate, key files.
#
# Relative pathing can be used, i.e. '.' to mean current directory,
# '../server.pem' or '../../server.pem' etc. If neither relative
# nor absolute (using '/') path is used then $MOOGSOFT_HOME is
# prepended to it.
# i.e. "config/server.pem" becomes "$MOOGSOFT_HOME/config/server.pem"
#
# Specify the server certificate.
#
"server_cert_file" : "server/server.pem",
#
# Enable client authentication by specifying the client certificate
# and key files below.
# The key file has to be in PKCS#8 format.
#
"client_cert_file" : "client/client.pem",
"client_key_file" : "client/client.key"
}
Note:
To disable SSL connectivity with the Message Bus, change the port number for the brokers back to the non-SSL port (typically 5672) and comment out the "ssl" section in system.conf.
Configure Search and Indexing
Cisco Crosswork Situation Manager uses Elasticsearch to provide search and data indexing functions.
You can control the Elasticsearch service using the following service script:
/etc/init.d/elasticsearch [start|restart|stop]
All Elasticsearch logs are stored in following location:
/var/log/elasticsearch/
Index Alerts and Situations
Two tools are used to index alerts and Situations: the Indexer Moolet and the Moog Indexer utility.
Indexer Moolet
The Indexer listens for new alerts and Situations on the Message Bus and indexes them. Cisco Crosswork Situation Manager indexes alerts and Situations as soon as they are are created or modified so that they are immediately searchable.
You can configure the Indexer in $MOOGSOFT_HOME/config/moolets/indexer.conf using the following parameters:
enable_private_teams
Set to true if you limit team permissions based upon services, Situations, or alerts assigned to the team. The the indexer applies team permissions to the indexes.Manage Teams
If disabled, the Indexer will index all alerts and Situations present in Cisco Crosswork Situation Manager.
Type: Boolean
Default: False
full_scan_batch_size
The maximum number of alerts or Situations the Indexer scans in each batch. This is useful because it is not possible to load all alerts to the memory at once.
By default the Indexer scans through batches of one thousand alerts or Situations.
Type: Integer
Default: 1000
full_scan_wait
The number of seconds the Indexer waits between batches. This frees up the CPU and memory used to index each batch.
It is set to zero by default so the Indexer will not wait between batches.
Type: Integer
Default: 0
full_scan_at
Determines the exact time when Indexer runs a full scan. This allows you to ensure the accuracy of search data once per day by performing a full reindex. If left empty, the Indexer does not perform a full scan.
Type: Time (HH:mm:ss)
Default: "02:12:35"
full_scan_at_startup
If enabled, the Indexer performs a full scan when it starts. This is useful if you are not using the scheduled scan and only restart Moogfarmd once a week.
Type: Boolean
Default: false
historic_scan_frequency
Determines how frequently the Indexer performs a full scan of both active and historic databases. By default, the Indexer scans both databases every three days.
Type: Integer
Default: 3
By default the Indexer is configured as follows:
# Set to false to disable private teams indexing.
enable_private_teams: false,
# Maximal full scan batch size
full_scan_batch_size: 1000,
# How many seconds to wait between batches (0 not to wait)
full_scan_wait: 0,
# When to run the full scan (HH:mm:ss) leave empty to disable full scan (HH:mm:ss)
full_scan_at: "02:12:35",
# Do we want to run full scan when the moolet starts?
full_scan_at_startup: false
# Scan the historic data once every how many full scans
historic_scan_frequency: 3
Moog Indexer
Before you can run the indexer utility, you must start Moogfarmd with a running Indexer Moolet. The moog_indexer accepts the following options:
| Argument |
Input |
Description |
| -h,--help |
- |
Displays the help text with arguments that can be used with the utility. |
| -f, --full |
- |
Scans both the active and historic data. Use this argument if you want data from both databases to be indexed. |
| -i,--in <arg> |
Integer |
Schedule full index to run in a set amount of time (in hours). This can be a decimal. For example, 0.1 = 6 minutes. |
| -l,--loglevel <arg> |
WARN|INFO|DEBUG|TRACE |
Specify the log level to choose the amount of debug output. Defaults to INFO. |
| -n,--now |
- |
Schedules a full index to run immediately. |
| -r,--report |
- |
Request report from on the last performed full scan index. This report will show the status of previous runs within the lifetime of the moogfarmd process and any runs still in progress. If moogfarmd is restarted, the -r argument will not return any data. |
Note:
If you use Private Teams mode, meaning one or more Roles do NOT have the all_data permission set, then you must run both the initial 'full index' and the 'incremental index crontab' moog_indexer commands with the -p argument. If not, users in one Team will be able to see search results for other Teams.
Tune your MySQL database to ensure indexing runs as quickly as possible. See either the Percona or MySQL websites for information on tuning and optimization.
An output example is shown below:
[root@myhost home]# moog_indexer -r
Got report:
05/10/17 13:43:06 - Starting full scan
05/10/17 13:43:06 - Scanning for alerts
05/10/17 13:43:07 - Scanned: [177] alerts
05/10/17 13:43:07 - Scanning for situations
05/10/17 13:43:07 - Scanned: [44] situations
05/10/17 13:43:07 - Full scan complete
05/10/17 13:43:22 - Starting full scan
05/10/17 13:43:22 - Scanning for alerts
05/10/17 13:43:22 - Scanned: [204] alerts
05/10/17 13:43:22 - Scanning for situations
05/10/17 13:43:23 - Scanned: [55] situations
05/10/17 13:43:23 - Full scan complete
Warning
Before you upgrade to Cisco Crosswork Situation Manager V6.2.1 or later, remove or disable the crontab jobs for the old indexer utility.
Elasticsearch Details
Elasticsearch runs on port 9200 by default.
To make Elasticsearch available externally and listen on the external host IP address, run the following command:
$MOOGSOFT_HOME/bin/utils/moog_init_search.sh -r
The script updates the Elasticsearch configuration and restarts the service.
Configure Logging
Cisco Crosswork Situation Manager components generate log files to report their activity. As a Cisco Crosswork Situation Manager administrator, you can refer to the logs to audit system usage or diagnose issues. In certain cases you may want to change logging levels based upon your specific environment or needs. See the Log Levels Reference for details.
Cisco Crosswork Situation Manageruses Apache Log4j for logging. See the Log4j configuration documentation for more information.
Configure Your Log Files
You can edit the log configuration files at $MOOGSOFT_HOME/config/logging/
There is a configuration file for every component or servlet in Cisco Crosswork Situation Manager. These files can be found in $MOOGSOFT_HOME/config/logging/servlets/ and follow the naming convention <servlet_name>.log.json. These configuration files control the logs for the following:
· events.log.json: Logs for the proxy LAM.
· graze.log.json: Graze request logs.
· moogpoller.log.json: Moogpoller logs.
· moogsvr.log.json: Logs relating to SAML/LDAP authentication and internal API calls.
· situation_similarity.log.json: Situation Similarity servlet logs.
· toolrunner.log.json: Toolrunner servlet logs.
· The other default configuration files include:
· moog_farmd.log.json: Configures logs for Moogfarmd process.
· moogsoft.log.json: Configures logs for all of the utilities.
· integrations.log.json: Configures logs for LAMs and integrations.
You can change log levels and make other configuration changes to components while they are running. Cisco Crosswork Situation Manager reads any changes and applies them every two seconds.
You can configure these files to meet your requirements. Refer to the Log4j documentation to see the available properties or see Log Configuration File Examples.
Log Files by Component
The following reference provides information about the log files for the various Cisco Crosswork Situation Manager components.
Apache Tomcat
Log location: /usr/share/apache-tomcat/logs
Primary log file: catalina.out
To change the logging level for the Cisco Crosswork Situation Manager servlets which run in Tomcat, edit the relevant files in $MOOGSOFT_HOME/config/logging/servlets.
Nginx
Log location: /var/log/nginx
Primary log file: error.log
To change the logging level for Nginx:
1. Edit /etc/nginx/nginx.conf.
2. Set the LogLevel property. For example to enable debug logging:
LogLevel debug
3. Restart Ngnix.
Moogfarmd
By default Moogfarmd and Ticketing integrations write logs into a log file stored in /var/log/moogsoft if you have write permissions for this directory. Otherwise, the logs are written to $MOOGSOFT_HOME/log. By default the log file takes the name of the HA address of the process. For example, MOO.moog_farmd.farmd_instance1.log.
MOO is the default HA cluster name in $MOOGSOFT_HOME/config/system.conf. If you change it the Moogfarmd log file path changes accordingly.
Restart Moogfarmd after making any of the following configuration changes.
To use a custom log configuration file for Moogfarmd:
1. Make a copy of the default Moogfarmd log configuration file and rename it, for example:
cd $MOOGSOFT_HOME/config/logging
cp moog_farmd.log.json mymoog_farmd.log.json
2. Edit the new file according to your Moogfarmd logging requirements.
3. Edit the configuration_file property in the log_config section of moog_farmd.conf to point to the new file. For example:
log_config:
{
configuration_file: "mymoogfarmd.log.json"
}
To change the logging level for Moogfarmd, edit the file $MOOGSOFT_HOME/config/logging/moog_farmd.log.json. For example:
"configuration":
{
"ThresholdFilter":
{
"level": "trace"
},
}
You can also modify the log level using moog_farmd --loglevel. See Moogfarmd Reference for more information.
To save Moogfarmd logs to a different location and/or filename, edit the Moogfarmd log configuration file located at $MOOGSOFT_HOME/config/logging/moog_farmd.log.json. For example:
"RollingFile":
{
"name" : "FILE",
"fileName" : "/var/log/moogsoft/Moogfarmd_test.log"
}
LAMs and Integrations
LAMs and monitoring integrations log their processing and data ingestion to two types of log files, process and capture. Ticketing integrations do not have dedicated log files, and instead log their processing and data to var/log/moogsoft/MOO.moog_farmd.log. For more information, refer to the preceding section on Moogfarmd.
Process Logs
LAMs and integrations record their activities as they ingest raw data. By default these process logs are written to a log file stored in /var/log/moogsoft if the user running the LAM has write permissions for this directory. Otherwise, the logs are written to $MOOGSOFT_HOME/log. By default the log file takes the name of the LAM or integration. For example, MOO.solarwinds_lam.log.
The configuration of LAM process logs is specified in a file located at $MOOGSOFT_HOME/config/logging/integrations.log.json.
To specify the log configuration for a particular LAM:
1. Make a copy of the default LAM log configuration file and rename it with the name of the LAM, for example:
cd $MOOGSOFT_HOME/config/logging
cp integrations.log.json solarwinds_lam.log.json
2. Edit the file according to your LAM logging requirements.
3. Edit the configuration_file property in the log_config section of the LAM configuration file to point to the new file. For example:
log_config:
{
configuration_file: "$MOOGSOFT_HOME/config/logging/solarwinds_lam.log.json"
}
If a polling integration or LAM fails to connect to the target system using the connection details in the UI or configuration file, Cisco Crosswork Situation Manager creates an alert with critical severity and writes the details to the process log. The following example shows a log file entry for a failed Zabbix Polling integration with an invalid URL:
WARN : [target1][20190117 13:03:33.942 +0000] [CZabbixPollingTask.java:129] +|40001: An error response received
from Zabbix REST server: [Invalid URL provided [http://zabbixserver1/zabbix/api_jsonrpc.php] for User Login request]|+
The following error code raises a Cisco Crosswork Situation Manager alert. The alert details are listed below:
| External ID |
Type |
Class |
Severity |
Example Alert Description |
| 40001 |
Internal Integrations Error |
Failed Connection Attempt |
Critical |
Failed Connection Attempt for target [target1] and destination [http://zabbixserver1/zabbix/api_jsonrpc.php]. This is attempt [1] out of [infinite]. |
If the integration or LAM polls successfully on the next attempt, the alert is cleared. If the integration or LAM is restarted to resolve the connection issue the alert is not cleared and must be handled manually.
Capture Logs
In addition to process logs, all LAMs except the Logfile LAM allow you to capture the raw data they receive. This feature is disabled by default. To enable it, edit the LAM's configuration file and uncomment the capture_log property in the agent section. The default path to the capture log files is $MOOGSOFT_HOME/log/data-capture/<lam_name>.log.
An example agent section in a LAM configuration file is as follows:
agent:
{
name : "SolarWinds",
capture_log : "$MOOGSOFT_HOME/log/data-capture/solarwinds_lam.log"
}
MySQL
Log location: /var/log/mysqld.log
MySQL logging defaults to the highest level. To remove warnings from the MySQL log:
1. Edit /etc/my.cnf .
2. Add the following line:
log_warnings = 0
3. Restart the MySQL service.
RabbitMQ
Log location: /var/log/rabbitmq
Refer to the RabbitMQ documentation for information on how to configure RabbitMQ.
Elasticsearch
Log location: /var/log/elasticsearch/elasticsearch.log.
Refer to the Elasticsearch documentation for information on how to configure Elasticsearch.
Hazelcast and Kryo
Cisco Crosswork Situation Manager uses two libraries for persistence: Hazelcast and Kryo. You can configure the logging for these components in the file $MOOGSOFT_HOME/config/logging/moog_farmd.log.json.
The logging level is set to WARN by default. Logs are written to the process log file.
Log Rotation
Moogfarmd, LAMs and integrations use a Java-based logging utility that automatically runs at startup to prevent log files becoming unmanageably large. The utility also prevents the loss of log data when you restart Cisco Crosswork Situation Manager.
The utility compresses each rotated log into gzip (.gz) format and appends the filename with a date stamp. Rotated log files are retained for 40 days before they are purged.
The logging utility rotates the logs when the file size reaches 500MB by default. It rotates up to 40 files by default. This is controlled in by two properties under RollingFile and Policies in $MOOGSOFT_HOME/config/logging/<component_log_file_name>.log.json.
size
The size limit of the log file in megabytes that triggers a log rotation.
Type: Integer
Default: 500M
max
The maximum number of files that Cisco Crosswork Situation Manager can rotate.
Type: Integer
Default: 40
The default logger configuration appears in $MOOGSOFT_HOME/config/logging/<component_log_file_name>.log.json as follows:
"Policies":
{
"SizeBasedTriggeringPolicy":
{
"size": "500M"
}
},
"DefaultRolloverStrategy":
{
"max": "40"
}
Log Configuration File Examples
You can customize each configuration log file to control the behaviour of the logging for the different components in Cisco Crosswork Situation Manager.
See Configure Logging for more information on logging.
Default Configuration Files
The default log configuration file for servlets and utilities is as follows:
{
"configuration": {
"packages": "com.moogsoft",
"monitorInterval": 2,
"ThresholdFilter": {
"level": "info"
},
"appenders": {
"Console": {
"name": "STDOUT",
"PatternLayout": {
"pattern": "%-5level: [%thread][%date{yyyMMdd HH:mm:ss.SSS Z}] [%file:%line] +|%message|+%n"
}
}
},
"loggers": {
"Logger": {
"name": "com.moogsoft",
"additivity": false,
"AppenderRef": [{
"ref": "STDOUT"
}],
"level": "info"
}
}
}
}
The default log configuration file for Moogfarmd is:
{
"configuration": {
"packages": "com.moogsoft",
"monitorInterval": 2,
"ThresholdFilter": {
"level": "info"
},
"appenders": {
"Console": {
"name": "STDOUT",
"PatternLayout": {
"pattern": "%-5level: [%thread][%date{yyyMMdd HH:mm:ss.SSS Z}] [%file:%line] +|%message|+%n"
}
},
"RollingFile": {
"name": "FILE",
"fileName": "${sys:MoogsoftLogFilename}",
"filePattern": "${sys:MoogsoftLogFilename}-%d{MM-dd-yy}-%i.gz",
"PatternLayout": {
"header": "${sys:MoogsoftLogHeader}",
"pattern": "%-5level: [%thread][%date{yyyMMdd HH:mm:ss.SSS Z}] [%file:%line] +|%message|+%n"
},
"Policies": {
"SizeBasedTriggeringPolicy": {
"size": "500M"
}
},
"DefaultRolloverStrategy": {
"max": "40"
}
}
},
"loggers": {
"Logger": {
"name": "com.moogsoft",
"additivity": false,
"AppenderRef": [{
"ref": "${sys:MoogsoftLogAppender}"
}],
"level": "info"
}
}
}
}
Asynchronous Appender
You can configure a log file to use an asynchronous appender. This allows you to log event asynchronously. See AsyncAppender for details.
{
"configuration": {
"packages": "com.moogsoft",
"monitorInterval": 2,
"ThresholdFilter": {
"level": "info"
},
"appenders": {
"Console": {
"name": "STDOUT",
"PatternLayout": {
"pattern": "%-5level: [%thread][%date{yyyMMdd HH:mm:ss.SSS Z}] [%file:%line] +|%message|+%n"
}
},
"RollingFile": {
"name": "FILE",
"fileName": "${sys:MoogsoftLogFilename}",
"filePattern": "${sys:MoogsoftLogFilename}-%d{MM-dd-yy}-%i.gz",
"PatternLayout": {
"header": "${sys:MoogsoftLogHeader}",
"pattern": "%-5level: [%thread][%date{yyyMMdd HH:mm:ss.SSS Z}] [%c]: %message%n"
},
"Policies": {
"SizeBasedTriggeringPolicy": {
"size": "500M"
}
},
"DefaultRolloverStrategy": {
"max": "40"
}
},
"Async" : {
"name": "Async",
"AppenderRef": {"ref": "FILE"}
}
},
"loggers": {
"Logger": {
"name": "com.moogsoft",
"additivity": false,
"AppenderRef": [{
"ref": "Async"
}],
"level": "info"
}
}
}
}
Post Logs to Elasticsearch
You can configure logs to be posted to Elasticsearch using the "Http" section and the 'url' property direct them to an Elasticsearch server:
{
"configuration": {
"packages": "com.moogsoft",
"monitorInterval": 2,
"ThresholdFilter": {
"level": "info"
},
"appenders": {
"Console": {
"name": "STDOUT",
"PatternLayout": {
"pattern": "%-5level: [%thread][%date{yyyMMdd HH:mm:ss.SSS Z}] [%file:%line] +|%message|+%n"
}
},
"RollingFile": {
"name": "FILE",
"fileName": "${sys:MoogsoftLogFilename}",
"filePattern": "${sys:MoogsoftLogFilename}-%d{MM-dd-yy}-%i.gz",
"PatternLayout": {
"header": "${sys:MoogsoftLogHeader}",
"pattern": "%-5level: [%thread][%date{yyyMMdd HH:mm:ss.SSS Z}] [%file:%line] +|%message|+%n"
},
"Policies": {
"SizeBasedTriggeringPolicy": {
"size": "500M"
}
},
"DefaultRolloverStrategy": {
"max": "40"
}
},
"Http": {
"name": "Elastic",
"url": "http://localhost:9200/logs/farmdlogs/",
"JsonLayout": {
"compact": true,
"eventEol": true,
"locationInfo": true,
"properties": true
}
}
},
"loggers": {
"Logger": {
"name": "com.moogsoft",
"additivity": false,
"AppenderRef": [{
"ref": "${sys:MoogsoftLogAppender}"
}, {
"ref": "Elastic"
}],
"level": "info"
}
}
}
}
Save Logs to the Database
You can configure your logs to be saved to the database with a configuration similar to the following:
/*
To create the table for the logs to use:
CREATE TABLE IF NOT EXISTS logs(time TIMESTAMP, message TEXT, level TEXT, logger TEXT, exception TEXT);
*/
{
"configuration": {
"packages": "com.moogsoft",
"monitorInterval": 2,
"ThresholdFilter": {
"level": "info"
},
"appenders": {
"Console": {
"name": "STDOUT",
"PatternLayout": {
"pattern": "%-5level: [%thread][%date{yyyMMdd HH:mm:ss.SSS Z}] [%file:%line] +|%message|+%n"
}
},
"RollingFile": {
"name": "FILE",
"fileName": "${sys:MoogsoftLogFilename}",
"filePattern": "${sys:MoogsoftLogFilename}-%d{MM-dd-yy}-%i.gz",
"PatternLayout": {
"header": "${sys:MoogsoftLogHeader}",
"pattern": "%-5level: [%thread][%date{yyyMMdd HH:mm:ss.SSS Z}] [%file:%line] +|%message|+%n"
},
"Policies": {
"SizeBasedTriggeringPolicy": {
"size": "500M"
}
},
"DefaultRolloverStrategy": {
"max": "40"
}
},
"JDBC" : {
"name": "DB",
"tableName": "logs",
"DriverManager": {
"connectionString": "jdbc:mysql://localhost:3306/moogdb??useUnicode=true&characterEncoding=UTF-8&characterSetResults=UTF-8&connectTimeout=5000&rewriteBatchedStatements=true&cacheCallableStmts=true&cachePrepStmts=true&callableStatementCacheSize=1000&prepStmtCacheSize=1000&prepStmtCacheSqlLimit=100000&useCursorFetch=true&useSSL=false",
"userName": "ermintrude",
"password": "m00"
},
"Column": [{
"name": "time",
"isEventTimestamp": true
}, {
"name": "message",
"pattern": "%message"
}, {
"name": "level",
"pattern": "%level"
}, {
"name": "logger",
"pattern": "%logger"
}, {
"name": "exception",
"pattern": "%ex{full}"
}
]
}
},
"loggers": {
"Logger": {
"name": "com.moogsoft",
"additivity": false,
"AppenderRef": [{
"ref": "${sys:MoogsoftLogAppender}"
}, {"ref": "DB"}],
"level": "info"
}
}
}
}
Log Levels Reference
Cisco Crosswork Situation Manager components generate log files to report their activity. Log messages sent from these components use the following log levels:
| Level |
Description |
| ERROR |
Errors have occurred but the application is still able to run. |
| WARN |
Indicates something potentially serious or harmful has happened to your application. |
| INFO |
Informational messages that report the application's normal behaviour. |
| DEBUG |
Diagnostic and granular information that can be useful for debugging an application. |
| TRACE |
Similar to DEBUG but even more fine-grained information. |
Configure Services to Restart
You can use Service Manager to control process startup for Cisco Crosswork Situation Manager.
The utility can keep processes associated with Cisco Crosswork Situation Manager services alive if your system fails or restarts. For every new install of Cisco Crosswork Situation Manager, a cronjob entry deployed by the Moogsoft initialization script (moog_init.sh) runs the process manager script (process_keepalive.sh) every minute. This script attempts to restart the processes of any services listed in the process manager configuration file at $MOOGSOFT_HOME/config/keep_procs_alive.conf. By default, the following services are set to restart:
· RabbitMQ
· MySQL
· Nginx
· Elasticsearch
· Apache-Tomcat
· Moogfarmd.
You can either use the new service_manager utility to edit the configuration file, or edit the file manually (and enter a '1' for all services you want to restart and enter a '0' for those that you want left alone). If you have a custom LAM, you can add this to the configuration file with the flag to determine the restart behavior. For example:
Customlamd=1
If your system fails or restarts, the Service Manager utility automatically starts after one minute and attempts to restart the configured processes/services up to three times. If the service does not start after three attempts, the utility disables the service restart attempts in future.
Service Manager is useful for ensuring non-core processes start and run if Cisco Crosswork Situation Manager fails or restarts. For example, you might want to ensure specific LAMs remain alive so no events are missed if your system reboots.
Configure Service Manager
You can configure Service Manager to control which services and their associated processes to start up when Cisco Crosswork Situation Manager reboots:
1. Run the Service Manager:
$MOOGSOFT_HOME/bin/utils/service_manager
The default utility settings are shown as follows:
------------------------------------------------ Page [1/3] ---
# Service Manager #
---------------------------------------------------------------
Check the services that will be started and kept alive...
[x] rabbitmq
[x] mysql
[x] nginx
[x] elasticsearch
[x] apache-tomcat
[x] moog_farmd
[ ] ansibletower_lam
[ ] appdynamics_lam
[ ] aws_lam
[ ] azure_classic_lam
[ ] azure_lam
[ ] ca_spectrum_lam
[ ] datadog_client_lam
[ ] datadog_lam
[ ] dynatrace_apm_lam
[ ] dynatrace_apm_plugin_lam
[ ] dynatrace_notification_lam
[ ] dynatrace_synthetic_lam
[ ] email_lam
[ ] emc_smarts_lam
[ ] extrahop_lam
[ ] fluentd_lam
[ ] hp_nnmi_lam
[ ] hp_omi_lam
Use arrows, page up/down and ENTER to navigate
2. Navigate through the list of available services using the directional arrows. There are multiple pages to scroll through.
3. Press Space or Enter to add or remove services you want to restart or do not want to restart. An [ x ] appears next to any services you select.
4. You can enable or disable Service Manager from restarting all services on the last page.
5. Select 'Apply Changes' and press Enter to make the changes.
After you exit, the process_keepalive.sh script keeps selected services alive if Cisco Crosswork Situation Manager fails or restarts.
Service Manager Command Line Reference
You can also configure the Service Manager using command line arguments. The utility uses the following syntax:
service_manager --service=<service_name> --command=<action>
The Service Manager resides at $MOOGSOFT_HOME/bin/utils/service_manager. You can configure the utility using the following arguments:
| Argument |
Input |
Description |
| -h,--help |
- |
Displays the syntax and arguments available in Service Manager. |
| -s,--service= |
service name |
Name of the service you want to execute the Service Manager command on. Apart from the core services, these include all of the LAMs. For example: email_lam, rest_lam, trapd_lam etc. |
| -c, --command= |
enable | disable | enable_start | disable_stop |
Commands the Service Manager can execute against the specified service: enable - Enables the service auto start option. disable - Disables the service auto start option. enable_start - Starts and enables the service. disable_stop - Stops and disables the service. |
| -a, --autostart-all= |
enable | disable |
Disables or enables the auto start option for all services. |
You can only run a command against a single service at a time using the command line arguments. For example, if you wanted to enable the Service Manager to restart the Email LAM in the event of a failover:
service_manager --service=email_lam --command=enable
Disable Service Restart
There are two ways to disable the default service restart functionality.
Disable theprocess_keepalive.shcronjob by removing it from the cron table, the commands scheduled to run on your system. To edit the cron table:
crontab -e
Delete or comment out/usr/share/moogsoft/bin/utils/process_keepalive.sh 2>&1 from the file.
Alternatively, disable the Service Manager utility:
$MOOGSOFT_HOME/bin/utils/service_manager -a disable
Service Manager Logging
To check the Service Manager logs you can view:
/var/log/moogsoft/process/keepalive.log
This contains all logs relating to the Service Manager utility (service_manager) and to the process that attempts to keep the services alive (process_keepalive).
Configure ToolRunner
ToolRunner allows an administrator to set up custom scripts to run on a server. It uses ssh to run tools and integrations. You must edit the servlets configuration file in Cisco Crosswork Situation Manager in order to use ToolRunner in the UI.
Warning
ToolRunner grants access to the ToolRunner user to run any command on the operating system. Therefore, only implement ToolRunner if it is absolutely necessary and follow the security-related recommendations closely.
Before you begin
Before you begin to configure ToolRunner, ensure you have met the following requirements:
· You have created or identified an operating system user that you will use to run tools:
— Do not run ToolRunner as root.
— Run ToolRunner in a user-restricted shell, for example, bash --restricted. See also https://www.gnu.org/software/bash/manual/html_node/.
— Run ToolRunner as a non-privileged user.
— Allow specific permissions to ToolRunner so that it only accesses the tools it needs.
· You have identified a separate host or a sandboxed environment. Cisco recommends that you do not run ToolRunner locally.
· You have the permissions to modify Cisco Crosswork Situation Manager configuration files.
· You have set the PasswordAuthentication property to yes in the /etc/ssh/sshd_config file on the Cisco Crosswork Situation Manager server and restarted the sshd service.
Configure ToolRunner
To manually configure ToolRunner, edit the Servlets configuration file located at $MOOGSOFT_HOME/config/servlets.conf as follows:
1. Update these properties in the toolrunner section of the file:
— toolrunnerhost: The host that ToolRunner runs commands on. This should be a separate host to where you have installed Cisco Crosswork Situation Manager.
— toolrunneruser: The ToolRunner user name. The user must exist on the toolrunnerhost system and have the appropriate permissions to run the required tools.
— toolrunnerpassword: The ToolRunner user password on the toolrunnerhost system.
If the password is not defined, ToolRunner will use the public key defined in ssh_key_file, or if that is not set, $MOOGSOFT_HOME/etc/keys/id_rsa.
For ssh_key_file, if the path is a relative path, it is assumed to be relative to $MOOGSOFT_HOME/etc. Your SSH key should have a passphrase set. You can specify this in the configuration file in encrypted form under encrypted_ssh_passphrase or in plaintext (not recommended) in ssh_passphrase.
If neither is set, weCisco Crosswork Situation Manager assumes the password is keyPwd.
— encrypted_toolrunnerpassword: An encrypted ToolRunner password. Use either the password or encrypted password property. See Moog Encryptor for more information.
— execute_locally: If this is set to true, ToolRunner executes commands on the server where the ToolRunner servlet is hosted and ToolRunner ignores toolrunnerhost. Otherwise, commands are run on toolrunnerhost. The default is false.
— webhost: Not used.
— sshtimeout: SSH timeout period in milliseconds. If this is set to 0, it will never time out. The default is 0.
2. Restart Apache Tomcat.
3. Restart Moogfarmd.
Once you have completed the configuration, ToolRunner is available in the Cisco Crosswork Situation Manager UI.
An example toolrunner section in the servlets configuration file is as follows:
toolrunner:
{
toolrunnerhost : "localhost",
toolrunneruser : "moogtoolrunner",
toolrunnerpassword : "moogtoolrunner",
#encrypted_toolrunnerpassword : "rmW2daCwMyI8JGZygfEJj0MZdbIkUqX3tT/OIVfMGyI=",
#execute_locally : false,
#webhost : "https://localhost",
sshtimeout : 900000
}
ToolRunner
In Cisco Crosswork Situation Manager the tool runner is used to run non-interactive command line tools that do not require root permission, for example, ping, cat. The output of running a tool will be asynchronously sent back to the web browser.
All commands are run in a Linux shell via ssh and executed on a specified user@hostuser@host.
When a tool is run from the UI, a user/password@host can be specified but, if not provided, the tool runs on a default user@host (configured in web.xml).
Using server tools in the Cisco UI
From the Alert View:
· Right-click an alert to open the menu.
· Select Tools to open ToolRunner.
For each alert, based on alert type, a list of configured tools will be displayed with the following fields:
| Field |
Description |
| Tool |
Display name of the tool. |
| Run host |
If left blank, the tool will run either on localhost, or, the default machine (which you can configure). If specified, the tool runs on the specified host. |
| Username |
If a run host is specified, then the username of the user that will be used to ssh into the run host needs to be specified. |
| Password |
If a username is specified, then this is the password that is used to log in to the run host. If left blank, the system will attempt to use ssh public/private keys. |
| Fire & forget |
If checked, then the tool will run and all output is ignored (basically the equivalent of 'nohup &'). |
ToolRunner servlet configuration
ToolRunner is implemented as a servlet which can be configured using MySQL or web.xml.
Supporting Configuration
Depending upon the exact environment, some support configurations may be required. ToolRunner uses ssh to log in to a system with a certain username and password to run tools/integrations. As a result, 'PasswordAuthentication' must to be set to 'yes' in /etc/ssh/sshd_config for this to work. Changes to that file require restarting the sshd service before they take effect.
MySQL
The database contains one table for the configuration of tools. The schema is as follows:
| Element |
Type |
Description |
| tid |
[INT AUTO_INCREMENT] |
Alert tool ID. |
| displayname |
[VARCHAR(100)] |
Tool name displayed in the UI. |
| cmd |
[VARCHAR(250)] |
Tool command (with no arguments). |
| args |
[VARCHAR(500)] |
Arguments to the command. |
| alerttype |
[TEXT] |
Alert type of the alert that is used to determine the list of valid tools. |
| description |
[TEXT] |
A textual description. |
When first installed, the table does not contain any tools. Tools can be added using the following SQL:
insert into moogdb.alert_tools value( 0,'Ping localhost', 'ping', '-c 5 localhost','SWBFence', 'This is an example tool');
Tool arguments
The arguments can be null if no argument is required. In addition, you can configure the argument to substitute information from the alert. For example:
cmd = ping
args = -c 5 $source -> -c 5 polyanna (after substitution)
You can use any alert internal field name in the argument substitution e.g., $source,$source_id, $severity. The case should match the internal field name.
Escaped argument variables
When an argument is substituted into the argument string it will also be escaped using a backslash. This allows you to substitute values to contain special characters, and also provides some security against command insertion. Be careful, the combination of the escaped value and the original argument string can produce unexpected results. For example, the command echo with the following argument strings will produce slightly different results:
argsV1 = $source
argsV2 = "$source"
If $HOST = local.host
resultV1= local.host
resultV2 = local\.host
Only the values are escaped, not the original argument string. For further information on how to build the full argument string, see Combining multiple arguments into a single argument string.
Combining multiple arguments into a single argument string
The following command has two arguments:
printf "%s\n" "hello world"
If the 'hello' and 'world' were from $X and $Y, the configuration for the command would be as follows:
cmd = printf
args = "%s\n" $x\ $y (version 1)
Alternatively:
args = "%s\n" "$x $y" (version 2)
Due to the argument value escaping, version 1 is probably the better choice, although version 2 is probably more readable/natural.
web.xml
Here is an example web.xml (/usr/share/apache-tomcat/webapps/toolrunner/WEB-INF):
<web-app>
<servlet>
<servlet-name>toolrunner</servlet-name>
<servlet-class>com.moogsoft.toolrunner.CToolRunner</servlet-class>
<async-supported>true</async-supported>
<init-param>
<param-name>webhost</param-name>
<param-value>https://localhost</param-value>
</init-param>
<init-param>
<param-name>polluri</param-name>
<param-value>/poll</param-value>
</init-param>
<init-param>
<param-name>toolrunuri</param-name>
<param-value>/run</param-value>
</init-param>
<init-param>
<param-name>toolstopuri</param-name>
<param-value>/stop</param-value>
</init-param>
<init-param>
<param-name>sshtimeout</param-name>
<param-value>900000</param-value>
</init-param>
<init-param>
<param-name>toolrunnerhost</param-name>
<param-value>localhost</param-value>
</init-param>
<init-param>
<param-name>toolrunneruser</param-name>
<param-value>toolrunner</param-value>
</init-param>
<init-param>
<param-name>toolrunnerpassword</param-name>
<param-value>toolrunner</param-value>
</init-param>
<load-on-startup>1</load-on-startup>
</servlet>
<servlet-mapping>
<servlet-name>toolrunner</servlet-name>
<url-pattern>/poll</url-pattern>
<url-pattern>/run</url-pattern>
<url-pattern>/stop</url-pattern>
</servlet-mapping>
<listener>
<listener-class>com.moogsoft.toolrunner.CSessionListener</listener-class>
</listener>
</web-app>
The following parameters can be edited; however, these are 'global' settings and would apply to all tools:
webhost
Defines the value of the HTTP header 'Access-Control-Allow-Origin' that is used to control cross-origin resource sharing (CORS). The default value ishttps://localhost.
sshtimeout
If a tool running via ssh stops providing any output for a specified period of time, due to the tool hanging or a problem with the connection, sshtimeout can be used to shutdown any resources associated with the tool. This configuration value is specified in milliseconds and the default value is 900000 (1000 * 60 * 15 = 15 minutes).
toolrunnerhost / toolrunneruser / toolrunnerpassword
These three configurations relate to the running of tools 'locally'. From the UI, if only a tool name is specified then use/this configuration comes into play. There are basically two valid configurations:
· All three configured: Any tools with no run host specified will run on the configured run host. The system will ssh to the run host using the configured username and password
· Run host and username configured: If no password is configured, then the system will attempt to ssh to the run host using the configured username with a private key that must be located in a specific directory. For further information refer to Passwordless SSH.
SSH
ssh must be installed on the remote machine that you want to run tools on.
Enable Password Authentication
In order to successfully log in to a remote machine, you must configure the remote ssh to allow password authentication. In /etc/ssh/sshd_config configure the following:
PasswordAuthentication yes
Passwordless SSH
To setup a user account that does not require a password, you need to do the following:
1. On the web server machine generate a secure SSH key by typing: ssh-keygen.
2. Copy the generated key to the remote server. For each user account you plan to use to run tools you want to setup password-less logins with. Use the following command string, or, you can use scp: cat ~/.ssh/id_dsa.pub | ssh user@remotehost 'cat >> ~/.ssh/authorized_keys'. This command takes the generated SSH key from the local machine, connects to the remote host via SSH, and then uses cat to append the key file to the remote users authorized key list. As this connects with SSH to the remote machine, you will need to enter the password to use this command.
3. Confirm that you can now login to the remote SSH server without a password: ssh user@remotehost.com.
4. Copy the private key ( id_rsa) to a directory called keys, which you need to create in the Tomcat Apache home directory, for example, /export/apache-tomcat-7.0.29.
Additional considerations
· At present stdout and stderr are combined together and displayed in the web UI.
· If a tool is run that produces a large amount of output, it can take a significant amount of time for the output to be processed over to the web ui so expect a time lag.
Configure SMS Notifications
Cisco Crosswork Situation Manager for Mobile uses a cloud-based notification service that allows SMS messages to be sent by its REST API.
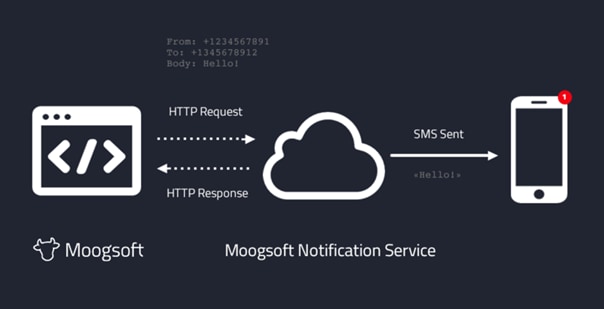
Any requests to the notification service's REST API require authentication. For HTTP basic authentication, the username is set to your AccountSid and the password is set to your AuthToken. See step 2 in the configuration instructions below.
Sent text messages are limited to 1600 characters in length. Any messages longer than this will be truncated.
Configuration
Follow these steps to configure the mobile version of Cisco Crosswork Situation Manager to send and receive SMS messages:
1. In the Cisco Crosswork Situation Manager UI, navigate to System Settings > Users. Add phone numbers for all users that will receive SMS messages.
Note:
All phone numbers must include the international country code in E.164 format. For example +1, +44, +61.
2. Contact Moogsoft Support or your Cisco Sales Engineer to enable SMS. You will be provided with an account session ID, authentication token and a phone number.
3. Open a terminal session to your Cisco Crosswork Situation Manager server and edit the file $MOOGSOFTHOME/config/system.conf. Add your details to this file in the following format:
"sms_sender":
{
"account_sid" : "AB1234c6d91dfe4eef9b3899dkrw34aabbab2b",
"auth_token" : "4eee23d50de54333f6949366fe0882a4",
"phone_number" : "+12345678910",
"character_limit" : 1600
}
4. Restart Apache Tomcat to activate the changes. See Control Moogsoft AIOps Processes for details.
By default you will receive SMS notifications about all invitations and assignments. This cannot be changed at present.
Enable Situation Room Plugins
You can add configurable third-party plugin tabs to the Situation Room in Cisco Crosswork Situation Manager that relate to the Situation. For example, you can link to a ServiceNow incident that is mapped to the Situation in question.
Cisco Crosswork Situation Manager requires a link_definition and custom_info column to enable the Situation Room Plugin.
Note:
The Show ServiceNow Incident in the Situation Room check box in System Administration, Integrations, ServiceNow adds the plugin automatically
Two use cases are:
· Conditional, based on contents of a field being present in the situation (if the field is left empty, the plugin will be disabled)
· Universal for all Situations
Further to these use cases, the link_definition can also have the same use cases:
· Conditional, taking attributes of the situation and passing to the linked application
· Generic, passing no details about the situation
Implementation
The moogdb.sitroom_plugins table has the following columns:
· the title
· its associated Situation field (from the moogdb.sigs table and can be custom_info.<blah>)
· the link_definition to use
mysql> describe moogdb.sitroom_plugins;
+---------------+--------------+------+-----+---------+-------+
| Field | Type | Null | Key | Default | Extra |
+---------------+--------------+------+-----+---------+-------+
| title | varchar(32) | NO | PRI | | |
| internal_name | varchar(255) | YES | | NULL | |
| link_name | varchar(32) | YES | MUL | NULL | |
+---------------+--------------+------+-----+---------+-------+
3 rows in set (0.00 sec)
Examples
Assuming Situation 14 had already been linked with ServiceNow Incident INC0000055 using the following SQL:
update moogdb.sigs set custom_info='{"servicenow_id":"INC0000055"}' where sig_id=14;
Enable a ServiceNow tab in the Situation Room
1. Define a link_definition to point to the ServiceNow URL, and use the $value dynamic placeholder to be replaced with the incident number when launched.
insert into moogdb.link_definitions (name, link) values ('servicenow', 'https://<your-server-here>/incident.do?sysparm_query=number%3D$value');
2. Add an entry into the sitroom_plugins table to define:
· the tab
· the Situation field to be used for $value
· the link_definition
insert into moogdb.sitroom_plugins (title, internal_name, link_name) values ('ServiceNow', 'custom_info.servicenow_id', 'servicenow');
If desired, you can define multiple plugin tabs (with unique title) using the same or different Situation fields.
Addendum
You must configure the browser to allow third party cookies from these URLs, otherwise, remote websites may not display within the tab area. To do this, either enable third-party cookies globally, or, allow the specific URLs to set third party cookies as exceptions.
ServiceNow Integration
Configure ServiceNow using the UI. See the Integrate ServiceNow section in ServiceNow for details.ServiceNow
Import a Topology
Cisco Crosswork Situation Manager can use Vertex Entropy and Cookbook calculations to group alerts based on their proximity or topological importance. You can use the topology builder utility to import your network topology into Cisco Crosswork Situation Manager so it can run these calculations.
To use topology builder, you create a comma-separated value (.csv) file of the node-to-node connections in your network. The utility builds and caches the topology in the moogdb and moog_reference databases. You can also add optional weight to indicate the value of each edge in the network.
Before You Begin
Before you import your network topology into Cisco Crosswork Situation Manager, ensure you have met the following requirements:
· You have generated a map of the connected nodes in your network in a .csv file.
· Your .csv file contains all of the nodes that are expected to send events.
· The lines in your .csv file follow the format: <node1>,<node2>,<weight>. For example:
host_a3,host_a1,3
host_a3,host_a2,3
host_a4,host_a1,3
Topology builder logs and rejects any lines in your file that are not in the correct format. It also ignores any loops such as 'host_x, host_x'. The string node names are case insensitive. The weight values can be decimals.
Build a Topology
Build your network topology in Cisco Crosswork Situation Manager as follows:
1. Import the .csv topology file into the databases using the topology builder found at $MOOGSOFT_HOME/bin:
./topology_builder -t <file_name>.csv
The -t option defines the topology file. You can use -l to define the level of debug output. For all options see Topology Builder Command Reference.
2. The topology builder utility uses the source data to build a topology. If there is no pre-existing topology, topology builder records host names in the entity_catalog table. By default topology builder assigns each node to the 'Network' group and the 'Unix servers' competency. The utility records the topological information in the moog_reference.one_hop_topo and moog_reference.topo_nodes tables.
After you have imported your topological data, you can use the values in clustering calculations by Cookbook. You can also use the graph analyser utility to calculate the /document/preview/11796#UUID8635a39b79fdd302137e104ae42562e8 of the nodes in your network.Vertex Entropy
Rebuild a Topology
You can rebuild the topology using the -r <percent> option. If you run topology builder and the percentage of new edges in the topology compared to the existing topology exceeds the <percent> value provided, the topology is rebuilt.
For example, if you want to rebuild the topology if at least 50% of the edges are new, run the following:
./topology_builder -t <file_name>.csv -r 50
To force a rebuild of the topology, run:
./topology_builder -t <file_name>.csv -r 0
Topology Builder Command Reference
This is a reference for the Topology Builder. The Topology Builder command-line utility accepts the following arguments:
| Argument |
Input |
Description |
| -h,--help |
- |
Display the topology_builder utility syntax and option descriptions. |
| -l,--loglevel <arg> |
WARN|INFO|DEBUG|TRACE |
Log level controlling the amount of information that topology_builder logs. Defaults to INFO. |
| -r,--rebuild <arg> |
Integer <percentage> |
Percentage of unprocessed topology before a rebuild. Utility rebuilds topology when the percentage of unlabelled nodes exceeds this value. If no percentage value is entered, the topology is not rebuilt. |
| -t,--topology-file <csv_filename> |
String <csv_filename> |
Name of the .csv file containing the pairs of connected nodes with an optional weighting value. |
Configure Historic Data Retention
Cisco Crosswork Situation Manager employs two databases, an active database and a historic database to enhance performance of the UI and extend data retention capabilities.
Note:
If you are upgrading from Cisco Crosswork Situation Manager v. 6.4 or earlier, manually split the database if you want to benefit from using a separate historic database. See Historic Database Benefits for further details.
See Historic Database Benefits for information on the performance and scalability advantages of separating the active and historic databases.
You can use various closing strategies to help maintain your active database at an optimal size:
· Manually close alerts.
· Programmatically close alerts.
· Use the Auto Close feature.Auto Close
The historic database can grow without affecting performance. When it is time to retire data from the historic database, you can archive selected Situations and alerts.
Control Historic Data Retention
Historic data retention requires the Housekeeper Moolet to work. Verify you have configured the Housekeeper Moolet and that it is enabled within Moogfarmd. The Housekeeper periodically identifies eligible closed alerts and Situations in the active database and moves them into the historic database.
You can control historic data retention using the database split enabler at $MOOGSOFT_HOME/bin/utils/moog_db_split_enabler.
See the Historic Data Utility Command Reference for a full list of available arguments.
Access Historic Data
By default, the database split enabler creates a database called historic_moogdb within the same MySQL instance as the active database: moogdb.
The historic database contains alert and Situation related tables that have the same structure as their equivalents in the active database.
You can access this historic data in the UI in read-only format:
· Search results (when "include close" is selected)
· Direct URL (for Situation Room, Alert Timeline etc.)
· Situation Room (including Situation Alert View and Situation Timeline)
· Similar Situations (historical closed Situations will feature in the Similar Situations list for a Situation)
· PRC feedback can be set for closed alerts from the historic database (as accessed from the Alerts Tab of a Situation Room)
Historic data is also accessible from various Graze endpoints and their equivalent MoogDb methods:Graze APIMoogDb V2
· getAlertIds
· getAlertDetails
· getSituationAlertIds
· getSituationDetails
· getSituationHosts
· getSituationProcesses
· getSituationServices
· getSituationActions
Cisco Crosswork Situation Manager rejects Graze endpoints and MoogDb methods that attempt to modify historic alerts and Situations.
Disable Historic Data Retention
When you disable the historic database, the data already in the historic database remains there. The Housekeeper Moolet does not move the data back to the active database. The old historic database is only accessible via SQL queries.
To disable the retention of historic data in a separate database, run the following command:
moog_db_split_enabler -d
Enable the Historic Database
Ifyou are upgrading from Cisco Crosswork Situation Manager v. 6.4 or earlier you need to manually split the data into an active database and a separate historic database.
Before you split the database, ensure you have met the following requirements:
· The Housekeeper Moolet is configured and running within Moogfarmd.
· You have the username and password for a MySQL user with schema creation privileges.
To split historic data into a separate database, run this command:
moog_db_split_enabler -e
Alert and Situation data that meet the default criteria are moved. If you do not specify alternative criteria, all closed alerts and Situations that have not been updated within the past hour are moved into a historic database.
See the Historic Data Utility Command Reference for a full list of default and available arguments. Any changes to the default settings are picked up and applied immediately to a Moogfarmd with Housekeeper Moolet running.
If the process encounters closed alerts that are eligible to be moved but still have a relationship with an open Situation, it copies the alerts to the historic database instead of moving them. Later, after they're no longer related to an open Situation, the Housekeeper Moolet moves them to the historic database.
If your system contains a large amount of closed data, the first run may take a long time and require additional CPU and memory use for the Moogfarmd process.
When the splitting process is active, you can monitor its progress in the Moogfarmd log by running this command:
tail -f /var/log/moogsoft/moogfarmd.log|grep Splitter
After the database is split, UI based filters do not return closed alerts or Situations that have been moved to the historic database.
Database Split Examples
To split the database with a grace_period and a run_interval of 60 seconds and an alerts_batch_size and a sigs_batch_size of 1000, run this command:
moog_db_split_enabler -e -g 60 -r 60 -a 1000 -s 1000
During the splitting process you can see entries such as the following in the Moogfarmd log:
WARN : [0:House][20180315 15:58:44.207 +0000] [CSplitterService.java]:143 +|Data Splitter started|+
WARN : [0:House][20180315 15:58:44.503 +0000] [CSplitterTask.java]:205 +|Splitter will copy [17] alerts and will move [1983] alerts and [500] situations|+
WARN : [0:House][20180315 15:58:44.706 +0000] [CSplitterTask.java]:205 +|Splitter will copy [152] alerts and will move [1848] alerts and [0] situations|+
WARN : [0:House][20180315 15:58:46.434 +0000] [CSplitterTask.java]:205 +|Splitter will copy [78] alerts and will move [917] alerts and [0] situations|+
WARN : [0:House][20180315 15:58:47.280 +0000] [CSplitterTask.java]:201 +|Nothing more to split|+
WARN : [0:House][20180315 15:58:47.282 +0000] [CSplitterService.java]:145 +|Data Splitter completed|+
If there is no eligible data to move to the historic database, the following entry is logged:
WARN : [0:House][20180315 15:12:22.547 +0000] [CSplitterService.java]:143 +|Data Splitter started|+
WARN : [0:House][20180315 15:12:22.666 +0000] [CSplitterTask.java]:201 +|Nothing more to split|+
WARN : [0:House][20180315 15:12:22.667 +0000] [CSplitterService.java]:145 +|Data Splitter completed|+
Example Split Scenario
The following table illustrates how the Housekeeper Moolet splits an example set of Situations and alerts.
| Pre-Split Active Database |
|
Post-Split Active Database |
Post-Split Historic Database |
| Situation 1 (closed) with member alerts: Alert 1 (closed) Alert 2 (closed) Alert 3 (closed) Situation 2 (closed) with member alerts: Alert 4 (closed) Alert 5 (closed) Alert 6 (closed) Situation 3 (open) with member alerts: Alert 5 (closed) Alert 6 (closed) Alert 7 (closed) Alert 8 (open) Situation 4 (open) with member alerts: Alert 8 (open) Alert 9 (open) Loose alerts: Alert 10 (closed) Alert 11 (open) |
→ Split occurs |
Situation 3 (open) with member alerts: Alert 5 (closed) Alert 6 (closed) Alert 7 (closed) Alert 8 (open) Situation 4 (Open) with member alerts: Alert 8 (open) Alert 9 (open) Loose alerts: Alert 11 (open) |
Situation 1 (closed) with member alerts: Alert 1 (closed) Alert 2 (closed) Alert 3 (closed) Situation 2 (Closed) with member alerts: Alert 4 (closed) Alert 5 (closed) Alert 6 (closed) Loose alerts: Alert 10 (closed) Other alerts: Alert 7 (closed) |
Notes on the above:
· The process copies closed alerts 5 and 6 to the historic database because they are related to open Situation 3. In the historic database they retain their relationship to closed Situation 2, but not open Situation 3 until it is closed and the Housekeeper Moolet moves it to the historic database.
· The process copies closed Alert 7 to the historic database, but within that database the relationship to open Situation 3 is removed, until Situation 3 is closed and the Housekeeper Moolet moves it to the historic database.
Historic Database Benefits
Prior to the release of Cisco Crosswork Situation Manager 6.4, the single-database architecture limited the amount of data you could retain while running a performant system. Systems with tens of millions of alerts could be slow to display the left navigation filters, especially alert filters. Sluggish performance could also affect the rendering of filter data or a refresh after a filter modification. The threshold for acceptable performance hovered around 15M alerts. In very large systems this typically represented two months of data. Aggressive archive management was the only solution to improve performance.
With Cisco Crosswork Situation Manager 6.5, separate active and historic databases are created as part of the installation process. The Housekeeper Moolet periodically migrates closed Situation and alert data from the active to the historic database.
The segmentation of open Situations and alerts from closed ones yields a number of performance and scalability improvements. The extent of the benefits depends on your system size and the size of your database.
If you are upgrading from Cisco Crosswork Situation Manager 6.4 or an earlier release, manually split the database if you want to benefit from using a separate historic database. See Configure Historic Data Retention for further details.
Performance Improvement Metrics
Cisco engineering used the following baselines for testing performance differences between split-database and single-database systems:
· Single Linux server with 64 x 2.3GHz cores
· 128 GB RAM
· 13 months of data from a very large system (100M events,14M alerts and 1M Situations)
· 3% open alerts and Situations.
Splitting the database improved all filtering and loading times. The bar chart below displays the loading times before and after the database split on 13 months of data. Note: most customers could not have operated in production for 13 months with such performance.
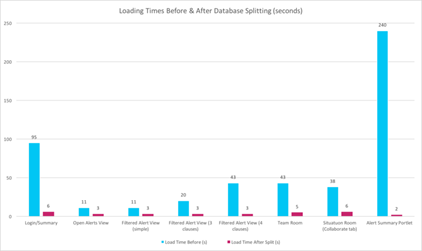
The percentage improvements to loading times for different areas of Cisco Crosswork Situation Manager on the 13 months of data were as follows:
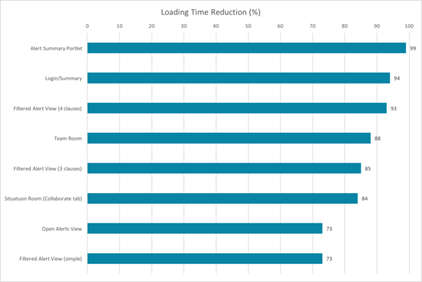
Other improvements included:
· 12% reduction in the time to run a full search re-index
· 12% reduction in the time taken for the Alert Builder to process 1M raw events from a Socket LAM to 600,000 events and 4,000 alerts in the database
· the Cookbook Sigaliser algorithms improved performance.
In this test environment example, the open:closed ratio for alerts and Situations was 3:97. The database split only impacts closed alerts and situations, so you might see different results if your system has a higher proportion of open alerts and Situations.
Next Steps
If you are upgrading to Cisco Crosswork Situation Manager v. 6.5 and your system has performance issues related to the amount of data in your database, you can learn more about the Configure Historic Data Retention feature and evaluate its benefits:
· Read the documentation: Configure Historic Data Retention
· Follow the instructions to implement a database split in a non-production environment so you can test the performance improvements and understand any potential impacts to your workflow.
· If you had previously implemented aggressive archiving, relax it incrementally and observe the system and user performance over time.
Be aware of the following impacts when you implement database splitting:
· General system performance depends on the database splitting settings. Aggressive splitting can lead to an increased CPU load because both MySQL and moogfarmd are consuming CPU. You can run the Housekeeper Moolet in its own moogfarmd on a separate host to potentially mitigate any performance impacts.
· Retaining more data means that your database will increase in size. Implement monitors to check your database growth.
Historic Data Utility Command Reference
This is a reference for the Configure Historic Data Retention. The moog-db-split-enabler command line utility accepts the following arguments:
| Argument |
Input |
Description |
| -a, --alerts_batch_size <arg> |
Integer: <number of alerts> |
Number of alerts pert batch when moving data to the historic database. Increasing this value can speed up the process but places more load on the database. Defaults to 2000. |
| -d, --disable |
- |
Disable the retention of historic data in a separate database. The data in the old historic database is not moved to the active database and is effectively inaccessible. |
| -e, --enable <arg> |
String |
Enable the retention of historic data in a separate database. |
| -g, --grace_period <arg> |
Integer: <number of seconds> |
Period of time since the last update after which closed alerts and Situations are eligible to be included in historic data retention. Defaults to 3600 (one hour). |
| -h, --help |
- |
Display the syntax and option descriptions. |
| -l, --loglevel <arg> |
WARN | INFO | DEBUG | TRACE |
Specify the output verbosity. Defaults to INFO. |
| -n,--database_name <arg> |
String |
Name of the database to contain the historic data. This database is created the first time the utility runs. If the name is changed from a previous run, the data in the old historic database is not moved to the new historic database and is inaccessible from the UI. Defaults to historic_moogdb. |
| -p,--password <arg> |
String |
Password for the MySQL user specified in the user argument -u. Defaults to ' '. |
| -r,--run_interval <arg> |
Integer: <number of seconds> |
The intervals at which the utility runs and moves any eligible data to the historic database. The first execution is always the run_interval time divided by two. Defaults to 600 (ten minutes). |
| -s,--sigs_batch_size <arg> |
Integer: <number of Situations> |
Number of Situations to include in each batch. Defaults to 500. |
| -u,--user <arg> |
String |
MySQL username with schema creation privileges. Defaults to root. |
Table Compression Utility
The moog_snapshots_online_table_change_utility is a command line utility. Using Percona table compression, the utility optimizes the snapshots table in MoogDb to minimize the size of your historic database. It also runs online, avoiding downtime, and can compress the size of your database by up to 85%.
The utility is compatible with all database types.
Note:
This utility requires a number of Perl packages to run. See the section at the bottom for instructions on how to install them if the utility reports issues with Perl dependencies.
Usage
The command you use to run the utility depends on your system configuration:
· If you are installing or upgrading Cisco Crosswork Situation Manager, run the following command:
$MOOGSOFT_HOME/bin/utils/moog_snapshots_online_table_change.sh -H hostname -P port -d historic_database_name -u username -p password
· If you are not upgrading Cisco Crosswork Situation Manager and, for example, installing a standalone database server, run the following command instead:
bash <(curl -s -k https://<username>:<password>@speedy.moogsoft.com/repo/aiops/moog_snapshots_online_table_change.sh) -H hostname -P port -d historic_database_name -u username -p password
| Argument |
Input |
Description |
| -H |
String |
Hostname of the database server. |
| -P |
Integer |
Port of the database server. |
| -d |
String |
Name of the database. |
| -u |
String |
Database username. |
| -p |
String |
Database password. |
Example
$MOOGSOFT_HOME/bin/utils/moog_snapshots_online_table_change.sh -H localhost -P 3306 -d historic_moogdb -u root -p Password123
No slaves found. See --recursion-method if host ldev11 has slaves.
Not checking slave lag because no slaves were found and --check-slave-lag was not specified.
Operation, tries, wait:
analyze_table, 10, 1
copy_rows, 10, 0.25
create_triggers, 10, 1
drop_triggers, 10, 1
swap_tables, 10, 1
update_foreign_keys, 10, 1
Altering `moogdb`.`snapshots`...
Creating new table...
Created new table moogdb._snapshots_new OK.
Altering new table...
Altered `moogdb`.`_snapshots_new` OK.
2019-07-12T15:47:49 Creating triggers...
2019-07-12T15:47:49 Created triggers OK.
2019-07-12T15:47:49 Copying approximately 36064233 rows...
Copying `moogdb`.`snapshots`: 0% 03:05:15 remain
Copying `moogdb`.`snapshots`: 0% 02:56:29 remain
Copying `moogdb`.`snapshots`: 0% 02:50:16 remain
Copying `moogdb`.`snapshots`: 1% 02:53:31 remain
Copying `moogdb`.`snapshots`: 1% 02:54:20 remain
Copying `moogdb`.`snapshots`: 1% 02:58:53 remain
Copying `moogdb`.`snapshots`: 1% 02:59:46 remain
Copying `moogdb`.`snapshots`: 2% 03:03:08 remain
…..
…..
Copying `moogdb`.`snapshots`: 94% 09:07 remain
Copying `moogdb`.`snapshots`: 94% 08:37 remain
Copying `moogdb`.`snapshots`: 94% 08:06 remain
Copying `moogdb`.`snapshots`: 95% 07:40 remain
Copying `moogdb`.`snapshots`: 95% 07:07 remain
Copying `moogdb`.`snapshots`: 95% 06:37 remain
Copying `moogdb`.`snapshots`: 96% 06:06 remain
Copying `moogdb`.`snapshots`: 96% 05:36 remain
Copying `moogdb`.`snapshots`: 96% 05:05 remain
Copying `moogdb`.`snapshots`: 97% 04:35 remain
Copying `moogdb`.`snapshots`: 97% 04:05 remain
Copying `moogdb`.`snapshots`: 97% 03:33 remain
Copying `moogdb`.`snapshots`: 98% 03:02 remain
Copying `moogdb`.`snapshots`: 98% 02:32 remain
Copying `moogdb`.`snapshots`: 98% 02:01 remain
Copying `moogdb`.`snapshots`: 99% 01:29 remain
Copying `moogdb`.`snapshots`: 99% 00:58 remain
Copying `moogdb`.`snapshots`: 99% 00:26 remain
2019-07-12T19:28:57 Copied rows OK.
2019-07-12T19:28:57 Analyzing new table...
2019-07-12T19:28:57 Swapping tables...
2019-07-12T19:28:57 Swapped original and new tables OK.
2019-07-12T19:28:57 Dropping old table...
2019-07-12T19:29:05 Dropped old table `moogdb`.`_snapshots_old` OK.
2019-07-12T19:29:05 Dropping triggers...
2019-07-12T19:29:05 Dropped triggers OK.
Successfully altered `moogdb`.`snapshots`.
Installing missing utility dependencies
The following commands need to be run (requires root permissions for the yum command) to install the required Perl packages which this utility needs:
curl -L -O http://mirror.as29550.net/mirror.centos.org/7.6.1810/os/x86_64/Packages/perl-Compress-Raw-Bzip2-2.061-3.el7.x86_64.rpm;
curl -L -O http://mirror.as29550.net/mirror.centos.org/7.6.1810/os/x86_64/Packages/perl-Compress-Raw-Zlib-2.061-4.el7.x86_64.rpm;
curl -L -O http://mirror.as29550.net/mirror.centos.org/7.6.1810/os/x86_64/Packages/perl-DBD-MySQL-4.023-6.el7.x86_64.rpm;
curl -L -O http://mirror.as29550.net/mirror.centos.org/7.6.1810/os/x86_64/Packages/perl-DBI-1.627-4.el7.x86_64.rpm;
curl -L -O http://mirror.as29550.net/mirror.centos.org/7.6.1810/os/x86_64/Packages/perl-Data-Dumper-2.145-3.el7.x86_64.rpm;
curl -L -O http://mirror.as29550.net/mirror.centos.org/7.6.1810/os/x86_64/Packages/perl-Digest-1.17-245.el7.noarch.rpm;
curl -L -O http://mirror.as29550.net/mirror.centos.org/7.6.1810/os/x86_64/Packages/perl-Digest-MD5-2.52-3.el7.x86_64.rpm;
curl -L -O http://mirror.as29550.net/mirror.centos.org/7.6.1810/os/x86_64/Packages/perl-IO-Compress-2.061-2.el7.noarch.rpm;
curl -L -O http://mirror.as29550.net/mirror.centos.org/7.6.1810/os/x86_64/Packages/perl-Net-Daemon-0.48-5.el7.noarch.rpm;
curl -L -O http://mirror.as29550.net/mirror.centos.org/7.6.1810/os/x86_64/Packages/perl-PlRPC-0.2020-14.el7.noarch.rpm;
curl -L -O http://centos.mirroring.pulsant.co.uk/7.7.1908/os/x86_64/Packages/perl-IO-Socket-IP-0.21-5.el7.noarch.rpm;
curl -L -O http://centos.mirroring.pulsant.co.uk/7.7.1908/os/x86_64/Packages/perl-IO-Socket-SSL-1.94-7.el7.noarch.rpm;
curl -L -O http://centos.mirroring.pulsant.co.uk/7.7.1908/os/x86_64/Packages/perl-Mozilla-CA-20130114-5.el7.noarch.rpm;
curl -L -O http://centos.mirroring.pulsant.co.uk/7.7.1908/os/x86_64/Packages/perl-Net-LibIDN-0.12-15.el7.x86_64.rpm;
curl -L -O http://centos.mirroring.pulsant.co.uk/7.7.1908/os/x86_64/Packages/perl-Net-SSLeay-1.55-6.el7.x86_64.rpm;
yum install *.rpm
Probable Root Cause
Probable Root Cause (PRC) is a machine learning process in Cisco Crosswork Situation Manager that identifies which Alerts responsible for causing a Situation. PRC looks for patterns in user supplied feedback. It does not use 'Root Cause Analysis' techniques.
With Probable Root Cause:
· You can immediately determine where to begin troubleshooting and diagnosis as soon as you open a Situation by looking at the Probable Root Cause Alerts.
· You can resolves Situations quickly by examining the The Top 3 Probable Root Cause Alerts appear under Next Steps in a Situation Room.
How does PRC work?
You manually label Alerts as either a Root Cause Alert or a Symptom Alert, the Cisco Crosswork Situation Manager PRC Model uses this data to predict Situation root causes.
Subsequently, when Cisco Crosswork Situation Manager generates Situations, it labels an Alert or Alerts as having a Root Cause Estimate. A Root Cause Estimate is always assigned even if the data set is small. Generally, the more data Cisco Crosswork Situation Manager has the more accurate it is. However, that data needs to be consistent and the model is only as effective as the data it is supplied with. For example, two conflicting labels will confuse the model. If you do not know the status of an Alert do not label it. You do not have to label every Alert.
How does Cisco Crosswork Situation Manager learn?
Machine Learning uses features like Severity, Host, Description and Class and takes the values of those features for all labelled Alerts and uses a Neural Network to estimate the Root Cause for all the Alerts in a newly created Situation. It does this even if that Situation has not been seen before based on the model and labelled data.
See Configure and Retrain Probable Root Cause for more information on training your model.Configure and Retrain Probable Root Cause
PRC Column
This column (Situation, Alerts Tab) shows the Probable Root Cause Estimate as a percentage of the Alerts in that Situation and is useful as a prioritisation aid. For example, the higher the value an Alert has, the higher the probability that the Alert is the root cause of the Situation
As Alerts are added to a Situation, the Root Cause is recalculated (Situation, Alerts list) and therefore the PRC column may change. The more accurate and consistent data you feed your model the more accurate the estimate.
URL-based Filters
You can create URLs to open filtered alerts and Situation Views. This is useful for context linking from a third-party application directly to Cisco Crosswork Situation Manager.
For example, context linking a device in a topology mapping product to an alert view for that device. It also allows creation of powerful dynamic alert and Situation Client Tools.
Creating a URL (Basic)
To create a valid URL, it must contain the location of Cisco Crosswork Situation Manager, the type of view and the basic filter query syntax to define the filter.
When creating a new URL, it should contain the following components:
| Component |
Example |
Description |
| The host server |
https://<localhost>/ |
Host name of your Cisco Crosswork Situation Manager instance. |
| The view type |
[#/alerts | #/situations | #/situationalerts] |
Defines whether an alert view, Situation view or alerts assigned to Situations are displayed. |
| The filter type |
?[filtereditor=basic | filtereditor=advanced] |
Defines whether the filter will use basic or advanced query syntax. Note: Please Note:: Place a question mark (?) at the start of your query parameter and separate each subsequent parameter with an ampersand (&) |
| The parameters |
&[filter-active_sig_list= |filter-alert_id= | filter-agent=] |
These are the parameters, operators and values used to define in the filter. E.g. &filter-alert_id=12, &filter-count=5 etc. For all available parameters click here. Note: Please Note:: All parameter names must be prefixed by 'filter-' |
Basic Example
The example below shows a URL-based filter using basic filter syntax:
https://<localhost>/#/situationalerts/172?filtereditor=basic&filter-type=CPUHigh&filter-severity=2
A breakdown of this URL's components are described in the table below:
| Example Component |
Description |
| https://<localhost>/ |
Host name of your Cisco Crosswork Situation Manager instance. |
| #/situationalerts/172 |
Specifies an alert view of all alerts assigned to Situation 172. |
| ?filtereditor=basic |
Specifies that you want to use basic filter query string. |
| &filter-type=CPUHigh&filter-severity=2 |
Defines the filter will display all alerts with the alert type 'CPUHigh' and that have the severity of 'Warning' (severity level 2). |
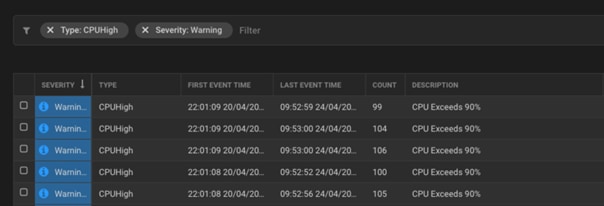
Note:
When using the URLs, if not currently logged into Cisco Crosswork Situation Manager, users are prompted to login. alerts and Situation Views opened are active and are updated with the latest data, with filter and action and navigation functions available as normal for that user.
Custom_info Field
You can filter URL-based filters for custom_info fields if you have added any to your instance of Cisco Crosswork Situation Manager.
Note:
For more information on adding custom_info fields see Custom Info.
The example below shows a URL-based filter
https://<localhost>/#/situations?filtereditor=basic&filter-custom_info.something_new=5
| Component |
Description |
| https://<localhost>/ |
Host name of your Cisco Crosswork Situation Manager instance. |
| #/situations? |
Specifies an alert view of all alerts assigned to Situation 172. |
| ?filtereditor=basic |
Specifies that you want to use basic filter query string. |
| &filter-custom_info.something_new=5 |
Defines that you filter the custom_info field 'something_new', this must be column field. The basic filter treats the field as text and uses 'matches' rather than 'equals'. |
Creating a URL (Advanced)
To create a valid URL using the Advanced Filter, it must contain the same components as before but they must be URL-encoded. See "Advanced Filter Syntax" on Filter Search Data.Filter Search Data
Note:
To encode a filter query, open DevTools (right-click and select Inspect) and go to Console:
Type 'encodeURI', insert the query in brackets and then double quotation marks:
Console Entry
encodeURI ("Severity = 'Warning' AND Type = 'DBFail'")
Press Enter to continue and encode the entry:
Encoded Result
"Severity%20=%20'Warning'%20AND%20Type%20=%20'DBFail'"
Advanced Example
The example below shows a URL-based filter using advanced filter query syntax:
https://<localhost>/#/situationalerts/172?filtereditor=advanced&filter-query=Severity%20=%20'Critical'%20AND%20Severity%20=%20'Minor'
This URL can be broken down into the following components:
| Component |
Description |
| https://<localhost>/ |
Host name of your Cisco Crosswork Situation Manager instance. |
| #/situationalerts/172 |
Directs the filter to a view of all alerts assigned to Situation 172. |
| ?filtereditor=advanced |
Specifies that you want to use advanced filter query syntax. |
| &filter-query=Severity%20=%20'Critical'%20AND%20Severity%20=%20'Minor' |
Defines the filter will display all alerts with 'Critical' and 'Minor' severity. |
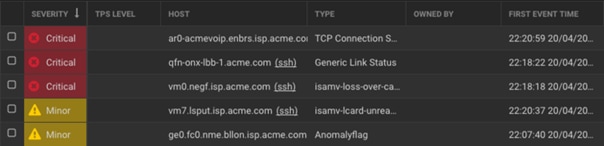
Custom_info field
You can also filter custom_info fields if you have added any to your instance of Cisco Crosswork Situation Manager.
Example:
https://<servername>/#/situations?/?filtereditor=advanced&filter-query=%60Something%20new%60%20MATCHES%20%225%22
| Example Component |
Description |
| https://<localhost>/ |
Host name of your Cisco Crosswork Situation Manager instance. |
| #/situations? |
Directs the filter to a Situations view. |
| ?filtereditor=advanced |
Specifies that you want to use advanced filter query string. |
| &filter-query=%60Something%20new%60%20MATCHES%20%225%22 |
Defines that you filter the custom_info field 'something_new'. This must be a column field. |
Popout Shortcut
There is a method to quickly popout a URL for Situation alerts.
Note:
The Popout action can only be performed on alerts that are assigned to Situations at present
To do this, go to the Situation Room for the Situation you are interested in and select the alerts tab.
Create a Basic or Advanced filter then go to Tools > Popout:
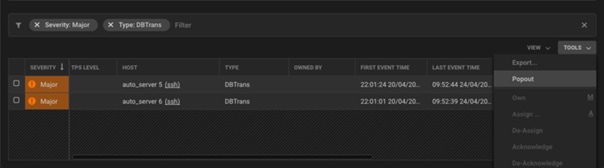
This will launch a new browser tab with the URL for the filter. See example below:
https://<servername>/#/situationalerts/172?filter-severity=4&filter-type=DBTrans&filtereditor=basic&sort=severity%3ADESC%2Calert_id%3ADESC
The filter URL will include the default sort order of alerts in descending severity order then by descending alert ID:
sort=severity%3ADESC%2Calert_id%3ADESC
Note:
If using the Popout method to generate a URL-based filter with advanced filter query syntax it will be automatically URL encoded
Use in alert and Situation Client Tools
You can create powerful dynamic alert and Situation Client Tools. URLs created using this mechanism can be added to alert and Situation client tools, so that their functionality is available from right-click menus in Situation and alert Views in Cisco Crosswork Situation Manager.
Examples
In an alert client tool, with the HTTP Method GET selected, the following code in the URL field shows an alert View with all alerts that have the same host as the alert the tool was run form:
https://<servername>/#/alerts?filtereditor=basic&filter-source=$source
In a Situation client tool, with the HTTP Method GET selected, the following code in the URL field shows a Situation View of all Situations that are impacting the same services at the Situation the tool was run from:
https://<servername>/#/situations?filtereditor=basic&filter-service_list=$service_list
Parameters
The tables below list the available parameters and the associated operators for alerts and Situations:
Warning
The operators listed below are to be used in the filter query only, prior to using either the Popout or URI-encoding to form your URL
alert Parameters
| UI/Display Name |
Filter Parameter |
Operator |
| Active Situations |
active_sig_list |
IN |
| alert Id |
alert_id |
> >= < <= != = |
| Agent Name |
agent |
MATCHES |
| Agent Host |
agent_location |
MATCHES |
| Class |
class |
MATCHES |
| Count |
count |
> >= < <= != = |
| Description |
description |
MATCHES |
| Entropy |
entropy |
> >= < <= != = |
| External ID |
external_id |
MATCHES |
| First Event Time |
first_event_time |
>= AND <=* |
| Host |
source |
MATCHES |
| Internal Last Event Time |
int_last_event_time |
>= AND <=* |
| Last Change |
last_state_change |
>= AND <=* |
| Last Event Time |
last_event_time |
>= AND <=* |
| Manager |
manager |
MATCHES |
| Owned By |
owner |
IN |
| Severity |
severity |
IN |
| Significance |
significance |
IN |
| Situations |
sig_list |
IN |
| Source ID |
source_id |
MATCHES |
| Status |
state |
IN |
| Type |
type |
MATCHES |
Situation Paramaters
| UI/Display Name |
Filter Parameter |
Operator |
| Category |
category |
MATCHES |
| Created At |
created_at |
>= AND <=* |
| Description |
description |
MATCHES |
| First Event Time |
first_event_time |
>= AND <=* |
| ID |
sig_id |
> >= < <= != = |
| Last Change |
last_state_change |
>= AND <=* |
| Last Event Time |
last_event_time |
>= AND <=* |
| Owned By |
owner |
IN |
| Participants |
participants |
> >= < <= != = |
| Process Impacted |
process_list |
CONTAINS |
| Scope Trend |
delta_entities |
>0 <=0 |
| Services Impacted |
service_list |
CONTAINS |
| Sev Trend |
delta_priority |
>0 <=0 |
| Severity |
severity |
IN |
| Status |
state |
IN |
| Story |
story_id |
> >= < <= != = |
| Teams |
teams |
IN |
| Total alerts |
total_alerts |
> >= < <= != = |
| User Comments |
user_comments |
> >= < <= != = |
These parameters have operators defining two times, 'from' and 'to' separated by a colon. These times need to be epoch/Unix times:
E.g. First Event Time: From May 3, 2017 00:45:00 to May 3, 2017 00:45:00 would appear as (`First Event Time` >= 1493768700) AND (`First Event Time` <= 1493768700) in advanced filter query syntax and in the URL, this will appear as follows:
?filter-first_event_time=1493768700000%3A1493768700000
Archive Situations and Alerts
You can run the command-line archiver tool included with Cisco Crosswork Situation Manager to archive and delete Situations, alerts, and statistical data. The benefits of archiving data include improved system performance, faster backup and recovery, reduced maintenance, and lower storage costs.
How Archiving Works
The archiver tool archives and deletes a single day's worth of data at a time, to reduce the impact on the database. After you launch the archiver, it automatically processes data in batches which are configurable using the -b, -y and -z options in the Archiver Command Reference.
Both the moogsoft-db and moogsoft-utils packages include the archiver tool. You can find it at:
$MOOGSOFT_HOME/bin/utils/moog_archiver
The archiver exports and deletes data from the historic database, unless you are deleting statistical data which resides only in the active database. If the historic database is disabled it performs all operations against the active database.
By default the archiver writes files to the /usr/local/archived directory.
Launch the Archiver
To launch the archiver execute the moog_archiver command and pass either the -e argument to export or the -r option to delete.
Export all data older than 28 days to the default directory and retain the data in the database:
./moog_archiver -e
Delete all data older than 28 days:
./moog_archiver -r
See the Archiver Command Reference for a full list of available arguments.
Archive Loose Alerts
You can modify the selection criteria for loose alerts and Situations and their member alerts. You can choose to archive and delete loose alerts only using the last example below.
Export loose alerts that have not been modified in the past 28 days, and closed/dormant/superseded Situations and their member alerts that have not been modified in the past 4 days, and then delete the data from the database:
./moog_archiver -e -r -o -s 4
Export loose alerts that have not been modified in the past 2 days, and closed/dormant/superseded Situations and their member alerts that have not been modified in the past 7 days, and then delete the data from the database:
./moog_archiver -e -r -o -l 2 -s 7
Export loose alerts that have not been modified in the past 28 days, and then delete the data from the database:
./moog_archiver -e -r -t
Archive Filtered Situations and Alerts
You can use global Situation and alert filters to limit the data that is eligible for archiving and deletion.
Export loose alerts that have not been modified in the past 28 days, and Situations and their member alerts that have not been modified in the past 7 days and match the global filter "My Global Alert Filter", and then delete the data from the database:
./moog_archiver -e -r -s 7 -i "My Global Alert Filter"
Delete all Situations that match the filter "My Global Situation Filter" and their member alerts, and delete all loose alerts that match the filter "My Global Alert Filter":
./moog_archiver -r -s 0 -l 0 -i "My Global Situation Filter" -a "My Global Alert Filter"
Use filters that extract data based on age with caution, as they can conflict with specified (or default) age constraints. If you use a filter that selects Situations created during the past day and apply an option to archive Situations older than 28 days, no data will be archived.
Delete Situations, Alerts and Statistical Data
You can use the archiver to delete Situations, alerts and statistical data that match specified criteria from the database.
Delete all Situation and alert data:
./moog_archiver -r -s 0 -l 0
Delete statistical data older than 15 days:
./moog_archiver -m -n 15
Delete files older than 7 days from the default directory:
./moog_archiver -f 7
Archive File Names and Structure
Archive files are named and structured as follows:
· Archive files containing Situation data including alerts, events and snapshots have the filename format <table name>-<yyyymmdd>.<hhmmss>.csv.
For example alerts-20150410.143637.csv
· Archive files containing loose alert data have the filename format <table name>-loose<yyyymmdd>.<hhmmss>.csv.
For example alerts-loose-20150410.143637.csv
· Quotes are used within the files to handle occurrences of the delimiter. Quote characters in cells are enclosed in a second quote character. Null values from the database are written as \N.
Usage Tips
The following tips can help you plan your archiving strategy:
· We recommend running the archiver tool outside core operational hours to minimize the impact to users. Users of the interface should refresh their sessions after the utility has been used to delete data.
· Archiving often in small quantities allows for fast execution and minimal impact.
· You can set up a cron job to run the archiver daily, outside core operational hours.
· You can use a specific alert or Situation filter to remove targeted events.
· Exporting and/or removing large amounts of data on a running system can be slow.
· Exporting from a remote machine is slower because of network latency.
· The archiver tool can export data from the prc_earliest_highest_severity_event table but it cannot delete this data.
· You do not need to re-run the indexer after using the archiver tool to delete data. The -r option deletes records from Elasticsearch to keep the search feature synchronized with the database.
Archiver Command Reference
This is a reference for the archiving of Situations and alerts. The moog-archiver command line utility accepts the following arguments:
| Argument |
Input |
Description |
| -a,--alert_filter <arg> |
String: <filter name> |
Include all loose alerts that match the specified global alert filter. Does not apply to alerts within Situations that are being archived. |
| -b,--update_batch_size <arg> |
Integer: <number of alerts/Situation rows> |
Defaults to 1000. Maximum number of alert/Situation rows to process at once during the export/deletion process. Increasing this value can speed up archiving but places more load on the database. |
| -d,--delimiter <arg> |
String |
Defaults to comma ",". Delimiter to insert between values in the export file. |
| -e,--export |
- |
Export the data to a file. |
| -f,--file_age <arg> |
Integer: <number of days> |
Delete files from the default directory /usr/local/archived that are older than the specified number of days. |
| -g,--loglevel <arg> |
WARN|INFO|DEBUG|TRACE |
Specify the output verbosity. Defaults to INFO. |
| -h,--help |
- |
Display the moog-archiver utility syntax and option descriptions. |
| -i,--situation_filter <arg> |
- |
Include all Situations that match the specified global alert filter. |
| -l,--loose_alert_age <arg> |
Integer: <number of days> |
Export data related to loose alerts older than the specified number of days. Defaults to 28 for a standard database or 395 if theConfigure Historic Data Retentionis enabled. |
| -m,--include_statistics |
- |
Include the deletion of statistical data. Statistical data can only be deleted, not archived. Deletes statistical data from the active database whether database split is enabled or disabled. |
| -n,--statistics_age <arg> |
Integer: <number of days> |
Delete statistical data older than the specified number of days. Defaults to 28 for a standard database or 395 if theConfigure Historic Data Retentionis enabled. |
| -o,--retain_open |
- |
Only include data from Situations with Closed, Dormant or Superseded status. Cannot be used with the Situation filter -i. |
| -p,--archive_path <arg> |
String: <path> |
Defaults to /usr/local/archived. Destination path for the archived data. |
| -r,--remove |
- |
Delete data from the database. |
| -s,--situation_age <arg> |
Integer: <number of days> |
Include Situation data (and alerts within Situations) older than the specified number of days. Defaults to 28 for a standard database or 395 if the Configure Historic Data Retention is enabled. |
| -t,--loose_alerts_only |
- |
Include loose alerts only. Cannot be used with -i -o -s |
| -y,--delay_time <arg> |
Integer: <number of milliseconds> |
Length of the delay (in milliseconds) between each batch operation. Can be used to slow the speed of archiving to reduce load on the database. Defaults to 0. |
| -z,--id_batch_size <arg> |
Integer: <number of rows> |
Maximum number of rows to process per batch during the export/deletion process. Increasing this value can speed up archiving but places more load on the database. Defaults to 100. |
Change passwords for default users
Cisco Crosswork Situation Manager creates users for Linux, RabbitMQ, the Cisco Crosswork Situation Manager UI and Graze API during the installation process. As a security measure, you must change the default passwords for these users. After you change the passwords you may need to update the Cisco Crosswork Situation Manager configuration to use the new passwords.
If you run in a distributed environment, you can set unique passwords for all components on each host.
Cisco recommends you encrypt passwords for use in Cisco Crosswork Situation Manager configuration files. See Moog Encryptor for more information. In distributed or high availability environments, encrypt passwords on each machine.
Linux users
The Cisco Crosswork Situation Manager installation package creates the following Linux users with login privileges:
Execute the passwd command to change the password of these Linux users. For example, to change the password for the moogtoolrunner user:
passwd moogtoolrunner
The Cisco Crosswork Situation Manager installation package creates the following Linux users without login privileges:
· Elasticsearch
· Nginx
Update Cisco Crosswork Situation Manager Configuration
After you change the password for moogtoolrunner, update its password in $MOOGSOFT_HOME/config/servlets.conf. You can use either the toolrunnerpassword or encrypted_toolrunnerpassword property. For example:
#toolrunnerpassword: "MyNewPassword",
encrypted_toolrunnerpassword: "rmW2daCwMyI8JGZygfEJj0MZdbIkUqX3tT/OIVfMGyI=",
Restart Apache Tomcat to apply the configuration change:
service apache-tomcat restart
Note:
You do not need to update the Cisco Crosswork Situation Manager configuration after you change the password for other Linux users with login privileges.
RabbitMQ user
The Cisco Crosswork Situation Manager installation process creates a RabbitMQ user called moogsoft. Execute the rabbitmqctl change_password command to change the moogsoft user password. For example:
rabbitmqctl change_password moogsoft <new-password>
Update Cisco Crosswork Situation Manager configuration
After you change the moogsoft user password, update the password in $MOOGSOFT_HOME/config/system.conf. You can use either the password or encrypted_password property. For example:
"username" : "moogsoft",
#"password" : "MyNewPassword",
"encrypted_password" : "e5uO0LY3HQJZCltG/caUnVbxVN4hImm4gIOpb4rwpF4=",
If you are running in a distributed environment, update the password configuration on every host.
Graze API and UI users
The installation process creates the following default users for the UI:
· admin
· graze
· super
You can also use the graze user to log into the Graze API.
To change the default passwords for these users, log into the UI and go to Settings > Users.
Upgrade Cisco Crosswork Situation Manager
This topic describes how to upgrade Cisco Crosswork Situation Manager to v7.3.x from any of the following versions:
· v7.0.x
· v7.1.x
· v7.2.x
For information on how to upgrade from other versions, see /document/preview/47128#UUIDcc26a467cc7c84ff916e9c28adb033d0.Releases
For instructions on how to install a distributed high availability (HA) configuration, see Distributed HA Installation.
Your upgrade path depends on your preferred mode of deployment:
· RPM: Use this method if you have root access to your Cisco Crosswork Situation Manager server(s) and you do not want to change the default installation locations.
· Tarball: Use this method if you need to run the process as a non-root user, or you want the ability to deploy to a non-default location and install all components under one directory.
The Tarball installer is hosted on the Cisco "speedy" Yum repository: https://speedy.moogsoft.com/installer/. Contact Cisco Support for access if you do not already have an account.
· If you have root access but your Cisco Crosswork Situation Manager server(s) do not have access to the internet, see "Prepare for an offline upgrade" in RPM - Prepare to upgrade.
Your Cisco Crosswork Situation Manager deployment is broken up into a set of roles. A role is a functional entity containing components that should always reside on the same server:
· UI: Nginx, Apache Tomcat, UI integrations.
· Core: Elasticsearch, Moogfarmd, RabbitMQ, Events Analyser.
· Databases: MySQL, Cisco Crosswork Situation Manager databases.
· Data ingestion: Server side LAMs.
This process enables you to upgrade the components in each role, whether your Cisco Crosswork Situation Manager system is distributed on several servers or installed on a single host.
RPM upgrade to Cisco Crosswork Situation Manager v7.3.x
To perform the RPM upgrade to Cisco Crosswork Situation Manager v7.3.x, complete the steps in the following documents, in this order:
4. Upgrade database components
5. Upgrade data ingestion components
6. Final steps and validate the upgrade
Tarball upgrade to Cisco Crosswork Situation Manager v7.3.x
To perform the Tarball upgrade to Cisco Crosswork Situation Manager v7.3.x, complete the steps in the following documents, in this order:
4. Upgrade database components
5. Upgrade data ingestion components
6. Final steps and validate the upgrade
Minimize upgrade downtime
To minimize the amount of downtime required for the upgrade process, follow this process:
1. Disable historic data retention.
2. Perform the upgrade according to your chosen method of deployment.
3. Re-enable the historic data utility.
4. Let the historic data retention utility process any alerts that have accumulated. This should not take long if the process has been disabled for only a few hours.
RPM - Prepare to upgrade
Follow these steps before you perform an RPM upgrade to Cisco Crosswork Situation Manager v7.3.x from v7.0.x, v7.1.x, or 7.2.x.
Refer to Upgrade Cisco Crosswork Situation Manager for general information and upgrade instructions for other components and versions.
Note:
During the upgrade process, the moog_reference incremental_token_data table is truncated. If you are using entropy in your deployment, it is important to initialize a full Events Analyser job towards the end of the upgrade process. See the #UUID811b30e4ead29a04100a45839c575e19_titleidm123139862768218 step for details.
Prepare for an offline upgrade
To prepare for an offline upgrade, where the Cisco Crosswork Situation Manager packages reside in a local Yum repository, complete the steps in the document Cisco Crosswork Situation Manager v7.3.x - Offline RPM pre-installation steps and then continue with the rest of the steps in this document.
Back up the existing system
To back up the existing system:
1. Back up $MOOGSOFT_HOME, particularly the following folders:
— $MOOGSOFT_HOME/config/
— $MOOGSOFT_HOME/bots/
— $MOOGSOFT_HOME/etc/
— $MOOGSOFT_HOME/contrib/
— For RPM deployments: /var/lib/moogsoft/moog-data/
— For Tarball deployments: $MOOGSOFT_HOME/moog-data/
2. Take a snapshot (for VMs).
3. Back up MySQL.
Note and uninstall UI integrations
Note:
Only perform this step if you are upgrading from Cisco Crosswork Situation Manager v7.0.x or v7.1.x.
If you are using any of the following UI integrations and are upgrading from v7.0.x or v7.1.x, make a note of their connection and configuration details, then uninstall them via the UI before you begin the upgrade. The post-upgrade steps include details on how to reconfigure them. This is required due to UI changes in the new version.
· AWS CloudWatch
· Cherwell
· JIRA Service Desk and JIRA Software
· JMS
· New Relic
· Remedy
· ServiceNow
· SevOne
· Slack
· SolarWinds
· VMware vCenter and vSphere
· vRealize Log Insight
· WebSphere MQ
· xMatters
To continue with the upgrade, see RPM v7.3.x - Upgrade UI components.
RPM - Upgrade UI components
Follow these steps to perform an RPM upgrade on the Cisco Crosswork Situation Manager UI components to v7.3.x from v7.0.x, v7.1.x, or 7.2.x:
· Nginx
· Apache Tomcat
· UI integrations
These components should always reside on the same server.
Refer to Upgrade Cisco Crosswork Situation Manager for general information and upgrade instructions for other components and versions.
Stop services and processes
Run the following command as root to stop the default tomcat service on any servers with the moogsoft-ui package installed and where the Apache Tomcat service is running. Change the service name if you are not using the default.
service apache-tomcat stop
Run the following commands as root to query/stop the default LAM/integrations services on any servers with the moogsoft-integrations/moogsoft-integrations-ui package installed and where the LAMs/integrations are running.
Check for running LAM and integration processes and stop them using the relevant service scripts:
systemctl status | grep lamd
service <lam_service_name> stop
Run the following command to stop any remaining active LAM and integration processes:
kill -9 $(ps -ef | grep java | grep _lam | awk '{print $2}') 2>/dev/null
Note:
Complete the Elasticsearch steps below if you have installed Elasticsearch on the same server as your UI components. Cisco Crosswork Situation Manager recommends that you move Elasticsearch to your Core server (the server running Moogfarmd) to optimize index performance.
Delete the Elasticsearch indexes
Run this command on the moogsoft-search/Elasticsearch server to remove the old Elasticsearch indexes:
curl -XDELETE 'http://localhost:9200/alerts/' && curl -XDELETE 'http://localhost:9200/situations/'
If the command completes successfully, the following message is displayed:
{"acknowledged":true}{"acknowledged":true}
Modify the Elasticsearch repo
Note:
You can skip this section if you are following the 'Offline RPM' upgrade process, as the Elasticsearch package is obtained from the local Yum repository instead.
Run the following command to modify the Elasticsearch Yum repository to point to v6 instead of v5:
sed -i 's/5.x/6.x/g' $(grep 'artifacts.elastic' /etc/yum.repos.d/* | awk -F: '{ print $1 }' | sort -u | head -1)
Upgrade Cisco Crosswork Situation Manager
To upgrade Cisco Crosswork Situation Manager, run the upgrade command below that corresponds to your chosen upgrade mechanism.
If you have already run this step on the current host as part of this upgrade (for single-host upgrade for example), you can skip this step.
· If you are using a remote or offline Yum repository, run the following command on every host where a Cisco Crosswork Situation Manager RPM package is installed:
yum -y upgrade $(rpm -qa --qf '%{NAME}\n' | grep moogsoft | sed 's/$/-7.3.0/')
· If you are using downloaded RPM files on a host, run the following command from the location where the files are installed:
yum -y upgrade moogsoft-*7.3.0*.rpm
Merge the latest configuration file changes
Note:
In Cisco Crosswork Situation Manager v7.3.x, the Sigalisers (Cookbook and Tempus), and merge groups (default and custom) are imported into the database by default, enabling you to to access and configure them via the UI and API. The migration occurs once when Moogfarmd is restarted. A new flag has been added to the 7.3.x version of moog_farmd.conf that you can use to prevent the migration from taking place (file_only_config=true). If this flag is missing or is set to false, Moogfarmd attempts to perform the import when it starts.
Manually merge and compare .rpmsave versions of files with the new versions of those files. Add any new properties to the older versions of the files.
Note:
If you have already completed this step previously (as part of this upgrade process) on the current host, you can skip this step.
The config and bot files from the previous version should not be copied on top of (replace) the new version of those files in 7.3.x, as they are not always forwards-compatible, and some config/bot lines need to be added for the new version to work.
To find files that have been changed, moved or deleted, run these commands:
find $MOOGSOFT_HOME -name '*.rpmsave'
find /etc/init.d/ -name '*.rpmsave'
For example, the following command displays the differences in the new version of the system.conf file:
diff -u $MOOGSOFT_HOME/config/system.conf $MOOGSOFT_HOME/config/system.conf.rpmsave
Follow this process to merge the file differences:
1. Rename the new versions of the files, without the .rpmsave extension, to end with .bak.
2. Merge the .rpmsave file with the new .bak file by adding new properties/configuration where needed (from the new version of the file into the old version), so the structure matches the new version of the file.
3. Rename the .rpmsave file to remove the .rpmsave extension.
Update JVM to use Java 11
Note:
Only perform this step if you are upgrading from Cisco Crosswork Situation Manager v7.0.x or v7.1.x.
Note:
If you have already completed this step previously (as part of this upgrade process) on the current host, you can skip this step.
On each server with a Cisco Crosswork Situation Manager RPM package installed, run the following command to replace the /usr/java/latest symlink so it points at the new JDK11 JAVA_HOME directory:
source $MOOGSOFT_HOME/bin/utils/moog_init_functions.sh
If there are non-Cisco Crosswork Situation Manager packages on this server that do not support JDK11, you must update those applications to use a different JAVA_HOME symlink (not /usr/java/latest).
To confirm this has worked, run the following command:
$JAVA_HOME/bin/java -version
It should return:
openjdk version "11.0.2" 2019-01-15 LTS
You can also use the 'alternatives' command to point the system 'java' shortcut to the new version:
alternatives --config java
Remove references to the old MySQL connector
Note:
Only perform this step if you are upgrading from Cisco Crosswork Situation Manager v7.0.x or v7.1.x.
Note:
If you have already completed this step previously (as part of this upgrade process) on the current host, you can skip this step.
The MySQL connector is upgraded in this release.
The original connector may be used by the External Database module in the current deployment, configured in $MOOGSOFT_HOME/config/moog_external_db_details.conf.
If this file is configured in the current deployment, update it to reference the new mariadb connector here: $MOOGSOFT_HOME/lib/cots/mariadb-java-client-2.4.0.jar.
Change ownership of Apache Tomcat folders
Apache Tomcat is now run as the 'moogsoft' system user, which requires a change in ownership for the folders previously owned by Apache Tomcat.
Run the following commands to change ownership:
chown -R moogsoft:moogsoft /var/lib/moogsoft
chown -R moogsoft:moogsoft /var/run/apache-tomcat
chown -R moogsoft:moogsoft $MOOGSOFT_HOME/etc/saml
If SAML SSO is in use in the deployment, the IDP metadata file specified in $MOOGSOFT_HOME/config/security.conf needs to be readable by the 'moogsoft' system user. Use an appropriate chmod/chown command to ensure the readability and ownership is correct.
Upgrade Apache Tomcat and Nginx
Cisco Crosswork Situation Manager v7.3.0 ships with Apache Tomcat version 9.0.22.
Note:
Cisco Crosswork Situation Manager v7.3.0 no longer runs Apache Tomcat as the 'tomcat' UNIX user. When you follow the instructions below, the new version of Apache Tomcat is deployed to run as the 'moogsoft' user instead. As more threads and processes are now used by the moogsoft UNIX system user, you may need to increase ulimits for this user.
Run the following commands in this section on the server with the moogsoft-ui RPM package installed on it.
1. Stop Apache Tomcat on any servers where it is running:
service apache-tomcat stop;
ps -ef | grep java | grep tomcat | awk '{print $2}' | xargs kill -9 2>/dev/null
2. Remove the existing Apache Tomcat:
rm -rf /etc/init.d/apache-tomcat;
rm -rf $APPSERVER_HOME
rm -rf /usr/share/apache-tomcat
3. Back up the Nginx configuration files and any certificates. Copy the files in the following location to another location before continuing: /etc/nginx/. This folder is based on the default Nginx installation location.
4. Deploy the new version of Apache Tomcat and Nginx:
$MOOGSOFT_HOME/bin/utils/moog_init_ui.sh -tfn
5. If you made any changes to the original Apache Tomcat service script, apply the same changes to the new version.
6. Update /etc/nginx/conf.d/moog-ssl.conf with the locations of any certificates used and then restart Nginx:
service nginx restart
To continue with the upgrade, see RPM v7.3.x - Upgrade Core components.
RPM - Upgrade Core components
Follow these steps to perform an RPM upgrade on the Cisco Crosswork Situation Manager Core components to v7.3.x from v7.0.x, v7.1.x, or 7.2.x:
· Elasticsearch
· Moogfarmd
· RabbitMQ
· Events Analyser
These components should always reside on the same server.
Refer to Upgrade Cisco Crosswork Situation Manager for general information and upgrade instructions for other components and versions.
Stop services and processes
Run the following command as root to stop the default Moogfarmd service on any servers with the moogsoft-server package installed and where the Moogfarmd service is running. Change the service name if you are not using the default.
service moogfarmd stop
Ensure no more Moogfarmd processes are running with the following command. This will force-kill any remaining java processes which have failed to stop cleanly.
kill -9 $(ps -ef | grep java | grep farm | awk '{print $2}') 2>/dev/null
Run the following commands as root to stop the Events Analyser and Graph Analyser processes on any servers with the moogsoft-server package installed and where the Events Analyser or Graph Analyser is configured to run.
1. Comment out the relevant lines in crontab:
(crontab -l | sed -e 's/^\(.*events_analyser.*\)$/#\1/') | crontab -
(crontab -l | sed -e 's/^\(.*graph_analyser.*\)$/#\1/') | crontab -
2. Stop any active Events Analyser processes:
ps -ef | grep java | egrep 'events_analyser|graph_analyser' | awk '{print $2}' | xargs kill 2>/dev/null
Note:
Complete the Elasticsearch steps below if you have installed Elasticsearch on the same server as your Core components. Cisco recommends this in order to optimize index performance.
Delete the Elasticsearch indexes
Run this command on the moogsoft-search/Elasticsearch server to remove the old Elasticsearch indexes:
curl -XDELETE 'http://localhost:9200/alerts/' && curl -XDELETE 'http://localhost:9200/situations/'
If the command completes successfully, the following message is displayed:
{"acknowledged":true}{"acknowledged":true}
Modify the Elasticsearch repo
Note:
You can skip this section if you are following the 'Offline RPM' upgrade process, as the Elasticsearch package is obtained from the local Yum repository instead.
Run the following command to modify the Elasticsearch Yum repository to point to v6 instead of v5:
sed -i 's/5.x/6.x/g' $(grep 'artifacts.elastic' /etc/yum.repos.d/* | awk -F: '{ print $1 }' | sort -u | head -1)
Upgrade Cisco Crosswork Situation Manager
To upgrade Cisco Crosswork Situation Manager, run the upgrade command below that corresponds to your chosen upgrade mechanism.
If you have already run this step on the current host as part of this upgrade (for single-host upgrade for example), you can skip this step.
· If you are using a remote or offline Yum repository, run the following command on every host where a Cisco Crosswork Situation Manager RPM package is installed:
yum -y upgrade $(rpm -qa --qf '%{NAME}\n' | grep moogsoft | sed 's/$/-7.3.0/')
· If you are using downloaded RPM files on a host, run the following command from the location where the files are installed:
yum -y upgrade moogsoft-*7.3.0*.rpm
Merge the latest configuration file changes
Note:
In Cisco Crosswork Situation Manager v7.3.x, the Sigalisers (Cookbook and Tempus), and merge groups (default and custom) are imported into the database by default, enabling you to to access and configure them via the UI and API. The migration occurs once when Moogfarmd is restarted. A new flag has been added to the 7.3.x version of moog_farmd.conf that you can use to prevent the migration from taking place (file_only_config=true). If this flag is missing or is set to false, Moogfarmd attempts to perform the import when it starts.
Manually merge and compare .rpmsave versions of files with the new versions of those files. Add any new properties to the older versions of the files.
Note:
If you have already completed this step previously (as part of this upgrade process) on the current host, you can skip this step.
The config and bot files from the previous version should not be copied on top of (replace) the new version of those files in 7.3.x, as they are not always forwards-compatible, and some config/bot lines need to be added for the new version to work.
To find files that have been changed, moved or deleted, run these commands:
find $MOOGSOFT_HOME -name '*.rpmsave'
find /etc/init.d/ -name '*.rpmsave'
For example, the following command displays the differences in the new version of the system.conf file:
diff -u $MOOGSOFT_HOME/config/system.conf $MOOGSOFT_HOME/config/system.conf.rpmsave
Follow this process to merge the file differences:
1. Rename the new versions of the files, without the .rpmsave extension, to end with .bak.
2. Merge the .rpmsave file with the new .bak file by adding new properties/configuration where needed (from the new version of the file into the old version), so the structure matches the new version of the file.
3. Rename the .rpmsave file to remove the .rpmsave extension.
Update JVM to use Java 11
Note:
Only perform this step if you are upgrading from Cisco Crosswork Situation Manager v7.0.x or v7.1.x.
Note:
If you have already completed this step previously (as part of this upgrade process) on the current host, you can skip this step.
On each server with a Cisco Crosswork Situation Manager RPM package installed, run the following command to replace the /usr/java/latest symlink so it points at the new JDK11 JAVA_HOME directory:
source $MOOGSOFT_HOME/bin/utils/moog_init_functions.sh
If there are non-Cisco Crosswork Situation Manager packages on this server that do not support JDK11, you must update those applications to use a different JAVA_HOME symlink (not /usr/java/latest).
To confirm this has worked, run the following command:
$JAVA_HOME/bin/java -version
It should return:
openjdk version "11.0.2" 2019-01-15 LTS
You can also use the 'alternatives' command to point the system 'java' shortcut to the new version:
alternatives --config java
Remove references to the old MySQL connector
Note:
Only perform this step if you are upgrading from Cisco Crosswork Situation Manager v7.0.x or v7.1.x.
Note:
If you have already completed this step previously (as part of this upgrade process) on the current host, you can skip this step.
The MySQL connector is upgraded in this release.
The original connector may be used by the External Database module in the current deployment, configured in $MOOGSOFT_HOME/config/moog_external_db_details.conf.
If this file is configured in the current deployment, update it to reference the new mariadb connector here: $MOOGSOFT_HOME/lib/cots/mariadb-java-client-2.4.0.jar.
Update the RabbitMQ configuration
Note:
Only perform this step if you are upgrading from Cisco Crosswork Situation Manager v7.0.x.
Cisco recommends that you update the RabbitMQ configuration to support autoheal and other processes that improve stability in HA environments.
Run the command(s) below which are appropriate for the deployment type. Replace <VHOST> with your desired RabbitMQ VHOST/Zone.
· RPM:
cp -f $MOOGSOFT_HOME/etc/cots/rabbitmq/rabbitmq.config /etc/rabbitmq/
bash $MOOGSOFT_HOME/bin/utils/moog_init_mooms.sh -z <VHOST> -p
· Tarball:
cp -f $MOOGSOFT_HOME/etc/cots/rabbitmq/rabbitmq.config $MOOGSOFT_HOME/cots/rabbitmq-server/etc/rabbitmq/
bash $MOOGSOFT_HOME/bin/utils/moog_init_mooms.sh -z <VHOST> -p
To continue with the upgrade, see RPM v7.3.x - Upgrade database components.
RPM - Upgrade database components
Follow these steps to perform an RPM upgrade on the Cisco Crosswork Situation Manager database components to v7.3.x from v7.0.x, v7.1.x, or 7.2.x:
· Cisco Crosswork Situation Manager databases
· MySQL
Refer to Upgrade Cisco Crosswork Situation Manager for general information and upgrade instructions for other components and versions.
Upgrade Cisco Crosswork Situation Manager
To upgrade Cisco Crosswork Situation Manager, run the upgrade command below that corresponds to your chosen upgrade mechanism.
If you have already run this step on the current host as part of this upgrade (for single-host upgrade for example), you can skip this step.
· If you are using a remote or offline Yum repository, run the following command on every host where a Cisco Crosswork Situation Manager RPM package is installed:
yum -y upgrade $(rpm -qa --qf '%{NAME}\n' | grep moogsoft | sed 's/$/-7.3.0/')
· If you are using downloaded RPM files on a host, run the following command from the location where the files are installed:
yum -y upgrade moogsoft-*7.3.0*.rpm
Upgrade MySQL to v5.7.26
It is important to upgrade MySQL to 5.7.26 to address a number of bugs and security vulnerabilities.
1. Check if MySQL is configured to run with --gtid-mode=ON using the following command in the MySQL CLI:
show variables like 'gtid_mode';
Remember what the value is because you will need it later. Official instructions for upgrading to 5.7.26 are here: https://dev.mysql.com/doc/refman/5.7/en/upgrading.html and the steps are summarized below. Cisco recommends that you perform a backup of the database before continuing.
2. Download and install the MySQL packages using the appropriate step below:
— Systems configured with the MySQL Yum repository:
yum -y upgrade mysql-community-libs-5.7.26 \
mysql-community-libs-compat-5.7.26 \
mysql-community-server-5.7.26 \
mysql-community-common-5.7.26 \
mysql-community-client-5.7.26
— Or download the MySQL packages to the server running MySQL:
curl -L -O https://repo.mysql.com/yum/mysql-5.7-community/el/7/x86_64/mysql-community-libs-5.7.26-1.el7.x86_64.rpm;
curl -L -O https://repo.mysql.com/yum/mysql-5.7-community/el/7/x86_64/mysql-community-libs-compat-5.7.26-1.el7.x86_64.rpm;
curl -L -O https://repo.mysql.com/yum/mysql-5.7-community/el/7/x86_64/mysql-community-server-5.7.26-1.el7.x86_64.rpm;
curl -L -O https://repo.mysql.com/yum/mysql-5.7-community/el/7/x86_64/mysql-community-common-5.7.26-1.el7.x86_64.rpm;
curl -L -O https://repo.mysql.com/yum/mysql-5.7-community/el/7/x86_64/mysql-community-client-5.7.26-1.el7.x86_64.rpm;
Then manually install the packages:
yum -y upgrade mysql-*5.7.26*.rpm
3. If the gtid-mode was OFF (based on the command run earlier in the upgrade), run the MySQL upgrade utility. Provide mysql root password when prompted or just press Enter if no password set.
mysql_upgrade -u root -p
More information on GTID and the MySQL upgrade is here: https://dev.mysql.com/doc/refman/5.7/en/replication-gtids-restrictions.html#replication-gtids-restrictions-mysql_upgrade.
4. Restart MySQL to ensure any changes to system tables are saved:
service mysqld restart
Merge the latest configuration file changes
Note:
In Cisco Crosswork Situation Manager v7.3.x, the Sigalisers (Cookbook and Tempus), and merge groups (default and custom) are imported into the database by default, enabling you to to access and configure them via the UI and API. The migration occurs once when Moogfarmd is restarted. A new flag has been added to the 7.3.x version of moog_farmd.conf that you can use to prevent the migration from taking place (file_only_config=true). If this flag is missing or is set to false, Moogfarmd attempts to perform the import when it starts.
Manually merge and compare .rpmsave versions of files with the new versions of those files. Add any new properties to the older versions of the files.
Note:
If you have already completed this step previously (as part of this upgrade process) on the current host, you can skip this step.
The config and bot files from the previous version should not be copied on top of (replace) the new version of those files in 7.3.x, as they are not always forwards-compatible, and some config/bot lines need to be added for the new version to work.
To find files that have been changed, moved or deleted, run these commands:
find $MOOGSOFT_HOME -name '*.rpmsave'
find /etc/init.d/ -name '*.rpmsave'
For example, the following command displays the differences in the new version of the system.conf file:
diff -u $MOOGSOFT_HOME/config/system.conf $MOOGSOFT_HOME/config/system.conf.rpmsave
Follow this process to merge the file differences:
1. Rename the new versions of the files, without the .rpmsave extension, to end with .bak.
2. Merge the .rpmsave file with the new .bak file by adding new properties/configuration where needed (from the new version of the file into the old version), so the structure matches the new version of the file.
3. Rename the .rpmsave file to remove the .rpmsave extension.
Update JVM to use Java 11
Note:
Only perform this step if you are upgrading from Cisco Crosswork Situation Manager v7.0.x or v7.1.x.
Note:
If you have already completed this step previously (as part of this upgrade process) on the current host, you can skip this step.
On each server with a Cisco Crosswork Situation Manager RPM package installed, run the following command to replace the /usr/java/latest symlink so it points at the new JDK11 JAVA_HOME directory:
source $MOOGSOFT_HOME/bin/utils/moog_init_functions.sh
If there are non-Cisco Crosswork Situation Manager packages on this server that do not support JDK11, you must update those applications to use a different JAVA_HOME symlink (not /usr/java/latest).
To confirm this has worked, run the following command:
$JAVA_HOME/bin/java -version
It should return:
openjdk version "11.0.2" 2019-01-15 LTS
You can also use the 'alternatives' command to point the system 'java' shortcut to the new version:
alternatives --config java
Remove references to the old MySQL connector
Note:
Only perform this step if you are upgrading from Cisco Crosswork Situation Manager v7.0.x or v7.1.x.
Note:
If you have already completed this step previously (as part of this upgrade process) on the current host, you can skip this step.
The MySQL connector is upgraded in this release.
The original connector may be used by the External Database module in the current deployment, configured in $MOOGSOFT_HOME/config/moog_external_db_details.conf.
If this file is configured in the current deployment, update it to reference the new mariadb connector here: $MOOGSOFT_HOME/lib/cots/mariadb-java-client-2.4.0.jar.
Upgrade the Cisco Crosswork Situation Manager database schema
To upgrade the Cisco Crosswork Situation Manager database, provide the Auto Upgrader utility with the credentials of a database user with super privileges. For single-host installations where MySQL was installed as part of the Cisco Crosswork Situation Manager deployment, you can use the default 'root' user.
1. Run the following command, replacing <MySQL-SuperUsername> with the username of your super user:
Note:
Run this command on the server where the database is installed (on an RPM deployment, this is where the moogsoft-db package is deployed).
bash $MOOGSOFT_HOME/bin/utils/moog_db_auto_upgrader -t 7.3.0 -u <MySQL-SuperUsername>
2. Enter the password for the user.
Note:
You can provide the password to the utility with the -p flag but Cisco does not recommend this in non-test deployments for security reasons.
Drop deprecated historic database tables
Note:
Only perform this step if you are upgrading from Cisco Crosswork Situation Manager v7.0.x.
Run the following commands to drop two tables from the historic database that are no longer used. If you do not drop the tables at this stage, the Database Validator utility that you run during the validation step reports their presence as a delta.
Note:
Run these commands on the server where the database or, on RPM deployments, the moogsoft-db package is installed.
These commands may fail if DBSplit has never been enabled. You can ignore these errors.
bash $MOOGSOFT_HOME/bin/utils/moog_mysql_client -i -e "drop table room_post_sigs" 2>/dev/null;
bash $MOOGSOFT_HOME/bin/utils/moog_mysql_client -i -e "drop table room_posts" 2>/dev/null;
To continue with the upgrade, see RPM v7.3.x - Upgrade data ingestion components.
RPM - Upgrade data ingestion components
Follow these steps to perform an RPM upgrade on the data ingestion LAMs to v7.3.x from v7.0.x, v7.1.x, or 7.2.x.
To upgrade UI integrations, see RPM 7.3.x - Upgrade UI components.
Refer to Upgrade Cisco Crosswork Situation Manager for general information and upgrade instructions for other components and versions.
Stop services and processes
Run the following commands as root to query/stop the default LAM/integrations services on any servers with the moogsoft-integrations/moogsoft-integrations-ui package installed and where the LAMs/integrations are running.
Check for running LAM and integration processes and stop them using the relevant service scripts:
systemctl status | grep lamd
service <lam_service_name> stop
Run the following command to stop any remaining active LAM and integration processes:
kill -9 $(ps -ef | grep java | grep _lam | awk '{print $2}') 2>/dev/null
Upgrade Cisco Crosswork Situation Manager
To upgrade Cisco Crosswork Situation Manager, run the upgrade command below that corresponds to your chosen upgrade mechanism.
If you have already run this step on the current host as part of this upgrade (for single-host upgrade for example), you can skip this step.
· If you are using a remote or offline Yum repository, run the following command on every host where a Cisco Crosswork Situation Manager RPM package is installed:
yum -y upgrade $(rpm -qa --qf '%{NAME}\n' | grep moogsoft | sed 's/$/-7.3.0/')
· If you are using downloaded RPM files on a host, run the following command from the location where the files are installed:
yum -y upgrade moogsoft-*7.3.0*.rpm
Merge the latest configuration file changes
Note:
In Cisco Crosswork Situation Manager v7.3.x, the Sigalisers (Cookbook and Tempus), and merge groups (default and custom) are imported into the database by default, enabling you to to access and configure them via the UI and API. The migration occurs once when Moogfarmd is restarted. A new flag has been added to the 7.3.x version of moog_farmd.conf that you can use to prevent the migration from taking place (file_only_config=true). If this flag is missing or is set to false, Moogfarmd attempts to perform the import when it starts.
Manually merge and compare .rpmsave versions of files with the new versions of those files. Add any new properties to the older versions of the files.
Note:
If you have already completed this step previously (as part of this upgrade process) on the current host, you can skip this step.
The config and bot files from the previous version should not be copied on top of (replace) the new version of those files in 7.3.x, as they are not always forwards-compatible, and some config/bot lines need to be added for the new version to work.
To find files that have been changed, moved or deleted, run these commands:
find $MOOGSOFT_HOME -name '*.rpmsave'
find /etc/init.d/ -name '*.rpmsave'
For example, the following command displays the differences in the new version of the system.conf file:
diff -u $MOOGSOFT_HOME/config/system.conf $MOOGSOFT_HOME/config/system.conf.rpmsave
Follow this process to merge the file differences:
1. Rename the new versions of the files, without the .rpmsave extension, to end with .bak.
2. Merge the .rpmsave file with the new .bak file by adding new properties/configuration where needed (from the new version of the file into the old version), so the structure matches the new version of the file.
3. Rename the .rpmsave file to remove the .rpmsave extension.
Update JVM to use Java 11
Note:
Only perform this step if you are upgrading from Cisco Crosswork Situation Manager v7.0.x or v7.1.x.
Note:
If you have already completed this step previously (as part of this upgrade process) on the current host, you can skip this step.
On each server with a Cisco Crosswork Situation Manager RPM package installed, run the following command to replace the /usr/java/latest symlink so it points at the new JDK11 JAVA_HOME directory:
source $MOOGSOFT_HOME/bin/utils/moog_init_functions.sh
If there are non-Cisco Crosswork Situation Manager packages on this server that do not support JDK11, you must update those applications to use a different JAVA_HOME symlink (not /usr/java/latest).
To confirm this has worked, run the following command:
$JAVA_HOME/bin/java -version
It should return:
openjdk version "11.0.2" 2019-01-15 LTS
You can also use the 'alternatives' command to point the system 'java' shortcut to the new version:
alternatives --config java
Remove references to the old MySQL connector
Note:
Only perform this step if you are upgrading from Cisco Crosswork Situation Manager v7.0.x or v7.1.x.
Note:
If you have already completed this step previously (as part of this upgrade process) on the current host, you can skip this step.
The MySQL connector is upgraded in this release.
The original connector may be used by the External Database module in the current deployment, configured in $MOOGSOFT_HOME/config/moog_external_db_details.conf.
If this file is configured in the current deployment, update it to reference the new mariadb connector here: $MOOGSOFT_HOME/lib/cots/mariadb-java-client-2.4.0.jar.
Update the RabbitMQ configuration
Note:
Only perform this step if you are upgrading from Cisco Crosswork Situation Manager v7.0.x.
If you have RabbitMQ installed and running on this server, complete the following step.
Cisco recommends that you update the RabbitMQ configuration to support autoheal and other processes that improve stability in HA environments.
Run the command(s) below which are appropriate for the deployment type. Replace <VHOST> with your desired RabbitMQ VHOST/Zone.
· RPM:
cp -f $MOOGSOFT_HOME/etc/cots/rabbitmq/rabbitmq.config /etc/rabbitmq/
bash $MOOGSOFT_HOME/bin/utils/moog_init_mooms.sh -z <VHOST> -p
· Tarball:
cp -f $MOOGSOFT_HOME/etc/cots/rabbitmq/rabbitmq.config $MOOGSOFT_HOME/cots/rabbitmq-server/etc/rabbitmq/
bash $MOOGSOFT_HOME/bin/utils/moog_init_mooms.sh -z <VHOST> -p
To continue with the upgrade, see v7.3.x - Finalize and validate upgrade.
RPM - Migrate from MySQL to Percona
This topic describes the RPM migration procedure from MySQL to Percona XtraDB Cluster.
Follow these steps to perform this process with root privileges.
Cisco Crosswork Situation Manager uses Percona XtraDB Cluster which supports the Galera replication protocol to support high availability (HA). Percona XtraDB is similar to MySQL with improvements for HA, scalability, and usability.
Cisco strongly recommends you perform the migration from MySQL to Percona XtraDB Cluster and HAProxy. See /document/preview/120574#UUID816c7d74d05ed359780616a54d06a4d4 for details behind the Cisco decision to use Percona and HAProxy.Database Strategy
Before you begin
Before you begin the migration process, ensure you have met the following requirements:
· You have root access to the servers you will use for your database nodes, and to any servers HAProxy will be installed on.
· You have credentials to connect to the "speedy" Cisco package repository.
Configure the Percona XtraDb Cluster donor node
To migrate to Percona XtraDB Cluster, perform the following steps on the server where the moogsoft-db package is installed.
Note:
If you have installed the moogsoft-db package on more than one server, for example in a master/standby configuration, use the master as the donor node.
1. Navigate to the desired location and install the Percona repository:
yum -y install https://repo.percona.com/yum/percona-release-latest.noarch.rpm
2. Install Percona XtraBackup:
yum -y install percona-xtrabackup-24.x86_64
3. Back up MySQL using the Percona XtraBackup tool:
innobackupex --user=root --password= /backups/mysql
4. When the backup is complete, repeat the process using the "apply log" setting, to apply any transactions that may have occurred during the backup process:
innobackupex --apply-log /backups/mysql
5. Stop MySQL:
service mysqld stop
6. Uninstall MySQL:
yum -y remove mysql-*community*
7. Install Percona Cluster Binary 5.7:
yum -y install Percona-Server-shared-compat-57
yum -y install Percona-XtraDB-Cluster-server-57
8. Configure the Percona cluster to start in bootstrap mode.
a. Edit the /etc/percona-xtradb-cluster.conf.d/wsrep.cnf file so that wsrep_cluster_address is not set to an IP address. For example:
[mysqld]
wsrep_cluster_address=gcomm://
b. Uncomment the following property, to enable the Percona user to be used for replication.
wsrep_sst_auth="username:password"
Note:
The Percona SST (State Transfer) user in the wsrep_sst_auth property does not exist yet. Set the authentication details here and you will create the user below.
1. Start the Percona donor node:
service mysqld start
2. Create a Percona SST user, grant the required permissions and add the user to the bootstrapped node.
Run the following command, replacing the username and password with your chosen user credentials:
mysql -u root -e "GRANT PROCESS, RELOAD, LOCK TABLES, REPLICATION CLIENT ON *.* TO 'username'@'localhost' identified by 'password';"
3. Run the following commands to create the clustercheck user required by HA Proxy:
mysql -u root -e "GRANT PROCESS ON *.* TO 'clustercheckuser'@'localhost' IDENTIFIED BY 'clustercheckpassword\!';"
mysql -u root -e "FLUSH PRIVILEGES;"
4. Add the IP addresses for the remaining nodes to the Percona configuration file.
Configure the wsrep_cluster_address property in the /etc/percona-xtradb-cluster.conf.d/wsrep.cnf file to contain a comma-separated list of all of the nodes you will add to the cluster. For example:
[mysqld]
wsrep_cluster_address=gcomm://1.1.1.1,1.1.1.2,1.1.1.3
Configure the Percona clustercheck script
The Percona clustercheck script is distributed as part of Percona XtraDB Cluster. It works with HA Proxy to monitor nodes in the cluster and performs health checks on backend servers.
To configure and deploy the script:
1. Install the Extended Internet Service Daemon xinetd:
yum -y install xinetd
2. Create a script to launch clustercheck on request, on port 9198:
cat > /etc/xinetd.d/mysqlchk << EOF
# default: on
# description: mysqlchk
service mysqlchk
{
disable = no
flags = REUSE
socket_type = stream
port = 9198
wait = no
user = nobody
server = /usr/bin/clustercheck
log_on_failure += USERID
only_from = 0.0.0.0/0
per_source = UNLIMITED
}
EOF
3. Add the script mysqlchk as a service to be run on request on port 9198 by xinetd. (edited)
echo "mysqlchk 9198/tcp # mysqlchk" >> /etc/services
4. Restart xinetd:
systemctl restart xinetd
Configure additional nodes
When you have configured the donor node, follow these steps to add your second and subsequent nodes.
1. Stop MySQL on the node:
service mysqld stop
2. Uninstall MySQL on the node:
yum -y remove mysql-*community*
3. Run the install_percona_nodes script to install the Percona Cluster Binary 5.7, add the node to the configuration file and start the node.
The script syntax is as follows:
RPM:
install_percona_nodes.sh -p|--primary -i|--ips [IP1,IP2,IP3] -u|--username -w|--password -h|--help
Tarball:
install_percona_nodes_tarball.sh -p|--primary -i|--ips [IP1,IP2,IP3] -u|--username -w|--password -h|--help
— -p: Set this node as primary, so it starts with default bootstrap enabled.
— -i: Comma-separated list of node IP addresses or hostnames.
— -u: Username of your Percona SST user.
— -w: Password of your Percona SST user.
— -h: Display the help information for the script.
Note:
For more information on how nodes join the cluster and state transfer (SST), see the Galera Cluster documentation on Node Provisioning.
For example:
bash <(curl -s -k https://<myspeedyuser>:<myspeedypassword>@speedy.moogsoft.com/repo/aiops/install_percona_nodes.sh) -i 1.1.1.1,1.1.1.2,1.1.1.3 -u mysstusername -w mysstpassword
Configure for Disaster Recovery
In a Disaster Recovery configuration with two or more data centres, you can enable synchronization of the binary log to disk before transactions are committed.
1. Edit the ~/.my.cnf file and set the following property:
sync_binlog = 1
2. Restart the databases to apply the change:
RPM:
systemctl restart mysqld
Tarball:
$MOOGSOFT_HOME/bin/utils/process_cntl mysql restart
Note:
Do not change this setting in a standard configuration, as it will impact negatively on performance.
Install HA Proxy
An administrator must install HA Proxy on all Cisco Crosswork Situation Manager servers on your network. Root privileges are required. The HA Proxy installer script syntax is as follows:
haproxy_installer.sh -l|--listener-port [3306] -i|--ips [IP1:PORT1,IP2:PORT2,IP3:PORT3] -c|--configure-aiops -h|--help
· -i: Comma-separated list of node IP addresses or hostnames and ports.
· -l: Port on which HA Proxy listens for connections. Default is 3306.
· -c: Configure the local Cisco Crosswork Situation Manager to use HA Proxy's port.
· -h: Display the help information for the script.
To install HA Proxy:
1. Set $MOOGSOFT_HOME to the correct location. For example:
export $MOOGSOFT_HOME=/home/admin/moogsoft
2. Run the HA Proxy installer script. For example:
bash <(curl -s -k https://<myspeedyusername>:<myspeedypassword>@speedy.moogsoft.com/repo/aiops/haproxy_installer.sh) -c -i 10.101.10.109:3306,10.101.10.110:3306,10.101.10.111:3306
3. Restart Moogfarmd, Apache Tomcat and any integrations you are using. See Control Cisco Crosswork Situation Manager Processes for details.
Tarball - Prepare to upgrade
Follow these steps before you perform a Tarball upgrade to Cisco Crosswork Situation Manager v7.3.x from v7.0.x, v7.1.x, or 7.2.x.
Refer to Upgrade Cisco Crosswork Situation Manager for general information and upgrade instructions for other components and versions.
Note:
During the upgrade process, the moog_reference incremental_token_data table is truncated. If you are using entropy in your deployment, it is important to initialize a full Events Analyser job towards the end of the upgrade process. See the #UUID811b30e4ead29a04100a45839c575e19_titleidm123139862768218 step for details.
Download the installer
Run the following command to download the installer, replacing the username and password with your Cisco Crosswork Situation Manager "speedy" Yum repository credentials:
curl -L -O "https://<username>:<password>@speedy.moogsoft.com/installer/moogsoft-aiops-7.3.0.tgz"
Back up the existing system
To back up the existing system:
1. Back up $MOOGSOFT_HOME, particularly the following folders:
— $MOOGSOFT_HOME/config/
— $MOOGSOFT_HOME/bots/
— $MOOGSOFT_HOME/etc/
— $MOOGSOFT_HOME/contrib/
— For RPM deployments: /var/lib/moogsoft/moog-data/
— For Tarball deployments: $MOOGSOFT_HOME/moog-data/
2. Take a snapshot (for VMs).
3. Back up MySQL.
Note and uninstall UI integrations
Note:
Only perform this step if you are upgrading from Cisco Crosswork Situation Manager v7.0.x or v7.1.x.
If you are using any of the following UI integrations and are upgrading from v7.0.x or v7.1.x, make a note of their connection and configuration details, then uninstall them via the UI before you begin the upgrade. The post-upgrade steps include details on how to reconfigure them. This is required due to UI changes in the new version.
· AWS CloudWatch
· Cherwell
· JIRA Service Desk and JIRA Software
· JMS
· New Relic
· Remedy
· ServiceNow
· SevOne
· Slack
· SolarWinds
· VMware vCenter and vSphere
· vRealize Log Insight
· WebSphere MQ
· xMatters
To continue with the upgrade, see Tarball v7.3.x - Upgrade UI components.
Tarball - Upgrade UI components
Follow these steps to perform a Tarball upgrade on the Cisco Crosswork Situation Manager UI components to v7.3.x from v7.0.x, v7.1.x, or 7.2.x:
· Nginx
· Apache Tomcat
· UI integrations
These components should always reside on the same server.
Refer to Upgrade Cisco Crosswork Situation Manager for general information and upgrade instructions for other components and versions.
Stop services and processes
Run the following command to stop Apache Tomcat:
$MOOGSOFT_HOME/bin/utils/process_cntl apache-tomcat stop
Obtain the following path variables before re-linking the directories. Replace 7.0 in the first line if you are upgrading from 7.1 or 7.2. From this step onwards, use the same terminal session to keep the variables.
VERSION_UPGRADING_FROM=7.0;
CERT_REAL_PATH_PEM=$(readlink -f $(grep -h 'ssl_certificate ' $MOOGSOFT_HOME/dist/${VERSION_UPGRADING_FROM}.*/cots/nginx/config/conf.d/moog-ssl.conf|head -1|awk '{print $2}'|tr -d ';'));
CERT_REAL_PATH_KEY=$(readlink -f $(grep -h 'ssl_certificate_key' $MOOGSOFT_HOME/dist/${VERSION_UPGRADING_FROM}.*/cots/nginx/config/conf.d/moog-ssl.conf|head -1|awk '{print $2}'|tr -d ';'));
CERT_PATH_PEM=$(grep -h 'ssl_certificate ' $MOOGSOFT_HOME/dist/${VERSION_UPGRADING_FROM}.*/cots/nginx/config/conf.d/moog-ssl.conf|head -1);
CERT_PATH_KEY=$(grep -h 'ssl_certificate_key' $MOOGSOFT_HOME/dist/${VERSION_UPGRADING_FROM}.*/cots/nginx/config/conf.d/moog-ssl.conf|head -1);
To stop LAMs and integrations, you can either use the Process Control utility:
$MOOGSOFT_HOME/bin/utils/process_cntl <lam_name> stop
Or the kill command:
kill -9 $(ps -ef | grep java | grep _lam | awk '{print $2}') 2>/dev/null
Note:
Complete the Elasticsearch steps below if you have installed Elasticsearch on the same server as your UI components. Cisco Crosswork Situation Manager recommends that you move Elasticsearch to your Core server (the server running Moogfarmd) to optimize index performance.
Delete the Elasticsearch indexes
Run this command on the moogsoft-search/Elasticsearch server to remove the old Elasticsearch indexes:
curl -XDELETE 'http://localhost:9200/alerts/' && curl -XDELETE 'http://localhost:9200/situations/'
If the command completes successfully, the following message is displayed:
{"acknowledged":true}{"acknowledged":true}
Upgrade Cisco Crosswork Situation Manager
To upgrade Cisco Crosswork Situation Manager, run the following commands.
If you have already run this step on the current host as part of this upgrade (for single-host upgrade for example), you can skip this step.
tar -xf moogsoft-aiops-7.3.0.tgz
bash moogsoft-aiops-install-7.3.0.sh
Follow the instructions that appear. The upgrade process detects the existing installation and performs the upgrade.
Merge the latest configuration file changes
Note:
In Cisco Crosswork Situation Manager v7.3.x, the Sigalisers (Cookbook and Tempus), and merge groups (default and custom) are imported into the database by default, enabling you to to access and configure them via the UI and API. The migration occurs once when Moogfarmd is restarted. A new flag has been added to the 7.3.x version of moog_farmd.conf that you can use to prevent the migration from taking place (file_only_config=true). If this flag is missing or is set to false, Moogfarmd attempts to perform the import when it starts.
The top-level $MOOGSOFT_HOME/config and $MOOGSOFT_HOME/bots folders are the master folder locations for configuration and bot files.
Note:
If you have already completed this step previously (as part of this upgrade process) on the current host, you can skip this step.
The new 'default' v7.3.0 versions of the config and bot files are stored in $MOOGSOFT_HOME/dist/7.3.0/config/ and $MOOGSOFT_HOME/dist/7.3.0/bots/ respectively.
The config and bot files from the previous version should not be copied on top of (replace) the new version of those files in 7.3.x, as they are not always forwards-compatible, and some config/bot lines need to be added for the new version to work.
1. Identify the config files that have changed between the previously installed version and v7.3.0. For example:
diff -rq $MOOGSOFT_HOME/dist/7.[^3]*/config $MOOGSOFT_HOME/dist/7.3.*/config | grep -i 'differ'
2. Update files in $MOOGSOFT_HOME/config with any changes introduced in the v7.3.0 versions of these files.
3. Identify the contrib files that have changed between the previously installed version and v7.3.0. For example:
diff -rq $MOOGSOFT_HOME/dist/7.[^3]*/contrib $MOOGSOFT_HOME/dist/7.3.*/contrib | grep -i 'differ'
4. Update files in $MOOGSOFT_HOME/contrib with any changes introduced in the v7.3.0 versions of these files.
5. Identify the bot files that have changed between the previously installed version and v7.3.0. For example:
diff -rq $MOOGSOFT_HOME/dist/7.[^3]*/bots $MOOGSOFT_HOME/dist/7.3.*/bots | grep -i 'differ'
6. Update files in $MOOGSOFT_HOME/bots with any changes introduced in the v7.3.0 versions of these files.
Upgrade Apache Tomcat and Nginx
Follow these steps to upgrade Apache Tomcat and the Nginx web server.
1. Upgrade Tomcat and Nginx:
$MOOGSOFT_HOME/bin/utils/moog_init_ui.sh -tnfz $($MOOGSOFT_HOME/bin/utils/moog_config_reader -k mooms.zone)
2. Migrate the Nginx certificates from the previous deployment to the new. Use the following commands as an example where SSL terminates in Nginx (default configuration):
cp -f $CERT_REAL_PATH_PEM $MOOGSOFT_HOME/cots/nginx/ssl/
cp -f $CERT_REAL_PATH_KEY $MOOGSOFT_HOME/cots/nginx/ssl/
sed -i "s|.*ssl_certificate .*|${CERT_PATH_PEM}|" $MOOGSOFT_HOME/cots/nginx/config/conf.d/moog-ssl.conf
sed -i "s|.*ssl_certificate_key.*|${CERT_PATH_KEY}|" $MOOGSOFT_HOME/cots/nginx/config/conf.d/moog-ssl.conf
3. If you previously customized the moog-ssl.conf/moog-default.conf file (including references to certificates, etc), make the same changes to the new version of the file.
4. Start Nginx:
$MOOGSOFT_HOME/bin/utils/process_cntl nginx start
To continue with the upgrade, see Tarball v7.3.x - Upgrade Core components.
Tarball - Upgrade Core components
Follow these steps to perform a Tarball upgrade on the Cisco Crosswork Situation Manager Core components to v7.3.x from v7.0.x, v7.1.x, or 7.2.x:
· Elasticsearch
· Moogfarmd
· RabbitMQ
· Events Analyser
These components should always reside on the same server.
Refer to Upgrade Cisco Crosswork Situation Manager for general information and upgrade instructions for other components and versions.
Stop services and processes
You must stop Cisco Crosswork Situation Manager services and processes before starting the upgrade, as follows.
1. Stop Moogfarmd:
$MOOGSOFT_HOME/bin/utils/process_cntl moog_farmd stop
2. Stop Apache Tomcat:
$MOOGSOFT_HOME/bin/utils/process_cntl apache-tomcat stop
3. Stop LAMs and integrations. You can use either the Process Control utility:
$MOOGSOFT_HOME/bin/utils/process_cntl <lam_name> stop
Or the kill command:
kill -9 $(ps -ef | grep java | grep _lam | awk '{print $2}') 2>/dev/null
4. Disable the Events Analyser and Graph Analyser:
a. Run the following command to comment out the relevant lines in crontab:
(crontab -l | sed -e 's/^\(.*events_analyser.*\)$/#\1/') | crontab -
(crontab -l | sed -e 's/^\(.*graph_analyser.*\)$/#\1/') | crontab -
b. Run the following command to stop any active Events Analyser or Graph Analyser processes:
ps -ef | grep java | egrep 'events_analyser|graph_analyser' | awk '{print $2}' | xargs kill 2>/dev/null
5. Stop MySQL, Elasticsearch, RabbitMQ and Nginx (if they are running):
$MOOGSOFT_HOME/bin/utils/process_cntl mysql stop
$MOOGSOFT_HOME/bin/utils/process_cntl elasticsearch stop
$MOOGSOFT_HOME/bin/utils/process_cntl rabbitmq stop
$MOOGSOFT_HOME/bin/utils/process_cntl nginx stop
Delete the Elasticsearch indexes
Run this command on the moogsoft-search/Elasticsearch server to remove the old Elasticsearch indexes:
curl -XDELETE 'http://localhost:9200/alerts/' && curl -XDELETE 'http://localhost:9200/situations/'
If the command completes successfully, the following message is displayed:
{"acknowledged":true}{"acknowledged":true}
Upgrade Cisco Crosswork Situation Manager
To upgrade Cisco Crosswork Situation Manager, run the following commands.
If you have already run this step on the current host as part of this upgrade (for single-host upgrade for example), you can skip this step.
tar -xf moogsoft-aiops-7.3.0.tgz
bash moogsoft-aiops-install-7.3.0.sh
Follow the instructions that appear. The upgrade process detects the existing installation and performs the upgrade.
Merge the latest configuration file changes
Note:
In Cisco Crosswork Situation Manager v7.3.x, the Sigalisers (Cookbook and Tempus), and merge groups (default and custom) are imported into the database by default, enabling you to to access and configure them via the UI and API. The migration occurs once when Moogfarmd is restarted. A new flag has been added to the 7.3.x version of moog_farmd.conf that you can use to prevent the migration from taking place (file_only_config=true). If this flag is missing or is set to false, Moogfarmd attempts to perform the import when it starts.
The top-level $MOOGSOFT_HOME/config and $MOOGSOFT_HOME/bots folders are the master folder locations for configuration and bot files.
Note:
If you have already completed this step previously (as part of this upgrade process) on the current host, you can skip this step.
The new 'default' v7.3.0 versions of the config and bot files are stored in $MOOGSOFT_HOME/dist/7.3.0/config/ and $MOOGSOFT_HOME/dist/7.3.0/bots/ respectively.
The config and bot files from the previous version should not be copied on top of (replace) the new version of those files in 7.3.x, as they are not always forwards-compatible, and some config/bot lines need to be added for the new version to work.
1. Identify the config files that have changed between the previously installed version and v7.3.0. For example:
diff -rq $MOOGSOFT_HOME/dist/7.[^3]*/config $MOOGSOFT_HOME/dist/7.3.*/config | grep -i 'differ'
2. Update files in $MOOGSOFT_HOME/config with any changes introduced in the v7.3.0 versions of these files.
3. Identify the contrib files that have changed between the previously installed version and v7.3.0. For example:
diff -rq $MOOGSOFT_HOME/dist/7.[^3]*/contrib $MOOGSOFT_HOME/dist/7.3.*/contrib | grep -i 'differ'
4. Update files in $MOOGSOFT_HOME/contrib with any changes introduced in the v7.3.0 versions of these files.
5. Identify the bot files that have changed between the previously installed version and v7.3.0. For example:
diff -rq $MOOGSOFT_HOME/dist/7.[^3]*/bots $MOOGSOFT_HOME/dist/7.3.*/bots | grep -i 'differ'
6. Update files in $MOOGSOFT_HOME/bots with any changes introduced in the v7.3.0 versions of these files.
Update the RabbitMQ configuration
Note:
Only perform this step if you are upgrading from Cisco Crosswork Situation Manager v7.0.x.
Cisco recommends that you update the RabbitMQ configuration to support autoheal and other processes that improve stability in HA environments.
Run the command(s) below which are appropriate for the deployment type. Replace <VHOST> with your desired RabbitMQ VHOST/Zone.
· RPM:
cp -f $MOOGSOFT_HOME/etc/cots/rabbitmq/rabbitmq.config /etc/rabbitmq/
bash $MOOGSOFT_HOME/bin/utils/moog_init_mooms.sh -z <VHOST> -p
· Tarball:
cp -f $MOOGSOFT_HOME/etc/cots/rabbitmq/rabbitmq.config $MOOGSOFT_HOME/cots/rabbitmq-server/etc/rabbitmq/
bash $MOOGSOFT_HOME/bin/utils/moog_init_mooms.sh -z <VHOST> -p
To continue with the upgrade, see Tarball v7.3.x - Upgrade database components.
Tarball - Upgrade database components
Follow these steps to perform a Tarball upgrade on the Cisco Crosswork Situation Manager database components to v7.3.x from v7.0.x, v7.1.x, or 7.2.x:
· Cisco Crosswork Situation Manager databases
· MySQL
Refer to Upgrade Cisco Crosswork Situation Manager for general information and upgrade instructions for other components and versions.
Upgrade MySQL to v5.7.26
You must update the ~/.my.cnf file to reflect the correct path for MySQL. Run the following commands to update this file. The command below assumes the Database .my.cnf file is under the current user's 'home' folder (~).
MYSQL_HOME=$(dirname $(dirname $(which mysqld)))
sed -i "s;basedir.*;basedir = ${MYSQL_HOME};" ~/.my.cnf
Now restart MySQL using the following command:
$MOOGSOFT_HOME/bin/utils/process_cntl mysqld restart
It is important to upgrade MySQL to 5.7.26 to address a number of bugs and security vulnerabilities.
1. Download the MySQL 5.7.26 tarball to the server:
curl -L -O https://dev.mysql.com/get/Downloads/MySQL-5.7/mysql-5.7.26-el7-x86_64.tar.gz
2. Check if MySQL is configured to run with --gtid-mode=ON using the following command in the MySQL CLI:
show variables like 'gtid_mode';
Remember what the value is because you will need it later. Official instructions for upgrading to 5.7.26 are here: https://dev.mysql.com/doc/refman/5.7/en/upgrading.html and the steps are summarized below. Cisco recommends you perform a backup of the database before continuing.
3. Move the MySQL tarball into the desired location and extract it:
tar -xf mysql-5.7.26-el7-x86_64.tar.gz
4. Update the system PATH to point at the new MySQL folder. The command below assumes the new MySQL folder is in the same folder as the previous MySQL folder (user home). If this is not the case, you must manually update the ~/.bashrc file.
sed -i 's/5.7.22/5.7.26/g' ~/.bashrc;
source ~/.bashrc;
5. Restart MySQL:
$MOOGSOFT_HOME/bin/utils/process_cntl mysql restart
6. If the gtid-mode was OFF (based on the command run earlier in the upgrade), run the MySQL upgrade utility. Provide the MySQL root password when prompted or just press Enter if no password set.
mysql_upgrade -u root -p -S $MOOGSOFT_HOME/var/lib/mysql/var/lib/mysql/mysql.sock
More information on GTID and the MySQL upgrade is here: https://dev.mysql.com/doc/refman/5.7/en/replication-gtids-restrictions.html#replication-gtids-restrictions-mysql_upgrade.
Restart MySQL to ensure any changes to system tables are saved:
$MOOGSOFT_HOME/bin/utils/process_cntl mysql restart
Upgrade Cisco Crosswork Situation Manager
To upgrade Cisco Crosswork Situation Manager, run the following commands.
If you have already run this step on the current host as part of this upgrade (for single-host upgrade for example), you can skip this step.
tar -xf moogsoft-aiops-7.3.0.tgz
bash moogsoft-aiops-install-7.3.0.sh
Follow the instructions that appear. The upgrade process detects the existing installation and performs the upgrade.
Merge the latest configuration file changes
Note:
In Cisco Crosswork Situation Manager v7.3.x, the Sigalisers (Cookbook and Tempus), and merge groups (default and custom) are imported into the database by default, enabling you to to access and configure them via the UI and API. The migration occurs once when Moogfarmd is restarted. A new flag has been added to the 7.3.x version of moog_farmd.conf that you can use to prevent the migration from taking place (file_only_config=true). If this flag is missing or is set to false, Moogfarmd attempts to perform the import when it starts.
The top-level $MOOGSOFT_HOME/config and $MOOGSOFT_HOME/bots folders are the master folder locations for configuration and bot files.
Note:
If you have already completed this step previously (as part of this upgrade process) on the current host, you can skip this step.
The new 'default' v7.3.0 versions of the config and bot files are stored in $MOOGSOFT_HOME/dist/7.3.0/config/ and $MOOGSOFT_HOME/dist/7.3.0/bots/ respectively.
The config and bot files from the previous version should not be copied on top of (replace) the new version of those files in 7.3.x, as they are not always forwards-compatible, and some config/bot lines need to be added for the new version to work.
1. Identify the config files that have changed between the previously installed version and v7.3.0. For example:
diff -rq $MOOGSOFT_HOME/dist/7.[^3]*/config $MOOGSOFT_HOME/dist/7.3.*/config | grep -i 'differ'
2. Update files in $MOOGSOFT_HOME/config with any changes introduced in the v7.3.0 versions of these files.
3. Identify the contrib files that have changed between the previously installed version and v7.3.0. For example:
diff -rq $MOOGSOFT_HOME/dist/7.[^3]*/contrib $MOOGSOFT_HOME/dist/7.3.*/contrib | grep -i 'differ'
4. Update files in $MOOGSOFT_HOME/contrib with any changes introduced in the v7.3.0 versions of these files.
5. Identify the bot files that have changed between the previously installed version and v7.3.0. For example:
diff -rq $MOOGSOFT_HOME/dist/7.[^3]*/bots $MOOGSOFT_HOME/dist/7.3.*/bots | grep -i 'differ'
6. Update files in $MOOGSOFT_HOME/bots with any changes introduced in the v7.3.0 versions of these files.
Upgrade the Cisco Crosswork Situation Manager database schema
To upgrade the Cisco Crosswork Situation Manager database, provide the Auto Upgrader utility with the credentials of a database user with super privileges. For single-host installations where MySQL was installed as part of the Cisco Crosswork Situation Manager deployment, you can use the default 'root' user.
1. Ensure the database is running, then execute the following command, replacing <MySQL-SuperUsername> with the username of your super user:
bash $MOOGSOFT_HOME/bin/utils/moog_db_auto_upgrader -t 7.3.0 -u <MySQL-SuperUsername>
2. Enter the password for the user.
Note:
You can provide the password to the utility with the -p flag but Cisco does not recommend this in non-test deployments for security reasons.
Drop deprecated historic database tables
Note:
Only perform this step if you are upgrading from Cisco Crosswork Situation Manager v7.0.x.
Run the following commands to drop two tables from the historic database that are no longer used. If you do not drop the tables at this stage, the Database Validator utility that you run during the validation step reports their presence as a delta.
Note:
Run these commands on the server where the database or, on RPM deployments, the moogsoft-db package is installed.
These commands may fail if DBSplit has never been enabled. You can ignore these errors.
bash $MOOGSOFT_HOME/bin/utils/moog_mysql_client -i -e "drop table room_post_sigs" 2>/dev/null;
bash $MOOGSOFT_HOME/bin/utils/moog_mysql_client -i -e "drop table room_posts" 2>/dev/null;
To continue with the upgrade, see Tarball v7.3.x - Upgrade data ingestion components.
Tarball - Upgrade data ingestion components
Follow these steps to perform a Tarball upgrade on the data ingestion LAMs to v7.3.x from v7.0.x, v7.1.x, or 7.2.x.
To upgrade UI integrations, see Tarball 7.3.x - Upgrade UI components.
Refer to Upgrade Cisco Crosswork Situation Manager for general information and upgrade instructions for other components and versions.
Stop services and processes
To stop LAMs and integrations, you can either use the Process Control utility:
$MOOGSOFT_HOME/bin/utils/process_cntl <lam_name> stop
Or the kill command:
kill -9 $(ps -ef | grep java | grep _lam | awk '{print $2}') 2>/dev/null
Upgrade Cisco Crosswork Situation Manager
To upgrade Cisco Crosswork Situation Manager, run the following commands.
If you have already run this step on the current host as part of this upgrade (for single-host upgrade for example), you can skip this step.
tar -xf moogsoft-aiops-7.3.0.tgz
bash moogsoft-aiops-install-7.3.0.sh
Follow the instructions that appear. The upgrade process detects the existing installation and performs the upgrade.
Merge the latest configuration file changes
Note:
In Cisco Crosswork Situation Manager v7.3.x, the Sigalisers (Cookbook and Tempus), and merge groups (default and custom) are imported into the database by default, enabling you to to access and configure them via the UI and API. The migration occurs once when Moogfarmd is restarted. A new flag has been added to the 7.3.x version of moog_farmd.conf that you can use to prevent the migration from taking place (file_only_config=true). If this flag is missing or is set to false, Moogfarmd attempts to perform the import when it starts.
The top-level $MOOGSOFT_HOME/config and $MOOGSOFT_HOME/bots folders are the master folder locations for configuration and bot files.
Note:
If you have already completed this step previously (as part of this upgrade process) on the current host, you can skip this step.
The new 'default' v7.3.0 versions of the config and bot files are stored in $MOOGSOFT_HOME/dist/7.3.0/config/ and $MOOGSOFT_HOME/dist/7.3.0/bots/ respectively.
The config and bot files from the previous version should not be copied on top of (replace) the new version of those files in 7.3.x, as they are not always forwards-compatible, and some config/bot lines need to be added for the new version to work.
1. Identify the config files that have changed between the previously installed version and v7.3.0. For example:
diff -rq $MOOGSOFT_HOME/dist/7.[^3]*/config $MOOGSOFT_HOME/dist/7.3.*/config | grep -i 'differ'
2. Update files in $MOOGSOFT_HOME/config with any changes introduced in the v7.3.0 versions of these files.
3. Identify the contrib files that have changed between the previously installed version and v7.3.0. For example:
diff -rq $MOOGSOFT_HOME/dist/7.[^3]*/contrib $MOOGSOFT_HOME/dist/7.3.*/contrib | grep -i 'differ'
4. Update files in $MOOGSOFT_HOME/contrib with any changes introduced in the v7.3.0 versions of these files.
5. Identify the bot files that have changed between the previously installed version and v7.3.0. For example:
diff -rq $MOOGSOFT_HOME/dist/7.[^3]*/bots $MOOGSOFT_HOME/dist/7.3.*/bots | grep -i 'differ'
6. Update files in $MOOGSOFT_HOME/bots with any changes introduced in the v7.3.0 versions of these files.
Update the RabbitMQ configuration
Note:
Only perform this step if you are upgrading from Cisco Crosswork Situation Manager v7.0.x.
If you have RabbitMQ installed and running on this server, complete the following step.
Cisco recommends that you update the RabbitMQ configuration to support autoheal and other processes that improve stability in HA environments.
Run the command(s) below which are appropriate for the deployment type. Replace <VHOST> with your desired RabbitMQ VHOST/Zone.
· RPM:
cp -f $MOOGSOFT_HOME/etc/cots/rabbitmq/rabbitmq.config /etc/rabbitmq/
bash $MOOGSOFT_HOME/bin/utils/moog_init_mooms.sh -z <VHOST> -p
· Tarball:
cp -f $MOOGSOFT_HOME/etc/cots/rabbitmq/rabbitmq.config $MOOGSOFT_HOME/cots/rabbitmq-server/etc/rabbitmq/
bash $MOOGSOFT_HOME/bin/utils/moog_init_mooms.sh -z <VHOST> -p
To continue with the upgrade, see v7.3.x - Finalize and validate upgrade.
Tarball - Migrate from MySQL to Percona
This topic describes the Tarball migration procedure from MySQL to Percona XtraDB Cluster.
Follow these steps if you need to run the process as a non-root user, or you want the ability to deploy to a non-default location and install all components under one directory.
Cisco Crosswork Situation Manager uses Percona XtraDB Cluster which supports the Galera replication protocol to support high availability (HA). Percona XtraDB is similar to MySQL with improvements for HA, scalability, and usability.
Cisco strongly recommends you perform the migration from MySQL to Percona XtraDB Cluster and HAProxy. See /document/preview/120574#UUID816c7d74d05ed359780616a54d06a4d4 for details behind the Cisco decision to use Percona and HAProxy.Database Strategy
Before you begin
Before you begin the migration process, ensure you have met the following requirements:
· You have enlisted an administrator to perform the following tasks, which require root privileges:
— Install the Perl dependencies on all hosts that you will configure as Percona nodes:
sudo yum -y install perl-Digest-MD5 perl-DBD-MySQL
— Install HA Proxy after you have configured the Percona nodes.
· You have credentials to connect to the "speedy" Cisco package repository.
Configure the Percona XtraDb Cluster donor node
To migrate to Percona XtraDB Cluster, perform the following steps on the server where the Cisco Crosswork Situation Manager database is installed.
Note:
If you have installed the Cisco Crosswork Situation Manager database on more than one server, for example in a master/standby configuration, use the master as the donor node.
1. Navigate to the desired location and install Percona XtraBackup:
curl -L https://www.percona.com/downloads/Percona-XtraBackup-2.4/Percona-XtraBackup-2.4.14/binary/tarball/percona-xtrabackup-2.4.14-Linux-x86_64.libgcrypt153.tar.gz -O
tar xzf percona-xtrabackup-2.4.14-Linux-x86_64.libgcrypt153.tar.gz
2. Back up MySQL using the Percona XtraBackup tool. Use the --password option to enter your MySQL root password. For example:
percona-xtrabackup-*/bin/innobackupex --user=root --password=root -H 127.0.0.1 ~/moog_datastore/mysql_backup
3. When the backup is complete, repeat the process using the --apply-log option, to apply any transactions that may have occurred during the backup process:
percona-xtrabackup-*/bin/innobackupex --apply-log ~/moog_datastore/mysql_backup
4. Stop MySQL:
$MOOGSOFT_HOME/bin/utils/process_cntl mysql stop
5. Navigate to the desired location and install Percona Cluster Binary 5.7:
curl -L https://www.percona.com/downloads/Percona-XtraDB-Cluster-LATEST/Percona-XtraDB-Cluster-5.7.26-31.37/binary/tarball/Percona-XtraDB-Cluster-5.7.26-rel29-31.37.1.Linux.x86_64.ssl102.tar.gz -O
tar xzf Percona-XtraDB-Cluster-5.7.26-rel29-31.37.1.Linux.x86_64.ssl102.tar.gz
6. Install dependencies for Percona cluster:
mkdir ~/install
cd ~/install
curl -L http://mirror.centos.org/centos/7/os/x86_64/Packages/socat-1.7.3.2-2.el7.x86_64.rpm -O
rpm2cpio socat-1.7.3.2-2.el7.x86_64.rpm | cpio -idmv
cd
7. Replace the MySQL binaries with the Percona binaries, as follows.
a. Back up the MySQL directory and link MySQL to the new Percona location:
mv ~/mysql-5.7.22-el7-x86_64 ~/mysql-5.7.22-el7-x86_64_save
ln -s ~/Percona-XtraDB-Cluster-5.7.26-rel29-31.37.1.Linux.x86_64.ssl102 ~/mysql-5.7.22-el7-x86_64
b. If the path to MySQL is set in the ~/.bashrc file, remove it.
c. Add the new Percona paths to the ~/.bashrc file:
cd ~; echo "export PATH=$PATH:~/Percona-XtraDB-Cluster-5.7.26-rel29-31.37.1.Linux.x86_64.ssl102/bin:~/percona-xtrabackup-2.4.14-Linux-x86_64/bin:~/install/usr/bin" >> ~/.bashrc
d. Add the new Percona paths to your environment variable:
export PATH=$PATH:~/Percona-XtraDB-Cluster-5.7.26-rel29-31.37.1.Linux.x86_64.ssl102/bin:~/percona-xtrabackup-2.4.14-Linux-x86_64/bin:~/install/usr/bin
e. Set the path to the Percona configuration file:
sed -i -e 's/WSREP_SST_OPT_CONF="$2".*/WSREP_SST_OPT_CONF="~\/\.my\.cnf"/' ~/Percona-XtraDB-Cluster-5.7.26-rel29-31.37.1.Linux.x86_64.ssl102/bin/wsrep_sst_common
8. Edit the ~/.my.cnf file as follows:
a. Add the following properties to the end of the file. This configures the Percona cluster to start in bootstrap mode.
[mysqld]
wsrep_provider=/home/admin/Percona-XtraDB-Cluster-5.7.26-rel29-31.37.1.Linux.x86_64.ssl102/lib/libgalera_smm.so
binlog_format=ROW
default_storage_engine=InnoDB
wsrep_slave_threads= 8
wsrep_log_conflicts
innodb_autoinc_lock_mode=2
wsrep_cluster_name=pxc-cluster
wsrep_node_name=pxc-cluster-node-1
pxc_strict_mode=ENFORCING
wsrep_sst_method=xtrabackup-v2
wsrep_sst_auth="username:password"
wsrep_cluster_address=gcomm://
Note:
The Percona SST (State Transfer) user in the wsrep_sst_auth property does not exist yet. Set the authentication details here and you will create the user below.
a. Configure the wsrep_provider property to contain the full path to the Galera Replication Plugin (libgalera_smm.so) if it differs from the default.
b. Enter your user credentials in the wsrep_sst_auth property.
9. Start the Percona donor node:
~/Percona-XtraDB-Cluster-5.7.26-rel29-31.37.1.Linux.x86_64.ssl102/bin/mysqld_safe &
10. Create a Percona SST user, grant the required permissions and add the user to the bootstrapped node.
Run the following command, replacing the username and password with your chosen credentials:
~/Percona-XtraDB-Cluster-5.7.26-rel29-31.37.1.Linux.x86_64.ssl102/bin/mysql -u root -proot -e "GRANT PROCESS, RELOAD, LOCK TABLES, REPLICATION CLIENT ON *.* TO 'username'@'localhost' identified by 'password';"
11. Run the following commands to create the clustercheck user required by HA Proxy. Replace password with your details:
mysql -u root -proot -e "GRANT PROCESS ON *.* TO 'clustercheckuser'@'localhost' IDENTIFIED BY 'clustercheckpassword\!';"
mysql -u root -proot -e "FLUSH PRIVILEGES;"
12. Add the IP addresses for the remaining nodes to the Percona configuration file.
Configure the wsrep_cluster_address property in the ~/.my.cnf file to contain a comma-separated list of all of the nodes you will add to the cluster. For example:
[mysqld]
wsrep_cluster_address=gcomm://1.1.1.1,1.1.1.2,1.1.1.3
Configure the Percona clustercheck script
The Percona clustercheck script is distributed as part of Percona XtraDB Cluster. It works with HA Proxy to monitor nodes in the cluster and performs health checks on backend servers.
To configure and deploy the script:
1. Configure the path to clustercheck app
INSTALLER_DIR=~/install
DB_PACKAGE_DIR=~/Percona-XtraDB-Cluster-5.7.26-rel29-31.37.1.Linux.x86_64.ssl102
2. Create a script to launch clustercheck upon request on port 9198:
cat > $INSTALLER_DIR/inetd << EOF
while :
do
${DB_PACKAGE_DIR}/bin/clustercheck clustercheckuser clustercheckpassword\!|nc -l 9198
done
EOF
3. Start the clustercheck script in the background:
chmod +x $INSTALLER_DIR/inetd
$INSTALLER_DIR/inetd &> /dev/null & disown $!
Configure additional nodes
When you have configured the donor node, follow these steps to add your second and subsequent nodes.
1. Stop MySQL on the node:
service mysqld stop
2. Uninstall MySQL on the node:
yum -y remove mysql-*community*
3. Run the install_percona_nodes script to install the Percona Cluster Binary 5.7, add the node to the configuration file and start the node.
The script syntax is as follows:
RPM:
install_percona_nodes.sh -p|--primary -i|--ips [IP1,IP2,IP3] -u|--username -w|--password -h|--help
Tarball:
install_percona_nodes_tarball.sh -p|--primary -i|--ips [IP1,IP2,IP3] -u|--username -w|--password -h|--help
— -p: Set this node as primary, so it starts with default bootstrap enabled.
— -i: Comma-separated list of node IP addresses or hostnames.
— -u: Username of your Percona SST user.
— -w: Password of your Percona SST user.
— -h: Display the help information for the script.
Note:
For more information on how nodes join the cluster and state transfer (SST), see the Galera Cluster documentation on Node Provisioning.
For example:
bash <(curl -s -k https://myspeedyusername:myspeedypassword@speedy.moogsoft.com/repo/install_percona_nodes_tarball.sh) -i 1.1.1.1,1.1.1.2,1.1.1.3 -u mysstusername -w mysstpassword
Configure for DR
In a Disaster Recovery configuration with two or more data centres, you can enable synchronization of the binary log to disk before transactions are committed.
1. Edit the ~/.my.cnf file and set the following property:
sync_binlog = 1
2. Restart the databases to apply the change:
RPM:
systemctl restart mysqld
Tarball:
$MOOGSOFT_HOME/bin/utils/process_cntl mysql restart
Note:
Do not change this setting in a standard configuration, as it will impact negatively on performance.
Install HA Proxy
An administrator must install HA Proxy on all Cisco Crosswork Situation Manager servers on your network. Root privileges are required. The HA Proxy installer script syntax is as follows:
haproxy_installer.sh -l|--listener-port [3306] -i|--ips [IP1:PORT1,IP2:PORT2,IP3:PORT3] -c|--configure-aiops -h|--help
· -i: Comma-separated list of node IP addresses or hostnames and ports.
· -l: Port on which HA Proxy listens for connections. Default is 3306.
· -c: Configure the local Cisco Crosswork Situation Manager to use HA Proxy's port.
· -h: Display the help information for the script.
To install HA Proxy:
1. Set $MOOGSOFT_HOME to the correct location. For example:
export $MOOGSOFT_HOME=/home/admin/moogsoft
2. Run the HA Proxy installer script. For example:
bash <(curl -s -k https://<myspeedyusername>:<myspeedypassword>@speedy.moogsoft.com/repo/aiops/haproxy_installer.sh) -c -i 10.101.10.109:3306,10.101.10.110:3306,10.101.10.111:3306
3. Restart Moogfarmd, Apache Tomcat and any integrations you are using. See Control Cisco Crosswork Situation Manager Processes for details.
Table Compression Utility
The moog_snapshots_online_table_change_utility is a command line utility. Using Percona table compression, the utility optimizes the snapshots table in MoogDb to minimize the size of your historic database. It also runs online, avoiding downtime, and can compress the size of your database by up to 85%.
The utility is compatible with all database types.
Note:
This utility requires a number of Perl packages to run. See the section at the bottom for instructions on how to install them if the utility reports issues with Perl dependencies.
Usage
The command you use to run the utility depends on your system configuration:
· If you are installing or upgrading Cisco Crosswork Situation Manager, run the following command:
$MOOGSOFT_HOME/bin/utils/moog_snapshots_online_table_change.sh -H hostname -P port -d historic_database_name -u username -p password
· If you are not upgrading Cisco Crosswork Situation Manager and, for example, installing a standalone database server, run the following command instead:
bash <(curl -s -k https://<username>:<password>@speedy.moogsoft.com/repo/aiops/moog_snapshots_online_table_change.sh) -H hostname -P port -d historic_database_name -u username -p password
| Argument |
Input |
Description |
| -H |
String |
Hostname of the database server. |
| -P |
Integer |
Port of the database server. |
| -d |
String |
Name of the database. |
| -u |
String |
Database username. |
| -p |
String |
Database password. |
Example
$MOOGSOFT_HOME/bin/utils/moog_snapshots_online_table_change.sh -H localhost -P 3306 -d historic_moogdb -u root -p Password123
No slaves found. See --recursion-method if host ldev11 has slaves.
Not checking slave lag because no slaves were found and --check-slave-lag was not specified.
Operation, tries, wait:
analyze_table, 10, 1
copy_rows, 10, 0.25
create_triggers, 10, 1
drop_triggers, 10, 1
swap_tables, 10, 1
update_foreign_keys, 10, 1
Altering `moogdb`.`snapshots`...
Creating new table...
Created new table moogdb._snapshots_new OK.
Altering new table...
Altered `moogdb`.`_snapshots_new` OK.
2019-07-12T15:47:49 Creating triggers...
2019-07-12T15:47:49 Created triggers OK.
2019-07-12T15:47:49 Copying approximately 36064233 rows...
Copying `moogdb`.`snapshots`: 0% 03:05:15 remain
Copying `moogdb`.`snapshots`: 0% 02:56:29 remain
Copying `moogdb`.`snapshots`: 0% 02:50:16 remain
Copying `moogdb`.`snapshots`: 1% 02:53:31 remain
Copying `moogdb`.`snapshots`: 1% 02:54:20 remain
Copying `moogdb`.`snapshots`: 1% 02:58:53 remain
Copying `moogdb`.`snapshots`: 1% 02:59:46 remain
Copying `moogdb`.`snapshots`: 2% 03:03:08 remain
…..
…..
Copying `moogdb`.`snapshots`: 94% 09:07 remain
Copying `moogdb`.`snapshots`: 94% 08:37 remain
Copying `moogdb`.`snapshots`: 94% 08:06 remain
Copying `moogdb`.`snapshots`: 95% 07:40 remain
Copying `moogdb`.`snapshots`: 95% 07:07 remain
Copying `moogdb`.`snapshots`: 95% 06:37 remain
Copying `moogdb`.`snapshots`: 96% 06:06 remain
Copying `moogdb`.`snapshots`: 96% 05:36 remain
Copying `moogdb`.`snapshots`: 96% 05:05 remain
Copying `moogdb`.`snapshots`: 97% 04:35 remain
Copying `moogdb`.`snapshots`: 97% 04:05 remain
Copying `moogdb`.`snapshots`: 97% 03:33 remain
Copying `moogdb`.`snapshots`: 98% 03:02 remain
Copying `moogdb`.`snapshots`: 98% 02:32 remain
Copying `moogdb`.`snapshots`: 98% 02:01 remain
Copying `moogdb`.`snapshots`: 99% 01:29 remain
Copying `moogdb`.`snapshots`: 99% 00:58 remain
Copying `moogdb`.`snapshots`: 99% 00:26 remain
2019-07-12T19:28:57 Copied rows OK.
2019-07-12T19:28:57 Analyzing new table...
2019-07-12T19:28:57 Swapping tables...
2019-07-12T19:28:57 Swapped original and new tables OK.
2019-07-12T19:28:57 Dropping old table...
2019-07-12T19:29:05 Dropped old table `moogdb`.`_snapshots_old` OK.
2019-07-12T19:29:05 Dropping triggers...
2019-07-12T19:29:05 Dropped triggers OK.
Successfully altered `moogdb`.`snapshots`.
Installing missing utility dependencies
The following commands need to be run (requires root permissions for the yum command) to install the required Perl packages which this utility needs:
curl -L -O http://mirror.as29550.net/mirror.centos.org/7.6.1810/os/x86_64/Packages/perl-Compress-Raw-Bzip2-2.061-3.el7.x86_64.rpm;
curl -L -O http://mirror.as29550.net/mirror.centos.org/7.6.1810/os/x86_64/Packages/perl-Compress-Raw-Zlib-2.061-4.el7.x86_64.rpm;
curl -L -O http://mirror.as29550.net/mirror.centos.org/7.6.1810/os/x86_64/Packages/perl-DBD-MySQL-4.023-6.el7.x86_64.rpm;
curl -L -O http://mirror.as29550.net/mirror.centos.org/7.6.1810/os/x86_64/Packages/perl-DBI-1.627-4.el7.x86_64.rpm;
curl -L -O http://mirror.as29550.net/mirror.centos.org/7.6.1810/os/x86_64/Packages/perl-Data-Dumper-2.145-3.el7.x86_64.rpm;
curl -L -O http://mirror.as29550.net/mirror.centos.org/7.6.1810/os/x86_64/Packages/perl-Digest-1.17-245.el7.noarch.rpm;
curl -L -O http://mirror.as29550.net/mirror.centos.org/7.6.1810/os/x86_64/Packages/perl-Digest-MD5-2.52-3.el7.x86_64.rpm;
curl -L -O http://mirror.as29550.net/mirror.centos.org/7.6.1810/os/x86_64/Packages/perl-IO-Compress-2.061-2.el7.noarch.rpm;
curl -L -O http://mirror.as29550.net/mirror.centos.org/7.6.1810/os/x86_64/Packages/perl-Net-Daemon-0.48-5.el7.noarch.rpm;
curl -L -O http://mirror.as29550.net/mirror.centos.org/7.6.1810/os/x86_64/Packages/perl-PlRPC-0.2020-14.el7.noarch.rpm;
curl -L -O http://centos.mirroring.pulsant.co.uk/7.7.1908/os/x86_64/Packages/perl-IO-Socket-IP-0.21-5.el7.noarch.rpm;
curl -L -O http://centos.mirroring.pulsant.co.uk/7.7.1908/os/x86_64/Packages/perl-IO-Socket-SSL-1.94-7.el7.noarch.rpm;
curl -L -O http://centos.mirroring.pulsant.co.uk/7.7.1908/os/x86_64/Packages/perl-Mozilla-CA-20130114-5.el7.noarch.rpm;
curl -L -O http://centos.mirroring.pulsant.co.uk/7.7.1908/os/x86_64/Packages/perl-Net-LibIDN-0.12-15.el7.x86_64.rpm;
curl -L -O http://centos.mirroring.pulsant.co.uk/7.7.1908/os/x86_64/Packages/perl-Net-SSLeay-1.55-6.el7.x86_64.rpm;
yum install *.rpm
Configuration Migration Utility
The Configuration Migration utility upgrades your existing Cisco Crosswork Situation Manager configuration files for merge groups and the Cookbook and Tempus moolets to make them compatible with Cisco Crosswork Situation Manager 7.3.
The utility is embedded in Moogfarmd and runs automatically the first time a 7.3 instance of Moogfarmd is started.
The file_only_config property in moog_farmd.conf serves two purposes related to the configuration migration utility:
· Setting the property to true before upgrading prevents the configuration migration utility from running.
· Setting the property to true after upgrading causes Cisco Crosswork Situation Manager to ignore all database configurations for Cookbook and Tempus clustering algorithms as well as merge groups, and only load their file configurations instead.
See Moogfarmd Reference for more information on Moogfarmd properties.
The following also applies to the Configuration Migration utility:
· The utility migrates the default merge group to your database. Any moolets that do not have a merge group explicitly defined will use the default merge group.
· The utility only migrates Tempus and Cookbook moolets. If a merge group contains Feedback or Classic Sigaliser, the utility still migrates the merge group, but without these moolets within it.
· During the upgrade process, the utility tarballs and copies all 7.2 configuration files to a backup folder. The utility provides you with the location of these during the upgrade.
· The utility notifies you of any conflicts during the upgrade. To avoid loss of data, it renames any moolets, merge groups and cookbook recipes in the file it is attempting to migrate to the database.
Finalize and validate the upgrade
Follow these steps to perform the final tasks for an upgrade to Cisco Crosswork Situation Manager v7.3.x from v7.0.x, v7.1,.x or 7.2.x.
Refer to Upgrade Cisco Crosswork Situation Manager for general information and upgrade instructions for other components and versions.
Configure the ServiceNow MID server to use Java 8
Note:
Only perform this step if you are upgrading from Cisco Crosswork Situation Manager v7.0.x or v7.1.x.
If you are using a ServiceNow MID server installed on the same host as Cisco Crosswork Situation Manager, you must configure it to point to Java 8. The MID server requires Java 8 (update 152 or later). It will not work with Java 9+. To do this:
1. Install the latest version of Java 8. See the ServiceNow MID server system requirements for more information.
2. Stop the MID server by running the appropriate command. For example:
kill -9 $(ps -ef | grep mid_server | grep -v grep | awk '{print $2}')
3. Configure the wrapper.java.command property to point to the Java 8 binary in the following file:
/usr/local/servicenow/moog_mid_server/agent/conf/wrapper-override.conf
For example:
wrapper.java.command=/usr/java/jre1.8.0_171-amd64/bin/java
Please note that in v7.3.0, the MidServer is not deployed or managed by Apache Tomcat and all configuration of the MidServer is now a manual task.
Restart services and processes
It is important to restart processes in the correct order. Follow each section below on the relevant servers, and run the commands in the specified order.
1. Database
This step only needs to be run if the Database is not running for any reason. If the documented upgrade process has been followed until this point, it should be running.
On the Database server (and any node where the database is configured to run), run the command appropriate to your deployment type:
— RPM:
service mysqld restart
— Tarball:
$MOOGSOFT_HOME/bin/utils/process_cntl mysql restart
2. Message Bus (RabbitMQ)
On the Core server (or any node where RabbitMQ is configured), run the command appropriate to your deployment type:
— RPM:
service rabbitmq-server restart
— Tarball:
$MOOGSOFT_HOME/bin/utils/process_cntl rabbitmq restart
3. Elasticsearch
On the Core server (or where Elasticsearch is configured), run the command appropriate to your deployment type:
— RPM:
service elasticsearch restart
— Tarball:
$MOOGSOFT_HOME/bin/utils/process_cntl elasticsearch restart
4. Moogfarmd
On the Core server (where Moogfarmd is configured), run the command appropriate to your deployment type:
— RPM:
service moogfarmd restart
— Tarball:
$MOOGSOFT_HOME/bin/utils/process_cntl moog_farmd restart
5. Data Ingestion
On the Data Ingestion server (where back-end LAMs are configured), run the commands appropriate to your deployment type:
— RPM:
Run the relevant service command for each of the LAMs deployed on the server. Follow this format replacing <LAM_service_name> as appropriate:
service <LAM_service_name> restart
For example:
service restlamd restart
— Tarball:
Run the relevant process_cntl command for each of the LAMs deployed on the server. Follow this format replacing <LAM_instance_name> as appropriate:
$MOOGSOFT_HOME/bin/utils/process_cntl <LAM_instance_name> restart
For example:
$MOOGSOFT_HOME/bin/utils/process_cntl rest_lam restart
6. UI
On the UI server, run the commands appropriate to your deployment type:
· RPM:
a. Rebuild the webapps and start Apache Tomcat:
$MOOGSOFT_HOME/bin/utils/moog_init_ui.sh -w
b. Restart Nginx:
service nginx restart
· Tarball:
a. Rebuild the webapps and start Apache Tomcat:
$MOOGSOFT_HOME/bin/utils/moog_init_ui.sh -w
b. Restart Nginx:
$MOOGSOFT_HOME/bin/utils/process_cntl nginx restart
Finalize the Events Analyser configuration
Note:
Complete this step on the server on which the Events Analyser process is configured to run (if you are using alert entropy in your deployment). You must complete this operation before any events are sent into the system to ensure events are correctly clustered into Situations.
Run the Events Analyser utility. See Run Events Analyser for more information on the Events Analyser command line options.
$MOOGSOFT_HOME/bin/events_analyser --readage 2w
Once complete, re-enable the regular Events Analyser cronjob:
(crontab -l | sed -e 's/^\#\+\(.*events_analyser.*\)/\1/') | crontab -
Reindex Elasticsearch
Note:
Run the following command on the server that houses the Core components. See Upgrade Cisco Crosswork Situation Manager for a description of the component groups.
Ensure that Moogfarmd is running, then run the following command to reindex alerts and Situations:
$MOOGSOFT_HOME/bin/utils/moog_indexer --now
The reindex process occurs in the background and may take a while to complete, depending on the number of alerts and Situations in your system.
Reconfigure UI integrations
Note:
Only perform this step if you are upgrading from Cisco Crosswork Situation Manager v7.0.x or v7.1.x.
If you are using any of the following UI integrations and are upgrading from v7.0.x or v7.1.x, reconfigure them using the details you noted prior to the upgrade. This is required due to UI changes in the new version.
· AWS CloudWatch
· Cherwell
· JIRA Service Desk and JIRA Software
· JMS
· New Relic
· Remedy
· ServiceNow
· SevOne
· Slack
· SolarWinds
· VMware vCenter and vSphere
· vRealize Log Insight
· WebSphere MQ
· xMatters
Validate the upgrade: UI components
Note:
Run the following commands/tasks on the server that houses the UI components. See Upgrade Cisco Crosswork Situation Manager for a description of the component groups.
Run this utility to confirm that all Apache Tomcat files were deployed correctly in $MOOGSOFT_HOME:
$MOOGSOFT_HOME/bin/utils/tomcat_install_validator.sh
If there are webapp differences, run the following command to extract the webapps with the correct files:
$MOOGSOFT_HOME/bin/utils/moog_init_ui.sh -w
If you set the file_only_config property to false (or the property is missing) when you merged the latest configuration file changes, Moogfarmd will attempt to import the following items from your Moogfarmd configuration into the MoogDb database:
· Cookbooks (including value and bot Recipes)
· Tempus configurations
· The default Merge Group and any custom Merge Groups
After the import operation, Moogfarmd backs up the entire $MOOGSOFT_HOME/config folder to $MOOGSOFT_HOME/config_backup_720.tgz. The import process did not remove any entries from the configuration files on disk. You can check that the import process completed successfully as follows:
Tempus configurations:
· The Cisco Crosswork Situation Manager v7.3.0 UI has a new UI System Settings panel for Tempus which displays the same settings that were used by your file-based Tempus configurations.
· If more than one Tempus is defined or referenced in your Moogfarmd configuration, they are all imported, but the UI is only designed to display the configuration for one. You can use the Graze API endpoint /document/preview/116871#UUID95b8569af7c92a58c38d5fa3a4b5dc80 to confirm that the configuration is correct.getTempus
· Run the ha_cntl -v utility to confirm whether the correctly-named Tempus is running.
Cookbooks:
· Run the ha_cntl -v utility to confirm whether the correctly-named Cookbook is running.
· Run the new Graze API endpoints /document/preview/117758#UUID47d338b70a9134303fc8837b1071949b and /document/preview/118019#UUID21682b218cb11e1b1bc663225e9150cf to check whether the Cookbooks and Recipes were imported successfully.getCookbooksgetRecipes
Default Merge Group:
· Run the new Graze API endpoint /document/preview/129426#UUIDbafd2e83727e85a1e3475c773f07c31b to check whether the default merge group was successfully imported.getDefaultMergeGroup
Custom Merge Groups:
· Run the new Graze API endpoint /document/preview/118371#UUID64daa6b50b714cfef92504405b8e9145 to check whether the custom merge groups were imported successfully.getMergeGroups
If the import was successful and the database-based Sigalisers and merge groups work as expected over a period of time, you can delete their entries in $MOOGSOFT_HOME/config/moog_farmd.conf. Moogfarmd will no longer attempt to import or run the Sigalisers or merge groups defined in the configuration filter after the import.
If one or more of the configuration items did not successfully migrate or are not present at all:
1. Confirm that the moog_farmd.conf property file_only_config is not set to true.
2. Confirm that your Sigalisers and Merge Groups are defined in the upgraded moog_farmd.conf file, or imported via 'included' Moolet configuration files.
3. Look for any startup errors in the Moogfarmd log file (the default log file is MOO.moog_farmd.log).
4. You can attempt the import again by truncating the config_migration table in the MoogDb database. To do this, run the following command:
$MOOGSOFT_HOME/bin/utils/moog_mysql_client -e "truncate config_migration"
5. Restart Moogfarmd.
6. Re-validate the import and check the Moogfarmd log for any errors on startup.
Note:
If you have already completed this step previously (as part of this upgrade process) on the current host, you can skip this step.
Run the Install Validator utility to ensure that all Cisco Crosswork Situation Manager files were deployed correctly in $MOOGSOFT_HOME:
$MOOGSOFT_HOME/bin/utils/moog_install_validator.sh
Validate the upgrade: Core components
Note:
Run the following command on the server that houses the core components. See Upgrade Cisco Crosswork Situation Manager for a description of the component groups.
Note:
If you have already completed this step previously (as part of this upgrade process) on the current host, you can skip this step.
Run the Install Validator utility to ensure that all Cisco Crosswork Situation Manager files were deployed correctly in $MOOGSOFT_HOME:
$MOOGSOFT_HOME/bin/utils/moog_install_validator.sh
Validate the upgrade: Data ingestion components
Note:
Run the following command on the server that houses the data ingestion components. See Upgrade Cisco Crosswork Situation Manager for a description of the component groups.
Note:
If you have already completed this step previously (as part of this upgrade process) on the current host, you can skip this step.
Run the Install Validator utility to ensure that all Cisco Crosswork Situation Manager files were deployed correctly in $MOOGSOFT_HOME:
$MOOGSOFT_HOME/bin/utils/moog_install_validator.sh
Validate the upgrade: Database components
Note:
Run the following command on the server that houses the database components. See Upgrade Cisco Crosswork Situation Manager for a description of the component groups.
Note:
If you have already completed this step previously (as part of this upgrade process) on the current host, you can skip this step.
Run the Database Validator utility to validate the database schema:
$MOOGSOFT_HOME/bin/utils/moog_db_validator.sh
Note:
Some schema differences are valid, for example those related to custom_info (new columns added etc).
An additional required schema upgrade step is documented on the Post-upgrade steps page. Until this has been run, you should expect to see the following differences in the output of the Database Validator utility:
Differences found in 'historic_moogdb' tables:
41,49c41,43
< primary key (`alert_id`),
< unique key `idx_signature` (`signature`),
< key `idx_first_event_time` (`first_event_time`),
< key `idx_state_last` (`state`,`last_state_change`),
< key `idx_severity` (`severity`,`state`),
< key `idx_agent` (`agent`(12)),
< key `idx_source` (`source`(12)),
< key `idx_type` (`type`(12)),
< key `idx_manager` (`manager`(12))
---
> primary key (`signature`),
> key `alert_id` (`alert_id`),
> key `first_event_time` (`first_event_time`,`alert_id`)
93,94c87
< key `timestamp` (`timestamp`,`type`),
< key `idx_type_time` (`type`,`timestamp`)
---
> key `timestamp` (`timestamp`,`type`)
241,242c234
< key `sig_id` (`sig_id`,`action_code`,`timestamp`),
< key `idx_action_sig` (`action_code`,`sig_id`)
---
> key `sig_id` (`sig_id`,`action_code`,`timestamp`)
The differences above will not have any functional impact, but you must complete the rest of the upgrade to ensure the system is performant and the schema is ready for future upgrades.
If you have performed an upgrade and you see errors similar to the following:
Differences found in 'moogdb' tables:
57a58
> key 'filter_id' ('filter_id'),
194a196
> key 'enrichment_static_mappings_ibfk_1' ('eid'),
1196a1199
> key 'sig_id' ('sig_id'),
1325a1329
> key 'filter_id' ('filter_id'),
Run the following commands to resolve these index-related problems:
mysql moogdb -u root -e "alter table alert_filters_access drop key filter_id"
mysql moogdb -u root -e "alter table situation_filters_access drop key filter_id"
mysql moogdb -u root -e "alter table enrichment_static_mappings drop key enrichment_static_mappings_ibfk_1"
mysql moogdb -u root -e "alter table sig_stats_cache drop key sig_id"
Now that the upgrade is complete, follow the instructions in v7.3.x - Post upgrade steps.
Post-upgrade steps
Follow these steps to perform the post-upgrade tasks for an upgrade to Cisco Crosswork Situation Manager v7.3.x from v7.0.x, v7.1.x, or 7.2.x.
Refer to Upgrade Cisco Crosswork Situation Manager for general information and upgrade instructions for other components and versions.
Upgrade the historic database
You must upgrade the historic database. This can be done after the main upgrade process has been completed and while the system is running.
The process runs in the background. It is separate from the main schema upgrade because for very large databases it can take several hours to complete. You can upgrade the historic database either before OR after you perform the migration from MySQL to Percona XtraDB Cluster.
To upgrade the historic database schema:
1. Run the moog_historic_post_migration script with the valid arguments for your system, on a terminal dedicated to the process. Use the -h flag to see all available options. Allow the process time to finish. For example:
$MOOGSOFT_HOME/bin/utils/moog_historic_post_migration.sh -H localhost -P 3306 -u root
2. Optionally, enable compression on the historic database snapshots table. Cisco recommends this if disk space is a concern.
This utility is documented here: Table Compression Utility
Note:
This utility requires a number of Perl dependencies to run. The following commands can be run to install these dependencies (root required for the final 'yum' command):
curl -L -O http://mirror.as29550.net/mirror.centos.org/7.6.1810/os/x86_64/Packages/perl-Compress-Raw-Bzip2-2.061-3.el7.x86_64.rpm;
curl -L -O http://mirror.as29550.net/mirror.centos.org/7.6.1810/os/x86_64/Packages/perl-Compress-Raw-Zlib-2.061-4.el7.x86_64.rpm;
curl -L -O http://mirror.as29550.net/mirror.centos.org/7.6.1810/os/x86_64/Packages/perl-DBD-MySQL-4.023-6.el7.x86_64.rpm;
curl -L -O http://mirror.as29550.net/mirror.centos.org/7.6.1810/os/x86_64/Packages/perl-DBI-1.627-4.el7.x86_64.rpm;
curl -L -O http://mirror.as29550.net/mirror.centos.org/7.6.1810/os/x86_64/Packages/perl-Data-Dumper-2.145-3.el7.x86_64.rpm;
curl -L -O http://mirror.as29550.net/mirror.centos.org/7.6.1810/os/x86_64/Packages/perl-Digest-1.17-245.el7.noarch.rpm;
curl -L -O http://mirror.as29550.net/mirror.centos.org/7.6.1810/os/x86_64/Packages/perl-Digest-MD5-2.52-3.el7.x86_64.rpm;
curl -L -O http://mirror.as29550.net/mirror.centos.org/7.6.1810/os/x86_64/Packages/perl-IO-Compress-2.061-2.el7.noarch.rpm;
curl -L -O http://mirror.as29550.net/mirror.centos.org/7.6.1810/os/x86_64/Packages/perl-Net-Daemon-0.48-5.el7.noarch.rpm;
curl -L -O http://mirror.as29550.net/mirror.centos.org/7.6.1810/os/x86_64/Packages/perl-PlRPC-0.2020-14.el7.noarch.rpm;
curl -L -O http://centos.mirroring.pulsant.co.uk/7.7.1908/os/x86_64/Packages/perl-IO-Socket-IP-0.21-5.el7.noarch.rpm;
curl -L -O http://centos.mirroring.pulsant.co.uk/7.7.1908/os/x86_64/Packages/perl-IO-Socket-SSL-1.94-7.el7.noarch.rpm;
curl -L -O http://centos.mirroring.pulsant.co.uk/7.7.1908/os/x86_64/Packages/perl-Mozilla-CA-20130114-5.el7.noarch.rpm;
curl -L -O http://centos.mirroring.pulsant.co.uk/7.7.1908/os/x86_64/Packages/perl-Net-LibIDN-0.12-15.el7.x86_64.rpm;
curl -L -O http://centos.mirroring.pulsant.co.uk/7.7.1908/os/x86_64/Packages/perl-Net-SSLeay-1.55-6.el7.x86_64.rpm;
yum install *.rpm
After you have run these steps, you can re-run the Database Validator utility to confirm that the schemas are now in sync. See #UUID811b30e4ead29a04100a45839c575e19_titleidm123139870443886 for details on how to run the utility.
Migrate the databases to Percona XtraDb Cluster and HA Proxy
Cisco Crosswork Situation Manager uses Percona XtraDB Cluster which supports the Galera replication protocol to support high availability (HA). Percona XtraDB is similar to MySQL with improvements for HA, scalability, and usability.
Cisco strongly recommends you perform the migration from MySQL to Percona XtraDB Cluster and HAProxy. See /document/preview/120574#UUID816c7d74d05ed359780616a54d06a4d4 for details behind the Cisco decision to use Percona and HAProxy.Database Strategy
To perform the migration, refer to the appropriate instructions, depending on your deployment type:
· Migrate from MySQL to Percona - RPM
· Migrate from MySQL to Percona - Tarball
Uninstall Cisco Crosswork Situation Manager
Follow the instructions in this topic if you need to uninstall Cisco Crosswork Situation Manager and its supporting packages.
Be sure to backup any files that you may need again for another installation.
Stop Core Cisco Crosswork Situation Manager and Supporting Services
1. Stop all core Cisco Crosswork Situation Manager services:
service moogfarmd stop
service logfilelamd stop
service restlamd stop
service socketlamd stop
service trapdlamd stop
2. Stop any additional moog_farmd or lam instances running as services.
service <service name> stop
3. As a precaution, forcibly kill any remaining core Cisco Crosswork Situation Manager processes:
kill -9 $(ps -ef|grep java|grep lam|awk '{print $2}') 2>/dev/null
kill -9 $(ps -ef|grep java|grep moog_farmd|awk '{print $2}') 2>/dev/null
4. Stop all supporting services:
service nginx stop
service elasticsearch stop
service apache-tomcat stop
service mysqld stop
service rabbitmq-server stop
Uninstall Core Cisco Crosswork Situation Manager Packages and Remove Directories and Users
1. Uninstall Core Cisco Crosswork Situation Manager Packages
yum remove $(rpm -qa|grep moogsoft)
If the above command produces errors such as 'Error in PREUN scriptlet' then the following command can be run to bypass script errors:
yum -y --setopt=tsflags=noscripts remove $(rpm -qa|grep moogsoft)
2. Remove Core Cisco Crosswork Situation Manager Directories
rm -rf /usr/share/moogsoft
rm -rf /var/lib/moogsoft
rm -rf /var/log/moogsoft
rm -rf /var/run/moogsoft
3. Remove any Cisco crontab entries with this command:
crontab -l | egrep -v "moog|JAVA_HOME" | crontab -
4. Remove Cisco system users (and their home directories):
userdel -r moogsoft
userdel -r moogadmin
userdel -r moogtoolrunner
groupdel moogsoft
Uninstall Supporting Applications
Follow these steps to remove the supporting applications Apache-Tomcat, ElasticSearch, MySQL, Nginx and RabbitMQ.
Uninstalling Apache Tomcat
Note:
Assumption: The Apache Tomcat service has already been stopped as per previous instructions above
To uninstall Apache Tomcat remove the installation directories and the service script:
Note:
Apache Tomcat is not actually installed as an rpm package but is deployed as a tarball (via the moog_init_ui.sh script).
rm -rf /usr/share/apache-tomcat
rm -rf /var/run/apache-tomcat
rm -f /etc/init.d/apache-tomcat
To remove the tomcat system user and its home directory:
userdel -r tomcat
Uninstalling Elasticsearch
Note:
Assumption: The Elasticsearch service has already been stopped as per previous instructions above.
To remove the Elasticsearch package:
yum remove elasticsearch
To remove related directories run the following commands:
rm -rf /usr/share/elasticsearch
rm -rf /var/lib/elasticsearch
Uninstalling MySQL
Note:
Assumption: The mysqld service has already been stopped as per previous instructions above.
Remove the MySQL community packages with the following command:
yum remove $(rpm -qa|grep mysql)
To remove the related directories:
rm -rf /usr/share/mysql
rm -rf /var/lib/mysql
To remove the MySQL system user and its home directory and group:
userdel -r mysql
Uninstalling Nginx
Note:
Assumption: The Nginx service has already been stopped as per previous instructions above.
Remove the nginx and supporting packages with the following command:
yum remove nginx
To remove related directories:
rm -rf /etc/nginx
rm -rf /usr/lib64/nginx
rm -rf /usr/share/nginx
rm -rf /var/log/nginx
rm -rf /var/lib/nginx
To remove the Nginx system user and its home directory and group:
userdel -r nginx
Uninstalling RabbitMQ
Note:
Assumption: RabbitMQ server service has already been stopped as per previous instructions above.
Remove the rabbitmq-server package with the following command:
yum remove rabbitmq-server
To remove related directories:
rm -rf /etc/rabbitmq
rm -rf /usr/lib/ocf/resource.d/rabbitmq
rm -rf /var/log/rabbitmq
rm -rf /var/lib/rabbitmq
To stop the erlang epmd daemon:
epmd -kill
Note:
The above command may not be necessary on EL7 installs.
To remove the RabbitMQ system user and its home directory and group:
userdel -r rabbitmq
Uninstall Remaining Packages and Remove Yum Repositories
Optionally, follow these steps to remove the remaining packages that are typically added during a Cisco Crosswork Situation Manager installation and clean up the Yum repositories:
Remove remaining packages:
Warning
Important: The below list of packages is based on reverting back to a "minimal" installation of CentOS 6.9 and will vary with different versions of Linux and installation level.
Care should be taken not to remove packages that impact other important applications that may be installed on the server.
Review carefully the yum summary before proceeding with the removal - specifically any other packages listed in the "Removing for dependencies:" output.
In the list of removal packages below, the libX* and perl* packages may typically impact other applications.
To remove the remaining packages, run these commands:
yum remove GeoIP GeoIP-GeoLite-data GeoIP-GeoLite-data-extra \
apr compat-readline5 erlang fontconfig freetype gd geoipupdate jdk1.8.0_121 \
libX11 libX11-common libXau libXpm libgfortran libjpeg-turbo libkqueue libpng libxcb libxslt \
nginx-filesystem \
perl perl-DBI perl-Module-Pluggable perl-Pod-Escapes perl-Pod-Simple perl-libs perl-version \
socat tomcat-native
Remove Yum Repositories:
Remove EPEL Yum Repository:
yum remove epel-release
rm -f /etc/yum.repos.d/epel*
Remove MySQL Community Yum Repository:
yum remove mysql-community-release
rm -f /etc/yum.repos.d/mysql*
Remove remaining Yum Repositories:
rm -f /etc/yum.repos.d/elasticsearch.repo
rm -f /etc/yum.repos.d/moog.repo
rm -f /etc/yum.repos.d/rabbitmq_rabbitmq-server.repo
Monitor and Troubleshoot Cisco Crosswork Situation Manager
The following topics describe the available health and performance indicators included with the Cisco Crosswork Situation Manager system. They also also provide some guidance on how to monitor your system and how to troubleshoot performance problems.
Note:
For the locations of specific installation and log files, see Configure Logging.
· Monitor Component Performance
· Monitor Moogfarmd Data Processing Performance
· Monitor Moogfarmd Health Logs
· Monitor Component CPU and Memory Usage
· Monitor System Performance Metrics
· Monitor RabbitMQ Message Bus Performance
The following topics provide troubleshooting advice and guidance:
· Troubleshoot Installation and Upgrade
· Troubleshoot Slow Alert/Situation Creation
· Troubleshoot Required Services for a Functional Production System
Monitor Component Performance
Cisco Crosswork Situation Manager features the ability to ingest large amounts of event data from various sources, process the data using configurable logic, and display the data to multiple concurrent users. This document outlines the various system components and how their interactions can impact system performance. It includes performance tuning suggestions where applicable.
To learn about opportunities to plan your implementation for increased performance capabilities, see Scale Your Cisco Crosswork Situation Manager Implementation.
For information on monitoring your system performance and handling performance issues, see Monitor and Troubleshoot Cisco Crosswork Situation Manager.
System Component Summary
Cisco Crosswork Situation Manager comprises several components which have tuning and configuration options available:
· Integrations and LAMs that listen or poll for data, parse and encode them into discrete events, and then pass the events to the Message Bus.
· The Message Bus (RabbitMQ) that receives published messages from integrations and LAMs. It publishes messages destined for data processing (Moogfarmd) and the web application server.
· The system datastore (MySQL) that handles transactional data from other parts of the system: integrations and LAMs, data processing, and the web application server.
· The data processing component (Moogfarmd), an application that consumes messages from the Message Bus. It processes event data in a series of servlet-like modules called Moolets. Moogfarmd reads and writes to the database and publishes messages to the bus.
· The web application server (Apache Tomcat) that reads and writes to the bus and the database.
The diagram below shows the general data flow of the components:

Other components include:
· A proxy (Ngnix) for the web application server and for integrations. See the Ngnix docs for more information.
· The search engine (Elasticsearch) for the UI that indexes documents from the indexer Moolet in the data processing series. It returns search results to Apache Tomcat. See the Elasticsearch documentation for more information.
Integration Performance
Event data enters the system via integrations and LAMs. Integrations and LAMs running on a large system can normally process up to 10,000 events per secondand publish them to the Message Bus at an equivalent rate. Integrations can buffer events under event storm conditions. The following factors affect the capacity to process events:
· CPU clock speed and number of available cores.
· Threads setting.
· Complexity of the LAMbot logic.
· Whether you have enabled "guaranteed delivery settings". For example, rest_response_mode for the REST LAM.
· Log level. For example, DEBUG is the slowest.
You can specify a value for the number of threads in the LAM's configuration file to control the number of active threads for the integration. To tune the socket LAM, for example, edit socket_lam.conf. Increasing the number of threads can improve ingestion performance. However it will also result in higher CPU usage and may cause internal buffering. Buffering increases memory usage until the buffer is cleared.
Message Bus Performance
RabbitMQ is very lightweight and, in all known cases, has been able to process the incoming event rate from Integrations. Refer to the RabbitMQ documentation for its performance tuning options.
Database Performance
Manage and tune your MySQL instance as you would any other database system in your enterprise. In addition to the standard tuning options in the MySQL documentation, consider the following recommendations for settings in /etc/my.cnf :
· On servers with >= 16 GB RAM that run MySQL and Cisco Crosswork Situation Manager applications ,set innodb-buffer-pool-size to 50% of system RAM.
· On servers where only MySQL is running, set innodb-buffer-pool-size to 80% of system RAM.
· If innodb-buffer-pool-size > 8 GB, increase the innodb-buffer-pool-instances to divide the buffer buffer pool into 1 G (GB) chunks to the maximum supported value of 64 G. For example, if your buffer pool size is 64 GB:
innodb-buffer-pool-size=64G
innodb_buffer_pool_instances=64
JVM Performance
Integrations and LAMs, Moogfarmd, and Tomcat are all Java processes so you can tune the memory allocation pool settings for the JVM to optimize performance. This -Xmx setting defines the maximum allowed Java heap size of the process. The default memory allocation for a Java process is one quarter of the server's RAM.
For LAMs, integrations and Moogfarmd, you can add the -Xmx argument to the line in $MOOGSOFT_HOME/bin/<lam name> or $MOOGSOFT_HOME/bin/moogfarmd where the JVM is launched.
For example, to set the maximum Java heap size for the Moogfarmd process to 16 GB, add "-Xmx16g" to the java_vm command line in $MOOGSOFT_HOME/bin/moogfarmd as follows:
#Run app
$java_vm -server -Xmx16g -DprocName=$proc_name -DMOOGSOFT_HOME=$MOOGSOFT_HOME -classpath $java_classpath $java_main_class "$@" &
For Tomcat, the default setting is 2GB. If you need to change it you can edit the service script /etc/init.d/apache-tomcat.
Monitor Component CPU and Memory Usage
MySQL Tuner provides useful diagnostics and recommendations on MySQL settings. See MySQL Tuner for more information.
To monitor the CPU and memory usage of the running components of a Cisco Crosswork Situation Manager system, you can run the following script that offers simple CPU and memory monitoring of the RabbitMQ, Socket LAM, Moogfarmd, Tomcat and MySQL processes:
#!/bin/bash
SLEEPTIME=$1
f_return_metrics() {
PROCPID=$1
TOPOUTPUT=`top -p $PROCPID -n1 | tail -2 | head -1 |sed 's/[^ ]\+\s\(.*\)/\1/g'`
PROCICPU=`echo $TOPOUTPUT| awk '{print $8}'`
if [ "$PROCICPU" == "S" ]; then PROCICPU=`echo $TOPOUTPUT| awk '{print $9}'`;fi
PROCPCPU=`ps -p $PROCPID -o pcpu|tail -1|awk '{print $1}'`
PROCMEM=`ps -p $PROCPID -o rss|tail -1|awk '{print $1}'`
echo $PROCICPU,$PROCPCPU,$PROCMEM
}
#Capture PIDs
RABBITPID=`ps -ef|grep beam|grep -v grep|awk '{print $2}'`
LAMPID=`ps -ef|grep socket_lam|grep java|grep -v grep|awk '{print $2}'`
MYSQLPID=`ps -ef|grep mysqld|grep -v mysqld_safe|grep -v grep|awk '{print $2}'`
TOMCATPID=`ps -ef|grep tomcat|grep java|grep -v grep|awk '{print $2}'`
FARMDPID=`ps -ef|grep moog_farmd|grep java|grep -v grep|awk '{print $2}'`
echo "DATE,TIME,RABBITICPU(%),RABBITPCPU(%),RABBITRSS(Kb),LAMICPU(%),LAMPCPU(%),LAMRSS(Kb),FARMDICPU(%),FARMDPCPU(%),FARMDRSS(Kb),TOMCATICPU(%),TOMCATPCPU(%),TOMCATRSS(Kb),MYSQLICPU(%),MYSQLPCPU(%),MYSQLRSS(Kb)"
while [ true ]; do
DATENOW=`date +"%m-%d-%y"`
TIMENOW=`date +"%T"`
RABBITMEAS=$(f_return_metrics $RABBITPID)
LAMMEAS=$(f_return_metrics $LAMPID)
FARMDMEAS=$(f_return_metrics $FARMDPID)
TOMCATMEAS=$(f_return_metrics $TOMCATPID)
MYSQLMEAS=$(f_return_metrics $MYSQLPID)
TOMCATMEAS=$(f_return_metrics $TOMCATPID)
echo "$DATENOW,$TIMENOW,$RABBITMEAS,$LAMMEAS,$FARMDMEAS,$TOMCATMEAS,$MYSQLMEAS"
sleep $SLEEPTIME
done
Sample Usage and Output
[root@ldev04 640]# ./perfmon.sh 5
DATE,TIME,RABBITICPU(%),RABBITPCPU(%),RABBITRSS(Kb),LAMICPU(%),LAMPCPU(%),LAMRSS(Kb),FARMDICPU(%),FARMDPCPU(%),FARMDRSS(Kb),TOMCATICPU(%),TOMCATPCPU(%),TOMCATRSS(Kb),MYSQLICPU(%),MYSQLPCPU(%),MYSQLRSS(Kb)
05-10-18,22:44:26,28.0,8.5,203068,2.0,1.0,557092,20.0,13.5,2853408,4.0,2.1,5680584,28.0,17.4,9657152
05-10-18,22:44:34,14.0,8.5,183492,4.0,1.0,557092,16.0,13.5,2850484,0.0,2.1,5680584,33.9,17.4,9657152
05-10-18,22:44:43,0.0,8.5,181072,0.0,1.0,557092,0.0,13.5,2850484,0.0,2.1,5680584,4.0,17.4,9658312
05-10-18,22:44:51,12.0,8.5,181040,0.0,1.0,557092,0.0,13.5,2850484,0.0,2.1,5680584,4.0,17.4,9658312
05-10-18,22:44:59,0.0,8.5,181040,0.0,1.0,557092,0.0,13.4,2850484,0.0,2.1,5680584,0.0,17.4,9658312
Notes:
Notes
· The script only outputs to the console, so you should redirect the output to a file for logging results.
· Output is in csv format.
· ICPU = "Instantaneous CPU Usage (%)"
· PCPU = "Percentage of CPU usage since process startup (%)"
· RSS = "Resident Set Size i.e. Memory Usage in Kb"
· For CPU measurements a measure of 100% represents all of one processor so results > 100% are achievable for multi-threaded processes.
Other Utilities
MySQLTuner provides useful diagnostics and recommendations on MySQL settings. See MySQL Tuner for more information.
To monitor the CPU and memory usage of the running components of a Cisco Crosswork Situation Manager system, you can run the following script that offers simple CPU and memory monitoring of the RabbitMQ, Socket LAM, Moogfarmd, Tomcat and MySQL processes:
#!/bin/bash
SLEEPTIME=$1
f_return_metrics() {
PROCPID=$1
TOPOUTPUT=`top -p $PROCPID -n1 | tail -2 | head -1 |sed 's/[^ ]\+\s\(.*\)/\1/g'`
PROCICPU=`echo $TOPOUTPUT| awk '{print $8}'`
if [ "$PROCICPU" == "S" ]; then PROCICPU=`echo $TOPOUTPUT| awk '{print $9}'`;fi
PROCPCPU=`ps -p $PROCPID -o pcpu|tail -1|awk '{print $1}'`
PROCMEM=`ps -p $PROCPID -o rss|tail -1|awk '{print $1}'`
echo $PROCICPU,$PROCPCPU,$PROCMEM
}
#Capture PIDs
RABBITPID=`ps -ef|grep beam|grep -v grep|awk '{print $2}'`
LAMPID=`ps -ef|grep socket_lam|grep java|grep -v grep|awk '{print $2}'`
MYSQLPID=`ps -ef|grep mysqld|grep -v mysqld_safe|grep -v grep|awk '{print $2}'`
TOMCATPID=`ps -ef|grep tomcat|grep java|grep -v grep|awk '{print $2}'`
FARMDPID=`ps -ef|grep moog_farmd|grep java|grep -v grep|awk '{print $2}'`
echo "DATE,TIME,RABBITICPU(%),RABBITPCPU(%),RABBITRSS(Kb),LAMICPU(%),LAMPCPU(%),LAMRSS(Kb),FARMDICPU(%),FARMDPCPU(%),FARMDRSS(Kb),TOMCATICPU(%),TOMCATPCPU(%),TOMCATRSS(Kb),MYSQLICPU(%),MYSQLPCPU(%),MYSQLRSS(Kb)"
while [ true ]; do
DATENOW=`date +"%m-%d-%y"`
TIMENOW=`date +"%T"`
RABBITMEAS=$(f_return_metrics $RABBITPID)
LAMMEAS=$(f_return_metrics $LAMPID)
FARMDMEAS=$(f_return_metrics $FARMDPID)
TOMCATMEAS=$(f_return_metrics $TOMCATPID)
MYSQLMEAS=$(f_return_metrics $MYSQLPID)
TOMCATMEAS=$(f_return_metrics $TOMCATPID)
echo "$DATENOW,$TIMENOW,$RABBITMEAS,$LAMMEAS,$FARMDMEAS,$TOMCATMEAS,$MYSQLMEAS"
sleep $SLEEPTIME
done
Example usage and output:
[root@ldev04 640]# ./perfmon.sh 5
DATE,TIME,RABBITICPU(%),RABBITPCPU(%),RABBITRSS(Kb),LAMICPU(%),LAMPCPU(%),LAMRSS(Kb),FARMDICPU(%),FARMDPCPU(%),FARMDRSS(Kb),TOMCATICPU(%),TOMCATPCPU(%),TOMCATRSS(Kb),MYSQLICPU(%),MYSQLPCPU(%),MYSQLRSS(Kb)
05-10-18,22:44:26,28.0,8.5,203068,2.0,1.0,557092,20.0,13.5,2853408,4.0,2.1,5680584,28.0,17.4,9657152
05-10-18,22:44:34,14.0,8.5,183492,4.0,1.0,557092,16.0,13.5,2850484,0.0,2.1,5680584,33.9,17.4,9657152
05-10-18,22:44:43,0.0,8.5,181072,0.0,1.0,557092,0.0,13.5,2850484,0.0,2.1,5680584,4.0,17.4,9658312
05-10-18,22:44:51,12.0,8.5,181040,0.0,1.0,557092,0.0,13.5,2850484,0.0,2.1,5680584,4.0,17.4,9658312
05-10-18,22:44:59,0.0,8.5,181040,0.0,1.0,557092,0.0,13.4,2850484,0.0,2.1,5680584,0.0,17.4,9658312
Notes:
· Script only outputs to the console so should be redirected to a file for logging results
· Output is in csv format.
· ICPU = "Instantaneous CPU Usage (%)"
· PCPU = "Percentage of CPU usage since process startup (%)"
· RSS = "Resident Set Size i.e. Memory Usage in Kb"
· For CPU measurements a measure of 100% represents all of one processor so results > 100% are achievable for multi-threaded processes.
Monitor Database
MySQL Tuner provides useful diagnostics and recommendations on MySQL settings. See MySQL Tuner for more information.
Database Pool Diagnostics
Cisco Crosswork Situation Manager features a capability to print out the current state of the DBPool in both Moogfarmd and Tomcat. This can be very useful to diagnose problems with slow event processing or UI response.
To trigger logging, run the ha_cntl utility and pass the cluster name using the -i argument. For example:
ha_cntl -i MOO
This will perform task "diagnostics" all groups within the [MOO] cluster.
Diagnostics results will be in the target process log file.
Are you sure you want to continue? (y/N)
The utility triggers logging to /var/log/moogsoft/moogfarmd.log. For example in a performant system:
WARN : [pool-1-][20180511 10:06:07.690 +0100] [CDbPool.java]:792 +|[farmd] DATABASE POOL DIAGNOSTICS:|+
WARN : [pool-1-][20180511 10:06:07.690 +0100] [CDbPool.java]:793 +|[farmd] Pool created at [20180510 17:54:48.911 +0100].|+
WARN : [pool-1-][20180511 10:06:07.690 +0100] [CDbPool.java]:797 +|[farmd] [2] invalid connections have been removed during the lifetime of the pool.|+
WARN : [pool-1-][20180511 10:06:07.690 +0100] [CDbPool.java]:833 +|[farmd] Pool size is [10] with [10] available connections and [0] busy.|+
It also triggers logging to /usr/share/apache-tomcat/logs/catalina.out. For example:
WARN : [0:MooMS][20180511 10:06:07.690 +0100] [CDbPool.java]:792 +|[SituationSimilarity] DATABASE POOL DIAGNOSTICS:|+
WARN : [0:MooMS][20180511 10:06:07.690 +0100] [CDbPool.java]:793 +|[SituationSimilarity] Pool created at [20180510 17:55:04.262 +0100].|+
WARN : [3:MooMS][20180511 10:06:07.690 +0100] [CDbPool.java]:792 +|[MoogPoller] DATABASE POOL DIAGNOSTICS:|+
WARN : [3:MooMS][20180511 10:06:07.690 +0100] [CDbPool.java]:793 +|[MoogPoller] Pool created at [20180510 17:55:01.990 +0100].|+
WARN : [0:MooMS][20180511 10:06:07.690 +0100] [CDbPool.java]:833 +|[SituationSimilarity] Pool size is [5] with [5] available connections and [0] busy.|+
WARN : [3:MooMS][20180511 10:06:07.691 +0100] [CDbPool.java]:833 +|[MoogPoller] Pool size is [10] with [10] available connections and [0] busy.|+
WARN : [1:MooMS][20180511 10:06:07.693 +0100] [CDbPool.java]:792 +|[ToolRunner] DATABASE POOL DIAGNOSTICS:|+
WARN : [1:MooMS][20180511 10:06:07.694 +0100] [CDbPool.java]:793 +|[ToolRunner] Pool created at [20180510 17:55:00.183 +0100].|+
WARN : [1:MooMS][20180511 10:06:07.694 +0100] [CDbPool.java]:792 +|[MoogSvr : priority] DATABASE POOL DIAGNOSTICS:|+
WARN : [1:MooMS][20180511 10:06:07.694 +0100] [CDbPool.java]:833 +|[ToolRunner] Pool size is [5] with [5] available connections and [0] busy.|+
WARN : [1:MooMS][20180511 10:06:07.694 +0100] [CDbPool.java]:793 +|[MoogSvr : priority] Pool created at [20180510 17:54:56.800 +0100].|+
WARN : [1:MooMS][20180511 10:06:07.695 +0100] [CDbPool.java]:797 +|[MoogSvr : priority] [5] invalid connections have been removed during the lifetime of the pool.|+
WARN : [1:MooMS][20180511 10:06:07.695 +0100] [CDbPool.java]:833 +|[MoogSvr : priority] Pool size is [25] with [25] available connections and [0] busy.|+
WARN : [1:MooMS][20180511 10:06:07.695 +0100] [CDbPool.java]:792 +|[MoogSvr : normal priority] DATABASE POOL DIAGNOSTICS:|+
WARN : [1:MooMS][20180511 10:06:07.695 +0100] [CDbPool.java]:793 +|[MoogSvr : normal priority] Pool created at [20180510 17:54:56.877 +0100].|+
WARN : [1:MooMS][20180511 10:06:07.695 +0100] [CDbPool.java]:833 +|[MoogSvr : normal priority] Pool size is [50] with [50] available connections and [0] busy.|+
In both of these examples, the connections are "available" and none show as busy. However, in a busy system with flagging performance, the Moogfarmd log will show different results. In the example below, all connections are busy and have been held for a long time. This type of critical issue causes Moogfarmd to stop processing:
WARN : [pool-1-]20180309 16:49:30.031 +0000] [CDbPool.java]:827 +|[farmd] Pool size is [10] with [0] available connections and [10] busy.|+
WARN : [pool-1-][20180309 16:49:30.031 +0000] [CDbPool.java]:831 +|The busy connections are as follows:
1: Held by 5:SituationMgrLOGFILECOOKBOOK for 173603 milliseconds. Checked out at [CArchiveConfig.java]:283.
2: Held by 7:SituationMgrSYSLOGCOOKBOOK for 173574 milliseconds. Checked out at [CArchiveConfig.java]:283.
3: Held by 8:SituationMgrSYSLOGCOOKBOOK for 173658 milliseconds. Checked out at [CArchiveConfig.java]:283.
4: Held by 9:SituationMgrSYSLOGCOOKBOOK for 173477 milliseconds. Checked out at [CArchiveConfig.java]:283.
5: Held by 8:TeamsMgr for 173614 milliseconds. Checked out at [CArchiveConfig.java]:283.
6: Held by 4:SituationMgrSYSLOGCOOKBOOK for 173514 milliseconds. Checked out at [CArchiveConfig.java]:283.
7: Held by 5:PRC Request Assign - SituationRootCause for 173485 milliseconds. Checked out at [CArchiveConfig.java]:283.
8: Held by 2:SituationMgrSYSLOGCOOKBOOK for 173661 milliseconds. Checked out at [CArchiveConfig.java]:283.
9: Held by 6:SituationMgrSYSLOGCOOKBOOK for 173631 milliseconds. Checked out at [CArchiveConfig.java]:283.
10: Held by 6:TeamsMgr for 172661 milliseconds. Checked out at [CArchiveConfig.java]:283.|+
It is expected that occasionally some of the connections will be busy but as long as they are not held for long periods of time then the system will be functioning normally.
You can use the following bash script to automatically gather DBPool diagnostics:
#!/bin/bash
#Get the cluster name
CLUSTER=$($MOOGSOFT_HOME/bin/utils/moog_config_reader -k ha.cluster)
#Get the current line numbers of latest log lines
FARMLINES=$(wc -l /var/log/moogsoft/moogfarmd.log|awk '{print $1}')
TOMLINES=$(wc -l /usr/share/apache-tomcat/logs/catalina.out|awk '{print $1}')
#Run ha_cntl -i <cluster>
ha_cntl -i $CLUSTER -y > /dev/null
sleep 5
#Print the results
echo "moog_farmd:"
tail -n +$FARMLINES /var/log/moogsoft/moogfarmd.log|egrep "CDbPool|Held by"
echo "tomcat:"
tail -n +$TOMLINES /usr/share/apache-tomcat/logs/catalina.out|egrep "CDbPool|Held by"
To run the script, execute the following command:
./get_dbpool_diag.sh
Monitor Graze API
The getSystemStatus endpoint returns useful information about running processes within the system. For example:
curl -u graze:graze -k "https://localhost/graze/v1/getSystemStatus"
See Graze API for more detail.Graze API
Monitor Moogfarmd Health Logs
Moogfarmd writes detailed health information in JSON format to its log file once a minute. Information falls into eight logical blocks:
· totals: running totals since Moogfarmd was started.
· interval_totals: running totals since the last 60 second interval)
· current_state: a snapshot of the important queues in Moogfarmd
· garbage_collection: JVM garbage collection data
· JVM_memory: JVM memory usage data
· message_queues: Queue usage and capacity
· locked_thread_count: Sum of locked threads
· total_thread_count: Sum of all threads
Example output:
WARN : [0:HLog][20190730 14:48:28.524 +0100] [CFarmdHealth.java:566] +|{"db_stats":{"locked_thread_count":0,"total_thread_count":3},"garbage_collection":{"total_collections_time":12827,"last_minute_collections":0,"last_minute_collections_time":0,"total_collections":1244},"current_state":{"pending_changed_situations":0,"total_in_memory_situations":4764,"situations_for_resolution":0,"event_processing_metric":0.047474747474747475,"message_queues":{"AlertBuilder":0,"TeamsMgr":0,"Housekeeper":0,"Indexer":0,"bus_thread_pool":0,"Cookbook3":0,"Cookbook1":0,"SituationMgr":0,"SituationRootCause":0,"Cookbook2":0},"in_memory_entropies":452283,"cookbook_resolution_queue":0,"total_in_memory_priority_situations":0,"active_async_tasks_count":0},"interval_totals":{"created_events":1782,"created_priority_situations":0,"created_external_situations":0,"created_situations":10,"messages_processed":{"TeamsMgr":182,"Housekeeper":0,"AlertBuilder":1782,"Indexer":2082,"Cookbook3":1782,"SituationRootCause":172,"Cookbook1":1782,"SituationMgr":172,"Cookbook2":1782},"alerts_added_to_priority_situations":0,"alerts_added_to_situations":111,"situation_db_update_failure":0},"JVM_memory":{"heap_used":1843627096,"heap_committed":3007840256,"heap_init":2113929216,"nonheap_committed":66912256,"heap_max":28631367680,"nonheap_init":2555904,"nonheap_used":64159032,"nonheap_max":-1},"totals":{"created_events":453252,"created_priority_situations":0,"created_external_situations":0,"created_situations":4764,"alerts_added_to_priority_situations":0,"alerts_added_to_situations":36020,"situation_db_update_failure":0}}|+
The message_queues block contains string values and queue limits. "-" represents an unlimited queue. An example message_queues block is as follows:
"message_queues":{"AlertBuilder":"0/-","Cookbook":"0/-","Housekeeper":"0/-","Indexer":"0/-","bus_thread_pool":"0/-","SituationMgr":"0/-"}
In a healthy system that is processing data:
· The count of created events and created Situations increases.
· The messages_processed shows that Moolets are processing messages.
· The current_state.message_queues does not accumulate (there may be spikes).
· The total_in_memory Situations increases over time but reduces periodically due to the retention_period.
The situation_db_update_failure should be zero.
Monitor Moogfarmd Data Processing Performance
The data processing component for Cisco Crosswork Situation Manager, Moogfarmd, is the most complex and configurable system component. It offers a range of performance capabilities depending on which Moolets you use and the workload for those Moolets. The following factors affect Moogfarmd performance:
· Incoming event rate from integrations and LAMs.
· CPU clock speed and number of available cores.
· Available memory and -Xmx setting of Moogfarmd process.
· Top-level and per-Moolet threads setting.
· Number of Moolets and their complexity and/or interaction with external services.
· Database load from other parts of the system, for example API requests.
· Incoming messages from the Message Bus or other parts of the system.
Moogfarmd buffers messages in message storm conditions. Each Moolet has its own message queue that enables it to handle message storms and process the backlog once the storm has cleared.
You can configure thread allocation for Moogfarmd in the $MOOGSOFT_HOME/config/moog_farmd.conf file as follows:
· The top-level threads property controls the following:
— The default number of threads for each Moolet unless you specify a setting for a particular Moolet.
— The size of the database pool for Moogfarmd to database connections.
· The per-Moolet level threads property allows individual control of the number of threads for a particular Moolet.
Increasing either setting can lead to improved processing performance but will likely increase CPU and memory usage. Too many threads can lead to overload of connections or transactions to the database and impact other areas of the system. For example, increasing the number of threads for the Alert Builder Moolet can improve the event processing rate, but increases load on the database potentially causing deadlocks.
Alert Builder Moolet
The main performance gateway for Moogfarmd is the Alert Builder because it interacts with MySQL the most. In simple configurations with a tuned MySQL database and no other load, you can increase number of threads for the Alert Builder to process up to 2500 events per second and write them to the database at an equivalent rate. The following graph illustrates the performance impact of adding Alert Builder threads for moogfarmd running only with Alert Builder.
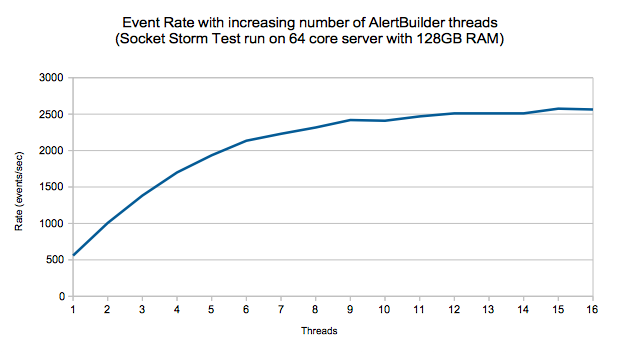
This scenario does not account for other database load, other Moolets, or any custom logic added to the Alert Builder Moobot. Event processing would run at about half this rate in a real-world case.
Sigalisers
Cisco Crosswork Situation Manager clustering algorithms or Sigalisers, employ complex calculations. Depending on its settings, the Sigaliser can account for a lot of processing time and memory within Moogfarmd. It is impossible to predict a processing rate for these algorithms because as they vary greatly according to configuration and workload. Normally Sigalisers do not add much load to the database except in a burst of Situation creation. Moogfarmd retains previously created active Situations in memory according to the retention_period setting in the Moogfarmd configuration file. You can expect memory to grow in Moogfarmd as a consequence under a high rate of Situation generation.
Other Moolets
The performance of other Moolets varies based upon configuration and the rate at which they receive messages to process. Moolets that interact with external services may introduce processing delay to Moogfarmd when there is network or processing latency associated with the external service.
Web Application Server Performance
The Apache Tomcat servlets provide the backend for the Cisco Crosswork Situation Manager UI which drives the end-user experience. Scalability tests show that a single Tomcat instance can support up to 500 concurrent UI users before response times degrade. Tomcat performance depends on the following factors:
· Incoming event rate from integrations and LAMs.
· Incoming messages from other parts of the system, such as Moogfarmd.
· CPU clock speed and number of available cores.
· Available memory and -Xmx setting of the Tomcat process.
· Database load from other parts of the system.
· Number and complexity of alert and Situation filters being used.
· Activities of the users.
To provide quicker load times for users, the UI employs caching benefits for filtered views. Tomcat writes to the Message Bus to cope with event or update storms.
The db_connections and priority_db_connections settings $MOOGSOFT_HOME/config/servlets.conf control the size of the database connection pool that Tomcat uses to connect to MySQL. You can increase either setting to potentially improve UI performance. Exercise caution when changing these values because increases to will typically increase CPU and memory usage of both the Tomcat and database processes. Too many connections can lead to an overload of transactions to the database which impacts other areas of the system.
Monitor RabbitMQ Message Bus Performance
RabbitMQ includes an admin UI that gives performance information about the message bus. By default this is accessible via http://hostname:15672 with credentials moogsoft/m00gs0ft. Check for the following scenarios:
· Early warning of any system resource issues in the "Nodes" section on the Overview page. For example, file/socket descriptors, Erlang processes, memory and disk space.
· Build-up of "Ready" messages in a queue - this indicates a message queue is forming. This means that the associated Cisco Crosswork Situation Manager process is not consuming messages from this queue. It could also point to an orphaned queue that no longer has an associated consumer. This could happen if "message_persistence" has been enabled in system.conf and Moogfarmd and or Tomcat has been reconfigured with a different HA process group name.
See the RabbitMQ docs for information on how to use the admin UI.
Monitor System Performance Metrics
Navigate to System Settings > Self Monitoring > Processing Metrics to see a breakdown of the current state of the system based on the metrics received from the running components.
· The Moogfarmd process and all LAMs publish detailed performance information.
· A bullet chart at the top of the page shows the key performance metric for the system: Current Maximum Event Processing Time. The defined performance ranges are color coded: good (green), marginal (yellow) and bad (red). As the metric changes the bullet chart updates to reflect good, marginal or bad performance.
· The system calclulates Current Maximum Event Processing Time as the approximate 95th percentile of the current maximum time in seconds that it takes for an event to make its way through the system from its arrival at a LAM until its final processing by a Moolet in Moogfarmd.
· By default, AlertBuilder, AlertRulesEngine and All Sigalisers are used to calculate the Current Maximum Event Processing Time metric.
· You can configure the metric_path_moolet property in moog_farmd.conf to specify the Moolets to use to calculate Current Maximum Event Processing Time.
· By default, the good, marginal and bad ranges of the bullet chart are set to 0-10secs, 10-15secs and 15-20secs respectively. You can change the configuration in the in the eventProcessingTimes section in the portal block of $MOOGSOFT_HOME/ui/html/web.conf.
Good performance means LAMs are consuming and publishing events without problem as indicated by:
· Message Queue Size is 0.
· Socket Backlog (if relevant) is not increasing.
Additionally, Moogfarmd is consuming and processing events successfully as indicated by all of:
· Total Abandoned Messages is 0 for the majority of the time.
· Asynchronous Task Queue Size is 0 for the majority of the time.
· Cookbook Resolution Queue is 0 for the majority of the time.
· Message backlogs for all Moolets is 0 for the majority of the time.
· The Messages Processed count for all running Moolets should be the same (unless custom configuration causes event routing through different Moolets) i.e. no Moolet is falling behind.
The above should lead to a stable low Current Maximum Event Processing Time depending on the complexity of the system.
Marginal or Bad performance means LAMs are not consuming and publishing events at the rate at which they receive them, as indicated by:
· Message Queue Size is > 0 and likely increasing.
· Socket Backlog is increasing.
Additionally, Moogfarmd is not consuming and processing events in a timely fashion as indicated by some or all of:
· Total Abandoned Messages is constantly > 0 and likely increasing.
· Asynchronous Task Queue Size is > 0 and likely increasing.
· Cookbook Resolution Queue is constantly > 0 and likely increasing.
· Message backlogs for all Moolets is constantly > 0 and likely increasing.
· The Messages Processed count for all running Moolets is not the same indicating that some Moolets are falling behind. This doesn't apply for cases where custom configuration causes event routing through different Moolets.
The above will likely lead to an unstable high Current Maximum Event Processing Time depending on the complexity of the system.
See Self Monitoring for more detail.Self Monitoring
Monitor Tomcat Servlet Logs
Tomcat writes counter information from each of the main servlets to its catalina.out once a minute.
Example output:
WARN : [Thread-][20180510 20:57:05.501 +0100] [CReporterThread.java]:136 +|MoogPoller read [16722] MooMs messages in the last [60] seconds.|+
WARN : [Thread-][20180510 20:57:07.169 +0100] [CReporterThread.java]:136 +|Graze handled [55] requests in the last [60] seconds.|+
WARN : [Thread-][20180510 20:57:10.181 +0100] [CReporterThread.java]:136 +|MoogSvr handled [86] requests in the last [60] seconds.|+
WARN : [Thread-][20180510 20:58:03.197 +0100] [CReporterThread.java]:136 +|Situations similarity component calculated similarities for [264] situations in the last [60] seconds.|+
The counters are:
· Number of MoogSvr requests in the last minute (i.e. number of standard UI requests made).
· Number of Moogpoller MooMs messages in the last minute (i.e. number of messages read from the bus).
· Number of Graze requests in the last minute.
· Number of similar Situations calculated in the last minute.
In a healthy system that is processing data:
· The Moogpoller count should always be non-zero.
· The MoogSvr and Graze counters may be zero, but should reflect the amount of UI and Graze activity.
· The similar Situations counter may be zero but should reflect the number of similar Situations that are occurring in the system.
Troubleshoot Installation and Upgrade
This topic outlines troubleshooting steps for issues you may encounter when installing or upgrading Cisco Crosswork Situation Manager.
Yum errors and workarounds
Yum: Incorrect Cisco Crosswork Situation Manager version
If an incorrect or outdated version is offered when installing Cisco Crosswork Situation Manager your Yum cache may need cleaning.
Run the following command and then re-attempt the installation:
yum clean all
Yum: HTTP Error 401 - unauthorized
If an attempt to install Cisco Crosswork Situation Manager fails with an error such as the following, check your username and password credentials are correct in the configured Cisco Yum repository.
https://<username>:<password>@speedy.moogsoft.com/repo/aiops/latest/repodata/repomd.xml: [Errno 14] HTTP Error 401 - Unauthorized
Yum: Problem making SSL connection
If an attempt to install Cisco Crosswork Situation Manager fails with an error such as the following:
https://<username>:<password>@speedy.moogsoft.com/repo/aiops/latest/repodata/repomd.xml: [Errno 14] problem making ssl connection
Trying other mirror.
Error: Cannot retrieve repository metadata (repomd.xml) for repository: moogsoft-aiops. Please verify its path and try again
You may need to update the NSS packages on your server. Run the following command and then re-attempt the installation.
yum -y update nss
Yum: MySQL conflict
If an attempt to install Cisco Crosswork Situation Manager fails with an error such as the following, it may be caused by a conflict with the MySQL libraries on the host.
Running rpm_check_debug
Running Transaction Test
Transaction Check Error:
file /usr/lib64/mysql/libmysqlclient.so.16.0.0 from install of mysql-community-libs-compat-5.7.22-2.el6.x86_64 conflicts with file from package compat-mysql51-5.1.54-1.el6.remi.x86_64
file /usr/lib64/mysql/libmysqlclient_r.so.16.0.0 from install of mysql-community-libs-compat-5.7.22-2.el6.x86_64 conflicts with file from package compat-mysql51-5.1.54-1.el6.remi.x86_64
Error Summary
-------------
Run the following bash commands to allow the product to be installed successfully:
echo "remove compat-mysql51" > /tmp/moog_yum_shell.txt
echo "install mysql-community-libs-compat-5.7.22" >> /tmp/moog_yum_shell.txt
echo "install mysql-community-client-5.7.22" >> /tmp/moog_yum_shell.txt
echo "install mysql-community-libs-5.7.22" >> /tmp/moog_yum_shell.txt
echo "install mysql-community-server-5.7.22" >> /tmp/moog_yum_shell.txt
echo "install mysql-community-common-5.7.22" >> /tmp/moog_yum_shell.txt
echo "groupinstall moogsoft" >> /tmp/moog_yum_shell.txt
echo "run" >> /tmp/moog_yum_shell.txt
cat /tmp/moog_yum_shell.txt | yum shell -y
The above error is most likely to occur on hosts on which some MySQL components are already installed. The issue is often seen when trying to install moogsoft-db on a system with an existing MySQL installation.
Nginx error and workaround
Error: Package: moogsoft-ui-7.2.0-123.x86_64 (moogsoft-aiops) Requires: nginx >= 1.14.0
If you encounter the following error when attempting to install Cisco Crosswork Situation Manager:
Requires: nginx >= 1.14.0
---> Package moogsoft-ui.x86_64 0:7.2.0-123 will be an update
--> Processing Dependency: nginx >= 1.14.0 for package: moogsoft-ui-7.2.0-123.x86_64
--> Finished Dependency Resolution
Error: Package: moogsoft-ui-7.2.0-123.x86_64 (moogsoft-aiops)
Requires: nginx >= 1.14.0
Try using --skip-broken to work around the problem, or try:
rpm -Va --nofiles --nodigest
Alternatively, you could manually install the Nginx repo with the following command and then re-attempt the Cisco Crosswork Situation Manager installation.
rpm -Uvh http://nginx.org/packages/centos/7/noarch/RPMS/nginx-release-centos-7-2.el7.ngx.noarch.rpm
UI errors and workarounds
Cannot access UI
If you cannot access the UI from your host machine, check your firewall and if you're listening on the right ports:
1. To check if your firewall is enabled:
sestatus
This returns the status disabled if the firewall is disabled.
2. To disable an active firewall:
setenforce 0
3. To check whether a port is open:
firewall-cmd --zone=public --query-port=8443/tcp
firewall-cmd --zone=public --query-port=8080/tcp
4. To open a port:
firewall-cmd --permanent --zone=public --add-port=8080/tcp
firewall-cmd --permanent --zone=public --add-port=8443/tcp
firewall-cmd --reload
Cannot access UI integrations
If you do not uninstall certain UI integrations before upgrading to Cisco Crosswork Situation Manager v7.3.x, you may see a 502 gateway error when trying to access integrations in the Cisco Crosswork Situation Manager UI.
To solve the problem, follow these steps to delete the UI integrations and perform some cleanup tasks.
1. Run the following SQL against the moogdb database:
use moogdb
DELETE t1 FROM system_config t1 JOIN integration_url_tools t2 ON t1.id = t2.system_config_id;
DELETE t1 FROM system_config t1 JOIN integration_moolets t2 ON t1.id = t2.system_config_id;
DELETE t1 FROM sitroom_plugins t1 JOIN integration_sitroom_plugins t2 ON t1.id = t2.plugin_id;
DELETE t1 FROM link_definitions t1 JOIN integration_link_definitions t2 ON t1.id = t2.link_id;
DELETE t1 FROM alert_column_names t1 JOIN integration_custom_fields t2 ON t1.internal_name = CONCAT('custom_info.',t2.field);
DELETE t1 FROM situation_column_names t1 JOIN integration_custom_fields t2 ON t1.internal_name = CONCAT('custom_info.',t2.field);
2. Run the following SQL against the moog_intdb database:
use moog_intdb
DELETE IGNORE FROM integration_migration;
3. Go to the Integrations tab in the UI and reconfigure your integrations.
Troubleshoot Integrations Controller
The Integrations Controller provides basic configurations for all of the brokers and integrations in your Cisco Crosswork Situation Manager instance beyond the configurations assigned through broker profiles.
This document provides guidance on how to deal with Integrations Controller-related issues.
“liquidbase.exception.LockException”
In the unlikely event that the Integrations Controller exits during DB table creation (this is only possible on the first startup after install/upgrade), the Controller will fail to initialize on subsequent attempts as there is a lock registered in the database.
You can detect if this issue is occurring if the Controller hangs for 5 minutes and then exits with the exception “liquidbase.exception.LockException”. You can then confirm that the lock exists by running the following query against the integrations database:
<integrations_database_name>: SELECT * FROM DATABASECHANGELOGLOCK WHERE LOCKED=TRUE;
If the query returns any results, the lock exists. To correct the issue, complete the following:
1. Ensure that no other Integrations Controllers are currently starting up and performing the DB table creation. If there are, allow them to finish.
2. Assuming no Controllers are performing the creation, run the following against the integrations database:
<integrations_database_name>: UPDATE DATABASECHANGELOGLOCK SET LOCKED=FALSE, LOCKGRANTED=null, LOCKEDBY=null where ID=1;
3. Restart Tomcat.
Troubleshoot Mobile
Cisco Crosswork Situation Manager includes a self-signed certificate by default. If you want to use Cisco Crosswork Situation Manager for Mobile on an iPhone, you need to add a valid SSL certificate. This is because WebSockets do not work on iOS with self-signed certificates.
If a valid root CA certificate is not added, a 'Connection Error' appears at login and Cisco Crosswork Situation Manager for Mobile does not work.
Nginx: SSL configuration
To apply a valid certificate to Nginx, go to the Nginx configuration directory and edit moog-ssl.conf :
cd common/config/nginx vi moog-ssl.conf
vi moog-ssl.conf
Change the default self-signed certificate and key locations to point to the valid root certificate and key:
#ssl_certificate /etc/nginx/ssl/certificate.pem;
#ssl_certificate_key /etc/nginx/ssl/certificate.key;
ssl_certificate /etc/certificates/GeoTrust_Universal_CA.crt;
ssl_certificate_key /etc/certificates/GeoTrust_Universal_CA.key;
Restart Nginx with this command:
systemctl restart nginx
Troubleshoot Percona
Percona XtraDB Cluster is the database clustering solution installed with this version of Cisco Crosswork Situation Manager. If you are an upgrading customer, strongly recommends that you upgrade to Percona.
This document provides guidance on how to deal with Percona-related issues.
Nodes in the Percona cluster are down
If two nodes in the Percona cluster go down simultaneously, it is a critical failure. It can produce the following symptoms:
· The Alert Builder can appear to become "stuck". It may be consuming events from the Message Bus but is not writing them to the database, causing a message queue to form.
Example output using the HA Control utility is as follows:
WARN : [0:HA Controller][20190614 10:47:20.194 +0100] [CAbstractPool.java:214] +|[moog_farmd] POOL DIAGNOSTICS:|+
WARN : [0:HA Controller][20190614 10:47:20.194 +0100] [CAbstractPool.java:216] +|[moog_farmd] Pool created at [20190613 16:24:53.302 +0100].|+
WARN : [0:HA Controller][20190614 10:47:20.194 +0100] [CAbstractPool.java:222] +|[moog_farmd] [12] invalid resources have been removed during the lifetime of the pool.|+
WARN : [0:HA Controller][20190614 10:47:20.194 +0100] [CAbstractPool.java:227] +|[moog_farmd] Pool size is [30] with [23] available connections and [4] busy.|+
WARN : [0:HA Controller][20190614 10:47:20.198 +0100] [CAbstractPool.java:244] +|The busy resources are as follows:
0: Held by 1:AlertBuilder for 584832 milliseconds. Currently in
java.net.SocketInputStream#socketRead0 - SocketInputStream.java:-2
java.net.SocketInputStream#socketRead - SocketInputStream.java:115
java.net.SocketInputStream#read - SocketInputStream.java:168
java.net.SocketInputStream#read - SocketInputStream.java:140
To resolve, try the following:
1. Ensure that you have bootstrapped the first node (started the node without any known cluster addresses). Depending on your installation type, see one of the following guides for more information:
2. Ensure that the other nodes do not have a file named grastate.dat in the MySQL data directory. If the file is present, delete it.
3. Restart one of the secondary nodes and wait for it to sync from the bootstrapped node. Note that this can create a temporary write lock on the bootstrapped node.
4. Once the second node is up and running, start the remaining nodes.
You can also refer to the Percona documentation on how to recover a PXC cluster in various scenarios.
Troubleshoot Processes
The following sections include troubleshooting advice for Cisco Crosswork Situation Manager, moogfarmd, RabbitMQ, LAM, and NGinix, alert, and situation processing issues.
Cisco Cisco Crosswork Situation Manager does not Start
Check the following:
· Check the file system with the command df -m and look for partitions that are full.
· The environment variables in your shell might not be set up correctly. Run the environment and check the location set for $MOOGSOFT_HOME.
Moogfarmd does not Start
The message +|No config present|+ in message in /var/log/moogsoft/moogfarmd.log indicates a syntax error in . Do the following:
· Check the config file for punctuation mistakes. Look for:
— Missing commas
— Unbalanced quotes
— Missing {' or '}
In this case, use f# to comment out code instead of */and /*
· Edit moog_farmd.conf and then restart the service
RabbitMQ Errors
See also Message System Deployment.
"No such user" Message on Startup
If you see the message No such user in /var/log/rabbitmq/startup_err, do the following:
· Check /etc/passwd for user rabbitmq with the following command:
grep rabbitmq/etc/passwd
· If no user is found, add the following to /etc/passwd:
rabbitmq:x:491:488:RabbitMQ messaging server:/var/lib/rabbitmq:/bin/bash
"Failed to create aux thread" Message
If you see the following message "Failed to create aux thread" in var/log/rabbitmq/startup_err, this is most likely a ulimit issue for the RabbitMQ user.
Do the following:
· Check ulimit settings for the RabbitMQ user by running the following command as root:
su - rabbitmq
bash-4.1$ ulimit -a
core file size (blocks, -c) 0
data seg size (kbytes, -d) unlimited
scheduling priority (-e) 0
file size (blocks, -f) unlimited
pending signals (-i) 515675
max locked memory (kbytes, -l) 64
max memory size (kbytes, -m) unlimited
open files (-n) 1024
pipe size (512 bytes, -p) 8
POSIX message queues (bytes, -q) 819200
real-time priority (-r) 0
stack size (kbytes, -s) 10240
cpu time (seconds, -t) unlimited
max user processes (-u) 1024
virtual memory (kbytes, -v) unlimited
file locks (-x) unlimited
· The above example shows ulimit settings that are likely too low for RabbitMQ.
· As per instructions here it may be appropriate to increase the ulimit settings for "open files" and "max user processes" to at least 4096 for development/QA environments and 65536 for production environments
"Unable to create connection" Message
If you see the message "Unable to create connection" message appearing in a LAM, Moogfarmd, or Apache Tomcat logs, it indicates that the process unable to connect to the Message Bus zone in RabbitMQ.
· Check that the RabbitMQ server is running:
service rabbitmq-server status
· If the service is not running, start it:
service rabbitmq-server start
· If the service is running, check that the zone used in Cisco Cisco Crosswork Situation Manager matches the vhost in RabbitMQ. List the zones (vhosts) added in RabbitMQ:
rabbitmqctl list_vhosts
· Check the MooMS section in /usr/share/moogsoft/config/system.conf for the zone used in Cisco Cisco Crosswork Situation Manager .
· If the zone is missing, add the zone (vhost) to RabbitMQ manually (see Message System Troubleshooting).
· Restart the affected process.
LAMs do not Start from Command Line
If LAMs run from the command line or as a service result in the following error:
[root@moogbox2 bin]# ./socket_lam
./socket_lam: error while loading shared libraries: libjvm.so: cannot open shared object file: No such file or directory
it may be because /usr/java/jdk1.8.0_171/jre/lib/amd64/server has not been added to the LD_LIBRARY_PATH.
To run the LAMs via a command line, a change the LD_LIBRARY_PATH to be as follows (the default initd files contain this setting):
export LD_LIBRARY_PATH=$MOOGSOFT_HOME/lib:/usr/GNUstep/Local/Library/Libraries:/usr/GNUstep/System/Library/Libraries:$JAVA_HOME/jre/lib/amd64/server
Generic LAM does not Start
"Unable to parse configuration file" Error
Check the following:
· Unable to parse configuration file" message in /var/log/moogsoft/<lamd_name>.log" indicates a syntax error in the LAM configuration file.
· Check the config file for syntax mistakes. Look for missing commas and unbalanced quotes.
· Compare the configuration file to a default configuration file for the same LAM. Use the following command to locate differences in the files:
diff -y <current_lam>.conf <default_lam>.conf | less
· Edit <current_lam>.conf. to resolve any syntax errors and restart the LAM.
"Connection refused" Error
Check the following:
· "Failed to connect to [host:port]: Connection refused" error in /var/log/moogsoft/<lamd_name>.log means that the port specified in the LAM configuration file is already in use.
· Use the following command to check that the LAM is not already started:
ps -ef | grep <lamd_name>
· Check that another process is not already bound to the port.
· If required, edit the port setting for the LAM in the configuration file and restart the LAM.
"Host unresolvable" Error
Check the following:
· "Host [hostname] unresolvable" error in /var/log/moogsoft/<lamd_name>.log means that the LAM is unable to resolve the host, or the hostname is incorrectly set.
· In the LAM config file, check the address property and correct any errors.
· Check that the /etc/hosts file contains an entry for the specified hostname.
"Failed to open file" Error
Check the following:
· "Failed to open file [<path to file>] error in /var/log/moogsoft/<lamd_name>.log means that the LAM is unable to locate a file specified in the LAM configuration file.
· Locate the missing file in $MOOGSOFT_HOME/bots/lambots or $MOOGSOFT_HOME/contrib.
· Update the LAM configuration file with the correct file path and restart the LAM.
Syntax Error in Presend Filter
Check the following:
· In the LAM configuration file, locate the presend filter file name.
You can do this with a JavaScript editor. Check the code to locate any syntax errors.
· If you have Node.js installed, you can run the following command to locate the incorrect line in the code:
node $MOOGSOFT_HOME/bots/lambots/<path_to_filter_file>.js
· Edit $MOOGSOFT_HOME/bots/lambots/<path_to_filter_file>.js to resolve the error and restart the LAM.
Empty Columns in Alert Lists
Check the following:
· Empty columns in alert lists may indicate incorrect field mapping assignments.
· Check field mappings at the bottom of the LAM configuration file.
· Edit the configuration file to properly map the field to the column name and then restart the LAM.
Socket LAM is not Processing
Check the following:
· The LAM may be set to Server mode rather than Client mode in the configuration file. For a description of mode types see Socket LAM.Socket LAM
· Set the mode correctly in the configuration file and restart the LAM.
JSON Feed is not Processing
Check the following:
· The JSON string might be incorrectly formatted. For example, event data contains nested JSON.
· Run the LAM in debug mode and look for nested JSON.
· Either modify the event data or edit the presend filter to match values in the nested JSON.Either modify the event data or edit the presend filter to match values in the nested JSON.
Logfile LAM Does not Start
Check the following:
· In the LAM configuration file, check the target setting and confirm the file path to the target log file.
· "Could not stat file [-1] error: [Bad file descriptor]" error in /var/log/moogsoft/<lamd_name>.log shows that the Logfile LAM cannot locate the log file to read.
REST LAM Does not Start
If the REST LAM does not start and you are using SSL, the SSL path might be missing. Do the following:
· Verify that the following properties are correctly set:
path_to_ssl_files
ssl_cert_filename
ssl_key_filename
· Verify that the value of the use_ssl property has been set correctly.
· indicates a missing SSL path in the LAM configuration file./var/log/moogsoft/<lamd_name>.log"No file path specified" error in
+|No file path specified|+ message in /var/log/moogsoft/<lamd_name>.log
Nginx Fails on Startup if IPv6 not Configured
Comment out the following references in two configuration files:
1. Go to /etc/nginx/conf.d
2. Edit out IPv6 references with a hash #:
| Configuration File |
Section |
| moog-default.conf |
listen 80 default_server; #listen [::]:80 default_server; |
| moog-ssl.conf |
listen 443 ssl default_server; #listen [::]:443 ssl; |
Alert Processing Issues
Do the following:
· Ensure that the product license has been applied.
· Check that the RabbitMQ server is running:
service rabbitmq-server status
· Check that the "run on startup" setting for Alert Builder in the Moogfarmd configuration file is set to true.
· Check the Moogfarmd log:
/var/log/moogsoft/moogfarmd.log
· Check the Alert Builder Moolet for syntax errors or errors in logic.
· Check that the LAM is correctly parsing/mapping the data feed.
· Check that the LAM is not performing any post-event processing that may be filtering out the events in the associated LAMbot.
No Situations Created
Do the following:
· Ensure that the product license has been applied.
· Check the Moogfarmd configuration file to ensure that the "run on startup" property for the Sigaliser used is set to true.
· In the Moogfarmd configuration file, check that the "process output of" setting for the Sigaliser used lists the correct Moolet.
· Check that the Moolet listed in the "process output of" property is running.
· If Moolet settings are too restrictive or too open they may not produce Situations.
Troubleshoot Required Services for a Functional Production System
These services support the following commands:
service <service-name> status
service <service-name> stop
service <service-name> start
service <service-name> restart
| Service name |
Description |
| apache-tomcat |
Web server that contains the servlets that provide the Cisco Crosswork Situation Manager user interface. |
| nginx |
Web server that handles security, such as Cisco Crosswork Situation Manager login, PHP and HTTP/SSL implementation. |
| socketlamd trapdlamd newreliclamd |
Link Access Modules used for data ingestion. These LAM names are provided as examples; the specific set of service names might differ in your system. At least one instance of a LAM is required for data feed. |
| moogfarmd |
Core Cisco Crosswork Situation Manager system application. |
| mysqld |
Database containing Cisco Crosswork Situation Manager data (database schemas etc.) |
| rabbitmq-server |
Message system for Cisco Crosswork Situation Manager. |
| elasticsearch |
Elasticsearch service for UI search feature. |
Troubleshoot Slow Alert/Situation Creation
If the system is showing signs of latency in alert or Situation creation then the problem is likely with Moogfarmd and/or the database. The following diagnostic steps will help you track down the cause:
| Step |
Description |
Possible Cause and Resolution |
| 1 |
Check the Moogfarmd log for any obvious errors or warning. |
Cause may be evident from any warnings or errors. |
| 2 |
Check the Self Monitoring > Processing Metrics Page |
If the event_process_metric is large and/or increasing then something is backing up. Check Moogfarmd health logging also for sign of message_queue build-up in any of the Moolets. |
| 3 |
Check the CPU/memory usage of the server itself. |
If the server, as a whole, is running close to CPU or memory limit and no other issues can be found (e.g. rogue processes or memory leaks in the Cisco Crosswork Situation Manager components) then consider adding more resource to the server or distributing the Cisco Crosswork Situation Manager components. |
| 4 |
Check whether the Moogfarmd java process is showing constant high CPU/memory usage. |
Moogfarmd may be processing an event or Situation storm. Check Moogfarmd health logging also for sign of message_queue build-up in any of the Moolets. Backlog should clear assuming storm subsides. |
| 5 |
Has the memory of the Moogfarmd java processed reached a plateau? |
Moogfarmd may have reached its java heap limit. Check the -Xmx settings of Moogfarmd. If not specified has Moogfarmd reached approximately a quarter of the RAM on the server? Increase the -Xmx settings as appropriate and restart the Moogfarmd service. |
| 6 |
Is the database tuned? |
Check the innodb-buffer-pool-size and innodb_buffer_pool_instances settings in /etc/my.cnf as per Tuning section above. Ensure they are set appropriately and restart mysql if changes are made. |
| 7 |
Check the server for any other high CPU or memory processes or that which might be impacting the database. |
Something may be hogging CPU/memory on the server and starving Moogfarmd of resources. The events_analyser utility may be running or a sudden burst of UI or Graze activity may be putting pressure on the database and affecting Moogfarmd. |
| 8 |
Run DBPool Diagnostics (see previous section) several times to assess current state of Moogfarmd to database connections. |
Moogfarmd database connections may be maxed out with long running connections - this may indicate a processing deadlock - perform a kill -3 <pid> on the Moogfarmd java process to generate a thread dump (in the Moogfarmd log) and send it to Moogsoft Support. Alternatively Moogfarmd may be very busy with lots of short but frequent connections to the database. Consider increasing the number DBPool connections for Moogfarmd by increasing the top-level "threads" property in the Moogfarmd configuration file and restarting the Moogfarmd service. |
| 9 |
Turn on MySQL slow query logging (see earlier section on how to do this) |
Slow queries from a Moobot in Moogfarmd may be causing problems and they should be reviewed for efficiency. Alternatively slow queries from other parts of the system may be causing problems (e.g. nasty UI filters). Slow queries may also be down to the sheer amount of data in the system. Consider enabling Database Split to move old data and/or using the Archiver to remove old data. |
| 10 |
Check Moogfarmd Situation resolution logging using: grep "Resolve has been running for" /var/log/moogsoft/moogfarmd.log |
If this logging shows non-zero upward trend in "Resolve" time then Moogfarmd is struggling with the number of "in memory" Situations for its calculations. Check the Moogfarmd health logging for the current count of "in memory" situations and consider reducing the retention_period setting in the Moogfarmd log (will need a Moogfarmd restart) and/or closing more old Situations. |
| 11 |
Is Moogfarmd memory constantly growing over time and a memory leak is suspected? Note that Moogfarmd memory does typically increase for periods of time then is trimmed back via Java garbage collection and Sigaliser memory purge (via retention_period property). |
Take periodic heap dumps from the Moogfarmd java process and send them to Moogsoft Support so they can analyse the growth. Use the following commands: DUMPFILE=/tmp/farmd-heapdump-$(date +%s).bin Notes: · jmap needs java jdk to be installed. "yum install jdk" should suffice to install this. · generating a heap dump is like to make the target process very busy for a period of time and also triggers a garbage collection so the memory usage of the process may well reduce. · heapdump files may be very large. |
Troubleshoot Slow UI
If the system is showing signs of slow UI performance, such as long login times, spinning summary counters, or other, then the problem is likely with Tomcat and/or the database. The following diagnostic steps will help you track down the cause:
| Step |
Description |
Possible Cause and Resolution |
| 1 |
Check catalina.out for any obvious errors or warning. |
Cause may be evident from any warnings or errors. |
| 2 |
Check browser console or any errors or timing out requests. |
Possibly a bug or more likely that the query to the database associated with the request is taking longer that 30secs (the default browser timeout). Root cause of this should be investigated. |
| 3 |
Check network latency between browser client machine and server using ping. |
Latency of =>100ms can make login noticeably slower. |
| 4 |
Check the CPU/memory usage of the server itself. |
If the server, as a whole, is running close to CPU or memory limit and no other issues can be found (e.g. rogue processes or memory leaks in the Cisco Crosswork Situation Manager components) then consider adding more resource to the server or distributing the Cisco Crosswork Situation Manager components. |
| 5 |
Check MoogSvr/Moogpoller/Graze counter logging in catalina.out |
Tomcat may be processing a high number of requests or bus updates. If Moogpoller count is zero then something may be wrong with Tomcat > RabbitMQ connection. Check RabbitMQ admin UI for signs of message queue build-up. |
| 6 |
Check whether Tomcat java process is showing constant high CPU/memory usage. |
Tomcat may be processing the updates from an event or situation storm. Backlog should clear assuming storm subsides. |
| 7 |
Has the memory of the Tomcat java processed reached a plateau? |
Tomcat may have reached its java heap limit. Check the -Xmx setting in /etc/init.d/apache-tomcat. Increase the -Xmx settings as appropriate and restart the apache-tomcat service. |
| 8 |
Is the database tuned? |
Check the innodb-buffer-pool-size and innodb_buffer_pool_instances settings in /etc/my.cnf as per Tuning section above. Ensure they are set appropriately and restart mysql if changes are made. |
| 9 |
Check the server for any other high CPU or memory processes or that which might be impacting the database. |
Something may be hogging CPU/memory on the server and starving Tomcat of resources. The Events Analyser utility may be running or a sudden burst of Moogfarmd or Graze activity may be putting pressure on the database and affecting the UI. |
| 10 |
Run DBPool Diagnostics (see previous section) several times to assess current state of Tomcat > Database connections. |
Tomcat database connections may be maxed out with long running connections - this may indicate a processing deadlock - perform a kill -3 <pid> on the Tomcat java process to generate a thread dump (in catalina.out) and send it to Cisco Crosswork Situation Manager Support. Alternatively Tomcat may be very busy with lots of short but frequent connections to the database. A Graze request bombardment is another possibility (Graze does not currently have a separate DB Pool). Consider increasing the number DBPool connections for Tomcat by increasing the related properties in servlets.conf and restarting the apache-tomcat service. |
| 11 |
Turn on MySQL slow query logging (see earlier section on how to do this) |
Slow queries from nasty filters in the UI may be causing problems and they should be reviewed for efficiency. Alternatively slow queries from other parts of the system may be causing problems (e.g. inefficient Moobot code). Slow queries may also be down to the sheer amount of data in the system. Consider enabling Database Split to move old data and/or using the Archiver to remove old data. |
| 12 |
Is Tomcat memory constantly growing over time and a memory leak is suspected? Note that Tomcat memory does typically increase for periods of time then is trimmed back via java garbage collection. |
Take periodic heap dumps from the Tomcat java process and send them to Cisco support so they can analyse the growth. Use the following commands: DUMPFILE=/tmp/tomcat-heapdump-$(date +%s).bin Notes: · jmap needs Java JDK to be installed. "yum install jdk" should suffice to install this. · generating a heap dump is likely to make the target process very busy for a period of time and also triggers a garbage collection so the memory usage of the process may well reduce. · heapdump files may be very large |
User Interface (UI) issues
Unavailable UI Login Page
· Check that port 443 is not being blocked by the firewall on the server.
· Check that the Nginx service is running with command:
service nginx status
· Check that Nginx is listening on port 443. Example expected output:
netstat -anp|grep 443
tcp 0 0 0.0.0.0:443 0.0.0.0:* LISTEN 42356/nginx
tcp 0 0 :::443 :::* LISTEN 42356/nginx
Login fails with "You could not be logged in. Please try again."
Apache-tomcat service not running
· Check the apache-tomcat service is running:
service apache-tomcat status
Communication problem between the UI and MySQL database
· Check the MySQL service is running:
service mysqld status
· If MySQL is running on a different server, check that it is accessible from the Cisco Crosswork Situation Manager web server and the required permissions have been applied.
Authentication problem between the UI and MySQL database
· Check that the user exists in the MySQL moogdb.users table.
· Check that the username and password used for authentication are correct.
Search/Elasticsearch
See Configure Search and Indexing for more information.
ElasticSearch not running or generating errors (such as MySQL connection problems)
· Check that the Elasticsearch service is running:
service elasticsearch status
· Any errors are written to /var/log/elasticsearch/elasticsearch.log
Tomcat cannot connect to Elasticsearch
· Check /usr/share/apache-tomcat/logs/catalina.out for any errors when attempting a search from the UI.
Cron job errors
· Check that cron job that runs the moog_indexer (created by the moog_init_search.sh script to re-index against the Cisco Crosswork Situation Manager database on a once-a-minute basis) exists and is not generating any warnings or errors.
· List the configured cron jobs:
crontab -l
· Errors are written to /var/log/cron
· Depending on the intervals at which Elasticsearch re-indexes against the Cisco Crosswork Situation Manager database, it is possible that new alerts, Situations, threads or comments have not yet been indexed, and so will not be searchable.
· To change the interval manually:
crontab -ed
Elasticsearch fails to start with /tmp directory permission problems
Elasticsearch fails to start with "java.lang. UnsatisfiedLinkError: /tmp/jna--<blah>" error. For example:
[2017-08-07T14:14:31,173][WARN ][o.e.b.Natives] unable to load JNA native support library, native methods will be disabled.
java.lang.UnsatisfiedLinkError: /tmp/jna--1985354563/jna3872404023206022895.tmp: /tmp/jna--1985354563/jna3872404023206022895.tmp: failed to map segment from shared object: Operation not permitted
at java.lang.ClassLoader$NativeLibrary.load(Native Method) ~[?:1.8.0_171]
at java.lang.ClassLoader.loadLibrary0(ClassLoader.java:1941) ~[?:1.8.0_171]
at java.lang.ClassLoader.loadLibrary(ClassLoader.java:1824) ~[?:1.8.0_171]
at java.lang.Runtime.load0(Runtime.java:809) ~[?:1.8.0_171]
at java.lang.System.load(System.java:1086) ~[?:1.8.0_171]
at com.sun.jna.Native.loadNativeDispatchLibraryFromClasspath(Native.java:851) ~[jna-4.2.2.jar:4.2.2 (b0)]
at com.sun.jna.Native.loadNativeDispatchLibrary(Native.java:826) ~[jna-4.2.2.jar:4.2.2 (b0)]
at com.sun.jna.Native.<clinit>(Native.java:140) ~[jna-4.2.2.jar:4.2.2 (b0)]
at java.lang.Class.forName0(Native Method) ~[?:1.8.0_171]
at java.lang.Class.forName(Class.java:264) ~[?:1.8.0_171]
at org.elasticsearch.bootstrap.Natives.<clinit>(Natives.java:45) [elasticsearch-5.6.9.jar:5.6.9]
at org.elasticsearch.bootstrap.Bootstrap.initializeNatives(Bootstrap.java:104) [elasticsearch-5.6.9.jar:5.6.9]
at org.elasticsearch.bootstrap.Bootstrap.setup(Bootstrap.java:203) [elasticsearch-5.6.9.jar:5.6.9]
at org.elasticsearch.bootstrap.Bootstrap.init(Bootstrap.java:333) [elasticsearch-5.6.9.jar:5.6.9]
at org.elasticsearch.bootstrap.Elasticsearch.init(Elasticsearch.java:121) [elasticsearch-5.6.9.jar:5.6.9]
at org.elasticsearch.bootstrap.Elasticsearch.execute(Elasticsearch.java:112) [elasticsearch-5.6.9.jar:5.6.9]
at org.elasticsearch.cli.SettingCommand.execute(SettingCommand.java:54) [elasticsearch-5.6.9.jar:5.6.9]
at org.elasticsearch.cli.Command.mainWithoutErrorHandling(Command.java:122) [elasticsearch-5.6.9.jar:5.6.9]
at org.elasticsearch.cli.Command.main(Command.java:88) [elasticsearch-5.6.9.jar:5.6.9]
at org.elasticsearch.bootstrap.Elasticsearch.main(Elasticsearch.java:89) [elasticsearch-5.6.9.jar:5.6.9]
at org.elasticsearch.bootstrap.Elasticsearch.main(Elasticsearch.java:82) [elasticsearch-5.6.9.jar:5.6.9]
This is most likely due to the noexec directive in the /tmp mount. The solution is to remove the noexec directive, if it is practical to do so:
sudo mount /tmp -o remount,exec
Or set the following in /etc/sysconfig/elasticsearch:
ES_JAVA_OPTS="-Djna.tmpdir=/var/lib/elasticsearch/tmp"
Restart the Elasticsearch service after either of the above changes.
Obtaining Documentation and Submitting a Service Request
For information on obtaining documentation, using the Cisco Bug Search Tool (BST), submitting a service request, and gathering additional information, see What’s New in Cisco Product Documentation.
To receive new and revised Cisco technical content directly to your desktop, you can subscribe to the What’s New in Cisco Product Documentation RSS feed. The RSS feeds are a free service.
THE SPECIFICATIONS AND INFORMATION REGARDING THE PRODUCTS IN THIS MANUAL ARE SUBJECT TO CHANGE WITHOUT NOTICE. ALL STATEMENTS, INFORMATION, AND RECOMMENDATIONS IN THIS MANUAL ARE BELIEVED TO BE ACCURATE BUT ARE PRESENTED WITHOUT WARRANTY OF ANY KIND, EXPRESS OR IMPLIED. USERS MUST TAKE FULL RESPONSIBILITY FOR THEIR APPLICATION OF ANY PRODUCTS.
THE SOFTWARE LICENSE AND LIMITED WARRANTY FOR THE ACCOMPANYING PRODUCT ARE SET FORTH IN THE INFORMATION PACKET THAT SHIPPED WITH THE PRODUCT AND ARE INCORPORATED HEREIN BY THIS REFERENCE. IF YOU ARE UNABLE TO LOCATE THE SOFTWARE LICENSE OR LIMITED WARRANTY, CONTACT YOUR CISCO REPRESENTATIVE FOR A COPY.
The Cisco implementation of TCP header compression is an adaptation of a program developed by the University of California, Berkeley (UCB) as part of UCB’s public domain version of the UNIX operating system. All rights reserved. Copyright © 1981, Regents of the University of California.
NOTWITHSTANDING ANY OTHER WARRANTY HEREIN, ALL DOCUMENT FILES AND SOFTWARE OF THESE SUPPLIERS ARE PROVIDED “AS IS” WITH ALL FAULTS. CISCO AND THE ABOVE-NAMED SUPPLIERS DISCLAIM ALL WARRANTIES, EXPRESSED OR IMPLIED, INCLUDING, WITHOUT LIMITATION, THOSE OF MERCHANTABILITY, FITNESS FOR A PARTICULAR PURPOSE AND NONINFRINGEMENT OR ARISING FROM A COURSE OF DEALING, USAGE, OR TRADE PRACTICE.
IN NO EVENT SHALL CISCO OR ITS SUPPLIERS BE LIABLE FOR ANY INDIRECT, SPECIAL, CONSEQUENTIAL, OR INCIDENTAL DAMAGES, INCLUDING, WITHOUT LIMITATION, LOST PROFITS OR LOSS OR DAMAGE TO DATA ARISING OUT OF THE USE OR INABILITY TO USE THIS MANUAL, EVEN IF CISCO OR ITS SUPPLIERS HAVE BEEN ADVISED OF THE POSSIBILITY OF SUCH DAMAGES.
Any Internet Protocol (IP) addresses and phone numbers used in this document are not intended to be actual addresses and phone numbers. Any examples, command display output, network topology diagrams, and other figures included in the document are shown for illustrative purposes only. Any use of actual IP addresses or phone numbers in illustrative content is unintentional and coincidental.
All printed copies and duplicate soft copies are considered un-Controlled copies and the original on-line version should be referred to for latest version.
Cisco has more than 200 offices worldwide. Addresses, phone numbers, and fax numbers are listed on the Cisco website at www.cisco.com/go/offices.
Cisco Trademark
Cisco and the Cisco logo are trademarks or registered trademarks of Cisco and/or its affiliates in the U.S. and other countries. To view a list of Cisco trademarks, go to this URL: www.cisco.com/go/trademarks. Third-party trademarks mentioned are the property of their respective owners. The use of the word partner does not imply a partnership relationship between Cisco and any other company. (1110R)
Cisco Copyright
© 2019 Cisco Systems, Inc. All rights reserved.
 Feedback
Contact Cisco
- Open a Support Case

- (Requires a Cisco Service Contract)