Cisco Network Visibility Application on APIC-EM User Guide, Release 1.4.0.x
Bias-Free Language
The documentation set for this product strives to use bias-free language. For the purposes of this documentation set, bias-free is defined as language that does not imply discrimination based on age, disability, gender, racial identity, ethnic identity, sexual orientation, socioeconomic status, and intersectionality. Exceptions may be present in the documentation due to language that is hardcoded in the user interfaces of the product software, language used based on RFP documentation, or language that is used by a referenced third-party product. Learn more about how Cisco is using Inclusive Language.
- Updated:
- February 21, 2017
Chapter: Discovering Devices and Hosts
Discovering Devices
and Hosts
About Discovery
The process of finding network devices and hosts is known as discovery. The Discovery function scans the devices and hosts in your network and populates the Cisco APIC-EM database with the information that it retrieves. To discover devices and hosts, you need to provide the controller with information about the devices so that the Discovery function can reach as many of the devices in your network as possible and gather as much information as it can.
The Discovery function uses the following protocols and methods to retrieve device information, such as hosts IP addresses, MAC addresses, and network attachment points:
-
Cisco Discovery Protocol (CDP)
-
Community-based Simple Network Management Protocol Version 2 (SNMPv2c)
-
Simple Network Management Protocol version 3 (SNMPv3)
-
Link Layer Discovery Protocol (LLDP)
-
IP Device Tracking (IPDT) (For Discovery to collect host information, you must manually enable IPDT on devices. After IPDT is enabled, Discovery collects host information on a best-effort basis, because in addition to IPDT, Discovery relies on ARP entries for host information.)
-
LLDP Media Endpoint Discovery (LLDP-MED) (IP phones and some servers are discovered using LLDP-MED).
For information about the required protocol configuration for your devices, see Device Configuration Prerequisites.
Understanding Discovery Credentials
The Cisco APIC-EM supports two different types of discovery credentials: global and job specific (or discovery request-specific). Both types of discovery credentials can consist of CLI or SNMP credentials that are configured using the controller's GUI.
Global credentials can be configured in either the Discovery window or the Discovery Credentials windows (as described in this chapter). Job specific credentials are only configured in the Discovery window.
 Note | For information about the procedure to configure global and/or job specific credentials in the Discovery window, see the Cisco Application Policy Infrastructure Controller Enterprise Module Configuration Guide. |
Both CLI and SNMP credentials are required for a successful discovery. The SNMP credentials (either global or job specific) are used for device discovery. The CLI credentials (either global or job specific) are used for capturing or applying device configurations for the controller's inventory.
You should enter at least one set of SNMP credentials, either SNMPv2c or SNMPv3, for your device discovery. If you are going to configure SNMPv2 settings in your network, then SNMP Read Only (RO) community string values should be entered in the controller to assure a successful discovery and populated inventory. However, if an SNMP RO community string and SNMP Read Writer (RW) community string is not entered into the controller, as a best effort, discovery will run with the default SNMP RO community string "public." Additionally, if no SNMP RO community string is entered but a SNMP RW community string is entered, then the SNMP RW community string will be used as SNMP RO community string.
Note | You can enter values for both SNMP versions (SNMPv2c and SNMPv3) for a single discovery. The controller supports multiple SNMP credential configurations. Altogether, you can enter a maximum of 5 global device credentials (SNMP or CLI) using the Discovery Credentials windows as described in this chapter, with an additional credentials set being created in the Discovery window. Therefore, for a single discovery scan request, you can configure a total of 6 credential sets of each type (CLI or SNMP). |
- Global Credentials
- Job Specific Credentials
- Discovery Credentials Example
- Discovery Credentials Rules
- Discovery Credentials Caveats
Global Credentials
Global credentials are defined as preexisting credentials that are common to the devices in a network. Global credentials (CLI and SNMP) are configured on the devices using the GUI (Discovery window or Discovery Credentials window) and permit successful login to the devices. Global credentials are used by the Cisco APIC-EM to authenticate and access the devices in a network that share this device credential when performing network discoveries.
You can configure the global CLI credentials in the CLI Credentials window. You access this window by clicking either admin or the Settings icon (gear) on the menu bar at the upper right of the screen. You then click the Settings link from the drop-down menu and then click CLI Credentials on the Setting Navigation pane. You can also configure global CLI credentials in the Credentials field in the Discovery window. For information about the procedure to configure global CLI credentials in the Discovery window, see the Cisco Application Policy Infrastructure Controller Enterprise Module Configuration Guide.
You configure the global SNMP credentials in the SNMPv2c or SNMPv3 window . You access these windows by clicking either admin or the Settings icon (gear) on the menu bar at the upper right of the screen. You then click the Settings link from the drop-down menu and then click one of the SNMP window links on the Setting Navigation pane. You can also configure global SNMP credentials in the Credentials field in the Discovery window. For information about the procedure to configure global SNMP credentials in the Discovery window, see the Cisco Application Policy Infrastructure Controller Enterprise Module Configuration Guide.
Note | Multiple credentials can be configured in the CLI Credentials window. |
Job Specific Credentials
Job specific credentials (request-specific credentials) are defined as preexisting device credentials for a specific network device or set of devices that do not share the global credentials.
You configure job specific credentials in the Discovery window prior to performing a discovery that is exclusive for that set of network devices. You access this window by clicking Discovery on the Navigation pane.
Discovery Credentials Example
Assume a network of 200 devices that form a CDP neighborship (neighboring devices discovered using Cisco Discovery Protocol (CDP)). In this network, 190 devices share a global credential (Credential-0) and the 10 remaining devices each have their own unique or job specific credentials (Credential 1- 5)
To properly authenticate and access the devices in this network by the Cisco APIC-EM, you perform the following tasks:
-
Configure the CLI global credentials as Credential-0 for the controller.
You can configure the global credentials in the CLI Credentials window. You access this window, by clicking either admin or the Settings icon (gear) on the menu bar at the upper right of the screen. You then click the Settings link from the drop-down menu and then click CLI Credentials on the Setting Navigation pane.
-
Configure the SNMP (v2c or v3) global credentials.
You can configure these global credentials in the two SNMP windows. You access these GUI windows by clicking the Settings button at the top right and then clicking SNMPv2c or SNMPv3 on the Setting Navigation pane.
-
Run a CDP discovery using one of the 190 device IP addresses (190 devices that share the global credentials) and selecting the global credentials in the GUI. You run a CDP discovery in the Discovery window. You access this window, by clicking Discovery on the Navigation pane.
-
Run 10 separate Range discoveries for each of the remaining 10 devices using the appropriate job specific credentials and SNMP values (for example, Credential-1, Credential-2-5, etc.).
You configure the job specific credentials in the Discovery window. You access this window, by clicking Discovery on the Navigation pane.
-
Review the Device Inventory table in the Device Inventory window to check the discovery results
Discovery Credentials Rules
Discovery credentials (global and job specific) operate under the rules as described in the bullet list and table below.
Job Specific Credential Rules
-
Job specific credentials can be provided when creating a new network discovery, but only a single set of job specific credentials is allowed per network discovery.
-
Job specific credentials take precedence over any configured global credentials.
-
If the job specific credentials are provided as part of a network discovery and cause an authentication failure, then discovery is attempted a second time with the configured global credentials (if explicitly selected in the Discovery window of the controller's GUI). If discovery fails with the global credentials then the device discovery status will result in an authentication failure.
-
When using Cisco APIC-EM APIs for a network discovery and the job specific credentials (both CLI and SNMP) are not provided as part of the network discovery, then the global credentials (both CLI and SNMP provided by the user) are used to authenticate devices.
Global Credential Rules
|
Global Credentials |
Job Specific Credentials |
Result |
||
|---|---|---|---|---|
|
Not configured |
Not configured |
If the network discovery is run from the controller's GUI, then the default SNMP read community string (public) is used for the discovery scan. A discovery failure will not occur in this case. If the network discovery is run using Cisco APIC-EM APIs, then a discovery failure will occur since both CLI and SNMP credentials must be configured for a successful device discovery using the Cisco APIC-EM APIs. |
||
|
Not configured |
Configured |
The specified job specific credentials will be used for discovery. |
||
|
Configured |
Not configured |
All the configured global credentials will be used. |
||
|
Configured but not selected |
Configured |
Only the job specific credentials will be used. |
||
|
Configured and selected |
Not configured |
Only selected global credential will be used. |
||
|
Configured and selected |
Configured |
Both specified credentials (global and job specific) will be used for discovery. |
||
|
Configured, but wrong global credential IDs are mentioned in the discovery POST REST API. |
Correct job specific credentials configured |
Discovery fails.
|
||
|
Configured, but wrong global credential IDs are mentioned in the discovery POST REST API. |
Not configured |
Discovery fails.
|
Discovery Credentials Caveats
The following are caveats for the Cisco APIC-EM discovery credentials:
-
If a device credential changes in a network device or devices after Cisco APIC-EM discovery is completed for that device or devices, any subsequent polling cycles for that device or devices will fail. To correct this situation, an administrator has following options:
-
If the ongoing discovery fails due to a device authentication failure (for example, the provided discovery credential is not valid for the devices discovered by current discovery), then the administrator has following options:
-
Stop or delete the current discovery. Create one or more new network discovery jobs (either a CDP or Range discovery type) with a job specific credential that matches the device credential.
-
Create a new global credential and execute a new discovery selecting the correct global credential.
-
Edit an existing global credential and re-run the discovery.
-
-
Deleting a global credential does not affect already discovered devices. These already discovered devices will not report an authentication failure.
-
The Cisco APIC-EM provides a REST API which allows the retrieval of the list of managed network devices in the Cisco APIC-EM inventory. The purpose of this API is to allow an external application to synchronize its own managed device inventory with the devices that have been discovered by the Cisco APIC-EM. For example, for Cisco IWAN scenarios, Prime Infrastructure makes use of this API in order to populate its inventory with the IWAN devices contained in the Cisco APIC-EM inventory in order to provide monitoring of the IWAN solution.
Note
Only the username is provided in clear text. SNMP community strings and passwords are not provided in cleartext for security reasons.
Configuring Global Discovery Credentials
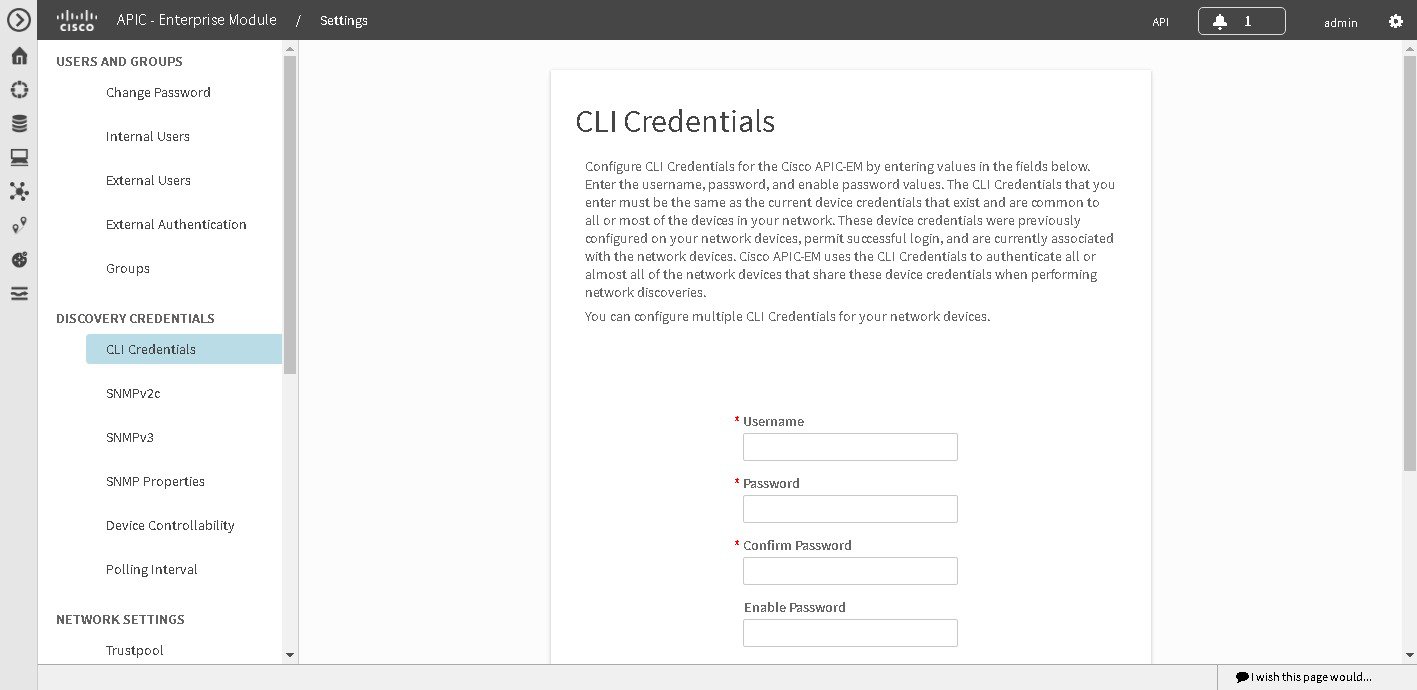
Configuring CLI Credentials
CLI credentials are defined as preexisting device credentials that are common to most of the devices in a network. CLI credentials are used by the Cisco APIC-EM to authenticate and access the devices in a network that share this CLI credential when performing devices discoveries.
You configure the CLI global credentials in the CLI Credentials window or the Discovery window. This procedure describes how to configure CLI global credentials in the CLI Credentials window.
Note | You can configure up to five CLI credentials. |
You must have successfully deployed the Cisco APIC-EM and it must be operational.
You must have administrator (ROLE_ADMIN) permissions and either access to all resources (RBAC scope set to ALL) or an RBAC scope that contains all of the resources that you want to group. For example, to create a group containing a specific set of resources, you must have access to those resources (custom RBAC scope set to all of the resources that you want to group).
For information about user permissions and RBAC scopes required to perform tasks using the Cisco APIC-EM, see "User Settings" in the chapter, "Configuring the Cisco APIC-EM Settings".
What to Do Next
Proceed to configure SNMP values for your network device discovery.
For a successful device discovery (with all the device information to be collected), CLI credentials (global and/or job specific) should be configured using the controller. The global credentials for CLI and SNMP (v2c or v3) can be configured in the Discovery Credentials windows (as described in this chapter) or the Discovery window, and are used in addition to any job specific credentials (for CLI and SNMP) that are also configured in the Discovery window.
Configuring SNMP
You configure SNMP for device discovery using the following Discovery Credentials windows in the Cisco APIC-EM GUI:
Note | You can also configure SNMP for device discovery in the Discovery window of the controller's GUI. For information about the procedures to configure SNMP for device discovery in the Discovery window, see the Cisco Application Policy Infrastructure Controller Enterprise Module Configuration Guide. |
You can use SNMP and the existing security features in SNMP v3 to secure communications between the controller and the devices in your network. SNMP v3 provides both privacy (encryption) and authentication capabilities for these communications. If possible for your network, we recommend that you use SNMPv3 with both privacy and authentication enabled.
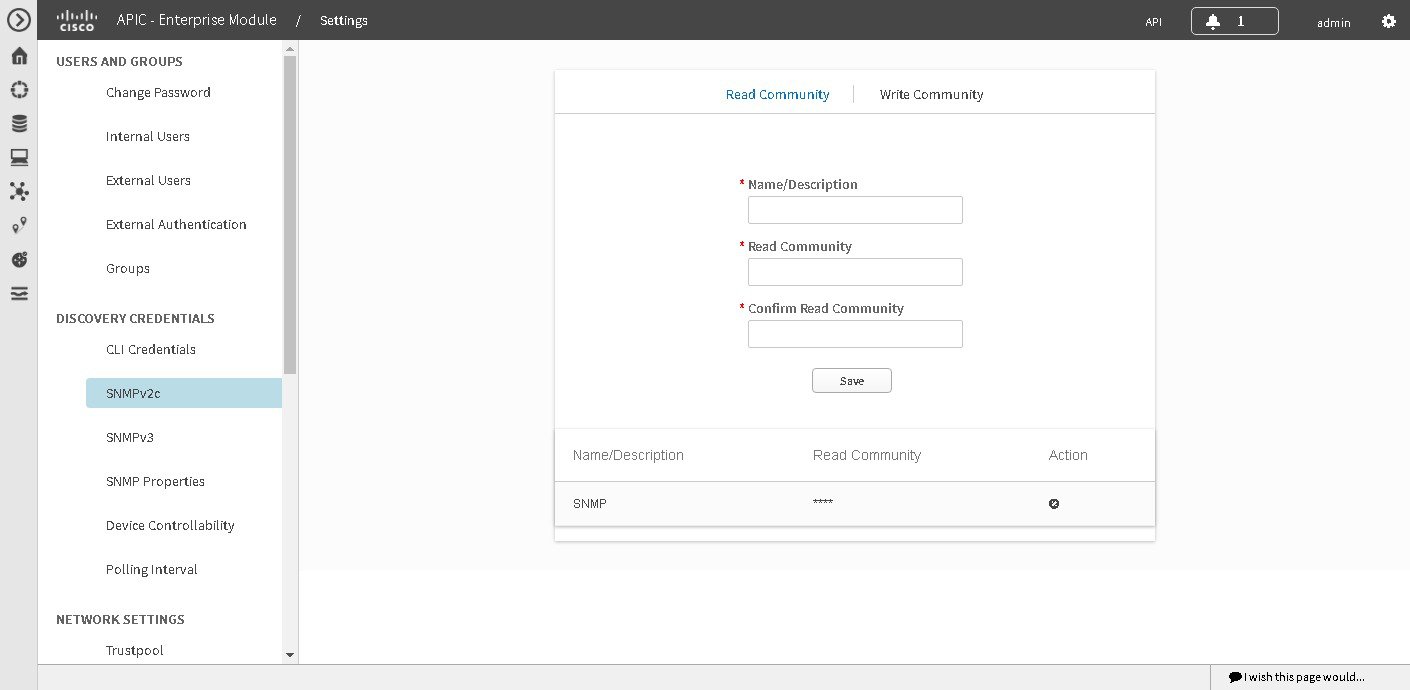
Configuring SNMPv2c
You configure SNMPv2c for device discovery in the SNMPv2c window in the Cisco APIC-EM GUI. The SNMP values that you configure for SNMPv2c for the controller must match the SNMPv2c values that have been configured for your network devices.
Note | You can configure up to five read community strings and five write community strings. |
SNMP is an application-layer protocol that provides a message format for communication between SNMP managers and agents. SNMP provides a standardized framework and a common language used for the monitoring and management of devices in a network. The different versions of SNMP are SNMPv1, SNMPv2, SNMPv2c, and SNMPv3.
SNMPv2c is the community string-based administrative framework for SNMPv2. Community string is a type of password, which is transmitted in clear text. SNMPv2c does not provide authentication or encryption (noAuthNoPriv level of security).
Note | In addition to configuring SNMPv2c for device discovery in the controller, a "best effort" Cisco APIC-EM discovery is in place, meaning that devices having SNMP with Read-Only (RO) community string set to "public" will be discovered all the time irrespective of the configured SNMP Read/Write community string. |
You must have successfully deployed the Cisco APIC-EM and it must be operational.
You must have your network's SNMP information available for this configuration procedure.
You must have administrator (ROLE_ADMIN) permissions and either access to all resources (RBAC scope set to ALL) or an RBAC scope that contains all of the resources that you want to group. For example, to create a group containing a specific set of resources, you must have access to those resources (custom RBAC scope set to all of the resources that you want to group).
For information about user permissions and RBAC scopes required to perform tasks using the Cisco APIC-EM, see "User Settings" in the chapter, "Configuring the Cisco APIC-EM Settings".
| Step 1 | In the Home window, click either admin or the Settings icon (gear) at the top right corner of the screen. | ||
| Step 2 | Click the Settings link from the drop-down menu. | ||
| Step 3 | In the Settings navigation pane, click SNMPv2c to view the SNMPv2c window. | ||
| Step 4 | In the
SNMPv2c window, click
Read
Community.
Enter your Read Community values:
| ||
| Step 5 | Click
Save to save your
Read
Community values.
The Read Community values will appear in the table below. | ||
| Step 6 | (Optional) In
the
SNMPv2c window, click
Write
Community.
Enter your Write Community values:
| ||
| Step 7 | (Optional) Click
Save to save your
Write
Community values.
The Write Community values will appear in the table below. |
What to Do Next
If required for your SNMP configuration, proceed to configure either SNMPv3 or SNMP Properties using the GUI.
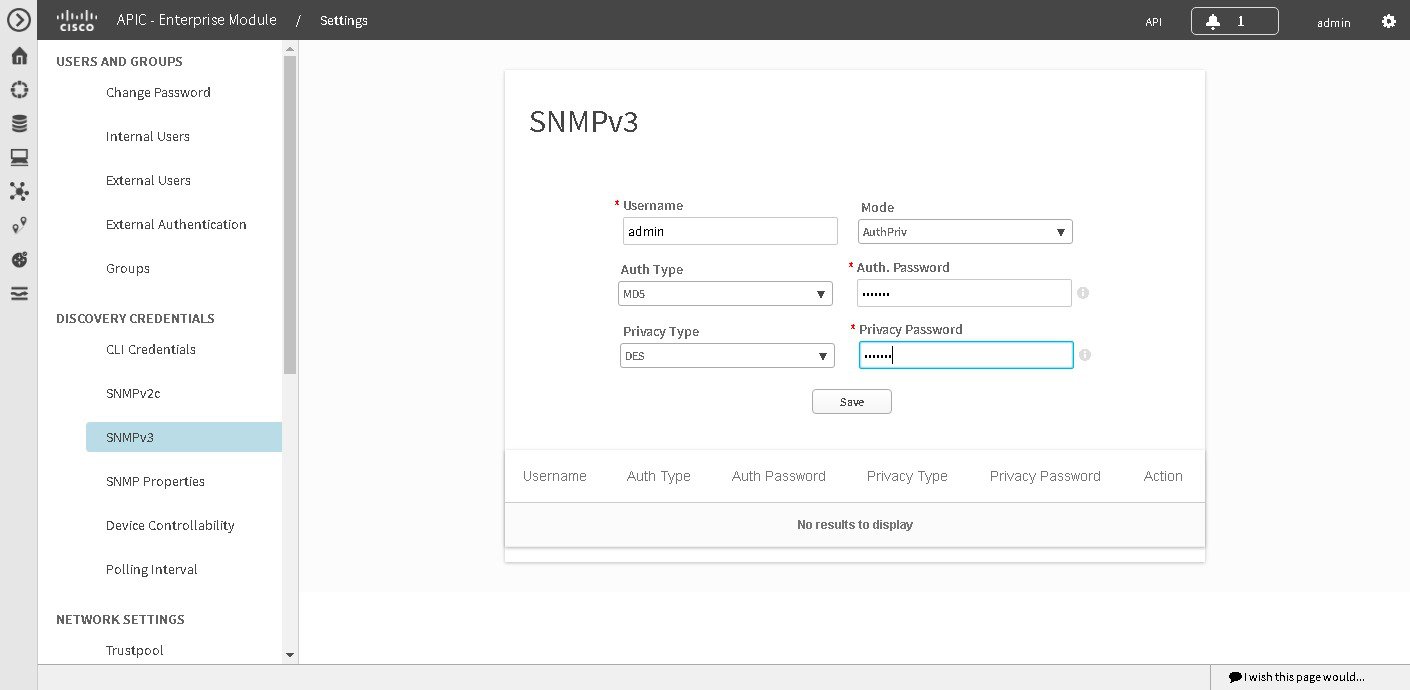
Configuring SNMPv3
You configure SNMPv3 for device discovery in the SNMPv3 window in the Cisco APIC-EM GUI. The SNMP values that you configure for SNMPv3 for the controller must match the SNMPv3 values that have been configured for your network devices. You can configure up to five SNMPv3 settings.
SNMP is an application-layer protocol that provides a message format for communication between SNMP managers and agents. SNMP provides a standardized framework and a common language used for the monitoring and management of devices in a network. The different versions of SNMP are SNMPv1, SNMPv2, SNMPv2c, and SNMPv3.
SNMPv3 provides secure access to devices by a combination of authenticating and encrypting frames over the network. The following are supported SNMPv3 security models:
-
Message integrity—Ensures that a packet has not been tampered with in-transit.
-
Authentication—Determines the message is from a valid source
-
Encryption—Scrambles the packet contents to prevent it from being seen by unauthorized sources
SNMPv3 provides for both security models and security levels. A security model is an authentication strategy that is set up for a user and the role in which the user resides. A security level is the permitted level of security within a security model. A combination of a security model and a security level determines which security mechanism is employed when handling an SNMP packet.
The security level determines if an SNMP message needs to be protected from disclosure and if the message needs to be authenticated. The various security levels that exist within a security model are as follows:
-
noAuthNoPriv—Security level that does not provide authentication or encryption
-
AuthNoPriv—Security level that provides authentication but does not provide encryption
-
AuthPriv—Security level that provides both authentication and encryption
The following table identifies what the combinations of security models and levels mean:
|
Model |
Level |
Authentication |
Encryption |
What Happens |
|---|---|---|---|---|
|
v2c |
noAuthNoPriv |
Community String |
No |
Uses a community string match for authentication. |
|
v3 |
noAuthNoPriv |
User Name |
No |
Uses a username match for authentication. |
|
v3 |
AuthNoPriv |
Either: |
No |
Provides authentication based on the Hash-Based Message Authentication Code (HMAC) Message Digest 5 (MD5) algorithm or the HMAC Secure Hash algorithm (SHA) |
|
v3 |
AuthPriv |
Either: |
Either: |
Provides authentication based on the HMAC-MD5 or HMAC-SHA algorithms. Provides Data Encryption Standard (DES) 56-bit encryption in addition to authentication based on the Cipher Block Chaining (CBC) DES (DES-56) standard or CBC-mode AES for encryption. |
You must have successfully deployed the Cisco APIC-EM and it must be operational.
You must have your network's SNMP information available for this configuration procedure.
You must have administrator (ROLE_ADMIN) permissions and either access to all resources (RBAC scope set to ALL) or an RBAC scope that contains all of the resources that you want to group. For example, to create a group containing a specific set of resources, you must have access to those resources (custom RBAC scope set to all of the resources that you want to group).
For information about user permissions and RBAC scopes required to perform tasks using the Cisco APIC-EM, see "User Settings" in the chapter, "Configuring the Cisco APIC-EM Settings".
Note | With SNMPv3, passwords (or passphrases) must be at least 8 characters in length (minimum). Additionally, for several Cisco Wireless LAN controllers, passwords (or passphrases) must be at least 12 characters in length (minimum). Failure to ensure these required minimum character lengths for the passwords will result in devices not being discovered, monitored, and/or managed by the controller. |
| Step 1 | In the Home window, click either admin or the Settings icon (gear) at the top right corner of the screen. | ||
| Step 2 | Click the Settings link from the drop-down menu. | ||
| Step 3 | In the
Settings navigation pane, click
SNMPv3 to view the
SNMPv3 window.
If you use SNMPv3 in your network to monitor and manage devices, then configure the SNMPv3 values for discovery for your network. | ||
| Step 4 | In the
SNMPv3 window, enter a
Username value and choose a
Mode from the drop down menu.
The following Mode options are available:
| ||
| Step 5 | If you selected
AuthPriv or
AuthNoPriv as a
Mode option, then choose an
Authentication type from the drop down menu and
enter an authentication password.
The following Authentication options are available: | ||
| Step 6 | If you selected
AuthPriv as a
Mode option, then choose a
Privacy type from the drop down menu and enter a
SNMPv3 privacy password.
The SNMPv3 privacy password is used to generate the secret key used for encryption of messages exchanged with devices that support DES or AES128 encryption. The following Privacy type options are available: | ||
| Step 7 | Click
Save to save your SNMPv3 configuration values.
The SNMPv3 configured values will appear in the table below. |
What to Do Next
If required for your SNMP configuration, proceed to configure either SNMPv2c or SNMP Properties using the GUI.
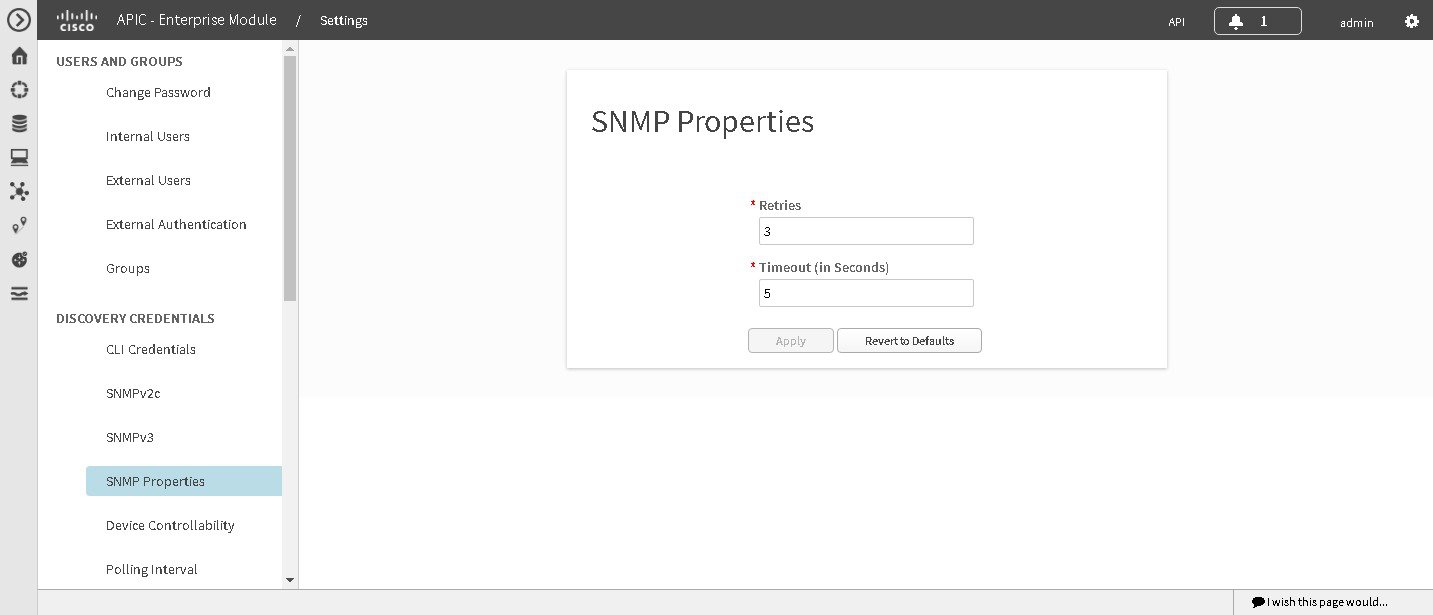
Configuring SNMP Properties
You configure SNMP properties for device discovery in the SNMP Properties window in the Cisco APIC-EM GUI.
You must have successfully deployed the Cisco APIC-EM and it must be operational.
You must have your network's SNMP information available for this configuration procedure.
You must have administrator (ROLE_ADMIN) permissions and either access to all resources (RBAC scope set to ALL) or an RBAC scope that contains all of the resources that you want to group. For example, to create a group containing a specific set of resources, you must have access to those resources (custom RBAC scope set to all of the resources that you want to group).
For information about user permissions and RBAC scopes required to perform tasks using the Cisco APIC-EM, see "User Settings" in the chapter, "Configuring the Cisco APIC-EM Settings".
| Step 1 | In the Home window, click either admin or the Settings icon (gear) at the top right corner of the screen. |
| Step 2 | Click the Settings link from the drop-down menu. |
| Step 3 | In the
Settings navigation pane, click
SNMP
Properties to view the
SNMP
Properties window.
Configure the SNMP property settings for discovery in your network. |
| Step 4 | In the
SNMP
Properties window, enter a value in the
Retries field.
The value entered in this field is the number of attempts the controller attempts to use SNMP to communicate with your network devices. |
| Step 5 | In the
SNMP
Properties window, enter a value in the
Timeout field.
The value entered in this field is the length of time in seconds the controller attempts to use SNMP to communicate with your network devices. |
| Step 6 | Click
Apply to save your SNMP configuration values.
You can also click Revert to Defaults to revert to the SNMP property default values. The following are the SNMP property default values: |
What to Do Next
If required for your SNMP configuration, proceed to configure either SNMPv2c or SNMPv3 using the GUI.
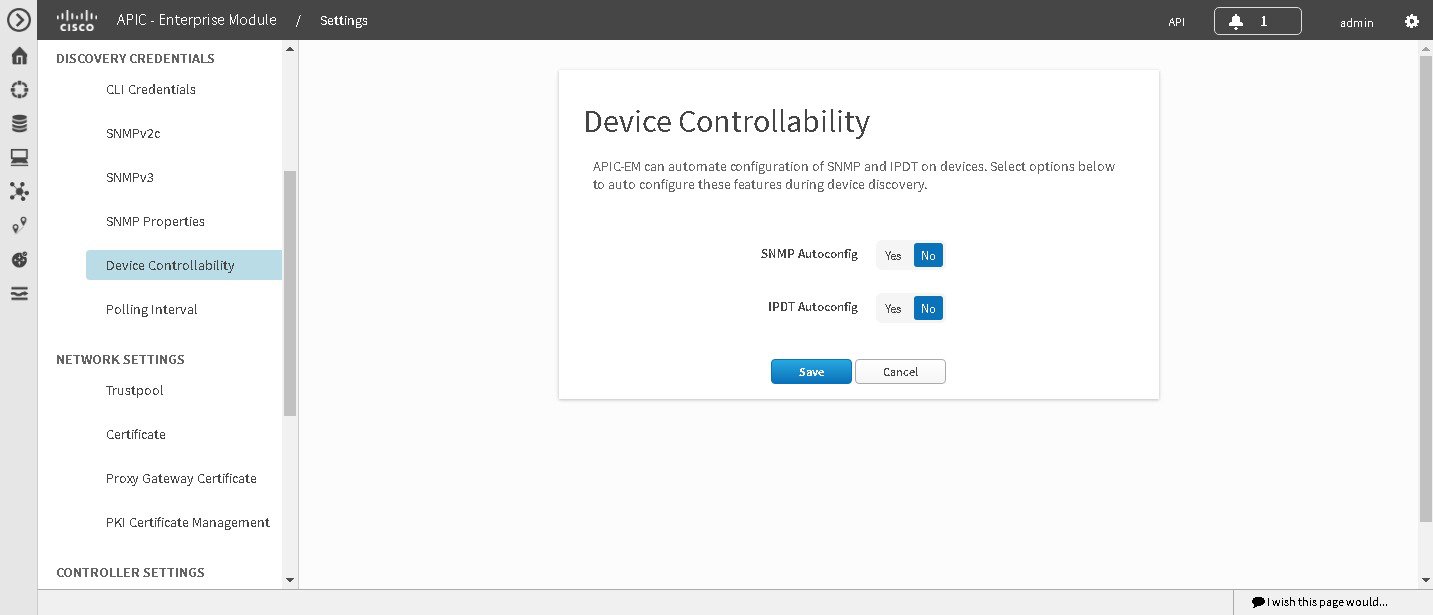
Enabling Device Controllability
You can enable device controllability in the Device Controllability window of the Cisco APIC-EM GUI. When you enable device controllability, the controller performs two actions during a discovery:
-
The controller automatically configures (applies) the SNMP credentials that you entered using the controller's GUI on any network devices without SNMP credentials (SNMPv2c and/or SNMPv3).
-
The controller automatically enables IP device tracking (IPDT) on any network devices where it is supported but not enabled in your network.
IPDT is enabled only on devices that are identified as Access role in Device Inventory window. The device does not need to be in a Managed state to have IPDT enabled. The IPDT configuration is applied to devices as long as Device Inventory has the device's software version, role, and so on.
Note | The device controllability functionality depends upon whether the CLI credentials provided by the user permits the controller to log into the device in enable mode (privilege level 15 for Cisco IOS devices). |
You must have successfully deployed the Cisco APIC-EM and it must be operational.
You must have administrator (ROLE_ADMIN) permissions and either access to all resources (RBAC scope set to ALL) or an RBAC scope that contains all of the resources that you want to group. For example, to create a group containing a specific set of resources, you must have access to those resources (custom RBAC scope set to all of the resources that you want to group).
For information about user permissions and RBAC scopes required to perform tasks using the Cisco APIC-EM, see "User Settings" in the chapter, "Configuring the Cisco APIC-EM Settings".
| Step 1 | In the Home window, click either admin or the Settings icon (gear) at the top right corner of the screen. |
| Step 2 | Click the Settings link from the drop-down menu. |
| Step 3 | In the Settings navigation pane, click Device Controllability to view the Device Controllability window. |
| Step 4 | (Optional) Click
Yes for
SNMP
Autoconfig to automatically to enable this feature.
Clicking Yes for SNMP Autoconfig automatically applies the SNMP credentials you configured using the controller's GUI to any devices in your network without an SNMP configuration. |
| Step 5 | (Optional)
Click
Yes for
IPDT
Autoconfig to enable this feature.
Clicking Yes for IPDT Autoconfig automatically enables IP device tracking (IPDT) on any devices in your network where it is supported but not enabled. |
| Step 6 | Click Save to save your configuration. |
What to Do Next
If you have not already done so, configure SNMP in either the Discovery window or the appropriate CLI Credentials window for SNMP in Settings.
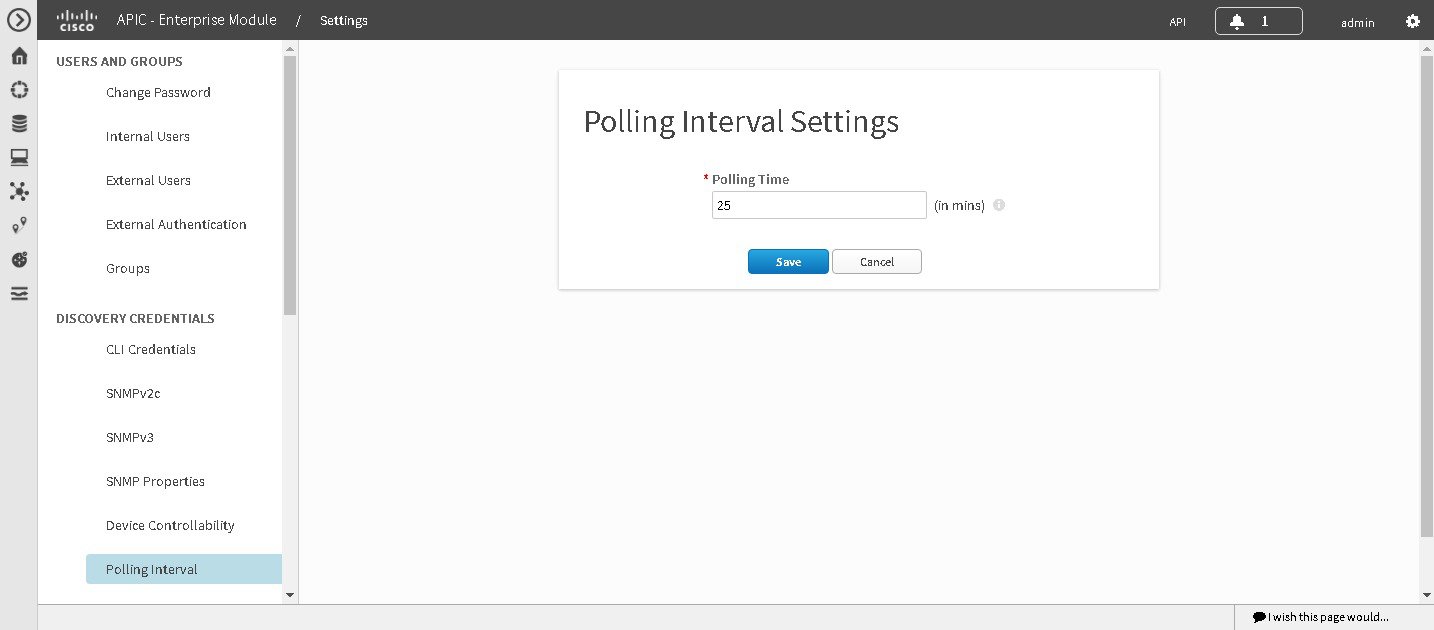
Configuring the Polling Interval
You can configure the polling interval for inventory data collection for devices managed by Cisco APIC-EM. This polling interval configuration will be used for all managed devices, unless the polling interval of a device is updated specifically in the Inventory page.
You configure the polling interval in the Polling Interval Settings window of the Cisco APIC-EM GUI.
Note | The polling interval value that you configure is a global value used for performing periodic inventory data collection, it is not used for discovering the device. |
You must have successfully deployed the Cisco APIC-EM and it must be operational.
You must have administrator (ROLE_ADMIN) permissions and either access to all resources (RBAC scope set to ALL) or an RBAC scope that contains all of the resources that you want to group. For example, to create a group containing a specific set of resources, you must have access to those resources (custom RBAC scope set to all of the resources that you want to group).
For information about user permissions and RBAC scopes required to perform tasks using the Cisco APIC-EM, see "User Settings" in the chapter, "Configuring the Cisco APIC-EM Settings".
| Step 1 | In the Home window, click either admin or the Settings icon (gear) at the top right corner of the screen. |
| Step 2 | Click the Settings link from the drop-down menu. |
| Step 3 | In the Settings navigation pane, click Polling Interval to view the Polling Interval window. |
| Step 4 | Enter a polling
interval value in minutes in the
Polling
Interval field.
The default polling interval is 25 minutes for device discovery by the controller. |
| Step 5 | Click Save to save your polling interval configuration. |
Performing Discovery
Performing Discovery Using CDP
You can discover devices and hosts using CDP.
You must have administrator (ROLE_ADMIN) permissions and access to all devices (RBAC Scope set to ALL) to perform this procedure.
CDP must be enabled on the devices in order for them to be discovered.
Your devices must have the required device configurations, as described in Device Configuration Prerequisites.
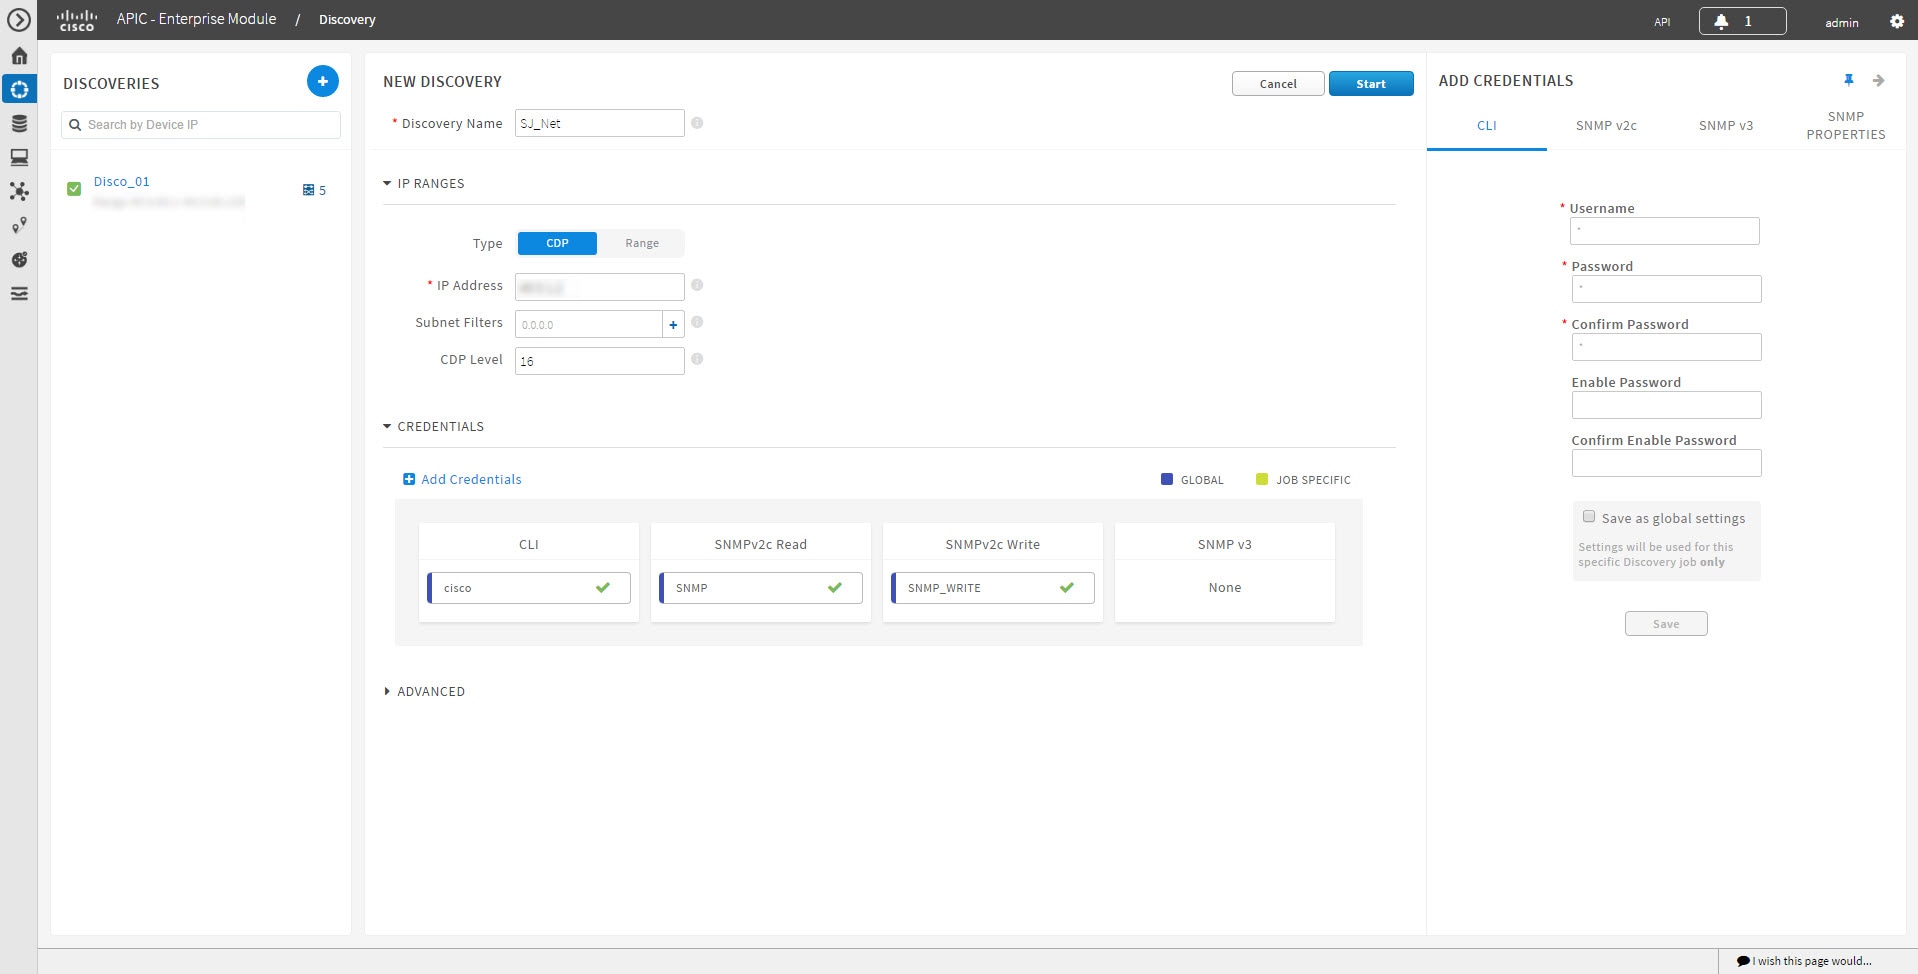
| Step 1 | From the Navigation pane, click Discovery. | ||||||||||||||||||||||||||||||||||||||||||||||
| Step 2 | From the Discovery window, click + New Discovery.
The New Discovery pane appears. | ||||||||||||||||||||||||||||||||||||||||||||||
| Step 3 | In the Discovery Name field, enter a unique name for the discovery job. | ||||||||||||||||||||||||||||||||||||||||||||||
| Step 4 | In the IP Ranges area, configure the following settings: | ||||||||||||||||||||||||||||||||||||||||||||||
| Step 5 | Open the Credentials area and configure the credentials that you want to use for the discovery job.
You can configure credentials to be used for the current discovery job, or you can check the Save as global settings checkbox to save the credentials for future discovery jobs.
| ||||||||||||||||||||||||||||||||||||||||||||||
| Step 6 | (Optional)To configure the protocols to be used to connect with devices, open the Advanced area and do the following: | ||||||||||||||||||||||||||||||||||||||||||||||
| Step 7 | Click
Start
Discovery.
The Discoveries window displays the results of your scan. The Discovery Details pane shows the status (active or inactive) and the discovery configuration. The Discovery Devices pane displays the host names, IP addresses, and status of the discovered devices for the selected discovery. |
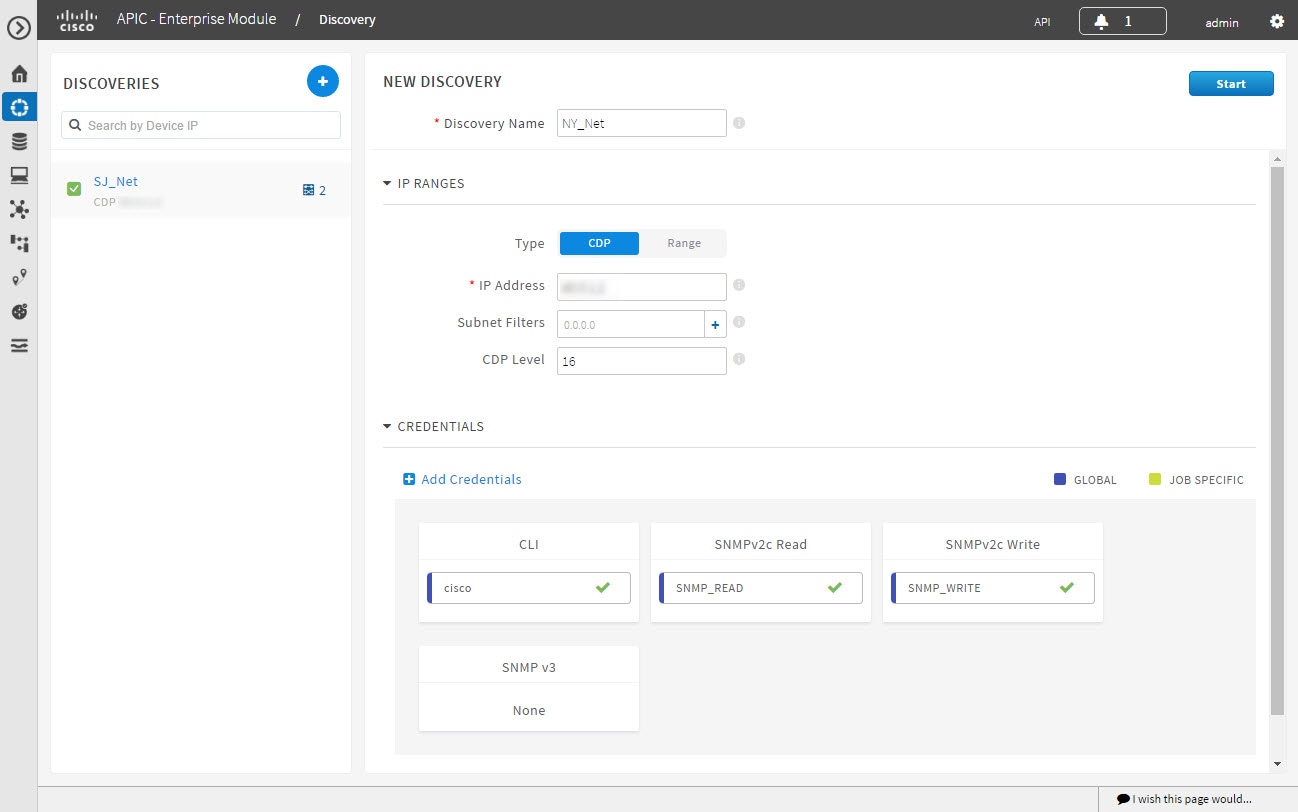
Performing Discovery Using an IP Address Range

You must have administrator (ROLE_ADMIN) permissions and access to all devices (RBAC Scope set to ALL) to perform this procedure.
Your devices must have the required device configurations, as described in Device Configuration Prerequisites.
| Step 1 | From the Navigation pane, click Discovery. | ||||||||||||||||||||||||||||||||||||||||||
| Step 2 | From the Discovery window, click + New Discovery.
The New Discovery pane appears. | ||||||||||||||||||||||||||||||||||||||||||
| Step 3 | In the Discovery Name field, enter a unique name for the discovery job. | ||||||||||||||||||||||||||||||||||||||||||
| Step 4 | If the Discovery Details pane does not appear, click Add New. | ||||||||||||||||||||||||||||||||||||||||||
| Step 5 | In the Discovery Name field, enter a unique name for this discovery. | ||||||||||||||||||||||||||||||||||||||||||
| Step 6 | In the
IP
Ranges area, do the following:
| ||||||||||||||||||||||||||||||||||||||||||
| Step 7 | Open the Credentials area and configure the credentials that you want to use for the discovery job.
You can configure credentials to be used for the current discovery job, or you can check the Save as global settings checkbox to save the credentials for future discovery jobs.
| ||||||||||||||||||||||||||||||||||||||||||
| Step 8 | Click Start Discovery.
The Discoveries window displays the results of your scan. The Discovery Details pane shows the status (active or inactive) and the discovery configuration. The Discovery Devices pane displays the host names, IP addresses, and status of the discovered devices for the selected discovery. | ||||||||||||||||||||||||||||||||||||||||||
| Step 9 | (Optional)To configure the protocols to be used to connect with devices, open the Advanced area and do the following: |
Copying a Discovery Job
You can copy a discovery job and retain all of the information defined for the job, except the SNMP and CLI credentials. The SNMP and CLI credentials are included in the copy only if you used global credentials (saved in Settings) for the original job. If you defined specific (one-time only) SNMP and CLI credentials for the original job, the credentials are not copied.
You have created at least one discovery scan.
| Step 1 | From the Navigation pane, click Discovery. |
| Step 2 | From the Discoveries pane, select the discovery job. |
| Step 3 | From the Discovery Details pane, click Copy.
The discovery job is copied, and the new job is named Copy of Discovery_Job. |
| Step 4 | (Optional)Change the name of the discovery job. |
| Step 5 | Define or update the SNMP and CLI credentials and any other parameters for the discovery job. |
Stopping and Starting a Discovery Job
You must have administrator (ROLE_ADMIN) permissions and access to all devices (RBAC Scope set to ALL) to perform this procedure.
Deleting a Discovery Job
You must have administrator (ROLE_ADMIN) permissions and access to all devices (RBAC Scope set to ALL) to perform this procedure.
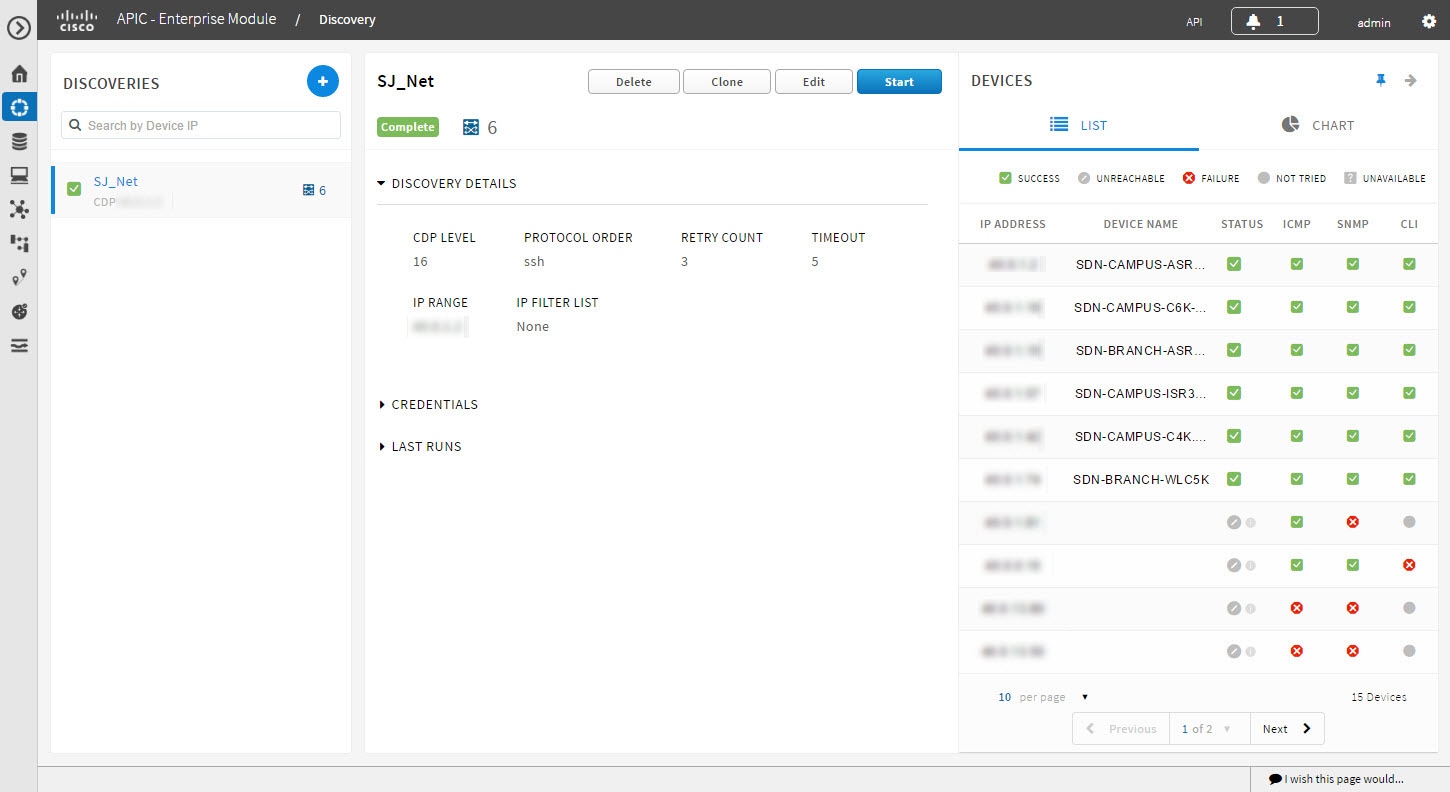
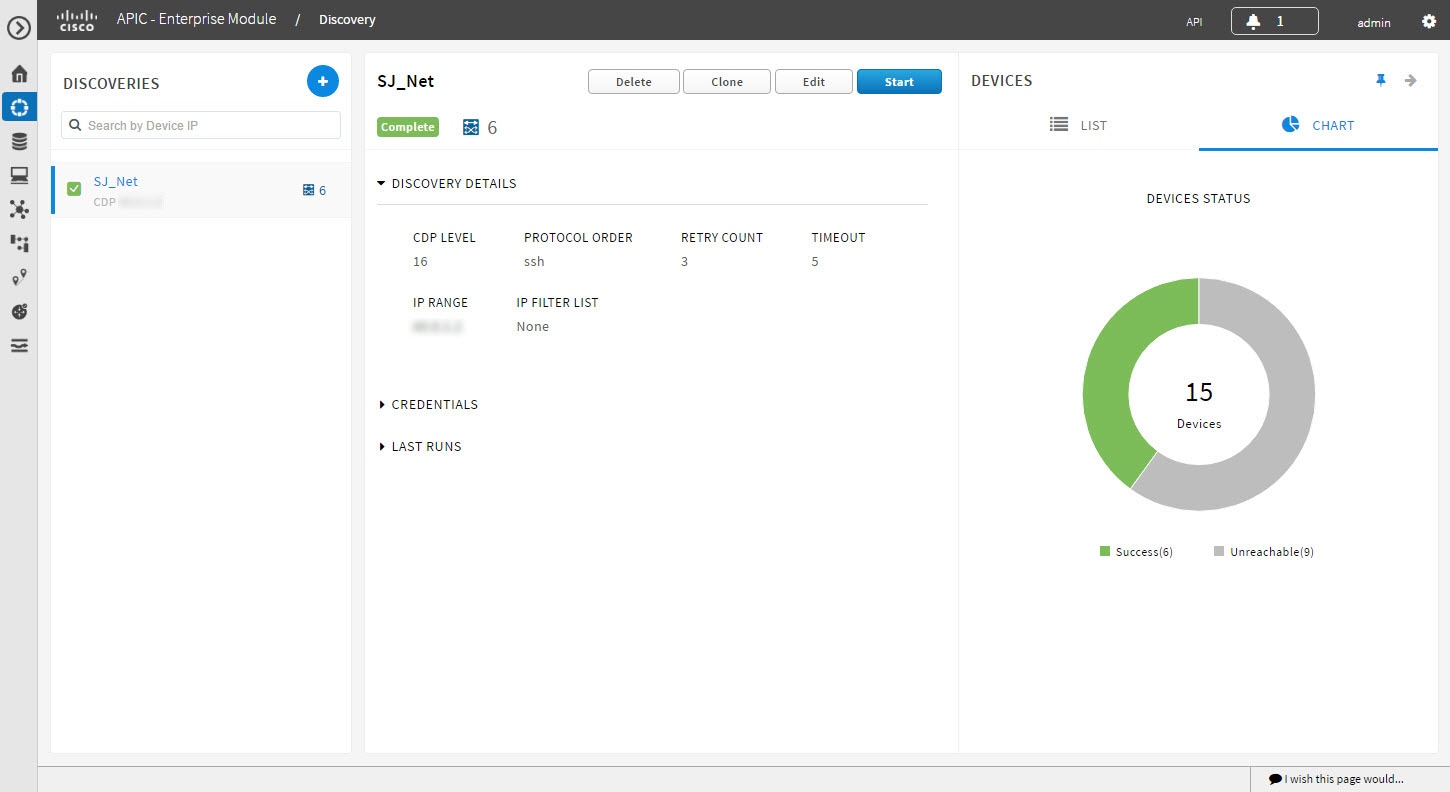
Understanding the Discovery Results
The Discovery Results pane provides information about the selected scan.
To access the Discovery Results pane, do the following:
-
From the Navigation pane, click Discovery.
-
From the Discoveries pane, select the discovery job that you want to display.
The Discovery Results pane appears. See the following figures and table for information.
|
Name |
Description |
|---|---|
|
Discovery Identification and Action Area |
Displays the following information:
From this area, you can delete, clone, edit, or start a discovery job. |
|
Discovery Details area |
Open this area to display detailed information about the parameters that were used to perform the discovery, including the CDP level (if used), protocol order, retry count, timeout value, IP address (seed) or range of IP addresses used, and IP address filter list. |
|
Credentials area |
Open this area to display the credentials used in the discovery job and identifies them as either global or job-specific. |
|
Last Runs area |
Open this area to display a table showing information about each iteration of the discovery job, including the job number, its status, an option to view the devices discovered, and the duration of the job. Clicking the View link in the Devices column opens the Devices pane. |
|
Devices pane |
(Shown when you open the Last Runs area and click the View link in the Devices column.) The devices pane displays the results of the device discovery in two forms:
|
 Feedback