Cisco Service Control Product Upgrade Guide, Release 4.2.x
Available Languages
Table of Contents
Cisco Service Control Guide to Upgrading to Cisco SCA BB 4.2.x
Upgrading from 3.x, 4.0.x, 4.1.x t o Version 4. 2.x
Supported Working Configurations
How to Upgrade the Cisco SCA BB Service Configuration Utility
Upgrading the Subscriber Manager Contents of the Distribution Files
Upgrading the Subscriber Manager
Automatic Upgrade of Subscribers with VLAN Mappings
Configuring the Required Memory Settings
How to Upgrade a Standalone Setup
How to Upgrade from a Standalone Setup to a Cluster Setup
How to Upgrade a Cluster Setup
How to Downgrade the Subscriber Manager
Upgrading the Cisco Service Control Collection Manager How to Upgrade the Collection Manager to Version 4.2.x
Verifying that the Server Is Operational
Upgrading the SCE Platform Software How to Upgrade the Cisco SCE Platform Software
Upgrading Cascaded SCE Platforms
SCA BB Clients and Service Configuration
Obtaining Documentation and Submitting a Service Request Cisco Service Control Guide to Upgrading to Cisco SCA BB 4.2.x
Upgrading the Subscriber Manager
Upgrading the Cisco Service Control Collection Manager
Upgrading the SCE Platform Software
Overview
Upgrading from 3.x, 4.0.x, 4.1.x to Version 4.2.x
This guide describes the process of upgrading the Cisco Service Control solution from 3.x, 4.0x, or 4.1.x to Version 4.2.x. It describes the upgrade process for each of the four components:
- Cisco Service Control Application for Broadband (SCA BB)
- Service Control Engine (SCE)
- Subscriber Manager (SM)
- Collection Manager (CM)
The procedure describes a scenario where the Service Control deployment is required to continue functioning throughout the upgrade procedure, with SCE platforms running SCA BB 3.x, 4.0.x, 4.1.x operating concurrently (using the same Collection Manager and Subscriber Manager servers).
This procedure aims to minimize service downtime (for however long the upgrade process takes), bound to several limitations, as described in the preceding sections.

Note
This is a high-level description of the procedure.
b.
Step 2
a.
The Subscriber Manager does not update an SCE that is identified as standby, even if it is configured as standalone in the Subscriber Manager.
Note Only after the Subscriber Manager is configured correctly can you update the SCEs.
Step 3
- If additional Collection Manager and database are deployed for the transition phase (two Collection Manager databases in total, regardless of whether the configuration is bundled), collection works for all SCE platforms (both older versions and 4.2.x). For nonbundled databases, there may be several ways to implement this; consult a database specialist if you are using a nonbundled database.
- Each Collection Manager collects Raw Data Records (RDRs) from a single version to a distinct database (either bundled or nonbundled) and comma-separated values (CSV) repository.
Step 4
At this stage, the entire solution is upgraded and fully operational.
Step 5
Supported Working Configurations
The Cisco SCA BB release 4.2.x supports a combination of component versions:
- Cisco Service Control Operating System (SCOS) 4.2.x
- Application - SCA BB 4.2.x (PQI for installation on SCE platform)
- Cisco Service Control Subscriber Manager 4.2.x (if a Subscriber Manager is required for the deployment)
- Cisco Service Control Collection Manager 4.2.x (if a Collection Manager is required for the deployment)
Note
Rollback Procedure
A software rollback might be required for Cisco SCE in cases where the upgrade process has failed, or has impaired the service. It requires a downgrade to the previous release to mitigate the damage to the network.
Generally, no automatic downgrade scripts are available for the solution components. To enable downgrade, the older configuration should be backed up before upgrading. To downgrade, a clean installation of the older release is required for each component.
Note
Note
Upgrading the Cisco SCA BB
This chapter details the procedure for upgrading from a functional Cisco SCA BB 3.8.x, 4.0.x, or 4.1.x deployment to Cisco SCA BB 4.2.x.
Upgrading Cisco SCA BB
Upgrading Cisco SCA BB consists of two steps:
1.
2.
How to Install the Console
Navigate to the console installation file, sca-bb-console-4.2.x.exe, and double-click it.
A standard installation wizard opens. Follow the standard procedure to install the console.
How to Upgrade the Cisco SCA BB Service Configuration Utility
To upgrade the Cisco SCA BB service configuration utility, complete these steps:
Step 1
Step 2
The following files are under the bin folder:
–
–
–
Upgrading the Subscriber Manager
This chapter describes how to upgrade the Cisco Service Control Management Suite Subscriber Manager.
Contents of the Distribution Files
The Cisco Service Control Subscriber Manager components are supplied in three distribution files:
Each distribution file is supplied as a tar file, which is compressed by gzip and has an extension of .tar.gz. For details, see the Cisco Service Control Management Suite Subscriber Manager User Guide .
Upgrading the Subscriber Manager
The Subscriber Manager supports several types of upgrade procedures, according to the Subscriber Manager version that was previously installed and the requirement (or lack of requirement) for fail-over in the new installation.
The following sections provide details on three types of upgrade procedures:
Data Duplication Procedure
The data duplication procedure enables you to duplicate or copy the entire database from one machine to the other, and then keep the databases synchronized by running the replication agent at the end. Some of the upgrade procedures use this procedure.
For details of the procedure, see the Database Duplication Recovery section of Cisco Service Control Management Suite Subscriber Manager User Guide .
Automatic Upgrade of Subscribers with VLAN Mappings
VLAN mappings are related to VPN rather than to a subscriber. During the upgrade procedure, the SM automatically creates a VPN with the VLAN-ID of the subscriber and associates a subscriber with the full range IP mapping to the new VPN.
For example, subscriber sub1 with VLAN-ID=15 results in the creation of VPN 15 with VLAN-ID=15 and subscriber sub1 with the mapping, 0.0.0.0/0@VLAN-ID.
Configuring the Required Memory Settings
To prepare the Subscriber Manager for the upgrade, configure the system kernel configuration file on the Subscriber Manager.
Subscriber Manager database requires that certain changes be made in the operating system kernel configuration file:
Note
You can make the required changes automatically or manually.
The root user must invoke this script file, without arguments, as follows:
Note
–
How to Upgrade a Standalone Setup
The following upgrade procedure is supported only by Release 3.x software versions. You can directly upgrade from version 3.7.2 or 3.8.x to 4.0.0. To upgrade the Subscriber Manager from a Release 2.x software version, you must first upgrade the Subscriber Manager environment to a Release 3.1.x software version and then perform an additional upgrade to Release 3.6.0. To upgrade from Version 3.5.5 to Version 3.7.0, you must first upgrade to Version 3.6.0 and then to 3.7.0. You can upgrade directly from Version 3.6.5 to Version 3.7.0. To upgrade from Version 3.7.0 to Version 3.8.5, you must first upgrade to Version 3.8.0 and then to 3.8.5.
For more information about how to upgrade from a Release 2.x software version to a Release 3.1.x software version, refer to the Release 3.1.x manuals.
This procedure applies to the Subscriber Manager 4.2.x and later.
This upgrade procedure requires service down-time.
Note
Step 1
Before you upgrade the Subscriber Manager, you must first load and extract the distribution files on the installed machine or in a directory that is mounted to the installed machine.
a.
b.
c.
d.
Step 2
Edit the install-def-cfg configuration file and set the PermSize and TempSize parameters according to the recommendations described in “Configuring the Required Memory Settings” section . For further information, see the Cisco Service Control Product Installation Guide .
Step 3
To upgrade from noncluster setups, the Subscriber Manager distribution provides an upgrade script that implements an upgrade from previous versions. The upgrade procedure script preserves the subscriber database and the entire Subscriber Manager configuration, including network elements, domains, and application-specific components.
Note For Linux—64-bit VM and database.
Note If the /etc/motd file exists, you can not run the script. Move or remove the file before you run the upgrade-sm.sh script.
From your workstation shell prompt, run the upgrade-sm.sh script:
Step 4
To add a user for PRPC authentication, use the p3rpc CLU. For example:
Step 5
If using a cascade SCE setup, configure the cascade SCE pair in the p3sm.cfg file as described in the SCE.XXX section in the Configuration File Options appendix of Cisco Service Control Management Suite Subscriber Manager User Guide .
How to Upgrade from a Standalone Setup to a Cluster Setup
Note
The following upgrade procedure is supported only from Release 3.x software versions. To upgrade Subscriber Manager from a Release 2.x software version, you must first upgrade the Subscriber Manager environment to a Release 3.1.x software version and then perform an additional upgrade to Release 3.6.0. From Version 3.6.0, you can upgrade to Version 3.7.0.
For more information about how to upgrade from Release 2.x software to Release 3.1.x software, the Release 3.1.x manuals. For details on how to upgrade to Version 3.6.0, see the Subscriber Manager 3.6.x manuals. For details on how to upgrade to Version 3.7.0, see the Subscriber Manager 3.7.x manuals.
This section describes the procedure for upgrading from a standalone setup to a cluster setup. This procedure applies to the Subscriber Manager from version 3.0.x and later.
This section describes the basic procedure for upgrading from a standalone setup to a cluster setup. This upgrade procedure requires service down-time.
Note
In the following procedure, SM-A is the original Subscriber Manager machine and SM-B is the new Subscriber Manager machine being added for redundancy.
Step 1
To install SM-B, follow the procedure described in the Installing the Subscriber Manager section of Cisco Service Control Product Installation Guide .
To upgrade SM-A, follow the procedure described in the “How to Upgrade a Standalone Setup” section .
Note From this step until the upgrade procedure is completed, there is no Subscriber Manager to handle subscribers.
Step 4
Copy the p3sm.cfg configuration file manually from SM-A to SM-B and load the configuration file by using the following CLU command:
Step 5
See the “Data Duplication Procedure” section for the data duplication procedure.
Configure the replication scheme for the data store replication to the redundant machine.
Note This CLU must be run on both machines, with user as pcube.
a.
On each machine, open the p3sm.cfg configuration file in any standard text editor and in the [SM High Availability Setup] section, set topology=cluster.
Load the updated configuration file by using the following CLU command:
Use the p3cluster --standby CLU command.
c.
Use the p3cluster --active CLU command.
Step 7
How to Upgrade a Cluster Setup
This section describes the procedure for upgrading from a cluster setup to a cluster setup without a service downtime. This section contains the following subsections:
Before You Start
- You can upgrade from Version 3.8.x, 4.0.x, 4.1.x to Version 4.2.x. You can upgrade from Version 3.8.x to Version 4.0.x. You can also upgrade directly from Cisco Service Control Subscriber Manager (SM) Version 3.6.5 to SM Version 3.7.0 or Version 3.7.x to Version 3.8.x. However, to upgrade from SM Version 3.5.5 or earlier to SM Version 3.7.0, you must first upgrade to SM Version 3.6.0 and then to SM Version 3.7.0. To upgrade from SM Version 2.x to SM Version 3.6, you must first upgrade to SM Version 3.0 or SM Version 3.1.
- Identify the devices in the cluster setup.
- Understand the Java Virtual Machine (JVM) used by the Cisco Service Control Subscriber Manager on your operating system:
–
- Understand how to download and extract the distribution files. For details, see the “Downloading and Extracting the Distribution Files” section.
- Understand the scripts used while upgrading a cluster setup. For details, see the “Understanding the Scripts Used During Upgrade” section .
Downloading and Extracting the Distribution Files
Before you upgrade the Subscriber Manager, you must download and extract the distribution files on the installed machine or in a directory that is mounted to the installed machine.
Step 1
Step 2
Step 3
Step 4
Understanding the Scripts Used During Upgrade
During the process of upgrading a cluster, you might use the following scripts:
- cluster-upgrade.sh. For details, see the “Understanding the cluster-upgrade.sh script” section .
- install-vcs-agents.sh. For details, see the “Understanding the install-vcs-agents.sh script” section .
Understanding the cluster-upgrade.sh script
Use this script, which is provided with the Subscriber Manager, to upgrade a cluster setup with earlier versions of Cisco Service Control Subscriber Manager to a cluster setup with the latest version of the Cisco Service Control Subscriber Manager.
The cluster-upgrade.sh script preserves the subscriber database and the entire Subscriber Manager configuration, including network elements, domains, and application-specific components.
The script performs the following actions:
- Detects the current Subscriber Manager version.
- Detects the new version of the Subscriber Manager.
- Verifies whether Java is installed on the machine.
- Verifies whether the user pcube exists.
- Verifies whether Subscriber Manager Version 3.x or later is present on the system.
- Verifies the values, if any, configured in install-def.cfg .
- Stops the Subscriber Manager, if it is running.
- Backs up the contents in the subscriber database to an external file.
- Removes the Subscriber Manager database.
- Backs up the Subscriber Manager configuration files.
- Installs the updated version of the Subscriber Manager and the Subscriber Manager Database.
- Invokes a separate program for upgrading the Subscriber Manager and the database configuration files.
- Restores the contents of the subscriber database that were backed up.
- When activated on the second machine, the script copies the contents of the database from the currently active Subscriber Manager; because the currently active Subscriber Manager contains the latest data.
You do not have to start the Subscriber Manager after running the script.
Table 1 lists the command options for the cluster-upgrade.sh script.
Understanding the install-vcs-agents.sh script
For details about the install-vcs-agents.sh script, see the Cisco Service Control Management Suite Subscriber Manager User Guide .
Upgrading a Cluster Setup
To upgrade a cluster setup, complete the following steps:
Configure the system kernel configuration file on both the machines:
Configure the system kernel configuration file on the standby Subscriber Manager.
Before starting the upgrade procedure, configure the system kernel configuration file on both the machines.
For details about the system kernel configuration procedure, see the “Configuring the Required Memory Settings” section .
For details about downloading and extracting the distribution files, see the “Downloading and Extracting the Distribution Files” section .
Stop VCS monitoring on the standby machine:
Log in as the root user.
Edit the install-def.cfg file on both the machines and set the PermSize and TempSize parameters according to the recommendations described in “Configuring the Required Memory Settings” section .
For details about the required memory settings, see the Cisco Service Control Product Installation Guide .
Pause database replication on the active machine:
On the active machine, change the directory to the location where you extracted the distribution files.
This step is applicable only when upgrading the first Subscriber Manager machine.
For details about the cluster-upgrade.sh script, see the “Understanding the Scripts Used During Upgrade” section
Wait until the cluster-upgrade.sh script finishes all tasks.
Stop the replication and start the SM on the standby machine.
The following steps should be performed only when performing upgrade on the first machine .
Stop the SM replication:
Because the database schema was changed, there is a need to load the SM for the first time without replicating the changes to the standby machine.
The SM boot time after the upgrade will be longer than usual due to the extra time taken to initialize the database indexes.
If the SMS-STATUS indicates a failure, stop the upgrade . For details on troubleshooting the SM in failure mode, see the Cisco Service Control Management Suite Subscriber Manager User Guide .
Run the install-vcs-agents.sh script on the standby machine:
Restart Veritas Cluster Server (VCS) monitoring on the standby machine:
Run the following VCS CLU command from /opt/VRTSvcs/bin:
VCS monitoring starts the SM process automatically in the initialization state.
The ./hastart command starts the replication agent that updates the database schema on the active machine.
After this operation is performed, you cannot downgrade to an earlier version.
Continue database replication on the active machine:
On the Active machine, change the directory to the location where you extracted the distribution files.
This step is applicable only when upgrading the first machine and only if Step 5 was performed.
Verify that the changed data has been replicated.
Wait until the replication of all the data that was changed while the upgrade script was running.
When upgrading the second Subscriber Manager, add a subscriber with a name other than dummySub because you have already added a subscriber with this name while upgrading the first Subscriber Manager.
For more information, see the Cisco Service Control SM LEGs User Guide .
Manually trigger a failover using the Veritas Cluster Manager and wait until the standby SM becomes active and the active SM becomes the standby:
For more information about the hagrp CLU command, refer to your Veritas Cluster Server documentation.
After performing the manual failover, the standby SM on which you perform the upgrade procedure becomes the active SM. The previously active SM becomes the new standby SM.
Repeat the upgrade procedure on the standby SM.
To upgrade the second SM, repeat the procedure from Step 2 . But, do not perform Step 5 , Step 8 , and Step 11 .
Upgrade the database replication protocol version:
Stop VCS monitoring of the standby SM.
Use the following VCS CLU command from /opt/VRTSvcs/bin:
On the standby SM, run the following CLU command:
From the /opt/VRTSvcs/bin folder, run the following VCS CLU command:
VCS monitoring starts the SM process automatically in the initialization state.
Perform this operation after both the SMs are upgraded .
Run the commands described in this step as the admin user on both the machines to upgrade the database replication protocol version.
The p3db --upgrade-rep-protocol CLU command performs the following actions:
- Removes the DB security flag
- Stops the SM
- Restarts the DB daemon
- Starts the SM
- Starts SM replication
For more information about the hagrp command, refer to your Veritas Cluster Server documentation.
Add a user for PRPC authentication using the p3rpc CLU, for example:
If you are upgrading from a version of the SM prior to Version 3.0.5, it is necessary to add a user for PRPC authentication because Cisco SCA BB requires a username and password to connect to the SM.
If you have a cascade SCE setup, configure the cascade SCE pair in the p3sm.cfg file. For details, see the Cisco Service Control Management Suite Subscriber Manager User Guide .
After successfully upgrading both the SMs we recommend that you remove the dummy subscribers that were added in order to verify replication during the upgrade.
How to Downgrade the Subscriber Manager
This section describes the procedure to downgrade the Subscriber Manager to an earlier version.
Step 1
Step 2
Note The upgrade-sm.sh and cluster-upgrade.sh upgrade scripts do not support Subscriber Manager downgrade.
Upgrading the Cisco Service Control Collection Manager
This chapter describes the procedures for upgrading the Collection Manager.
When upgrading a complete system, it is recommended that you install a second Collection Manager running the new version and then uninstall the Collection Manager running the earlier version. This procedure provides a seamless transition to the new version. In this case, no upgrade procedure is run on the Collection Manager.
Note
To install the Collection Manager, see the Installing the Collection Manager section of Cisco Service Control Product Installation Guide .
How to Upgrade the Collection Manager to Version 4.2.x
Step 1
Step 2
Step 3
Step 4
Step 5
Step 6
Do you want to upgrade the CM Tables to latest Schema? (It will take time if the table have huge data) (yes/no)[yes]:
Note
Step 7
Note
Verifying that the Server Is Operational
To verify that the server is functioning correctly, use the alive.sh script:
The script verifies that the following components are operational:
- Collection Manager
- Database (in the bundled database case)
- Report tables (in the bundled database case)
If any component is down, the script issues an error message.
As the scmscm user, run the alive.sh script.
Note It takes time for the components to initialize after a startup; after a restart, wait for five minutes before you run this script.
Upgrading the SCE Platform Software
This chapter describes the wizard that upgrades the SCE platform software.
The console SCE Software Upgrade Wizard performs a software upgrade on one or more SCE platforms. The wizard allows you to select the following:
- SCE platforms to be upgraded
- Firmware (pkg) version to upgrade to
- Application (pqi) version to upgrade to
- Service configuration (pqb) to apply
- Protocol pack (spqi) to apply
Before You Start
Before you begin the SCE platform upgrade, make sure that you do the following:
- If the IP address of all SCE platforms to be upgraded are not defined in the Network Navigator, gather the IP addresses of all SCE platforms to be upgraded.
- Download the relevant pkg file, pqi file, and protocol pack to a local location or to a location accessible by FTP. If using an FTP site, make sure to have the complete FTP location and path for each file.
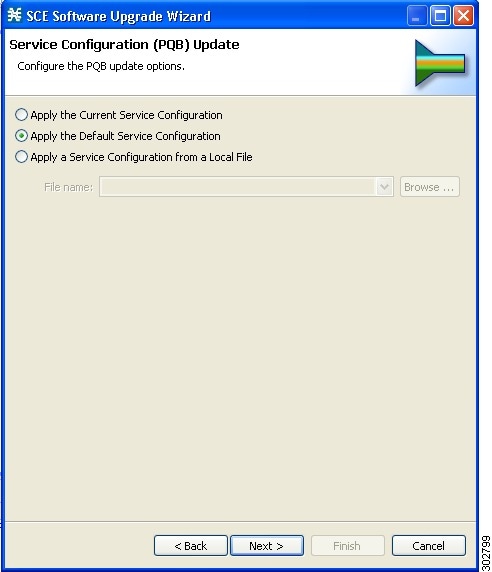
- Decide what service configuration to use:
–
–
–
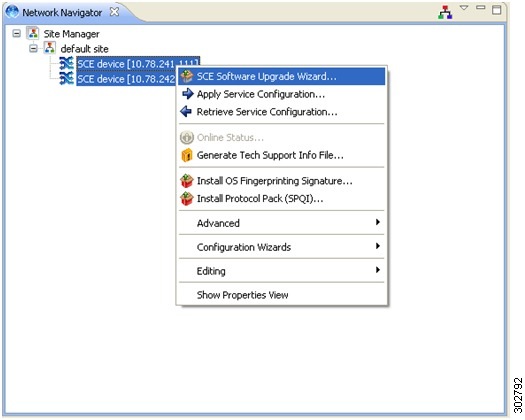
How to Upgrade the Cisco SCE Platform Software
Step 1
If the Cisco SCE platforms are not yet defined in the Network Navigator, you can select the site node.
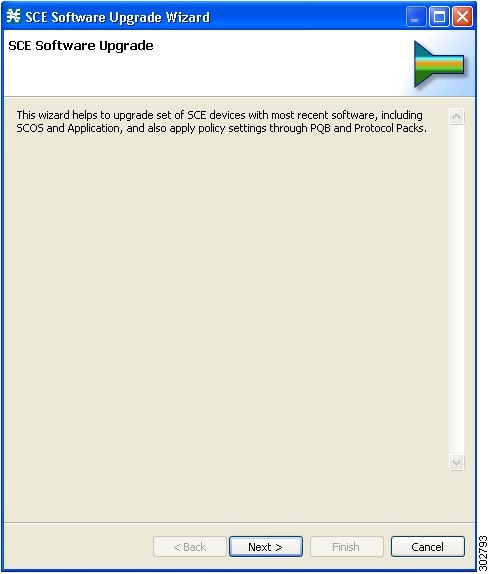
The SCE Software Upgrade Wizard opens. Click Next (see Figure 2) .
Figure 2 SCE Software Upgrade Wizard
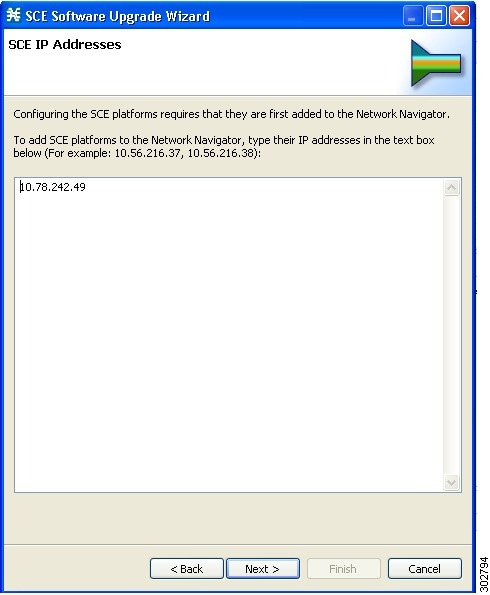
Step 2
Figure 3 SCE Software Upgrade Wizard—SCE IP Addresses
Step 3
Figure 4 SCE Software Upgrade Wizard—SCE Usernames and Passwords Window

Step 4
Figure 5 SCE Software Upgrade Wizard—SCE Firmware (PKG) Installation

Step 5
Note You need to remove the old PQI reference in SCE, before downgrading to any version.
To remove the old PQI reference, use the following CLI:
SCE8000(config if)#> no applicationFigure 6 SCE Software Upgrade Wizard—SCE Application Software (PQI) Installation

Step 6
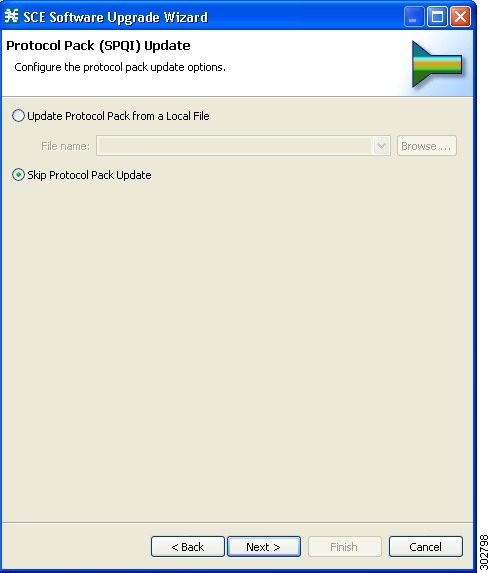
Note If you install the protocol pack during the upgrade, it must be the same version or a later version of the protocol pack you are upgrading from.
Figure 7 SCE Software Upgrade Wizard—Protocol Pack (SPQI) Update
Step 7
Clearing or Resetting Protocol Pack Version
If Protocol Pack version mismatch appears in Cisco SCE and SCABB, you need to clear or reset the Protocol pack to get the default version.
To clear or reset the Protocol pack:
1.
2.
4.
6.
- Close and re-open the Cisco SCABB console
- Close all service configuration and freshly open service configuration
Note If the Cisco SCABB version mismatches, you can change the version of the Cisco SCABB with the corresponding same version of the Cisco SCE.

Step 8
Figure 9 SCE Software Upgrade Wizard—Service Configuration (PQB) Update
Step 9
To enable the experimental feature, check the Enable Experimental Features check box. The following options appear:
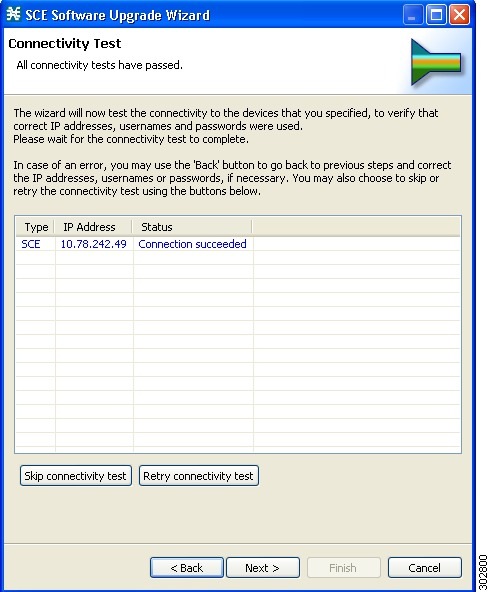
The Connectivity Test pane of the SCE Software Upgrade Wizard is displayed (see Figure 10) . Click Next .
Note If a connection to one or more devices cannot be made, or if there is a problem with the connection (such as invalid version of the device), an error is displayed next to the device. (You can skip these tests by clicking Skip connectivity test). The connections are validated when you click Finish.
Step 10
Figure 11 SCE Software Upgrade Wizard—Summary

This system checks the following:
If the user requested that any of these components not be upgraded (selected Skip for any file), the version of those files is retrieved from SCE platform for this verification. For instance, if the user requested to skip PKG installation and install PQI Version 3.6.0, version information about the installed PKG file is retrieved.
A list of all problems and errors is displayed when the verification process is complete.
The basic steps being performed during the upgrade are as follows (assuming all components are upgraded):
- Retrieve the current service configuration from the SCE platform (only if the current service configuration is going to be reinstalled after the upgrade).
- Uninstall the existing application software (PQI).
- Upgrade SCE platform firmware (PKG).
- Install application software (PQI).
- Apply service configuration (PQB).
- Install the protocol pack (SPQI).
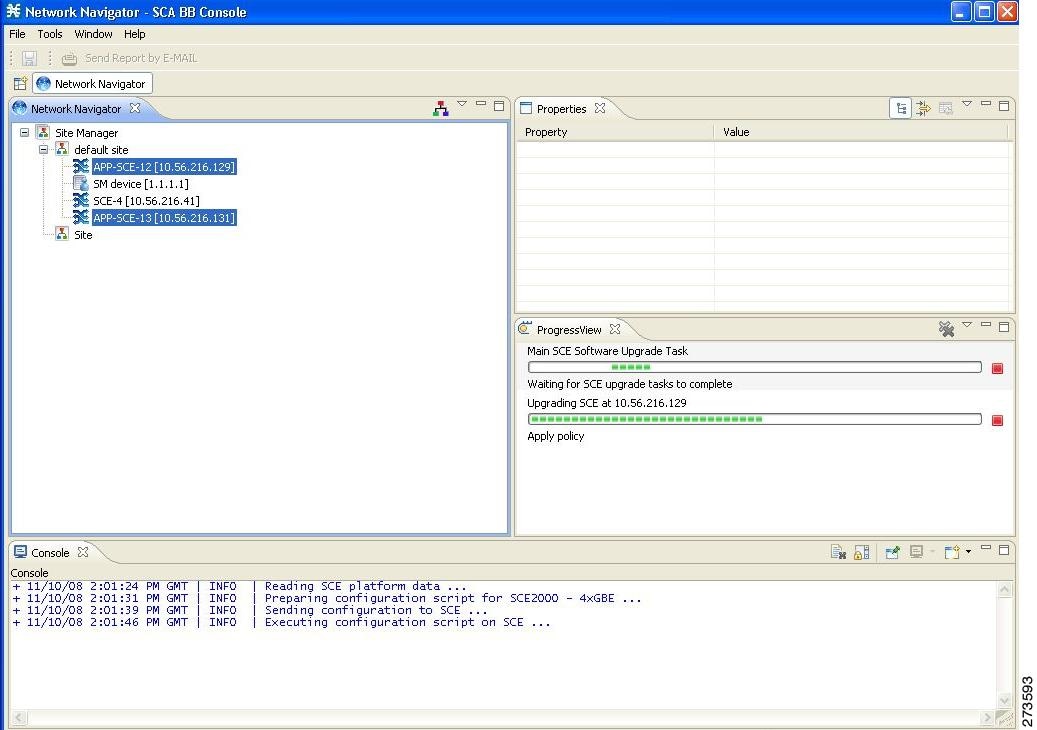
The specified SCE platforms are upgraded simultaneously, with the upgrade process for each SCE platform running in separate thread.
Step 11
Click Run in Background to run the upgrade in the background.
Figure 12 Main SCE Software Upgrade Task
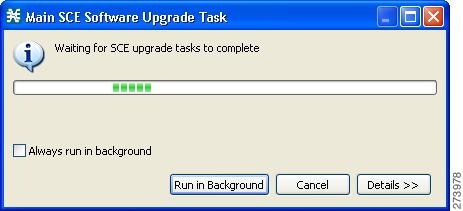
The upgrade runs in the background (see Figure 13) .
Upgrading Cascaded SCE Platforms
In a high-availability deployment, a pair (or pairs) of SCE platforms are cabled in a cascaded setup, providing SCE platform redundancy. This type of deployment requires the following steps when upgrading:
Step 1
Step 2
This step makes the upgraded SCE platforms the active ones, and they begin to give the new service.
Step 3
Make sure to specify the same upgrade files that you used in Step 1 .
Because this step includes a reboot, it is not necessary to undo the force failure command.
Upgrade Procedure Limitations
This chapter provides details of limitations to the Cisco Service Control solution upgrade procedure.
Link Downtime Because of LIC Re-Burning
Link downtime is expected during SCE platform upgrade (the LIC chip firmware is reburned). The expected downtime depends on the auto-negotiation configuration of the system, and can be up to one minute.
Misclassification of Flows Initiated Before Upgrade Completion
Flows that were initiated before upgrade completion can be misclassified. Gradual classification restoration is expected when SCE software upgrade is completed, or when a standby SCE becomes active. This reclassification is needed because the previous classification decision of the flow is lost. This reclassification would usually be inaccurate because an accurate classification depends on analyzing the beginning of the flow. Therefore, the flow would usually be reclassified according to the corresponding Generic or Behavioral signature. This downtime ends when all these reclassified flows are closed.
Service Downtime
Service downtime is expected during SCE platform upgrade on non-high-availability setups and on high-availability setups.
- On non-high-availability setups, the SCE platform does not perform traffic classification, reporting, and control during the SCE platform upgrade. These capabilities are restored after upgrade completion (restoration is gradual, due to misclassification of traffic flows that were initiated before upgrade completion). See the “Misclassification of Flows Initiated Before Upgrade Completion” section for further information.
- On high-availability setups, service downtime is not expected (as the cascaded SCE platforms alternate on upgrade), except for gradual service buildup when switching SCE platforms because of misclassification of traffic flows that were initiated before upgrade completion. See the “Misclassification of Flows Initiated Before Upgrade Completion” section for further information.
Loss of Aggregated Unreported Data
During SCE platform upgrade, subscriber quota and usage information maintained in the SCE platform that was not reported to a collection system is lost. Depending on the system data export frequency (configurable through periods between RDRs of all sorts), the amount of such information can be kept to a minimum.
Loss of Configuration
Any non-default assignments of RDR tags to categories are lost when upgrading; the default mapping is restored after the upgrade. If any non-default assignments were made, you should reconfigure them manually after the upgrade.
SCA BB Clients and Service Configuration
SCA BB Console, which incorporates the service configuration editor and Subscriber Manager GUI is not backward compatible and can work only with the 4.2.x system components (SCE platform, Collection Manager, and Subscriber Manager).
Cisco SCA BB Console Interoperability
Version 4.2.x of the Network Navigator cannot apply service configurations to earlier versions of the SCE platforms. Nevertheless, the Network Navigator 4.2.x can upgrade the SCE platform to 4.2.x, and then service configurations can be applied.
Subscriber Manager
In non-High Availability Subscriber Manager setups, the SM upgrade procedure causes downtime for subscriber provisioning and subscriber status awareness (LEG communication).
Quota Manager
If the Quota Manager is not deployed as a cluster, service downtime is expected. This downtime is the same service downtime that is expected during a Subscriber Manager upgrade.
Collection Manager
Upgrading the Collection Manager imposes downtime for the upgraded machine during the entire process. To avoid data collection downtime, an alternate Collection Manager can be used (for either bundled or unbundled configurations).
The SCE platform supports sending RDRs to an alternate Collection Manager.
Obtaining Documentation and Submitting a Service Request
For information on obtaining documentation, submitting a service request, and gathering additional information, see the monthly What’s New in Cisco Product Documentation , which also lists all new and revised Cisco technical documentation, at:
http://www.cisco.com/en/US/docs/general/whatsnew/whatsnew.html
Subscribe to the What’s New in Cisco Product Documentation as a Really Simple Syndication (RSS) feed and set content to be delivered directly to your desktop using a reader application. The RSS feeds are a free service and Cisco currently supports RSS Version 2.0.
Cisco and the Cisco logo are trademarks or registered trademarks of Cisco and/or its affiliates in the U.S. and other countries. To view a list of Cisco trademarks, go to this URL: www.cisco.com/go/trademarks . Third-party trademarks mentioned are the property of their respective owners. The use of the word partner does not imply a partnership relationship between Cisco and any other company. (1110R)
Any Internet Protocol (IP) addresses used in this document are not intended to be actual addresses. Any examples, command display output, and figures included in the document are shown for illustrative purposes only. Any use of actual IP addresses in illustrative content is unintentional and coincidental.
 Feedback