-
Cisco Unity System Administration Guide (With Microsoft Exchange), Release 4.0(5)
-
Index
-
Preface
-
Introduction
-
Accessing the Cisco Unity Administrator
-
Using the Cisco Unity Administrator
-
Default Accounts and Message Handling
-
Cisco Unity Conversation
-
Setting Up Cisco Unity Applications on Subscriber Workstations
-
Preparing Subscribers, Operators, and Support Desk Personnel to Work with Cisco Unity
-
Languages
-
Integrating a Fax Server with Cisco Unity
-
Subscriber Template Settings
-
Class of Service Settings
-
Creating Subscriber Accounts
-
Deleting Subscriber Accounts
-
Subscriber Settings
-
Hospitality and Property Management System Integration
-
Public Distribution List Settings
-
Account Policy Settings
-
Call Management
-
Call Handler Settings
-
Directory Handler Settings
-
Interview Handler Settings
-
Call Routing
-
Restriction Tables
-
Reports
-
Network Settings
-
System Settings
-
Glossary
-
Appendix: Exiting and Starting the Cisco Unity Software and Server
-
 Feedback
Table Of Contents
Using the Cisco Unity Greetings Administrator to Record and Manage Greetings
Using the Media Master to Record Greetings and Names
Determining Which Recording and Playback Device to Use
Selecting Your Recording and Playback Device
Sending System Broadcast Messages
System Broadcast Messages Overview
Task List for Setting Up and Offering Access to the Cisco Unity Broadcast Message Administrator
Setting Up the Cisco Unity Broadcast Message Administrator
Enabling Subscribers to Send and Update System Broadcast Messages
Using the Cisco Unity Broadcast Message Administrator to Send and Update System Broadcast Messages
How You Can Customize Cisco Unity Conversations
Changing How Subscribers Skip Messages During Message Playback (Standard Conversation)
Enabling a Warning Tone for End of Recording
Customizing the Warning Tone for End of Recording
Specifying How Subscribers Log On to Cisco Unity From Subscriber Greetings
Configuring Call Waiting Hold Time
Offering Subscribers Additional Caller Information Before Message Playback
Changing the Order for Addressing and Recording
Changing How Subscribers Confirm Message Addressing
Streamlining Message Addressing
Changing What Subscribers Hear When They Manage Deleted Messages
How Subscribers Can Customize the Cisco Unity Conversation
Cisco Unity Conversation
When callers access Cisco Unity by phone, they hear a set of prerecorded instructions and options known as the Cisco Unity conversation—or the TUI (telephone user interface). Unidentified callers hear the unidentified caller conversation, which enables them to access the Cisco Unity automated attendant, conduct subscriber searches by using directory assistance, use call routing options, and play audiotext messages. Subscribers hear the subscriber conversation, which enables them to log on to Cisco Unity, enroll as new subscribers, send and receive messages, record greetings, and change their personal settings.
To learn about the ways in which you can manage the Cisco Unity conversation and change what Cisco Unity plays to unidentified callers and subscribers, see the following sections in this chapter:
•
Recording Greetings and Names
•
•
•
Related Documentation
For information on the audio codecs that Cisco Unity supports, see the "Audio Codecs" section on page 26-6.
About System Prompts
System prompts are standard recordings that come with the Cisco Unity system. The prompts are played in different combinations in multiple places in the phone conversation. All system prompts are located in the CommServer\Localize\Prompts directory and subdirectories.
You can specify the default language in which system prompts are played to all subscribers and callers. See the "Specifying Phone Languages" section on page 8-3. In addition, you can use the Audio Management tools available in Tools Depot to change prompt volume and speed for each Cisco Unity server:
•
•
You cannot change what the system prompts say by using the Cisco Unity Administrator, the Cisco Unity Assistant, or the phone conversation. In fact, customizing system prompts is not supported. Do not delete system prompts, as this can cause system errors. All system prompts are automatically deleted and replaced when you upgrade Cisco Unity (including maintenance upgrades).
Recording Greetings and Names
You can record names for subscribers, public distribution lists, private lists, and call handlers (including interview handlers and directory handlers), and greetings for subscribers and call handlers, by using a Media Master control bar on the pages within the Cisco Unity Administrator. In circumstances when you cannot access the Cisco Unity Administrator, you can access the Cisco Unity Greetings Administrator from any phone to manage greetings for call handlers.
Before you begin recording subscriber and call handler names and greetings, consider the following:
•
•
Review the following sections to learn about the ways in which you can record greetings and names. Note that subscribers can record their own names and personal greetings by accessing the Cisco Unity conversation by phone, or by using a Media Master on the pages within the Cisco Unity Assistant. (Note that in version 3.1 and earlier, the Cisco Unity Assistant was known as the ActiveAssistant, or AA.) For more information on setting up subscribers to record names and greetings, see the "Setting Up the Media Master" section on page 6-11.
Using the Cisco Unity Greetings Administrator to Record and Manage Greetings
The Cisco Unity Greetings Administrator allows you—or the call handler owner(s) that you assign—to manage call handler greetings from any phone. The owner of the call handler can be any subscriber or public distribution list.
By using the Cisco Unity Greeting Administrator, you can do the following tasks without having to access a Media Master control bar in the Cisco Unity Administrator:
•
•
•
For example, if your office is unexpectedly closed because of bad weather, you can call Cisco Unity from home to enable the alternate Opening Greeting, or rerecord a call handler greeting to state that the office is closed.
Note
For information on setting up and using the Cisco Unity Greetings Administrator, see the "Setting Up the Cisco Unity Greetings Administrator" section on page 19-3 and the "Using the Cisco Unity Greetings Administrator to Change Call Handler Greetings" section on page 19-5.
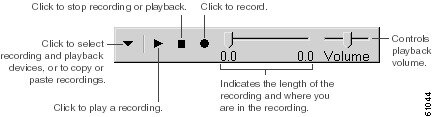
Using the Media Master to Record Greetings and Names
The Media Master control bar appears on each page of the Cisco Unity Administrator on which recordings can be made. It allows you to make and play recordings, either with a phone or with your computer microphone and speakers, by clicking the Media Master controls.
The Media Master control bar relies on DCOM (Distributed Component Object Model), and does not work through a firewall that blocks DCOM communications. It also requires that your browser is able to download and run ActiveX controls.
Figure 5-1 Media Master Control Bar
See Table 5-1 for an overview of the Media Master Options menu.
Table 5-1 Media Master Control Bar Options Menu
New
Use this option to start a new recording.
Paste
Paste a copied recording of a voice message, name, or greeting into this recording.
Paste from file
Paste a WAV file that you have stored on your computer into this recording. Note that when you do, the file is converted (if applicable) and saved on the Cisco Unity server in the G711 format—even when this is not the recording and storage codec specified for the Cisco Unity server.
(For consistent sound quality, the codec format of all greetings and recorded names should match the message recording and storage codec being used by Cisco Unity. You can view the codec format of greetings and recorded names by using the Codec Checker utility. You change the codec format for greetings and recorded names by using the Set WAV Format utility. Both utilities are available in the Cisco Unity Tools Depot.)
Copy
Copy this recording so that you can paste it into another voice message, name, or greeting recording.
Copy to file
Save this recording as a WAV file to a location that you specify.
Playback devices
Select the phone or the multimedia speakers used with your computer. If you select the phone, you must click Options on the Media Master Control Bar Options menu and enter an extension and server name.
For more information, see the "Determining Which Recording and Playback Device to Use" section.
Recording devices
Select the phone or the multimedia microphone used with your computer. Note that if you select the phone, you must click Options on the Media Master Control Bar Options menu and enter an extension and server name.
For more information, see the "Determining Which Recording and Playback Device to Use" section.
Options
Enter an extension and the Cisco Unity server name here when you want to use the phone as the playback and recording device for the Media Master.
Note that during failover and failback, you cannot use the phone as a recording or playback device with the Media Master in the Cisco Unity Administrator unless you manually update the Cisco Unity server name specified in the Media Master. For more information, refer to the "Notifying Subscribers to Update the Server Name in the Media Master" section in the Cisco Unity Failover Configuration and Administration Guide. The guide is available at http://www.cisco.com/en/US/products/sw/voicesw/ps2237/products_feature_guides_list.html.
Determining Which Recording and Playback Device to Use
When determining the recording and playback device that you want to use with the Media Master in the Cisco Unity Administrator, consider the following points:
•
•
In order to use the phone as a recording and playback device, Cisco Unity must have at least one port assigned for a TRAP Connection per session on the System > Ports page. (See the "Voice Messaging Port Settings" section on page 26-17 for more information.) Alternatively, when you make and play recordings by using a computer microphone and speakers, no ports are used, which decreases the load on the Cisco Unity server and leaves ports open for other functions.
For a "behind the scenes" summary of how the Media Master works with a given recording and playback device, see the "What Happens When Subscribers Use the Phone as Their Recording and Playback Device" section on page 6-13 and the "What Happens When Subscribers Use a Computer Microphone and Speakers as Their Recording and Playback Device" section on page 6-13.
•
(For consistent sound quality, the codec format of all greetings and recorded names should match the message recording and storage codec being used by Cisco Unity. You can view the codec format of greetings and recorded names by using the Codec Checker utility. You change the codec format of greetings and recorded names by using the Set WAV Format utility. Both utilities are available in the Cisco Unity Tools Depot.)
Selecting Your Recording and Playback Device
Use the following procedure to change the recording and playback device used by the Media Master. Updates to the Media Master are saved per user, per computer. If you plan to use another computer to access the Cisco Unity Administrator, the Media Master needs to be updated on the second computer as well.
To Select a Recording and Playback Device
Step 1
Step 2
The Options menu button is on the far left of the Media Master control bar. See Figure 5-1.
Step 3
The <Use Preferred Device> option refers to the recording and playback devices that you have already selected for your computer (click Settings > Control Panel > Sounds and Multimedia on the Windows Start menu to set your preferred devices). See the Windows Help for more information on preferred recording and playback devices.
Step 4
Sending System Broadcast Messages
System broadcast messages are recorded announcements sent to everyone in an organization (or to particular location(s) within an organization). You determine whether subscribers can use the Cisco Unity Broadcast Message Administrator to send and/or update broadcast messages. (By default, Cisco Unity subscribers are not enabled to use the Cisco Unity Broadcast Message Administrator.)
See the following sections to learn about broadcast messaging:
•
•
•
System Broadcast Messages Overview
Though system broadcast messages may sound similar to regular voice messages, they are not simply voice messages sent to a large distribution list. They are unique in the following ways:
•
•
•
•
•
•
•
•
•
•
•
Task List for Setting Up and Offering Access to the Cisco Unity Broadcast Message Administrator
Use the following task list to set up broadcast messaging:
1.
2.
–
–
–
–
–
Refer to the Advanced Settings Help for details on each setting. (The Advanced Settings tool is available in Tools Depot.)
3.
4.
5.
Make sure that those who are able to send system broadcast messages to subscribers on multiple servers understand the meaning of each addressing option offered by the Cisco Unity Broadcast Message Administrator, and that they understand how to address a message to reach subscribers on a particular group of servers.
Refer to the applicable section in the Networking in Cisco Unity Guide:
–
–
The guide is available at http://www.cisco.com/en/US/products/sw/voicesw/ps2237/products_feature_guides_list.html.
Setting Up the Cisco Unity Broadcast Message Administrator
To send a system broadcast message, Cisco Unity subscribers log on to the Cisco Unity Broadcast Message Administrator—a special conversation that allows them to send and/or update system broadcast messages. You can give subscribers access to the Cisco Unity Broadcast Message Administrator in one of the following ways:
Create a Call Handler to Send Subscribers to the Cisco Unity Broadcast Message Administrator
You can create a new call handler, assign it a unique extension, and specify the Broadcast Message Administrator as the action that Cisco Unity performs after the greeting. To make the transfer quick and seamless to subscribers, select a blank greeting for the call handler.
See the "Creating and Modifying Call Handlers" section on page 19-2.
Offer the Cisco Unity Broadcast Message Administrator as a One-Key Dialing Option From a Greeting
You can specify that Cisco Unity will send a caller to the Broadcast Message Administrator (on the Caller Input page for any call handler or subscriber greeting) when a caller presses a particular key during the greeting. For example, you could specify that Cisco Unity sends the caller to the Cisco Unity Broadcast Message Administrator when a subscriber presses a particular key during the Opening Greeting or even during his or her own greeting.
To set up a one-key dialing option for accessing the Cisco Unity Broadcast Message Administrator, use caller input settings for a call handler to send callers to the Broadcast Message Administrator conversation when they press the key that you specify during a call handler greeting. Then, enable caller input for the applicable greeting. Optionally, you can (re)record the greeting to mention the key that callers can press in the call handler greeting. (For example, "...for the Cisco Unity Broadcast Message Administrator, press 3.")
For additional information on setting caller input options, see the "Call Handler Caller Input Settings" section on page 19-13.
Set Up a Special "Cisco Unity Broadcast Message Administrator" Phone Number and Routing Rule
Refer to the documentation for the phone system to set up a new phone number. Then, on the Call Management > Call Routing > Direct Calls page in the Cisco Unity Administrator, create a routing rule that sends any call that arrives for the new number to the Broadcast Message Administrator conversation. Distribute the new number to callers who are enabled to send and/or update system broadcast messages.
For additional information on setting up call routing rules, see the "Creating and Modifying Call Routing Rules" section on page 22-3 and the "Direct Calls and Forwarded Calls Routing Table Settings" section on page 22-4.
Enabling Subscribers to Send and Update System Broadcast Messages
Because system broadcast messages are designed to convey important and often time-sensitive information to a large number of subscribers at once, Cisco Unity subscribers can use the Cisco Unity Broadcast Message Administrator only if they are enabled to do so in the Cisco Unity Administrator. By default, Cisco Unity subscribers are not enabled to use the Cisco Unity Broadcast Message Administrator to send or update system broadcast messages.
In the Cisco Unity Administrator, you can specify whether subscriber(s) can send system broadcast messages to all subscribers on the local Cisco Unity server, to all locations in the Cisco Unity global directory, or to specific locations and/or public distribution lists set up for system broadcast messaging to remote networks. You can also specify whether subscribers can update system broadcast messages stored on the local Cisco Unity server. If you want to enable an existing group of subscribers to send system broadcast messages, you can use the Bulk Edit tool available in Tools Depot.
Consider how subscribers in your organization might use system broadcast messaging when determining which Cisco Unity subscribers can send and update system broadcast messages, and whether they can send messages to subscribers on the local Cisco Unity server, or other locations and/or remote networks. For example, as a Cisco Unity administrator, you may want to send a welcome message to subscribers on a new system or remind all Cisco Unity subscribers to change their phone passwords. Other Cisco Unity subscribers—such as network administrators, members of management, Human Resources personnel, and facilities managers—may also need to send system broadcast messages to announce planned network outages for particular locations, organization-wide goals and personnel changes, branch office closures for holidays, security alerts, and the like.
You can use the following procedures to enable subscribers to send and update system broadcast messages:
•
•
To Enable Sending and Updating System Broadcast Messages in a Subscriber Template
Step 1
Step 2
Step 3
•
•
•
Consider that when a system broadcast message is sent to multiple locations, a copy of the message is sent to each server and then distributed to the subscribers homed on that server. As a result, subscribers must make updates to each message locally. To do so, subscribers must be enabled to update messages on each server and then they must log on to Cisco Unity Broadcast Message Administrator for each Cisco Unity server to update the messages.
Step 4
To Enable an Existing Subscriber to Send and Update System Broadcast Messages
Step 1
Step 2
Step 3
•
•
•
Consider that when a system broadcast message is sent to multiple locations, a copy of the message is sent to each server and then distributed to the subscribers homed on that server. As a result, subscribers must make updates to each message locally. To do so, subscribers must be enabled to update messages on each server and then they must log on to Cisco Unity Broadcast Message Administrator for each Cisco Unity server to update the messages.
Step 4
Using the Cisco Unity Broadcast Message Administrator to Send and Update System Broadcast Messages
Subscribers who are able to send system broadcast messages can use the Cisco Unity Broadcast Message Administrator to do the following tasks:
•
•
Note
Subscribers who are able to update system broadcast messages can use the Cisco Unity Broadcast Message Administrator to do the following tasks on the local Cisco Unity server:
•
•
•
•
•
How You Can Customize Cisco Unity Conversations
You can customize the conversations that subscribers and unidentified callers hear in several ways, as shown in Table 5-2.
Table 5-2 Summary of Conversation Customizations That You Can Make
Broadcast messages
Specify that subscribers can use Cisco Unity to do the following tasks:
•
•
•
Default: Disabled.
Individual subscribers and/or groups
Call handlers
You can customize the predefined call handlers or create your own. You may want to use a call handler in the following ways:
•
•
•
•
All subscribers and/or outside callers per server
See the "Call Handler Settings" chapter.
For guidance on creating a call management plan, see the "Call Management" chapter.
Call holding wait time and music
You can configure call waiting hold time. You can also customize the music that callers hear while on hold.
All subscribers and/or outside callers per server
See the "Configuring Call Waiting Hold Time" section, and the "Cisco Unity Music on Hold" section.
Call routing
You can customize how Cisco Unity handles direct calls and forwarded calls.
Based on criteria such as the phone number of the caller and the schedule that you specify, you can route certain calls to the Operator call handler, Opening Greeting, a subscriber greeting, the subscriber logon conversation, and so on.
All subscribers and/or outside callers per server
See the "Call Routing" chapter.
For guidance on creating a call management plan, see the "Call Management" chapter.
Caller ID
You can enable Cisco Unity to provide subscribers with additional information about callers who leave messages for them.
Individual subscribers and/or groups
See the "Offering Subscribers Additional Caller Information Before Message Playback" section.
Caller input
For subscriber greetings, you can define the actions that Cisco Unity takes in response to touchtone keys pressed by callers.
Default: Enabled with the *, 0, or # keys mapped as follows:
•
•
•
Individual subscribers and/or groups
See the "Subscriber Template Greetings Settings" section on page 10-15 and the "Subscriber Greetings Settings" section on page 14-19.
Conversation menu style
You can specify that subscribers hear the comprehensive instructions offered by the full menus, or that they hear brief menus.
Default: Full.
Individual subscribers and/or groups
See the "Subscriber Template Conversation Settings" section on page 10-7 and the "Subscriber Conversation Settings" section on page 14-10.
Conversation style
You can select the conversation style that subscribers hear when they listen to and manage their messages over the phone. Each style offers a different keypad mapping for the message-retrieval menus, and one even allows you to specify your own keypad mapping:
•
•
•
•
•
•
A Hospitality conversation is also available for hotel guests.
Default: Standard.
Individual subscribers and/or groups
See the "Subscriber Template Conversation Settings" section on page 10-7 and the "Subscriber Conversation Settings" section on page 14-10.
The Cisco Unity User Guide is available at http://www.cisco.com/en/US/prod
ucts/sw/voicesw/ps2237/products_
user_guide_list.html.The Custom Keypad Map utility is available in Tools Depot. To learn how to use it, refer to Help.
If applicable, see the "Hospitality and Property Management System Integration" chapter.
Deleting messages
You can:
•
•
•
•
Note that the Cisco Unity conversation plays the menu that offers the deleted messages option to all subscribers—even those who do not have COS rights to access deleted messages. You can specify that Cisco Unity plays the menu offering access to deleted messages only to subscribers who have COS rights to access them.
All subscribers and/or outside callers per server
See the "Class of Service Messages Settings" section on page 11-9.
Additionally, see the "Changing What Subscribers Hear When They Manage Deleted Messages" section.
To change whether the Cisco Unity plays the menu that offers the deleted messages option, refer to the Advanced Settings tool Help (in the Unity Settings list, click Conversation—Do Not Offer Deleted Messages Option). The Advanced Settings tool is available in Tools Depot.
Directory handlers
You can specify:
•
•
•
•
You can also set up multiple directory handlers to provide directory searches for systems with hundreds or thousands of subscribers.
All subscribers and/or outside callers per server
See the "Directory Handler Settings" chapter.
For guidance on creating a call management plan, see the "Call Management" chapter.
Double-key time interval
You can adjust the time that Cisco Unity waits for a second key before acting upon the first (known as the "double-key timeout"). Consider changing the interval of time that Cisco Unity uses to interpret two key presses if subscribers complain that Cisco Unity does not act upon key presses as they expect.
See also the "Responding to phone menus: timeouts for subscribers" section in this table.
All subscribers per server
Refer to the Advanced Settings tool Help (in the Unity Settings list, click Conversation—Set "Double Key Press" Time). The Advanced Settings tool is available in Tools Depot.
Finding messages
You can enable subscribers to use Message Locator to find voice messages from Cisco Unity subscribers and outside callers when they check messages by phone.
When Message Locator is enabled, subscribers are prompted to "Press 5 to find messages" from the Cisco Unity Main menu.
Default: Disabled.
Individual subscribers and/or groups
See the "Subscriber Template Features Settings" section on page 10-30 and the "Subscriber Features Settings" section on page 14-38.
First-time enrollment
You can specify that when subscribers log on for the first time (or the next time, as applicable), Cisco Unity prompts them to enroll. The first-time enrollment conversation asks subscribers to record a name and greeting, set a password, and choose whether to be listed in directory assistance.
Note that Cisco Unity does not prevent subscribers from completing the enrollment process if they do not record their name. You can change the first-time enrollment conversation so that it requires subscribers to record a voice name to complete first-time enrollment.
Default: First-time enrollment is enabled, but subscribers are not required to record a voice name.
Individual subscribers and/or groups
All subscribers per server (require recorded name)
See the "Subscriber Template Profile Settings" section on page 10-3 and the "Subscriber Profile Settings" section on page 14-2.
To require all subscribers to record a voice name during enrollment, refer to the Advanced Settings tool Help (in the Unity Settings list, click Conversation—First-Time Enrollment: Require Subscribers to Record Names). The Advanced Settings tool is available in Tools Depot.
Greetings: alternate greeting notification and caller options
You can enable Cisco Unity to play a prompt that reminds subscribers when their alternate greeting is turned on.
To prevent mailboxes from filling up while subscribers are on vacation or on an extended leave of absence, you can also specify that Cisco Unity will:
•
•
•
Default: Disabled.
Individual subscribers and/or groups
See the "Subscriber Template Greetings Settings" section on page 10-15 and the "Subscriber Greetings Settings" section on page 14-19.
Greetings: maximum length
You can set the maximum recording length allowed for subscriber greetings.
Default: 90 seconds.
(See also the "Recording time limits" section in this table.)
Subscriber groups
See the "Class of Service Greetings Settings" section on page 11-10.
Greetings: setting up
You can enable up to five greetings for each subscriber and call handler. You specify how long each greeting is enabled, the greeting source, and the actions that Cisco Unity takes during and after each greeting.
Individual subscribers and/or groups
See the "Subscriber Template Greetings Settings" section on page 10-15, the "Subscriber Greetings Settings" section on page 14-19, and the "Call Handler Greetings Settings" section on page 19-10.
Identified Subscriber Messaging (ISM)
ISM affects what subscribers hear when they call other subscribers from their primary or alternate extensions and are forwarded to the greetings of the subscribers they call. If they then leave a message, ISM affects what the called subscriber hears and can do when listening to the message.
When ISM is enabled, Cisco Unity recognizes that the calling extension is associated with a subscriber and accordingly plays the internal greeting of the called subscriber. Additionally, when the called subscriber later listens to the message, Cisco Unity plays the recorded voice name of the subscriber who left the message and allows the called subscriber to record a reply.
Default: Enabled.
All subscribers and/or outside callers per server
See the "Configuration Settings" section on page 26-2.
For an explanation of how ISM works with remote subscribers, and for information on how to set it up, refer to the applicable guide:
•
products/sw/voicesw/ps2237/
products_feature_guides_list.
html.•
products/sw/voicesw/ps2237/
products_feature_guides_list.
htmlInterview handlers
You can specify:
•
•
•
•
All subscribers and/or outside callers per server
See the "Interview Handler Settings" chapter.
For guidance on creating a call management plan, see the "Call Management" chapter.
Language: settings for routing rules and call handlers
You can customize the language settings for routing rules, call handlers, interview handlers, and directory handlers.
Individual conversation components
Language: settings for specific subscribers
You can specify which language callers hear when they leave messages for individual subscribers. (This affects prompts such as "Record your message at the tone.")
Individual subscribers and/or groups
Language: system prompts
You can specify the default language in which system prompts are played to all subscribers and callers.
All subscribers and/or outside callers per server
Language: Text to Speech (TTS)
You can specify the default TTS language that subscribers hear when having their e-mail read to them over the phone.
Individual subscribers and/or groups
See the "Specifying Text to Speech Languages" section on page 8-2.
Leaving messages: enabling and customizing a warning tone
(Cisco CallManager and SIP phone system integrations only)
You can enable a warning tone to play before the maximum allowable message length of a recording is reached.
You can also customize the tone by recording a WAV file with another tone or a brief message.
Default: Disabled.
All subscribers and/or outside callers per server
See the "Enabling a Warning Tone for End of Recording" section and the "Customizing the Warning Tone for End of Recording" section.
Leaving messages: maximum message length for unidentified callers
You can set the maximum message length allowed to unidentified callers.
(See also the "Sending messages: maximum message length for subscribers" section and the "Recording time limits" section in this table.)
Individual subscribers and/or groups
See the "Subscriber Template Messages Settings" section on page 10-22 and the "Subscriber Messages Settings" section on page 14-25.
Leaving messages: what unidentified callers can do
You can dictate whether the Cisco Unity conversation offers callers the opportunity to edit the messages that they leave for subscribers, and allows them to mark messages urgent.
Individual subscribers and/or groups
See the "Subscriber Template Messages Settings" section on page 10-22 and the "Subscriber Messages Settings" section on page 14-25.
Logging off
You can select the destination—such as a call handler, interview handler, subscriber, or directory assistance—that Cisco Unity sends subscribers to when they exit the subscriber conversation.
Individual subscribers and/or groups
See the "Subscriber Template Conversation Settings" section on page 10-7 and the "Subscriber Conversation Settings" section on page 14-10.
Logging on
For subscribers on each Cisco Unity server, you can use caller input settings to specify:
•
•
You can also set up cross-server logon for multiple Cisco Unity servers. Cross-server logon allows you to provide subscribers with one phone number that they can call to log on to Cisco Unity from outside your organization.
Individual subscribers and/or groups for single or networked servers
See the "Specifying How Subscribers Log On to Cisco Unity From Subscriber Greetings" section.
For more information, refer to the "Cross-Server Logon, Transfers, and Live Reply" chapter of the Networking in Cisco Unity Guide, available at http://www.cisco.com/en/US/prod
ucts/sw/voicesw/ps2237/products_
feature_guides_list.html.Playing messages: excluding all receipts
You can exclude nondelivery receipts (NDRs) and return (read and delivery) receipts from the list of messages that the Cisco Unity conversation plays for subscribers. (By default, all receipts are included.)
All subscribers and/or outside callers per server
Refer to the Advanced Settings tool Help. The setting is called Conversation—Exclude All Receipts From Voice Mail Stack.
The Advanced Settings tool is available in Tools Depot.
Playing messages: excluding return receipts
You can exclude return receipts (read and delivery) from the list of messages that are played for subscribers. (By default, read receipts are included.)
All subscribers and/or outside callers per server
Refer to the Advanced Settings tool Help. The setting is called Conversation—Exclude Return Receipts From Voice Mail Stack.
The Advanced Settings tool is available in Tools Depot.
Playing messages: message playback options
You can dictate whether subscribers hear the Message Type menu, message counts, and timestamps when they check messages, and you can specify the order in which Cisco Unity plays messages.
Individual subscribers and/or groups
See the "Subscriber Template Conversation Settings" section on page 10-7 and the "Subscriber Conversation Settings" section on page 14-10.
Recorded names: maximum recorded name length
You can specify the number of seconds allowed for subscriber recorded names.
Subscriber groups
See the "Class of Service Profile Settings" section on page 11-3.
Recording time limits
You can specify:
•
•
•
•
All subscribers and/or outside callers per server
(Re)playing messages
You can change the Cisco Unity conversation so that it replays only the message body when a subscriber replays a voice message.
Default: Cisco Unity replays both the summary and the body of the message.
All subscribers and/or outside callers per server
Refer to the Advanced Settings tool Help. The setting is called Conversations—Do Not Replay Message Summary.
The Advanced Settings tool is available in Tools Depot.
Replying to messages: "Live Reply"
On each Cisco Unity server, you can enable subscribers to reply to messages from other subscribers by calling them.
You can also enable cross-server live reply to subscribers on networked Cisco Unity servers. Cross-server live reply allows subscribers to "live reply" to messages from subscribers on other Cisco Unity servers in a dialing domain.
Default: Disabled.
Subscriber groups for single or networked servers
See the "Class of Service Messages Settings" section on page 11-9.
For more information, refer to the "Cross-Server Logon, Transfers, and Live Reply" chapter of the Networking in Cisco Unity Guide, available at http://www.cisco.com/en/US/prod
ucts/sw/voicesw/ps2237/products_
feature_guides_list.html.Responding to phone menus: timeouts for outside callers
For outside callers, you can specify the following:
•
•
•
Outside callers per server
Responding to phone menus: timeouts for subscribers
For each subscriber, you can specify the following:
•
•
•
See also the "Double-key time interval" section in this table.
Individual subscribers and/or groups
See the "Subscriber Template Conversation Settings" section on page 10-7 and the "Subscriber Conversation Settings" section on page 14-10.
Securing voice messages
You can set up private secure messaging and enable subscribers to use it. Private secure messaging provides security through the use of public/private key encryption for voice messages that subscribers record by using the Cisco Unity conversation.
Voice messages that are marked private and secure cannot be heard by anyone other than a Cisco Unity subscriber who is homed on a Cisco Unity server that is configured for private secure messaging.
All subscribers and/or outside callers per server
For information on how to set up private secure messaging, refer to the "Private Secure Messaging (Cisco Unity Version 4.0(5) and Later)" section in the "Securing Subscriber Messages" chapter of the Cisco Unity Security Guide. The guide is available at http://www.cisco.com/en/US/prod
ucts/sw/voicesw/ps2237/prod_mai
ntenance_guides_list.html.Sending messages: address by name or number
You can determine how Cisco Unity prompts subscribers to address messages to other subscribers when they send messages ("Press 2 to send a message"): by entering extensions, by spelling first names, or by spelling last names.
(When spelled name searches are enabled for the server, subscribers can switch between addressing by name and addressing by extension by pressing the # key twice at any time. See also the "Spelled name searches and addressing" section in this table.)
Individual subscribers and/or groups
See the "Subscriber Template Conversation Settings" section on page 10-7 and the "Subscriber Conversation Settings" section on page 14-10.
Sending messages: address confirmation
You can alter how Cisco Unity prompts a subscriber to confirm message addressing when they send messages ("Press 2 to send a message").
All subscribers and/or outside callers per server
See the "Changing How Subscribers Confirm Message Addressing" section.
Sending messages: addressing order
You can change the order in which Cisco Unity prompts subscribers to address and record messages.
All subscribers and/or outside callers per server
See the "Changing the Order for Addressing and Recording" section.
Sending messages: maximum message length for subscribers
You can set the maximum message length allowed to subscribers.
Default: 300 seconds.
(See also the "Leaving messages: maximum message length for unidentified callers" section in this table.)
Individual subscribers and/or groups
See the "Subscriber Template Messages Settings" section on page 10-22 and the "Subscriber Messages Settings" section on page 14-25.
Sending messages: public distribution lists
You can specify whether subscribers can send messages to public distribution lists.
Subscriber groups
See the "Class of Service Messages Settings" section on page 11-9.
Sending messages: streamlining addressing
You can specify that Cisco Unity allows subscribers to continue adding names after adding a recipient. In this way, you can significantly streamline the addressing process when subscribers send and forward messages to multiple recipients.
All subscribers and/or outside callers per server
Skipping messages
(Optional conversation 1 only)
You can specify whether Cisco Unity saves new messages that subscribers have skipped by pressing # during message playback: as saved messages or as new messages.
Default: Saved as new.
All subscribers and/or outside callers per server
Skipping messages
(standard conversation only)
You can specify whether Cisco Unity fast-forwards to the end of a message or skips to the next message when subscribers press the # key during message playback.
Default: Cisco Unity fast-forwards to the end of the message and then plays the After Message menu. Subscribers press ## to skip to the next message during message playback.
All subscribers and/or outside callers per server
See the "Changing How Subscribers Skip Messages During Message Playback (Standard Conversation)" section.
Speed control: prompts for all conversations
You can specify how fast Cisco Unity plays all system prompts.
(To learn more about system prompts, see also the "About System Prompts" section.)
All subscribers and/or outside callers per server
Refer to the Set Prompt Speed utility Help. In particular, review the Requirements/Special Notes section before you run the utility.
The Set Prompt Speed utility is an Audio Management tool, available in Tools Depot.
Speed control: prompts for subscriber conversation
You can specify the speed at which Cisco Unity plays prompts to subscribers on the applicable Conversation page for a subscriber template or an individual subscriber in the Cisco Unity Administrator or by using Bulk Edit.
Note that the speed you specify does not affect the playback speed of recorded names, greetings, or messages.
Individual subscribers and/or groups
See the "Subscriber Template Conversation Settings" section on page 10-7 or the "Subscriber Conversation Settings" section on page 14-10.
Speed control: subscriber messages
You cannot specify how fast Cisco Unity plays subscriber messages. Instead, subscribers can adjust the playback speed of their messages by phone or from a Media Master control bar. (Not all phone system integrations support speed control by phone.)
(See also the "Speed control: prompts for subscriber conversation" section and the "Speed control: prompts for all conversations" section in this table.)
Individual subscribers
For information about adjusting the playback speed of messages, refer subscribers to the "Overview: Changing Recording and Playback Settings" chapter in the Cisco Unity User Guide, available at http://www.cisco.com/en/US/prod
ucts/sw/voicesw/ps2237/products_
user_guide_list.html.Spelled name searches and addressing
You can specify whether Cisco Unity allows subscribers to search for and address messages to other subscribers by spelling names.
Default: Enabled.
(See also the "Sending messages: address by name or number" section in this table.)
All subscribers and/or outside callers per server
Transfer and holding options
You can dictate some of what subscribers and unidentified callers hear when Cisco Unity transfers a call from the automated attendant or a directory handler to a subscriber, including what they hear when they are on hold.
For example, depending on how you set up Cisco Unity and the phone system to handle call transfers, you may be able to use call transfer settings to:
•
•
•
Individual subscribers and/or groups
See the "Subscriber Template Call Transfer Settings" section on page 10-12 and the "Subscriber Call Transfer Settings" section on page 14-15.
Transfers: across networked servers
Cross-server transfer allows for transfers of calls from the automated attendant or a directory handler of one Cisco Unity server to a subscriber on another Cisco Unity server in the dialing domain.
All subscribers and/or callers for networked servers
For more information, refer to the "Cross-Server Logon, Transfers, and Live Reply" chapter of the Networking in Cisco Unity Guide, available at http://www.cisco.com/en/US/prod
ucts/sw/voicesw/ps2237/products_
feature_guides_list.html.Transfers: offering "system transfers"
You can set up call handler greetings, subscriber greetings, and/or routing rules to allow subscribers to dial internal phone numbers that are not associated with Cisco Unity subscribers.
By default, Cisco Unity prompts subscribers and callers to confirm the number that they enter before performing the transfer. You can disable the prompt.
Individual subscribers and/or groups
Transfers: restricting phone numbers
You can specify which phone numbers subscribers can use for transferring calls.
Subscriber groups
See the "Restriction Tables" chapter.
TTY
You can install TTY prompts so that subscribers and unidentified callers who use TTY can call Cisco Unity and use the same features that a hearing caller can use, with a few exceptions.
Individual subscribers and/or groups
See the "TTY Overview" section on page 8-5.
Volume: subscriber menus
(for analog or DTMF integrations only)
You can select the volume level at which subscribers hear the Cisco Unity conversation.
Individual subscribers and/or groups
See the "Subscriber Template Conversation Settings" section on page 10-7 and the "Subscriber Conversation Settings" section on page 14-10.
Volume: system prompts
You can select the volume level at which all callers hear Cisco Unity system prompts. (To learn more about system prompts, see also the "About System Prompts" section.)
All subscribers and/or outside callers per server
Refer to the Set Volume utility Help.
The Set Volume utility is an Audio Management tool, available in Tools Depot.
Changing How Subscribers Skip Messages During Message Playback (Standard Conversation)
You can customize the standard conversation to change how subscribers skip messages. By default, subscribers can press the # key to fast-forward to the end of a message, and press ## to skip to the next message as they play messages. You may want to consider changing the Cisco Unity conversation so that subscribers can press a single # key to skip a message during message playback.
By using the Advanced Settings tool to change the registry, you can specify what action Cisco Unity takes when subscribers press the # key while playing new, saved, and deleted messages. (Subscribers require the applicable COS rights to play deleted messages by phone.) The applicable registry values are:
Changing whether subscribers press # or ## to skip a message during message playback also affects the shortcuts that subscribers can use while listening to a message. The changes to all keys are summarized in Table 5-3 below:
Table 5-3 Keys Affected by Changing How Subscribers Skip Messages During Message Playback
Fast-forward to end of message
(Cisco Unity plays After Message menu)#
99
Skip message and save as is
##
#
Skip message and restore as saved
#2
992
Skip message and reply
#4
994
Skip message and reply to all
#42
9942
Skip message and forward message
#5
995
Skip message and save as new/restore as new
#6
996
Skip message and deliver e-mail/fax to fax
#8
998
Skip message and play message properties
#9
999
1 Note that the Cisco Unity at a Glance, Cisco Unity Phone Menus and Shortcuts, and the Cisco Unity User Guide reflect the key mapping that subscribers use when the registry value is set to 0.
2 Subscribers can also use the 99 key combinations when the registry value is set to 0.
The registry change is applied systemwide to all subscribers who are associated with the Cisco Unity server and who use the standard conversation. You cannot make the change for an individual subscriber or a specific group of subscribers who use the standard conversation. If subscribers in your organization are already accustomed to pressing ## to skip to the next message, review the "Support Desk Orientation" section on page 7-7 before you make the change. It is important that you understand the potential problems that may arise when subscribers do not readily adapt to the new key mappings.
Note
Do the following procedure if you would like to change the action that Cisco Unity takes when subscribers press the # key during message playback.
To Change How Subscribers Skip Messages During Message Playback
Step 1
Step 2
Step 3
Step 4
Step 5
Step 6
Step 7
Enabling a Warning Tone for End of Recording
Note
Cisco Unity can be set to sound a warning tone before reaching the maximum allowable message length while callers record their messages. By default, the warning tone is disabled. There are two settings that can be customized:
•
•
For example, if the maximum message length is set for 300 seconds and the first setting is set for 10 seconds, the warning tone will sound after 290 seconds of recording—10 seconds before the recording limit is reached and the recording session is terminated.
You can also customize the warning tone by recording a WAV file with another tone or a brief message. To do so, see the "Customizing the Warning Tone for End of Recording" section.
Note
To enable the warning tone, do the following procedure.
To Enable the Warning Tone for the End of Recording
Step 1
Step 2
Step 3
Step 4
Step 5
Step 6
Step 7
Step 8
Step 9
Step 10
Customizing the Warning Tone for End of Recording
When enabled, a recording beep sounds as the warning tone. You can customize the warning tone by recording another tone or a brief message as a WAV file and specifying the location of the WAV file.
Note
To specify a customized warning tone, do the following procedure.
To Specify the Location of a Customized Warning Tone
Step 1
Step 2
Step 3
Step 4
Step 5
Step 6
Step 7
Specifying How Subscribers Log On to Cisco Unity From Subscriber Greetings
Caller input settings allow you to specify how subscribers log on to Cisco Unity when they are listening to a subscriber greeting. By using the caller input settings you can specify which key(s) subscribers can press to interrupt a subscriber greeting so that they can log on to Cisco Unity, and what subscribers hear after Cisco Unity prompts them to log on.
Note
By default, Cisco Unity is set up so that subscribers hear the Cisco Unity Sign-In conversation, which prompts them for their ID and password when they press * during any subscriber greeting—either their own or another subscriber greeting. As an alternative, you can accommodate subscribers who want an easier way to log on from their own greeting by offering the Easy Sign-In conversation, which prompts subscribers only for a password.
Table 5-4 summarizes the options available to you for specifying how subscribers log on to Cisco Unity from their own greeting or from another subscriber greeting:
Configuring Call Waiting Hold Time
With call holding, when the phone is busy, Cisco Unity can ask callers to hold. Cisco Unity manages each caller in the queue, according to the settings you configure. You can configure call waiting hold time, as described below. You can also customize the music that callers hear while on hold, as described in the "Cisco Unity Music on Hold" section.
The call holding wait time for the first caller in the queue can be configured by making changes in the following registry keys:
HKEY_LOCAL_MACHINE\SOFTWARE\Active Voice\CallTransfer\1.0\WaitTimeSec
HKEY_LOCAL_MACHINE\SOFTWARE\Active Voice\CallTransfer\1.0\Attempts
The default value for each key is 5. To obtain the call holding queue wait time for the first caller in the queue, Cisco Unity multiplies the values of the keys. For example, the default value of 25 seconds is a WaitTimeSec of 5 seconds x 5 Attempts. If both keys were set to a value of 10, the call holding queue wait time would be 100 seconds (a WaitTimeSec of 10 x 10 Attempts), and so on.
The WaitTimeSec setting controls how long Cisco Unity waits between attempts to connect the caller. We recommend a value between 5 and 15. A value outside of this range could prevent Cisco Unity from functioning as designed.
The Attempts setting controls how many times Cisco Unity tries the subscriber extension before asking whether the caller wants to continue to hold. We recommend a value between 2 and 10. Increasing this setting will decrease the frequency at which Cisco Unity asks whether the caller wants to continue to hold.
If these registry keys are not present on your system, you can add them as DWORD values. You do not need to restart Cisco Unity for the changes to take effect.
Do the following procedure to add or change call holding wait time registry keys.
To Add or Change Call Holding Wait Time Registry Keys
Step 1
Step 2
Caution
Step 3
Step 4
HKEY_LOCAL_MACHINE\SOFTWARE\Active Voice\CallTransfer\1.0If the registry key does not exist, continue with Step 5; otherwise, skip to Step 12.
Step 5
Step 6
Step 7
Step 8
Step 9
Step 10
Step 11
Step 12
Step 13
Step 14
HKEY_LOCAL_MACHINE\SOFTWARE\Active Voice\CallTransfer\1.0If the Attempts setting for the registry key does not exist, continue with Step 15; otherwise, skip to Step 18.
Step 15
Step 16
Step 17
Step 18
Step 19
Step 20
Step 21
Cisco Unity Music on Hold
When Music on Hold is enabled, what callers on hold hear depends on the phone system.
The default wait time in the holding queue for the second and subsequent callers is approximately 30 seconds, and is based on the playing time of the music on hold system prompt WAV files. Cisco Unity plays each of the music on hold files in sequence, beginning with the file PHHoldMusic009.wav. If the caller presses 1 to continue to hold, Cisco Unity loops back to the first file, PHHoldMusic000.wav, then plays the next sequentially-numbered file if the caller wants to continue to hold, and so on.
To increase the holding queue wait time for the second and subsequent callers in the call holding queue, re-record the following ten prompts: PHHoldMusic000.wav through PHHoldMusic009.wav, located in the \CommServer\Localize\Prompts\<Language>\<Codec>\AvPHGreet directory. You can use the same music source for each of the prompts, or choose different music for each prompt. If you do not have an automatic call distribution or other call center product installed, you can record custom messages at the beginning or at the end of the music for several of the prompts, for example, "Your call is important to us. We apologize for the delay. A representative will be with you shortly," or a brief message advertising your products. The playing time for each of these WAV files should be approximately the same, and be from 45 to 120 seconds in length. Be sure to record and test all ten prompts. If any of the ten PHHoldMusic WAV files are missing, callers will hear the fail-safe conversation and be unable to continue holding.
Be aware that subsequent callers in the holding queue cannot advance while a particular WAV file is playing; Cisco Unity takes action on the call at the end of the playing of each WAV file. Therefore, we recommend that you keep the playing time for each of the prompts to the minimum amount of time that meets the needs of your site. (Note, however, that the first caller on hold will be transferred to the extension at whatever point it becomes available.)
Caution
Changing How Cisco Unity Saves New Messages That Subscribers Skip During Message Playback (Optional Conversation 1)
You can customize Optional Conversation 1 to change how Cisco Unity handles new messages that subscribers skip during message playback. By default, when subscribers press # to skip a new message during message playback, Cisco Unity saves the message as new. This means that when subscribers call Cisco Unity to check messages, the skipped message remains in the list of new messages that Cisco Unity plays. In addition, message waiting indicators (MWI) on subscriber phones remain lit as long as there are new messages.
By using the Advanced Settings Tool to change the registry, you can customize Optional Conversation 1 so that Cisco Unity saves new messages that subscribers skip by pressing # during message playback as saved messages rather than as new messages. Subscribers in your organization may prefer this so that when they call Cisco Unity to check for new messages, they hear only newly arrived messages, and not the messages that they skipped earlier. Likewise, subscribers can then rely on their MWIs to determine when a new message arrives.
How Cisco Unity saves new messages that subscribers skip depends on the registry value you set:
Cisco Unity saves skipped messages as new messages.
Cisco Unity saves skipped messages as saved messages.
The registry change is applied systemwide to all subscribers who are associated with the Cisco Unity server and who use Optional Conversation 1. You cannot make the change for an individual subscriber or a specific group of subscribers who use Optional Conversation 1. The change does not affect subscribers who use the standard conversation.
Note
Do the following procedure if you would like Cisco Unity to save new messages as saved messages when subscribers skip them by pressing # during message playback. Note that the procedure does not change how Cisco Unity saves messages when subscribers press 9 or # after message playback.
To Change How Cisco Unity Handles Messages That Subscribers Skip By Pressing # During Message Playback
Step 1
Step 2
Step 3
Step 4
Step 5
Step 6
You do not need to restart the Cisco Unity software for the registry change to take effect.
Offering Subscribers Additional Caller Information Before Message Playback
The Cisco Unity subscriber conversation can be customized so that it provides subscribers with additional information about each caller who left a message, before it plays the message. By using the Bulk Edit utility (available in Tools Depot), you can provide individual subscribers or a specific group of subscribers with additional information on one or both of the types of callers who leave messages for them, as indicated in Table 5-5.
If you choose to provide Cisco Unity subscribers with additional caller information before message playback, consider the following requirements:
•
•
Refer to the Bulk Edit Help for details on using it to modify existing subscriber accounts. You use one or both of the following fields on the Conversation tab in Bulk Edit to offer subscribers additional caller information before message playback:
Changing the Order for Addressing and Recording
The Cisco Unity subscriber conversation can be customized to change the order in which Cisco Unity prompts subscribers to address and record when they send or forward messages to other subscribers or distribution lists. By default, when a subscriber sends or forwards a message, Cisco Unity first prompts the subscriber to address the message and then prompts the subscriber to record the message or to record an introduction for a forwarded message.
By using the Advanced Settings Tool to change the registry, you can customize the subscriber conversation so that Cisco Unity prompts subscribers to record a message or introduction before prompting them to address it.
How Cisco Unity prompts subscribers to address and record when they send and forward messages depends on the registry value you set:
Cisco Unity records the message and then addresses it.
Cisco Unity addresses the message and then records it.
The registry change is applied systemwide to all subscribers associated with the Cisco Unity server. You cannot make the change for an individual subscriber or a specific group of subscribers. Finally, note that you cannot change the order in which Cisco Unity prompts subscribers to address and record when they reply to messages; Cisco Unity always prompts subscribers to record a reply before allowing them to add additional recipients.
Note
Do the following procedure to change the order in which Cisco Unity prompts subscribers to address and record when they send messages.
To Change the Order of Addressing and Recording When Subscribers Send Messages
Step 1
Step 2
Step 3
Step 4
Step 5
Step 6
You do not need to restart the Cisco Unity software for the registry change to take effect.
Changing How Subscribers Confirm Message Addressing
The Cisco Unity subscriber conversation can be customized to alter how Cisco Unity prompts a subscriber to confirm message addressing. By default, when a subscriber addresses a message, Cisco Unity plays the recorded name and extension of the intended recipient (or, when there is no recorded name, Cisco Unity plays the extension instead) and asks the subscriber to confirm that the recipient is correct.
By using the Advanced Settings Tool to change the registry, you can customize how Cisco Unity prompts subscribers to confirm message addressing. Table 5-6 shows the confirmation prompts that subscribers hear during message addressing, depending on the registry value you set.
Note
The registry change is applied systemwide to all subscribers associated with the Cisco Unity server. You cannot change how Cisco Unity prompts an individual subscriber or a specific group of subscribers to confirm message addressing.
Note
Do the following procedure to change how subscribers confirm message addressing.
To Change How Subscribers Confirm Message Addressing
Step 1
Step 2
Step 3
Step 4
Step 5
Step 6
You do not need to restart the Cisco Unity software for the registry change to take effect.
Streamlining Message Addressing
By default, when subscribers address messages by phone ("Press 2 to send," or during forwarding), Cisco Unity allows them to add a single recipient and then prompts them to indicate with a key press what they want to do next (for example, "To add another recipient, press 1. For message options, press 3. To record, press #."). Subscribers who send and forward messages to multiple recipients may find pressing 1 to continue addressing after each recipient tedious and time-consuming. Instead, you can specify that Cisco Unity allows subscribers to continue adding names after each recipient. In this way, you can significantly streamline the addressing process when subscribers send and forward messages to multiple recipients.
To specify that Cisco Unity allow subscribers to continue entering recipient names or extensions (as applicable) until they indicate that they have completed addressing, do the following procedure. By enabling streamlined addressing, forwarding messages to single recipients requires that subscribers press an extra keystroke as when streamlined addressing is disabled. The change affects the Send and Forward flows for all subscribers associated with the Cisco Unity server, regardless of subscriber conversation style and whether Cisco Unity is set up to prompt subscribers to record before or after addressing.
Note
To Streamline Message Addressing
Step 1
Step 2
Step 3
Step 4
Step 5
Step 6
You do not need to restart the Cisco Unity software for the change to take effect.
Changing What Subscribers Hear When They Manage Deleted Messages
You can use the Advanced Settings tool (available in Tools Depot) to customize the subscriber conversation to change what subscribers hear when they manage their deleted messages in the following ways:
•
As alternatives to the default, you can specify that Cisco Unity does not prompt subscribers to choose, and instead will permanently delete the type of messages you specify: either deleted voice messages or all deleted messages (voice, fax, and e-mail, as applicable). To set up either alternative, use the Advanced Settings tool to change the Conversation—Set How Deleted Messages Are Deleted in Bulk setting. Refer to the Advanced Settings Help for details.
•
You can enable Cisco Unity to request confirmation from subscribers before proceeding with the deletion. To do so, use the Advanced Settings tool to change the Conversation—Confirm Delete When Deleting a Deleted Message setting. Refer to the Advanced Settings Help for details.
•
You may want to enable Cisco Unity to request confirmation from subscribers before proceeding with the deletion, especially if many subscribers do not belong to a class of service that allows them to retain and review their deleted messages, because the deletion would be permanent for them. To do so, use the Advanced Settings tool to change the Conversation—Confirm Delete When Deleting a New or Saved Message setting. Refer to the Advanced Settings Help for details.
Setting Up System Transfers
In your organization, you may find that callers want to be able to dial numbers that are not typically listed in directory assistance. For example, subscribers and outsider callers may find it convenient to be able to call Cisco Unity and transfer from the Opening Greeting or another call handler to a lobby extension, conference room extension, or an extension assigned to someone in the organization who is not a Cisco Unity subscriber, such as an employee who is visiting from another site and is using a guest office. In addition, some subscribers may want to be able to call Cisco Unity and then transfer to phone numbers outside of the organization—such as frequently called customers or vendors—so that they do not have to hang up after checking messages to place another call, or so that they will not incur long-distance charges while on business travel.
You can route callers to one of two "system transfer" conversations, both of which offer callers the ability to transfer to numbers that are not associated with Cisco Unity subscribers:
You can route callers to either system transfer conversation in several ways, including:
•
For example, to allow all callers to transfer to a lobby phone, guest office, or a conference room from the Opening Greeting, you could specify that Cisco Unity will offer Caller System Transfers when callers press 3. To offer system transfers to a particular subscriber, you could specify that Cisco Unity will offer Subscriber System Transfers when the subscriber presses a particular key during the Opening Greeting or even during his or her own greeting.
•
Note
Follow the applicable task list in this section to set up Caller and Subscriber System Transfers. For both types of transfers, Cisco Unity prompts subscribers and callers to confirm the number that they enter before performing the transfer. To disable the confirmation prompt, use the Advanced Settings tool to change the Conversation—Confirm Number Before System Transfer Conversation setting. Refer to the Advanced Settings Help for details. (The Advanced Settings tool is available in Tools Depot.)
Task List: Offering Caller System Transfers
1.
2.
•
•
Task List: Offering Subscriber System Transfers
1.
Tip
2.
•
•
How Subscribers Can Customize the Cisco Unity Conversation
Subscribers can customize the Cisco Unity conversation by phone or by using the Cisco Unity Assistant. Table 5-7 details the conversation settings that subscribers can change.
Table 5-7 Settings That Subscribers Can Change
Greetings:
•
•
•
•
Greetings:
•
•
•
Call Transfer1 :
•
•
Call Transfer1:
•
•
Call Holding and Screening2 :
•
•
Call Holding and Screening2:
None
Message Playback:
•
•
•
•
•
Message Playback:
Select full or brief Cisco Unity conversation menus
Message Addressing:
•
•
Message Addressing:
Switch between addressing to other subscribers by name or by extension (by pressing ##)
Caller Options:
•
•
Caller Options:
None
Personal Settings:
•
•
•
Personal Settings:
•
•
1 Call transfer options apply only to incoming calls that were routed to the subscriber from the automated attendant or a directory handler, and not on direct calls. Transfer options do not apply when an outsider caller or another subscriber dials a subscriber extension directly.
2 Call holding and screening options apply only to incoming calls that were routed to the subscriber from the automated attendant or a directory handler, and not on direct calls. Holding and screening options do not apply when an outsider caller or another subscriber dials a subscriber extension directly. In addition, holding and screening options are available only when supervised transfers are enabled.
3 Note that this depends on whether you have enabled spelled name addressing. See the "Configuration Settings" section on page 26-2 for details.
To set up the recording and playback devices that subscribers will use, see the "Setting Up the Media Master" section on page 6-11. For a complete list of settings that subscribers can change by phone or by using the Cisco Unity Assistant—including call transfer, message notification, and private list settings, see the "Subscriber Orientation" section on page 7-1.