Installation and Upgrade Guide for Cisco Unified MeetingPlace Web Conferencing Release 5.3
Installing Cisco Unified MeetingPlace Web Conferencing Release 5.3 in a Load Balancing Configuration

Table Of Contents

Installing Cisco Unified MeetingPlace Web Conferencing Release 5.3 in a Load Balancing Configuration

About Installing Cisco Unified MeetingPlace Web Conferencing Release 5.3 in a Load Balancing Configuration

Restrictions for Installing Cisco Unified MeetingPlace Web Conferencing in a Load Balancing Configuring

Cisco Unified MeetingPlace Web Conferencing Load Balancing and Standard Web Server Load Balancing

Cisco Unified MeetingPlace Web Conferencing Clusters

Load Balancing Behaviors in Cisco Unified MeetingPlace Web Conferencing

Cisco Unified MeetingPlace Web Conferencing Load Balancing Algorithm

Suggestions for a Robust Cisco Unified MeetingPlace System

About Installing Cisco Unified MeetingPlace Web Conferencing Release 5.3 in a Load Balancing Configuration for Video-Enabled Systems

Default Behavior of Load Balancing in Video-Enabled Systems

Video Meetings in Segmented Meeting Access Deployments

SQL Server Considerations

End-User Considerations

Preinstallation Tasks: Cisco Unified MeetingPlace Web Conferencing Release 5.3 in a Load Balancing Configuration

Understanding the Cisco Unified MeetingPlace Web Conferencing Installation and Load Balancing Configuration Process

Preparing the Internal Cluster

Preparing the External Cluster

Creating a Common Storage Location

Installation Tasks: Cisco Unified MeetingPlace Web Conferencing Release 5.3 in a Load Balancing Configuration

Installing the First Internal Web Server

Configuring Services for the First Internal Web Server

Installing Additional Internal Web Servers

Copying GUIDS From the Internal to the External Web Server

Installing the First External Web Server

Configuring Services for the First External Web Server

Installing Additional External Web Servers

Configuring Redirection of External Meetings

Postinstallation Tasks: Cisco Unified MeetingPlace Web Conferencing Release 5.3 in a Load Balancing Configuration

Configuring Ad-Hoc Video Meetings

Viewing the Amount of Web-Conferencing Load on a Server

Disabling Load Balancing


Installing Cisco Unified MeetingPlace Web Conferencing Release 5.3 in a Load Balancing Configuration


This chapter describes how to install Cisco Unified MeetingPlace Web Conferencing in a load balancing configuration. It does not describe upgrades. For upgrade instructions, see "Upgrading to Cisco Unified MeetingPlace Web Conferencing Release 5.3."

Topics in this section include:

About Installing Cisco Unified MeetingPlace Web Conferencing Release 5.3 in a Load Balancing Configuration

About Installing Cisco Unified MeetingPlace Web Conferencing Release 5.3 in a Load Balancing Configuration for Video-Enabled Systems

Preinstallation Tasks: Cisco Unified MeetingPlace Web Conferencing Release 5.3 in a Load Balancing Configuration

Installation Tasks: Cisco Unified MeetingPlace Web Conferencing Release 5.3 in a Load Balancing Configuration

Postinstallation Tasks: Cisco Unified MeetingPlace Web Conferencing Release 5.3 in a Load Balancing Configuration


Note Before reviewing this chapter, make sure that you read the Release Notes for Cisco Unified MeetingPlace Web Conferencing Release 5.3 for updated system requirements. New installations of Release 5.3 require a Cisco MCS.


About Installing Cisco Unified MeetingPlace Web Conferencing Release 5.3 in a Load Balancing Configuration

Load balancing in Cisco Unified MeetingPlace Web Conferencing makes use of an algorithmic formula to evenly distribute web-conferencing requests within clusters of web servers. Updates occur every 60 seconds by default and recalculate current server load and current web-conferencing load.

The following additional factors are taken into consideration when identifying which web server within a cluster has the lightest load: each server's CPU usage percentage, memory usage percentage, number of active conferences, and number of attendees. You can view the amount of web-conferencing load per server from the Web Server administrative page. This information is only displayed on internal web servers.

To configure load balancing, you should understand the following concepts:

Restrictions for Installing Cisco Unified MeetingPlace Web Conferencing in a Load Balancing Configuring

Cisco Unified MeetingPlace Web Conferencing Load Balancing and Standard Web Server Load Balancing

Cisco Unified MeetingPlace Web Conferencing Clusters

Load Balancing Behaviors in Cisco Unified MeetingPlace Web Conferencing

Suggestions for a Robust Cisco Unified MeetingPlace System

Related Topics

Also see the "About the MeetingNotes Purge Parameter and SMA-2S Configurations" section in Chapter 3 of the Configuration Guide for Cisco Unified MeetingPlace Web Conferencing Release 5.3.

For information about deploying a web server dedicated to audio file conversion, also see Chapter 3 in the Configuration Guide for Cisco Unified MeetingPlace Web Conferencing Release 5.3.

Restrictions for Installing Cisco Unified MeetingPlace Web Conferencing in a Load Balancing Configuring

Microsoft Network Load Balancing is not supported.

Internal clusters and external clusters can only have one web server with the "Both" installation option. For more information on the Both installation option, see the "Gathering Cisco Unified MeetingPlace Web Conferencing Installation Values" section.

Cisco Unified MeetingPlace Web Conferencing Load Balancing and Standard Web Server Load Balancing

In standard web server load balancing, third-party software typically monitors incoming web server requests and distributes the load by sending requests to different web servers. This can also be accomplished by a DNS round-robin configuration.

With Cisco Unified MeetingPlace Web Conferencing load balancing, all users enter through one designated web server. If they are all attempting to attend the same meeting, they are directed to the same web server. Current server load is assessed in order to distribute web-conferencing load across the various servers. HTTP (or HTTPS) requests are not distributed across web servers.

Cisco Unified MeetingPlace Web Conferencing Clusters

With Cisco Unified MeetingPlace Web Conferencing, you can configure up to six web servers into a cluster, and you can configure clusters as either internal or external.

Internal cluster—Places all web servers behind the firewall inside the private corporate network. Typically, all web servers in an internal cluster display the full-access Cisco Unified MeetingPlace Web Conferencing interface

External cluster—Places all web servers between the private corporate network and the Internet, such as in a DMZ. For increased security, all web servers in an external cluster typically display the attend-only Cisco Unified MeetingPlace Web Conferencing interface.

You can attach a maximum of 16 web servers (including both internal and external clusters) to a single Cisco Unified MeetingPlace Audio Server system. The two databases (one for the internal cluster, one for the external cluster) must have identical GUIDS.

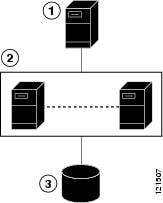
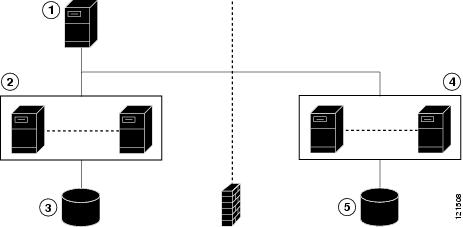
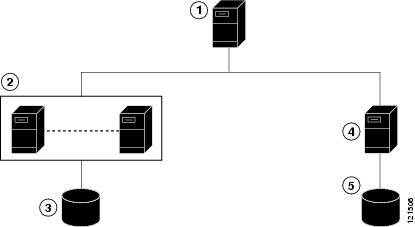
Cisco Unified MeetingPlace Web Conferencing supports five potential load balancing configurations, as shown in Figure 4-1, Figure 4-2, and Figure 4-3.

Figure 4-1 One Cluster Configuration

:

1

Cisco Unified MeetingPlace Audio Server system.

2

Cisco Unified MeetingPlace web server cluster—This can be an internal cluster or external cluster.

3

SQL Server—All web servers in a cluster must connect to the same SQL Server.


Figure 4-2 Mixed Configuration: Internal and External Clusters of Web Servers

1

Cisco Unified MeetingPlace Audio Server system.

2

Internal cluster of web servers—You can have up to six web servers in a cluster.

3

SQL Server—All web servers in the internal cluster must connect to the same SQL Server.

4

External cluster of web servers—You can have up to six web servers in a cluster.

5

SQL Server—All web servers in the external cluster must connect to the same SQL Server.


Figure 4-3 Mixed Configuration: One Web Server and a Cluster of Web Servers

1

Cisco Unified MeetingPlace Audio Server system.

2

Cluster of web servers—This can be an internal cluster or an external cluster.

3

SQL Server—All web servers in a cluster must connect to the same SQL Server.

4

Single web server—This can be an internal or external web server.

5

SQL Server—The single web server must connect to a separate SQL Server.


Load Balancing Behaviors in Cisco Unified MeetingPlace Web Conferencing

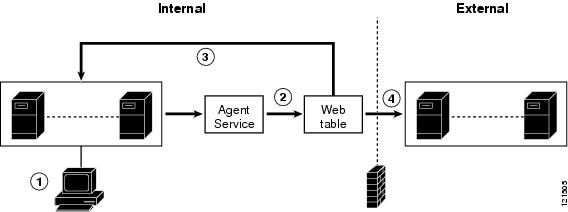
All users attend a Cisco Unified MeetingPlace web conference by opening their browsers and signing in through the Cisco Unified MeetingPlace Web Conference home page. When the first meeting participant attempts to join the web conference, the Cisco MeetingPlace Agent Service determines if the meeting should be held on an internal web server or external web server by checking the Allow Internet Access parameter. This parameter is only visible if your Cisco Unified MeetingPlace system has an external site or cluster configured. Table 4-1 describes load-balancing behaviors for load-balancing configuration options.

Table 4-1 Load Balancing Behavior in Cisco Unified MeetingPlace Web Conferencing

If
Then

Allow Internet Access is set to No

This meeting is reserved for internal attendees only. When the first attendee launches the meeting console, the Agent Service directs the web-conferencing session to the least busy web server in the internal cluster. This web server now owns the meeting. All subsequent attendees are directed to this server for their web conference.

Allow Internet Access is set to Yes

This meeting is accessible to external attendees, that is, participants attending from outside the firewall.

If the first attendee attempts to join the web conference from an external web server, the Agent Service finds the least busy web server in the external cluster. The web-conferencing session is directed to that server, which now owns the meeting.

If the first attendee attempts to join the web conference from an internal web server, the Agent Service determines if it has an associated external web server. Such information is found on the Web Server Properties administrative page in the DMZ Web Server field.

If there is an entry in the DMZ Web Server field, the Agent Service performs a redirection to that external server.

If the Agent Service does not find an entry in the DMZ Web Server field, the web-conferencing session is directed to the least busy internal server as described for internal meetings. All subsequent attendees are directed to the same web server for their web conference.


Internal users can join both internal meetings and external meetings. If a meeting is designated as external, internal users who log in to an internal web server are redirected to an external web server.

External users can only join external meetings on external web servers.

Figure 4-4 External Meeting Redirection from an Internal to External Web Server

1. First user attempts to join the web conference.

2. The Agent Service checks the web table to determine where the meeting should be held.

3. If the meeting is internal, the Agent Service finds the least busy internal web server and directs the web-conferencing session to that server.

4. If the meeting is external (Internet-accessible), the Agent Service checks for an associated external web server. If it finds one, the web-conferencing session is redirected to this server.

Cisco Unified MeetingPlace Web Conferencing Load Balancing Algorithm

The current data-conferencing (DC) load balancing algorithm is as follows:

X = 0.5 * (CPUPercent * 0.6 + MemPercent * 0.4) + DCLoad * DCLoad, where the values for the factors are as follows:

CPUPercent—The value of the particular resource's usage on the web server as reported by Windows. This value ranges from 0 to 1 as a percent, for example, if 50%, then 0.5.

MemPercent—The value of the particular resource's usage on the web server as reported by Windows. This value ranges from 0 to 1 as a percent.

DCLoad—The percent of the total number of web or data conferencing (DC) users. This value ranges from 0 to 1 as a percent.

X—The load balancing factor. The X value is calculated for each server, and the server with the lowest score hosts the meeting.

Suggestions for a Robust Cisco Unified MeetingPlace System

To ensure a robust system with redundancy and failover, we recommend that you have the following:

An internal web cluster

An external web cluster

Multiple remote SQL Servers in the form of an SQL farm

Remote storage location with RAID5 and a comprehensive backup policy

About Installing Cisco Unified MeetingPlace Web Conferencing Release 5.3 in a Load Balancing Configuration for Video-Enabled Systems

Cisco Unified MeetingPlace Web Conferencing limits video functionality to one web server. It is important to consider this limitation when configuring load balancing in video-enabled systems.

Before you configure Cisco Unified MeetingPlace Web Conferencing load balancing in video-enabled systems, you should understand the following concepts:

Default Behavior of Load Balancing in Video-Enabled Systems

Video Meetings in Segmented Meeting Access Deployments

SQL Server Considerations

End-User Considerations

Default Behavior of Load Balancing in Video-Enabled Systems

If your Cisco Unified MeetingPlace Audio Server system is licensed for video, all of the web servers connected to it will display video-related fields. These fields appear on the following pages for those users who have video scheduling privileges and allow such users to schedule their meetings from any web server:

New Meeting scheduling page

Meeting Details pages

Account Basics page

If a meeting is scheduled with video ports, the web-conferencing component is always held on the web server that has the Cisco Unified MeetingPlace Video Integration installed. If that server goes down, the meeting rolls to another web server after 5 * Load Stats Poll Period (default equals 5 minutes). Since the second web server does not have the video integration installed, video functionality from the meeting console is disabled.

Video Meetings in Segmented Meeting Access Deployments

Cisco Unified MeetingPlace Web Conferencing supports two segmented meeting access deployments that allow web conferences to be held on both internal and external web servers. For more information on these deployments, see "Installing Cisco Unified MeetingPlace Web Conferencing for a Segmented Meeting Access Configuration."

In a Segmented Meeting Access-1 Server (SMA-1S) deployment, users with access to the video MCU can schedule both internal and external video meetings from the Web.

In a Segmented Meeting Access-2 Server (SMA-2S) deployment, the following rules apply:

If...
Then...

The video integration is deployed on an internal web server.

Users can schedule internal video-enabled meetings from the Web. Requests to schedule external video meetings are denied.

When scheduling meetings, users must make sure the Allow Internet Access parameter on the New Meeting scheduling page is set to No. Setting it to Yes results in failed scheduling requests.

System administrators and users with System Manager privileges can still schedule external video meetings from MeetingTime, but users may not see video features when attending from the Web.

The video integration is deployed on an external web server.

Users can schedule external video meetings from the Web. Requests to schedule internal video meetings are denied.


SQL Server Considerations

If you have multiple SQL Server databases, keep the following considerations in mind:

If a video-enabled web server is in an internal cluster, all web servers connected to it must share the same SQL Server database.

Web servers that do not conform to this configuration are not visible to the shared SQL Server database and are considered external to the video-enabled web server. Users attempting to schedule internal video meetings from these web servers are denied. They are, however, able to schedule external video meetings by setting the Allow Internet Access parameter to Yes.

End-User Considerations

If users attempts to use their video endpoints to dial in to a meeting that is hosted on a web server without the video integration installed, the request to dial in to the meeting can succeed and a video meeting can be created. However, video features will not be available in the meeting console for that meeting.

Preinstallation Tasks: Cisco Unified MeetingPlace Web Conferencing Release 5.3 in a Load Balancing Configuration

This section contains the following procedures:

Understanding the Cisco Unified MeetingPlace Web Conferencing Installation and Load Balancing Configuration Process

Preparing the Internal Cluster

Preparing the External Cluster

Creating a Common Storage Location

Understanding the Cisco Unified MeetingPlace Web Conferencing Installation and Load Balancing Configuration Process

This section provides an overview of how to install Cisco Unified MeetingPlace Web Conferencing with load balancing. Complete only the steps that are relevant to your configuration.

Before You Begin

Read the "About Installing Cisco Unified MeetingPlace Web Conferencing Release 5.3 in a Load Balancing Configuration" section.

(Optional) If necessary, read the "About Installing Cisco Unified MeetingPlace Web Conferencing Release 5.3 in a Load Balancing Configuration for Video-Enabled Systems" section.

When you install multiple web servers, make sure that you synchronize the Purge parameters. For more information, see the "About the MeetingNotes Purge Parameter and SMA-2S Configurations" section in Chapter 3 of the Configuration Guide for Cisco Unified MeetingPlace Web Conferencing Release 5.3.

Procedure


Step 1 Prepare the internal cluster, external cluster, and common storage locations for your installation.

For instructions, see the following sections:

Preparing the Internal Cluster.

Preparing the External Cluster

Creating a Common Storage Location

Step 2 Install the first internal web server.

For instructions, see the "Installing the First Internal Web Server" section.

Step 3 Configure services for the first internal web server.

For instructions, see the "Configuring Services for the First Internal Web Server" section.

Step 4 Install additional internal web servers sequentially and configure services.

For instructions, see the "Installing Additional Internal Web Servers" section.

Step 5 Copy GUIDS from the first internal web server to the first external web server.

For instructions, see the "Copying GUIDS From the Internal to the External Web Server" section.

Step 6 Install the first external web server.

For instructions, see the "Installing the First External Web Server" section.

Step 7 Configure services for the first external web server.

For instructions, see the "Configuring Services for the First External Web Server" section.

Step 8 Install additional external web servers sequentially and configure services.

For instructions, see the "Installing Additional External Web Servers" section.

Step 9 Configure redirection of public meetings.

For instructions, see the "Configuring Redirection of External Meetings" section.

Step 10 (Optional) If one of your web servers has Cisco Unified MeetingPlace Video Integration installed, review the information on load balancing video-enabled systems.

See the "About Installing Cisco Unified MeetingPlace Web Conferencing Release 5.3 in a Load Balancing Configuration for Video-Enabled Systems" section.


Preparing the Internal Cluster

Before You Begin

Review the "Load Balancing Requirements" section in the Release Notes for your release of Cisco Unified MeetingPlace Web Conferencing.

Restrictions

Remember that restrictions can lower the maximum number of web servers permitted per cluster. For more information, contact your Cisco support representative.

Procedure


Step 1 Determine and create a common domain Windows administration account.

This account is used by all of the web servers in this cluster. It starts Cisco Unified MeetingPlace Web Conferencing services and allows all web servers in this cluster to access the shared storage location by using a Universal Naming Convention (UNC) path.

After creating this account, enter the value here:_____________________________________


Note Enter different values for your internal and external clusters.


Step 2 Determine and create a common storage location.

You can create this folder on the same machine as your first internal web server, or on a separate machine. Keep in mind that this common storage location is where attachments are stored and, therefore, where all web servers in this cluster go to find attachments. For more information, see the "Creating a Common Storage Location" section.

Enter this value in the space provided as a UNC path, that is, \\servername\shared folder\MPWeb\Meetings.

Common storage location (attachments):___________________________________________

Step 3 (Optional) Determine common storage locations for audio files.

If you are doing audio conversions, we recommend that you separate the encoded audio files from the rest of the meeting's associated attachments by determining common storage locations for the audio files.

When created, change these folders to "shared folder" status and enter the locations below.

Common storage locations (audio files): ___________________________________________

Windows Media:______________________________________________________________

MP3:_______________________________________________________________________


Preparing the External Cluster

Before You Begin

(Optional) Read "Installing Cisco Unified MeetingPlace Web Conferencing for a Segmented Meeting Access Configuration" to understand the difference between internal and external servers.

Procedure


Step 1 Determine and create a common domain Windows administration account.

This account is used by all of the web servers in this cluster. It starts Cisco Unified MeetingPlace Web Conferencing services and allows all web servers in this cluster to access the shared storage location using a UNC path.

After creating this account, enter the value here:______________________________________


Note Enter different values for your internal and external clusters.


Step 2 Determine and create a common storage location.

You can create this folder on the same machine as your first external web server, or on another machine. Keep in mind that this common storage location is where attachments are stored and, therefore, where all web servers in this cluster go to find attachments. For more information, see the "Creating a Common Storage Location" section.

Enter this value in the space provided as a UNC path, that is, \\servername\shared folder\MPWeb\Meetings.

Common storage location (attachments):____________________________________________

Step 3 (Optional) Determine common storage locations for audio files.

If you are doing audio conversions, we recommend that you separate the encoded audio files from the rest of the meeting's associated attachments by determining common storage locations for the audio files.

When created, change these folders to "shared folder" status and enter the locations below.

Common storage locations (audio files): ___________________________________________

Windows Media: _____________________________________________________________

MP3:_______________________________________________________________________


Creating a Common Storage Location

Each web server cluster requires a common storage location. The common storage location can be on the same machine as the first web server in your cluster, or on another machine. As an example, the following procedure uses a shared folder called Web_data on the first web server in the cluster.

Procedure


Step 1 Create a folder called drive:\Web_data and change it to a shared folder.

Step 2 From drive:\Web_data, create a folder called MPWeb.

Step 3 From drive:\Web_data\MPWeb, create a folder called Meetings. You should now have the following directory structure:

drive:\Web_data

drive:\Web_data\MPWeb

drive:\Web_data\MPWeb\Meetings


Installation Tasks: Cisco Unified MeetingPlace Web Conferencing Release 5.3 in a Load Balancing Configuration

Topics in this section include:

Installing the First Internal Web Server

Configuring Services for the First Internal Web Server

Installing Additional Internal Web Servers

Copying GUIDS From the Internal to the External Web Server

Installing the First External Web Server

Configuring Services for the First External Web Server

Installing Additional External Web Servers

Configuring Redirection of External Meetings

Installing the First Internal Web Server

Before You Begin

Read "Installing Cisco Unified MeetingPlace Web Conferencing Release 5.3" and have it available to assist you with this procedure.

Complete the "Preparing the Internal Cluster" section.

Procedure


Step 1 Install Cisco Unified MeetingPlace Web Conferencing on the first internal machine.

For Server Location, choose Internal (Full Access).

For Database Location, do one of the following:

If there is a full SQL Server installed elsewhere, choose Existing remote server.

To have the installer install SQL Server 2000 on this machine for you, choose Local server.

When you reach the final installer window, choose to restart your computer later; then, click Finish.

Step 2 Configure the attachment location and SSL option for this web server.

a. Open your web browser to access the Cisco Unified MeetingPlace Web Conferencing home page.

b. Use your System Manager-level user ID and password to sign in.

c. Click Admin; then, Web Server.

d. From the "View" section of the page, click the name of the web server you just installed.

e. For Attachment Location, enter the path of the common storage location in the form of a UNC path, that is, \\servername\sharedfolder\MPWeb\Meetings.

This is the value you entered in Step 2 of the "Preparing the Internal Cluster" section.

f. For Require SSL, indicate if the web server is configured for an SSL connection by choosing Yes, No, or Either.

Either means that this web server can support both SSL and non-SSL connections.

For more information about SSL, see the "How to Configure Secure Sockets Layer" section in Chapter 6 of the Configuration Guide for Cisco Unified MeetingPlace Web Conferencing Release 5.3.

g. Click Submit; then, close your browser.

Step 3 Proceed to the "Configuring Services for the First Internal Web Server" section.


Configuring Services for the First Internal Web Server

Before You Begin

Complete the "Installing the First Internal Web Server" section.

Procedure


Step 1 Stop the Cisco MeetingPlace Web Conferencing service.

a. In the Windows Services control panel, right-click Cisco MeetingPlace Web Conferencing.

b. Choose Stop.

Step 2 Move the Meetings folder from the MPWeb directory to the common storage location of the internal cluster.

a. Cut the Meetings folder from drive:\Program Files\Cisco Systems\MPWeb.

b. Paste the Meetings folder in to drive:\Web_data\MPWeb.

c. You should now have the following directory structure: drive:\Web_data\MPWeb\Meetings.

Step 3 From the MPWeb directory, create a new virtual directory called Meetings and map it to the UNC path.

a. Open IIS to Default Web Site and open the MPWeb directory.

If there is a Meetings folder in the MPWeb directory, delete the folder.

The Meetings folder is already gone if you moved it in Step 2.

b. In the MPWeb directory, create a new virtual directory called Meetings.

c. Right-click the MPWeb folder and choose New > Virtual Directory.

d. For Alias, enter Meetings.

e. For Directory, enter the path to the common storage location using the UNC path specification.

This value must equal the value you entered in the Web Server administrative page's Attachment Location field in the "Installing the First Internal Web Server" section.

f. For User Name, enter the username of the common domain Windows administration account or click Browse to choose it from a list.

The common domain Windows administration account is the account you created in Step 1 of the "Preparing the Internal Cluster" section.

g. For Password, enter the password you created for the common domain Windows administration account.

h. Confirm the password and click OK.

i. For Access Permissions, click Script and executable to uncheck it.

j. Click Finish.

Step 4 In the Windows Services control panel, change the following services to Log On As by using the common Windows administration account:

Cisco MeetingPlace Agent Service

Cisco MeetingPlace Audio Service

Cisco MeetingPlace Conferencing Gateway

Cisco MeetingPlace Conversion Agent

Cisco MeetingPlace Replication Service

Cisco MeetingPlace Web Conferencing

Step 5 Configure registry keys.

a. Open regedit and navigate to HKEY_LOCAL_MACHINE\SOFTWARE\Data Connection\DCMS\Admin.

b. If the UserReset registry key exists, delete it. Do not simply blank out the value of the key.

c. Set the following registry keys to ensure that Cisco Unified MeetingPlace Web Conferencing services from this web server are able to access the common storage location:

Registry Key
Action

UserDomain

Change it to the domain or workgroup that owns your common Windows administration account.

UserName

Enter the Windows administration user account name.

UserPassword

Enter the Windows administration user account password.

FileServer

Change it to match your Attachment Location value.


d. Reboot this machine.

Step 6 Proceed to the next task as follows:

If you have additional internal web servers, proceed to the "Installing Additional Internal Web Servers" section.

If you do not have additional internal web servers, proceed to the "Copying GUIDS From the Internal to the External Web Server" section.


Installing Additional Internal Web Servers

Before You Begin

Complete the "Installing the First Internal Web Server" section and the "Configuring Services for the First Internal Web Server" section.

Restrictions

When installing two or more web servers that share a single database and point to the same Cisco Unified MeetingPlace Audio Server system, the MeetingPlace Server hostname that you specify during the installation of all web servers must match. By default if the MeetingPlace Server hostnames do not match, a second site is created with a WebConnect configuration.

Procedure


Step 1 Install Cisco Unified MeetingPlace Web Conferencing on the next machine in your internal cluster.

For Server Location, choose Internal (Full Access).

For Database Location, choose Existing remote server and specify the SQL Server that you used in the "Installing the First Internal Web Server" section.

Step 2 Configure the attachment location and SSL option for the web server.

Complete Step 2 in the "Installing the First Internal Web Server" section.

Step 3 Stop the Cisco MeetingPlace Web Conferencing service.

a. From the Windows Services control panel, right-click Cisco MeetingPlace Web Conferencing.

b. Choose Stop.

Step 4 Configure Cisco Unified MeetingPlace Web Conferencing services.

Complete Step 3 to Step 5 in the "Configuring Services for the First Internal Web Server" section.

Step 5 Repeat the steps in this procedure until you have installed all of your internal web servers.

Step 6 Proceed to the "Copying GUIDS From the Internal to the External Web Server" section.


Copying GUIDS From the Internal to the External Web Server

The GUIDS entries for site and system must match between internal and external web servers. Make sure that you run the GUIDS.reg file on each external web server before installing Cisco Unified MeetingPlace Web Conferencing.


Caution You must complete this step before running the Cisco Unified MeetingPlace Web Conferencing installer on the external web server. If this step is skipped or completed incorrectly, Presentation mode will not work for internal users in external meetings, and recovering from this problem requires that you rebuild the SQL Server database.

Before You Begin

Complete installing and configuring at least one internal Cisco Unified MeetingPlace web server.

Procedure


Step 1 Copy the GUIDS.reg file from the internal web server (located in drive:\Program Files\Cisco Systems\MPWeb).

Step 2 Place the GUIDS.reg file in the external web server's drive:\Temp directory.

Step 3 To install the GUIDS.reg file on the external web server, double-click it.

Step 4 When prompted to add the information from the GUIDS.reg file to the registry, click OK.

Step 5 Proceed to the "Installing the First External Web Server" section.


Installing the First External Web Server

Before You Begin

Read "Installing Cisco Unified MeetingPlace Web Conferencing Release 5.3" and have it available to assist you with this procedure.

Complete the "Preparing the External Cluster" section.

Complete the "Copying GUIDS From the Internal to the External Web Server" section.


Note The GUIDS entries for site and system must match between internal and external web servers. Make sure that you run the GUIDS.reg file on each external web server before installing Cisco Unified MeetingPlace Web Conferencing.


Procedure


Step 1 Install Cisco Unified MeetingPlace Web Conferencing on the first web server in your external cluster.

For Server Location, choose External (Limited Access).

For Database Location, do one of the following:

If the SQL Server is installed locally, choose Local server.

If there is a full SQL Server installed elsewhere, choose Existing remote server

When you reach the final installer window, choose to restart your computer later; then, click Finish.

Step 2 Copy and paste the GUIDS.reg file.

a. Navigate to drive:\Temp.

b. Copy the GUIDS.reg file.

c. Paste the GUIDS.reg file in drive:\Program Files\Cisco Systems\MPWeb.

This replaces the GUIDS.reg file that the installer created.

d. For changes to take effect, restart your server.

Step 3 Configure the attachment location and SSL option for the web server:

a. Open your browser and enter http://server/mpweb/admin/ where server is the name of the external web server that you want to access.

b. Sign in by using your System Manager-level user ID and password.

c. Click Admin; then, Web Server.

d. From the "View" section of the page, choose the web server that you want to modify.

Information about this server populates the "Edit" section of the page.

e. For Attachment Location, enter the path of the common storage location in the form of a UNC path, that is, \\servername\sharedfolder\MPWeb\Meetings.

This is the value you entered in Step 2 of the "Preparing the External Cluster" section.

f. For Require SSL, indicate if this web server is configured for an SSL connection (https://) by choosing Yes, No, or Either.

Either means that this web server can support both SSL and non-SSL connections.

For more information about SSL, see the "How to Configure Secure Sockets Layer" section in Chapter 6 of the Configuration Guide for Cisco Unified MeetingPlace Web Conferencing Release 5.3.

g. Click Submit and close your browser.

Step 4 Proceed to the "Configuring Services for the First External Web Server" section.


Configuring Services for the First External Web Server

Before You Begin

Complete the instructions in the "Installing the First External Web Server" section.

Procedure


Step 1 Stop all Cisco Unified MeetingPlace Web Conferencing services:

a. From the Windows Services control panel, right-click Cisco MeetingPlace Web Conferencing.

b. Choose Stop.

Step 2 Move the Meetings folder from the MPWeb directory to the common storage location of the external cluster:

a. Cut the Meetings folder from drive:\Program Files\Cisco Systems\MPWeb.

b. Paste the Meetings folder in to drive:\Web_data\MPWeb.

You should now have the following directory structure: drive:\Web_data\MPWeb\Meetings.


Note Ensure that the common storage location for the internal cluster and external cluster are different.


Step 3 From the MPWeb directory, create a new virtual directory called Meetings and map it to the UNC path:

a. Open IIS to Default Web Site and open the MPWeb directory.

If there is a Meetings folder under the MPWeb directory, delete the folder.

The Meetings folder will already be gone if you physically moved it in Step 2.

b. From the MPWeb folder, right-click and then choose New > Virtual Directory.

c. For Alias, enter Meetings.

d. For Directory, enter the path to the common storage location using the UNC path specification.

This value must equal the value that you entered in the Web Server administrative page's Attachment Location field in the "Installing the First External Web Server" section.

e. For User Name, enter the username of the common domain Windows administrator account or click Browse to choose it from a list.

The is the account that you created in Step 1 of the "Preparing the External Cluster" section.

f. For Password, enter the password you created for the common domain Windows administrator account.

g. Confirm the password and click OK.

h. For Access Permissions, click Script and executable to uncheck it.

i. Click Finish.

Step 4 From your Windows Services control panel, change the following services to Log On As by using the common Windows administrator account:

Cisco MeetingPlace Agent Service

Cisco MeetingPlace Audio Service

Cisco MeetingPlace Conferencing Gateway

Cisco MeetingPlace Conversion Agent

Cisco MeetingPlace Replication Service

Cisco MeetingPlace Web Conferencing

Step 5 Modify registry keys:

a. Open regedit and navigate to HKEY_LOCAL_MACHINE\SOFTWARE\Data Connection\DCMS\Admin.

b. If there is a UserReset registry key, delete it. Do not simply blank out the value of the key.

c. Set the following registry keys to ensure that Cisco Unified MeetingPlace Web Conferencing services from this web server are able to access the common storage location:

Registry Key
Action

UserDomain

Change it to the domain or workgroup that owns your common Windows administrator account.

UserName

Enter the Windows admin user account name.

UserPassword

Enter the Windows admin user account password.

FileServer

Change it to match your Attachment Location value.


d. Reboot the server.

Step 6 (Optional) If you have additional external web servers, proceed to the "Installing Additional External Web Servers" section.


Installing Additional External Web Servers

Before You Begin

Complete both the "Installing the First External Web Server" section and the "Configuring Services for the First External Web Server" section.

Make sure that the GUIDS.reg file from the first internal web server is copied to each external web server.


Note The GUIDS entries for site and system must match between internal and external web servers. Make sure that you run the GUIDS.reg file on each external web server before installing Cisco Unified MeetingPlace Web Conferencing.


Procedure


Step 1 Install Cisco Unified MeetingPlace Web Conferencing on the next external web server.

For Server Location, choose External (Limited Access).

For Database Location, choose Existing remote server and specify the SQL Server used in the "Installing the First External Web Server" section.

When you reach the final installer window, choose to restart your computer later; then, click Finish.

Step 2 Copy and paste the GUIDS.reg file:

a. Navigate to drive:\Temp.

b. Copy the GUIDS.reg file.

c. Paste the GUIDS.reg file in to drive:\Program Files\Cisco Systems\MPWeb.

This replaces the GUIDS.reg file that the installer created.

d. For changes to take effect, restart your server.

Step 3 Define the attachment location and SSL option for the web server.

Complete Step 3 in the "Installing the First External Web Server" section.

Step 4 Stop all Cisco Unified MeetingPlace Web Conferencing services:

a. From the Windows Services control panel, right-click Cisco MeetingPlace Web Conferencing.

b. Choose Stop.

Step 5 Configure Cisco Unified MeetingPlace Web Conferencing services.

Complete Step 3 to Step 5 in the "Configuring Services for the First External Web Server" section.

Step 6 Repeat the steps in this procedure until you have installed all the external web servers.


Configuring Redirection of External Meetings

External meetings are held on an external web server so that users can access their meetings from the Internet. Rather than have all of your users log in to a particular external web server, configure automatic redirection of all external meetings from your internal web servers to a designated external web server.

Before You Begin

You must have properly installed Cisco Unified MeetingPlace Web Conferencing on all of your internal and external web servers.

Procedure


Step 1 From the internal web server, sign in to Cisco Unified MeetingPlace Web Conferencing.

Step 2 From the Welcome page, click Admin; then, Web Server.

Step 3 From a blank Web Server Name field, enter the name of a new web server to represent your designated external web server.

Step 4 For Hostname, enter the fully qualified domain name (FQDN) of your external web server, that is, hostname.domain.com. If your web server is not in a Domain Name Server (DNS), enter the IP address instead.

You must be able to resolve this hostname from the internal web server.

If you are using SSL, make sure that the hostname on the SSL certificate resolves to the external web server's IP address.

If you are using SSL and a segmented DNS, make sure that the DNS name and the SSL certificate name differ.

Step 5 To add this web server to the database, click Submit.

This server now appears as part of your list of web servers on the bottom portion of the page.

If you only have one internal web server and one external web server, stop here.

If you have more than one internal web server, proceed to Step 6.

Step 6 Return to the main Admin page and click Site.

The Site administrative page appears.

Step 7 Click the Site Name that represents your cluster of internal web servers.

There should only be one site indicated on this page unless you deployed WebConnect.

Site Name should have a default value equal to the NetBIO name of the first web server you installed in this cluster.

Step 8 For DMZ Web Server, choose the external web server you just added.

This configures the internal web servers in this cluster to point to this external web server in the case of external meetings.

Step 9 Click Submit.


Tip The external cluster does not require any additional SQL Server database configurations.


Postinstallation Tasks: Cisco Unified MeetingPlace Web Conferencing Release 5.3 in a Load Balancing Configuration

Topics in this section include:

Configuring Ad-Hoc Video Meetings

Viewing the Amount of Web-Conferencing Load on a Server

Disabling Load Balancing

Configuring Ad-Hoc Video Meetings

Ad-hoc video meetings are controlled by a setting on the Site administrative page. This setting is called "Allow Web Load Balancing in Ad Hoc Video Meetings" and defaults to No.

When set to No, the system forces all meetings scheduled by users with video scheduling privileges on the video-enabled web server. Therefore, if the user wants to start an ad-hoc video meeting, resources are available. We recommend this setting.

When you choose Yes, if a user with video scheduling privileges schedules a zero-video-port meeting, it is load-balanced across all appropriate servers. Video features therefore depend on whether the web portion of the meeting lands on the web server with the video integration installed. If it does, ad-hoc video works successfully. If it does not, video features are not available from the meeting console.

Restrictions

If you have Cisco Unified MeetingPlace Video Integration installed in a web server cluster that does not have load balancing configured, leave "Allow Web Load Balancing in Ad Hoc Video Meetings" set to No.

Procedure


Step 1 Sign in to Cisco Unified MeetingPlace Web Conferencing.

Step 2 From the Welcome page, click Admin; then, Site.

Step 3 For Allow Web Load Balancing in Ad Hoc Video Meetings, choose No or Yes.


Viewing the Amount of Web-Conferencing Load on a Server

The amount of web-conferencing load on a web server is indicated in the Current Server Load Index field as a number between 0 and 1. This number is a weighed average among several factors, such as CPU, memory, and disk usage. The higher the value, the heavier the load on this web server.

Procedure


Step 1 Sign in to Cisco Unified MeetingPlace Web Conferencing.

Step 2 From the Welcome page, click Admin; then, Web Server.

Step 3 From the "View" section of the page, locate the web server you want to view.

The amount of web-conferencing load on this web server is indicated in the Current Server Load Index field.


Disabling Load Balancing

Procedure


Step 1 Sign in to Cisco Unified MeetingPlace Web Conferencing.

Step 2 From the Welcome page, click Admin; then, Web Server.

Step 3 From the "View" section of the page, click the name of the web server you want to remove from load balancing.

Information about this server populates the "Edit" section of the page.

Step 4 Set Web Conference Active to No.

Step 5 Click Submit.