-
Cisco CallManager System Guide, Release 4.1(3)
-
Index
-
Preface
-
Introduction
-
Cisco IP Telephony Overview
-
System Configuration Overview
-
Multilevel Administration Access
-
System-Level Configuration Settings
-
Clustering
-
Redundancy
-
Call Admission Control
-
Cisco TFTP
-
Device Support
-
Services
-
Auto-Registration
-
Partitions and Calling Search Spaces
-
Time-of-Day Routing
-
Understanding Route Plans
-
Application Dial Rules Overview
-
Understanding the Directory
-
Managing User Directory Information
-
Media Resource Management
-
Annunciator
-
Conference Bridges
-
Transcoders
-
Music On Hold
-
Media Termination Points
-
Cisco DSP Resources for Transcoding, Conferencing, and MTP
-
Voice Mail Connectivity to Cisco CallManager
-
SMDI Voice Mail Integration
-
Cisco Unity Messaging Integration
-
Cisco DPA Integration
-
Call Park
-
Call Pickup and Group Call Pickup
-
Cisco IP Phone Services
-
Cisco CallManager Extension Mobility and Phone Login Features
-
Cisco CallManager Attendant Console
-
Cisco IP Manager Assistant
-
Understanding Cisco CallManager Voice Gateways
-
Understanding IP Telephony Protocols
-
Understanding Session Initiation Protocol (SIP)
-
Understanding Cisco CallManager Trunk Types
-
Cisco IP Phones
-
Understanding Video Telephony
-
Computer Telephony Integration
-
Cisco ATA 186 and Cisco ATA 188
-
Administrative Tools Overview
-
Administrative Accounts and Passwords
-
 Feedback
Table Of Contents
System-Level Configuration Settings
Survivable Remote Site Telephony References
System Configuration Checklist
Where to Find More Information
System-Level Configuration Settings
Configure system-level settings before you add devices and configure other Cisco CallManager features. This section covers the following topics:
•
Survivable Remote Site Telephony References
•
•
Cisco CallManager Groups
A Cisco CallManager group comprises a prioritized list of up to three Cisco CallManagers. The first Cisco CallManager in the list serves as the primary Cisco CallManager for that group, and the other members of the group serve as secondary (backup) Cisco CallManagers.
Cisco CallManager groups associate with devices through device pools. Each device belongs to a device pool, and each device pool specifies the Cisco CallManager group for all of its devices.
Note
Cisco CallManager groups provide two important features for your system:
•
Note
•
For most systems, you will assign a single Cisco CallManager to multiple groups to achieve better load distribution and redundancy.
Date/Time Groups
Use Date/Time Groups to define time zones for the various devices that are connected to Cisco CallManager.
Cisco CallManager provides a default Date/Time Group called CMLocal that configures automatically when you install Cisco CallManager; however, Cisco recommends that you configure a group for each local time zone. CMLocal synchronizes to the active date and time of the operating system on the Cisco CallManager server. After installing Cisco CallManager, you can change the settings for CMLocal as desired. Normally, you adjust the server date/time to the local time zone date and time.
Note
Tip
You cannot delete a Date/Time Group that any device pool uses. If you try to delete a Date/Time Group that is in use, Cisco CallManager displays an error message. To find out which device pools use the Date/Time Group, click the Dependency Records link on the Date/Time Group Configuration window. Before deleting a Date/Time Group that is currently in use, you must perform either or both of the following tasks:
•
•
Device Defaults
Use device defaults to set the default characteristics of each type of device that registers with a Cisco CallManager. The device defaults for a device type apply to all devices of that type within a Cisco CallManager cluster. Default settings for devices include
•
•
•
When a device auto-registers with a Cisco CallManager, it acquires the device default settings for its device type. After a device registers, you can update its configuration individually to change the device settings.
Installing Cisco CallManager automatically sets the device defaults. You cannot create new device defaults or delete existing ones, but you can change the default settings.
Cisco IP Phone models 7910, 7940, 7960, and 7970 have image authenticated phone loads, which are included with Cisco CallManager. Authenticated phone loads, called signed loads, comprise firmware images in the phones and as such are listed as the device default for each of these phones in the Device Defaults Configuration window.
Before updating the device defaults, perform any of the following tasks that apply to your system:
•
For example, for the firmware load P002A0305556, a file named P002A0305556.bin resides in the TFTPPath folder.
•
•
Regions
When you create a region, you specify the codec that can be used for calls between devices within that region, and between that region and other regions. The system uses regions also for applications that only support a specific codec; for example, an application that only uses G.711.
The audio codec type specifies the technology that is used to compress and decompress voice signals. The choice of audio codec determines the compression type and amount of bandwidth that is used per call. See Table 5-1 for specific information about bandwidth usage for available audio codecs.
The default audio codec for all calls through Cisco CallManager specifies G.711. If you do not plan to use any other audio codec, you do not need to use regions.
Regions prove useful for Cisco CallManager multisite deployments where you may need to limit the bandwidth for individual calls that are sent across a WAN link, but where you want to use a higher bandwidth for internal calls.
To specify audio codec usage for devices using regions, you must
•
•
•
Note
See the "Device Pools" section for more information about device pool settings. For information about codes and video calls, see Understanding Video Telephony.
Supported Audio Codecs and Bandwidth Usage
Cisco CallManager supports the following audio codecs for use with the regions feature:
•
•
•
•
•
•
•
Regions that specify wideband as the codec type must have a large amount of network bandwidth available because wideband uses four times as much bandwidth as G.7ll.
The total bandwidth that is used per call stream depends on the audio codec type as well as factors such as data packet size and overhead (packet header size), as indicated in Table 5-1. (The bandwidth information provided in Table 5-1 applies for ethernet.)
Note
Table 5-1 Bandwidth Used Per Call by Each Codec Type
G.711
64 kbps
80 kbps
88 kbps
G.723
6 kbps
24 kbps
Not applicable
G.729
8 kbps
24 kbps
32 kbps
Wideband1
256 kbps
272 kbps
280 kbps
GSM2
13 kbps
29 kbps
37 kbps
1 Uncompressed. Cisco CallManager supports wideband audio from IP phone to IP phone for Cisco IP Phone 7900 Family model phones only.
2 Global system for mobile communications.
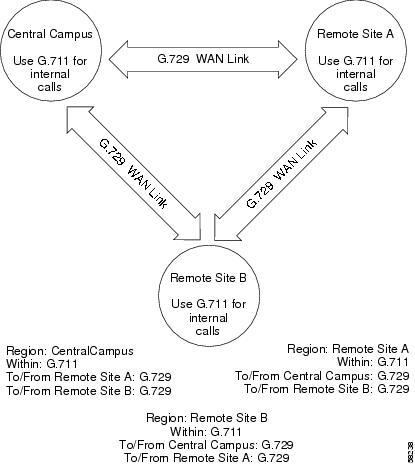
Example
Figure 5-1 shows a very simple region configuration example for deployment with a central site and two remote branches. In the example, an administrator configures a region for each site. The G.711 codec equals the maximum bandwidth codec that is used for calls within each site, and the G.729 codec equals the maximum bandwidth codec that is used for calls between sites across the WAN link.
After region configuration, the administrator assigns devices to the following sites:
•
•
•
Figure 5-1 Simple Region Example
Locations and Regions
In Cisco CallManager, locations-based call admission control works in conjunction with regions to define the characteristics of a network link. Regions define the type of codec that is used on the link (and therefore, the amount of bandwidth that is used per call), and locations define the amount of available bandwidth for the link. You must assign each device on the network to both a region (by means of a device pool) and a location. See the "Call Admission Control" section.
Modifying or Deleting Regions
When you update region settings, the changes do not take effect until you restart the devices that use that region.
You cannot delete a region that any device pool uses. If you try to delete a region that is in use, Cisco CallManager displays an error message. To find out which device pools are using the region, click the Dependency Records link on the Region Configuration window. Before deleting a region that is currently in use, you must perform either or both of the following tasks:
•
•
Device Pools
Device pools provide a convenient way to define a set of common characteristics that can be assigned to devices. You can specify the following device characteristics for a device pool:
•
•
•
•
•
•
•
•
•
•
Note
•
•
•
–
–
–
You must configure the preceding items before you configure a device pool if you want to choose the items for the device pool.
After adding a new device pool to the database, you can use it to configure devices such as Cisco IP Phones, gateways, conference bridges, transcoders, media termination points, voice-mail ports, CTI route points, and so on.
If using auto-registration, you can assign all devices of a given type to a device pool, by using the Device Defaults window in Cisco CallManager Administration. See the "Device Defaults" section for more information.
Updating Device Pools
If you make changes to a device pool, you must reset the devices in that device pool before the changes will take effect.
You cannot delete a device pool that has been assigned to any devices or one that is used for Device Defaults configuration. To find out what devices are using the device pool, click the Dependency Records link in the Device Pool Configuration window. If you try to delete a device pool that is in use, an error message displays. Before deleting a device pool that is currently in use, you must perform either or both of the following tasks:
•
•
Enterprise Parameters
Enterprise parameters provide default settings that apply to all devices and services in the same cluster. (A cluster comprises a set of Cisco CallManagers that share the same database.) When you install a new Cisco CallManager, it uses the enterprise parameters to set the initial values of its device defaults.
You cannot add or delete enterprise parameters, but you can update existing enterprise parameters. Enterprise parameters are general or specific; for example, General parameters, CDR parameters, and Feature parameters.
You can display additional descriptions for enterprise parameters through use of the i button on the Enterprise Parameters Configuration window.
Call Admission Control
Use call admission control to maintain a desired level of voice quality over a WAN link. For example, you can use call admission control to regulate the voice quality on a 56-kbps frame relay line that connects your main campus and a remote site.
Voice quality can begin to degrade when too many active calls exist on a link and the amount of bandwidth is oversubscribed. Call admission control regulates voice quality by limiting the number of calls that can be active on a particular link at the same time. Call admission control does not guarantee a particular level of audio quality on the link, but it does allow you to regulate the amount of bandwidth that is consumed by active calls on the link.
Cisco CallManager supports two types of call admission control:
•
•
Note
See the "Call Admission Control" section for more information.
Survivable Remote Site Telephony References
If an IP phone is in a remote part of the IP network (for instance, across a wide-area network from a Cisco CallManager) and the phone loses IP connectivity to the Cisco CallManager, preserving rudimentary call capability is desirable. Survivable remote site telephony (SRST) references provide limited call capability in this situation. Using SRST references, IP gateways can take over limited Cisco CallManager functionality. When phones lose connectivity to all associated Cisco CallManagers, the phones in a device pool attempt to make a Cisco CallManager connection to the SRST reference IP gateway.
The system administrator can configure the SRST configuration for a device pool of phones. The following list gives configuration options that are available:
•
•
•
The administrator defines SRST configurations in the SRST Reference Configuration window. Any of the preceding SRST configuration options can apply to a device pool. The Cisco TFTP reads the SRST configuration and provides it to the IP phone in a .cnf.xml file. The IP phone reacts appropriately to the SRST configuration.
Connection Monitor Duration
An IP phone connected to the SRST over a Wide Area Network (WAN) reconnects itself to Cisco CallManager as soon as it can establish a connection with Cisco CallManager over the WAN link. However, if the WAN link is unstable, the IP phone switches back and forth between the SRST and Cisco CallManager causing temporary loss of phone service (no dial tone). These reconnect attempts, known as WAN link flapping issues, continue until the IP phone successfully reconnects itself back to Cisco CallManager. These WAN link disruptions can be classified into two kinds: infrequent random outages that occur on an otherwise stable WAN and the sporadic, frequent disruptions that last a few minutes.
To resolve the WAN link flapping issues between Cisco CallManager and SRST, Cisco CallManager provides an enterprise parameter and a setting in the Device Pool Configuration window called Connection Monitor Duration. Depending upon system requirements, the administrator decides which parameter to use. The value of the parameter gets delivered to the IP phone in the XML configuration file.
The default for the enterprise parameter specifies 120 seconds. Use the enterprise parameter to change the connection duration monitor value for all IP Phones in the Cisco CallManager cluster.
Use the Device Pool Configuration window to change the connection duration monitor value for all IP Phones in a specific device pool.
For more information refer to Device Pool Configuration Settings in the Cisco CallManager Administration Guide.
For information on configuring security for the SRST reference and the SRST-enabled gateway, refer to Cisco CallManager Security Guide 4.1.
Dependency Records
To find out specific information about system-level settings such as servers, device pools, and date/time groups, click the Dependency Records link that is provided on the Cisco CallManager Administration configuration windows for each system-level setting. If the dependency records are not enabled for the system, the dependency records summary window displays a message.
Note
The Cisco CallManager Configuration Dependency Records window provides information about Cisco CallManager groups that it accesses. The Date/Time Group Configuration Dependency Records window provides information about Device Pools that it accesses.
For more information about Dependency Records, refer to Accessing Dependency Records, Cisco CallManager Administration Guide.
System Configuration Checklist
Table 5-2 lists the general steps for configuring system-level settings.
Table 5-2 System Configuration Checklist
Step 1
Configure Cisco CallManager groups for redundancy.
Cisco CallManager Group Configuration, Cisco CallManager Administration Guide.
Step 2
Configure regions, if needed.
You do not need to configure regions if you are using only the default G.711 audio codec.
Region Configuration, Cisco CallManager Administration Guide.
Step 3
Configure Date/Time groups.
Date/Time Group Configuration, Cisco CallManager Administration Guide.
Step 4
Configure media resource groups and media resource group lists.
Media Resource Management, page 19-1
Media Resource Group Configuration, Cisco CallManager Administration Guide.
Step 5
Configure device pools.
Device Pool Configuration, Cisco CallManager Administration Guide.
Step 6
Update device defaults, if needed.
Updating Device Defaults, Cisco CallManager Administration Guide.
Step 7
Configure locations or gatekeepers for call admission control.
Step 8
Configure survivable remote site telephony (SRST) references.
Survivable Remote Site Telephony References
Survivable Remote Site Telephony Configuration, Cisco CallManager Administration Guide
Step 9
Update enterprise parameters, if necessary.
Enterprise Parameters Configuration, Cisco CallManager Administration Guide.
Where to Find More Information
Related Topics
•
Additional Cisco Documentation
•