-
Cisco CallManager Administration Guide, Release 3.1(2)
-
Index
-
Preface
-
Introduction
-
Server Configuration
-
Cisco CallManager Configuration
-
Cisco CallManager Group Configuration
-
Date/Time Group Configuration
-
Device Defaults Configuration
-
Region Configuration
-
Device Pool Configuration
-
Enterprise Parameters Configuration
-
Location Configuration
-
Auto-Registration Configuration
-
Partition Configuration
-
Calling Search Space Configuration
-
Route Filter Configuration
-
Route Group Configuration
-
Route List Configuration
-
Route Pattern Configuration
-
Translation Pattern Configuration
-
External Route Plan Wizard
-
Special Characters and Settings
-
Route Plan Report
-
Cisco Messaging Interface Configuration
-
Cisco TFTP Configuration
-
Cisco WebAttendant Configuration
-
Conference Bridge Configuration
-
Media Termination Point Configuration
-
Music On Hold Configuration
-
Media Resource Group Configuration
-
Media Resource Group List Configuration
-
Service Parameters Configuration
-
Transcoder Configuration
-
Starting and Stopping Services
-
Call Park Configuration
-
Call Pickup and Group Call Pickup Configuration
-
Cisco IP Phone Services Configuration
-
Device Configuration
-
CTI Route Point Configuration
-
Cisco Voice Mail Configuration
-
Device Profile Configuration
-
Gatekeeper Configuration
-
Gateway Configuration
-
Cisco IP Phone Configuration
-
Phone Button Template Configuration
-
Adding a New User
-
Searching the Global Directory
-
Plugin Configuration
-
Cisco TAPI Service Provider Installation and Configuration
-
Cisco JTAPI Installation and Configuration
-
Personal Directory
-
 Feedback
Table Of Contents
Cisco JTAPI Installation and Configuration
Installing the Cisco JTAPI Software
Configuring Cisco JTAPI Tracing
JTAPI Preferences on non-Microsoft environments
Administering User Information for JTAPI and TAPI Applications
Cisco JTAPI Installation and Configuration
Cisco Java Telephony API (JTAPI) implementation comprises Java classes that reside on all client machines running Cisco JTAPI applications. Installation of the Cisco JTAPI implementation must take place before Cisco JTAPI applications will function correctly. Make sure the Cisco JTAPI classes are installed wherever JTAPI applications will run, whether on Cisco CallManager, on a separate machine, or on both. Installation requires 5 MB of local disk space.
Note
If you have upgraded to Cisco CallManager 3.1, you must upgrade the JTAPI client software on any application server or client workstation on which JTAPI applications are installed. If you do not upgrade the JTAPI client, your application will fail to initialize. If you need to upgrade, download the appropriate client from the Cisco CallManager Administration as described in the "Installing the Cisco JTAPI Software" section.
The upgraded JTAPI client software does not work with older releases of Cisco CallManager.This section discusses the software installation and configuration required to ready the Cisco JTAPI environment for programming and running applications.
•
•
•
Installing the Cisco JTAPI Software
The Cisco JTAPI installation utility installs the following items on the local disk drive:
•
•
•
•
Note
To use JTPREFS with Cisco JTAPI, however, requires Microsoft Java Virtual Machine 5.00.3190 or later. For information on JTPrefs, see the "Configuring Cisco JTAPI Tracing" section.
If you are installing Cisco JTAPI on a Windows 2000 workstation or server, you already have a compatible version of the Microsoft Virtual Machine. On all other Microsoft platforms such as Windows 95, Windows 98, and Windows NT, verify the current version of the Microsoft Virtual Machine by running the command "jview /?" and noting the version printed at the top of the console. You can download the latest version of the Microsoft Java Virtual Machine from http://www.microsoft.com/java.Perform the following steps to install the Cisco JTAPI software.
Procedure
Step 1
Step 2
Step 3
Step 4
http://Name/CCMAdmin/main.asp
where:
Name specifies the name or IP address of the Cisco CallManager
Step 5
Step 6
Step 7
Step 8
Note
Verifying the Installation
To verify the JTAPI installation, you can use the makecall application that allows you to place a call via JTAPI. Perform the following procedure to use the makecall application.
Procedure
Step 1
Step 2
Jview makecall <server name> <login> <password> 1000 <phone1> <phone2>
where:
server name specifies the hostname or IP address of the Cisco CallManager (for example, CTISERVER).
phone1 and phone2 designate directory numbers of IP phones or virtual phones that the user controls according to the user configuration. See the "Adding a User" section on page 44-2 for details.
For login and password, use the user ID and password that you configured in the Cisco CallManager User Configuration window.
Configuring Cisco JTAPI Tracing
Use the Cisco JTAPI tracing preferences application (JTPREFS.EXE) to configure trace levels and trace destinations. Installation of the Cisco JTAPI Preferences into the Program Files\JTAPITools directory utility takes place by default. To open the Cisco JTAPI Preferences utility, choose Start > Programs > Cisco JTAPI > JTAPI Preferences.
This section, which describes how to use the Cisco JTAPI preferences application, discusses the following topics:
Trace Levels
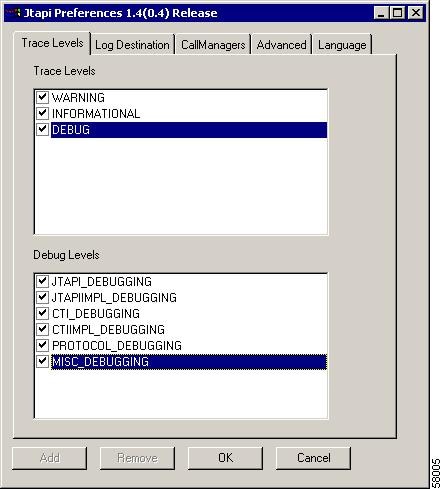
Figure 48-1 illustrates the Trace Levels tab of the Cisco JTAPI preferences application. The window title shows the JTAPI version number.
Figure 48-1 Trace Levels Tab
The Trace Level tab allows you to enable or disable the following JTAPI trace levels:
•
•
•
You may enable or disable additional debugging levels in the Debug Levels window, as described in the following list:
•
•
•
•
•
•
Log Destination
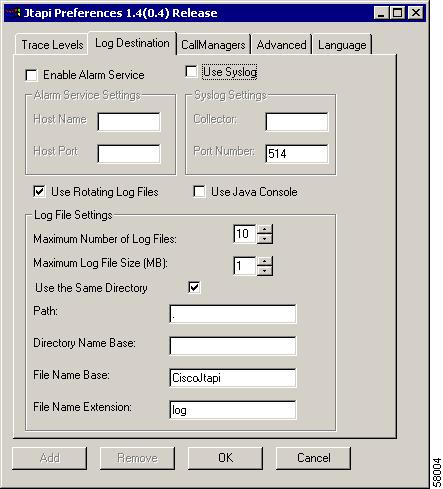
Figure 48-2 illustrates the Log Destination tab of the Cisco JTAPI preferences application.
Figure 48-2 Log Destination Tab
The Log Destination tab allows you to configure how JTAPI creates traces and how they are stored. Table 48-1 contains descriptions of the log destination fields:
Cisco CallManager
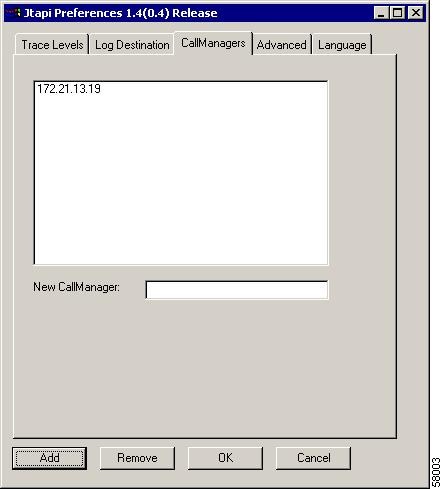
Figure 48-3 illustrates the Cisco CallManager tab of the Cisco JTAPI preferences application.
Figure 48-3 CallManager Tab
This tab allows you to define a list of Cisco CallManagers that a JTAPI application can present to the user for optional Cisco CallManager connectivity.
Advanced
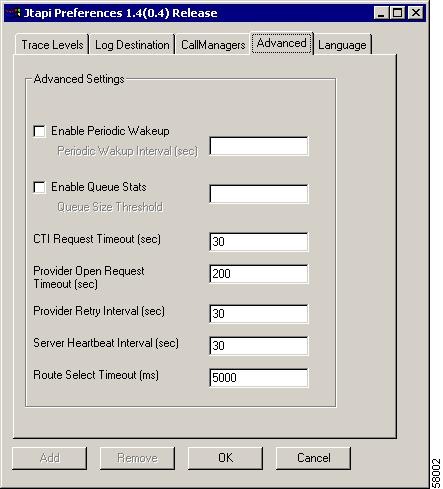
Figure 48-4 illustrates the Advanced tab of the Cisco JTAPI preferences application.
Figure 48-4 Advanced Tab
You can configure the parameters in Table 48-2 through the Advanced tab in the JTPrefs application. You may need these low-level parameters for troubleshooting and debugging purposes only.
Note
JTAPI Preferences on non-Microsoft environments
For non-Microsoft environments, you must create a jtapi.ini file manually and place it in the CLASSPATH. The following list provides the parameter names with sample values:
PROTOCOL_DEBUGGING=0UseSameDirectory=1JTAPIIMPL_DEBUGGING=0UseSystemDotOut=0QueueStatsEnabled=0PeriodicWakeupInterval=50RouteSelectTimeout=5000UseTraceFile=0ProviderOpenRequestTimeout=30Directory=DEBUG=0DesiredServerHeartbeatInterval=30AlarmServicePort=1444CTI_DEBUGGING=0SyslogCollector=JTAPI_DEBUGGING=0PeriodicWakeupEnabled=0NumTraceFiles=10AlarmServiceHostname=MISC_DEBUGGING=0TracePath=.UseAlarmService=0CTIIMPL_DEBUGGING=0WARNING=0Traces=WARNING;INFORMATIONAL;DEBUGINFORMATIONAL=0UseSyslog=0CtiPortAutoRecovery=1FileNameBase=CiscoJtapiCtiRequestTimeout=15TraceFileSize=1048576Debugging=JTAPI_DEBUGGING;JTAPIIMPL_DEBUGGING;CTI_DEBUGGING;CTIIMPL_DEBUGGING;PROTOCOL_DEBUGGING;MISC_DEBUGGINGFileNameExtension=logQueueSizeThreshold=25ProviderRetryInterval=30CallManagers=cm1SyslogCollectorUDPPort=514Administering User Information for JTAPI and TAPI Applications
JTAPI and TAPI applications require that users be administered in the directory and be given privilege to control one or more devices. Follow the procedures for adding a user and assigning devices to a user in the "Adding a New User" section before using a JTAPI or TAPI application. The list of devices assigned to the user represents the phones that the user needs to control from the application (e.g., make calls, answer calls).