-
Cisco CallManager Administration Guide, Release 3.1(2)
-
Index
-
Preface
-
Introduction
-
Server Configuration
-
Cisco CallManager Configuration
-
Cisco CallManager Group Configuration
-
Date/Time Group Configuration
-
Device Defaults Configuration
-
Region Configuration
-
Device Pool Configuration
-
Enterprise Parameters Configuration
-
Location Configuration
-
Auto-Registration Configuration
-
Partition Configuration
-
Calling Search Space Configuration
-
Route Filter Configuration
-
Route Group Configuration
-
Route List Configuration
-
Route Pattern Configuration
-
Translation Pattern Configuration
-
External Route Plan Wizard
-
Special Characters and Settings
-
Route Plan Report
-
Cisco Messaging Interface Configuration
-
Cisco TFTP Configuration
-
Cisco WebAttendant Configuration
-
Conference Bridge Configuration
-
Media Termination Point Configuration
-
Music On Hold Configuration
-
Media Resource Group Configuration
-
Media Resource Group List Configuration
-
Service Parameters Configuration
-
Transcoder Configuration
-
Starting and Stopping Services
-
Call Park Configuration
-
Call Pickup and Group Call Pickup Configuration
-
Cisco IP Phone Services Configuration
-
Device Configuration
-
CTI Route Point Configuration
-
Cisco Voice Mail Configuration
-
Device Profile Configuration
-
Gatekeeper Configuration
-
Gateway Configuration
-
Cisco IP Phone Configuration
-
Phone Button Template Configuration
-
Adding a New User
-
Searching the Global Directory
-
Plugin Configuration
-
Cisco TAPI Service Provider Installation and Configuration
-
Cisco JTAPI Installation and Configuration
-
Personal Directory
-
 Feedback
Table Of Contents
Cisco WebAttendant Configuration
Configuring Cisco WebAttendant Users
Adding a Cisco WebAttendant User
Viewing, Updating, and Deleting Cisco WebAttendant Users
Cisco WebAttendant User Configuration Settings
Viewing, Updating, or Deleting a Pilot Point
Pilot Point Configuration Settings
Configuring Linked Hunt Groups
Viewing, Updating, or Deleting Hunt Group Members
Hunt Group Configuration Settings
Installing the Cisco WebAttendant Client
Configuring Cisco WebAttendant Client Settings
Cisco WebAttendant Client Configuration Settings
Cisco WebAttendant Server Configuration
Setting Up the wauser Shared Directory for Cisco WebAttendant
Starting the Cisco Telephony Call Dispatcher
Viewing Cisco WebAttendant Performance Monitors
Cisco WebAttendant Configuration
Cisco WebAttendant, a client-server application, allows you to set up Cisco IP phones as attendant consoles. Employing a graphical user interface, the Cisco WebAttendant client creates an attendant console that uses speed-dial buttons and quick directory access to look up phone numbers, monitor line status, and direct calls. A receptionist or administrative assistant can use the Cisco WebAttendant client to handle calls for a department or company, or another employee can use it to manage his own calls.
Use Cisco CallManager Administration to manage the Cisco Telephony Call Dispatcher, configure pilot points and hunt groups, and add or delete Cisco WebAttendant users.
This section describes the following configuration procedures for Cisco WebAttendants:
•
Configuring Cisco WebAttendant Users
•
•
•
•
•
•
Configuring Cisco WebAttendant Users
This section covers the following procedures:
•
•
Adding a Cisco WebAttendant User
This section describes how to add a Cisco WebAttendant user. You must add users through Cisco WebAttendant User Configuration before they can log into a Cisco WebAttendant client.
Note
Procedure
Step 1
Step 2
Step 3
Step 4
Step 5
Note
Related Topics
•
•
•
Viewing, Updating, and Deleting Cisco WebAttendant Users
This section describes how to view, update, or delete a Cisco WebAttendant user.
Procedure
Step 1
Step 2
The Cisco WebAttendant User Configuration window displays with a list of current users on the left side of the window.
Step 3
Step 4
Step 5
Related Topics
•
•
•
•
Cisco WebAttendant User Configuration Settings
Use Table 24-1, which describes Cisco WebAttendant user configuration settings, to complete procedures in the "Adding a Cisco WebAttendant User"and "Viewing, Updating, and Deleting Cisco WebAttendant Users"sections.
Related Topics
•
•
Configuring Pilot Points
You must configure pilot points and hunt groups through Cisco CallManager Administration before the Cisco Telephony Call Dispatcher (TCD) can route calls.
This section contains the following topics:
•
•
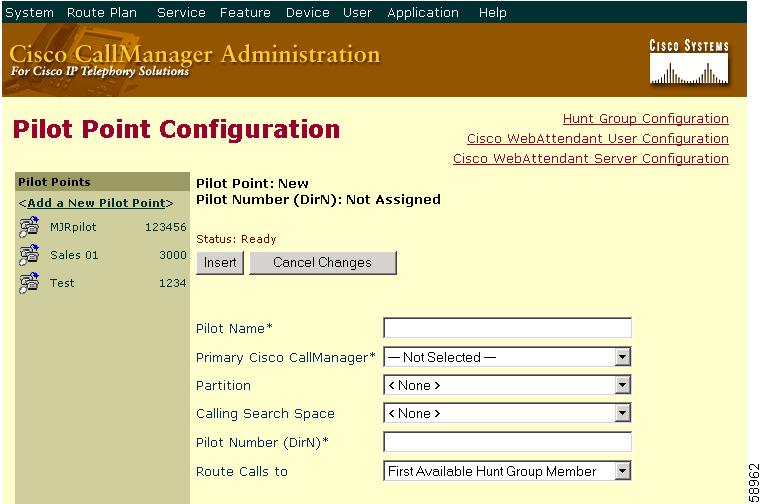
Adding a Pilot Point
This section describes how to add a pilot point.
Procedure
Step 1
Figure 24-1 Pilot Point Configuration Window
Step 2
Step 3
Now that the pilot point is created, the Pilot Point Configuration window refreshes to display the name of the new pilot point in the list on the left. The new pilot point and its settings display.
Once the pilot point is created, you must configure a hunt group to specify how the calls that come in to the pilot point are redirected.
Related Topics
•
•
•
Viewing, Updating, or Deleting a Pilot Point
This section describes how to view, update, or delete a pilot point.
Note
Procedure
Step 1
The Pilot Point Configuration window displays, and the list on the left side of the window shows all currently configured pilot points.
Step 2
Step 3
Step 4
Within approximately 10 minutes after you delete a pilot point, Cisco TCD will stop directing calls to any hunt group members associated with that pilot point.
Related Topics
•
•
Pilot Point Configuration Settings
Use Table 24-2, which describes pilot point configuration settings, to complete procedures in the "Adding a Pilot Point" and "Viewing, Updating, or Deleting a Pilot Point" sections.
Configuring Hunt Groups
After you configure the pilot point, you must configure the hunt group. A hunt group comprises a list of destinations (either directory numbers or Cisco WebAttendant user /line numbers) that determine the call redirection order.
This section covers the following procedures:
•
•
•
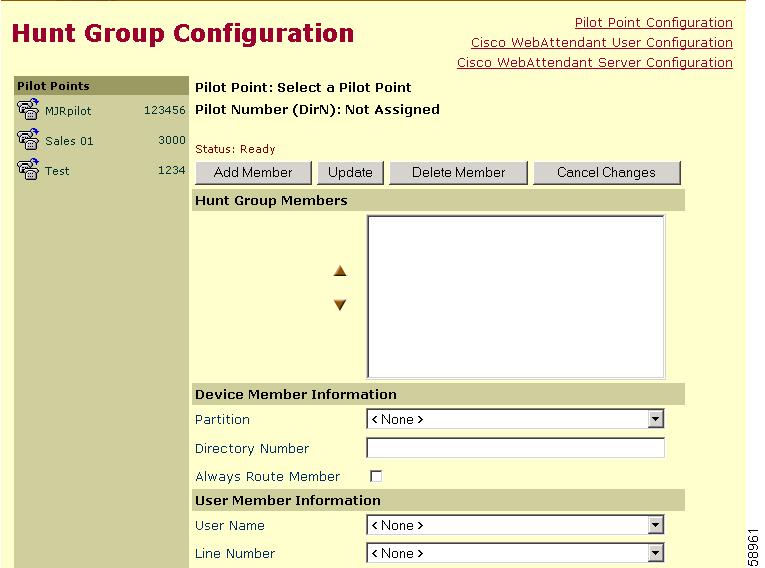
Adding Hunt Group Members
This section describes how to add hunt group members.
Procedure
Note
Step 1
Step 2
Step 3
Figure 24-2 Hunt Group Configuration Window
Step 4
<<Not Configured>>.Step 5
•
•
Step 6
•
•
Note
As you make selections, the Hunt Group Member list box reflects the information you choose. The Hunt Group Member list displays either the device directory number or the Cisco WebAttendant user name and line number; for example:
#1 Call directory number 35201 (directory number example)
#2 Direct Call to Mary Brown, Line 1 (user and line number example)
Step 7
Note
Step 8
Related Topics
•
•
•
Configuring Linked Hunt Groups
This section describes how to configure linked hunt groups.
Procedure
Step 1
•
Caution
•
•
Step 2
Caution
Step 3
Related Topics
•
•
•
•
Viewing, Updating, or Deleting Hunt Group Members
This section describes how to view, update, or delete hunt group members.
Procedure
Step 1
The Pilot Point Configuration window displays.
Step 2
The Hunt Group Configuration window displays, and the list on the left side of the window displays all currently configured pilot points.
Step 3
The Hunt Group Configuration window displays information for the chosen pilot point.
Step 4
•
•
•
•
Step 5
Related Topics
•
Hunt Group Configuration Settings
Use Table 24-3 to complete procedures in the following sections:
•
•
Related Topics
•
•
Installing the Cisco WebAttendant Client
This section describes how to install the Cisco WebAttendant client on a user PC.
Procedure
Step 1
Step 2
Step 3
Step 4
Step 5
Step 6
The Cisco WebAttendant installation wizard runs.
Step 7
Step 8
Step 9
Step 10
•
•
Step 11
Step 12
•
•
Step 13
Step 14
Step 15
Once the application is installed, you can configure or update any client settings that you did not configure during the installation process.
See the "Configuring Cisco WebAttendant Client Settings" section for more information.
Related Topics
•
•
•
Configuring Cisco WebAttendant Client Settings
After you install Cisco WebAttendant, you must configure the client before a user can log in to Cisco WebAttendant. Use the procedure in this section to configure settings not specified during installation, to view current settings, or to update the client configuration.
Once configured, the Cisco WebAttendant client operates with the specified settings until the administrator changes them.
Procedure
Step 1
Step 2
Step 3
Step 4
Note
Related Topics
•
•
•
•
Cisco WebAttendant Client Configuration Settings
Use Table 24-4 to complete the procedure in the "Configuring Cisco WebAttendant Client Settings" section.
Table 24-4 Cisco WebAttendant Client Configuration Settings
MAC Address
Enter SEP plus the media access control (MAC) address, a 12-character number found on the bottom of the Cisco IP phone, for the Cisco IP phone you plan to use with Cisco WebAttendant.
You must enter SEP, then the MAC address, eliminating any dashes. You must use uppercase letters; for example, SEP0010EB001234.
Cisco TCD Database Path
Leave this setting blank if you want to use the Cisco TCD default database associated with the Cisco WebAttendant client. Cisco recommends the default setting. To ensure that this setting works correctly, you must perform the required steps in the "Setting Up the wauser Shared Directory for Cisco WebAttendant" section.
As an alternative to the default setting, copy the file named C:\Program Files\Cisco\Users\UsersDB1.mdb or C:\Program Files\Cisco\UsersDB2.mdb on the Cisco CallManager server to a different location (such as a file in a different shared directory on the network or a file on the Cisco WebAttendant user PC) and enter the path to the file in this field. For important information on this path, refer to the"Understanding Cisco TCD Database Path Options" section in the Cisco CallManager System Guide.
IP Address or Host Name
Enter the IP address or host name of the Cisco TCD server. This entry designates the Cisco CallManager to which the Cisco IP phone is normally registered.
IP Port
The default value is 4321. Do not modify this value.
WebAttendant User ID
This field designates the User ID for the Cisco WebAttendant user as specified in the Cisco WebAttendant User Configuration window from Cisco CallManager Administration. See the "Installing the Cisco WebAttendant Client" section for more information.
Note
WebAttendant Password
This field designates the password for this Cisco WebAttendant user as specified in the Cisco WebAttendant User Configuration window in Cisco CallManager Administration. See the "Installing the Cisco WebAttendant Client" section for more information.
Note
Connected To
This view-only field displays the IP address of the Cisco CallManager currently connected to the Cisco WebAttendant.
IP Address or Host Name
Enter the IP address or host name of the line state server. This entry designates the Cisco CallManager to which the Cisco IP Phone is normally registered.
IP Port
This field designates the line state server IP port number, which has the default value 3224. Do not change this setting unless advised to do so by the Cisco Technical Assistance Center.
Connected To
This view-only field displays the IP address of the line state server currently connected to the Cisco WebAttendant client.
When you configure your settings in the Settings dialog box, check the Activate WebAttendant when a call is received check box to ensure that the Cisco WebAttendant Console automatically displays every time a call comes into the system.
Related Topics
•
•
•
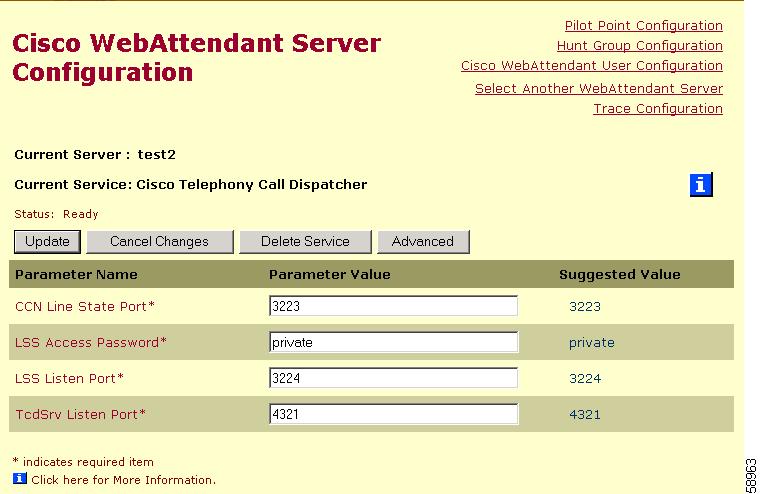
Cisco WebAttendant Server Configuration
The Cisco WebAttendant Server Configuration window lists service parameters and enables you to configure trace parameters for the Cisco Telephony Call Dispatcher (TCD).
Caution
Perform the following steps to update Cisco TCD trace parameters.
Procedure
Step 1
The Pilot Point Configuration window displays.
Step 2
The Cisco WebAttendant Server Configuration window for the chosen server appears. It displays all configured service parameters for the Cisco TCD. Figure 24-3 shows an example of the Cisco WebAttendant Server Configuration window.
Figure 24-3 Cisco WebAttendant Server Configuration Window
Note
Related Topics
•
Setting Up the wauser Shared Directory for Cisco WebAttendant
By default, the client uses cached directory information from the Cisco CallManager Directory user database. The Cisco WebAttendant client displays user and line information in the Directory section of its user interface.
If you choose the default Cisco TCD database setting during Cisco WebAttendant client configuration, you must perform the following procedure to ensure that the Cisco WebAttendant client can display the directory information from the Cisco CallManager directory database.
Note
Perform the following steps to set up the wauser shared directory:
Procedure
Step 1
Step 2
C:\Program Files\Cisco\Users
Step 3
Step 4
Step 5
Step 6
Step 7
Step 8
Step 9
Step 10
Step 11
Step 12
Step 13
Step 14
Step 15
Step 16
Step 17
Step 18
Note
Step 19
Step 20
Step 21
Note
Cisco CallManager automatically makes directory database information available to Cisco WebAttendant clients and updates the information every 24 hours with the latest changes.
Related Topics
•
•
Starting the Cisco Telephony Call Dispatcher
The Cisco Telephony Call Dispatcher (TCD) service starts running automatically when Cisco CallManager is started. The following procedure describes how to verify that the Cisco TCD service is running and how to start Cisco TCD if it is stopped.
Note
Procedure
Step 1
Step 2
The Service Name column lists all services that are configured on this server.
Step 3
•
•
Step 4
Related Topics
•
•
Viewing Cisco WebAttendant Performance Monitors
Perform the following procedures to view CcmLineLinkState and other performance monitoring information for Cisco TCD and Cisco WebAttendant:
Procedure
Step 1
Step 2
Step 3
Step 4
Step 5
Step 6
Related Topics
•
•