Feedback
Table Of Contents
Managing Cisco ISE Backup and Restore Operations
Overview of Cisco ISE Backup and Restore
Creating and Editing Repositories
Synchronizing Primary and Secondary Nodes in a Distributed Environment
Recovering Lost Nodes in Standalone and Distributed Deployments
Loss of All Nodes in a Distributed Setup, Recovery Using Existing IP Addresses and Hostnames
Loss of All Nodes in a Distributed Deployment, Recovery Using New IP Addresses and Hostnames
Standalone Deployment, Recovery Using Existing IP Address and Hostname
Standalone Deployment, Recovery Using New IP Address and Hostname
Primary Node Failure in a Distributed Deployment
Secondary Node Failure in a Distributed Deployment
Managing Cisco ISE Backup and Restore Operations
This chapter describes the Cisco Identity Services Engine (ISE) database backup and restore operations, which include Cisco ISE application configuration and Cisco Application Deployment Engine operating system (ADE operating system) configuration. This chapter does not cover the Monitoring and Troubleshooting database backup and restore procedures. For information on the Monitoring and Troubleshooting database backup and restore, see Chapter 22, "Monitoring and Troubleshooting."
Note
Backup and restore is not available for Inline Posture nodes in Cisco ISE, Release 1.0. For more information on this and other Known Issues, see the Release Notes for the Cisco Identity Services Engine, Release 1.0.
This chapter contains the following sections:
•
•
•
Overview of Cisco ISE Backup and Restore
Cisco ISE allows you to back up data only from the primary or standalone Administration ISE node. Backup can be done either from the Cisco ISE command-line interface (CLI) or Cisco ISE user interface. The restore operation can only be done through the CLI.
Cisco ISE allows you to back up the following data:
•
•
Backup and restore must always be performed on the same version of Cisco ISE software. For example, if you have a backup taken from an ISE node (Cisco ISE Release 1.0) before an upgrade, you can restore it only on an ISE node that has Cisco ISE Release 1.0 installed on it.
Cisco ISE allows you to restore Cisco ISE application and ADE operating system data on a primary or standalone administration node. After you restore data on the primary administration node, the changes are replicated to the secondary nodes in your deployment.
If you obtain the backup from your primary Administration ISE node in one timezone and try to restore it on another ISE node in another timezone, the restore process might fail. This failure happens if the timestamp in the backup file is later than the system time on the ISE node on which the backup is restored. If you restore the same backup a day after it was obtained, then the timestamp in the backup file is in the past and the restore process succeeds.
Note
Note
Typically, you would need the application-specific backup to be scheduled more frequently, and the whole system backup infrequently. The whole system backup is required in case of a hardware failure that requires you to reimage your hardware.
You need a data repository, which is the location where Cisco ISE saves your backup file. You must create a repository before you can run an on-demand or scheduled backup.
Note
You can perform a backup either through the CLI or through the Cisco ISE user interface.
Refer to the Cisco Identity Services Engine CLI Reference Guide, Release 1.0 for more information on the CLI backup commands:
Note
Configuring Repositories
Cisco ISE allows you to create, edit, and delete repositories through the Cisco ISE user interface. You can use these repositories for various operations such as backup, restore, and so on. You can create the following types of repositories:
•
•
•
•
•
•
•
•
The Repositories page allows you to manage repositories from the Cisco ISE administrative user interface. You can create, edit, and delete repositories through the administrative user interface.
Note
This section contains the following topics:
•
Creating and Editing Repositories
Prerequisite:
Every Cisco ISE administrator account is assigned one or more administrative roles. To perform the operations described in the following procedure, you must have one of the following roles assigned: Super Admin or System Admin. See Cisco ISE Admin Group Roles and Responsibilities for more information on the various administrative roles and the privileges associated with each of them.
To create a repository, complete the following steps:
Step 1
Step 2
The Repository List page appears with a list of configured repositories. This page will be blank when you create repositories for the first time.
Step 3
•
•
The Repository Configuration page appears.
Step 4
•
Note
•
•
The path must be valid and must exist at the time you create the repository. The following three fields are required depending on the protocol that you have chosen.
–
–
–
Step 5
A message similar to the following one appears:
Repository is created successfully.
Step 6
Next Steps:
1.
show repository repository_name
where repository_name is the name of the repository that you have created. For more information, see the Cisco Identity Services Engine CLI Reference Guide, Release 1.0.
Note
2.
Deleting Repositories
Prerequisite:
Every Cisco ISE administrator account is assigned one or more administrative roles. To perform the operations described in the following procedure, you must have one of the following roles assigned: Super Admin or System Admin. See Cisco ISE Admin Group Roles and Responsibilities for more information on the various administrative roles and the privileges associated with each of them.
To delete a repository, complete the following steps:
Step 1
Step 2
The repositories listing page appears.
Step 3
Cisco ISE prompts you with the following message:
Are you sure you want to delete this repository?
Step 4
The following message appears:
Repository was deleted successfully.
The Repository List page appears and the repository that you deleted will no longer be listed in this page.
On-Demand Backup
Cisco ISE provides an option to obtain an on-demand backup of the primary administration node. You can obtain a backup of the Cisco ISE application-specific configuration data, or application and Cisco ADE operating system data.
Running On-Demand Backup
Prerequisites:
1.
2.
3.
Note
To perform an on-demand backup, complete the following steps:
Step 1
Step 2
The Backup On Demand page appears.
Step 3
Step 4
You cannot enter a repository name here. You can only choose an available repository from the drop-down list. Ensure that you create the repository before you run a backup.
Step 5
Step 6
Note
Step 7
Backup is done successfully.
If you have moved to other pages in the Cisco ISE user interface, to check the status of your backup, you must go to the Backup History page. See the "Viewing Backup History" section for more information.
Cisco ISE appends the backup filename with the timestamp and stores this file in the specified repository. Check if your backup file exists in the repository that you have specified.
For more information:
This procedure backs up your Cisco ISE application and Cisco ADE operating system data. To back up Monitoring and Troubleshooting database data, see the "Backing Up and Restoring the Monitoring Database" section on page 22 -44. You can also schedule backup jobs that runs periodically. See the "Scheduled Backups" section for more information.
Scheduled Backups
Cisco ISE allows you to schedule your system-level backup operations. You can schedule a backup to be run periodically (daily, weekly, monthly), and specify the time of the day when the backup should be run. Backup operations usually take some amount of time and the scheduling option allows you to configure backups at a convenient time. The Scheduled Backup page lists the backups that you have scheduled.
You can schedule a backup from the Cisco ISE CLI or through the Cisco ISE user interface. To schedule a job from the CLI, you must use the kron CLI command.
Refer to the the Cisco Identity Services Engine CLI Reference Guide, Release 1.0 for more information on the kron command.
An example is given below:
ise/admin(config)# kron policy-list policylistnameise/admin(config-Policy List)# cli backup backupfilename repository repositoryname application iseise/admin(config-Policy List)# kron occurrence backup_occur_backupfilenameise/admin(config-Occurrence)# at 10:00 Sundayise/admin(config-Occurrence)# recurringise/admin(config-Occurrence)# policy-list policylistnameise/admin(config-Occurrence)# exitise/admin(config)# exitise/admin#To create a kron job, you must define a policy list. This policy list will also be created when you schedule a backup through the Cisco ISE user interface.
Note
Scheduling a Backup
Prerequisites:
1.
2.
3.
Note
To schedule a backup from the Cisco ISE user interface, complete the following steps:
Step 1
Step 2
The Scheduled Backup List page appears. This page provides the following information:
•
•
•
•
•
Step 3
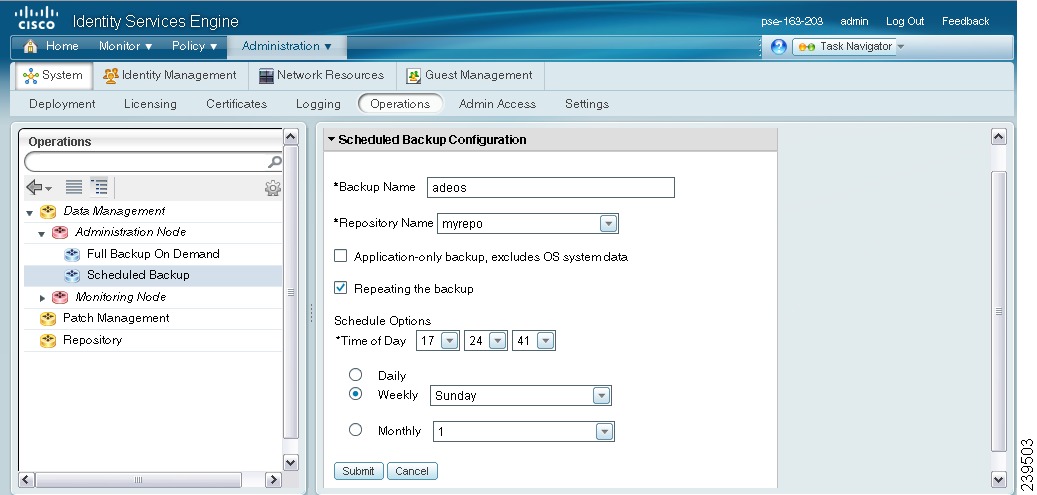
The Scheduled Backup Configuration page appears as shown in Figure 14-1.
Figure 14-1 Scheduled Backup: Create Page
Step 4
You can enter a descriptive name of your choice. Cisco ISE appends the timestamp to the backup filename and stores it in the repository. You will have unique backup filenames even if you configure a series of backups.
Note
Step 5
You cannot enter a repository name. You have to create a repository from the Cisco ISE user interface or through the Cisco ISE CLI. See the "Configuring Repositories" section for information on how to create repositories. Ensure that you create a repository before you schedule a backup job.
Step 6
Step 7
Step 8
•
•
–
–
–
Step 9
Click the Scheduled Backup List link at the top of this screen to return to the Scheduled Backup Listing page.
For more information:
The scheduled backup will be listed in the Scheduled Backup page. To see the status of your previously scheduled jobs, see the "Viewing Backup History" section. This procedure schedules a backup job that backs up the Cisco ISE application and the Cisco ADE operating system data. To schedule a Monitoring and Troubleshooting database backup job, see the "Backing Up and Restoring the Monitoring Database" section on page 22 -44.
Deleting a Scheduled Backup
Cisco ISE allows you to delete an existing backup schedule and create a new schedule. There is no option to edit a scheduled backup job in Cisco ISE.
Prerequisite:
Every Cisco ISE administrator account is assigned one or more administrative roles. To perform the operations described in the following procedure, you must have one of the following roles assigned: Super Admin or System Admin. See Cisco ISE Admin Group Roles and Responsibilities for more information on the various administrative roles and the privileges associated with each of them.
To delete a scheduled backup job, complete the following steps:
Step 1
Step 2
The Scheduled Backup List page appears with a list of scheduled jobs.
Step 3
Step 4
Are you sure you want to delete this scheduled backup?
Step 5
Viewing Backup History
For scheduled backups, you can obtain information about the backup, backup events, and status (when the backup was performed, whether it was successful or not, and so on) from the Backup History page.
Prerequisite:
Every Cisco ISE administrator account is assigned one or more administrative roles. To perform the operations described in the following procedure, you must have one of the following roles assigned: Super Admin or Monitoring Admin or Helpdesk Admin. See Cisco ISE Admin Group Roles and Responsibilities for more information on the various administrative roles and the privileges associated with each of them.
To view the backup history, complete the following steps:
Step 1
Step 2
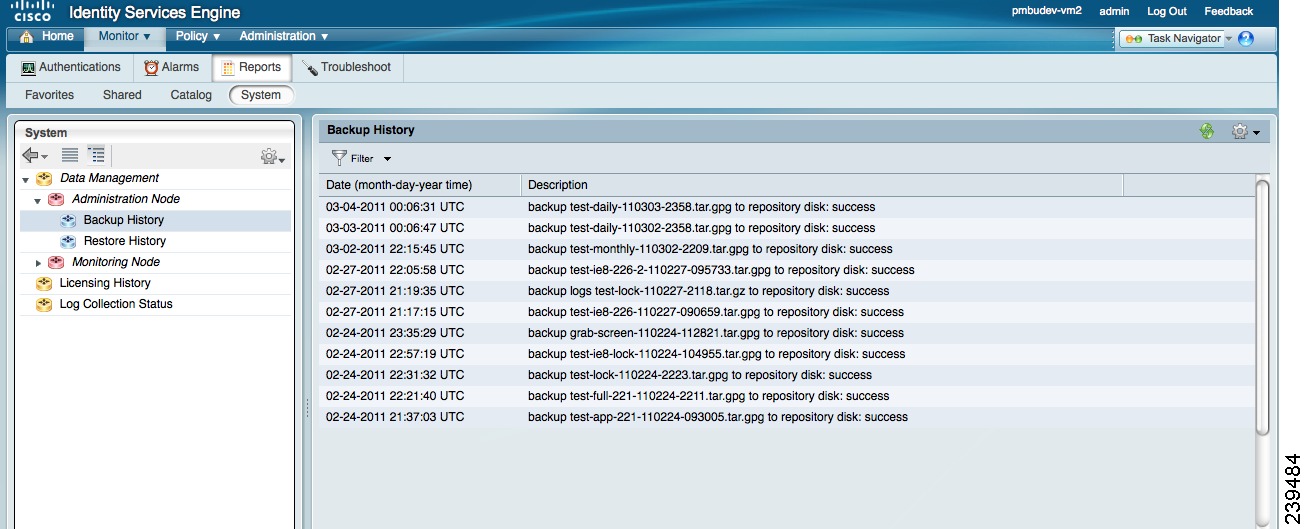
The Backup History page appears with information about all backups that were run on the Cisco ISE node as shown in Figure 14-2.
Figure 14-2 Backup History Page
The Backup History page provides basic information about the scheduled backups that were run. For failed backups, you must run the backup-logs command from the Cisco ISE CLI and look at the ADE.log for more information.
Note
Restoring Data from a Backup
You can restore data only through the Cisco ISE CLI.
•
restore backupfilename.tar.gpg repository repositoryname application ise
•
restore backupfilename.tar.gpg repository repositoryname
where
•
•
After you restore data, you must wait until all the application server processes are up and running. To verify if the Cisco ISE application server processes are running, enter the following command from the Cisco ISE CLI:
show application status ise
For more information, see the Cisco Identity Services Engine CLI Reference Guide, Release 1.0.
Note
To check for the status of your restore job, see the "Viewing Restore History" section.
Viewing Restore History
You can obtain information about all restore operations, restore log events, and statuses (when the restore was done, whether it was successful or not, and so on) from the Restore History page.
Prerequisite:
Every Cisco ISE administrator account is assigned one or more administrative roles. To perform the operations described in the following procedure, you must have one of the following roles assigned: Super Admin or Monitoring Admin or Helpdesk Admin. See Cisco ISE Admin Group Roles and Responsibilities for more information on the various administrative roles and the privileges associated with each of them.
To view the restore history, complete the following steps:
Step 1
Step 2
The Restore History page appears with information about all the restore operations that were performed on the Cisco ISE node.
Note
Synchronizing Primary and Secondary Nodes in a Distributed Environment
In a distributed environment, after restoring a backup file on your primary administration node, sometimes the Cisco ISE database in the primary and secondary nodes are not synchronized automatically. At such times, you can manually force a full replication from the primary administration node to your secondary ISE nodes. You can force a synchronization only from a primary to secondary nodes. During the sync-up operation, you cannot make any configuration changes. Once a sync-up operation starts, a progress bar appears displaying the progress of the forced replication. Cisco ISE allows you to navigate to other Cisco ISE user interface pages and make any configuration changes only after the synchronization is complete.
Prerequisite:
Every Cisco ISE administrator account is assigned one or more administrative roles. To perform the operations described in the following procedure, you must have one of the following roles assigned: Super Admin or System Admin. See Cisco ISE Admin Group Roles and Responsibilities for more information on the various administrative roles and the privileges associated with each of them.
To synchronize your secondary Cisco ISE nodes with your primary Cisco ISE node, complete the following steps:
Step 1
Step 2
The Deployment Nodes page appears.
Step 3
Step 4
The nodes are synchronized with the primary administration node. You will have to wait until this process is complete before you can access the Cisco ISE user interface again.
Result
When all the nodes are synchronized, the following message appears:
Sync up is done for all the nodes.
An error message appears if Cisco ISE cannot force a full replication.
Recovering Lost Nodes in Standalone and Distributed Deployments
This section provides troubleshooting information that you can use to recover lost nodes in standalone and multinode deployments. Some of the following use cases use the backup and restore functionality and others use the replication feature to recover lost data:
•
•
•
•
•
•
Loss of All Nodes in a Distributed Setup, Recovery Using Existing IP Addresses and Hostnames
In a distributed deployment setup, there is a natural disaster leading to the loss of all the nodes. After recovery, you want to use the existing addresses and hostnames.
Scenario
You have two nodes: N1 (primary Administration node) and N2 (secondary Administration node) and a backup of the N1 node is available that was taken at time t1. Later, both N1 and N2 nodes fail because of a natural disaster.
Assumption
All Cisco ISE nodes in the deployment were destroyed. The new hardware was imaged using the same hostnames and IP addresses.
Resolution Steps
1.
2.
3.
–
–
Both the N1 and N2 nodes will now have data reset to time t1.
Loss of All Nodes in a Distributed Deployment, Recovery Using New IP Addresses and Hostnames
In a distributed setup, all the nodes in the deployment are destroyed because of a natural disaster. The new hardware is reimaged at a new location and requires new IP addresses and hostnames.
Scenario
You have two ISE nodes: N1 (primary Administration node) and N2 (secondary Policy Service node) and a backup of N1 node is available that was taken at time t1. Later, both N1 and N2 nodes fail because of a natural disaster. ISE nodes are replaced at a new location and the new hostnames are N1A (primary Administration node) and N2A (secondary Policy Service node). N1A and N2A are standalone nodes at this point in time.
Assumptions
All Cisco ISE nodes in the deployment were destroyed. The new hardware was imaged at a different location using different hostnames and IP addresses.
Resolution Steps
1.
2.
3.
a.
b.
Standalone Deployment, Recovery Using Existing IP Address and Hostname
There is a standalone Administration node that goes down.
Scenario
You have a standalone Administration node, N1, and a backup of the N1 database that was taken at time t1 is available. The N1 node goes down because of a physical failure and must be reimaged or a new hardware is required. The N1 node must be brought back up with the same IP address and hostname.
Assumptions
This deployment is a standalone deployment and the new or reimaged hardware has the same IP address and hostname.
Resolution Steps
Once the N1 node is back up after a reimage or you have introduced a new ISE node with the same IP address and hostname, you must restore the backup taken from the old N1 node. You do not have to make any role changes. See "Restoring Data from a Backup" section for more information.
Standalone Deployment, Recovery Using New IP Address and Hostname
There is a standalone Administration node that goes down.
Scenario
You have a standalone administration node, N1, and a backup of the N1 database that was taken at time t1 is available. The N1 node goes down because of a physical failure and will be replaced by a new hardware at a different location with a different IP address and hostname.
Assumptions
This deployment is a standalone deployment and the replaced hardware has a different IP address and hostname.
Resolution Steps
1.
2.
Configuration Rollback
There may be instances where you inadvertently make configuration changes that you later determine were incorrect. For example, you may delete several NADs or modify some RADIUS attributes incorrectly and realize this issue several hours later. In this case, you can revert back to the original configuration by restoring a backup that was taken before you made the changes.
Scenario
There are two nodes: N1 (primary Administration node) and N2 (secondary Administration node) and a backup of the N1 node is available. You made some incorrect configuration changes on N1 and want to remove the changes.
Resolution Steps
Obtain a backup of the N1 node that was taken before the incorrect configuration changes were made. Restore this backup on the N1 node. See "Restoring Data from a Backup" section for more information. Restore script will sync the data from N1 to N2.
Primary Node Failure in a Distributed Deployment
In a multinode deployment, the primary Administration node fails.
Scenario
You have two ISE nodes, N1 (primary Administration node) and N2 (secondary Administration node). N1 fails because of hardware issues.
Assumptions
Only the primary node in a distributed deployment has failed.
Resolution Steps
1.
The N1 node is replaced with a new hardware, reimaged, and is in the standalone state.
2.
Now, the N2 node becomes your primary node and the N1 node becomes your secondary node.
If you wish to make the N1 node the primary node again, log into the N1 user interface and make it the primary node. N2 automatically becomes a secondary server. There is no data loss.
Secondary Node Failure in a Distributed Deployment
In a multinode deployment, a single secondary node has failed. No restore is required.
Scenario
You have multiple nodes: N1 (primary Administration node), N2 (secondary Administration node), N3 (secondary Policy Service node), N4 (secondary Policy Service node). One of the secondary nodes, N3, fails.
Resolution Steps
1.
2.
3.
Data is replicated from N1 to N3A. No restore is required.