Feedback
Table Of Contents
Importing a Server Certificate
Generating a Self-Signed Certificate
Generating a Certificate Signing Request
Binding a CA-Signed Certificate
Viewing and Exporting Certificate Signing Requests
Deleting a Certificate Signing Request
Certificate Authority Certificates
Viewing Certificate Authority Certificates
Adding a Certificate Authority Certificate
Editing a Certificate Authority Certificate
Deleting a Certificate Authority Certificate
Exporting a Certificate Authority Certificate
Creating Certificate Trust Lists in the Primary Cisco ISE Node
Importing Root and CA Certificates into the CTL of the Primary Node
Importing the CA-Signed Certificate from the Secondary Node into the Primary Node's CTL
Importing the Self-Signed Certificate from the Secondary Node into the CTL of the Primary Node
Managing Certificates
The Cisco Identity Services Engine (Cisco ISE) relies on public key infrastructure (PKI) to provide secure communication for the following:
•
Client and server authentication for Transport Layer Security (TLS)-related Extensible Authentication Protocol (EAP) protocols
•
Cisco ISE provides a web interface for managing PKI credentials. There are two types of credentials:
•
Cisco ISE identifies when a local certificate is about to expire and logs a warning in the audit logs. The expiration date also appears in the local certificate list page (Administration > System > Certificates > Local Certificates). The audit log message would be logged in the catalina.out file. You can download this file as part of the support bundle (Monitor > Troubleshoot > Download Logs). The catalina.out file will be available in this directory: support\apache_logs. There are two types of audit log messages that provide information on local certificate expiry warning:
–
–
•
In a distributed deployment, at the time of registering a secondary node to the primary node, the secondary node should present a valid certificate. Usually, the secondary node will present its local HTTPS certificate. To provide authentication for deployment operations that require direct contact with the secondary node, the CTL of the primary node should be populated with the appropriate trust certificates, which can be used to validate the HTTPS certificate of the secondary node. Before you register a secondary node in a deployment, you must populate the CTL of the primary node. If you do not populate the CTL of the primary node, node registration fails. Node registration also fails if certificate validation fails for some reason.
Note
This chapter contains the following sections:
•
Local Server Certificates
After installation, Cisco ISE generates, by default, a self-signed local certificate and private key, and stores them on the server. For certificate-based authentications, Cisco ISE authenticates itself to clients using the default self-signed certificate that is created at the time of installation. This self-signed certificate is used for both HTTPS and EAP protocols to authenticate clients. This self-signed certificate is valid for one year and its key length is set to 512 bits. At the time of generation, this certificate is used for both EAP and HTTPS protocols. You can change this definition after you have imported or generated other local certificates. In a self-signed certificate, the hostname of Cisco ISE is used as the common name (CN) because it is required for HTTPS communication.
Note
You might want to install a CA-signed certificate and configure it for use by HTTPS or EAP or both. You can import a CA certificate and its private key or request a CA for a CA-signed certificate. To request a CA-signed certificate, you must generate a certificate signing request (CSR) from the Cisco Cisco ISE user interface, export it, and send it to a CA. The CA will sign the certificate and return it to you. You must then bind the certificate that the CA returned with the private key that is stored with the CSR in Cisco ISE. After you bind this certificate with the private key, you can configure it for HTTPS or EAP or both.
The Cisco ISE provides a web interface that allows you to do the following:
•
Note
•
•
•
•
•
•
•
•
•
This section covers the following topics:
•
Viewing Local Certificates
The Local Certificate page lists all the local certificates added to the Cisco ISE.
Prerequisite:
Every Cisco ISE administrator account is assigned one or more administrative roles. To perform the operations described in the following procedure, you must have the Super Admin or System Admin role assigned. See Cisco ISE Admin Group Roles and Responsibilities for more information on the various administrative roles and the privileges associated with each of them.
To view the local certificate list, complete the following steps:
Step 1
Step 2
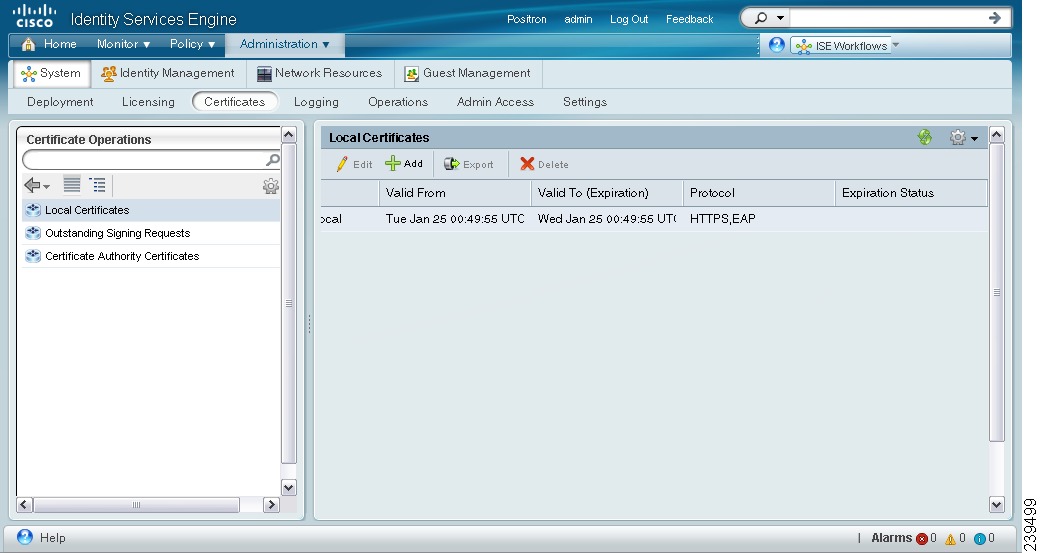
The Local Certificate page appears and provides the following information for the local certificates as shown in Figure 12-1:
•
•
The common name is usually the fully qualified domain name of the Cisco ISE node.
•
•
•
•
•
If your certificate expires in less than 90 days, the status is displayed as "Expiring in x days." If your certificate has already expired, the status is displayed as "Certificate has expired."
Figure 12-1 Local Certificate List Page
Adding a Local Certificate
Note
You can add a local certificate to Cisco ISE in one of the following ways:
•
•
•
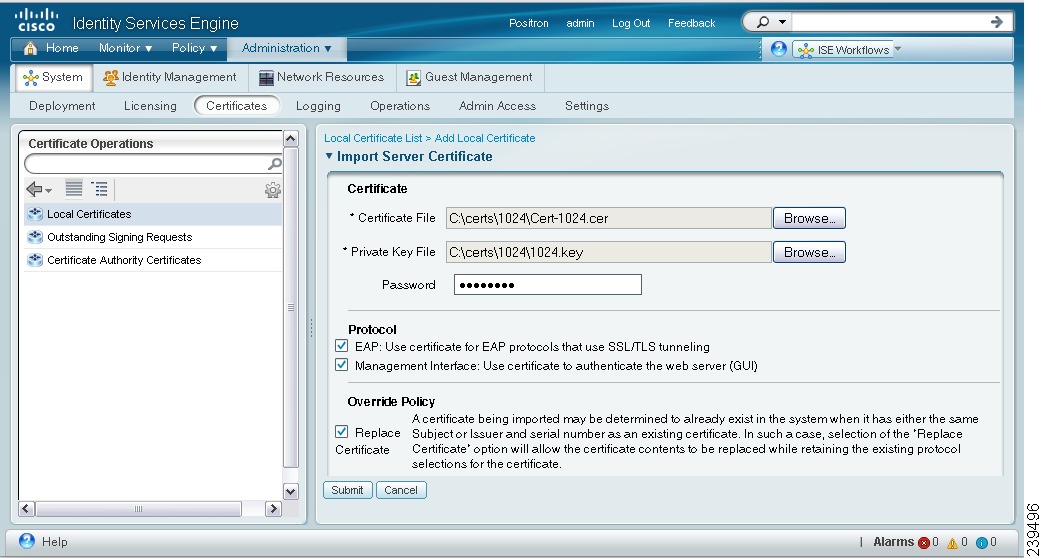
Importing a Server Certificate
Before you import a local certificate, ensure that you have the local certificate and the private key file on the system that is running the client browser.
Note
Prerequisites:
•
•
To import a server certificate, complete the following steps:
Step 1
Step 2
Note
The Local Certificate page appears.
Step 3
The Import Local Server Certificate page appears as shown in Figure 12-2.
Figure 12-2 Import Server Certificate Page
Step 4
If the private key is encrypted, enter the password to decrypt it.
Step 5
•
•
Note
Step 6
Step 7
If you import a local certificate to your primary Cisco ISE node, you must restart the secondary nodes connected to your primary Cisco ISE node. To restart the secondary nodes, from the command-line interface (CLI), enter the following commands:
a.
b.
Refer to the Cisco Identity Services Engine CLI Reference Guide, Release 1.0 for more information on these commands.
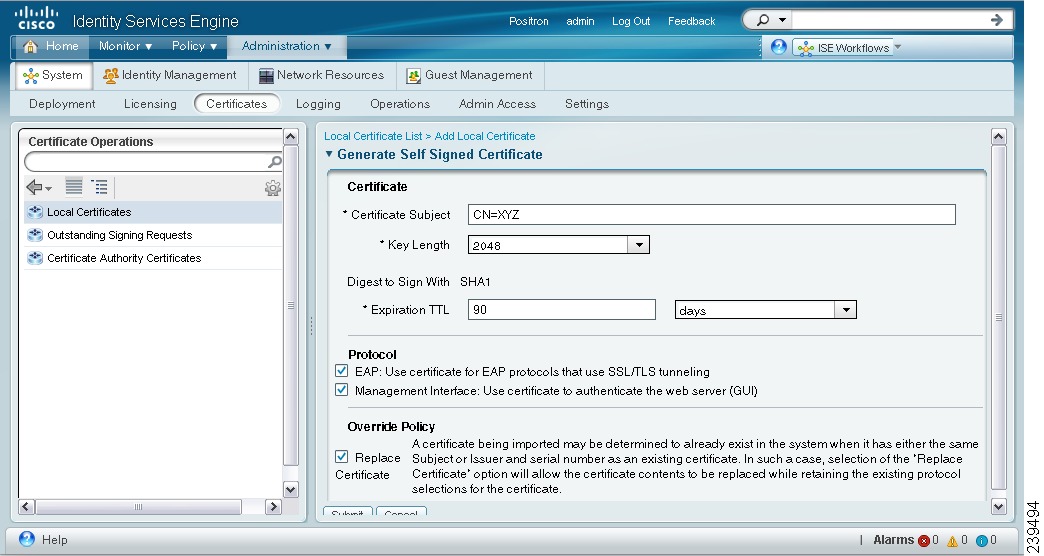
Generating a Self-Signed Certificate
Prerequisite:
Every Cisco ISE administrator account is assigned one or more administrative roles. To perform the operations described in the following procedure, you must have the Super Admin or System Admin role assigned. See Cisco ISE Admin Group Roles and Responsibilities for more information on the various administrative roles and the privileges associated with each of them.
To generate a self-signed certificate, complete the following steps:
Step 1
Step 2
Note
The Local Certificate page appears.
Step 3
The Generate Self-Signed Certificate page appears as shown in Figure 12-3.
Figure 12-3 Generating a Self-Signed Certificate Page
Step 4
•
•
•
Step 5
•
•
Note
Step 6
Step 7
If you generate a self-signed certificate on your primary Cisco ISE node, you must restart the secondary nodes connected to your primary Cisco ISE node. To restart the secondary nodes, from the command-line interface (CLI), enter the following commands:
a.
b.
Refer to the Cisco Identity Services Engine CLI Reference Guide, Release 1.0 for more information on these commands.
Note
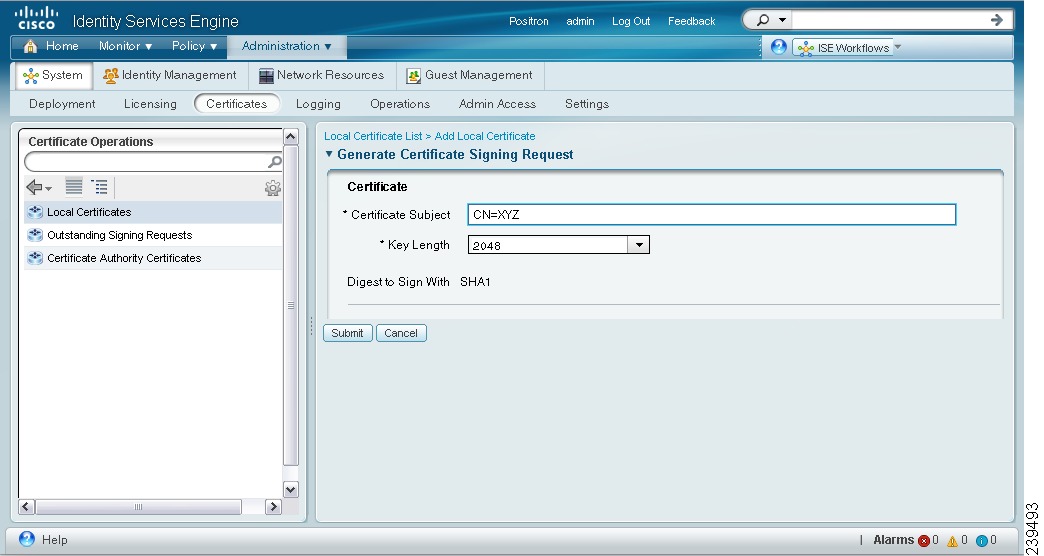
Generating a Certificate Signing Request
Prerequisite:
Every Cisco ISE administrator account is assigned one or more administrative roles. To perform the operations described in the following procedure, you must have the Super Admin or System Admin role assigned. See Cisco ISE Admin Group Roles and Responsibilities for more information on the various administrative roles and the privileges associated with each of them.
To generate a certificate signing request (CSR), complete the following steps:
Step 1
Step 2
Note
The Local Certificate page appears.
Step 3
The Generate Certificate Signing Request page appears as shown in Figure 12-4.
Figure 12-4 Generating a Certificate Signing Request
Step 4
Note
Step 5
A CSR and its private key are generated and stored in Cisco ISE. You can view this CSR in the Certificate Signing Requests page. You can export the CSR and send it to a CA to obtain a signature.
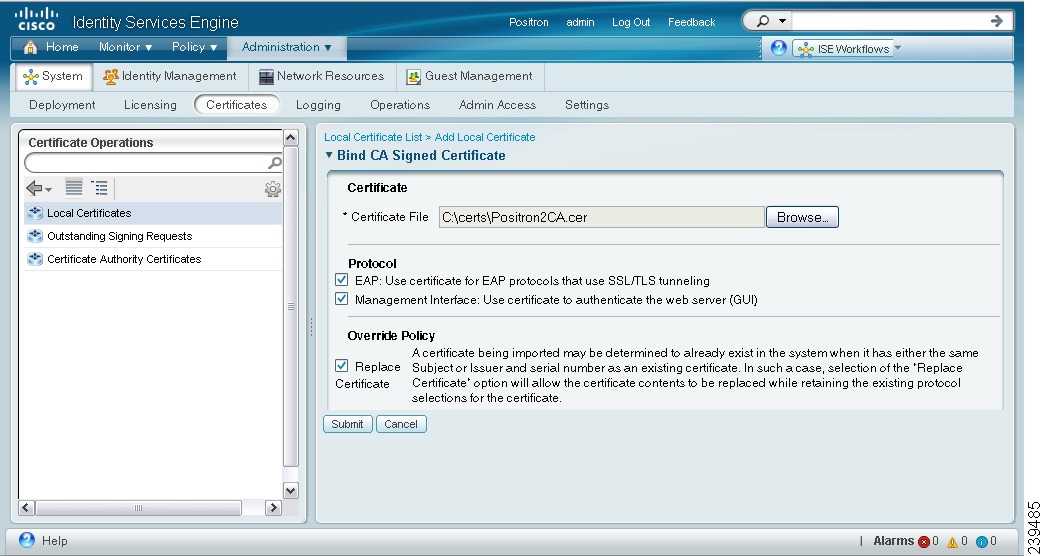
Binding a CA-Signed Certificate
After your CSR is signed by a CA and returned to you, use this process to bind the CA-signed certificate with its private key.
Prerequisites:
•
•
To bind a CA-signed certificate, complete the following steps:
Step 1
Step 2
Note
The Local Certificate page appears.
Step 3
The Bind CA Signed Certificate page appears as shown in Figure 12-5.
Figure 12-5 Binding a CA-Signed Certificate
Step 4
Step 5
•
•
Note
Step 6
Step 7
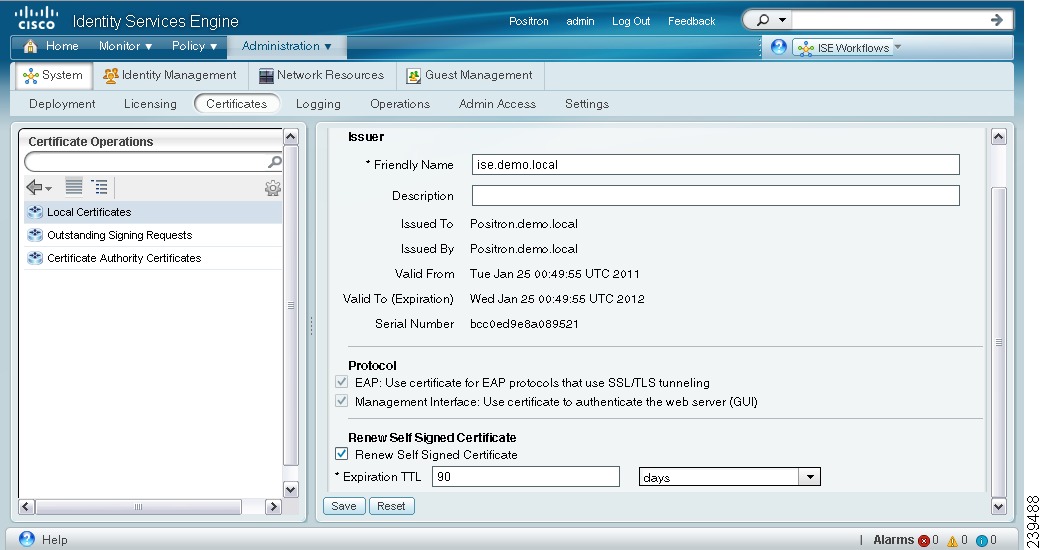
Editing a Local Certificate
Prerequisite:
Every Cisco ISE administrator account is assigned one or more administrative roles. To perform the operations described in the following procedure, you must have the Super Admin or System Admin role assigned. See Cisco ISE Admin Group Roles and Responsibilities for more information on the various administrative roles and the privileges associated with each of them.
To edit a local certificate, complete the following steps:
Step 1
Step 2
Note
The Local Certificate page appears.
Step 3
The page refreshes and lists the information for the local certificate as shown in Figure 12-6.
Figure 12-6 Local Certificate Edit Page
You can edit the following:
•
•
•
•
Step 4
Step 5
Step 6
•
•
Note
For example, if local_certificate_1 is currently designated for EAP and you check the EAP check box while editing local_certificate_2, then after you save the changes to local_certificate_2, local_certificate_1 will no longer be associated with EAP.
Step 7
Step 8
If you edit a local certificate on your primary Cisco ISE node, you must restart the secondary nodes connected to your primary Cisco ISE node. To restart the secondary nodes, from the command-line interface (CLI), enter the following commands:
a.
b.
Refer to the Cisco Identity Services Engine CLI Reference Guide, Release 1.0 for more information on these commands.
Deleting a Local Certificate
Prerequisite:
Every Cisco ISE administrator account is assigned one or more administrative roles. To perform the operations described in the following procedure, you must have the Super Admin or System Admin role assigned. See Cisco ISE Admin Group Roles and Responsibilities for more information on the various administrative roles and the privileges associated with each of them.
To delete a local certificate, complete the following steps:
Step 1
Step 2
Note
The Local Certificate page appears.
Step 3
Step 4
Are you sure you want to delete the selected item(s)?
Step 5
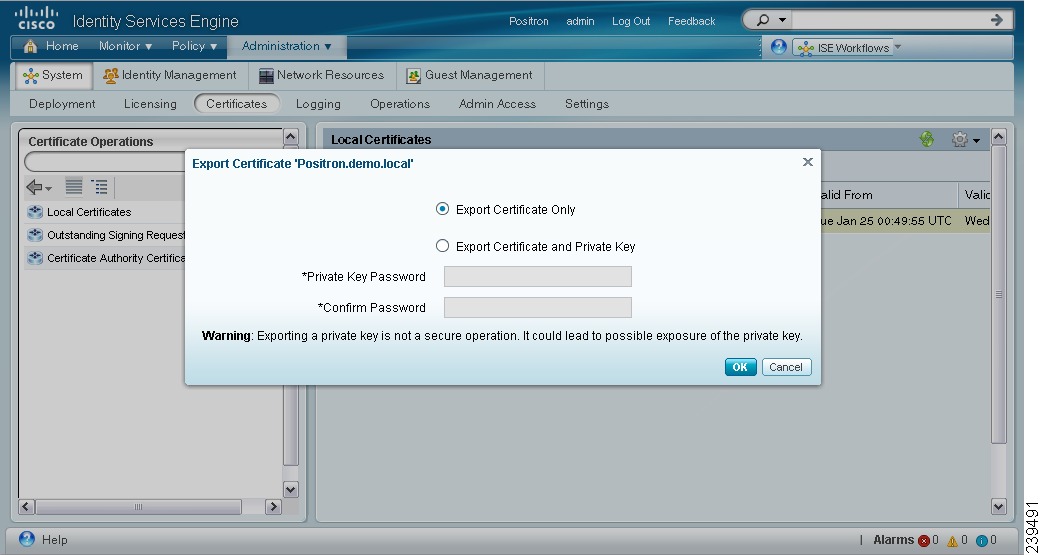
Exporting a Local Certificate
You can export the selected local certificate, or the certificate and the private key.
Prerequisite:
Every Cisco ISE administrator account is assigned one or more administrative roles. To perform the operations described in the following procedure, you must have the Super Admin or System Admin role assigned. See Cisco ISE Admin Group Roles and Responsibilities for more information on the various administrative roles and the privileges associated with each of them.
To export a local certificate, complete the following steps:
Step 1
Step 2
Note
The Local Certificate page appears.
Step 3
The Select Certificate Components to Export dialog box appears as shown in Figure 12-7.
Figure 12-7 Exporting a Local Certificate
You can choose to export only the certificate, or the certificate and the private key.
Cisco does not recommend exporting the private key associated with the certificate because its value may be exposed. If you must export the private key, you must specify an encryption password for the private key. You will need to specify this password while importing this certificate into another Cisco ISE server to decrypt the private key.
Note
Step 4
Step 5
Step 6
If you export only the certificate, the certificate is stored in the privacy-enhanced mail format. If you export both the certificate and the private key, the certificate is exported as a zip file that contains the certificate in the privacy-enhanced mail format and the encrypted private key file.
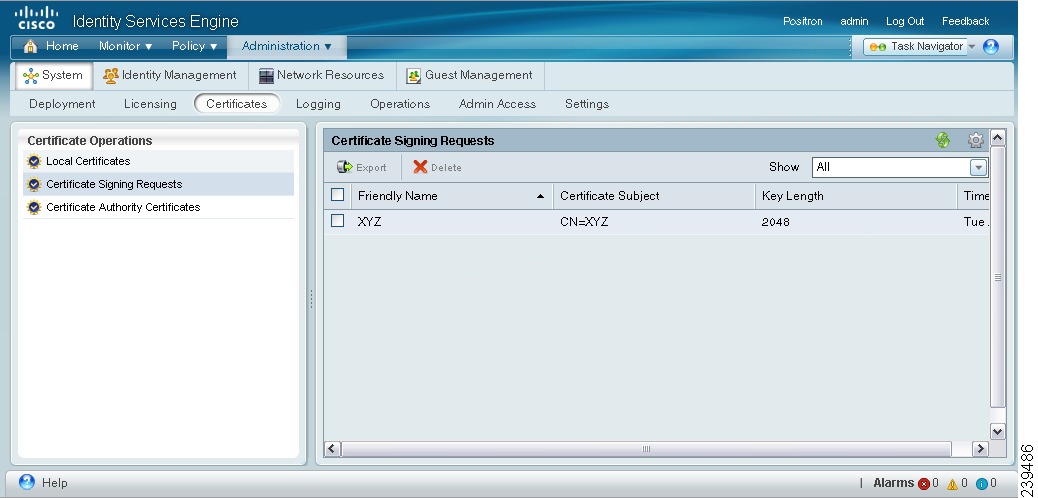
Certificate Signing Requests
The list of CSRs that you have created is available in the Certificate Signing Requests page. To obtain signatures from a CA, you must export the CSRs to the local file system that is running your client browser. You must then send the certificates to a CA. The CA will sign and return your certificates. The Certificate Signing Requests page allows you to export the CSRs to the local file system.
Note
This section contains the following topics:
•
•
Viewing and Exporting Certificate Signing Requests
Prerequisite:
Every Cisco ISE administrator account is assigned one or more administrative roles. To perform the operations described in the following procedure, you must have the Super Admin or System Admin role assigned. See Cisco ISE Admin Group Roles and Responsibilities for more information on the various administrative roles and the privileges associated with each of them.
To view the CSRs, complete the following steps:
Step 1
Step 2
Note
The Certificate Signing Requests page appears with a list of CSRs as shown in Figure 12-8.
Figure 12-8 Certificate Signing Requests
Step 3
Step 4
Deleting a Certificate Signing Request
Prerequisite:
Every Cisco ISE administrator account is assigned one or more administrative roles. To perform the operations described in the following procedure, you must have the Super Admin or System Admin role assigned. See Cisco ISE Admin Group Roles and Responsibilities for more information on the various administrative roles and the privileges associated with each of them.
To delete a CSR, complete the following steps:
Step 1
Step 2
Note
The Certificate Signing Requests page appears with a list of CSRs.
Step 3
The following message appears:
Are you sure you want to delete the selected item(s)?
Step 4
Certificate Authority Certificates
Certificate authority certificates are certificates that are signed by a CA. A CA is a trusted third party that issues digital certificates for use by clients and servers so that they can identify themselves to each other. The digital certificates issued by a CA contain a public key and the identity of the user. You must request the certificate authority certificate from your CA and import it into Cisco ISE. When you import more than one certificate authority certificate, the certificate authority certificates form a Certificate Trust List (CTL). When a client sends an authentication request, Cisco ISE verifies the client certificate against the CTL. If the certificate of the client is issued by a CA that is present in the CTL, then Cisco ISE authenticates the client.
Cisco ISE provides a web interface that allows you to do the following:
•
•
•
•
•
•
Note
This section covers the following topics:
•
•
•
•
•
•
Viewing Certificate Authority Certificates
The certificate authority certificates page lists all the certificates that have been added to Cisco ISE.
Prerequisite:
Every Cisco ISE administrator account is assigned one or more administrative roles. To perform the operations described in the following procedure, you must have the Super Admin or System Admin role assigned. See Cisco ISE Admin Group Roles and Responsibilities for more information on the various administrative roles and the privileges associated with each of them.
To view the certificate authority certificates, complete the following steps:
Step 1
Step 2
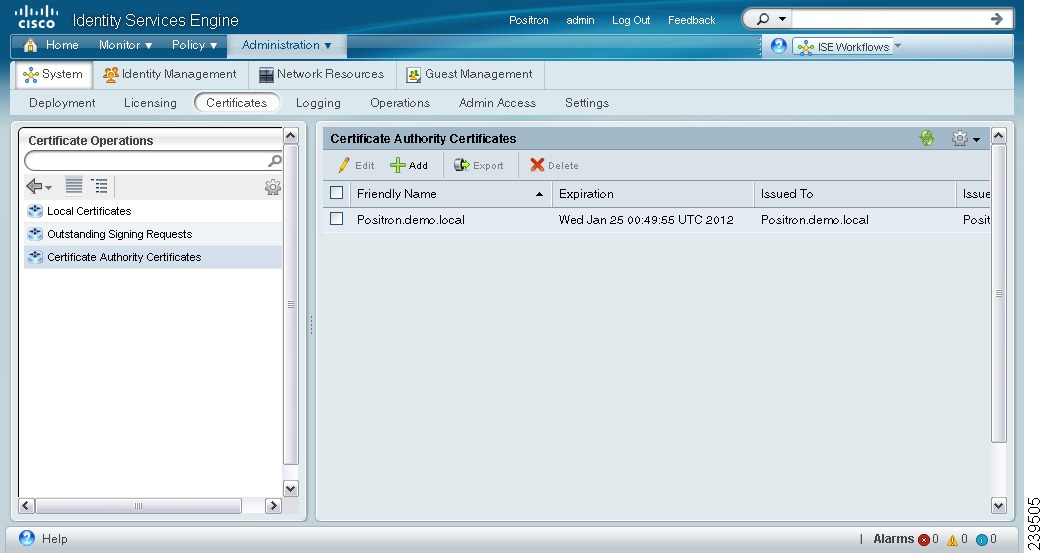
The Certificate Authority Certificates page appears as shown in Figure 12-9.
Figure 12-9 Certificate Authority Certificate List Page
This page provides the following information for the certificate authority certificates:
•
•
•
•
•
Adding a Certificate Authority Certificate
Note
Prerequisite:
Every Cisco ISE administrator account is assigned one or more administrative roles. To perform the operations described in the following procedure, you must have the Super Admin or System Admin role assigned. See Cisco ISE Admin Group Roles and Responsibilities for more information on the various administrative roles and the privileges associated with each of them.
To add a certificate authority certificate, complete the following steps:
Step 1
Step 2
The Certificate Authority Certificates page appears.
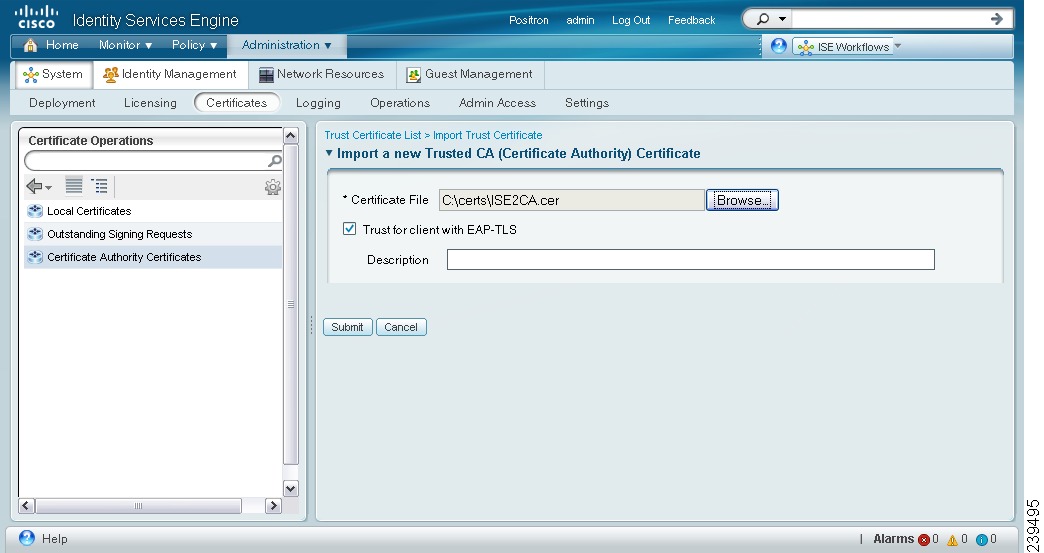
Step 3
The Import a new Trusted CA (Certificate Authority) Certificate page appears as shown in Figure 12-10.
Figure 12-10 Import a Trusted CA Page
Step 4
Step 5
Note
Step 6
Step 7
If you add a certificate authority certificate to your primary Cisco ISE node, you must restart the secondary nodes connected to your primary Cisco ISE node. To restart the secondary nodes, from the command-line interface (CLI), enter the following commands:
a.
b.
Refer to the Cisco Identity Services Engine CLI Reference Guide, Release 1.0 for more information on these commands.
Editing a Certificate Authority Certificate
Prerequisite:
Every Cisco ISE administrator account is assigned one or more administrative roles. To perform the operations described in the following procedure, you must have the Super Admin or System Admin role assigned. See Cisco ISE Admin Group Roles and Responsibilities for more information on the various administrative roles and the privileges associated with each of them.
To edit a certificate authority certificate, complete the following steps:
Step 1
Step 2
The Certificate Authority Certificates page appears.
Step 3
The page refreshes and the information for the certificate authority certificate is listed as shown in Figure 12-11.
Figure 12-11 Certificate Authority Certificate Edit Page
You can edit the following:
•
•
•
•
Step 4
Step 5
Step 6
Note
Step 7
a.
b.
The CRL can be downloaded automatically or periodically.
c.
d.
e.
f.
Step 8
If you edit a certificate authority certificate on your primary Cisco ISE node, you must restart the secondary nodes connected to your primary Cisco ISE node. To restart the secondary nodes, from the command-line interface (CLI), enter the following commands:
a.
b.
Refer to the Cisco Identity Services Engine CLI Reference Guide, Release 1.0 for more information on these commands.
Deleting a Certificate Authority Certificate
Prerequisite:
Every Cisco ISE administrator account is assigned one or more administrative roles. To perform the operations described in the following procedure, you must have the Super Admin or System Admin role assigned. See Cisco ISE Admin Group Roles and Responsibilities for more information on the various administrative roles and the privileges associated with each of them.
To delete a certificate authority certificate, complete the following steps:
Step 1
Step 2
The Certificate Authority Certificates page appears.
Step 3
The following message appears.
Are you sure you want to delete?
Step 4
Exporting a Certificate Authority Certificate
Prerequisite:
Every Cisco ISE administrator account is assigned one or more administrative roles. To perform the operations described in the following procedure, you must have the Super Admin or System Admin role assigned. See Cisco ISE Admin Group Roles and Responsibilities for more information on the various administrative roles and the privileges associated with each of them.
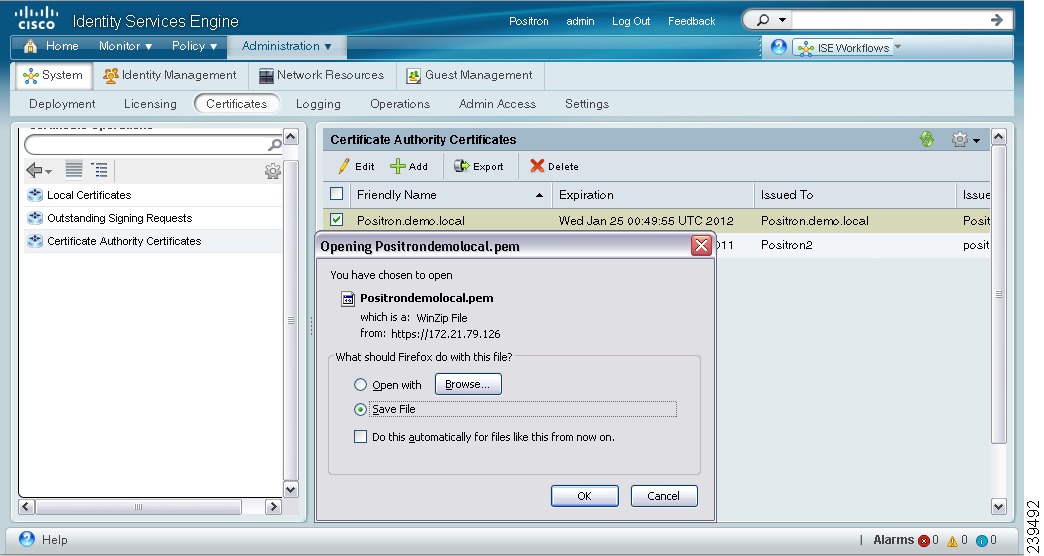
To export a certificate authority certificate, complete the following steps:
Step 1
Step 2
The Certificate Authority Certificates page appears.
Step 3
Note
A pop-up appears as shown in Figure 12-12.
Figure 12-12 Exporting a Certificate Authority Certificate
Step 4
Importing Certificate Chains
You can import certificates from a file that contains a certificate chain. Cisco ISE supports the privacy-enhanced mail format for importing chains, where each privacy-enhanced-mail-encoded certificate is ordered with the root CA certificate appearing first to the last certificate (end entity) in the correct order. For example, if there are n certificates, then certificates 1 to n - 1 are assumed to be root or CA certificates that belong to the trust list, and the nth certificate is assumed to be an end entity certificate from the local certificate store. The associated private key file belongs to the nth (end entity) certificate. Ensure that this format and convention is strictly followed.
Importing the certificate chain is a two-step process:
•
•
Creating Certificate Trust Lists in the Primary Cisco ISE Node
In a distributed deployment, before registering a secondary node, you must populate the primary node's CTL with the appropriate CA certificates that can be used to validate the HTTPS certificate of the secondary node. The procedure to populate the CTL of the primary node is different for different scenarios:
•
•
•
Note
Importing Root and CA Certificates into the CTL of the Primary Node
Prerequisite:
Every Cisco ISE administrator account is assigned one or more administrative roles. To perform the operations described in the following procedure, you must have the Super Admin or System Admin role assigned. See Cisco ISE Admin Group Roles and Responsibilities for more information on the various administrative roles and the privileges associated with each of them.
To import root and CA certificates into the CTL of the primary node, complete the following steps:
Step 1
Step 2
Importing the CA-Signed Certificate from the Secondary Node into the Primary Node's CTL
Prerequisite:
Every Cisco ISE administrator account is assigned one or more administrative roles. To perform the operations described in the following procedure, you must have the Super Admin or System Admin role assigned. See Cisco ISE Admin Group Roles and Responsibilities for more information on the various administrative roles and the privileges associated with each of them.
To import the CA-signed certificate from the secondary node into the CTL of the primary node, complete the following steps:
Step 1
Note
Step 2
Importing the Self-Signed Certificate from the Secondary Node into the CTL of the Primary Node
Prerequisite:
Every Cisco ISE administrator account is assigned one or more administrative roles. To perform the operations described in the following procedure, you must have the Super Admin or System Admin role assigned. See Cisco ISE Admin Group Roles and Responsibilities for more information on the various administrative roles and the privileges associated with each of them.
To import the self-signed certificate from the secondary node into the CTL of the primary node, complete the following steps:
Step 1
Note
Step 2