Working with Context Directory Agent
The Cisco Context Directory Agent (CDA) is a web based application that supports HTTPS, using self-signed certificate.
Understanding the CDA User Interface
Supported Browsers
Logging into the CDA User Interface
You can open a web browser and get connected to CDA through the web interface.
To log in to the CDA user interface, complete the following steps:
Step 1 Enter the CDA machine URL in the web browser, https://<ip_address/hostname>/cda
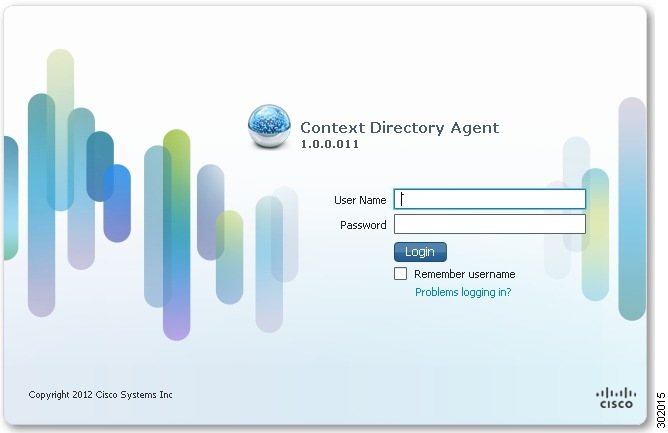
Step 2 Enter your user name and password in the CDA login page (Figure 3-1), and click Login .
Step 3 The CDA Dashboard is displayed (Figure 3-2) when you first log in.
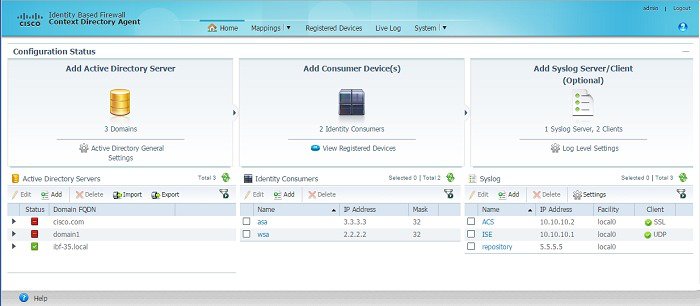
CDA Dashboard
The CDA Dashboard provides dashlets to quickly create, edit, or delete Active Directory servers, Consumer devices, Syslog servers, and Administrators.
It also provides dashlets with lists of existing Active Directory servers, Consumer devices, and Syslog servers. In addition, the dashboard provides links to Active Directory general settings, registered devices page, and log level settings. See Figure 3-2.
To go back to the Dashboard from any other page, click Home .
Working in the CDA User Interface
- Consumer Devices
- Active Directory Servers
- Sending and Receiving Syslog Messages
- IP-to-User-Identity Mappings
- Mapping Filters
- Registered Devices
- Administrators
- Password Policy
- Session Timeout
- Live Logs
Consumer Devices
Consumer devices are responsible for actively retrieving (and/or passively receiving) the latest IP-to-user-identity mappings from CDA. You can add, edit or delete network devices. CDA validates that the IP Address ranges in this table do not overlap.
Adding and Editing Consumer Devices
Consumer device entries in the dashlet are not synonymous with the actual ASA and WSA firewall devices. Instead, each Consumer Device entry here is a logical rule, permitting an IP Address (if the Mask is 32), or a range of addresses (if the Mask is 0-31), to communicate with CDA over RADIUS.
Creating a consumer device entry in the table or dashlet does not actually initiate any communication with the device. It only creates the rule that allows the consumer device to communicate with CDA over RADIUS. CDA acts as the RADIUS server in this case, hence it does not initiate the conversation with the device. It is the actual consumer device that initiates the RADIUS conversation with CDA. First add the consumer device IP Address or range in CDA, and then configure the device itself to contact CDA using the CLI or management GUI.
To add or edit a consumer device, complete the following steps:
Step 1 Click Add on the Identity Consumers dashlet, or check the check box next to a device and click Edit to edit it. You can alternatively click Add Consumer Devices link on the Dashboard.
The Consumer Device Configuration dialog box appears (Figure 3-4).
Figure 3-3 Identity Consumers Dashlet
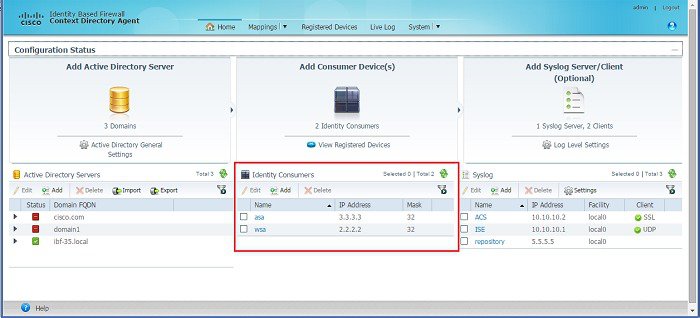
Figure 3-4 Consumer Device Configuration Dialog Box
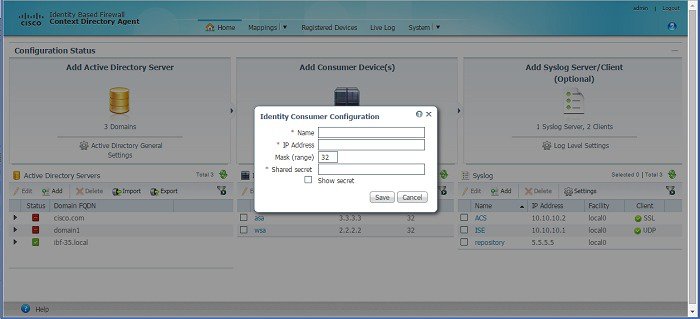
Step 2 Fill in or edit the following details:

Note When you add a WSA device, enter the management IP address of the device.
- Mask (range)—A number between 0-32. This describes the consumer device IP range in CIDR notation.
- Shared Secret—Passphrase that a consumer device will use for communicating with the CDA device. The Shared secret entered here should be identical to that configured in the device with that IP Address (or each of the multiple devices in the IP range), attempting to access CDA via this rule.
Step 3 Check the Show Secret check box if you want the shared secret to be displayed in plain text.
The new network device is listed in the Identity Consumers dashlet.
Deleting Consumer Devices
It is advised to first configure the consumer device to stop querying CDA before deleting it as a consumer device in CDA. Deleting a consumer device also disallows this device to communicate with CDA as it deletes the security rule that allowed this communication.
To delete a Consumer device, complete the following steps:
Step 1 From the Identity Consumers dashlet, select the check box next to device you want to delete in the list and click Delete .
CDA will prompt for a confirmation.
The consumer device is deleted.
Filtering Consumer Devices
You can filter Consumer devices based on the following criteria:
To filter the Consumer Devices list, complete the following steps:
Step 1 Click the filter  icon in the Identity Consumers dashlet.
Step 2 Fill in the criteria on which you want to filter.
Active Directory Servers
The Active Directory maintains the organization identities and their information. CDA inter operates with the Active Directory (or the domain controller) to obtain the IP-to-user-identity mapping information using the MS WMI protocol. You can add, edit, import, export, or delete Active Directory servers. You should also add a backup Active Directory Domain Controller machine.
CDA 1.0, patch 5, introduces a new uptime/downtime field in the Active Directory Server details table of the Active Directory Server dashlet. You can view this field when you expand each Active Directory server to see its details. This field displays the time for which the selected Active Directory servers is up or down.
Adding and Editing Active Directory Servers
Make sure all the requirements as described in “Active Directory Requirements for Successful Connection with CDA” section are fulfilled, for a successful connection with CDA.
To add or edit an Active Directory server, complete the following steps:
Step 1 Click Add on the Active Directory Servers dashlet, or check the check box next to a server and click Edit to edit it. You can alternatively click Add Active Directory Server link on the Dashboard.
The Active Directory Server Configuration dialog box appears. (Figure 3-5).
Figure 3-5 Active Directory Server Configuration Dialog Box
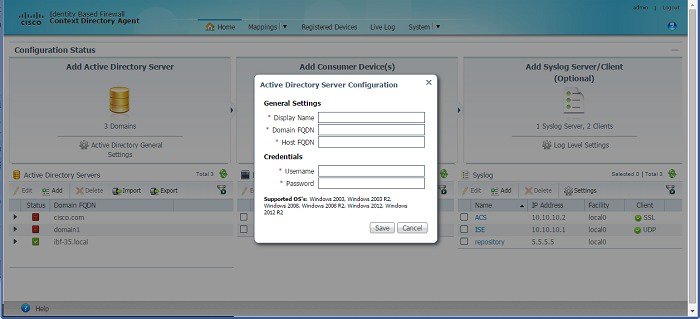
Step 2 Fill in the following details:
– Display Name—Display name of the Active Directory server.
– Domain FQDN—Domain fully qualified domain name (FQDN) of the Active Directory server.
– Host FQDN—Host FQDN of the Active Directory server.
– User name—Username that CDA will use to communicate with the Active Directory server.
– Password—Password that CDA will use to communicate with the Active Directory server. It should be the password corresponding to the username specified above.
This account must have the necessary privileges as described in the “Active Directory Requirements for Successful Connection with CDA” section.
The new Active Directory sever is listed in the Active Directory Servers dashlet.
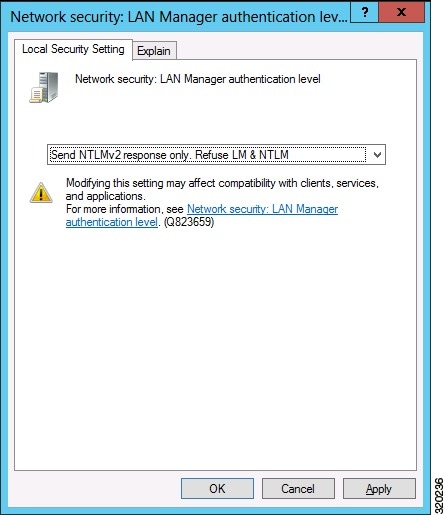
If the Group Policy enforced on the Domain Controller is set to “Send NTLMv2 response only. Refuse LM & NTLM”, see Figure 3-6, then you should use NTLMv2 to connect to the Domain Controller. You must check the “Use NTLMv2” check box in Active Directory General Settings, for the CDA to successfully connect to the Domain Controller.
To see what is the Group Policy applied on the Domain Controller:
Step 1 Go to Start > Administrative Tools > Group Policy Management
Step 2 Choose Default Domain Controllers Policy, right click and choose Edit.
Group Policy Management Editor appears.
Step 3 Go to Security Settings > Local Policies > Security Options .
The Local Security Settings tab shows the Group Policy.
Importing Active Directory Servers
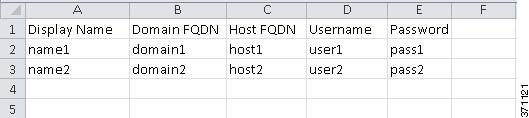
You can import Active Directory servers from a .txt or a .csv file.
Step 1 Click Import on the Active Directory Servers dashlet.
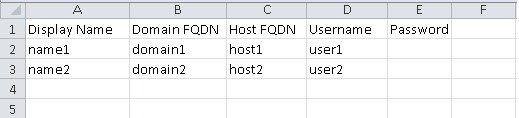
Step 2 Click Browse and select the .txt or .csv file from your local system. See Figure 3-7 for a sample .csv import file. You can also right-click the Generate Template link on the top right corner to save a sample import file.
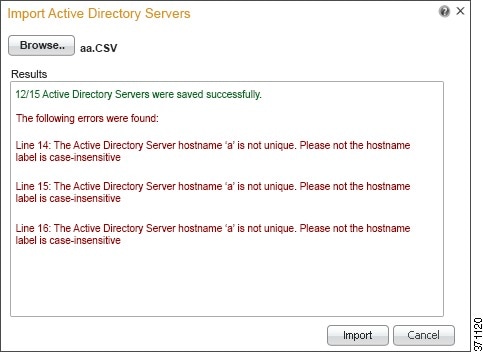
Step 3 Click Import . All the active directory servers in the file will be imported. You can see the import result in the Results area (Figure 3-8.) Errors, if any, are also listed in the same area.
Note The passwords within the import file (.csv or .txt) should be kept unencrypted, and this file should be treated as a sensitive file. Upon import, CDA would store those passwords internally hashed.
Exporting Active Directory Servers
CDA 1.0 patch 5, allows you to export Active Directory servers details to a comma separated value (.csv) file using the export option available on the Active Directory Server dashlet. This option exports all Active Directory servers that are listed in the Active Directory Server dashlet to a .csv file. You can save this file to a local drive. All the Active Directory server details except the password are exported to the CSV file. The password is not exported to ensure safety of the Active Directory servers. See Figure 3-9 for a sample csv export file.
Step 1 Click Export on the Active Directory Servers dashlet.
CDA prompts you to save the file to your local drive.
Step 2 Choose an appropriate location and click Save .
CDA exports the listed Active Directory servers to a .csv file and saves the .csv file in the location that you specify. See Figure 3-9 for a sample csv export file.
Deleting Active Directory Servers
To delete an Active Directory server, complete the following steps:
Step 1 From the Active Directory Servers dashlet, select the check box next to Active Directory server you want to delete in the list and click Delete .
CDA will prompt for a confirmation.
The Active Directory server is deleted.
Filtering Active Directory Servers
You can filter Active Directory servers based on the Domain FQDN.
To filter the Active Directory servers list, complete the following steps:
Step 1 Click the filter
icon in the Active Directory Servers dashlet.
Step 2 Enter the Domain FQDN of the server.
Active Directory General Settings
You can change the Active Directory General Settings to configure how CDA interacts with the Active Directory servers.
To configure the Active Directory general settings, complete the following steps:
Step 1 Click the Active Directory General Settings link on the Dashboard.
The Active Directory General Settings dialog box is displayed.
Step 2 Fill in the following details:
- Monitoring—Time span between consecutive monitoring of the DC machine’s up/down status.
- History—Specify the number of minutes in the past from which to start reading the security logs of DC machines that are configured. For example, if you want history for the past ten minutes, enter 10 .
- User Logon Expiration Period—Time duration after which logged-in user is marked as logged-out.
- Use NTLMv2—Check this check box to use NTLMv2 protocol. This will cause CDA to use NTLMv2 authentication protocol when connecting to Active Directory Domain Controllers. This check box is not checked by default after installing CDA, patch 2.
Make sure all the requirements as described in “Active Directory Requirements for Successful Connection with CDA” section are fulfilled, for a successful connection with CDA.
If the Group Policy enforced on the Domain Controller is set to “Send NTLMv2 response only. Refuse LM & NTLM”, see Figure 3-6, then you should use NTLMv2 to connect to the Domain Controller for the CDA to successfully connect to the Domain Controller.
Sending and Receiving Syslog Messages
CDA can forward logs containing administrative and troubleshooting information to one or more syslog servers. The contents of these logs are identical to that of the customer logs that are locally available on the CDA machine.
CDA can also act as a syslog server when one or more syslog clients are added. It can connect to Cisco Identity Services Engine (ISE) and Cisco Secure Access Control System (ACS) and receive syslog messages. You can check live logs to see the syslog messages received. The advantage is to integrate CDA with 802.1x deployment and support other devices that are not necessarily authenticated by Microsoft domain controller.
CDA supports ISE 1.1, 1.2, 1.3, and 2.0 and ACS 5.3, 5.4, 5.6, 5.7, and 5.8 only. CDA supports only Cisco devices for ISE 2.0.
You can add, edit or delete syslog servers or clients.
CDA supports the following three type of syslog messages:
- UDP syslog, where CDA listens for incoming UDP messages from ISE on port 514.
- TCP syslog, where CDA listens for incoming TCP messages from ISE on port 1468.
- Semisecure TCP syslog, where CDA listens for incoming TCP messages from ISE on port 6514. In this case, you should import CDA certificate into ISE certificate store. CDA does not authenticate ISE by its certificate, the certificate is required by ISE to authenticate CDA and for encrypting the syslog content over the TCP connection.
Adding and Editing Syslog Servers/Clients
To add or edit a syslog server/client, complete the following steps:
Step 1 Click Add on the Syslog dashlet, or check the check box next to a server and click Edit to edit it. You can alternatively click Add Syslog Server/Client link on the Dashboard.
The Syslog Server/Client Configuration dialog box appears. (Figure 3-5).
Figure 3-10 Syslog Server/Client Configuration Dialog Box
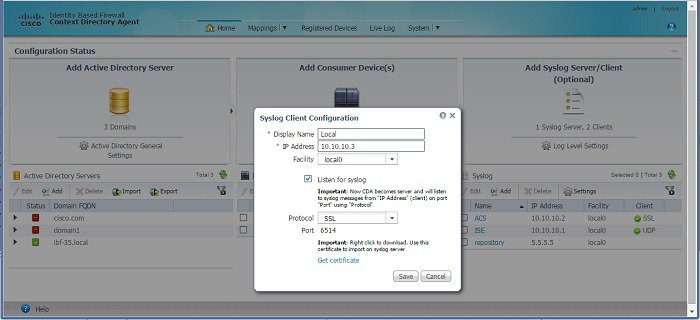
Step 2 Fill in the following details:
- Display Name—Display name of the syslog server/client.
- IP Address—IP Address of the syslog server/client.
- Facility—Syslog facility.
- Listen for Syslog—Check this check box to enable CDA to receive syslog messages from Cisco ISE/ACS.
- Protocol—Select the protocol that you want to use. CDA can connect to ISE 1.2, 1.3, and 2.0 and ACS 5.5, 5.6, 5.7, and 5.8 via UDP, TCP and SSL. It can connect to ISE 1.1.x and ACS 5.3/5.4 via UDP only. CDA supports only Cisco devices for ISE 2.0.
Note Currently, secure syslog over SSL is used for encryption only and does not authenticate ISE/ACS as certified sender of syslog messages.
- Port—This is a display-only field. The port number changes according to the protocol you select.
- Get Certificate—Click this to download the security certificate and send it to the ISE server. When you connect CDA with ISE using SSL, you need to be authenticated before the connection is established. To do this, you have to send this security certificate to the ISE server and then import it in to the ISE certificate store, in order to establish a connection.
Note Add the IP addresses of all the ISE nodes whose syslogs you want to send to the CDA.
The new sever/client is listed in the Syslog Server/Client dashlet.
For users who are authenticated through ISE against , the domain that ISE is joined to is used as the domain name. For users who are authenticated through ISE but not against , do not have a domain and “LOCAL” is used as the domain name.
Configuring ISE to Forward User Login Events to CDA
In order to setup CDA to receive syslog messages from ISE, you have to set remote log target in ISE, which will forward passed authentication and RADIUS accounting syslog messages to CDA. In CDA you have to setup syslog server that will receive syslog messages from ISE.
The following steps describe the required configuration in ISE and CDA.
Step 1 Configure a new remote log target in ISE. This log target should be the CDA machine that will receive syslog messages originated by ISE (Figure 3-11.) For more information on how to configure remote log target, see the Cisco Identity Services Engine User Guide, Release 1.2 .
Figure 3-11 Configuring Remote Log Target in ISE
Step 2 Configure ISE to forward Passed Authentication syslog messages to CDA (Figure 3-12.) For more information, see Cisco Identity Services Engine User Guide, Release 1.2 .
Figure 3-12 Configuring ISE to Forward Passed Authentication Syslog Messages

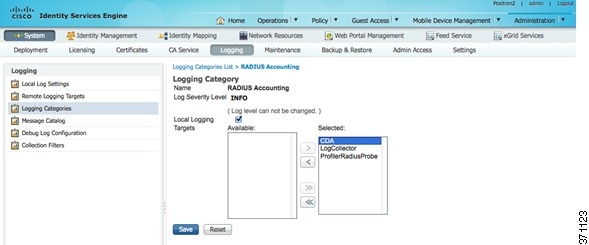
Step 3 Configure ISE to forward RADIUS Accounting syslog messages to CDA(Figure 3-13.) For more information, see Cisco Identity Services Engine User Guide, Release 1.2 .
Figure 3-13 Configuring ISE to Forward RADIUS Accounting Syslog Messages
See “Adding and Editing Syslog Servers/Clients” section for information on how to configure syslog servers in CDA with ISE details. Ensure that when configuring CDA, you check the Listen for Syslog checkbox so messages from ISE are parsed.
Configuring a Default Domain Name
If the attribute for domain name is not set by the syslog client (ISE/ACS), by default CDA uses LOCAL as the domain name in the IP-to-User-Identity Mappings page. This happens in cases such as EAP-TLS authentications, RADIUS authentications, etc. To avoid this, you can configure a domain name that would be displayed in case the domain name of the user is unknown.
If the attribute of the domain name is missing and you configured a replacement domain name, that name will be applied to all the syslog listeners. You cannot configure different domain names for several domains. The replacement domain name will be applied to all future syslog messages you will receive after the configuration.
To configure a common domain name for users whose domain cannot be derived from ISE/ACS, complete the following steps:
Step 1 Go to the CDA Home page.
Step 2 Choose Settings from the Syslog dashlet.
Step 3 Enter a replacement Domain Name.
Figure 3-14 Default Domain Name
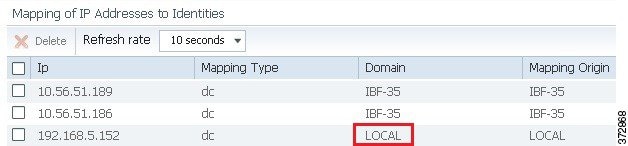
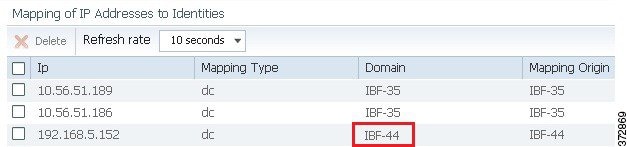
In the Figure 3-14, the highlighted domain name shows the default name displayed as LOCAL. You can change the default domain name as shown in Figure 3-15.
Figure 3-15 Change the Default Domain Name

After you change the default domain name, the updated name is displayed in the IP-to-User-Identity Mappings page, as shown in Figure 3-16.
Figure 3-16 Domain Name Configured
Deleting Syslog Servers
To delete a Syslog server, complete the following steps:
Step 1 From the Syslog Servers dashlet, select the check box next to server you want to delete in the list and click Delete .
CDA will prompt for a confirmation.
Filtering Syslog Servers
You can filter Syslog servers based on the following criteria:
To filter the syslog server list, complete the following steps:
Step 1 Click the filter
icon in the Syslog Servers dashlet.
Step 2 Fill in the criteria on which you want to filter.
Log Level Settings
This is used to globally configure log level settings used for logs sent to syslog servers and the logs that are stored on the CDA machine and can be viewed in the user interface under live logs.
To configure the global log level settings, complete the following steps:
Step 1 Click the Log Level Settings link on the Dashboard.
The Global Log Level Settings dialog box is displayed.
Step 2 Select a log level for the Log Level drop-down list. CDA provides the following log levels:
IP-to-User-Identity Mappings
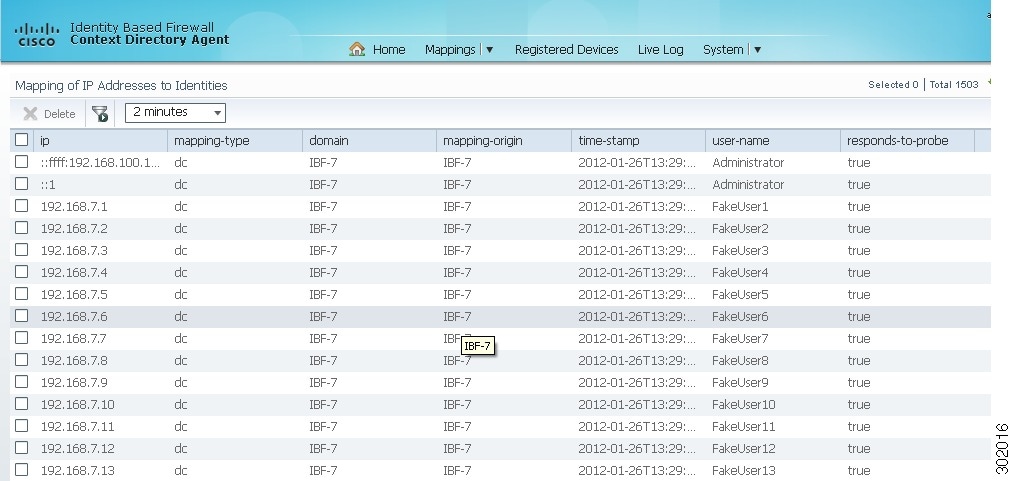
CDA lists all the currently cashed IP-to-user-identity mappings and allows the administrator to refresh, filter and delete the mappings. Figure 3-17 shows the IP-to-user-identity mappings page.
Figure 3-17 IP-to-User-Identity Mappings Page
Listing the IP-to-User-Identity Mappings
To list the IP-to-user-identity mappings, choose Mappings > IP to Identity.
Refreshing the IP-to-User-Identity Mappings Page
this page gets automatically refreshed after every 10 seconds, by default. You can change the refresh rate to one of the following:
Filtering the IP-to-User-Identity Mappings Page
You can use the quick filter or advanced filter options to filter the IP-to-user-identity mapping records.
Step 1 Choose Mapping > IP to Identity .
The Mapping of IP Addresses to Identities page appears, which lists all the IP-to-user-identity mapping records.
Step 2 Click the Show drop-down to list the filter options.
Here, you can choose a Quick Filter, an Advanced Filter for filtering, or the Manage Preset Filters option, which allows you to manage preset filters for filtering.
Note To return to the IP-to-user-identity mapping list, choose All from the Show drop-down list to display all the mappings without filtering.
To filter by using the Quick Filter option, complete the following steps:
A quick filter filters IP-to-user-identity mapping based on each attribute on the Mapping of IP Addresses to Identities page.
To filter, click inside any field and enter the search criteria in the text box. It refreshes the page with the results on the Mapping of IP Addresses to Identities page. If you clear the field, it displays the list of all the mappings on the Mapping of IP Addresses to Identities page.
To filter by using the Advanced Filter option, complete the following steps:
An advanced filter enables you to filter IP-to-user-identity mapping by using variables that are more complex. It contains one or more filters that filter mappings based on the values that match the field descriptions. A filter on a single row filters mappings based on each attribute and the value that you define in the filter. Multiple filters can be used to match the values and filter mappings by using any one or all of the filters within a single advanced filter.
Step 1 Choose an attribute from the drop-down list. You can filter the IP-to-user-identity mapping records on any of the following record attributes:
Step 2 Choose the operator from the drop-down list.
Step 3 Enter the value for the attribute that you selected.
Step 4 Click the Add Row (plus [+] sign) button to add a filter, or click the Remove Row (minus [-] sign) button to remove a filter.
Step 5 Choose All to match the value in each filter, or Any to match the value in any one of the filters.
Step 6 Click Go to start filtering.
Step 7 Click the Save icon to save the filter.
The Save a Preset Filter dialog appears. Enter a file name to save the filter, and click Save . Do not include spaces when creating the name for a preset filter. Click Cancel to clear the filter without saving the current filter.
Deleting the IP-to-User-Identity Mappings
You can delete the selected mappings or clear all the mapping records. Both of these operations are asynchronous by nature, therefore, it will take some time for the Identity to IP mappings page to reflect the change.
To delete a mapping, complete the following steps:
Step 1 Choose Mappings > IP to Identity
Step 2 Select the check box next to the mapping you want to delete
Mapping Filters
You can use the Mapping Filters to block particular users or IP Addresses from being monitored by CDA.
You can create filters and specify user names, IP Addresses or both. CDA will ignore mapping updates with the specified users and/or IP Addresses, and will not collect mapping data from those updates. The data for the filtered users/IP Addresses will not be cashed by CDA. Hence, it will not be listed on the IP-to-Identity mapping page, nor will it be distributed to consumer devices.
To create Mapping filters, complete the following steps:
Step 1 Choose Mappings > Filters .
The Mapping Filters Configuration dialog box is displayed.
Step 3 Fill in the following details:
The new filter will be listed on the filters page.
Registered Devices
Registered Devices page displays a list of consumer devices that are connected to CDA and have been subscribed to receive mapping updates for specific IP Addresses (On demand with registration), or for the entire mapping database (Full download with registration).
Note that some consumer devices do not register for updates, and will not show up in this page, even though they communicate with CDA as required. For such devices, this does not indicate any issue. Cisco WSA is an example of such a device.
To view all the registered devices, click on the Registered Devices tab in the home page.
This page lists the following details:
The status field indicates whether the device is “in-sync” (green) or “out-of-sync” (red) with CDA. The other fields display information that was provided when the device was configured.
Administrators
You can add CDA administrators with admin or user privileges to access the CDA user interface.
An administrator with only user privilege has access to all the CDA user interface screens and functionality, except the System menu.
An administrator with both user and admin privileges has access to all the CDA user interface screens and functionality, including the System menu.
Adding and Editing Administrators
To add or edit an administrator, complete the following steps:
Step 1 Choose System > Administrators
The Administrators page appears.
Step 2 Do one of the following
Step 3 Enter the following details:
Step 4 Click Save to save add or edit the administrator.
Deleting Administrators
To delete an administrator, complete the following steps:
Step 1 Choose System > Administrators
Step 2 Select the check box next to the administrator you want to delete in the list and click Delete .
CDA will prompt for a confirmation.
Password Policy
You can create a password policy for administrator accounts to enhance security. The policy that you define here is applied to all accounts with admin privilege in CDA.
To configure the password policy, complete the following steps:
Step 1 Choose System > Password Policy
The Password Policy page appears.
Step 2 Enter the following information:
– Three or more consecutive characters—Check this check box to restrict the use of three or more consecutive characters.
– Username (or reversed)—Check this check box to restrict the use of the administrator username or its characters in reverse order.
– “Cisco” (or reversed)—Check this check box to restrict the use of the word “cisco” or its characters in reverse order.
– Custom word (or Reversed)—Restrict the use of any word that you define or these characters in reverse order.
Step 3 Click Save to save the policy.
Session Timeout
CDA also allows you to determine the length of time a CDA user interface session can be inactive and still remain connected. You can specify a time in minutes after which CDA logs out the administrator. After a session timeout, the administrator must log in again to access the CDA user interface.
To configure the session timeout, complete the following steps:
Step 1 Choose System > Session Timeout
The Session Timeout page appears.
Step 2 Enter the Session timeout value in minutes.
Live Logs
CDA live logs provide a mechanism for diagnosing, troubleshooting, and auditing the operations of CDA. Live logs gather all the information you need for auditing and troubleshooting the system. Live logs are stored in the db/reports.db file and in the configured Syslog servers. The live logs GUI presents up to the last 10,000 messages generated by CDA.
CDA live logs list the following messages:
- Syslog Server Messages (when CDA is connected as a syslog server)
- CDA Control Messages
- Configuration Changes
- Mapping Updates
- Sync Requests
- CoA Based Traffic
- Session Data Snapshot Transfer
- On-demand Queries
- Keep Alive Requests
- Domain Status Query
- DC Status Tracking
- Statistics of daily events per DC
CDA live log messages include the following information:
The following are the log levels and their status symbols supported by CDA:


CDA enables you to configure log verbosity to one of the following values:
Filtering the Live Logs
You can filter the live logs on any of the log attribute. The log attributes are:
To filter the live logs, complete the following steps:
Step 1 Click the filter
icon in the
Live Logs
page.
Step 2 Enter the filter criteria in the text box.
The filtered data is displayed.
 Feedback