Downloads |
 Feedback Feedback
|
Table Of Contents
Overview of the Installation Environment
Launching Oracle and Opening Your Database
Testing Your Oracle Database Connection
Oracle Tablespace Requirements
Creating the TFTP Home Directory
Setting Environment Variables and Server Arguments
Distributed Installation Issues
Starting the Cisco IP Manager Software
Setting Environment Variables on Server Hosts
Changing Environment Variables and Server Launch Flags
Relaunching Remote Hosts After a Database Shutdown
Logging In to the Application for the First Time
Working Config versus Running Config
Getting Started
Overview of the Installation Environment
The Cisco IP Manager software consists of several servers (separate executable files) and a graphical user interface (GUI) application. You can install all of the servers on one machine or divide them among several machines.
You can install the GUI application on the server machine or on one or more client workstations. You can run the GUI application locally or you can log in remotely using the UNIX rlogin command.
Once you have uncompressed the software packages from the CD and untarred the files as described in the section "Installing the Software," you will need to edit several files before you run the launch script.
Note
The scripts provided with the Cisco IP Manager software assume you are running a C shell. If you want to install the software under any other shell, you will have to modify the scripts accordingly.
Before you begin, you will need to know the hostname of the machine (or machines) on which your Naming Server and Event Server are to be installed, and all server hosts should be capable of translating hostnames into IP addresses (using DNS—recommended—or some other means of hostname resolution).
The Naming Server and Event Server are part of the Cisco IP Manager center package.
You must have an Oracle database installed and operational before you can successfully launch the Cisco IP Manager software.
Installing Oracle
You must install Oracle before you install the Cisco IP Manager software (or at least know your Oracle home directory, host machine, and Oracle Server ID), and your database must be running when you launch the Cisco IP Manager servers. See the section "Minimum System Requirements" in the chapter "" for a list of required Oracle components.
If you have already installed Oracle, you can perform the installation process a second time with a new ORACLE_SID value and select the Database Only installation option. This will create a new database without overwriting your existing database files and will not reinstall the Oracle binary files.
If you intend to use the same Oracle installation with more than one installation of the Cisco IP Manager servers, you must create a unique Oracle SID and Oracle tablespace for each Cisco IP Manager installation. (This requirement applies to multiple complete installations of the Cisco IP Manager software; it does not apply to multiple users of a single installation or multiple client installations which use the same servers.)
Verifying Oracle Processes
Log in to the Oracle host machine and enter the following on the command line to see if the Oracle processes are running:
ps -ef | grep ora_If there is no output displayed from the ps command, Oracle is not running.
If Oracle is running, you should see something similar to the following:
oracle 328 1 0 14:25:18 0:00 ora_pmon_CIPMoracle 328 1 0 14:25:18 0:00 ora_dbwr_CIPMoracle 328 1 0 14:25:18 0:00 ora_lgwr_CIPMoracle 328 1 0 14:25:18 0:00 ora_ckpt_CIPMoracle 328 1 0 14:25:18 0:00 ora_smon_CIPMoracle 328 1 0 14:25:18 0:00 ora_reco_CIPMoracle 328 1 0 14:25:18 0:00 ora_wmon_CIPMThese are the Oracle processes currently running (your output may not match this list exactly, depending on which Oracle components are installed).
If any Cisco IP Manager servers are installed on a remote host, you must have the Oracle SQL*Net listener process running on the Oracle host. Enter the following on the Oracle host's command line to see if the listener process is running:
ps -ef | grep tnslsnrIf there is no output on the screen, the listener process is not running.
If the listener process is running, you should see something similar to the following:
oracle 354 1 0 14:27:13 ? 0:00 /oracle/7.3.4/bin/tnslsnrLISTENER -inheritLaunching Oracle and Opening Your Database
Your Oracle database must be open before you can install or use the Cisco IP Manager software.
If Oracle is not currently running, you need to use the startup utilities located in the /bin subdirectory of your Oracle installation.
To open your database, you must be logged in to the Oracle host workstation under the Oracle administrator (DBA) user ID, then locate your $ORACLE_HOME/bin subdirectory.
On the command line, enter the following:
dbstartThe dbstart script will start the database identified in the oratab file. If the database starts successfully, you should see several lines of output, including the following:
SVRMGR> Connected to an idle instance.SVRMGR> ORACLE instance started....and ending with the following:
Server Manager Complete.Database "CIPM" warm started.If the SQL*Net listener process is not running, you will need to start that process as well. On the command line, enter the following
lsnrctl startYou should see several lines of output as the process is invoked, then you should see output similar to the following:
Services Summary...CIPM has 1 Service handler(s)The command completed successfullyTesting Your Oracle Database Connection
When you have configured your database and listener file, enter the following (for the database named CIPM) on the command line:
svrmgrlconnect <database_username>/<database_password>@CIPMUsername and password are separated by a slash with no spaces, and there are no spaces around the @ symbol.
If your system is set up properly (and your Oracle database is running), you should see a message advising you that you are connected to Oracle. Enter quit on the command line to exit the database.
Setting Up Your Oracle Files
To configure your database to work with the Cisco IP Manager software, you need to create a tablespace and configure several files.
You must be logged in to the Oracle host using the user ID (such as oracle) created during the Oracle installation procedure.
Oracle Tablespace Requirements
You will need to create an Oracle tablespace for your Cisco IP Manager tables. Reserve 200 megabytes of space for the first 500 network elements, plus 1 MB for each additional 100 elements.
To create the tablespace, Oracle must be running and your database must be open.
Log in to the Oracle host using the oracle user ID. Identify (or create) the directory where your Cisco IP Manager data should be stored, and grant write permission to the oracle user ID. Be sure your ORACLE_SID and ORACLE_HOME environment variables are set correctly, then launch the Oracle utility svrmgrl, which is located in the $ORACLE_HOME/bin directory.
At the SVRMGR prompt, enter the following on the command line:
connect internal;CREATE TABLESPACE CIPM_DATDATAFILE '/<your data directory>/CIPM_DAT_01.dbf' size 200MDEFAULT STORAGE ( INITIAL 50K NEXT 50KMINEXTENTS 1MAXEXTENTS 100PCTINCREASE 20);The directory specified must already exist. The tablespace and datafile names are arbitrary. You can use any names that help you keep track of what files are associated with what database. The only requirement is that the name given to the tablespace at the time of its creation (CIPM_DAT in the example) be the same as the default tablespace listed when you create the ipmgr user account.
Oracle User Account
While svrmgrl is still running, create an ipmgr user account using your CIPM_DAT tablespace as follows:
CREATE USER ipmgr IDENTIFIED BY <password>DEFAULT TABLESPACE CIPM_DAT;GRANT CONNECT TO ipmgr;GRANT RESOURCE TO ipmgr;You should use this user and password when entering Oracle information in the script ipmgr.configure (as described in the section "User IDs" elsewhere in this chapter).
File Permission Conflicts
If the Cisco IP Manager NEMServer is launched by a person with write permission to certain Oracle trace files, the NEMServer may fail during Telnet operations.
To prevent this, you should delete the files collect.dat, process.dat and regid.dat in the otrace/admin subdirectory of your Oracle installation.
If you cannot remove these files, you should at least ensure that the person who launches the NEMServer does not have write permission for them.
You can create one user ID for launching the Cisco IP Manager servers and another for launching Oracle. Or, you should at least see that the following conditions are met:
•
•
•
Note
init<ORACLE_SID>.ora
This file should already exist in the /dbs subdirectory of your Oracle installation. (The filename will contain your database's S1D in place of <ORACLE_SID>. If you named your database CIPM, this file will be named initCIPM.ora.)
If it has not already been done, you must edit the initCIPM.ora file so that the compatible value reflects the correct version of Oracle. Edit the appropriate line in the file to read as follows:
compatible = 7.3.0.0.0If this line does not exist in the initCIPM.ora file, you should add it. If it does exist but has been commented out, you should uncomment the line so that it is active. After editing this file, you should shut down and restart the database.
tnsnames.ora
If you are installing the Cisco IP Manager software on multiple machines, each remote server host machine (all except the one on which the ding package was installed) must have a tnsnames.ora file in a directory called /var/opt/oracle. You must also install the Oracle component SQL*Net on each of these remote hosts.
The ORACLE_HOME environment variable on the remote host should be set to the directory in which you install this package.
For a database created with the ORACLE_SID of CIPM, located on a machine called host in the DNS domain cisco.com, the contents of the edited file should look like the following:
CIPM =(DESCRIPTION =(ADDRESS =(PROTOCOL = TCP)(Host = host.cisco.com)(Port = 1521)(CONNECT_DATA =(SID = CIPM)(GLOBAL_NAME = CIPM)))You can create your own file, or edit the sample tnsnames.ora file from the following subdirectory of your Cisco IP Manager installation:
SRVRS/sample_db_filesThe first line is the service name, and (aside from any domain appendages, if any) it must match the GLOBAL_NAME entry. You should change the Host entry to be equal to the hostname of the database server, and both the SID and GLOBAL_NAME entries to the value of your ORACLE_SID. Oracle uses the GLOBAL_NAME entry to resolve alternate names for the same database. The entry is required, even though the Cisco IP Manager software does not make use of this feature.
Protocol and Port are required and must be set to the values shown. Proper indentation is important. Keyword/value pairs should be indented beneath their parent keyword; if an entry must be wrapped, its second line must be indented by at least one space or it will be misread as a new parameter.
listener.ora
If any of the Cisco IP Manager servers that communicate with the database are located on a machine other than the one on which Oracle is installed, a listener.ora file must be located on the Oracle host, in either a directory called /var/opt/oracle or in the $ORACLE_HOME/network/admin directory. (All of the Cisco IP Manager servers except INGServer and CNGSServer need to communicate with the database.)
The listener.ora file provides the Oracle listener process with information about your Oracle installation. Edit the sample file located in the following subdirectory of your Cisco IP Manager installation:
SRVRS/sample_db_filesFor a database called CIPM installed on a machine called host, which is located in the DNS domain cisco.com, the contents of the listener.ora file would look like the following:
LISTENER =(ADDRESS_LIST =(ADDRESS =(PROTOCOL = IPC)(KEY = CIPM))(ADDRESS =(PROTOCOL = TCP)(Host = host.cisco.com)(Port = 1521)))SID_LIST_LISTENER =(SID_LIST =(SID_DESC =(SID_NAME = CIPM)(ORACLE_HOME = /oracle/7.3.4)))The KEY value should be set to your ORACLE_SID. The Host value should be set to the hostname of the database server. The SID_NAME is your ORACLE_SID again. The ORACLE_HOME value should be the full path to your Oracle installation.
Protocol and Port values are required and must be listed as shown. Indentation should be the same as described for the tnsnames.ora file. This file is case sensitive. Enter data exactly as shown.
If your Oracle database was installed prior to your Cisco IP Manager installation, you can append this file to the listener.ora file that already exists. If you installed Oracle specifically for use with Cisco IP Manager software and are not already using the listener process, you can replace the existing listener.ora file with your edited version.
oratab
The oratab file should be located in the /var/opt/oracle directory on the machine on which the database is installed. It will be used by Oracle's dbstart utility to identify your database.
The oratab file consists of a single line:
<database name>:<location of your Oracle executables>:YIf your Oracle home directory is oracle7.3.4 and your database SID is CIPM, the oratab entry would be as follows:
CIPM:oracle7.3.4:YA sample oratab file is located in the following subdirectory of your Cisco IP Manager installation:
SRVRS/sample_db_filesThis file identifies the name and location of your database for the Oracle utility dbstart (and its companion dbshut). The dbstart utility starts Oracle; the "Y" at the end of the oratab entry tells the dbstart utility to open the database named CIPM. (Substitute your database name for CIPM in the sample. You should list the path to your Oracle installation as an absolute path, not a relative path.)
To make this happen automatically following a reboot (after a power interruption, for example), execute the dbstart utility from a script in the /etc/init.d directory on the Oracle host machine. For more information, see the section "Restarting After a Reboot" elsewhere in this chapter.
User IDs
File read/write/execute permissions will be inherited from the login of the person who installs the software. You, or your system administrator, should create an ipmgr user ID on each machine that will host a Cisco IP Manager server. This user ID should be used both for installing the software and for launching any of the servers.
The default behavior is to allow the GUI application to be run by any person able to log into a workstation on which the GUI has been installed, regardless of UNIX-level permissions on the server machines.
Installing the Software
Before installing the Cisco IP Manager software, you should be sure your Oracle database is set up and operational, as described in the section "Setting Up Your Oracle Files" elsewhere in this chapter. If you are still logged in to your UNIX workstation with the oracle user ID, log off and log back on using your ipmgr user ID.
The Cisco IP Manager software is contained in several compressed files on the installation CD:
•
•
•
•
•
•
•
You may install these files in any combination and on as many machines as needed, except that the center and ding packages should only be installed on one machine each (may be the same machine, or different machines for each).
Installation
To install the Cisco IP Manager software, copy the files for the packages you want to install from the distribution CD to a single directory and expand them using the UNIX uncompress utility. (You will need the installation package for any installation. When installing any of the servers, you must also copy and uncompress the orbixmt package.)
Untar only the cisco.ipmgr.installation.tar file. The installation script will untar the others for you.
The installation script will not run if you are logged in as root; otherwise, file permissions would be set incorrectly. Log in as the ipmgr user described in the section "User IDs" elsewhere in this chapter.
On the command line, enter the following:
tar xvf cisco.ipmgr.installation.tarWhen the file has been untarred, execute the ipmgr.install script as follows:
./ipmgr.install <target_directory> [center] [dnem] [ding] [gui] [all]The orbixmt package will be installed as needed; there is no need to specify it.
The first argument is an absolute path to the directory into which the files will be untarred. This can be the directory in which you are running the ipmgr.install script, but it does not need to be.
The rest of the parameters can be given in any order, and any that you don't want to install may be omitted. If you are using the all parameter, you need not specify any others except the target directory. (The external_idl package will not be installed by the ipmgr.install script; you will have to install that yourself, as described in the Cisco IP Manager API Reference Guide.)
For example, to install all packages into the directory ipmgr, enter the following on the command line:
./ipmgr.install /ipmgr allOnce the software has been properly installed, you can delete the tar files.
If you have installed the dnem package on a machine other than the one on which Oracle is installed, you must also install the Oracle SQL*Net package. When you run the script ipmgr.configure, specify the local Oracle installation directory.
GUI client workstations do not need to be configured to work with Oracle, nor do they need to be configured for TFTP. However, you must run the ipmgr.configure script as described in the section "Setting Environment Variables and Server Arguments."
Setting Up a TFTP Server
The Cisco IP Manager software is designed to use the Trivial File Transfer Protocol (TFTP) to upload and download network element data. Before you can use this protocol, however, you must configure a machine to be a TFTP server.
If possible, each machine on which you install NEMServer should act as its own TFTP server.
If you use a remote TFTP server, the /tftpboot directory must be mounted on the NEMServer host.
Enabling the TFTP Daemon
Log in as the superuser and edit the file /etc/inetd.conf. Locate the line that enables TFTP:
#tftp dgram udp wait root /usr/sbin/in.tftpd in.tftpd -s /tftpbootRemove the comment character (#) from the beginning of the line. Save your changes and exit the text editor.
The Cisco IP Manager NEMServer requires the TFTP directory to be named /tftpboot. If you are not able to do this, you must set up a symbolic link to your TFTP directory. (The user who launches the servers must have write permission to this directory.) If for some reason your network requires you to use something like myTftp, you should create a symbolic link by entering the following on the command line:
ln -s /myTftp /tftpbootTo verify that your workstation is TFTP-enabled, enter the following on the UNIX command line:
ps -ef | grep -v grep | grep inetdThe output will display the process identification number for the inetd configuration:
root 106 1 0 Sep 21 ? 0:00 /usr/sbin/inetd -sThe first column shows the user ID of the user who owns the process (inetd is owned by root.) The process ID is the number in the second column. In the example, the process ID is 106.
Issue a kill command with a -l (the number one) or -HUP argument to force the inetd process to read the newly edited inetd.conf file:
kill -1 106Verify that TFTP is enabled by entering the following:
netstat -a | grep tftpYour machine is enabled as a TFTP server if you see the following:
*.tftp IdleIf there is no output from the netstat command, TFTP is not enabled. Check the /etc/inetd.conf file for errors and repeat the previous instructions. For more information about TFTP or the kill command, see the UNIX man pages for tftp, tftpd, and kill.
Creating the TFTP Home Directory
While logged in as the superuser, create the /tftpboot directory if it does not already exist, by entering the following on the command line:
mkdir /tftpbootModify the permissions for this directory to give all users read, write, and execute permissions, by entering the following command:
chmod 777 /tftpbootIf you intend to specify a subdirectory of /tftpboot for your Cisco IP Manager TFTP communications when you run the ipmgr.configure script, you should create that at this time, as well, and set its permissions to the same value.
Your system is now enabled to act as a TFTP server.
Setting Environment Variables and Server Arguments
From the directory you specified as the target_directory when you ran the script ipmgr.install, execute the ipmgr.configure script. This script will generate a file named ipmgr.cfg.csh, which will be used to set the environment variables needed by the Cisco IP Manager launch scripts.
You must run ipmgr.configure every time you install an installation package. Each host, including a GUI-only workstation, needs its own ipmgr.cfg.csh file.
You should be prepared to provide some or all of the following information (depending on which packages you install) when prompted by the script:
•
•
•
•
•
•
•
•
Note
Distributed Installation Issues
If you install the dnem package on multiple machines, you must install Oracle SQL*Net on each and set up the Oracle listener process on the Oracle host to recognize each of the remote NEMServer hosts. When you run the ipmgr.configure utility during installation, specify the location of the SQL*Net files as the Oracle home variable on each remote host.
If you install the ding package on a remote host, you must edit the Orbix.hosts file on the remote host. The Orbix.hosts file is located in the SRVRS/pack/OrbixMT/2.3/cfg subdirectory of your Cisco IP Manager installation. Add the following line to the file:
CNGSServer:<ding installation hostname>:If the server on which you have installed the ding package is not able to resolve names, specify an IP address instead of the hostname.
You can have only one ding installation.
Starting the Cisco IP Manager Software
The Cisco IP Manager software consists of several independent executable files (servers) installed onto one or more server machines, and an executable GUI program that provides the user interface on one or more client machines.
Setting Environment Variables on Server Hosts
Before launching any of the servers, you must source the file ipmgr.csh, which is located in the SRVRS directory. You can do this manually, or you can add the following line to the .cshrc or .login file in the home directory of your ipmgr user ID:
source /<installation_home>/SRVRS/ipmgr.csh...where installation_home is the full path to the location of your Cisco IP Manager installation. (Before you can source the ipmgr.csh file, you must have already run the ipmgr.configure utility.)
You do not have to source the file ipmgr.csh on a workstation running only the Cisco IP Manager GUI application.
Server Startup Utility Files
Before you can use the Cisco IP Manager software, you need to first register each of the server applications you intend to use with the Orbix Naming Service, and then launch them. Two utilities for doing these tasks—ipmgr.putit and ipmgr.launch—are located in the SRVRS subdirectory beneath your Cisco IP Manager root directory.
Servers can be registered (using ipmgr.putit) or launched (using ipmgr.launch) one at a time or all at once. To register or launch more than one but less than all, issue a separate command for each server.
Do not use the all parameter unless all servers are present on the same machine.
When starting center package servers, start ES, NS, LOGServer, NAMServer, AASServer, AUTHServer, and CTMServer.
When starting the ding package servers, start the INGServer and CNGSServer.
When the dnem package is installed, start the NEMServer.
Note
If certain Oracle files are writable, the NEMServer will be unable to communicate with your network's devices. The ipmgr.launch script will check the status of these files. If there is a conflict, the script will display an error message and halt.
For more information, see the "File Permission Conflicts" discussion elsewhere in this chapter.
ipmgr.launch.csh
The utilities ipmgr.launch and ipmgr.putit both invoke the UNIX source command on the file ipmgr.launch.csh, which ensures a common working environment.
This file also sets command line options for each of the servers, as described in the section "Starting the Cisco IP Manager Software" elsewhere in this chapter. Server arguments are defined in the appendix "."
ipmgr.putit
The ipmgr.putit script invokes the Orbix putit command to register the servers with the Orbix Naming Service.
Change to the directory SRVRS beneath the root installation directory and execute the utility ipmgr.putit for the server you plan to launch. Usage is as follows:
./ipmgr.putit <server_name>...where server_name is one of the following (listed in the order in which they should be started):
ESNSLOGServerNAMServerNEMServerAUTHServerAASServerCTMServerCNGSServerINGServerall // use only if all servers are on one machineipmgr.launch
After using the ipmgr.putit utility, you can launch one or more of the server applications by executing the launch utility in the SRVRS subdirectory, as follows:
./ipmgr.launch <server_name>...where server_name is one of the following (listed in the order in which they should be started):
ESNSLOGServerNAMServerNEMServerAUTHServerAASServerCTMServerCNGSServerINGServerall // use only if all servers are on one machine
Note
Other Utilities
Other utility scripts provided in the SRVRS subdirectory are:
•
If you launched the servers manually or through a script other than ipmgr.launch, the ipmgr.killit command may miss them. After executing the ipmgr.killit utility, you should check to be sure all Cisco IP Manager process were in fact halted before restarting any servers. To do so, enter the following on the command line:
ps -ef | grep SRVRSThe output of this command will list all processes that originated from the SRVRS subdirectory. In addition to the Cisco IP Manager servers, this list should also show the Orbix processes. The ipmgr.killit command will not halt those processes.
If any Cisco IP Manager servers survived ipmgr.killit, issue the UNIX kill command directly:
kill -9 <PIDs>Substitute the process IDs of the surviving servers for the <PIDs> argument. The process IDs are displayed in the column following the user ID in output from the UNIX ps command.
•
•
•
###########################banner text###########################The characters # and > are part of an IOS prompt. For all devices which use the console connection method (set in the Device Properties window), the Cisco IP Manager servers must determine when these reserved characters are being used as a banner graphic and when they designate a prompt. The test involves introducing a delay (default is four seconds) to each device download. If you are downloading to a large number of devices, the aggregate delay can be significant. You should not use this check if you know your configurations do not contain banners that use the characters # and >.
For information about setting the length of the delay, see the discussion of "Detecting Banner Text Errors" in the appendix "."
Orbix Utilities
Several Orbix-related utilities from Iona Technologies PLC are available to you. (Launch them from any directory. Their location—SRVRS/pack/OrbixMT/2.3/bin—was included in your path when you sourced ipmgr.csh.) The ones used with the Cisco IP Manager servers are:
•
•
•
•
•
•
Note
Changing Environment Variables and Server Launch Flags
Environment variables are referenced in several scripts, and there are inter-script dependencies.With one exception—changing server launch flags in the file ipmgr.launch.csh—you should not edit these scripts. To change your environment, rerun ipmgr.configure.
If you are executing the ipmgr.configure script again, your existing ipmgr.cfg.csh file will be saved as ipmgr.cfg.csh.bak (and any previous ipmgr.cfg.csh.bak file will be overwritten). New Orbix.hosts and Orbix.cfg files will also be generated, but no backups of these files will be generated. If you want to preserve them, you will need to save them under a new name before proceeding.
You must set a value for every variable each time you run ipmgr.configure. If you enter nothing, the variable will be set to nothing.
After executing ipmgr.configure while servers are running, you should run the utilities ipmgr.killit and ipmgr.rmit to unregister the servers, source the file ipmgr.csh again, and then reinvoke both ipmgr.putit and ipmgr.launch as described elsewhere in this chapter. These files are all located in the SRVRS subdirectory of your Cisco IP Manager installation.
For more about editing the file ipmgr.launch.csh to change server launch flags, see the appendix "."
Restarting After a Reboot
If the system on which your servers are installed reboots, you must do the following:
•
•
•
If you choose to create a startup script to relaunch the Cisco IP Manager servers automatically upon reboot, copy your script into the directory /etc/init.d (you must be the root user). Link the script to aliases with the prefaces S99 and K99 in the /etc/rc2.d directory (the "K" link provides for an orderly database stop in the event of a manual reboot).
Here is the text of a sample C shell script that restarts Oracle and the Cisco IP Manager servers when all are installed on a single host:
#!/bin/sh## startup and shutdown script for Cisco IP Manager# Replace $ORACLE_HOME, $ORACLE_SID and $IPMGR_HOME with your actual# paths#case $1 in'start')echo "Cisco IP Manager starting..."## restart Orbix daemon#IT_CONFIG_PATH=/etc; export IT_CONFIG_PATH<$IPMGR_HOME>/SRVRS/pack/OrbixMT/2.3/bin/orbixd &## restart Oracle#ORACLE_HOME=<$ORACLE_HOME>; export ORACLE_HOMEORACLE_SID=<$ORACLE_SID>; export ORACLE_SIDsu oracle -c "<$ORACLE_HOME>/bin/dbstart"su oracle -c "<$ORACLE_HOME>/bin/lsnrctl start"## restart Cisco IP Manager servers# (add server launch commands here)#'stop')echo "Cisco IP Manager stopping..."## stop Oracle#su oracle -c "<$ORACLE_HOME>/bin/lsnrctl stop"su oracle -c "<$ORACLE_HOME>/bin/dbshut"*)echo "usage: /etc/init.d/ipm_start {start|stop}"esacSave the script as ipm_start, then copy the script into the /etc/init.d directory:
cp ipm_start /etc/init.dChange directories to the /etc/init.d directory and create links to the script, as follows:
cd /etc/init.dln ipm_start /etc/rc2.d/S99ipm_startln ipm_start /etc/rc2.d/K99ipm_startFor more information about executing scripts on reboot, see the UNIX init.d man page.
Relaunching Remote Hosts After a Database Shutdown
If the database is shutdown and restarted for any reason, you must restart all of the Cisco IP Manager servers which use the database, including those on remote hosts. (All but CNGSServer, INGServer, ES and NS use the database.)
Reinstallation
If you reinstall the center package software, you must also shut down and restart any servers that are running on remote hosts.
Running the GUI
The GUI is launched by the script ipmgr.gui in the GUI subdirectory of the target directory specified when you installed the GUI package. The Orbix daemon must be running. The ipmgr.gui script checks to be sure the daemon is running; if it is not found, the script launches it.
To launch the GUI, change directories to the GUI subdirectory (unless you have sourced the file ipmgr.csh from your userid's .cshrc or .login file), and issue the following command:
./ipmgr.guiLogging In to the Application for the First Time
From the UNIX command line, start the GUI program by entering ./ipmgr.gui. The IP Manager Login window will open. (If the window remains blank for an extended period of time, resize it slightly by clicking and dragging one of its corners. This will force the computer to redraw the elements inside the window.)
Figure 3-1 IP Manager Login window
When you start the Cisco IP Manager software for the first time, there will only be one user in the system, the SuperUser. The log-in name for this user is admin; the default password is password.
You cannot change this user name, but you can and should change the password. Anybody who logs in as admin will have unlimited access to everything in the database and can view, modify, create, or delete any object in the system.
You cannot delete the SuperUser from the system.
Services Window
Whenever you log in, the Cisco IP Manager Services control panel opens first.
Figure 3-2 Services control panel
The buttons presented in the Services window are the launching points for all of the functions of the Cisco IP Manager software.
The window has the following menus:
File Menu
•
Help Menu
•
The buttons on the Services window are:
•
•
•
•
Click the System Control Panel button (at the bottom of the main control panel) to open the System Control Panel.
Figure 3-3 System Control Panel
This window has the same menu structure as the Services control panel, except that the File menu contains a Close command instead of the Exit command. The Close command closes the System Control Panel window but does not exit the program.
Click the User Manager button to open the User Authentication Manager window.
Figure 3-4 User Authentication Manager window
If this is the first time you have used the Cisco IP Manager software, there will be only one entry—admin— in the User List at the left side of the window. You should select this entry and change the password.
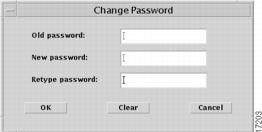
Click on the Change Password button to open the Change Password window.
Figure 3-5 Change Password window
Enter the current password in the Old password field. Enter the new password twice, in the New password and Retype password fields. Click the OK button to change the password, the Clear button to clear the fields but leave the window open, or the Cancel button to close the window without accepting the changes.
When you click the OK button, the password change will take effect and a confirmation dialog will be displayed.
Note
After you click OK in the confirmation dialog, you can click the Cancel button at the bottom right of the User Authentication Manager window to close the window.
Your next tasks should be:
1
2
3
For information about creating domains, see the chapter "."
For information about adding users and permission groups, see the chapter "."
Baselines
Occasionally, this manual will make reference to a baseline.
Some of the features available in the Cisco IP Manager software were initially developed for a companion product line, the Cisco Netsys network management tools. That suite of software first builds a model of your network that contains copies of all device configurations. This model is called a baseline.
In order to use the Netsys features such as the integrity, syntax and unconnected WAN interfaces checks, the Cisco IP Manager software needs to construct temporary baselines in memory. Unlike baselines used by the Netsys software, baselines are transient in the Cisco IP Manager software and must be constructed each time you log in to the GUI application.
Configuration Reports
The Cisco IP Manager software can check your configurations for certain connectivity problems using capabilities developed for the Cisco Netsys network management products. The reports you can generate are:
•
•
•
Note
Most reports are initiated from the Element Management window, as described in the chapter "." You can also generate a syntax check from the template configuration builder in the Template Management window, as described in the chapter "."
Working Config versus Running Config
Whenever you create, modify, or check a device's configuration, you are actually using a copy of the configuration (unless you are given the option of choosing). The Cisco IP Manager software stores this copy in the database. This is the working config.
The running config is the configuration that is currently running in the device's memory. To make your working config the device's running config, you must explicitly download the configuration to the device. (At that time, you must also select whether you want the downloaded configuration copied to the device's startup configuration memory area.)
Getting Started Checklist
Here is a step-by-step checklist of all of the things you need to do in order to install and launch the Cisco IP Manager software: