 Feedback Feedback
|
Table Of Contents
Overview of Template Management
Data Pane is Three Dimensional
Template Management
Overview of Template Management
A template is a configuration "boilerplate," a form that contains the text and IOS commands that are common to a number of devices, plus placeholders for the data that will vary from device to device.
Templates are constructed in two parts:
•
Template body—holds the non-changing text and tokens (called attribute names) that will be replaced with data during generation of the configuration.
•
Template data—lists the devices for which configurations will be generated and defines the values that will be substituted for the tokens in the template body.
Before you can define a template using the GUI developed by Cisco, the devices for which you want to generate configurations must already exist in the database. Use the Element Management window to add devices. For information about using the Element Management window, see the chapter "."
When the devices have been added to the database, click the Template Manager button on the Services control panel to open theTemplate Management window, where you can open a Template Config Builder window (described later in this chapter).
Both parts of the template are constructed in the same Template Config Builder window. You also use this window to preview device configurations, commit configurations to the database (as working configs), and run syntax checks on selected device configurations.
However, to download the configurations to devices, you must use the Element Management window, as described in the sections "Downloading to a Device" and Downloading to Multiple Devices" in the chapter "."
Template Management Window
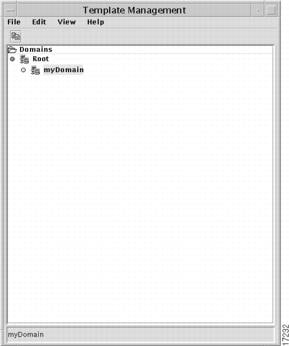
The Template Management window is nearly identical in appearance to the Element Management window and works in a similar way. The menu structure of the two windows is the same (except that the Template Management window does not include the Configuration Reports command on the View menu). For a description of the menu commands that are available in the Template Management window, see the section "Element Management Window" in the chapter "."
Figure 5-1 Template Management window
The Template Management window displays a data tree which shows all of the domains to which you have been given access. Unlike the Element Management data structure, however, the tree displayed in the Template Management window shows templates and template data objects, not network elements.
To create, open, modify, or delete templates and template data objects, use the floating options menu (opened by right-clicking the mouse).
To create a new template, first expand the elements in the tree to display the domain in which you want to locate your template, and then right click on that domain's name. From the floating menu that opens, select New Template, give the template a name in the dialog that opens, and click the OK button (or click the Cancel button to close the dialog without creating a template).
See the section "Name Restrictions" in the chapter "" for limitations on characters in names.
If you do not see the template in the data tree immediately beneath the domain to which it belongs, click on the ball next to the computer icon (or double click on the icon itself) to expand the domain listing in the data tree.
Before you can do anything with your new template, you must create a template data object, which will contain the values you assign to the template attributes. (Deleting this data item from the Template Manager window removes only the data values from the template. Body text and attribute names are stored in the template object.) Right click the mouse on the name of your newly created template and select the New Data command from the menu that opens. Enter a name for this data object and click the OK button (or click the Cancel button to close the dialog without creating a data object).If you do not see the data object in the data tree immediately beneath the template to which it belongs, click on the ball next to the computer icon (or double click on the icon itself) to expand the domain listing in the data tree.
Note
You can have multiple data objects associated with a single template, but any changes you make to the template body text will affect all of the data objects that are associated with the template, regardless of which data file you used to open the Template Config Builder.
Template Config Builder
Right click on a data object and select the Config Builder command from the menu that is displayed.
The Template Config Builder window will open. This is where you will create the template body, identify the devices for which you want to generate configuration files, and define the values that will be used for individual devices.
Figure 5-2 Template Config Builder window
The template body is entered in the editable text area that takes up the left half of the Template Config Builder window.
Devices to be configured will be listed in the pane that occupies the right half of the window. This is also where you will enter the data that will vary from device to device.
Template Body
The template body contains the text that does not change from device to device, plus placeholders for the data that will change for each device.
Enter the text for the body in the editable text box that occupies the left half of the Template Config Builder window.
Importing Text
To import the template body from some other source—either a router configuration file or a text-only file created in some other application—select the Import command from the File menu in the Template Config Builder window, and choose the Template Body command on the submenu.
When you have located the file in the Import Template Body window that opens, click the OK button. The selected file will be imported into the Template Config Builder.
Attribute Names
Placeholders, or attribute names, must adhere to the following syntax:
•
Attribute names are prefixed with a dollar sign ($) and enclosed in curly braces if mandatory, square brackets if optional, or angle brackets if global:
${mandatory_attribute}$[optional_attribute]$<global_attribute>•
Banner text can include attributes, but cannot contain the following characters as part of the banner text:
# >•
Names within the braces/brackets must start with a letter of the alphabet (either upper or lower case), followed by any printable characters.
•
A mandatory or optional attribute name can only be used once in a template body (global attributes can be used as many times as necessary).
•
There should be no white space in the attribute name (which includes the brackets and dollar sign).
Here is a sample template body:
hostname ${host_name}router ospf ${process_id}redistribute static metric ${metric_val}network ${ip_subnet} ${ip_mask} area ${area_id}When you have entered the template body text, save the template. This will cause all attribute names (anything preceded by a $ and enclosed in braces or brackets) to be displayed as blue text.
It will also cause numbered pages in the right-hand pane (the template data region of the Template Config Builder window) to be divided into as many columns as there are mandatory and optional attributes, plus one. Columns will each be headed by a different attribute name.
The number of attributes that a single template can hold is dependent on both the capacity of the Java Runtime Environment and your system's resources. You should be able to add several hundred attributes, but more 1,000 attributes may cause excessive delays in calculating the spreadsheet. For large numbers of attributes (an access list, for example), consider using subtemplates.
The global page (which precedes page 1) will be divided into as many columns as there are global attributes.
The first column heading, on both numbered and global pages, will be Device.
Subtemplates
You can reference another template (a subtemplate) from within a template by using the reserved word #include, followed by the name of the domain to which the subtemplate is attached in the Template Management window, a colon, and the subtemplate's template name all in quotes (except the #include command):
#include "domainName:templateName"There can be no white space between the names, and no embedded carriage returns. However, there must be a space between #include and the first quote mark. Domain names can have an optional non-letter symbol followed by at least one alphanumeric character, followed by any printable character.
A subtemplate must be in the same domain, or an ancestor of the domain, in which the parent template is located in the Template Management window. Subtemplate references must be in a straight line up the data tree (you cannot refer to a template that is in a subdomain of an ancestor domain, for example).
Subtemplates cannot reference other subtemplates.
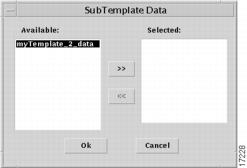
You must associate a data object with each subtemplate, by right-clicking the #include line. Select the Choose SubTemplateData command on the floating Options menu, then select the data object in the SubTemplate Data window which opens.
Figure 5-3 SubTemplateData window
Use the center arrow buttons to move selected data from the Available window to the Selected window (or back again).
This association will not be stored in the database. You must do this each time you open the Template Configuration Builder.
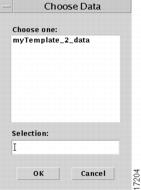
The Open SubTemplate command on the floating Options menu (displayed when you right-click on the #include line) opens the Choose Data window.
Figure 5-4 Choose Data window
When you select a data object and click the OK button, a new Template Config Builder window will open. The body text will be that of the subtemplate referenced by the #include statement. The data will be that which is contained in the selected data object.
Template Data
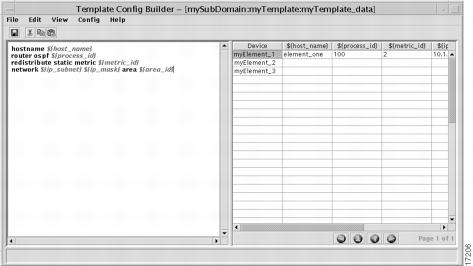
Once you have saved your template, the right side of the Template Config Builder will display columns with attribute names for titles. These columns will hold the data to be used for individual devices.
Each row configures a different device. You can have a maximum of 200 rows in a data object (but a single template body can be associated with multiple data objects).
Figure 5-5 Template Body and Data in the Template Config Builder window
List each network element in the Device column by its name as defined in the Element Management window. This name is an arbitrary value that you define within the Cisco IP Manager software; it may or may not be the device's actual hostname.
You can add any element in any domain to which you have access, using the following syntax:
<domain>:<element>There can be no spaces surrounding the colon. Do not specify more than one domain (or subdomain). The entry domainA:subdomainB:element would be interpreted as a device named subdomainB:element in the domain domainA. The device named element resides in subdomainB; there is no device named subdomainB:element. Specifying subdomainB:element is sufficient, even though they are nested in domainA. (Domain names must be unique throughout the system.)
You can copy network elements from the Element Management window, then paste them into your template. Select the devices to be copied and use the Copy to Clipboard command on the Edit menu. Return to the Template Management window, click in the first open cell in the Device column, and choose Paste from the Edit menu.
Data Pane is Three Dimensional
The data portion of the Template Config Builder window has three dimensions:
•
Rows—Each row in the data window represents a different device. Use the vertical scrollbar on the right side of the pane to display additional rows.
•
Columns—Each column (other than the first) represents a different attribute name in the template body. Use the horizontal scrollbar at the bottom of the grid to display additional columns.
•
Pages—Data for each iteration of an IOS configuration line is stored on a separate page. Page numbers are displayed in the lower rigbht corner of the window. Each time you open the Template Config Builder window, page 1 will be displayed. Use the arrow buttons (green diamonds in black circles) at the bottom of the data pane to move forward and back through the pages. The left arrow takes you to the global page, which precedes page 1, and the right arrow takes you to the last pages; the up/down arrows move forward and back one page at time. When the last page is displayed, clicking the down arrow will add a new, blank page.
For each mandatory or optional attribute name in the template body, enter a data value in the appropriate cell on page 1 in the data pane. Enter a data value for each unique global attribute, on the global page.
Global attributes defined in the parent template can be referenced in the body text of subtemplates. If no data value is assigned to the attribute on the global page in the subtemplate, the value assigned in the parent template will be used.
If you want the configuration file to contain multiple iterations of a line that is specified once in the template body, enter one complete set of data—one value for each of the attribute names on that line—for each iteration, with each data set on a different numbered data page. Do not repeat data for non-iterative lines.
To repeat the network... line contained in the body of the template shown previously, for example, add one set of data for the attribute names ${ip_subnet}, ${ip_mask}, and ${area_id} for each repetition desired, one set per page. The first set could be included on the first page along with the data for hostname and the other lines that won't be repeated. But data for these non-recurring lines should appear only once, on the first page.
Use the page forward button at the bottom of the window to advance to the next page. There can be an infinite number of pages.
Note
While it is possible to skip over blank pages and continue to add data, this will consume memory unnecessarily and performance will suffer. To remove blank pages, save the template and then force the Template Config Builder to reload it by selecting the Revert command from the File menu (or close and reopen the Template Config Builder).
Importing Data
To import template data from a text file, select the Import command on the File menu in the Template Config Builder window and choose the Template Data command on the submenu.
Data should be saved in a text file, one device per line. To supply values for fields, separate them by tabs or commas. (Do not mix separators within a file—use one or the other, or data will be lost.)
You must first create the columns in the data portion of the Template Config Builder window by saving the template before importing the data. If your data file specifies a value for a column that does not exist Template Config Builder window, that value will be ignored.
Multiple data pages cannot be specified from a single text file.
It is possible to import data to one page from one text file, then advance to another page and import data from a second text file. However, data will always be imported into the page beginning at the top left cell, regardless of device specification, and device names in the second text file will be ignored.
For example, if you create a template that has data fields ${A} and ${B} in addition to the device column and you import the following data from a file:
deviceOne, dataA-1, dataB-1deviceTwo, dataA-2, dataB-2deviceThree, dataA-3, dataB-3...then advance to page 2 and import the following text from a second file:
deviceTwo, dataA-2.2, dataB-2.2...the data in the second file will be imported into the first row of page two and the device specification will be ignored. This will assign the data to deviceOne, not deviceTwo, even though the Template Config Builder window shows deviceTwo on the screen. When you exit this page and return, there will be no data assigned to deviceTwo on this second page.
To make the data match the device, you should duplicate the device names from the first file, even if some of the devices have no second-page data.
The example would work if the second file contained the following lines:
deviceOnedeviceTwo, dataA-2.2, dataB-2.2deviceThreeMissing Values
If a configuration line in the template body contains multiple mandatory attribute names and you provide data for some but not all of them, an error message will be sent to the message console: "Some attribute values are missing in the spreadsheet." The configuration will not be generated.
If no values are given for any of the attribute names on a template body line, the corresponding line in the configuration file will not be generated.
If there is no value assigned to a global attribute, the configuration will not be generated and an error message will be sent to the message console. (However, see the discussion of subtemplates.)
If there is no value in the template data object for an optional attribute, an empty string will be generated for that value.
If you change the name of an attribute, data associated with the attribute will be lost when you save the template. You should copy the entire data column for that attribute name before you change the attribute's name. After saving the edited template, paste the data back into the column.
Previewing Configurations
When you have entered data for a device, you can preview the configuration that will be generated. On page 1 in the data pane, select one or more devices and choose the Preview command from the Config menu. (Templates must be saved before you can preview the configuration; if you have not yet saved the template, a dialog will ask if you want to. When you save the template, you must again select the device in the data pane and choose the Preview command.)
A preview window will be opened for each selected device, displaying the text of the configuration that will be generated. You can export the text from any of these windows by right-clicking anywhere inside the window and selecting one of the commands from the floating menu that opens. The Export All Text command will save all text in the preview window to an ASCII file; the Export Selected Text command will save only the text which you selected (prior to opening the options menu).
When you close the preview window, you must then choose the Commit command on the Config menu in order to generate a working config that will be retained in the database. If you do not commit the configuration, an Object not found error message will be generated when you choose an operation that requires the device's working configuration. Select multiple devices to generate and commit configurations for a group of network elements. Choose Syntax Check from the Config menu to perform an IOS command syntax check on the working configuration.
Finding Data and Body Text
You can use the Find dialog to search for text in either the body or the data portion of your template. First click the mouse in either the body or data side of the Template Config Builder window, then select the Find command on the Edit menu. Enter the text you want to locate in the Find What field, select the Match Case checkbox if you want the search to be case sensitive, then choose the Find Next button. When text is located in the data pane, the corresponding attribute in the body pane will be highlighted.
Syntax Check
To generate a syntax check report, you must first create and save (or commit) a working config, as described in the section titled "Template Config Builder" elsewhere in this chapter. Then, with the device (or multiple devices) selected in the Template Config Builder window's data pane, select the Syntax Check command from the Config menu.
The first thing the syntax-checking operation will do is attempt to construct a temporary Netsys baseline from the selected devices' working configurations. (Unlike the Netsys product, where a baseline is a permanent object that is stored, and can be closed and reopened, the Cisco IP Manager baseline is created in memory only for the duration of a single syntax check. Each time you initiate a new check, even if it is for the same configuration, a new baseline is created.) If this operation fails for any one of the selected devices, a message will be displayed informing you that an error has occurred. Dismiss this message box and select the Message Console command from the View menu to open the Message Console window. The messages displayed here will tell you what failed, and for which devices.
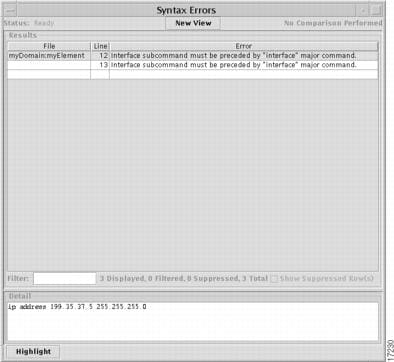
For each of those configurations that were successfully added to the baseline, a Syntax Errors window will be opened to display the results of the Syntax Check.
Figure 5-6 Syntax Errors window
This window displays a grid which identifies the type and location of any syntax errors found. For a complete list of errors that the software is capable of catching, see the appendix "."
See the section "Configuration Reports" in the chapter "" for a general description of reports.
See the section "Syntax Check Report" in the chapter "" for a description of the Syntax Check window.
When you are finished viewing the Syntax Check report, double click on the window's control button (extreme left end of the title bar), or click once on it and choose the Close command.
Generating Configurations
When you are satisfied that the template will generate the configurations you want, select the devices you want to configure and choose the Commit command from the Config menu.
This will generate configurations using the template body and data, and the configurations will be written to the database as working configs.
To download configurations to devices, use the Element Management window. Select one or multiple devices, right click the mouse, and choose the Download to Elements command.
