Feedback
Table Of Contents
Summary of Configuration Steps
Overview of ACS Configuration
This chapter describes the general steps for configuring Cisco Secure Access Control Server, hereafter referred to as ACS, and presents a flowchart showing the sequence of steps.
This chapter contains:
•
Summary of Configuration Steps
Summary of Configuration Steps
To configure ACS:
Step 1
Determine how many ACS servers you need and their placement in the network.
For detailed information, see Chapter 2, "Deploy the Access Control Servers."
Step 2
Install the ACS servers as required. For detailed installation instructions, refer to:
•
http://www.cisco.com/en/US/products/sw/secursw/ps2086/
prod_installation_guides_list.html•
http://www.cisco.com/en/US/products/sw/secursw/ps5338/
prod_installation_guides_list.htmlStep 3
When you install the Windows version of ACS, there are initially no administrative users. When you install Cisco Secure ACS Solution Engine (ACS SE), there is initially one administrator.
Note
To set up additional administrative accounts:
a.
b.
c.
–
–
–
For detailed information, see Chapter 3, "Password Policy Configuration Scenario."
Step 4
a.
b.
c.
–
–
–
–
Step 5
a.
b.
–
–
–
–
–
–
–
–
–
For detailed instructions, see "Displaying RADIUS Configuration Options" in Chapter 2 of the User Guide for Cisco Secure ACS 4.1, "Using the Web Interface."
Step 6
a.
–
–
–
–
For detailed instructions, see "Displaying RADIUS Configuration Options" in Chapter 2 of the User Guide for Cisco Secure ACS 4.1, "Using the Web Interface."
Step 7
This step is required if you are using EAP-TLS, Secure Sockets Layer (SSL), or Cisco Network Admission Control (NAC).
For detailed instructions, see Step 3: Install and Set Up an ACS Security Certificate, page 4-6.
Step 8
Configure the security protocols that ACS uses to authenticate users. You can configure the following global authentication methods:
•
•
•
•
•
•
For detailed instructions, see "Global Authentication Setup" in Chapter 8 of the User Guide for Cisco Secure ACS 4.1, "System Configuration: Authentication and Certificates."
Step 9
You can configure the following shared profile components:
•
•
•
•
•
For detailed instructions, see Chapter 3 of the User Guide for Cisco Secure ACS 4.1, "Shared Profile Components."
Step 10
You can set up network device groups to simplify configuration of common devices. For detailed information, see the User Guide for Cisco Secure ACS 4.1.
Step 11
You can add RADIUS clients or TACACS+ clients. For detailed instructions, see Step 2: Configure a RADIUS AAA Client, page 4-5.
Step 12
Set up user groups to apply common configuration settings to groups of users. For detailed instructions, see Chapter 2 of the User Guide for Cisco Secure ACS 4.1, "User Group Management."
Step 13
If you are using ACS with NAC, configure posture validation. For detailed instructions, see Step 11: Set Up Network Access Profiles, page 7-16 and Step 13: Configure Posture Validation for NAC, page 7-29
Step 14
If required, set up network access profiles. For detailed information, see Step 11: Set Up Network Access Profiles, page 7-16
Step 15
Configure reports to specify how ACS logs data. You can also view the logs in HTML reports. For detailed instructions, see Chapter 9 of the User Guide for Cisco Secure ACS 4.1, "Logs and Reports.
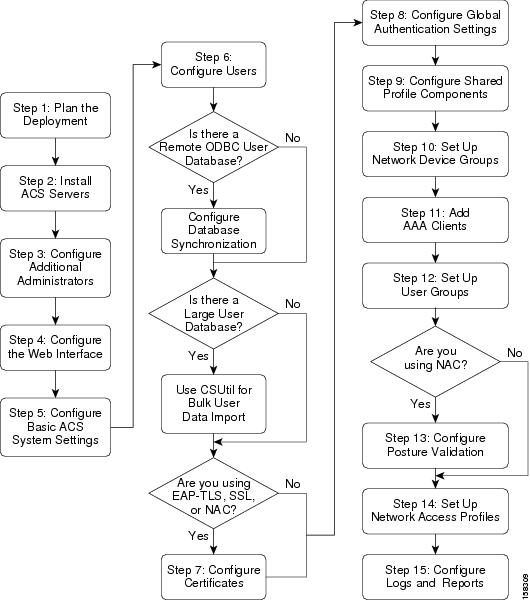
Configuration Flowchart
Figure 1-1 is a configuration flowchart that shows the main steps in ACS configuration.
Figure 1-1 ACS Configuration Flowchart
Refer to the list of steps in Summary of Configuration Steps for information on where to find detailed descriptions of each step.