Feedback
Table Of Contents
Agentless Host Support Configuration Scenario
Overview of Agentless Host Support
Using Audit Servers and GAME Group Feedback
Summary of Configuration Steps
Basic Configuration Steps for Agentless Host Support
Step 2: Configure a RADIUS AAA Client
Step 3: Install and Set Up an ACS Security Certificate
Obtain Certificates and Copy Them to the ACS Host
Run the Windows Certificate Import Wizard to Install the Certificate (ACS for Windows)
Enable Security Certificates on the ACS Installation
Step 4: Configure LDAP Support for MAB
Configure an External LDAP Database for MAB Support
Create One or More LDAP Database Configurations in ACS
Step 5: Configure User Groups for MAB Segments
Step 6: Enable Agentless Request Processing
Enable Agentless Request Processing for a NAP
Step 7: Configure Logging and Reports
Configuring Reports for MAB Processing
Configuration Steps for Audit Server Support
Agentless Host Support Configuration Scenario
This chapter describes how to configure the agentless host feature in Cisco Secure Access Control Server 4.1, hereafter referred to as ACS.
Note
The procedure in this chapter describes how to configure agentless host support by using ACS with a Lightweight Directory Access Protocol (LDAP) database. You can also configure agentless host support by using the ACS internal database: but, using an LDAP database is generally more efficient.
This chapter contains the following sections:
•
•
•
•
Overview of Agentless Host Support
Many hosts that ACS authenticates run agent software that requests access to network resources and receives authorization from ACS. However, some hosts do not run agent software. For example:
•
•
ACS 4.1 solves this problem by using the MAC address of the host device to identify and authenticate the host. This technique is called MAC authentication bypass (MAB).
1.
2.
3.
–
–
4.
–
–
–
–
–
–
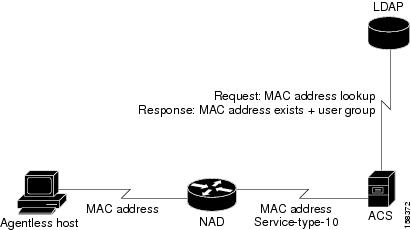
Figure 4-1 shows the flow of MAB information.
Figure 4-1 MAB Flow
Using Audit Servers and GAME Group Feedback
You can configure ACS 4.1 to use audit servers. An audit server is a device that checks the information that the NAD provides against a list of predetermined device types.
With ACS 4.1, the audit server can categorize an end device and provide additional information to ACS. ACS can then make a group assignment decision based on the categorization of the device. For example, if the device is a printer, ACS can assign the device to a user group that includes printers.
In a Cisco Network Admission Control (NAC) environment, ACS 4.1 supports audit server authentication by enabling Generic Authorization Message Exchange (GAME) group feedback.
GAME group feedback provides an added security check for MAC address authentication by checking the device type categorization that ACS determines by associating a MAC address with a user group against information stored in a database on an audit server.
To use the GAME group feedback feature, you must add a NAC attribute-value pair to the ACS RADIUS dictionary before configuring a posture validation policy that uses GAME group feedback.
You then configure a posture validation policy in a NAP that requests device type authentication from the audit server. For details on configuring posture validation, see Enable Posture Validation, page 7-68.
The detailed steps for configuring GAME group feedback are described in Enable GAME Group Feedback, page 7-68 in Chapter 7, "NAC Configuration Scenario"
Summary of Configuration Steps
To configure agentless host support in ACS 4.1:
Step 1
See Install ACS for Windows or ACS Solution Engine. for details.
Step 2
See Configure a RADIUS AAA client. for details.
Configure restrictions on the admin user password.
Step 3
Note
a.
b.
c.
d.
e.
See Install and set up an ACS security certificate: for details.
Step 4
a.
b.
See Configure LDAP support for MAB: for details.
Step 5
See Configure user groups for MAB segments. for details.
Step 6
a.
b.
c.
See Enable agentless request processing: for details.
Step 7
Add the Bypass Info attribute to the Passed Authentications and Failed Attempts reports. See Configure logging and reports..
Note
Basic Configuration Steps for Agentless Host Support
This section describes the basic configuration steps for agentless host support.
Step 1: Install ACS
This section describes the installation process that you perform to run ACS, which runs on a Windows 2000 Server, a Windows 2003 system, or a Cisco Secure ACS solution Engine (ACS SE).
To install ACS:
Step 1
For detailed information on ACS installation, refer to the:
•
•
During the installation process, you are prompted to enter a password for encrypting the internal database.
Step 2
The ACS installation process for ACS for Windows automatically creates a shortcut to the ACS administrative GUI on your desktop.
Note
Step 3
Step 4
•
•
where IP_address is the IP address of the host that is running ACS and hostname is the hostname of the host that is running ACS.
Step 2: Configure a RADIUS AAA Client
Before you can configure agentless host support, you must configure a RADIUS AAA client.
To configure a RADIUS AAA client:
Step 1
The Network Configuration page opens.
Step 2
•
•
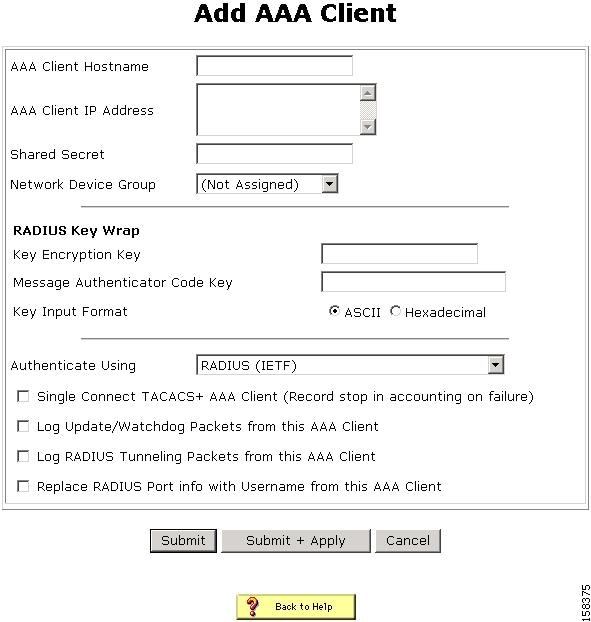
The Add AAA Client page opens, shown in Figure 4-2.
Figure 4-2 Add AAA Client Page
Step 3
Step 4
Step 5
Step 6
Step 7
Step 8
Step 3: Install and Set Up an ACS Security Certificate
This section describes a simplified procedure for the ACS for Windows platform. For detailed information on installing certificates, and also for information on how to install certificates on the Cisco Secure ACS Solution Engine platform, see Chapter 9 of the User Guide for Cisco Secure ACS 4.1, "Advanced Configuration: Authentication and Certificates."
The steps in this section are required to enable posture validation, which is used in network access profiles (NAPs) that are used to
Obtain Certificates and Copy Them to the ACS Host
To copy a certificate to the ACS host:
Step 1
Step 2
a.
b.
mkdir <selected_drive>:\Certs
where selected_drive is the currently selected drive.
Step 3
•
•
•
Run the Windows Certificate Import Wizard to Install the Certificate (ACS for Windows)
To run the Windows Certificate Import wizard to install the certificate on the server:
Step 1
Step 2
where selected_drive is the currently selected drive.
Step 3
The Certificate dialog appears.
Step 4
The Windows Certificate Import wizard starts.
Step 5
Step 6
Note
Enable Security Certificates on the ACS Installation
To enable security certificates:
Step 1
The System Configuration page opens.
Step 2
Step 3
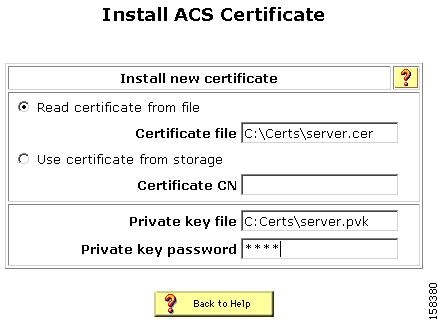
Step 4
Figure 4-3 Install ACS Certificate Page
Step 5
Step 6
Step 7
Step 8
Step 9
Step 10
Step 11
Restart the services later, after you have completed the steps for adding a trusted certificate. See Add a Trusted Certificate.
Install the CA Certificate
To install the CA Certificate:
Step 1
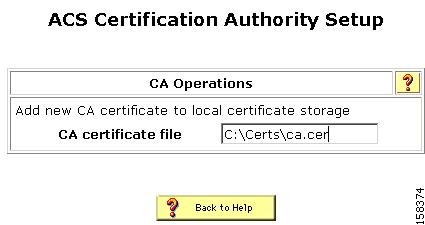
Step 2
Figure 4-4 ACS Certification Authority Setup Page
Step 3
Step 4
Add a Trusted Certificate
After you add a server certificate and set up the certificate authority, install a trusted certificate.
To add a trusted certificate:
Step 1
The Edit Certificate Trust List appears.
Step 2
Step 3
Step 4
Step 4: Configure LDAP Support for MAB
You can configure the ACS internal database to manage MAB used with the agentless host feature; however, if you have a large number of MAC addresses to process (for example, several thousand), it is more efficient to use an external LDAP database than to configure the MAC address mappings manually through the ACS GUI.
To configure LDAP support for MAB:
Step 1
See Configure an External LDAP Database for MAB Support for details.
Step 2
See Create One or More LDAP Database Configurations in ACS for details.
Configure an External LDAP Database for MAB Support
Configure one or more external LDAP databases for MAB support. In each LDAP database, create:
•
•
Example 4-1 shows portions of a sample Lightweight Directory Interchange Format (LDIF) file that defines an LDAP database for agentless host support.
Example 4-1 Sample LDAP Schema for MAB Support
dn: ou=MAB Segment, o=mycorpou: MAB SegmentobjectClass: topobjectClass: organizationalUnitdescription: MAC Authentication Bypass Sub-Treedn: ou=MAC Addresses, ou=MAB Segment, o=mycorpou: MAC AddressesobjectClass: topobjectClass: organizationalUnitdn: ou=MAC Groups, ou=MAB Segment, o=mycorpou: MAC GroupsobjectClass: topobjectClass: organizationalUnitdn: cn=user00-wxp.emea.mycorp.com,ou=MAC Addresses, ou=MAB Segment, o=mycorpipHostNumber: 10.56.60.100objectClass: topobjectClass: ipHostobjectClass: ieee802DevicemacAddress: 00:11:22:33:44:55cn: user00-wxp.emea.mycorp.comdn: cn=user11-wxp.emea.mycorp.com,ou=MAC Addresses, ou=MAB Segment, o=mycorpipHostNumber: 10.56.60.111objectClass: topobjectClass: ipHostobjectClass: ieee802DevicemacAddress: 11-22-33-44-55-66cn: user11-wxp.emea.mycorp.comdn: cn=Group_1_colon,ou=MAC Groups, ou=MAB Segment, o=mycorpobjectClass: topobjectClass: groupofuniquenamesdescription: group of delimited MAC AddressesuniqueMember: cn=user00-wxp.emea.mycorp.com, ou=MAC Addresses, ou=MAB Segment,o=mycorpuniqueMember: cn=user77a-wxp.emea.mycorp.com, ou=MAC Addresses, ou=MAB Segment, o=mycorpuniqueMember: cn=user88-wxp.emea.mycorp.com, ou=MAC Addresses, ou=MAB Segment,o=mycorpcn: Group_1_colondn: cn=Group_2_dash,ou=MAC Groups, ou=MAB Segment, o=mycorpobjectClass: topobjectClass: groupofuniquenamesdescription: group of - delimited MAC AddressesuniqueMember: cn=user11-wxp.emea.mycorp.com, ou=MAC Addresses, ou=MAB Segment,o=mycorpuniqueMember: cn=user77b-wxp.emea.mycorp.com, ou=MAC Addresses, ou=MAB Segment, o=mycorpcn: Group_2_dashDescription of the Settings in the Sample LDAP Schema
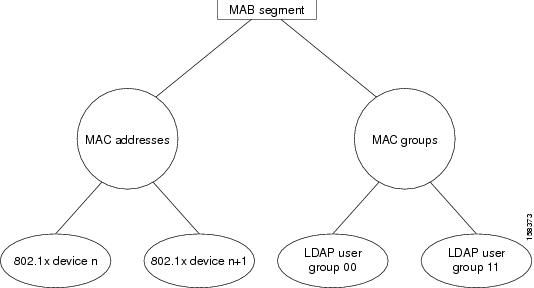
Figure 4-5 shows the tree structure of the LDAP schema that is presented in Example 4-1.
Figure 4-5 Tree Structure for a MAB Support LDAP Schema
How the Subtrees Work
The sample LDAP schema in Example 4-1 contains code to define two subtrees:
dn: ou=MAC Addresses, ou=MAB Segment, o=mycorpou: MAC AddressesobjectClass: topobjectClass: organizationalUnitdn: ou=MAC Groups, ou=MAB Segment, o=mycorpou: MAC GroupsobjectClass: topobjectClass: organizationalUnitThe LDAP subtrees are:
•
When you specify a user directory subtree during LDAP configuration in the ACS user interface, you enter the name assigned to the user directory subtree in your LDAP schema in the User Directory Subtree text box.
•
When you specify a group directory subtree during LDAP configuration in the ACS user interface, you enter the name assigned to the group directory subtree in your LDAP schema in the Group Directory Subtree text box.
How the LDAP User Groups Work
Each LDAP user group record sets up an LDAP user group that maps users connecting through one or more devices to the specified group.
For example, the LDAP user group identified as cn=Group_1_colon sets up an LDAP user group that will map users connecting from the host at 10.56.60.100 as well as from two other hosts:
dn: cn=Group_1_colon,ou=MAC Groups, ou=MAB Segment, o=mycorpobjectClass: topobjectClass: groupofuniquenamesdescription: group of delimited MAC AddressesuniqueMember: cn=user00-wxp.emea.mycorp.com, ou=MAC Addresses, ou=MAB Segment,o=mycorpuniqueMember: cn=user77a-wxp.emea.mycorp.com, ou=MAC Addresses, ou=MAB Segment, o=mycorpuniqueMember: cn=user88-wxp.emea.mycorp.com, ou=MAC Addresses, ou=MAB Segment,o=mycorpcn: Group_1_colonACS queries the LDAP database to determine to which user groups to assign users who connect from a host with a specified MAC address. ACS then assign users in the LDAP user group to a specified ACS user group that you configure.
Table 4-1 describes the attributes of the sample LDAP groups.
Table 4-1 Attributes in LDAP User Groups for Agentless Host Support
objectClass
The value in the example indicates that this is a "group of unique names." The value that you specify here must match the name that you specify in the Group Object Class text box when you specify the Common LDAP configuration during ACS LDAP configuration.
For information on configuring LDAP, see Configure an External LDAP Database for MAB Support.
uniqueMember
The value in the example is uniqueMember. One or more uniqueMember entries are used to specify one or more device type records that have been set up in the LDAP schema to define agentless hosts with specified MAC addresses. The objectClass field in the LDAP user group shown in the previous code sample includes user00, user77a, and user88.
The name that you give to this field in your LDAP schema must match the value that you enter in the Group Attribute Name text box when you specify the common LDAP configuration during ACS LD configuration.
For information on configuring LDAP, see Configure an External LDAP Database for MAB Support.
Create One or More LDAP Database Configurations in ACS
After you have configured one or more LDAP databases to support MAB, configure ACS to query the LDAP databases.
The settings in the following procedure are based on the LDAP schema described in the previous section, Configure an External LDAP Database for MAB Support. For your ACS installation, configure ACS based on the schema that you set up for your network.
To create a LDAP configuration in ACS:
Step 1
The External User Databases page opens.
Step 2
The External User Database Configuration page opens.
Step 3
The Database Configuration Creation table appears. If an LDAP configuration exists, the External User Database Configuration table also appears.
Step 4
•
•
Step 5
Step 6
The Generic LDAP Configuration page appears and contains four sections:
•
•
•
•
Step 7
Step 8
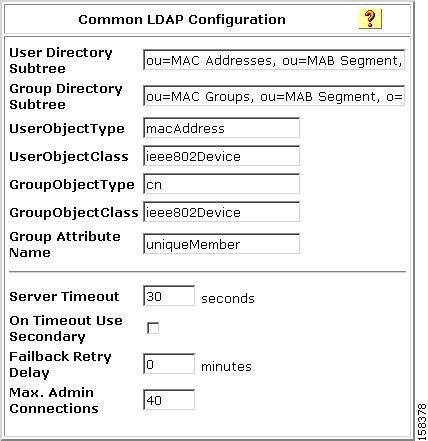
Figure 4-6 shows the Common LDAP Configuration section.
Figure 4-6 Common LDAP Configuration Section
You must specify:
•
In the LDAP schema shown in Example 4-1, the DN of the User Directory Subtree is ou=MAC Addresses, ou=MAB Segment, o=mycorp.
•
In the LDAP schema shown in Example 4-1, the DN of the group directory subtree is ou=MAC Groups, ou=MAB Segment, o=cisco.
•
•
•
•
•
–
–
–
–
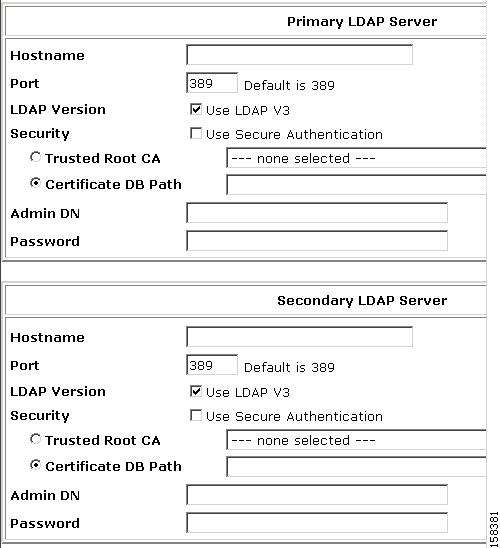
Specify LDAP server configuration information:
Figure 4-7 shows the Primary LDAP Server and Secondary LDAP Server configuration sections.
Figure 4-7 LDAP Server Configuration Sections
a.
–
–
–
–
Solution Engine Only:
You must ensure that the Port box contains the port number used for SSL on the LDAP server.
–
–
For detailed information on this field, refer to the "LDAP Configuration Options" section in Chapter 12 of the User Guide for Cisco Secure Access Control Server, "User Databases."
–
uid=user id,[ou=organizational unit,][ou=next organizational unit]o=organization
where user id is the username, organizational unit is the last level of the tree, and next organizational unit is the next level up the tree.
For example:
uid=joesmith,ou=members,ou=administrators,o=cisco
You can use anonymous credentials for the administrator username if the LDAP server is configured to make the group name attribute visible in searches by anonymous credentials. Otherwise, you must specify an administrator username that permits the group name attribute to be visible to searches.
Note
–
b.
The options and text input boxes in the Secondary LDAP Server section are the same as the ones in the Primary LDAP Server section.
Step 9
Step 5: Configure User Groups for MAB Segments
During configuration of network access profiles (NAPs) to enable agentless request processing, you will be required to map devices that have specified MAC addresses to one of the default user groups that ACS provides.
Before you assign the user groups, plan how to configure the user groups. For example, users associated with the user group can:
•
•
•
For detailed information on how to set up user groups, refer to chapter 5 of the User Guide for Cisco Secure ACS 4.1, "User Group Management."
Step 6: Enable Agentless Request Processing
To enable agentless request processing, you must set up a network access profile (NAP) that enables the feature. To create a NAP to enable agentless request processing:
Step 1
See Create a New NAP for details.
Step 2
Step 3
See Configure MAB for details.
Step 4
See Enable Agentless Request Processing for a NAP for details.
Create a New NAP
To create a new NAP:
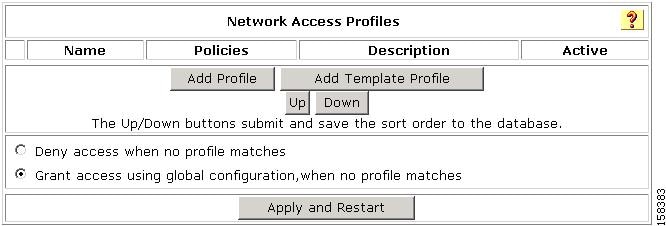
Step 1
The Network Access Profiles page opens, as shown in Figure 4-8.
Figure 4-8 Network Access Profiles Page
Step 2
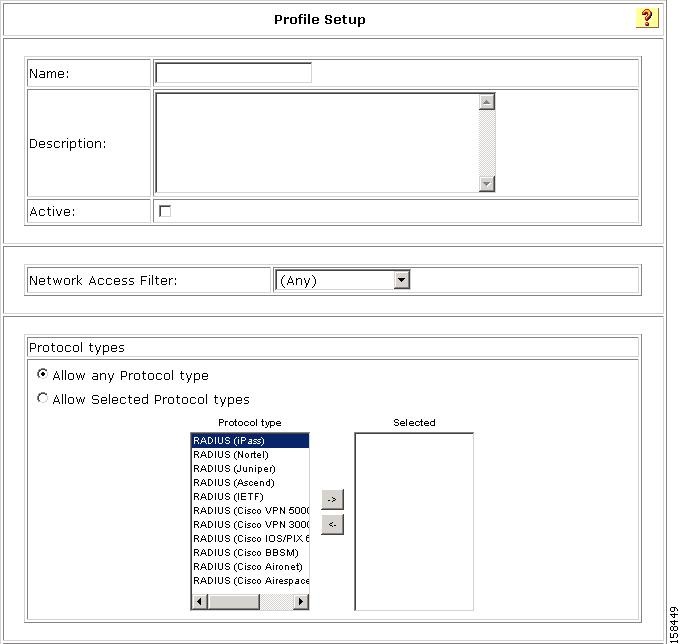
The Profile Setup page opens, shown in Figure 4-9.
Figure 4-9 Profile Setup Page
Step 3
Step 4
Step 5
Step 6
Step 7
The Edit Network Access Protocols page for the new profile appears, as shown in Figure 4-10.
Figure 4-10 Edit Network Access Protocols Page
You are now ready to enable agentless request processing.
Enable Agentless Request Processing for a NAP
To enable agentless request processing for a NAP:
Step 1
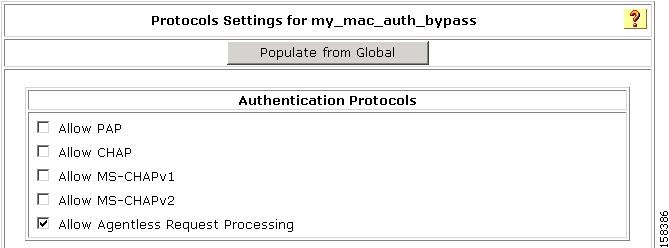
The Protocols Settings page for the selected NAP opens. Figure 4-11 shows the top portion of the Protocols Settings page.
Figure 4-11 Protocols Settings Page
Step 2
Step 3
Step 4
Step 5
You are now ready to configure MAB settings.
Configure MAB
To configure MAB:
Step 1
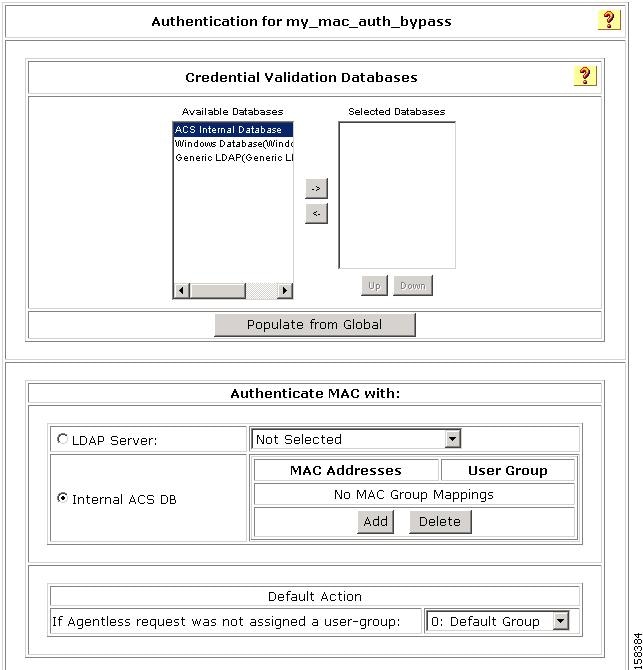
The Authentication page for the selected NAP opens. Figure 4-12 shows the Authentication Settings page.
Figure 4-12 Authentication Settings Page
Step 2
Note
Step 3
Step 4
a.
b.
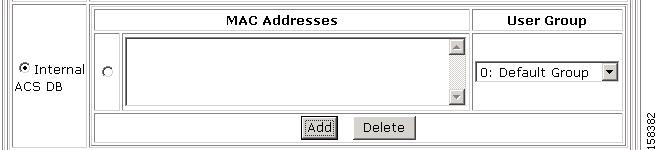
A text box for entering MAC addresses and associated user group mappings appears, as shown in Figure 4-13.
Figure 4-13 MAC Address Input Area
c.
You can enter the MAC address in the following formats for representing MAC-48 addresses in human-readable form:
–
–
–
d.
e.
Step 5
Step 6
Step 7
Step 8
Step 7: Configure Logging and Reports
By default, the following information about MAB processing is logged to the CSAuth log file:
•
The format of this message is:
Performing Mac Authentication Bypass on <MAC_address>where MAC_address is the MAC address that triggered the processing.
•
<MAC_address> was (not) found in <DB_name> and mapped to <user_group> user-groupwhere MAC_address is the MAC address that was mapped, DB_name is the name of the database that was used to match the MAC_address, and user_group is the name of the user group to which the MAC address was mapped.
Note
Configuring Reports for MAB Processing
When you configure reports, you can add a new attribute called Bypass info to the Passed Authentications and Failed Attempts reports.
To add this attribute:
Step 1
The System Configuration page opens.
Step 2
The Logging Configuration page opens.
The Logging Configuration page shows three columns of ACS reports: CSV, ODBC, and Syslog.
Step 3
a.
The Enable Logging page for the specified report opens.
b.
c.
d.
e.
f.
g.
Step 4
Step 5
Configuration Steps for Audit Server Support
If you are using ACS with the NAC solution or with other applications that support the use of audit servers, you can set up agentless host support that uses an audit server.
An audit server runs a database that can enable further authentication of the information that is used to assign agentless host devices to user groups. For example, the categorization of devices in the LDAP schema might set up device categories such as printer, PC, or FAX machine. The database on the audit server can check whether a device with a specified MAC address or IP address is the type of device associated in the database with the specified MAC address or IP address. If it is not the correct device type, a specified authentication policy can be executed.
The mechanism that ACS 4.1 uses to communicate with audit servers in a NAC environment is called GAME group feedback. The GAME protocol defines the GAME groups. When you configure GAME group feedback for an audit server that is used in a NAP, you can enable the Request Device Type from Audit Server feature. If this feature is enabled, the audit feature can request a device type from the audit server and then check the device type against the device type that MAC authentication returns.
Configure GAME Group Feedback
To configure GAME group feedback:
Step 1
Step 2
Step 3
Step 4
Step 5
Step 6
Step 7
•
•
•
Step 8
The detailed steps for configuring GAME group feedback are described in Enable GAME Group Feedback, page 7-68 in Chapter 7, "NAC Configuration Scenario"