- MPLS Traffic Engineering and Enhancements
- MPLS Traffic Engineering Configurable Path Calculation Metric for Tunnels
- MPLS Traffic Engineering Scalability Enhancements
- MPLS Traffic Engineering--LSP Attributes
- MPLS Traffic Engineering AutoTunnel Mesh Groups
- MPLS Traffic Engineering Verbatim Path Support
- MPLS Traffic Engineering RSVP Hello State Timer
- MPLS Traffic Engineering Forwarding Adjacency
- MPLS Traffic Engineering Class-based Tunnel Selection
- MPLS Traffic Engineering Interarea Tunnels
- MPLS Traffic Engineering Static IPv6 Routes over MPLS TE IPv4 Tunnels
- MPLS Traffic Engineering Automatic Bandwidth Adjustment for TE Tunnels
- MPLS TE Bundled Interface Support
- MPLS Point-to-Multipoint Traffic Engineering
- MPLS Point-to-Multipoint Traffic Engineering Support for Static Pseudowires
- Finding Feature Information
- Prerequisites for MPLS Point-to-Multipoint Traffic Engineering Support for Static Pseudowires
- Restrictions for MPLS Point-to-Multipoint Traffic Engineering Support for Static Pseudowires
- Information About MPLS Point-to-Multipoint Traffic Engineering Support for Static Pseudowires
- How to Configure MPLS Point-to-Multipoint Traffic Engineering Support for Static Pseudowires
- Configuration Examples for MPLS Point-to-Multipoint Traffic Engineering Support for Static Pseudowires
- Additional References
- Feature Information for MPLS Point-to-Multipoint Traffic Engineering Support for Static Pseudowires
MPLS Point-to-Multipoint Traffic Engineering Support for Static Pseudowires
The MPLS Point-to-Multipoint Traffic Engineering: Support for Static Pseudowires feature allows you to configure a point-to-multipoint pseudowire (PW) to transport Layer 2 traffic from a single source to one or more destinations. This feature provides traffic segmentation for Multiprotocol Label Switching (MPLS) Point-to-Multipoint Traffic Engineering (P2MP TE) tunnels.
The MPLS Point-to-Multipoint Traffic Engineering: Support for Static Pseudowires feature uses Layer 2 Virtual Private Network (L2VPN) static PWs to provide point-to-multipoint Layer 2 connectivity over an MPLS network to transport Layer 2 traffic. The static PW does not need Label Distribution Protocol (LDP).
- Finding Feature Information
- Prerequisites for MPLS Point-to-Multipoint Traffic Engineering Support for Static Pseudowires
- Restrictions for MPLS Point-to-Multipoint Traffic Engineering Support for Static Pseudowires
- Information About MPLS Point-to-Multipoint Traffic Engineering Support for Static Pseudowires
- How to Configure MPLS Point-to-Multipoint Traffic Engineering Support for Static Pseudowires
- Configuration Examples for MPLS Point-to-Multipoint Traffic Engineering Support for Static Pseudowires
- Additional References
- Feature Information for MPLS Point-to-Multipoint Traffic Engineering Support for Static Pseudowires
Finding Feature Information
Your software release may not support all the features documented in this module. For the latest caveats and feature information, see Bug Search Tool and the release notes for your platform and software release. To find information about the features documented in this module, and to see a list of the releases in which each feature is supported, see the feature information table at the end of this module.
Use Cisco Feature Navigator to find information about platform support and Cisco software image support. To access Cisco Feature Navigator, go to www.cisco.com/go/cfn. An account on Cisco.com is not required.
Prerequisites for MPLS Point-to-Multipoint Traffic Engineering Support for Static Pseudowires
Before configuring the MPLS Point-to-Multipoint Traffic Engineering: Support for Static Pseudowires feature, ensure that the following prerequisites are met:
- If a Cisco 7600 device acts as a P2MP TE midpoint, it should be running Cisco IOS Release 15.0(1)S or later releases.
- The supervisor engine must support the egress replication.
Restrictions for MPLS Point-to-Multipoint Traffic Engineering Support for Static Pseudowires
- This feature is supported only on the Cisco 7600 series routers.
-
This feature is supported only in the following attachment circuits: - ATM over MPLS
- Scalable Ethernet over MPLS
- PPP over MPLS
- Frame Relay over MPLS
- High-Level Data Link Control over MPLS
- Mapping of Layer 2 traffic onto P2MP TE tunnels is manually configured using the xconnectpreferred command. Traffic using static routes and xconnect fallback configuration is not supported.
- This feature does not support egress replication.
- This feature is not supported with label switched path (LSP) ping and trace.
- Fallback path configuration is not supported for P2MP static PW.
Information About MPLS Point-to-Multipoint Traffic Engineering Support for Static Pseudowires
- Overview of MPLS Point-to-Multipoint Traffic Engineering Support for Static Pseudowires
- VC Label Collisions
- Label Spoofing
Overview of MPLS Point-to-Multipoint Traffic Engineering Support for Static Pseudowires
The MPLS Point-to-Multipoint Traffic Engineering: Support for Static Pseudowires feature transports Layer 2 traffic from a single source to one or more destinations. This feature has the following characteristics:
- It uses L2VPN static PWs to provide point-to-multipoint Layer 2 connectivity over an MPLS network to transport Layer 2 traffic.
- The segmentation for MPLS P2MP TE tunnels provided by this feature allows for applications such as video distribution and clock distribution (mobile backhaul).
- This feature is compatible with Cisco nonstop forwarding (NSF), stateful switchover (SSO). See NSF/SSO—MPLS TE and RSVP Graceful Restart and MPLS Point-to-Multipoint Traffic Engineering for information on configuring NSF/SSO with this feature.
- In this implementation, the PW is bidirectional, in accordance with the Framework and Requirements for Virtual Private Multicast Service .
VC Label Collisions
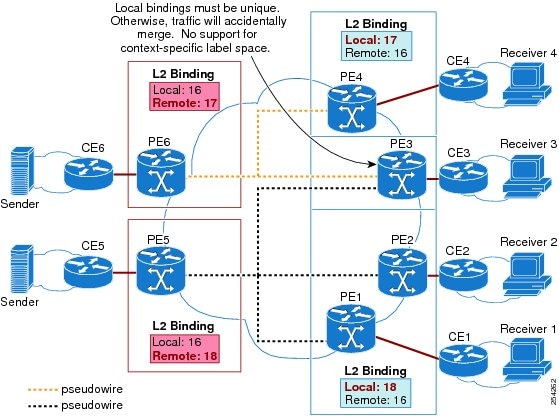
This feature does not support context-specific label spaces. When configuring the MPLS Point-to-Multipoint Traffic Engineering: Support for Static Pseudowires feature, ensure that local bindings are unique. Otherwise, traffic unintentionally merges. In the figure below, both PWs share router PE 3 as an endpoint. The local label on each PW is 16, which causes a collision.
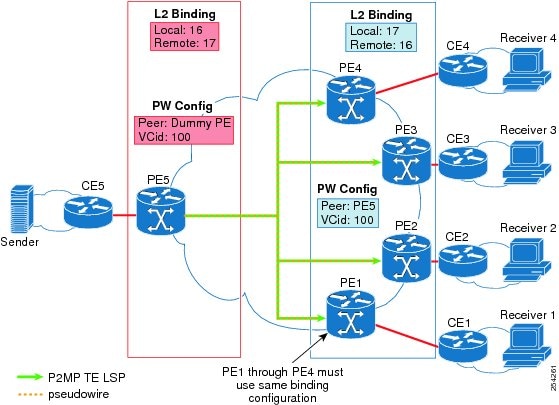
Label Spoofing
For P2MP static PWs, there is no signaling protocol to verify that the labels are configured correctly on either end. If the labels are not configured correctly, traffic might go to the wrong destinations. Because the traffic going into wrong destinations is a multicast confutation, scalability might be impacted.
The P2MP static PW does not have a context-specific label in the upstream direction and does not use a signaling protocol. Therefore, it is possible to spoof a PW label and route the traffic to the wrong destination. If a PW label is spoofed at the headend, it cannot be validated at the tailend, because the MPLS lookup at the tailend is performed on the global table. So if a spoofed label exists in the global table, traffic is routed to the wrong destination: customer equipment (CE).
The same situation can happen if the user incorrectly configures the static PW label. If the wrong PW label is configured, traffic goes to the wrong destination (CE).
The figure below shows PW label allocation with no context-specific label space.
How to Configure MPLS Point-to-Multipoint Traffic Engineering Support for Static Pseudowires
- Configuring the Headend Routers
- Configuring the Tailend Routers
- Verifying the Static PW Configuration
Configuring the Headend Routers
Perform this task to configure the headend routers. This task involves the following actions:
- Configuring a fake peer IP address as part of the xconnect command. It is very important that this IP address be reserved by the network domain administrator so that it is not used by any other routers in the network.
- Configuring a P2MP static PW using the preferred path configuration. In the PW class, the tunnel interface is specified as the preferred path and the fallback path is disabled.
See the following documents for more information:
1. enable
2. configure terminal
3. pseudowire-class class-name
4. encapsulation mpls
5. protocol none
6. preferred-path [interfacetunneltunnel-number][disable-fallback]
7. exit
8. interface tunnel number
9. ip unnumbered loopback number
10. tunnel mode mpls traffic-eng point-to-multipoint
11. tunnel destination list mpls traffic-eng {identifierdest-list-id | namedest-list-name}
12. exit
13. interface loopback number
14. ip address [ip-addressmask [secondary]]
15. exit
16. interface ethernet number
17. no ip address [ip-addressmask [secondary]]
18. no keepalive [period [retries]]
19. xconnect peer-ip-address vcid encapsulation mpls manual pw-class class-name
20. mpls label local-pseudowire-label remote-pseudowire-label
21. mpls control-word
22. end
DETAILED STEPS
| Command or Action | Purpose | |
|---|---|---|
| Step 1 | enable Example: Router> enable |
Enables privileged EXEC mode.
|
| Step 2 | configure terminal Example: Router# configure terminal |
Enters global configuration mode. |
| Step 3 | pseudowire-class class-name Example: Router(config)# pseudowire-class static-pw |
S pecifies a static AToM PW class and enters PW class configuration mode. |
| Step 4 | encapsulation mpls Example: Router(config-pw)# encapsulation mpls |
Specifies MPLS as the data encapsulation method for tunneling Layer 2 traffic over the PW. |
| Step 5 | protocol none Example: Router(config-pw)# protocol none |
S pecifies that no signaling will be used in L2TPv3 sessions created from the static PW. |
| Step 6 | preferred-path [interfacetunneltunnel-number][disable-fallback] Example: Router(config-pw)# preferred-path interface tunnel 1 disable-fallback |
Specifies the P2MP tunnel as the traffic path and disables the router from using the default path when the preferred path is unreachable. |
| Step 7 | exit Example: Router(config-pw)# exit |
ExitsPW class configuration mode and returns to global configuration mode. |
| Step 8 | interface tunnel number Example: Router(config)# interface tunnel 1 |
Configures a tunnel and enters interface configuration mode. |
| Step 9 | ip unnumbered loopback number Example: Router(config-if)# ip unnumbered loopback 0 |
Enables IP processing on a loopback interface without assigning an explicit IP address to the interface.
|
| Step 10 | tunnel mode mpls traffic-eng point-to-multipoint Example: Router(config-if)# tunnel mode mpls traffic-eng point-to-multipoint |
Enables MPLS P2MP TE on the tunnel. |
| Step 11 | tunnel destination list mpls traffic-eng {identifierdest-list-id | namedest-list-name} Example: Router(config-if)# tunnel destination list mpls traffic-eng name in-list-01 |
Specifies a destination list to specify the IP addresses of point-to-multipoint destinations. |
| Step 12 | exit Example: Router(config-if)# exit |
Exits interface configuration mode and returns to global configuration mode. |
| Step 13 | interface loopback number Example: Router(config)# interface loopback 0 |
Configures a loopback interface and enters interface configuration mode. |
| Step 14 | ip address [ip-addressmask [secondary]] Example: Router(config-if)# ip address 172.16.255.5 255.255.255.255 |
Specifies a primary IP address for the loopback interface. |
| Step 15 | exit Example: Router(config-if)# exit |
Exits interface configuration mode and returns to global configuration mode. |
| Step 16 | interface ethernet number Example: Router(config)# interface ethernet 0/0 |
Configures an Ethernet interface and enters interface configuration mode. |
| Step 17 | no ip address [ip-addressmask [secondary]] Example: Router(config-if)# no ip address |
Disables IP processing on the interface. |
| Step 18 | no keepalive [period [retries]] Example: Router(config-if)# no keepalive |
Disables the keepalive packets on the interface.
|
| Step 19 | xconnect peer-ip-address vcid encapsulation mpls manual pw-class class-name Example: Router(config-if)# xconnect 172.16.255.255 100 encapsulation mpls manual pw-class static-pw |
Configures a static AToM PW and enters xconnect configuration mode where the static PW labels are set. |
| Step 20 | mpls label local-pseudowire-label remote-pseudowire-label Example: Router(config-if-xconn)# mpls label 16 17 |
Configures the AToM static PW connection by defining local and remote circuit labels.
|
| Step 21 | mpls control-word Example: Router(config-if-xconn)# mpls control-word |
Checks whether the MPLS control word is sent.
|
| Step 22 | end Example: Router(config-if-xconn)# end |
Exits xconnect configuration mode. |
Configuring the Tailend Routers
1. enable
2. configure terminal
3. pseudowire-class class-name
4. encapsulation mpls
5. protocol none
6. exit
7. interface loopback number
8. ip address [ip-addressmask [secondary]]
9. exit
10. interface ethernet number
11. no ip address [ip-addressmask [secondary]]
12. no keepalive [period [retries]]
13. xconnect peer-ip-address vcid encapsulation mpls manual pw-class class-name
14. mpls label local-pseudowire-label remote-pseudowire-label
15. mpls control-word
16. end
DETAILED STEPS
Verifying the Static PW Configuration
To verify the L2VPN static PW configuration, use the showrunning-config EXEC command. To verify that the L2VPN static PW was provisioned correctly, use the showmplsl2transportvcdetailand pingmplspseudowireEXEC commands as described in the following steps.
1. show mpls l2transport vc detail
2. ping mpls pseudowire ipv4-address vc-id vc-id
DETAILED STEPS
| Step 1 | show mpls l2transport vc detail For nonstatic PW configurations, this command lists the type of protocol used to send the MPLS labels (such as LDP). For static PW configuration, the value of the signaling protocol field should be Manual. The following is sample output from the showmplsl2transportvcdetailcommand: Example:
Router# show mpls l2transport vc detail
Local interface: Et1/0 up, line protocol up, Ethernet up
  Destination address: 10.0.1.1, VC ID: 200, VC status: up
    Output interface: Et3/0, imposed label stack {17}
    Preferred path: not configured
    Default path:
    Next hop: 10.0.0.2
  Create time: 00:27:27, last status change time: 00:27:24
  Signaling protocol: Manual
    MPLS VC labels: local 17, remote 17
    Group ID: local 0, remote 0
    MTU: local 1500, remote 1500
  Sequencing: receive disabled, send disabled
  VC statistics:
    packet totals: receive 193, send 193
    byte totals:   receive 19728, send 23554
    packet drops:  receive 0, send 0
|
| Step 2 | ping mpls pseudowire ipv4-address vc-id vc-id Because there is no directed control protocol exchange of parameters on a static PW, both ends of the connection must be correctly configured. One way to detect mismatch of labels or control word options is to send an MPLS PW LSP ping command as part of the configuration task, and then reconfigure the connection if problems are detected. An exclamation mark (!) is displayed when the ping command is successfully sent to its destination. The following is sample output from the pingmplspseudowirecommand: Example:
Router# ping mpls pseudowire 10.7.1.2 vc-id 1001
Sending 5, 100-byte MPLS Echos to 10.7.1.2,
      timeout is 2 seconds, send interval is 0 msec:
Codes: '!' - success, 'Q' - request not sent, '.' - timeout,
   'L' - labeled output interface, 'B' - unlabeled output interface,
   'D' - DS Map mismatch, 'F' - no FEC mapping, 'f' - FEC mismatch,
   'M' - malformed request, 'm' - unsupported tlvs, 'N' - no label entry,
   'P' - no rx intf label prot, 'p' - premature termination of LSP,
   'R' - transit router, 'I' - unknown upstream index,
   'X' - unknown return code, 'x' - return code 0
Type escape sequence to abort.
!!!!!
Success rate is 100 percent (5/5), round-trip min/avg/max = 1/2/4 ms
|
Configuration Examples for MPLS Point-to-Multipoint Traffic Engineering Support for Static Pseudowires
Example Configuring the Headend Router (PE5)
In the following sample configuration of the headend router, note the following:
- The preferred-pathinterfacetunnel1command specifies the P2MP tunnel as the preferred path.
- Thetunnelmodemplstraffic-engpoint-to-multipoint command enables the P2MP tunnel.
- Themplslabelcommand defines the static binding.
- The xconnectcommand creates a dummy peer.
Router(config)# pseudowire-class STATIC-PW
Router(config-pw-class)# encapsulation mpls
Router(config-pw-class)# protocol none
Router(config-pw-class)# preferred-path interface Tunnel1

!
Router(config)# interface Tunnel1
Router(config-if)# description PE5->PE1,PE2,PE3,PE4-EXCIT
Router(config-if)# ip unnumbered loopback 0
Router(config-if)# tunnel mode mpls traffic-eng point-to-multipoint
Router(config-if)# tunnel destination list mpls traffic-eng name P2MP-EXCIT-DST-LIST
Router(config-if)# tunnel mpls traffic-eng priority 7 7
Router(config-if)# tunnel mpls traffic-eng bandwidth 10000
!
Router(config)# interface loopback 0
Router(config-if)# ip address 172.16.255.5 255.255.255.255
!
Router(config)# interface ethernet 0/0
Router(config-if)# description CONNECTS to CE5
Router(config-if)# no ip address
Router(config-if)# no keepalive
Router(config-if)# xconnect 172.16.255.255 100 encapsulation mpls manual pw-class static-pw
Router(config-if-xconn)# mpls label 16 17
Router(config-if-xconn)# mpls control-word
!
Example Configuring the Tailend Router (PE1)
In the following sample configuration of the tailend router, note the following:
- All the tailend routers must use the same binding configuration.
- The xconnectcommand must always be configured on tailend routers.
Router(config)# pseudowire-class static-pw
Router(config-pw-class)# encapsulation mpls
Router(config-pw-class)# protocol none
!
Router(config)# interface loopback 0
Router(config-if)# ip address 172.16.255.1 255.255.255.255
!
Router(config)# interface ethernet 0/0
Router(config-if)# description CONNECTS TO CE1
Router(config-if)# no ip address
Router(config-if)# no keepalive
Router(config-if)# xconnect 172.16.255.5 100 encapsulation mpls manual pw-class static-pw
Router(config-if-xconn)# mpls label 17 16
Router(config-if-xconn)# mpls control-word
!
Additional References
Related Documents
| Related Topic |
Document Title |
|---|---|
| Cisco IOS commands |
|
| MPLS commands |
Cisco IOS Multiprotocol Label Switching Command Reference |
| MPLS P2MP TE |
MPLS Point-to-Multipoint Traffic Engineering |
| AToM static PW provisioning |
AToM Static Pseudowire Provisioning |
| NSF/SSO |
NSF/SSO—MPLS TE and RSVP Graceful Restart |
Standards
| Standard |
Title |
|---|---|
| draft-ietf-l2vpn-vpms-frmwk-requirements-02.txt |
Framework and Requirements for Virtual Private Multicast Service |
MIBs
| MIB |
MIBs Link |
|---|---|
| None |
To locate and download MIBs for selected platforms, Cisco IOS releases, and feature sets, use Cisco MIB Locator found at the following URL: |
RFCs
| RFC |
Title |
|---|---|
| None |
— |
Technical Assistance
| Description |
Link |
|---|---|
| The Cisco Support and Documentation website provides online resources to download documentation, software, and tools. Use these resources to install and configure the software and to troubleshoot and resolve technical issues with Cisco products and technologies. Access to most tools on the Cisco Support and Documentation website requires a Cisco.com user ID and password. |
Feature Information for MPLS Point-to-Multipoint Traffic Engineering Support for Static Pseudowires
The following table provides release information about the feature or features described in this module. This table lists only the software release that introduced support for a given feature in a given software release train. Unless noted otherwise, subsequent releases of that software release train also support that feature.
Use Cisco Feature Navigator to find information about platform support and Cisco software image support. To access Cisco Feature Navigator, go to www.cisco.com/go/cfn. An account on Cisco.com is not required.
| Feature Name |
Releases |
Feature Information |
|---|---|---|
| MPLS Point-to-Multipoint Traffic Engineering: Support for Static Pseudowires |
15.0(1)S |
This feature allows you to configure a point-to-multipoint PW to transport Layer 2 traffic from a single source to one or more destinations. |
 Feedback