Cisco uBR10012 Universal Broadband Router Fan Assembly Module
Available Languages
Table of Contents
Cisco uBR10012 Universal Broadband Router Fan Assembly Module
Fan Assembly Module (UBR10-FAN-ASSY=)
Fan Assembly Module (UBR10012-FAN-PLUS=)
Preparing to Unpack the Fan Assembly Module
Electrical Equipment Guidelines
Preventing Electrostatic Discharge Damage
Unpacking and Preparing the Fan Assembly Module
Installing the Fan Assembly Modules in the Chassis
Install the Fan Assembly Module
Removing and Replacing the Fan Assembly Module
Removing the Fan Assembly Module
Removing the Fan Assembly Cable
Replacing the Fan Assembly Cable
Troubleshooting the Fan Assembly
Obtaining Documentation and Submitting a Service Request
Cisco uBR10012 Universal Broadband Router
Fan Assembly Module
This document includes procedures for installing and removing the fan assembly module that is shipped with the Cisco uBR10012 universal broadband router. This document also includes technical specifications and troubleshooting information.
Objective
The purpose of this document is to provide installation, removal, and troubleshooting information for the fan assembly module installed in the Cisco uBR10012 universal broadband router.
Audience
This document is intended for field service engineers who are familiar with Cisco products and headend cable installation procedures.

Warning Only trained and qualified personnel should be allowed to install, replace, or service this equipment. Statement 1030.
Overview
The Cisco uBR10012 chassis uses a fan assembly module containing fans to supply cooling air to the chassis. The fan assembly connects to the chassis through a blind mate connector that plugs into the cable assembly and then into the chassis backplane. The fan assembly modules are identified by their product part numbers. The fan assembly modules supported on the Cisco uBR10012 chassis are:

Note The output of the show inventory command does not display the serial numbers for the fan assembly modules (UBR10-FAN-ASSY and UBR10012-FAN-PLUS). Visually inspect the serial number labels printed on the fan assembly modules to locate the serial number.
Fan Assembly Module (UBR10-FAN-ASSY=)
This fan assembly module as shown in Figure 1 has four internal fans that draw cooling air into the front of the chassis and directs it across the internal components. The air is exhausted through the openings at the rear of the chassis. The fan assembly module works at two speeds:
The temperature of the fan module at the module air outlet determines the operating speed. Three LEDs indicate the status of the fan assembly.
Figure 1 Fan Assembly Module (UBR10-FAN-ASSY=)
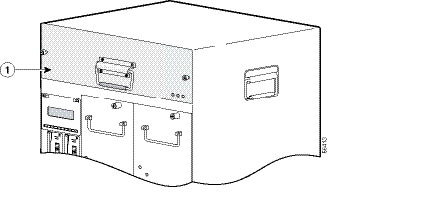
Table 1 lists the LEDs on the fan assembly module.
Four alarms (System OK, FAN-MISSING, PARTIAL-FAN Failure, and TOTAL-FAN Failure) are used for monitoring the fan module.
Fan Assembly Module (UBR10012-FAN-PLUS=)
This fan assembly as shown in Figure 2 has nine internal fans that draw cooling air into the front of the chassis and directs it across the internal components. This fan assembly module provides:
- Increased cooling capability
- Higher redundancy in case of a failure
- Repositioned thermal sensor that detects the ambient temperature of the cable plant or facility and adjusts the variable fan speeds to maintain the temperature
Figure 2 Fan Assembly Module (UBR10012-FAN-PLUS=)
This fan assembly module works at four variable speed levels (0, 1, 2, and 3). The operating speed of the fan is determined by the temperature of the facility. A thermistor, mounted on the fan assembly module, is placed in front of the vent holes on the front panel. It measures the ambient air temperature on the outside of the fan module. The threshold temperatures and speed levels are set internally and the fan assembly controller monitors the thermistor and controls the speed of the fan. When powered on, the fans operate at a speed according to the ambient average air temperature of the facility at the appropriate speed level.
Note Each speed level is based on a certain system pressure drop. As the system pressure changes, the air flow rate also changes.
Note On startup, it may take up to 30 seconds for the fans to stabilize at the appropriate speed.
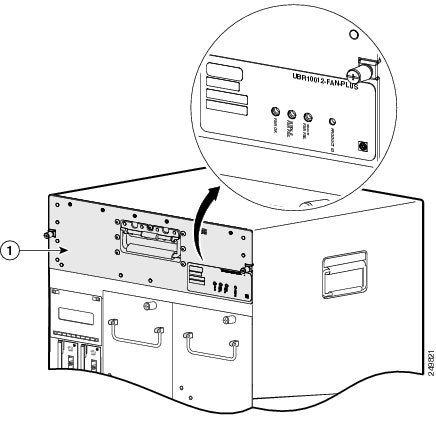
Three LEDs indicate the status of the fan assembly. Table 1 lists the LEDs on the front panel of the fan assembly module. In addition, there is a PRODUCT ID LED/switch on the front panel of the fan assembly module (see Figure 3 ).
Figure 3 Front Panel of the Fan Assembly Module (UBR10012-FAN-PLUS)

Table 2 lists the default activation status of the PRODUCT ID LED/switch when it is shipped.
Table 2 PRODUCT ID LED/Switch Default Activation Status
Fan module and Cisco uBR10012 chassis running unsupported Cisco IOS Release
Fan module and Cisco uBR10012 chassis running supported Cisco IOS Release1
1.For information on Cisco IOS Releases that support the PRODUCT ID LED/switch feature, see the Cisco uBR10012 Router Release Notes for Cisco IOS Release 12.2(33)SCE.
If the PRODUCT ID LED/switch is illuminated (green), the Cisco IOS software identifies the fan assembly module as UBR10012-FAN-PLUS only if you are running a supporting Cisco IOS release on the chassis. If the PRODUCT ID LED/switch is illuminated (green) but a non-supporting release is running on the chassis, the software reports the default UBR10-FAN-ASSY product part number and a FAN-MISSING alarm may be randomly raised. To clear the alarm, see “Troubleshooting the Fan Assembly” section .

Tip Use a small object, such as a paper clip, to press the PRODUCT ID LED/switch inside the cavity on the front panel of the fan assembly module.
Four alarms (System OK, FAN-MISSING, PARTIAL-FAN Failure, and TOTAL-FAN Failure) are used for monitoring the fan module.
Table 3 summarizes the specifications of both the fan assembly modules.
Preparing to Unpack the Fan Assembly Module
This section presents the following topics:
- Safety Guidelines
- Electrical Equipment Guidelines
- Preventing Electrostatic Discharge Damage
- Technical Specifications
- Unpacking and Preparing the Fan Assembly Module
Safety Guidelines
Follow the safety guidelines provided here, when working with any equipment that connects to electrical power.
Warning This warning symbol means danger. You are in a situation that could cause bodily injury. Before you work on any equipment, be aware of the hazards involved with electrical circuitry and be familiar with standard practices for preventing accidents. To see translations of the warnings that appear in this publication, refer to the translated safety warnings that accompanied this device. Statement 1071
Electrical Equipment Guidelines
Follow these basic guidelines when working with any electrical equipment:
- Before beginning any procedures requiring access to the chassis interior, locate the emergency power-off switch for the room where you are working.
- Disconnect all power and external cables before moving a chassis.
- Do not work alone when potentially hazardous conditions exist.
- Never assume that power has been disconnected from a circuit; always check.
- Do not perform any action that creates a potential hazard to people or makes the equipment unsafe.
- Carefully examine your work area for possible hazards such as moist floors, ungrounded power extension cables, and missing safety grounds.
Preventing Electrostatic Discharge Damage
Electrostatic discharge (ESD) damage, which occurs when electronic cards or components are improperly handled, can result in complete or intermittent failures. The AC-input power shelf and its AC power modules contain a printed circuit card that is fixed in a metal carrier. Electromagnetic interference (EMI) shielding and connectors are integral components of the carrier. Although the metal carrier helps to protect the cards from ESD, use an antistatic strap each time you handle the modules.
Following are guidelines for preventing ESD damage:
- Always use an ESD-preventive wrist or ankle strap and ensure that it makes good skin contact. Before removing a card from the chassis, connect the equipment end of the strap to a bare metal, unpainted surface on the chassis, or rack-mount.
- Handle components by the carrier edges only; avoid touching the card components or any connector pins.
- When removing a module, place it on an antistatic surface or in a static-shielding bag. If the module is to be returned to the factory, immediately place it in a static-shielding bag.
- Avoid contact between the modules and clothing. The wrist strap protects the card from ESD voltages on the body only; ESD voltages on clothing can still cause damage.

Technical Specifications
Table 4 lists the specifications for the UBR10-FAN-ASSY= fan assembly module.
Table 5 lists the specifications for the UBR10012-FAN-PLUS= fan assembly module.
Steps
To unpack the fan assembly module:
Step 1
Open the shipping carton by cutting the packing tape along the flaps on the top of the box.
Step 2
Step 3
Step 4
What to do next
After performing this step, install the Fan assembly modules, see “Install the Fan Assembly Module” section.
Installing the Fan Assembly Modules in the Chassis
This procedure is applicable to both the fan assembly modules (UBR10-FAN-ASSY= and UBR10012-FAN-PLUS=).
Prerequisites
- If you are installing the fan module (UBR10012-FAN-PLUS=, Spare) in an existing Cisco uBR10012 router chassis, ensure that the PRODUCT ID LED/switch activation status is in accordance with the Cisco IOS Release running on the chassis (see Table 2 for details).
- The UBR10012-FAN-PLUS= fan assembly module is pre-installed with EMI gaskets (see Figure 4). If you are installing the fan module (UBR10012-FAN-PLUS=, Spare) in an existing Cisco uBR10012 router chassis, ensure that the EMI gaskets on the Cisco uBR10012 router chassis (if present) are removed before mounting the fan assembly module.
Figure 4 EMI Gasket Location on UBR10012-FAN-PLUS= Fan Assembly Module
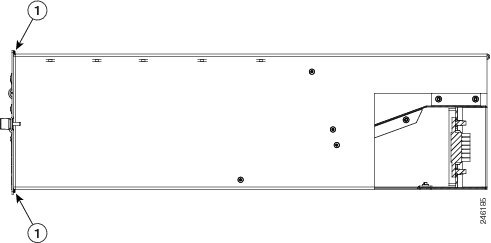
Caution Do not remove the required EMI gaskets on the UBR10012-FAN-PLUS= fan assembly module (see Figure 4).
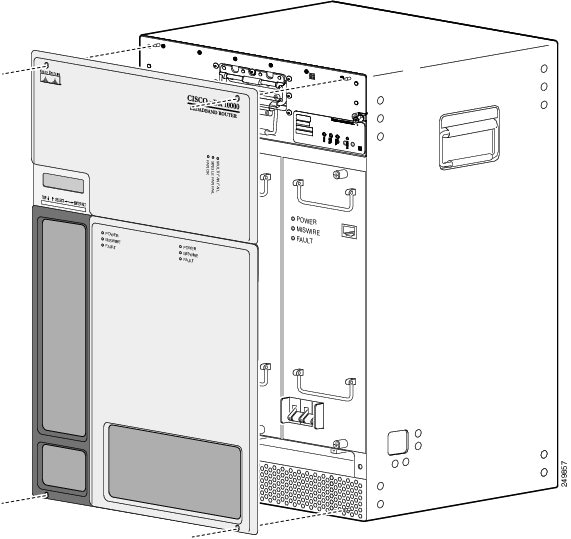
The EMI gaskets present on the Cisco uBR10012 router chassis are used with the UBR10-FAN-ASSY= fan assembly module (see Figure 5). For information about installing EMI gaskets, see Installing EMI Gaskets and RF Absorber Material on the Cisco uBR10012 Universal Broadband Router .
Figure 5 EMI Gasket Location on the Cisco uBR10012 Router

Steps
To install a fan assembly module into the Cisco uBR10012 router:
Step 1
Step 2
Step 3
Step 4
Note To tighten the captive screws on the fan assembly modules, the installation torque used should be 8 in-lbs.
Step 5
Step 6
Step 7
Note If you are using the fan module (UBR10012-FAN-PLUS=), and running a Cisco IOS Release that does not support the PRODUCT ID LED feature, ensure that the PRODUCT ID LED/switch is not illuminated. For information on Cisco IOS Releases that support the PRODUCT ID LED/switch feature, see Cisco uBR10012 Router Release Notes for Cisco IOS Release 12.2(33)SCE. If you are using a supported Cisco IOS release, the software may not identify the fan assembly as UBR10012-FAN-PLUS. If this occurs, ensure that the PRODUCT ID LED/switch is illuminated and then either reload the software, or physically remove the fan assembly module for at least 1 minute and then reinsert it. For more information, see “Troubleshooting the Fan Assembly” section.
Step 8
a.
b.
Removing and Replacing the Fan Assembly Module
Caution Do not run the Cisco uBR10012 chassis without a working fan assembly module for more than three minutes. To prevent the possibility of the system overheating, be sure that the replacement fan assembly module is out of its box and packaging, so it is ready to install as soon as the defective module is removed.
Caution The total service window for removal and replacement of the fan assembly module is three minutes before possible system shutdown. Ensure that you complete the replacement procedure within this time limit.
Note The fan assembly module supports hot-swapping and can be replaced without interrupting system operation.
This section represents the following topics:
Removing the Fan Assembly Module
This procedure is applicable to both fan assembly modules (UBR10-FAN-ASSY= and UBR10012-FAN-PLUS=).
Note The fan assembly module does not need to be replaced when it is operating normally. If a failure (SINGLE FAN FAIL or MULTI FAN FAIL) LED illuminates (yellow), use the following procedure to remove and reinsert the fan assembly module to test the connection. If the failure (SINGLE FAN FAIL or MULTI FAN FAIL) LED still illuminates (yellow) after removing and reinserting the module, use the following procedure to replace the fan assembly module.
Prerequisites
- Ensure that the PRODUCT ID LED/switch on the UBR10012-FAN-PLUS= fan assembly module is illuminated or not illuminated before removing and replacing the fan assembly module. Table 2 provides information on the PRODUCT ID LED/switch activation status and compatibility with the Cisco IOS Release.
Steps
Note In this section, the UBR10012-FAN-PLUS= fan assembly module is depicted in the illustrations Figure 6 and Figure 7.
To remove the fan assembly module from the Cisco uBR10012 router:
Step 1
Figure 6 Removing the Front Cover
Step 2
Step 3
Step 4
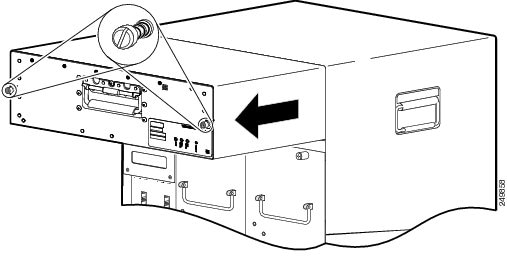
Caution The fan assembly module weighs approximately 30 pounds. Use one hand to pull the fan assembly module using its handle and position the other hand underneath the module to support it, so that it does not suddenly swing down when it clears the chassis.
What to do next
After performing this task, install the fan assembly module, see “Install the Fan Assembly Module” section.
If you are removing and replacing fan assembly cable, see the “Removing the Fan Assembly Cable” section, and “Replacing the Fan Assembly Cable” section.
Removing the Fan Assembly Cable
This procedure is applicable to both the fan modules (UBR10-FAN-ASSY= and UBR10012-FAN-PLUS=).
The fan assembly cable connects the fan assembly to the backplane. The cable is located inside the chassis, underneath the fan assembly. Normally, the cable is not removed when a fan assembly module is removed from the chassis (see Figure 8).
Note The cable has different connectors on each end.

Steps
To remove the fan assembly cable:
Step 1
Step 2
Step 3
Note Ensure that you make notes of the securing points of the tie wrap before you remove them. The tie wrap securing points are required while replacing the fan cable.
Step 4
Figure 9 Location of Fan Cable Inside the Chassis
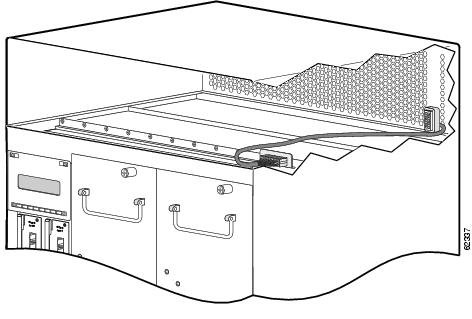
Note The fan assembly cable has two “U” shaped bends that allow the cable to curve back into the brackets and fit snugly on the bottom of the fan module enclosure. (See Figure 9.)
Step 5
Step 6
What to do next
After performing this task, replace the fan assembly cable, see “Replacing the Fan Assembly Cable” section.
Replacing the Fan Assembly Cable
This procedure is applicable to both the fan modules (UBR10-FAN-ASSY= and UBR10012-FAN-PLUS=).
Prerequisites
Replacing a fan cable requires removing the cooling facilities of the chassis. It is not necessary to remove power from the chassis for this procedure. However, because you are shutting down the fans that cool the chassis and boards, it is important to have the new cable ready for immediate installation.
Steps
Step 1
Step 2
Tip Use the existing cable as a template.
Step 3
Step 4
Step 5
Step 6
Step 7
Tip If the fan assembly module does not slide easily into the chassis, remove the module and check the location of the cable. The cable should lay flat along the bottom of the fan assembly enclosure.
Troubleshooting the Fan Assembly
Check the following to help isolate a problem with the cooling system:
When the fans are operating, you should be able to hear them. You should also be able to feel air being drawn in at the bottom front and expelled at the top rear of the chassis.
1. Check for fan failure by checking the fan status LEDs and running the show environment command.
2. Ensure that no alarms are triggered on the fan assembly module.
3. Check if there is sufficient ventilation on the chassis intake and chassis exhaust.
4. Verify if the ambient temperature is within the specified range.
If the problem persists, see the “Obtaining Documentation and Submitting a Service Request” section .
Remove the fan assembly module and reinsert it. If this does not help, examine the LED that is illuminated, see “Fan Assembly LEDs and Their Function” section. Else see, “Obtaining Documentation and Submitting a Service Request” section.
These messages indicate that the system has detected a critical over-temperature condition or out-of-tolerance power inside the chassis.
Although an over-temperature condition is unlikely at initial startup, ensure that heated exhaust air from other equipment is not entering the inlet vent of the router and that there is sufficient clearance around the sides of the chassis to allow cooling air to flow.
Note The message could also indicate a faulty component or temperature sensor. Use the show environment or show environment table command to display the internal chassis environment.
- Is the PRODUCT ID LED/switch on fan assembly module illuminated (green) and a FAN-MISSING alarm is randomly being triggered?
If you are running a Cisco IOS Release that does not support the PRODUCT ID LED/switch feature, then ensure that the PRODUCT ID LED/switch is not pressed and is not illuminated. Upgrade to a supported Cisco IOS Release on the chassis.
Note If you cannot upgrade to a supported Cisco IOS Release, then ensure that the PRODUCT ID LED/switch is not pressed and not illuminated (green).
If you are running a Cisco IOS Release that supports this feature, but the FAN-MISSING alarm is still being triggered, then follow the steps below to clear the alarm so that the software recognizes the fan module:
1. Ensure that the PRODUCT ID LED/switch is pressed and illuminated (green).
2. Remove the fan assembly module.
3. Wait for 1 minute and reinsert the fan assembly module.
If the alarm is still being triggered, and the software still does not recognize the fan, then the fan may be faulty, you may have to replace the fan module.
If none of the above solves the problem, see the “Obtaining Documentation and Submitting a Service Request” section .
- If you experience trouble with the startup, and the issue is not resolved with these procedures, manually power off the router and contact a service representative for assistance and further instructions, see the “Obtaining Documentation and Submitting a Service Request” section .
Related Documentation
Cisco uBR10012 Series Universal Broadband Router Quick Start Guide
http://www.cisco.com/en/US/docs/cable/cmts/ubr10012/quick/start/10kqsg_2.html
Cisco uBR10012 Universal Broadband Router Hardware Installation Guide at the following URL:
http://www.cisco.com/univercd/cc/td/doc/product/cable/ubr10k/ubr10012/hig/index.htm
Cisco uBR10012 Universal Broadband Router Software Configuration Guide at the following URL:
http://www.cisco.com/univercd/cc/td/doc/product/cable/ubr10k/ubr10012/scg/index.htm
Obtaining Documentation and Submitting a Service Request
For information on obtaining documentation, using the Cisco Bug Search Tool (BST), submitting a service request, and gathering additional information, see What’s New in Cisco Product Documentation at: http://www.cisco.com/c/en/us/td/docs/general/whatsnew/whatsnew.html .
Subscribe to What’s New in Cisco Product Documentation , which lists all new and revised Cisco technical documentation, as an RSS feed and deliver content directly to your desktop using a reader application. The RSS feeds are a free service.
This document is to be used in conjunction with the documents listed in the “ Related Documentation” section.
Cisco and the Cisco logo are trademarks or registered trademarks of Cisco and/or its affiliates in the U.S. and other countries. To view a list of Cisco trademarks, go to this URL: www.cisco.com/go/trademarks . Third-party trademarks mentioned are the property of their respective owners. The use of the word partner does not imply a partnership relationship between Cisco and any other company. (1110R)
Any Internet Protocol (IP) addresses used in this document are not intended to be actual addresses. Any examples, command display output, and figures included in the document are shown for illustrative purposes only. Any use of actual IP addresses in illustrative content is unintentional and coincidental.
 Feedback
Contact Cisco
- Open a Support Case

- (Requires a Cisco Service Contract)