- Preface
- Chapter 1 - Product Overview and Installation
- Chapter 2 - Configuring Wireless Profiles
- Chapter 3 - Configuring EAP Types
- Chapter 4 - Performing Administrative Tasks
- Chapter 5 - Routine Procedures
- Chapter 6 - Troubleshooting and Diagnostics
- Appendix A - EAP Messages
- Appendix B - Technical Specifications
- Appendix C - Translated Safety Warnings
- Appendix D - Declarations of Conformity and Regulatory Information
- Appendix E - Channels, Power Levels, and Antenna Gains
- Appendix F - Acknowledgments and Licensing
- Appendix G - Abbreviations
Cisco Aironet 802.11a/b/g Wireless LAN Client Adapters (CB21AG and PI21AG) Installation and Configuration Guide for Windows Vista, Release 1.0
Bias-Free Language
The documentation set for this product strives to use bias-free language. For the purposes of this documentation set, bias-free is defined as language that does not imply discrimination based on age, disability, gender, racial identity, ethnic identity, sexual orientation, socioeconomic status, and intersectionality. Exceptions may be present in the documentation due to language that is hardcoded in the user interfaces of the product software, language used based on RFP documentation, or language that is used by a referenced third-party product. Learn more about how Cisco is using Inclusive Language.
- Updated:
- May 19, 2008
Chapter: Chapter 5 - Routine Procedures
Routine Procedures
This chapter provides procedures for common tasks related to the client adapter.
The following topics are covered in this chapter:
•![]() Upgrading the Client Adapter Software
Upgrading the Client Adapter Software
Removing a Client Adapter
Follow the instructions in this section to remove a PC-Cardbus card or PCI card from a computing device, when necessary.

Removing a PC-Cardbus Card
To remove a PC-Cardbus card after it is successfully installed and configured (such as when your laptop is to be transported), completely shut down your computer and pull the card directly out of the Cardbus slot. When the card is reinserted and the computer is rebooted, your connection to the network should be re-established.

Note ![]() If you need to remove your PC-Cardbus card but do not want to shut down your computer, double-click the Safely Remove Hardware icon in the Windows system tray, choose the Cisco Aironet client adapter you want to remove under hardware devices, click Stop, and click OK to close each open window. Then pull the card directly out of the card slot.
If you need to remove your PC-Cardbus card but do not want to shut down your computer, double-click the Safely Remove Hardware icon in the Windows system tray, choose the Cisco Aironet client adapter you want to remove under hardware devices, click Stop, and click OK to close each open window. Then pull the card directly out of the card slot.
Removing a PCI Card
Because PCI client adapters are installed inside desktop computers that are not designed for portable use, you should have little reason to remove the adapter. However, instructions are provided below if you need to remove your PCI card.
Step 1 ![]() Completely shut down your computer.
Completely shut down your computer.
Step 2 ![]() Remove the computer cover.
Remove the computer cover.
Step 3 ![]() Remove the screw from the top of the CPU back panel above the PCI expansion slot that holds your client adapter.
Remove the screw from the top of the CPU back panel above the PCI expansion slot that holds your client adapter.
Step 4 ![]() Disassemble the antenna from the base.
Disassemble the antenna from the base.
Step 5 ![]() Pull up firmly on the client adapter to release it from the slot and carefully tilt the adapter to slip its antenna through the opening near the slot.
Pull up firmly on the client adapter to release it from the slot and carefully tilt the adapter to slip its antenna through the opening near the slot.
Step 6 ![]() Reinstall the screw on the CPU back panel and replace the computer cover.
Reinstall the screw on the CPU back panel and replace the computer cover.
Upgrading the Client Adapter Software
Note ![]() Before you upgrade the software, ensure that the client adapter is inserted properly.
Before you upgrade the software, ensure that the client adapter is inserted properly.
Follow these steps to upgrade your Cisco Aironet CB21AG or PI21AG client adapter software to a more recent release and maintain the settings that were selected during the previous installation.
Step 1 ![]() Obtain the desired software release. For instructions on obtaining software from Cisco.com, see the "Obtaining Client Adapter Software" section of Chapter 1 "Product Overview and Installation."
Obtain the desired software release. For instructions on obtaining software from Cisco.com, see the "Obtaining Client Adapter Software" section of Chapter 1 "Product Overview and Installation."
Step 2 ![]() Double-click the software WinClient-802.11a-b-g-Vista-Ins-Wizard-vxx.exe file that you have saved on the device on which the client adapter is inserted. A window appears that asks you if you want to run the software file.
Double-click the software WinClient-802.11a-b-g-Vista-Ins-Wizard-vxx.exe file that you have saved on the device on which the client adapter is inserted. A window appears that asks you if you want to run the software file.
Step 3 ![]() Click Run. The Cisco Aironet Installation Program - InstallShield window appears (see Figure 5-1).
Click Run. The Cisco Aironet Installation Program - InstallShield window appears (see Figure 5-1).
Figure 5-1 Cisco Aironet Installation Program—Installation Wizard Preparing Setup Window

Step 4 ![]() Allow the preparation sequence to finish . After the preparation sequence finishes, the Cisco Aironet Installation Program—Previous installation detected window appears (see Figure 5-2).
Allow the preparation sequence to finish . After the preparation sequence finishes, the Cisco Aironet Installation Program—Previous installation detected window appears (see Figure 5-2).
Figure 5-2 Cisco Aironet Installation Program—Previous installation detected Window
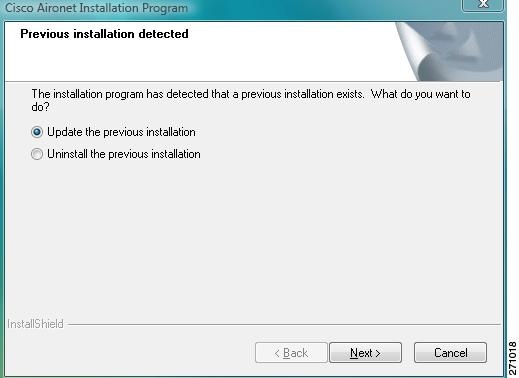
Step 5 ![]() Click Update the previous installation.
Click Update the previous installation.
Note ![]() If you click Uninstall the previous installation, a dialog box asks you to confirm the complete removal of the previous installation. If you remove the previous installation instead of updating it, you remove all configured wireless profiles.
If you click Uninstall the previous installation, a dialog box asks you to confirm the complete removal of the previous installation. If you remove the previous installation instead of updating it, you remove all configured wireless profiles.
Step 6 ![]() Click Next. The Cisco Aironet Installation Program—Setup Status window appears (see Figure 5-3).
Click Next. The Cisco Aironet Installation Program—Setup Status window appears (see Figure 5-3).
Figure 5-3 Cisco Aironet Installation Program—Setup Status Window
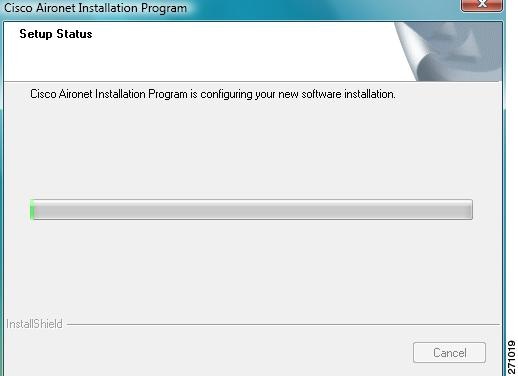
Step 7 ![]() Allow the software installation to finish. After the installation finishes, the Cisco Aironet Installation Program—InstallShield Wizard Complete window appears (see Figure 5-4).
Allow the software installation to finish. After the installation finishes, the Cisco Aironet Installation Program—InstallShield Wizard Complete window appears (see Figure 5-4).
Figure 5-4 Cisco Aironet Installation Program—InstallShield Wizard Complete Window

Step 8 ![]() Click Finish.
Click Finish.
 Feedback