Cisco Unified IP Phone 3905 User Guide for Cisco Unified Communications Manager Express Version 8.8 (SIP)
Bias-Free Language
The documentation set for this product strives to use bias-free language. For the purposes of this documentation set, bias-free is defined as language that does not imply discrimination based on age, disability, gender, racial identity, ethnic identity, sexual orientation, socioeconomic status, and intersectionality. Exceptions may be present in the documentation due to language that is hardcoded in the user interfaces of the product software, language used based on RFP documentation, or language that is used by a referenced third-party product. Learn more about how Cisco is using Inclusive Language.
- Updated:
- October 21, 2013
Chapter: Overview
Overview
This guide provides phone layout and feature descriptions for the Cisco Unified IP Phone 3905.
Physical Description of Cisco Unified IP Phone 3905
The Cisco Unified IP Phone 3905 is a single-line phone. Buttons near the handset provide direct access to several features.

Item |
Description |
|
1 |
Handset |
Functions as traditional phone handset. |
2 |
Message waiting indicator |
Indicates new voice message (steady red) or an incoming call (blinking). |
3 |
Phone screen |
Displays phone menus and call activity including caller ID (phone number), call duration, and call state. |
4 |
Navigation Pad and Select (center) button |
Allows you to scroll through menu items and highlight items. When the phone is on-hook, displays the call logs (Missed Calls, Received Calls, Placed Calls) and your Speed Dials. |
5 |
Application button |
Provides access to phone settings such as call history, user preferences, phone configuration (including administration settings, device configuration, network configuration, and other common configurations), and phone model information. |
6 |
Previous button  |
Toggles back to the previous setting. |
7 |
Hold button |
Places an active call on hold. |
8 |
Transfer button |
Transfers active calls to another extension. |
9 |
Redial button |
Dials the last dialed number. |
10 |
Keypad |
Allows you to dial phone numbers and enter numbers or letters. |
11 |
Speakerphone button |
Selects the speakerphone. When the speakerphone is on, the button is lit. |
12 |
Volume button  |
Controls the handset and speakerphone volume (off-hook) and the ringer volume (on-hook). |
13 |
Mute button |
Mutes the speakerphone and handset. If the button is lit, the speaker and handset are muted. |
Phone Connections
For your phone to work, it must be connected to the corporate IP telephony network. Your system administrator can help you connect your phone.
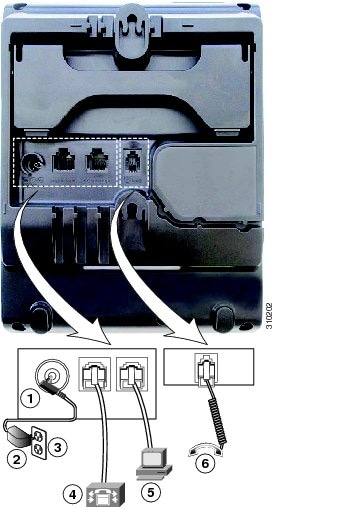
| 1 | DC adaptor port (DC 4.2V) | 4 | Network port (10/100 SW) connection. IEEE 802.3af power enabled. |
| 2 | AC-to-DC power supply (optional) | 5 | Access port (10/100 PC) connection |
| 3 | AC power wall plug (optional) | 6 | Handset connection |
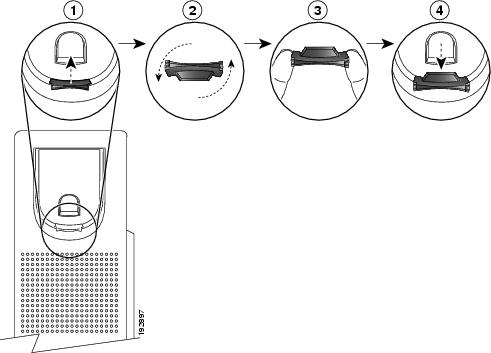
Adjusting the Handset Rest
You can adjust the handset rest of a wall-mounted phone so that the receiver does not slip out of the cradle.
 Feedback