Required Software
Cisco JTAPI requires the following software:
-
Cisco Unified Communications Manager
-
Supported Operating System Platform
The documentation set for this product strives to use bias-free language. For the purposes of this documentation set, bias-free is defined as language that does not imply discrimination based on age, disability, gender, racial identity, ethnic identity, sexual orientation, socioeconomic status, and intersectionality. Exceptions may be present in the documentation due to language that is hardcoded in the user interfaces of the product software, language used based on RFP documentation, or language that is used by a referenced third-party product. Learn more about how Cisco is using Inclusive Language.
This chapter describes how to install and configure the Cisco Unified Java Telephony API (JTAPI) client software for Cisco Unified Communications Manager.
Cisco JTAPI requires the following software:
Cisco Unified Communications Manager
Supported Operating System Platform
For a detailed breakdown of supported Windows, Linux, and VMware platforms for Cisco Unified JTAPI, see https://developer.cisco.com/site/jtapi/documents/cisco-unified-jtapi-supported-jvm-versions/.
For additional information on virtualization within a Unified Communications environment, see http://docwiki.cisco.com/wiki/Virtualization_for_Cisco_Unified_Communications_Manager_(CUCM).
The Cisco Java Telephony API (JTAPI) implementation comprises Java classes that reside on all client machines that run JTAPI applications. Installation of the Cisco Unified JTAPI client must take place before these applications can function correctly. Make sure that the Cisco Unified JTAPI classes are installed wherever JTAPI applications run, whether on Cisco Unified Communications Manager, a separate machine, or both.
From Release 12.5(1), the Linux, and Windows versions generates the zip file (.zip) which includes the JTAPI packages for Linux (32 and 64 bit) or Windows (32 and 64 bit), documentation, and sample codes. You can download the zip files (CiscoJTAPIWindows.zip or CiscoJTAPILinux.zip), by clicking the Download link corresponding to the Cisco JTAPI Client for Linux (32 and 64 bit) or Cisco JTAPI Client for Windows (32 and 64 bit) available in the Cisco Unified CM Administration interface, Find and List Plugins window ().
For a detailed breakdown of supported JVM versions for this release of Cisco Unified Communications Manager, see https://developer.cisco.com/site/jtapi/documents/cisco-unified-jtapi-supported-jvm-versions/.
 Note |
If you have upgraded from Cisco Unified Communications Manager 4.x to 5.0 or later, you must upgrade the JTAPI client software on any application server or client workstation on which JTAPI applications are installed. If you do not upgrade the JTAPI client, your application fails to initialize. Upgraded JTAPI client software does not work with previous releases of Cisco Unified Communications Manager. |
You can install the Cisco Unified JTAPI software in these modes:
Silent Install Invocation
Command Line Invocation
End User Installation
The installer temporarily installs a Java Runtime Environment (JRE) version and uses it for its operation. The system removes the JRE during the uninstall process.
Note |
Distribution of the JRE with the Cisco Unified JTAPI Installer occurs in accordance with an agreement between Oracle/Sun Microsystems, Inc., and Cisco Systems, Inc. |
Applications can bundle the JTAPI Installer along with their installation by using a silent install invocation of the JTAPI Installer.
Applications that run the JTAPI Installer in silent mode can use the following commands:
Linux (32-bit) platforms—CiscoJTAPIClient-linux –silent
Windows (32-bit) platforms—CiscoJTAPIClient.exe –silent
For Cisco Unified Communications Manager 8.6(1) and later, for 64 bit installer on a 64 bit Operating System (OS), the applications can use the following commands:
Windows platforms—CiscoJTAPIx64-Windows.exe -i silent
Linux RedHat platforms—CiscoJTAPIx64-Linux.bin -i silent
TFTP settings can be passed during a silent install with the following command (For Windows and Linux):
CiscoJTAPIx64-Windows.exe - silent -DKEY_TFTPIP = "IP address"
When you are performing a fresh install or an upgrade/downgrade, the JTAPI Installer automatically detects the destination folders and performs a silent install. The installer places the JTAPI Sample Applications and the JAR Files in the appropriate folders that are specified during installation or in the default folders during a silent install. However, if a previous version is present, the JTAPI Installer does not know the application path, so it creates the default folders, Lib and JTAPITools, and installs the applications in those folders.
For Windows clients, the JTAPI Installer also updates the registry with the new install information. For Linux versions, it creates the file jtapiver.ini in the users home directory.
Note |
When using Windows 7 and Windows 2008 Server, you must disable the User Access Control (UAC) service for the silent installation process to succeed. |
To run the JTAPI Installer interactively from the command line, enter one of the following commands from the command prompt:
Linux (32 bit) platforms—CiscoJTAPIClient-linux.bin –console
Windows (32 bit) platforms—CiscoJTAPIClient.exe -console
For Cisco Unified Communications Manager 8.6(1) and later, for 64 bit installer on a 64 bit OS, use the following commands:
Windows (64 bit) platforms—CiscoJTAPIx64-Windows.exe -i console
Linux (64 bit) platforms—CiscoJTAPIx64-Linux.bin -i console
For more information on supported platforms for JTAPI, see Supported Platforms.
The command line mode is helpful for installing JTAPI in systems that do not have GUI support, such as Linux systems. A character-based menu, where the user is asked to provide a series of inputs based on the install time conditions, guides the entire installation procedure. All installation parameters are available during the console mode installation.
You will find that the command line mode is helpful for installing JTAPI in systems that do not have GUI support, such as Linux systems. A character-based menu, where the user is asked to provide a series of inputs based on the install time conditions, guides the entire installation procedure. This mode also provides all the other options that the GUI-based installer provides.
Note |
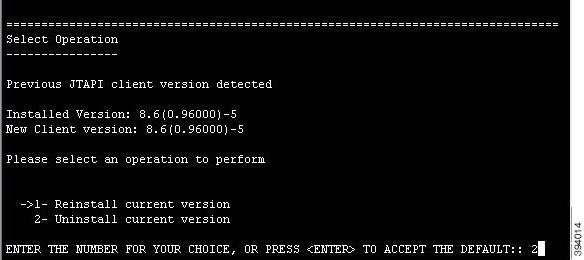
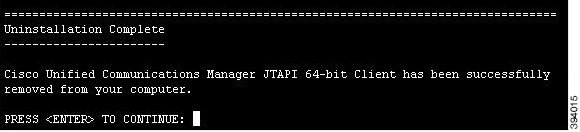
If you perform a reinstall/upgrade/downgrade on Linux in console mode and select the option for ‘Uninstall Current Version’, the client is uninstalled but the screen does not display a progress indicator. Once the uninstall is complete, you are notified through the console panel and the installer exits. |
The JTAPI Installer uses a Java Foundation Classes (JFC) swing interface for the end user interface. The install procedure asks the user to provide a series of information and checks.
The installer creates and installs uninstallers on the target system, under the folder "_uninst." You can find this folder under the JTAPI application path, which is normally C:\Program Files\JTAPITools for Windows and $HOME/.jtapi/bin for Linux. You can invoke the uninstaller by using this path.
A log file that is named ismpInstall.txt (or ismpUninstall.txt) in the folder from which the installer/uninstaller is executed stores all details about the installation procedure. You can also use this file to check for any errors that may occur because it contains the entire list of traces of the various events that occur during client installation.
For Cisco Unified Communications Manager 8.6(1) and later, JTAPI Client supports installations on 64 bit platforms. The installer created using the InstallAnywhere tool installs JTAPI tools and applications under the default folder C:\Program Files\Cisco\JTAPI64Tools\ for Windows. For Linux, JTAPI tools and applications are installed at $HOME/.jtapi64/. The uninstaller is located in the same directory under the _uninstaller directory. The library files (jtapi.jar, jtracing.jar and updater.jar) are installed in the lib folder under the parent directory.
A log file, InstallLog_stout.txt/ InstallLog_sterr.txt is created under the user home directory, like in Windows C:\Documents and Settings\Administrator. It stores all details about the installation procedure. You can also use this file to check errors because it contains the entire list of traces of the various events that occur during product installation.
OS Platform Check
You cannot install a 64-bit JTAPI client on a 32-bit OS. If you attempt this, the following error screen will pop-up to abort the installation[ windows platform].
Installation will abort on Linux platform as well, with a similar error.
Installation of 32-bit JTAPI client on 64-bit OS is supported. Installation will be successful. Installer will run under WOW64, that is, all files/folders/registry of WOW64 settings will be used.
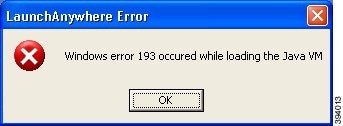
Installation of 64-bit JTAPI client on 32-bit OS is not supported. Installation will fail with the error message: Windows error 193 occurred while loading JVM.
Installation of 32-bit JTAPI client on 32-bit OS is supported. Installation will proceed successfully( Normal installation)
Installation of 64-bit JTAPI client on 64-bit OS is supported. Installation will proceed successfully( Normal installation)
The following sections describe the installation procedures for the Linux and Windows platforms.
Cisco Unified JTAPI supports multiple languages for the installation and JTAPI Preferences user interface.
JTAPI java classes in $HOME/.jtapi/lib
JTAPI Preferences in $HOME/.jtapi/bin
JTAPI sample applications (makecall, jtrace) in $HOME/.jtapi/bin
JTAPI documentation in $HOME/.jtapi/bin/doc
Applicable from 8.6 release:
JTAPI java classes in $HOME/.jtapi64/lib
JTAPI Preferences in $HOME/.jtapi64/bin
JTAPI sample applications (makecall, jtrace) in $HOME/.jtapi64/bin
JTAPI documentation in $HOME/.jtapi64/bin/doc
Log in to the computer where you want to install the Cisco Unified JTAPI client software.
Locate the appropriate ISMP/IA installer and launch it:
Applicable from 8.6 release::
Log in to the computer where you want to install the Cisco Unified JTAPI client software.
Locate the appropriate ISMP/IA installer and launch it:
Follow the instructions that the Cisco Unified JTAPI Installer presents.
Applicable from 12.5.1 release:
Perform the following steps to install the Cisco Unified JTAPI software on a Linux platform:
If you are using Cisco JTAPI version earlier to release 12.5(1), then uninstall the earlier version.
| Step 1 |
Log in to the computer where you want to install the Cisco Unified JTAPI client software. |
||||
| Step 2 |
Click Download link to download the required JTAPI client from the Unified Communications Manager Administrative interface Plugins page (Application > Plugins). Save the zipped file on the CTI application server where JTAPI is used. |
||||
| Step 3 |
Un-zip the downloaded folder to extract the files. The files include the JTAPI packages for Linux (32-bit and 64-bit), documentation, and sample code. Update the classpath variable. Go to Step 6. |
||||
| Step 4 |
Alternatively, run install32.sh or install64.sh depending on the platform . Follow the instructions mentioned in the scripts to install and update classpath. |
||||
| Step 5 |
After installation, go to the installed location. |
||||
| Step 6 |
Run the jtprefs.bat file.
|
To ensure that the JTAPI installation has been done properly, perform the following steps:
| Step 1 |
Check that the .jtapiver.ini file is created in the $HOME directory. |
||
| Step 2 |
Check that the JTAPI Program files and documentation are present under the folder $HOME/.jtapi/bin. |
||
| Step 3 |
Check that the JTAPI Library is present under the folder $HOME/.jtapi/lib. |
||
| Step 4 |
After ensuring that jtapi.jar is present in the classpath, run the following command from the command line prompt of $HOME/.jtapi/bin ./_jvm/bin/java: The JTAPI Preferences dialog box appears.
|
For Cisco Unified Communications Manager 8.6(1) and later, for 64 bit installer on a 64 bit OS, the default install directory is $HOME/.jtapi64/.
After installation, CLASSPATH is updated with the location of jtapi.jar. For linux a file .jtapiver.ini is updated with the install location in user home directory. For classpath changes to take effect, you need to log off and login again.
During installation, you can choose a different folder than $HOME to install JTAPI. In this case, the system creates a folder called .jtapi within the specified folder and creates the bin and lib folders within that folder for copying the corresponding files. For example, if you choose the folder name /home/jtapiuser, the folder structure would be
/home/jtapiuser/.jtapi/bin (for 32 bit installers)—Contains the makecall, jtrace, Locale_files, and doc folders.
or
/home/jtapiuser/.jtapi64/bin (for 64 bit installers)
/home/jtapiuser/.jtapi/lib(for 32 bit installers)—Contains the jtapi.jar, jtracing.jar, and updater.jar files
or
/home/jtapiuser/.jtapi64/lib (for 64 bit installers)
In this case, run the command at Step 4 from the /home/jtapiuser/.jtapi/bin folder (for 32 bit installer) or /home/jtapiuser/.jtapi64/bin folder (for 64 bit installer).
Cisco Unified JTAPI supports multiple languages for the installation and JTAPI Preferences user interface.
JTAPI Java classes in %SystemRoot%\java\lib
JTAPI Preferences in Program Files\JTAPITools
JTAPI sample applications (makecall, jtrace) in Program Files\JTAPITools
JTAPI documentation in Program Files\JTAPITools\doc
Applicable from 8.6 release:
For 64-bit JTAPI Installer on 64-bit OS,
JTAPI Java Preferences in Program Files\Cisco\JTAPI64Tools
JTAPI Java classes in Program Files\Cisco\JTAPI64Tools\lib
JTAPI sample applications (makecall, jtrace) in Program Files\Cisco\JTAPI64Tools
JTAPI documentation in Program Files\Cisco\JTAPI64Tools\doc
Post installation, CLASSPATH is updated with the location of jtapi.jar. For windows, registry is updated, [HKEY_LOCAL_MACHINE\SOFTWARE\Cisco Systems, Inc.\JTAPI\Client\Tools
HKEY_LOCAL_MACHINE\SOFTWARE\Cisco Systems, Inc.\JTAPI\Client\Tools\Lib]
Log in to the computer where you want to install the Cisco Unified JTAPI client software.
Close all Windows programs.
Locate the Cisco Unified JTAPI installer (CiscoJTAPIClient.exe) and launch it.
Follow the installer instructions.
Applicable from 12.5.1 release:
Perform the following steps to install the Cisco Unified JTAPI software on a Windows platform:
If you are using Cisco JTAPI version earlier to release 12.5(1), then uninstall the earlier version.
| Step 1 |
Log in to the computer where you want to install the Cisco Unified JTAPI client software. |
||
| Step 2 |
Click Download link to download the required JTAPI client from the Unified Communications Manager Administrative interface Plugins page (Application > Plugins). Save the zipped file on the CTI application server where JTAPI is used.. |
||
| Step 3 |
Un-zip the downloaded folder to extract the files. The files include the JTAPI packages for Windows (32-bit and 64-bit), documentation, and sample code. Update the classpath variable. Go to Step 6. |
||
| Step 4 |
Alternatively, run install32.bat or install64.bat depending on the platform . Follow the instructions mentioned in the scripts to install and update classpath. |
||
| Step 5 |
After installation, go to the installed location. |
||
| Step 6 |
Run the jtprefs.bat file.
|
To install the Cisco Unified JTAPI software on a 32 bit Windows platform, perform the following steps.
| Step 1 |
Log in to the computer where you want to install the Cisco Unified JTAPI client software. |
| Step 2 |
Close all Windows programs. |
| Step 3 |
Download the 32 bit JTAPI client from the Unified Communications Manager Administrative interface Plugins page (Application > Plugins). Save the client on the CTI application server where JTAPI is used. |
| Step 4 |
Double click CiscoJTAPIClient.exe to start the installation process. The following screen appears: 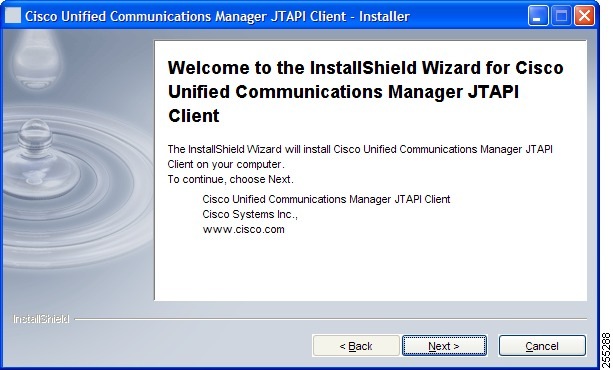 |
| Step 5 |
Click Next. The following screen appears: 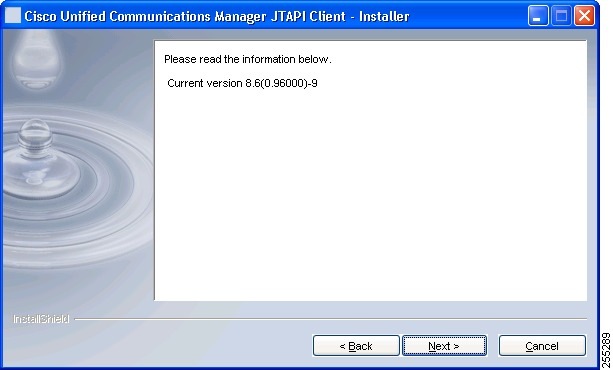 |
| Step 6 |
Click Next. The following screen appears. 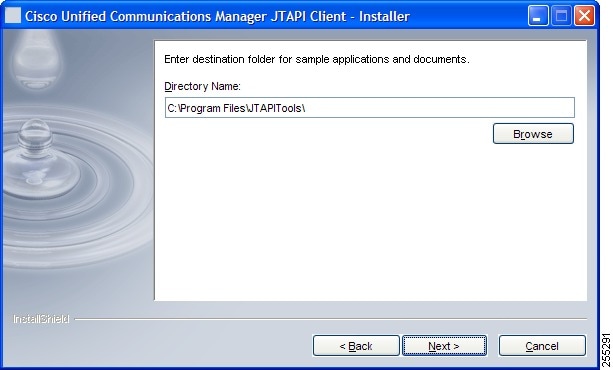 |
| Step 7 |
Specify the destination folder for storing library files (jtapi.jar). Alternatively, you can click Browse and navigate to the folder where you want to store the library files. |
| Step 8 |
Click Next. The following screen appears. This screen shows the default location of javadoc for Cisco JTAPI, sample apps and the Cisco JTAPI preferences application. You can change the location by clicking the Browse button. |
| Step 9 |
Click Next. The next screen shows the location where the libraries and sample applications will be installed. 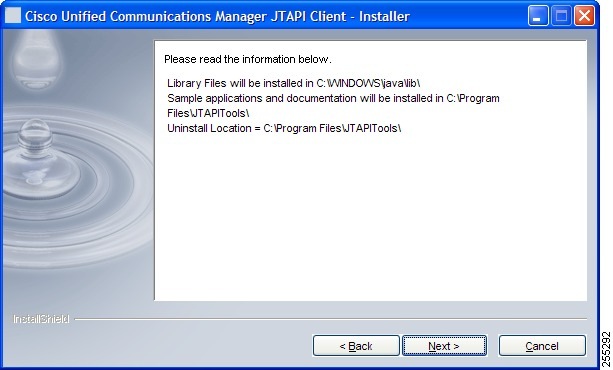 |
| Step 10 |
Click Next. The next window shows the progress of install as follows: 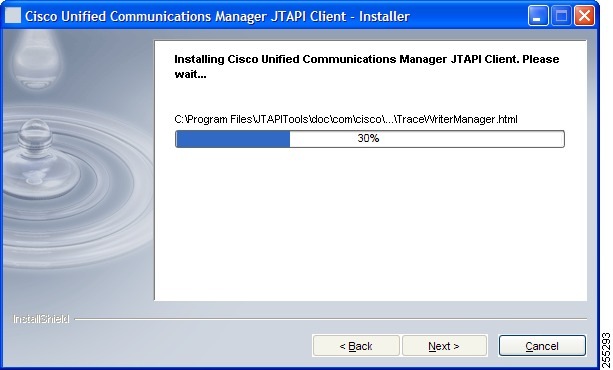 |
| Step 11 |
After the installation completes, click Next. The following screen appears: 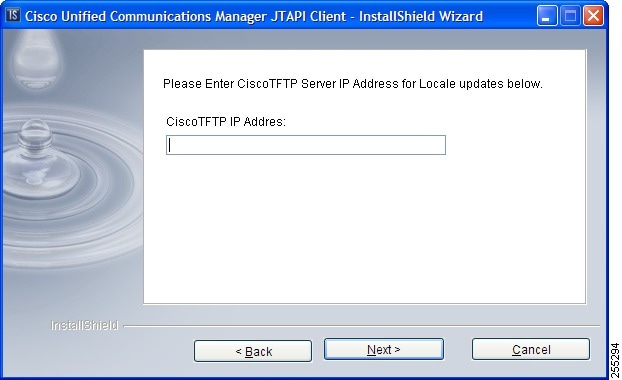 |
| Step 12 |
Specify the Cisco TFTP IP Address and click Next. This address will be used by JTAPI to download any locale updates from Cisco Unified Communication Manager. If you do not know the TFTP address during installation, you can populate it using JTAPI Preferences. The following screen appears. 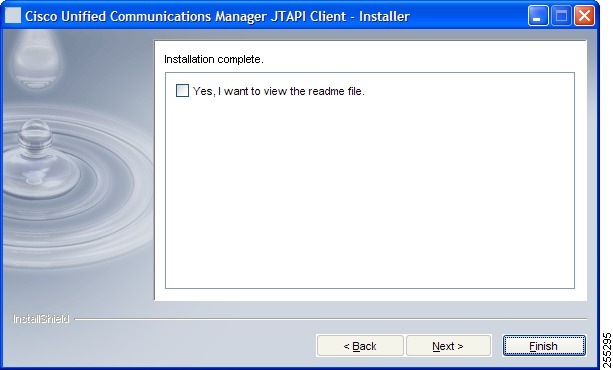 This screen provides an option to read the readme file. This file contains information on how to use the sample applications, caveats and other information. You can check the Yes, I want to view the readme file check box and click Finish. |
To install the Cisco Unified JTAPI software on a 64 bit Windows platform, perform the following steps:
| Step 1 |
Log in to the computer where you want to install the Cisco Unified JTAPI client software. |
| Step 2 |
Close all Windows programs. |
| Step 3 |
Download the 64 bit JTAPI client from the Unified Communications Manager Administrative interface Plugins page (Application > Plugins). Save the client on the CTI application server where JTAPI is used. |
| Step 4 |
Double click CiscoJTAPIx64-Windows.exe to start the installation process. The following screen appears. 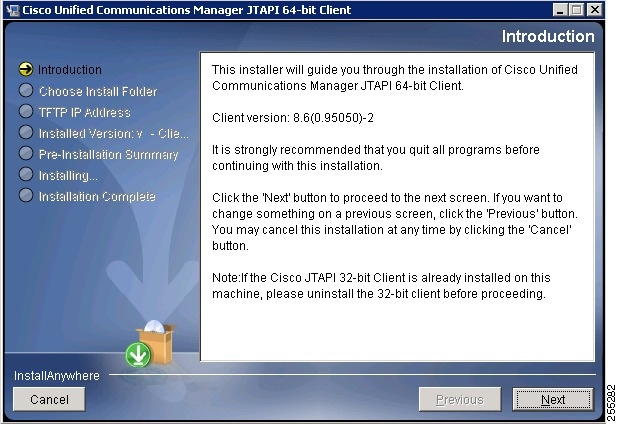 |
| Step 5 |
Click Next. The next screen displays the default location of java class files(jtapi.jar), javadoc for Cisco JTAPI, sample apps and the Cisco JTAPI preferences application. You can change the location by clicking the Choose button. 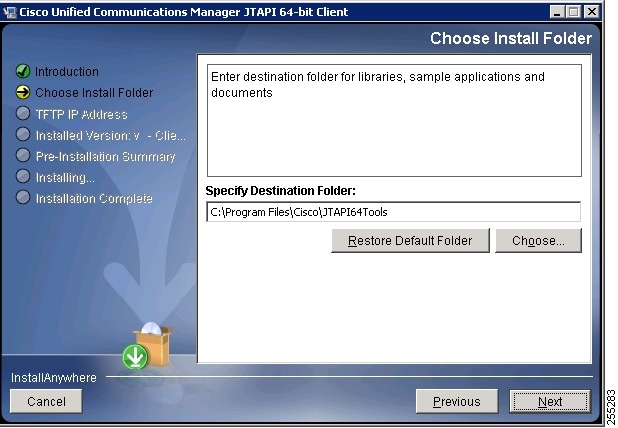 |
| Step 6 |
Click Next. The following screen appears. 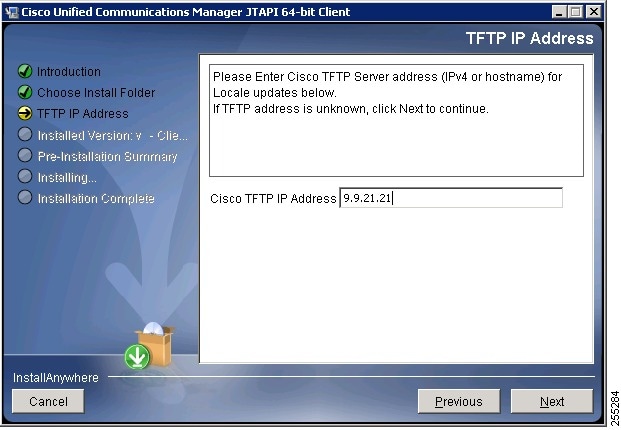 |
| Step 7 |
Specify TFTP IP address. This address will be used by Cisco JTAPI to download any locale updates from Cisco Unified Communication Manager. If you do not know the TFTP address during installation, you can populate it using JTAPI preferences. |
| Step 8 |
Click Next. The next screen displays the pre-install summary which includes the location of the install folder and the library files. 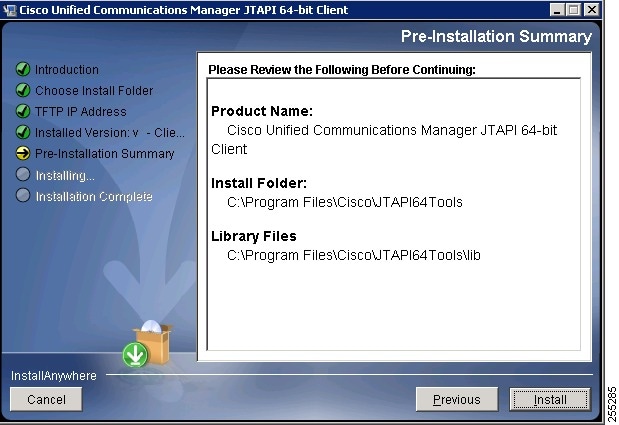 |
| Step 9 |
Click Install. The next window shows the progress of install as follows: 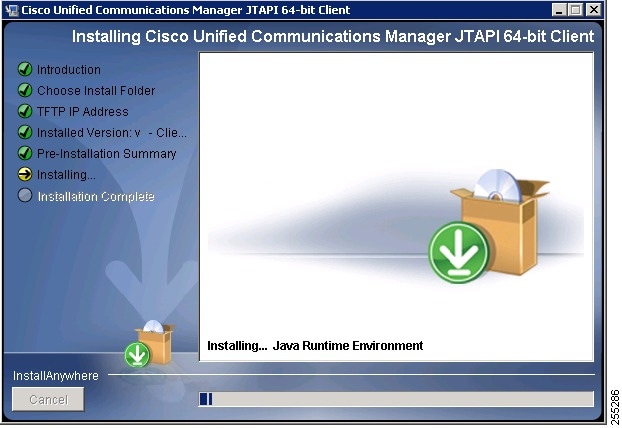 After the installation completes, the following screen appears. 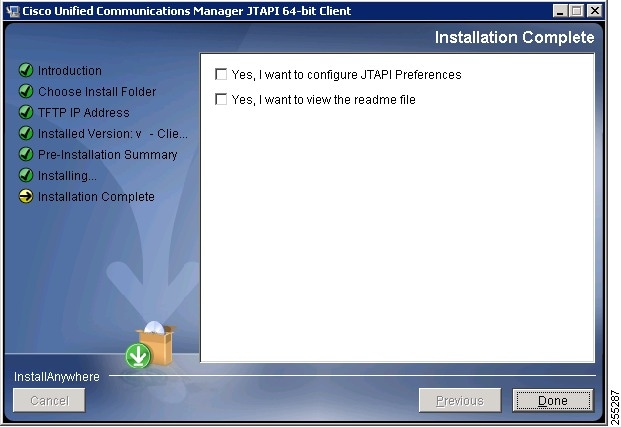 |
| Step 10 |
Check the Yes I want to configure JTAPI Preferences check box to open the JTAPI preference settings. Check the Yes I want to view the readme file to view the readme file that contains information on how to use the sample applications, caveats and other information. |
| Step 11 |
Click Done. |
To verify the JTAPI Windows installation, you can use the makecall application that allows you to place a call via JTAPI. Perform the following steps to use the makecall application.
| Step 1 |
From the Windows command line, navigate to the directory where you installed Cisco Unified JTAPI Tools. By default, this directory is C:\Program Files\JTAPITools (for 32 bit installers) and C:\Program Files\JTAPI64Tools (for 64 bit installers). |
||
| Step 2 |
Execute the following command: java CiscoJtapiVersion |
||
| Step 3 |
Execute the following command: java makecall <server name> <login> <password> 1000 <phone1> <phone2>
The phone1 and phone2 variables designate directory numbers of IP phones or virtual phones that the user controls according to the user configuration. Refer to the chapter ‘Directory Number Configuration’ in Cisco Unified Communications Manager Administration Guide for details. For the login and password variables, use the user ID and password that you configured in the Cisco Unified Communications Manager User Configuration window. |
To determine the JTAPI version number from the installer, use one of the following commands:
For Cisco Unified Communications Manager 8.6(1) and later, for 64 bit JTAPI Installer on 64 bit OS, use one of the following commands;
These commands create a file called "jtapiversion.txt" in the folder where you execute the command. This file contains the JTAPI version in the format A.B(C.D)-E.
When a previous JTAPI version is present in the system and an upgrade is made to the current version of JTAPI, the installer invokes the uninstaller of the previous release. If you want to invoke the previous uninstaller in silent mode on a Windows system, use the command
CiscoJtapiClient.exe -silent -W newversion.silent = ”1”If it is installed, you can also use the JTAPI Preferences user interface utility tool to verify the installed JTAPI version.
| Step 1 |
Choose . The following menu displays: 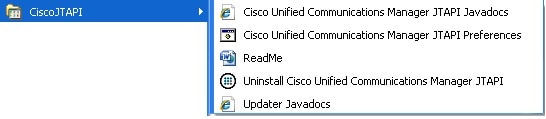 |
| Step 2 |
Select the "ReadMe" file. This file identifies the currently installed version of Cisco Unified JTAPI. |
The following section describes the program group and program elements created by the installation of Cisco JTAPI.
After the installation of Cisco JTAPI, a program group called CiscoJTAPI is created which contains the following elements:
Cisco Unified Communications Manager JTAPI Javadocs — Opens the Javadocs reference guide for Cisco JTAPI.
Cisco Unified Communications Manager JTAPI Preferences — Launches the JTAPI Preferences application.
ReadMe — Launches the readme.htm file in the default web browser.
Updater Javadocs — Opens the Javadocs Updater package that is bundled with Cisco JTAPI.
You can use the Cisco Unified JTAPI Preferences application to configure trace levels and trace destinations as well as several other system parameters.
Note |
When using Windows 7 and Windows 2008 Server, you must run the JTAPI Preferences application in Administrative Mode when the User Access Control (UAC) service is running. If the UAC service is disabled, the JTAPI Preference application can run without administrative privileges. |
This section, which describes how to use the Cisco Unified JTAPI Preferences application, includes the following topics:
The JTAPI Tracing tab lets you change trace settings for the JTAPI layer. The following figure illustrates the JTAPI Tracing tab of the Cisco Unified JTAPI Preferences application. The window title shows the JTAPI version number.
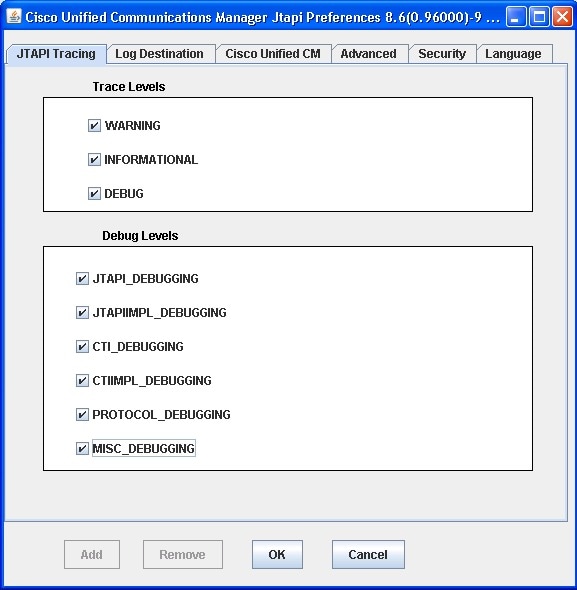
The JTAPI Tracing tab lets you enable or disable JTAPI trace levels as listed in the following table.
|
Jtapi.ini fields |
Description |
|---|---|
|
Trace Levels |
|
|
WARNING |
Low-level warning events |
|
INFORMATIONAL |
Status events |
|
DEBUG |
Highest level debugging events |
|
Debug Levels |
|
|
JTAPI_DEBUGGING |
JTAPI methods and events trace |
|
JTAPIIMPL_DEBUGGING |
Internal JTAPI implementation trace |
|
CTI_DEBUGGING |
Trace Cisco Unified Communications Manager events that are sent to JTAPI |
|
CTIIMPL_DEBUGGING |
Internal CTICLIENT implementation trace |
|
PROTOCOL_DEBUGGING |
Full CTI protocol decoding |
|
MISC_DEBUGGING |
Miscellaneous low-level debug trace |
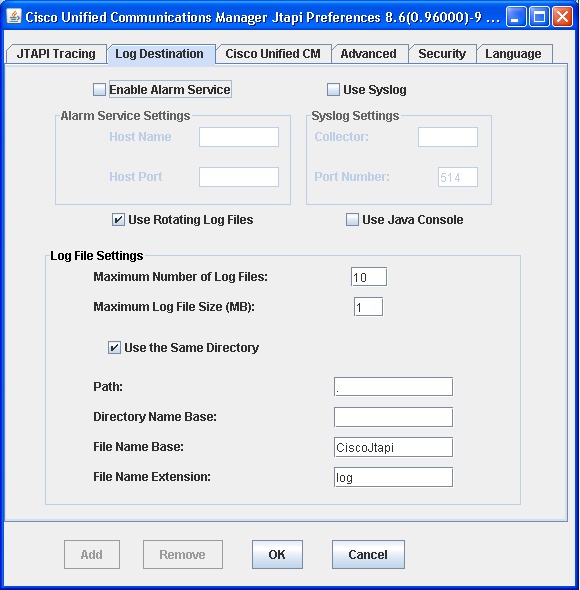
The Log Destination tab allows you to configure how JTAPI creates traces and where they are stored. The following figure illustrates the Log Destination tab of the Cisco Unified JTAPI preferences application. The following table contains descriptions of the log destination fields.
|
Field name |
Default |
Min |
Max |
Description |
|---|---|---|---|---|
|
Enable Alarm Service(UseAlarmService) |
0 |
Not Applicable (NA) |
NA |
When this option is enabled, JTAPI alarms go to an alarm service that is running on the specified machine. You must specify the host name and port number when you enable this option. |
|
Use Syslog (UseSyslog) |
FALSE |
NA |
NA |
When this option is enabled, traces go to a UDP port as specified in the Collector and Port Number fields. Syslog collector service collects traces and directs them to the Cisco Operations Manager Suite server. |
|
Alarm Service Settings |
||||
|
Host Name |
NA |
NA |
Use this field to specify the host name of the alarm service server. |
|
|
Host Port |
NA |
NA |
Use this field to specify the host port of the alarm service server. |
|
|
Syslog Settings |
||||
|
Collector |
0 |
NA |
NA |
Use this field to specify the Syslog collector service that collects traces. |
|
Port Number |
514 |
NA |
NA |
Use this field to specify the UDP port of the collector. |
|
Use Rotating Log Files (SyslogCollector) |
FALSE |
NA |
NA |
This field allows you to direct traces to a specific path and folder. No fewer than two log files and no more than 99 files can exist. Cisco Unified JTAPI rotates through the log files in numerical order, returning to the first log file after filling the last. Log files increase in size in 1-megabyte increments. |
|
Use Java Console (UseSystemDotOut) |
FALSE |
NA |
NA |
When this option is enabled, tracing goes to the standard output or console (command) window. |
|
Log File Settings |
||||
|
Maximum Number of Log Files (NumTraceFiles) |
10 |
2 |
1000 |
This setting lets you specify the maximum number of log files to be written. |
|
Maximum Log File Size (TraceFileSize) |
1048576 |
1048576 |
NP |
This setting lets you specify the maximum size of log files to be written. |
|
Use the Same Directory (UseSameDirectory) |
1 |
NA |
NA |
This setting lets you specify whether the same folder name should be used for each instance of an application. When this option is enabled, JTAPI traces the log files to the same directory. In this case, successive instances of a JTAPI application will restart the log files, starting at index 01. When this option is disabled, each instance of the application, whether successive or simultaneous, will cause trace files to be placed in a new folder sequential to the last folder that was written. Cisco Unified JTAPI detects the last folder present in the trace path and automatically increments the numeric index. |
|
Trace Path (TracePath) |
. |
NA |
NA |
This setting lets you specify the path name to which trace files are written. When the path is not specified, JTAPI defaults to the application path. |
|
Directory Name Base (Directory) |
. |
NA |
NA |
This setting lets you specify a folder name where the trace files will be contained. |
|
File Name Base (FileNameBase) |
Cisco Jtapi |
NA |
NA |
Use this value to create the trace file name. |
|
File Name Extension (FileNameExtension) |
log |
NA |
NA |
This setting lets you specify a numerical index to append to the file base name indicates the order in which trace files are created. If you enter "jtapiTrace" in the File Name Base field and "log" in the File Name Extension field, the system names the trace files jtapiTrace01.log, jtapiTrace02.log, and so on. If the File Name Base and File Name Extension fields are left blank, JTAPI picks the trace files names as CiscoJtapi01.log, CiscoJtapi02.log, and so on. |
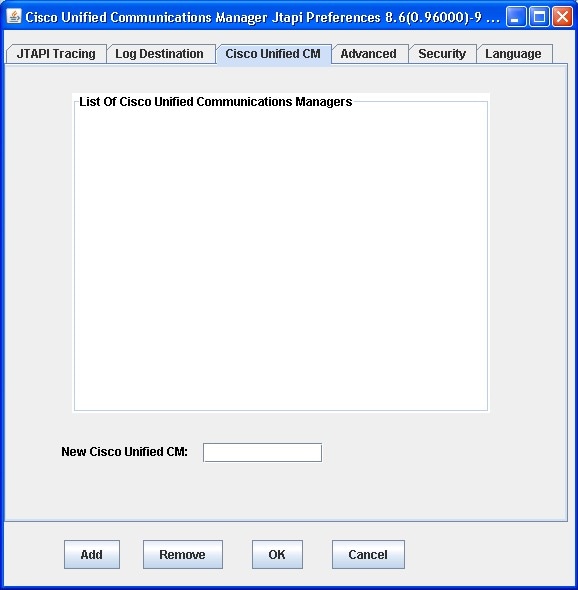
This tab allows you to define a list of IP addresses for Cisco Unified Communications Manager Subscribers where CTIManager is enabled. Applications can query JTAPI for this list and use it to find the IP addresses to connect to. You can define a maximum 10 IP addresses.
The following figure illustrates the Cisco Unified CM tab of the preferences application.
You can configure the parameters in the table in this section through the Advanced tab in the JTAPI Preferences application. These low-level parameters are used for troubleshooting and debugging purposes only.
The following figure illustrates the Advanced tab of the preferences application.

Note |
Cisco strongly recommends that you not modify the parameters in the following table unless the Cisco Technical Assistance Center (TAC) instructs you to do so. |
|
Field |
Default |
Min |
Max |
Description |
|---|---|---|---|---|
|
Enable Periodic Wakeup(PeriodicWakeupEnabled) |
FALSE |
Not Applicable (NA) |
NA |
Enables (or disables) a heartbeat in the internal message queue that JTAPI uses. If JTAPI has not received a message in the time that is defined in PeriodicWakeupInterval, it causes the thread to wake up and creates a log event. |
|
Periodic Wakeup Interval(PeriodicWakeupInterval) |
50 |
Not Present (NP) |
NP |
Allows you to define a period of inactivity in the JTAPI internal message thread (in seconds). If JTAPI has not received a message during this time, the thread wakes up and logs an event. |
|
Enable Queue Stats(QueueStatsEnabled) |
FALSE (disabled) |
NA |
NA |
Causes JTAPI to log the max queue depth over the specified number of messages that are queued to JTAPI main event thread. For every x messages processed, JTAPI logs a DEBUGGING level trace that reports the maximum queue depth over that interval, where x represents the number of messages that are specified in Queue Size Threshold. |
|
Queue Size Threshold(QueueSizeThreshold) |
25 |
10 |
NP |
Specifies the number of messages that define the interval over which JTAPI will report the maximum queue depth. |
|
CTI Request Timeout(CtiRequestTimeout) |
15 |
10 |
NP |
Specifies the number of seconds that JTAPI will wait for a response from a CTI request. |
|
Provider Open Request Timeout(ProviderOpenRequestTimeout) |
200 |
10 |
NP |
Specifies the number of seconds that JTAPI will wait for a response to a Provider Open Request. |
|
Provider Retry Interval(ProviderRetryInterval) |
30 |
5 |
NP |
Specifies the number of seconds that JTAPI will retry opening connection to a Cisco Unified Communications Manager cluster in case of system failure. |
|
Server Heartbeat Interval(DesiredServerHeartbeatInterval) |
30 |
>0 |
NP |
Specifies the interval at which the connection between JTAPI and the Cisco Unified Communications Manager cluster will get verified (in seconds). If JTAPI fails to receive heartbeats, it will establish a connection via the second CTIManager that is specified in the provider open request. |
|
Route Select Timeout(RouteSelectTimeout) |
5000 |
0 |
NP |
Specifies the interval in milliseconds that JTAPI will wait for the application to respond to the Route event. If the application does not respond in this time, JTAPI ends the route and sends the corresponding RouteEnd event. |
|
Post Condition Timeout |
15 |
0 |
NP |
Specifies the timeout. |
The following figure illustrates the Security tab of the preferences application.

Administrators need to configure the User Name, Instance ID, Authorization Code, TFTP Server IP-Address, and CAPF Server IP-Address parameters through the JTAPI Preferences application before invoking the JTAPI API or JTAPI Preferences to download/install certificates on the application server.
You can use JTAPI Preferences to configure security profiles for one or more User Name/Instance ID pairs. If an application user has previously configured a security profile for a User Name/Instance ID pair, the security profile automatically populates when the user enters the User Name/Instance ID and clicks any of the other edit boxes.
Apart from the GUI that is provided through JTAPI Preferences, an application can also install a client certificate by calling the interface that is provided at CiscoJtapiProperties. When Interface UpdateCertificate is called, the JTAPI client connects to the TFTP server to download the CTL file and extract certificates to the given certificate path. It then connects to the CAPF server to download the client certificate and installs it into the given certificate path.
The jtapi.ini files store user security records in comma separated value (CSV) format. Semicolons separate individual records. An example of a users security record is as follows:
SecurityProperty = user, 123, 12345, 172.19.242.37, 3804, 172.19.242.37, 69, .\\, true, false;<next record>; …
You can configure the following parameters on the Security tab:
|
Field |
Default |
Min |
Max |
Description |
|---|---|---|---|---|
|
Enable Security Tracing(SecurityTraceEnabled) |
FALSE |
Not Applicable (NA) |
NA |
You can enable (or disable) tracing for certificate install operations by checking this check box and choosing the desired trace level. |
|
Select Trace Level(SecurityTraceLevel) |
0 |
0 |
2 |
You can choose one of three different trace levels:
|
|
User Name(Username) |
NA |
NA |
NA |
If application users have previously configured a security profile for a User Name/Instance ID pair, that security profile automatically populates when the user enters the User Name/Instance ID and clicks any of the other edit boxes. |
|
Instance ID(instanceID) |
NA |
NA |
NA |
This field specifies the application instance identifier. If an application is connecting to CTIManager with the same user, it needs to define an instanceID for each instance of the application to download the certificate Authorization String. |
|
Authentication String(authcode) |
NA |
NA |
NA |
This field specifies a one-time string that is used to download a certificate. |
|
TFTP Server IP Address |
NA |
NA |
NA |
This field specifies the IP address of the TFTP server (normally the Cisco Unified Communications Manager IP Address). |
|
TFTP Server Port |
69 |
Not Present (NP) |
NP |
The TFTP Server Port defaults to 69. Do not change this value unless the System Administrator advises you to do so. |
|
CAPF Server IP Address |
NA |
NA |
NA |
This field specifies the IP address of the CAPF server in dotted decimal. |
|
CAPF Server Port |
3804 |
NP |
NP |
The CAPF Server Port number defaults to 3804; however, you can also configure this number in the Cisco Unified Communications Manager Administration. Ensure that the value that is entered through the JTAPI Preferences matches the one that is configured in Cisco Unified Communications Manager Administration. |
|
Certificate Path |
JTAPI. jarlocation |
NA |
NA |
This field specifies the path where the application wants server and client certificates to be installed. If this field is blank, the system installs certificates in the ClassPath of JTAPI.jar. |
|
Enable Secure Connection |
FALSE |
NA |
NA |
Check this option to enable a secure TLS connection to Cisco Unified Communications Manager. If this option is not checked, JTAPI cannot make a nonsecure connection to CTI even if the certificate is updated/installed. |
|
Certificate Update Status |
NA |
NA |
NA |
This field provides information on whether the certificate has been updated. |
|
Delete Certificate |
NA |
NA |
NA |
This button deletes the existing certificate. |
|
Update Certificate |
NA |
NA |
NA |
This button updates the existing certificate with the changed parameters. |
|
FIPS Compliant |
FALSE |
NA |
NA |
Check this option to enable JTAPI to be FIPS compliant. |
The following figure illustrates the Language tab of the preferences application.
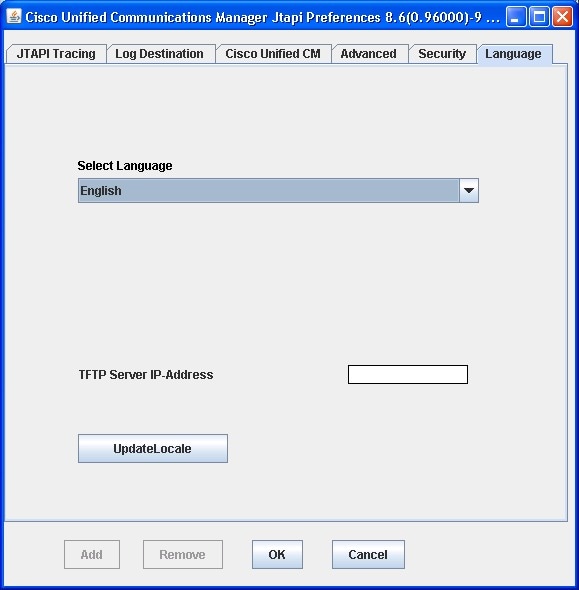
The Language tab allows you to select one of the installed languages to view the configuration settings in that language.
Note |
You must install the language pack on the TFTP server before using this feature. |
You can select the following languages:
|
Arabic |
Brazilian Portuguese |
Chinese Taiwan |
Croatian |
Czech |
|
Danish |
Dutch |
English |
Finnish |
French |
|
German |
Greek |
Hebrew |
Hungarian |
Italian |
|
Japanese |
Nederlands |
Norwegian |
Polish |
Portuguese |
|
Russian |
Simplified Chinese |
Slovak |
Spanish |
Swedish |
Select a language, and the tabs display with text in that language.
You can perform the following actions on all the Cisco JTAPI clients.
Applicable from 12.5.1 release:
Use the following procedure to reinstall or upgrade or downgrade the Cisco JTAPI client on all supported platforms from release 12.5(1) and later versions.
Note |
To reinstall or upgrade the JTAPI version earlier to release 12.5(1), refer to the "Cisco Unified JTAPI Installation" chapter of the Cisco Unified JTAPI Developers Guide for Cisco Unified Communications Manager, Release 11.5(1), at https://www.cisco.com/c/en/us/support/unified-communications/unified-communications-manager-callmanager/products-programming-reference-guides-list.html. |
| Step 1 |
Delete the contents of the previous zip folder present in the system and clear the classpath variables . Alternatively, you can run the Uninstall Script present in the installed folder to delete the files and update classpath. |
||
| Step 2 |
Click Download link to download the required JTAPI client from the Unified Communications Manager Administrative interface Plugins page (Application > Plugins). Save the zipped file on the CTI application. |
||
| Step 3 |
Un-zip the downloaded folder to extract the files . Manually update the classpath variables. Additionally, you can run the Install Script present in the extracted folder to install Cisco JTAPI and update the classpath.
|
To remove the JTAPI version release 12.5(1), delete the folder (CiscoJTAPIWindows or CiscoJTAPILinux) and its extracted files from the system.
Delete the contents of the previous zip folder present in the system and clear the classpath variables.
You can also run the Uninstall Script present in the extracted folder to delete the files and update classpath. Run uninstall32.bat or uninstall32.sh for 32-bit machines and uninstall64.bat or uninstall64.sh for 64-bit machines.
Follow the instructions mentioned in the script.
To uninstall the JTAPI version earlier to release 12.5(1), refer to the "Cisco Unified JTAPI Installation" chapter of the Cisco Unified JTAPI Developers Guide for Cisco Unified Communications Manager, Release 11.5(1), at https://www.cisco.com/c/en/us/support/unified-communications/unified-communications-manager-callmanager/products-programming-reference-guides-list.html.
The JTAPI application requires that users be given the privilege to control one or more devices. Follow the procedures for adding an application user and assigning devices to an application user in the "Application user setup" chapter of the Cisco Unified Communications Manager Administration Guide before using the JTAPI application. The list of devices that are assigned to the user represents the phones that the user needs to control from the application (for example, make calls and answer calls).
Applications that run in non-GUI based platforms, where the JTAPI Preferences application cannot be invoked, can write their own jtapi.ini file and place it along with jtapi.jar based on the values that are provided here. JTAPI will make use of these values.
Applications should ensure that they provide valid data as described in the following table. Applications are responsible for errors that are caused in JTAPI behavior due to improper jtapi.ini file values.
|
Jtapi.ini fields |
Default |
Min |
Max |
Description |
|---|---|---|---|---|
|
INFORMATIONAL |
0 |
Not Applicable (NA) |
NA |
This field specifies status events |
|
DEBUG |
0 |
NA |
NA |
This field specifies highest level debugging events |
|
WARNING |
0 |
NA |
NA |
This field specifies low-level warning events |
|
JTAPI_DEBUGGING |
0 |
NA |
NA |
This field specifies JTAPI methods and events trace |
|
JTAPIIMPL_DEBUGGING |
0 |
NA |
NA |
This field specifies internal JTAPI implementation trace |
|
CTI_DEBUGGING |
0 |
NA |
NA |
This field specifies trace Cisco Unified Communications Manager events that are sent to the JTAPI implementation |
|
CTIIMPL_DEBUGGING |
0 |
NA |
NA |
This field specifies internal CTICLIENT implementation trace |
|
PROTOCOL_DEBUGGING |
0 |
NA |
NA |
This field specifies full CTI protocol decoding |
|
MISC_DEBUGGING |
0 |
NA |
NA |
This field specifies miscellaneous low-level debug trace |
|
DesiredServerHeartbeatInterval |
30 |
>0 |
Not Present (NP) |
This field specifies how often, in seconds, the connection between JTAPI and the Cisco Unified Communications Manager cluster will be verified. If JTAPI fails to receive heartbeats, it will establish a connection via the second CTIManager that is specified in the provider open request. |
|
TracePath |
. |
NA |
NA |
This field specifies the path name to which the trace files are written. When the path is not specified, JTAPI makes the application path as the default. |
|
FileNameExtension |
log |
NA |
NA |
This field specifies a numerical index that is appended to the file base name to indicate the order in which the files are created. For example, if you enter jtapiTrace in the File Name Base field and log in the File Name Extension field, the trace files would rotate between jtapiTrace01.log, jtapiTrace02.log, and jtapiTrace10.log. If the File Name Base and File Name Extension fields are left blank, Cisco Unified JTAPI picks the trace files names as CiscoJtapi01.log, CiscoJtapi02.log, and so on. |
|
SyslogCollector |
FALSE |
NA |
NA |
This field specifies you to direct the traces to a specific path and folder in the system. No fewer than two log files and no more than 99 files can exist. Cisco Unified JTAPI rotates through the log files in numerical order, and returns to the first log file after filling the last. Log files increase in size in 1-megabyte increments. |
|
TraceFileSize |
1048576 |
1048576 |
NP |
This field allows you to specify the maximum size of log files to be written. |
|
UseAlarmService |
0 |
NA |
NA |
When this option is enabled, JTAPI alarms go to an alarm service that is running on the specified machine. You must specify the host name and port number if you enable this option. |
|
ProviderOpenRequestTimeout |
200 |
10 |
NP |
This field specifies the time in seconds that JTAPI will wait for a response for the Provider Open Request. The default is 10 seconds. |
|
JtapiPostConditionTimeout |
15 |
10 |
20 |
JTAPI has post conditions for events, and if the post condition is not met before a timeout, JTAPI will throw exceptions. Use this field to set the timeout value of such conditions. |
|
ApplicationPriority |
2 |
NA |
NA |
This field prioritizes multiple provider open requests. Currently, JTAPI only sends a default value. |
|
SecurityTraceEnabled |
FALSE |
NA |
NA |
This field enables tracing for security-related messages. You can enable (or disable) tracing for certificate install operations by selecting this check box and selecting the desired trace level. |
|
AlarmServicePort |
1444 |
NP |
NP |
This field is used for sending alarms to a different server. Users can select the alarm server host name and port on which the service is running, and JTAPI will send the alarms to the specified server and port. |
|
AlarmServiceHostname |
null |
NA |
NA |
This field displays the alarm server host name. |
|
RouteSelectTimeout |
5000 |
0 |
NP |
This field specifies the time, in milliseconds, that JTAPI waits for the application to respond to the Route event. If the application does not respond in this time, JTAPI ends the route and sends the corresponding RouteEnd event. |
|
ProviderRetryInterval |
30 |
5 |
NP |
This field specifies the time, in seconds, that JTAPI will retry opening a connection to the Cisco Unified Communications Manager cluster in case of system failure. |
|
QueueStatsEnabled |
FALSE |
NA |
NA |
This field is used by JTAPI to log the max queue depth over the specified number of messages that are queued to JTAPI main event thread. In other words, for every x messages processed, JTAPI logs a DEBUGGING level trace that reports the maximum queue depth over that interval, where x represents the number of messages that are specified in Queue Size Threshold. |
|
FileNameBase |
CiscoJtapi |
NA |
NA |
This field specifies a value to create the trace file name. |
|
PeriodicWakeupEnabled |
FALSE |
NA |
NA |
This field enables (or disables) a heartbeat in the internal message queue that JTAPI uses. If JTAPI has not received a message in the time that is defined in PeriodicWakeupInterval, it causes the thread to wake up and creates a log event. |
|
JTAPINotificationPort |
2789 |
1 |
NP |
This field specifies the Port through which the JTAPI parameter changes are communicated to JTAPI applications during runtime. |
|
PeriodicWakeupInterval |
50 |
NP |
NP |
This field allows you to define a time of inactivity in the JTAPI internal message thread. If JTAPI does not received a message during this time, the thread wakes up and logs an event. |
|
QueueSizeThreshold |
25 |
10 |
NP |
This field allows you to specify the number of messages that define the time over which JTAPI will report the maximum queue depth. |
|
UseSystemDotOut |
FALSE |
NA |
NA |
This field is used to display traces on the console. |
|
UseSameDirectory |
1 |
NA |
NA |
This field allows you to specify whether the same folder name must be used for each instance of an application. When this option is enabled, JTAPI traces the log files to the same directory. In this case, successive instances of a JTAPI application will restart the log files, starting at index 01. When this option is disabled, each instance of the application, whether successive or simultaneous, will cause the trace files to be placed in a new folder sequential to the last folder that was written. Cisco Unified JTAPI detects the last folder in the trace path and automatically increments the numeric index. |
|
NumTraceFiles |
10 |
2 |
1000 |
This field allows you to specify the maximum number of log files to be written. |
|
UseSyslog |
FALSE |
NA |
NA |
This field, when enabled, allows the traces go to a UDP port as specified in the Collector and Port Number fields. Syslog collector service collects traces and directs them to the Cisco Operations Manager Suite server. |
|
SecurityTraceLevel |
0 |
0 |
2 |
This field specifies trace level for security messages 0 = Error, 1 = debug, 2 = detailed |
|
UseTraceFile |
TRUE |
NA |
NA |
This field enables the writing of logs to logFile Trace Writer. |
|
CMAssignedAppID |
0 |
NA |
NA |
This field specifies the feature ID that is assigned to the application. Cisco Unified Communications Manager preassigns this ID. |
|
CtiManagers |
null |
NA |
NA |
This field specifies the list of CTI Managers for which tracing needs to be collected. |
|
Directory |
. |
NA |
NA |
This field allows you to specify a folder name where the trace files will be contained. |
|
Security Property SecurityProperty = username, instanceId, authcode, tftp ip address, tftp port, capf ip address, capf port, certificate path, security option, certificate status, fips compliant |
NA |
NA |
NA |
This field specifies the users security record (username, instanceId, authcode, tftp ip address, tftp port, capf ip address, capf port, certificate path, security option, certificate status, fips compliance), that will be stored in jtapi.ini files in a comma separated string. A semicolon separates the records. SecurityProperty = user, 123, 12345, 172.19.242.37, 3804, 172.19.242.37, 69, .\\, true, false, false; <next record>;… |
|
Security Property Entries |
||||
|
Username |
NA |
NA |
NA |
This field automatically populates the security profile of an application user who has previously configured a User Name/Instance ID pair and clicks any of the other edit boxes. |
|
instanceId |
NA |
NA |
NA |
This field specifies the application instance identifier. If an application is connecting to CTIManager with the same user, it needs to define an Instance ID for each instance of the application to download the certificate Authorization String. |
|
authcode |
NA |
NA |
NA |
This field specifies authorization string that is configured in the Cisco Unified Communications Manager database. This can be used only once for getting certificate. |
|
Communications Manager TFTP IP address |
NA |
NA |
NA |
This field specifies the TFTP Address of Cisco Unified Communications Manager (normally, the Cisco Unified Communications Manager IP Address) |
|
CallManager TFTP port |
69 |
NP |
NP |
This field displays the default value of the CallManager TFTP port.Do not change the default value of 69 unless advised to do so by the System Administrator. |
|
Communications Manager CAPF IP server address |
NA |
NA |
NA |
This field specifies CAPF Server IP Address |
|
Communications Manager CAPF server port |
3804 |
NP |
NP |
This field displays the default value (3804) for CAPF server port. Be aware, you can configure this value in Cisco Unified Communications Manager Administration service parameters. Ensure that the value you enter through this interface should match the value configured on Cisco Unified Communications Manager Administration window. |
|
Certificate path |
JTAPI.jar location |
NA |
NA |
This field specifies the location where application wants sever and client certificates to be installed. If this field is left blank, the system installs certificates in the ClassPath of JTAPI.jar |
|
Enable secure connection |
TRUE |
NA |
NA |
This field, if set to TRUE then JTAPI will make a nonsecure connection to CTI even if certificates are updated/installed. |
|
Certificate Update Status |
NA |
NA |
NA |
The JTAPI Preferences dialog box is used to configure the security profile for one or more User Name/Instance ID pairs. |
|
FIPS Compliance |
FALSE |
NA |
NA |
This field, if set to TRUE, will enable the use of FIPS compliant cryptography algorithms and libraries in JTAPI. |
#Cisco Unified JTAPI version 7.0(1.1000)-1 Release ini parameters
#Wed Sep 14 16:55:30 PDT 2008
INFORMATIONAL = 0
DesiredServerHeartbeatInterval = 30
TracePath = .
FileNameExtension = log
SyslogCollector =
TraceFileSize = 1048576
UseAlarmService = 0
ProviderOpenRequestTimeout = 200
JtapiPostConditionTimeout = 15
ApplicationPriority = 2
SecurityTraceEnabled = 0
AlarmServicePort = 1444
RouteSelectTimeout = 5000
ProviderRetryInterval = 30
QueueStatsEnabled = 0
FileNameBase = CiscoJtapi
JTAPI_DEBUGGING = 0
PeriodicWakeupEnabled = 0
CTI_DEBUGGING = 0
JTAPINotificationPort = 2789
Traces = WARNING;INFORMATIONAL;DEBUG
PeriodicWakeupInterval = 50
AlarmServiceHostname =
QueueSizeThreshold = 25
Debugging = JTAPI_DEBUGGING;JTAPIIMPL_DEBUGGING;CTI_DEBUGGING;CTIIMPL_DEBUGGING;
PROTOCOL_DEBUGGING;MISC_DEBUGGING
PROTOCOL_DEBUGGING = 0
UseSystemDotOut = 0
MISC_DEBUGGING = 0
UseSameDirectory = 1
NumTraceFiles = 10
UseSyslog = 0
DEBUG = 0
SecurityTraceLevel = 0
UseTraceFile = 1
WARNING = 0
CMAssignedAppID = 0
UseProgressAsDisconnectedDuringErrorEnabled = 0
CtiManagers = ;;;;;;;;;
Directory =
CTIIMPL_DEBUGGING = 0
CtiRequestTimeout = 30
JTAPIIMPL_DEBUGGING = 0
SyslogCollectorUDPPort = 514
SecurityProperty = cisco, 123, 12345,  A.B.C.D, 3804,  A.B.C.D, 69,
/C\:/Program Files/JTAPITools/./,  false,  false;
 Feedback