- Preface
- Introduction
- Planning the Usage of Voice Messaging Ports in Cisco Unity Connection
- Setting Up an Alcatel 4400 Analog PIMG Integration with Cisco Unity Connection
- Setting Up an Avaya Definity G3 Digital PIMG Integration with Cisco Unity Connection
- Setting Up an Avaya Definity ProLogix Digital PIMG Integration with Cisco Unity Connection
- Setting Up an Avaya S8300/S8500/S8700 Digital PIMG Integration with Cisco Unity Connection
- Setting Up a Mitel SX-200 Digital PIMG Integration with Cisco Unity Connection
- Setting Up a Mitel SX-2000 Digital PIMG Integration with Cisco Unity Connection
- Setting Up an NEC NEAX 2400 Digital PIMG Integration with Cisco Unity Connection
- Setting Up a Nortel Meridian 1 Digital PIMG Integration with Cisco Unity Connection
- Setting Up a Rolm 9751 Digital PIMG Integration with Cisco Unity Connection
- Setting Up a Serial (SMDI, MCI, or MD-110) PIMG Integration with Cisco Unity Connection
- Setting Up a Siemens Hicom 150 Analog PIMG Integration with Cisco Unity Connection
- Setting Up a Siemens Hicom 300 E (European) Analog PIMG Integration with Cisco Unity Connection
- Setting Up a Siemens Hicom 300 E (North American) Digital PIMG Integration with Cisco Unity Connection
- Setting Up a Siemens Hipath 3750 Analog PIMG Integration with Cisco Unity Connection
- Setting Up a Siemens Hipath 4000 Analog PIMG Integration with Cisco Unity Connection
- Testing the Integration
- Adding New User Templates for Multiple Integrations
- Adding a Secondary Master PIMG Unit
- Application Note for the Ericsson MD-110 Serial PIMG Integration
- Application Note for the Nortel SL-100 Serial SMDI TIMG Integration
- Settings for PIMG Firmware Version 5.x
- Index
PIMG Integration Guide for Cisco Unity Connection Release 10.x
Bias-Free Language
The documentation set for this product strives to use bias-free language. For the purposes of this documentation set, bias-free is defined as language that does not imply discrimination based on age, disability, gender, racial identity, ethnic identity, sexual orientation, socioeconomic status, and intersectionality. Exceptions may be present in the documentation due to language that is hardcoded in the user interfaces of the product software, language used based on RFP documentation, or language that is used by a referenced third-party product. Learn more about how Cisco is using Inclusive Language.
- Updated:
- November 11, 2014
Chapter: Application Note for the Nortel SL-100 Serial SMDI TIMG Integration
Application Note for the Nortel SL-100 Serial SMDI TIMG Integration
This is an application note for programming the Nortel SL-100 phone system for a serial SMDI integration with Cisco Unity Connection using TIMG units. For instructions on setting up analog PIMG units and creating the serial PIMG integration in Unity Connection, see the “Setting Up a Serial (SMDI, MCI, or MD-110) PIMG Integration with Cisco Unity Connection” chapter.
Network Topology
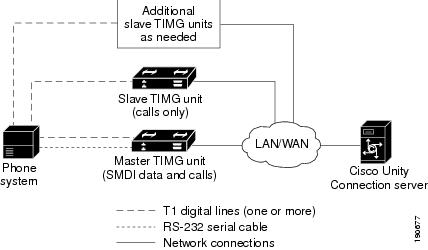
Figure 22-1 shows the required connections for a serial SMDI integration using TIMG units.
Figure 22-1 Connections for a Serial SMDI Integration Using TIMG Units
For more information about this integration, see Chapter1, “Introduction”
Requirements
Programming Nortel SL-100 Phone System for Serial Integration
The following programming instructions are provided as an example of a functioning integration. The specific programming for your phone system may vary depending on its configuration.

Example of Programming for the Nortel SL-100 Phone System in a Serial Integration
1.![]() On the MAP terminal, enter table mpc and press Enter.
On the MAP terminal, enter table mpc and press Enter.
3.![]() On Table MPC, enter the following settings.
On Table MPC, enter the following settings.
4.![]() Enter table mpclink and press Enter.
Enter table mpclink and press Enter.
6.![]() On Table MPCLINK, enter the following settings.
On Table MPCLINK, enter the following settings.
7.![]() Enter table sllnkdev and press Enter.
Enter table sllnkdev and press Enter.
9.![]() On Table SLLNKDEV, enter the following settings.
On Table SLLNKDEV, enter the following settings.
10.![]() Enter table ofrt and press Enter.
Enter table ofrt and press Enter.
You use Table OFRT to set up a treatment for unanswered calls. The following example shows settings for routing unanswered calls back to the voice messaging system.
11.![]() Enter add and press Enter.
Enter add and press Enter.
12.![]() On Table OFRT, enter the following settings.
On Table OFRT, enter the following settings.
13.![]() Enter table digcol and press Enter.
Enter table digcol and press Enter.
You use Table DIGCOL to set up the action that the line module must take with the first digit that is dialed.
14.![]() Enter add and press Enter.
Enter add and press Enter.
15.![]() On Table DIGCOL, enter the following settings.
On Table DIGCOL, enter the following settings.
16.![]() Enter table ucdgroup and press Enter.
Enter table ucdgroup and press Enter.
You use Table UCDGRP to set up the UCD group.

Note![]() The UCD group must have a unique primary DN.
The UCD group must have a unique primary DN.
17.![]() Enter add and press Enter.
Enter add and press Enter.
18.![]() On Table UCDGRP, enter the following settings.
On Table UCDGRP, enter the following settings.
19.![]() Enter table dnroute and press Enter.
Enter table dnroute and press Enter.
You use Table DNROUTE to set up the UCD group.
Note![]() The UCD group must have a unique primary DN.
The UCD group must have a unique primary DN.
20.![]() Enter add and press Enter.
Enter add and press Enter.
21.![]() On Table DNROUTE, enter the following settings.
On Table DNROUTE, enter the following settings.
22.![]() Enter table lninv and press Enter.
Enter table lninv and press Enter.
You use Table LNINV to assign card slots on the line or remote line module.
23.![]() Enter add and press Enter.
Enter add and press Enter.
24.![]() On Table LNINV, enter the following settings.
On Table LNINV, enter the following settings.
|
|
|
|---|---|
Enter the name of the appropriate pad group that appears in the PADDATA table. |
|
25.![]() Enter servord and press Enter.
Enter servord and press Enter.
You can add agents to the UCD group by entering the following inputs at the prompts.
26.![]() Enter servord and press Enter.
Enter servord and press Enter.
You can add a pilot number (UCD group DN) for the ports on the TIMG units by entering the following inputs at the prompts.
27.![]() Connect a phone to the line.
Connect a phone to the line.
29.![]() Dial the call forward activation code followed by the pilot number (UCD DN). For example, dial *80 5551234.
Dial the call forward activation code followed by the pilot number (UCD DN). For example, dial *80 5551234.
Note![]() If you do not know this code, look it up in Table IBNXLA. The code is in the CFWP field.
If you do not know this code, look it up in Table IBNXLA. The code is in the CFWP field.
30.![]() Confirm that you hear the confirmation tone, which indicates that the line has been forwarded.
Confirm that you hear the confirmation tone, which indicates that the line has been forwarded.
Note![]() If the phone system is restarted, you must repeat Step 27. through Step 30. for each line DN that CFUs to the UCD group.
If the phone system is restarted, you must repeat Step 27. through Step 30. for each line DN that CFUs to the UCD group.
31.![]() Enter table ibnxla and press Enter.
Enter table ibnxla and press Enter.
You use Table IBNXLA to set up and message waiting indicators (MWIs).
32.![]() Enter add and press Enter.
Enter add and press Enter.
33.![]() On Table IBNXLA, enter the following settings.
On Table IBNXLA, enter the following settings.
|
|
|
|
|---|---|---|
Enter the name of the translator, 1–8 characters, for the MWI feature. |
||
 Feedback