Upgrade Guide for Cisco Digital Media Suite 5.4.1
Available Languages
Table of Contents
Upgrade Guide for Cisco Digital Media Suite 5.4.1
Connect a Terminal to Your Appliance
Force DMPs From Their ‘Initial’ State, As Needed
Upgrade the Firmware and Root File System on DMP Endpoints
Upgrade Cisco Digital Media Manager (Appliance or Virtual Machine)
Upgrade a Failover Configuration
Upgrade Guide for Cisco Digital Media Suite 5.4.1

Warning
Before you upgrade your Cisco Digital Media Suite (Cisco DMS) environment, read this document carefully. It contains important information that can help you to avoid potentially serious problems during the upgrade process.
This guide explains how to upgrade Cisco Digital Media Suite from version 5.4 to 5.4.1.
- See the “Hardware Compatibility” section for information about which server and endpoint hardware models this release supports.
- See Release Notes for Cisco Digital Media Suite 5.4.x on Cisco.com for information about new features in this release.
- If you use any release that predates Cisco DMS 5.4, you must upgrade to 5.4 first, and then upgrade to Cisco DMS 5.4.1.
- You must have a valid Cisco DMS license to use this upgrade.
Prerequisites
Your Cisco DMS 5.4 hardware and software components must all be running correctly before you start to upgrade them.
Important Upgrade Notes
- When you use federated authentication (single sign-on) mode in Cisco DMS 5.4, you must reimport service provider (SP) metadata into your identity provider (IDP) server after you upgrade to 5.4.1. For information about how to export the SP metadata, see the Authentication chapter’s “Configure SSO Services” section in User Guide for Cisco Digital Media Manager 5.4.x at http://cisco.com/en/US/docs/video/digital_media_systems/5_x/5_4/dmm/user/guide/admin/auth.html
Hardware Compatibility
Cisco DMS 5.4.1 is supported on the following hardware platforms:
Table 1 shows supported upgrade paths to Cisco DMS 5.4.1 by hardware platform.

Note
Before You Begin
Before you upgrade your Cisco DMS appliances, do the following:
3.
Back Up Your Appliance
We recommend backing up your appliances before performing the upgrade. To learn how to back up your appliance, see Administration Guide for Cisco Digital Media Suite 5.4.x Appliances on Cisco.com at http://www.cisco.com/en/US/partner/docs/video/digital_media_systems/5_x/5_4/dms/aai/administration/guide/dms_appliance_admin.html
Obtain the Update Media
To obtain the update media, do one of the following:
- When you have a valid service contract for Cisco DMS, visit http://tools.cisco.com/gct/Upgrade/jsp/productUpgrade.jsp and enter your contract number to obtain access to the upgrade.
- When you do not have a valid service contract for Cisco DMS, you must purchase the upgrade. See the data sheet for ordering information:
http://www.cisco.com/en/US/products/ps6682/products_data_sheets_list.htmlAfter you obtain the upgrade images, you can either burn the upgrade images to DVD or stage them on an FTP server for remote access. We recommend that you stage them.
Connect a Terminal to Your Appliance
- You must attach a monitor and keyboard to each Cisco DMM appliance that you upgrade.
- Do not attempt to upgrade over a remote SSH session—your upgrade will fail. The upgrade process reboots the appliance several times, causing remote sessions to drop. Your input is required after each reboot, but you cannot reestablish a remote session until the entire upgrade process is completed.
Upgrade Cisco DMS
Perform the following tasks to upgrade your installation. You must upgrade your Cisco Digital Media Player (DMP) software before your Cisco DMM software.
Upgrade Your DMPs
To upgrade your DMPs, complete these steps in exactly this order:
1.
2.
3.
Force DMPs From Their ‘Initial’ State, As Needed

Timesaver Complete this procedure if you have reapplied our factory-default settings to one or more of your DMPs. Otherwise, if you have not restored DMP factory defaults, you can skip this procedure.

Caution
Before the Cisco Digital Signs software on your DMM appliance can manage these DMPs centrally, you must complete either this simple procedure now or the more complex procedure later.
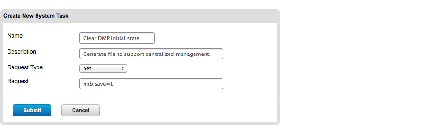
A DMP returns to its “initial” state when you reset it to use factory-default settings. In its initial state, a DMP lacks an internal database file that supports centralized management. This procedure shows you how to force it from this initial state.

Tip
Step 1

Step 2
Step 3
a.

b.

Step 4
a.
b.
c.
d.
Step 5
a.
b.

c.
OR
Use other check boxes in the Name column to select individual DMPs.

The Run Task dialog box opens.
e.
DMM populates a table with all of its saved system tasks.
f.

Tip Is your system task missing in the Run Task dialog box? It might only be hidden. You can change how many table rows the dialog box shows at one time. The default is 10 rows but you can show as many as 100. Another way that you can use the pagination controls is to navigate among hidden results when the table has more entries than visible rows.
Step 6
Stop All Applications on DMPs
Before you upgrade DMPs, you must stop all applications.
Note
Step 1

Step 2
Step 3

b.

Step 4
a.
b.
c.
Step 5
a.
b.

c.
OR
Use other check boxes in the Name column to select individual DMPs.

The Run Task dialog box opens.
e.

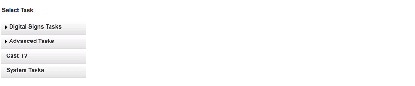
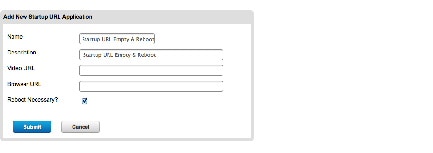
Scroll to, and then click, the DMP Startup URL entry in the Advanced Tasks drawer.
DMM populates a table with all of your saved DMP Startup URL tasks.
f.

Step 6
Upgrade the Firmware and Root File System on DMP Endpoints
Note It takes approximately 30 minutes to upgrade the firmware and root file system on a DMP. However, while the upgrade is in progress on a DMP 4400G, its behavior might be confusing. It:
1.
(Where NN is a percentage value that climbs from 1 to 99.)
2.
3.
4.
This occurs because the 4400G must install a small amount of data and restart before it can accept its new firmware and file system.
- When you use Cisco ECDS or Cisco ACNS, we recommend that you send DMP firmware files to it and deploy the upgrades as a future event—not an immediate event.
- If you deploy the upgrade directly to your DMPs, we recommend that you upgrade just one DMP initially or upgrade just a small group of DMPs and test the result before you send the firmware to multiple DMPs.
- We recommend that you never upgrade more than five DMPs at a time and that all upgrades occur outside normal business hours for your organization.
Warning
Step 1
Step 2
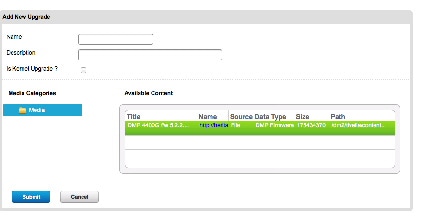
a.

The Add Asset dialog box opens.
b.

d.
e.
f.
Do not click any button or move away from this page in your browser until the upload is finished. After it is finished, the page refreshes automatically. You should see that a description of the firmware file has been added in the table that the page shows.
Note
Step 3
Step 4
Step 5
a.

b.

Step 6
a.
b.
c.
Step 7
Tip To check the status of an upgrade, deploy the system task called Upgrade Status.
Step 8
- After updating your DMPs, proceed to Upgrade Cisco Digital Media Manager (Appliance or Virtual Machine).
Upgrade Cisco Digital Media Manager (Appliance or Virtual Machine)
The upgrade for Cisco Digital Media Manager can take an hour or more to complete. Make sure that you have ample time in your maintenance window to complete the upgrade. During an upgrade, users cannot access the Cisco DMM web interface.
Note
DMM Virtual Machine Pre-Requisite Steps
Warning
Step 1
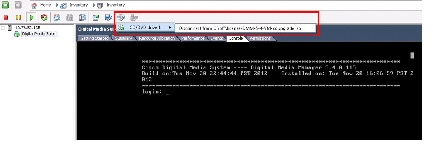
Step 2
Step 3
Step 4
Step 5
Step 6
Press Enter when ready to proceed with the installation of the patch.

Step 7
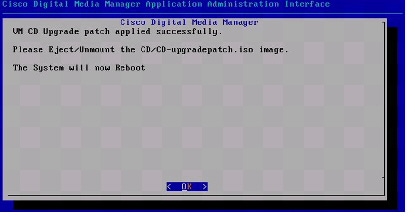
Step 8
Step 9
Step 1
Step 2
Step 3
Step 4
Step 5
The appliance reboots. A dialog asks you to confirm that you want to upgrade the appliance.
Step 6
The upgrade process begins. The appliance reboots and again asks you if you want to upgrade.
The system installs the 5.4.1 update. If you are prompted to type “yes” to bypass a pause, you can type yes or ignore it; the upgrade will continue automatically after the designated time. After the update is completed, the system reboots and runs post-installation tasks
The upgrade is done when an AAI login prompt appears.
Step 8
The Main Menu shows your installed DMM version.
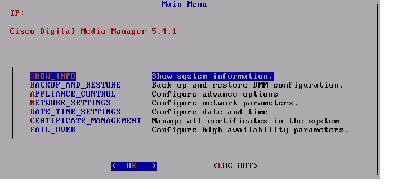
Step 9
Upgrade a Failover Configuration
To upgrade a failover configuration for you DMS installation, perform the following procedures in the order presented:
Verify the System Upgrade
Use this procedure to log into Cisco DMM for the first time after you upgrade.
Step 1
Step 3
Step 4
Learn More About...
For information on obtaining documentation, submitting a service request, and gathering additional information, see the monthly What’s New in Cisco Product Documentation, which also lists all new and revised Cisco technical documentation, at: http://www.cisco.com/en/US/docs/general/whatsnew/whatsnew.html
Subscribe to What’s New in Cisco Product Documentation as a Really Simple Syndication (RSS) feed and set content to be delivered directly to your desktop using a reader application. The RSS feeds are a free service and Cisco currently supports RSS Version 2.0.
Cisco and the Cisco logo are trademarks or registered trademarks of Cisco and/or its affiliates in the U.S. and other countries. To view a list of Cisco trademarks, go to this URL: www.cisco.com/go/trademarks. Third-party trademarks mentioned are the property of their respective owners. The use of the word partner does not imply a partnership relationship between Cisco and any other company. (1110R)
Any Internet Protocol (IP) addresses used in this document are not intended to be actual addresses. Any examples, command display output, and figures included in the document are shown for illustrative purposes only. Any use of actual IP addresses in illustrative content is unintentional and coincidental.

 Burn:
NN %
Burn:
NN %
 Verify:
NN %
Verify:
NN %
 Internal Upgrade Completed.


 Feedback
Contact Cisco
- Open a Support Case

- (Requires a Cisco Service Contract)