Configuring CIMC Access
If you are a remote user, use the Cisco IOS CLI to configure CIMC access.
-
Connect a keyboard and monitor to the front panel of the E-Series Server, and then use the CIMC Configuration Utility to configure CIMC access.

Note
The CIMC Configuration Utility is not applicable to the EHWIC E-Series NCE and the NIM E-Series NCE.
-
Use the Cisco IOS CLI to configure CIMC access. See one of the following as appropriate:
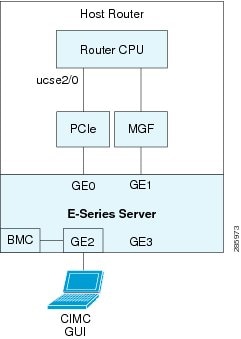
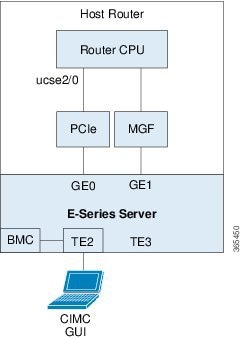
Understanding the Interfaces in an E-Series Server and the Cisco ISR G2
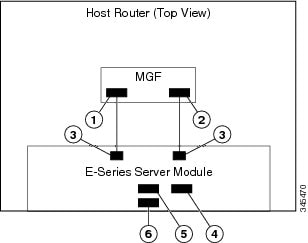
The following figure shows the interfaces in a double-wide E-Series Server and the Cisco ISR G2 host router.
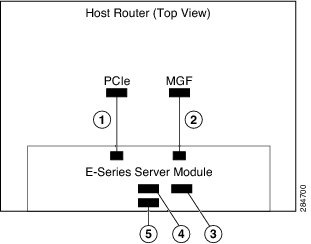
|
Interface |
Interface Location |
Description |
|||
|
1 |
Router’s PCIe slot/0 Interface |
Internal Interface |
Also called Console interface. This interface connects the router’s PCIe interface to the E-Series Server. The PCIe interface provides an internal Layer 3 GE link between the router and the E-Series Server. It can be used both for CIMC configuration and for host operating system configuration. |
||
|
2 |
Router’s MGF slot/1 VLAN Interface |
Internal Interface |
Used to access CIMC over a high-speed backplane switch. The MGF VLAN interface provides an internal Layer 2 GE link between the router and the E-Series Server. This interface can be used both for CIMC configuration and for host operating system configuration. |
||
|
3 |
Management (Dedicated) Interface |
External Interface |
Used for CIMC configuration and management. |
||
|
4 |
GE3 Interface |
External Interface |
Used as a primary interface or as a backup interface. This interface can be used both for CIMC configuration and for host operating system configuration.
|
||
|
5 |
GE2 Interface |
External Interface |
Used as a primary interface or as a backup interface. This interface can be used both for CIMC configuration and for host operating system configuration. |
CIMC Access Configuration Options—Cisco ISR G2
Depending on whether you are a remote user or a local user, do one of the following to configure CIMC access.
-
If you are a remote user, use either the external Management (dedicated) interface or one of the following shared LOM interfaces to configure CIMC access:
-
Router’s internal PCIe slot/0 Console interface
-
Router's internal MGF slot/1 VLAN interface
-
E-Series Server’s external GE2 or GE3 interface
-
-
If you are a local user, use the Cisco IOS CLI or the CIMC Configuration Utility to configure CIMC access.
Configuring CIMC Access Using the E-Series Server's External Management (Dedicated) Interface—Cisco ISR G2
See the following figure and the procedure that follows to configure CIMC access using the E-Series Server's external Management (dedicated) interface.
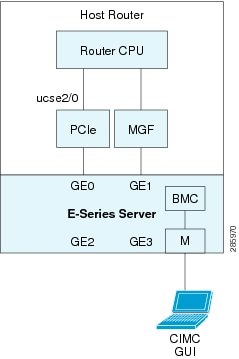
Before you begin
Make sure that you have the following information:
-
IP address of CIMC.
-
Username and password for logging in to the router.
-
Slot or subslot and port number of the E-Series Server or NCE.
Procedure
| Command or Action | Purpose | |
|---|---|---|
| Step 1 |
Router> enable |
Enters privileged EXEC mode on the host router. Enter your password if prompted. |
| Step 2 |
Router# configure terminal |
Enters global configuration mode on the host router. |
| Step 3 |
Router (config)# interface ucse slot/port |
Enters interface configuration mode for the slot and port where the E-Series Server is installed. |
| Step 4 |
Router (config-if)# imc ip address cimc-ip-address subnet-mask default-gateway cimc-gateway-ip-address |
Specifies the IP address of CIMC and the IP address of the default gateway that CIMC must use.
|
| Step 5 |
Router (config-if)# imc access-port dedicated |
Configures CIMC access through the server’s external Management (dedicated) interface. See # 3 in E-Series Server Interfaces. |
| Step 6 |
Router (config-if)# no shut |
Causes the interface to be administratively up. |
| Step 7 |
Router (config-if)# end |
Exits interface configuration mode. |
Example
This example shows how to configure CIMC access using the server’s external IMC dedicated interface:
Router> enable
Router> password
Router# configure terminal

Router(config)# interface ucse 2/0
Router(config-if)# imc ip address 10.0.0.1 255.0.0.0 default-gateway 10.0.0.2
Router(config-if)# imc access-port dedicated
Router(config-if)# no shut
Router(config-if)# end
Configuring CIMC Access Using Shared LOM—Cisco ISR G2
Use one of the following shared LOM interfaces to configure CIMC access:
-
Router’s internal PCIe slot/0 Console interface
-
Router's internal MGF slot/1 VLAN interface
-
E-Series Server’s external GE2 or GE3 interface
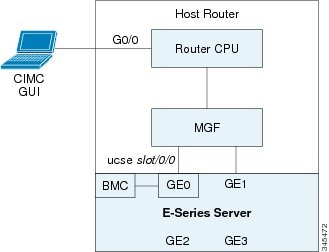
Configuring CIMC Access Using the Router's Internal PCIe slot/0 Console Interface—Cisco ISR G2
See the following figure and the procedure that follows to configure CIMC access using the router's internal PCIe slot/0 Console interface.
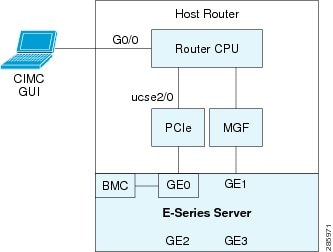
Before you begin
Make sure that you have the following information:
-
IP address of CIMC.
-
Username and password for logging in to the router.
-
Slot or subslot and port number of the E-Series Server or NCE.
Procedure
| Command or Action | Purpose | |||||
|---|---|---|---|---|---|---|
| Step 1 |
Router> enable |
Enters privileged EXEC mode on the host router. Enter your password if prompted. |
||||
| Step 2 |
Router# configure terminal |
Enters global configuration mode on the host router. |
||||
| Step 3 |
Router (config)# interface GigabitEthernet0/0 |
Enters interface configuration mode for Gigabit Ethernet 0/0. |
||||
| Step 4 |
Router (config-if)# ip address ip-address subnet-mask |
Specifies the IP address and subnet mask of the interface. |
||||
| Step 5 |
Router (config-if)# no shut |
Causes the interface to be administratively up. |
||||
| Step 6 |
Router (config-if)# end |
Exits interface configuration mode. |
||||
| Step 7 |
Router# configure terminal |
Enters global configuration mode on the host router. |
||||
| Step 8 |
Router (config)# interface ucse slot/port |
Enters interface configuration mode for the slot and port where the E-Series Server is installed. |
||||
| Step 9 |
Router (config-if)# ip unnumbered type number |
The ip unnumbered command enables IP processing on an interface without assigning an explicit IP address to that interface.
When you use the ip unnumbered command, you must use the ip route command to create a static route.
|
||||
| Step 10 |
Router (config-if)# imc ip address cimc-ip-address subnet-mask default-gateway cimc-gateway-ip-address |
Specifies the IP address of CIMC and the IP address of the default gateway that CIMC must use.
|
||||
| Step 11 |
Router (config-if)# imc access-port shared-lom console |
Configures CIMC access using the router's PCIe slot/0 (console) interface. See # 1 in E-Series Server Interfaces. |
||||
| Step 12 |
Router (config-if)# no shut |
Causes the interface to be administratively up. |
||||
| Step 13 |
Router (config-if)# end |
Exits interface configuration mode. |
||||
| Step 14 |
Router# configure terminal |
Enters global configuration mode on the host router. |
||||
| Step 15 |
Router (config)# ip route cimc-ip-address subnet-mask ucse slot/port |
Creates a static route.
|
||||
| Step 16 |
Router (config-if)# end |
Exits interface configuration mode. |
||||
| Step 17 |
Router# ping cimc-ip-address |
Verifies connection from the router to CIMC through the router's internal PCIe slot/0 console interface. |
Example
This example shows how to configure CIMC access using the server’s internal PCIe slot/0 console interface:
Router> enable
Router> password
Router# configure terminal

Router(config)# interface GigabitEthernet0/0
Router(config-if)# ip address 10.0.0.1 255.0.0.0
Router(config-if)# no shut
Router(config-if)# end

Router# configure terminal
Router(config)# interface ucse 2/0
Router(config)# ip unnumbered GigabitEthernet0/0
Router(config-if)# imc ip address 10.0.0.2 255.0.0.0 default-gateway 10.0.0.1
Router(config-if)# imc access-port shared-lom console
Router(config-if)# no shut
Router(config)# end

Router# configure terminal
Router(config)# ip route 10.0.0.2 255.255.255.255 ucse 2/0
Router(config)# end

Router# ping 10.0.0.2
Type escape sequence to abort.
Sending 5, 100-byte ICMP Echos to 10.0.0.2, timeout is 2 seconds:
!!!!!
Success rate is 100 percent (5/5), round-trip min/avg/max = 1/2/4 ms
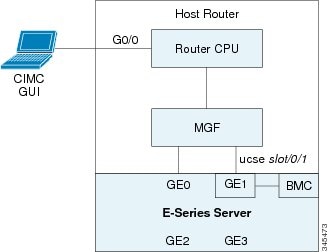
Configuring CIMC Access Using the Router's Internal MGF slot/1 VLAN Interface—Cisco ISR G2
See the following figure and the procedure that follows to configure CIMC access using the router's internal MGF slot/1 VLAN interface.
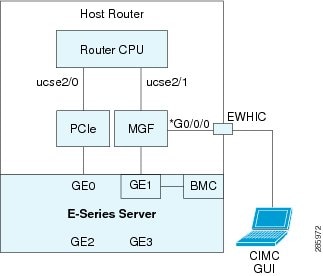
Before you begin
Make sure that you have the following information:
-
IP address of CIMC.
-
Username and password for logging in to the router.
-
Slot or subslot and port number of the E-Series Server or NCE.
Procedure
| Command or Action | Purpose | |
|---|---|---|
| Step 1 |
Router> enable |
Enters privileged EXEC mode on the host router. Enter your password if prompted. |
| Step 2 |
Router# show vlan-switch |
Displays VLANs. |
| Step 3 |
Router# configure terminal |
Enters global configuration mode on the host router. |
| Step 4 |
Router (config)# interface vlan vlan-number |
Enters VLAN configuration mode for the specified VLAN number. |
| Step 5 |
Router (config-if)# ip address vlan-ip-address subnet-mask |
Specifies the IP address for the VLAN.
|
| Step 6 |
Router (config-if)# end |
Exits interface configuration mode. |
| Step 7 |
Router# configure terminal |
Enters global configuration mode on the host router. |
| Step 8 |
Router (config)# interface ucse slot/port |
Enters interface configuration mode for the slot and port where the E-Series Server is installed. |
| Step 9 |
Router (config-if)# imc ip address cimc-ip-address subnet-mask default-gateway cimc-gateway-ip-address |
Specifies the IP address of CIMC and the IP address of the default gateway that CIMC must use.
|
| Step 10 |
Router (config-if)# imc access-port shared-lom GE1 |
Configures CIMC access using the router’s internal slot/1 MGF VLAN interface. See # 2 in E-Series Server Interfaces. |
| Step 11 |
Router (config-if)# no shut |
Causes the interface to be administratively up. |
| Step 12 |
Router (config-if)# end |
Exits interface configuration mode. |
| Step 13 |
Router# ping cimc-ip-address |
Verifies connection from the router to CIMC through the router's internal MGF slot/1 VLAN interface. |
Example
This example shows how to configure CIMC access using the router's internal MGF slot/1 VLAN interface:
Router> enable
Router> password
Router> show vlan-switch
VLAN Name                             Status    Ports
---- -------------------------------- --------- -------------------------------
1    default                          active    Gi0/0/0, Gi0/0/1, Gi0/0/2
                                                            Gi0/0/3, uc2/1
Router# configure terminal
Router(config)# interface vlan 1
Router(config-if)# ip address 10.0.0.1 255.0.0.0
Router(config-if)# end

Router# configure terminal
Router(config)# interface ucse 2/0
Router(config-if)# imc ip address 10.0.0.2 255.0.0.0 default-gateway 10.0.0.1
Router(config-if)# imc access-port shared-lom GE1
Router(config-if)# no shut
Router(config-if)# end

Router# ping 10.0.0.2
Type escape sequence to abort.
Sending 5, 100-byte ICMP Echos to 10.0.0.2, timeout is 2 seconds:
!!!!!
Success rate is 100 percent (5/5), round-trip min/avg/max = 1/2/4 ms
Configuring CIMC Access Using the Router's Internal MGF slot/1 Interface Using a Non-Native VLAN—Cisco ISR G2
See the following figure and the procedure that follows to configure CIMC access using the router's internal MGF slot/1 interface using a non-native VLAN.
Before you begin
Make sure that you have the following information:
-
IP address of CIMC.
-
Username and password for logging in to the router.
-
Slot or subslot and port number of the E-Series Server or NCE.
Procedure
| Command or Action | Purpose | |
|---|---|---|
| Step 1 |
Router> enable |
Enters privileged EXEC mode on the host router. Enter your password if prompted. |
| Step 2 |
Router# show vlan-switch |
Displays VLANs. |
| Step 3 |
Router# configure terminal |
Enters global configuration mode on the host router. |
| Step 4 |
Router (config)# vlan vlan-number |
Configures the specified VLAN. |
| Step 5 |
Router (config)# end |
Exits VLAN configuration. |
| Step 6 |
Router# configure terminal |
Enters global configuration mode on the host router. |
| Step 7 |
Router (config)# interface vlan vlan-number |
Enters VLAN configuration mode for the specified VLAN number. |
| Step 8 |
Router (config-if)# ip address vlan-ip-address subnet-mask |
Specifies the IP address for the VLAN.
|
| Step 9 |
Router (config-if)# end |
Exits interface configuration mode. |
| Step 10 |
Router# configure terminal |
Enters global configuration mode on the host router. |
| Step 11 |
Router (config)# interface ucse slot/port |
Enters interface configuration mode for the slot and port where the E-Series Server is installed. |
| Step 12 |
Router (config)# imc vlan vlan-id |
Configures the specified VLAN ID for CIMC. |
| Step 13 |
Router (config-if)# imc ip address cimc-ip-address subnet-mask default-gateway cimc-gateway-ip-address |
Specifies the IP address of CIMC and the IP address of the default gateway that CIMC must use.
|
| Step 14 |
Router (config-if)# imc access-port shared-lom GE1 |
Configures CIMC access using the router’s internal slot/1 MGF VLAN interface. See # 2 in E-Series Server Interfaces. |
| Step 15 |
Router (config-if)# no shut |
Causes the interface to be administratively up. |
| Step 16 |
Router (config-if)# end |
Exits interface configuration mode. |
| Step 17 |
Router# configure terminal |
Enters global configuration mode on the host router. |
| Step 18 |
Router (config)# interface ucse slot/1 |
Enters interface configuration mode for the router’s MGF slot/1 VLAN interface. |
| Step 19 |
Router (config-if)# switchport mode trunk |
Puts the port into permanent trunking mode. The default configuration is access mode. |
| Step 20 |
Router (config-if)# no shut |
Causes the interface to be administratively up. |
| Step 21 |
Router (config-if)# end |
Exits interface configuration mode. |
| Step 22 |
Router# ping cimc-ip-address |
Verifies connection from the router to CIMC through the router's internal MGF slot/1 VLAN interface. |
Example
This example shows how to configure CIMC access using the router's internal MGF slot/1 interface using a non-native VLAN:
Router> enable
Router> password
Router> show vlan-switch
VLAN Name                             Status    Ports
---- -------------------------------- --------- -------------------------------
1    default                          active    Gi0/0/0, Gi0/0/1, Gi0/0/2
                                                            Gi0/0/3, uc2/1

Router# configure terminal
Router(config)# vlan 2
Router(config)# end

Router# configure terminal
Router(config)# interface vlan 2
Router(config-if)# ip address 10.0.0.1 255.0.0.0
Router(config-if)# end

Router# configure terminal
Router(config)# interface ucse 2/0
Router(config-if)# imc vlan 2
Router(config-if)# imc ip address 10.0.0.2 255.0.0.0 default-gateway 10.0.0.1
Router(config-if)# imc access-port shared-lom GE1
Router(config-if)# no shut
Router(config-if)# end

Router# configure terminal
Router(config)# interface ucse 2/1
Router(config-if)# switchport mode trunk
Router(config-if)# no shut
Router(config-if)# end

Router# ping 10.0.0.2
Type escape sequence to abort.
Sending 5, 100-byte ICMP Echos to 10.0.0.2, timeout is 2 seconds:
!!!!!
Success rate is 100 percent (5/5), round-trip min/avg/max = 1/2/4 ms
Configuring CIMC Access Using the E-Series Server's External GE2 or GE3 Interface—Cisco ISR G2
See the following figure and the procedure that follows to configure CIMC access using the E-Series Server's external GE2 or GE3 interface.
Note |
This figure shows how to configure CIMC access using the E-Series Server's external GE2 interface. |
Before you begin
Make sure that you have the following information:
-
IP address of CIMC.
-
Username and password for logging in to the router.
-
Slot or subslot and port number of the E-Series Server or NCE.
Procedure
| Command or Action | Purpose | |
|---|---|---|
| Step 1 |
Router> enable |
Enters privileged EXEC mode on the host router. Enter your password if prompted. |
| Step 2 |
Router# configure terminal |
Enters global configuration mode on the host router. |
| Step 3 |
Router (config)# interface ucse slot/port |
Enters interface configuration mode for the slot and port where the E-Series Server is installed. |
| Step 4 |
Router (config-if)# imc ip address cimc-ip-address subnet-mask default-gateway cimc-gateway-ip-address |
Specifies the IP address of CIMC and the IP address of the default gateway that CIMC must use.
|
| Step 5 |
Router (config-if)# imc access-port shared-lom {GE2 | GE3} |
Configures CIMC access through the E-Series Server's external GE2 or GE3 interface. See # 4 and 5 in E-Series Server Interfaces. |
| Step 6 |
Router (config-if)# no shut |
Causes the interface to be administratively up. |
| Step 7 |
Router (config-if)# end |
Exits interface configuration mode. |
Example
This example shows how to configure CIMC access using the server's external GE2 interface:
Router> enable
Router> password
Router# configure terminal

Router(config)# interface ucse 2/0
Router(config-if)# imc ip address 10.0.0.1 255.0.0.0 default-gateway 10.0.0.2
Router(config-if)# imc access-port shared-lom GE2
Router(config-if)# no shut
Router(config-if)# end
Understanding the Interfaces in an E-Series Server and the Cisco ISR 4000 Series
The following figure shows the interfaces in a double-wide E-Series Server and the Cisco ISR 4000 series host router.
|
Interface |
Interface Location |
Description |
|||
|
1 |
Router’s ucse slot/0/0 Interface |
Internal Interface |
Used to access CIMC over a high-speed backplane switch. The MGF interface provides an internal Layer 2 GE link between the router and the E-Series Server. This interface can be used both for CIMC configuration and for host operating system configuration.
|
||
|
2 |
Router’s ucse slot/0/1 Interface |
Internal Interface |
Used to access CIMC over a high-speed backplane switch. The MGF interface provides an internal Layer 2 GE link between the router and the E-Series Server. This interface can be used both for CIMC configuration and for host operating system configuration.
|
||
|
3 |
GE0 and GE1 Interfaces |
Internal Interfaces |
E-Series Server's internal NIC interfaces. |
||
|
4 |
Management (Dedicated) Interface |
External Interface |
Used for CIMC configuration and management. |
||
|
5 |
GE3 Interface |
External Interface |
Can be used both for CIMC configuration and for host operating system configuration.
|
||
|
6 |
GE2 Interface |
External Interface |
Can be used both for CIMC configuration and for host operating system configuration. |
CIMC Access Configuration Options—Cisco ISR 4000 Series
Depending on whether you are a remote user or a local user, do one of the following to configure CIMC access.
-
If you are a remote user, use the Cisco IOS CLI to configure CIMC access by using one of the following interfaces:
-
CIMC Management (dedicated) interface
-
E-Series Server’s internal GE0 and the router's ucse slot/0/0 interface
-
E-Series Server’s internal GE1 interface and the router's ucse slot/0/1 interface
-
E-Series Server’s external GE2 or GE3 interface
-
-
If you are a local user, use the CIMC Configuration Utility or the Cisco IOS CLI (mentioned above) to configure CIMC access.
Configuring CIMC Access Using the E-Series Server's External Management (Dedicated) Interface—Cisco ISR 4000 Series
See the following figure and the procedure that follows to configure CIMC access using the E-Series Server's external Management (dedicated) interface.

Before you begin
Make sure that you have the following information:
-
IP address of CIMC.
-
Username and password for logging in to the router.
-
Slot or subslot and port number of the E-Series Server or NCE.
Procedure
| Command or Action | Purpose | |
|---|---|---|
| Step 1 |
Router> enable |
Enters privileged EXEC mode on the host router. Enter your password if prompted. |
| Step 2 |
Router# configure terminal |
Enters global configuration mode on the host router. |
| Step 3 |
Router (config)# ucse subslot slot/subslot |
Enters ucse interface configuration mode for the slot and subslot where the E-Series Server is installed. |
| Step 4 |
Router (config-ucse)# imc ip address cimc-ip-address subnet-mask default-gateway cimc-gateway-ip-address |
Specifies the IP address of CIMC and the IP address of the default gateway that CIMC must use.
|
| Step 5 |
Enter one of the following commands:
|
Configures CIMC access through the server’s external Management (dedicated) interface. See # 4 in Understanding the Interfaces in the NIM E-Series NCE and the Cisco ISR 4000 Series.
|
| Step 6 |
Router (config-ucse)# end |
Returns to privileged EXEC mode on the host router. |
Example
This example shows how to configure CIMC access using the server’s external management interface—Applicable only with Cisco IOS XE Release 3.9S:
Router> enable
Router> password
Router# configure terminal

Router(config)# ucse subslot 1/0
Router(config-ucse)# imc ip address 10.0.0.1 255.0.0.0 default-gateway 10.0.0.2
Router(config-ucse)# imc access-port mgmt
Router(config-ucse)# end
This example shows how to configure CIMC access using the server’s external dedicated interface—Applicable with Cisco IOS XE Release 3.10S and later versions:
Router> enable
Router> password
Router# configure terminal

Router(config)# ucse subslot 1/0
Router(config-ucse)# imc ip address 10.0.0.1 255.0.0.0 default-gateway 10.0.0.2
Router(config-ucse)# imc access-port dedicated
Router(config-ucse)# end
Configuring CIMC Access Using the E-Series Server's NIC Interfaces—Cisco ISR 4000 Series
-
E-Series Server’s internal GE0 and the router's ucse slot/0/0 interface
-
E-Series Server’s internal GE1 interface and the router's ucse slot/0/1 interface
-
E-Series Server’s external GE2 or GE3 interface
Configuring CIMC Access Using the E-Series Server's Internal GE0 Interface and the Cisco ISR 4000 Series ucse slot/0/0 Interface
See the following figure and the procedure that follows to configure CIMC access using the E-Series Server's internal GE0 interface and the router's ucse slot/0/0 interface.
Before you begin
Make sure that you have the following information:
-
IP address of CIMC.
-
Username and password for logging in to the router.
-
Slot or subslot and port number of the E-Series Server or NCE.
Procedure
| Command or Action | Purpose | |||||
|---|---|---|---|---|---|---|
| Step 1 |
Router> enable |
Enters privileged EXEC mode on the host router. Enter your password if prompted. |
||||
| Step 2 |
Router# configure terminal |
Enters global configuration mode on the host router. |
||||
| Step 3 |
Router (config)# interface GigabitEthernet 0/0/0 |
Enters interface configuration mode for Gigabit Ethernet interface 0/0/0. |
||||
| Step 4 |
Router (config-if)# ip address ip-address subnet-mask |
Specifies the IP address and subnet mask of the interface. |
||||
| Step 5 |
Router (config-if)# no shut |
Causes the interface to be administratively up. |
||||
| Step 6 |
Router (config-if)# exit |
Exits interface configuration mode. |
||||
| Step 7 |
Router (config)# interface ucse slot/0/0 |
Enters ucse interface configuration mode for the slot, subslot, and port where the E-Series Server is installed. |
||||
| Step 8 |
Router (config-if)# ip unnumbered type number |
The ip unnumbered command enables IP processing on an interface without assigning an explicit IP address to that interface.
When you use the ip unnumbered command, you must use the ip route command to create a static route.
|
||||
| Step 9 |
Router (config-if)# no shut |
Causes the interface to be administratively up. |
||||
| Step 10 |
Router (config-if)# exit |
Exits interface configuration mode. |
||||
| Step 11 |
Router (config)# ucse subslot slot/subslot |
Enters ucse interface configuration mode for the slot and subslot where the E-Series Server is installed. |
||||
| Step 12 |
Router (config-ucse)# imc ip address cimc-ip-address subnet-mask default-gateway cimc-gateway-ip-address |
Specifies the IP address of CIMC and the IP address of the default gateway that CIMC must use.
|
||||
| Step 13 |
Enter one of the following commands:
|
Configures CIMC access using the E-Series Server's internal GE0 or console interface. See # 3 in Understanding the Interfaces in an E-Series Server and the Cisco ISR 4000 Series.
|
||||
| Step 14 |
Router (config-ucse)# exit |
Exits ucse interface configuration mode. |
||||
| Step 15 |
Router (config)# ip route cimc-ip-address subnet-mask ucse slot/subslot/port |
Creates a static route.
|
||||
| Step 16 |
Router (config)# end |
Exits configuration mode. |
||||
| Step 17 |
Router# ping cimc-ip-address |
Verifies the connection from the router to CIMC through the ucse slot/0/0 interface. |
Example
This example shows how to configure CIMC access using the E-Series Server's internal GE0 interface and the router's ucse slot/0/0 interface—Applicable only with Cisco IOS XE Release 3.9S:
Router> enable
Router> password
Router# configure terminal

Router(config)# interface GigabitEthernet0/0/0
Router(config-if)# ip address 10.0.0.1 255.0.0.0
Router(config-if)# no shut
Router(config-if)# exit

Router(config)# interface ucse 1/0/0
Router(config-if)# ip unnumbered GigabitEthernet0/0/0
Router(config-if)# no shut
Router(config-if)# exit

Router(config)# ucse subslot 1/0
Router(config-ucse)# imc ip address 10.0.0.2 255.0.0.0 default-gateway 10.0.0.1
Router(config-ucse)# imc access-port ge0
Router(config-ucse)# exit

Router(config)# ip route 10.0.0.2 255.255.255.255 ucse 1/0/0
Router(config)# end

Router# ping 10.0.0.2
Type escape sequence to abort.
Sending 5, 100-byte ICMP Echos to 10.0.0.2, timeout is 2 seconds:
!!!!!
Success rate is 100 percent (5/5), round-trip min/avg/max = 1/2/4 ms
This example shows how to configure CIMC access using the E-Series Server's internal console interface and the router's ucse slot/0/0 interface—Applicable with Cisco IOS XE Release 3.10S and later versions:
Router> enable
Router> password
Router# configure terminal

Router(config)# interface GigabitEthernet0/0/0
Router(config-if)# ip address 10.0.0.1 255.0.0.0
Router(config-if)# no shut
Router(config-if)# exit

Router(config)# interface ucse 1/0/0
Router(config-if)# ip unnumbered GigabitEthernet0/0/0
Router(config-if)# no shut
Router(config-if)# exit

Router(config)# ucse subslot 1/0
Router(config-ucse)# imc ip address 10.0.0.2 255.0.0.0 default-gateway 10.0.0.1
Router(config-ucse)# imc access-port shared-lom console
Router(config-ucse)# exit

Router(config)# ip route 10.0.0.2 255.255.255.255 ucse 1/0/0
Router(config)# end

Router# ping 10.0.0.2
Type escape sequence to abort.
Sending 5, 100-byte ICMP Echos to 10.0.0.2, timeout is 2 seconds:
!!!!!
Success rate is 100 percent (5/5), round-trip min/avg/max = 1/2/4 ms
Configuring CIMC Access Using the E-Series Server's Internal GE1 Interface and the Cisco ISR 4000 Series ucse slot/0/1 Interface
See the following figure and the procedure that follows to configure CIMC access using the E-Series Server's internal GE1 interface and the router's ucse slot/0/1 interface.
Before you begin
Make sure that you have the following information:
-
IP address of CIMC.
-
Username and password for logging in to the router.
-
Slot or subslot and port number of the E-Series Server or NCE.
Procedure
| Command or Action | Purpose | |||||
|---|---|---|---|---|---|---|
| Step 1 |
Router> enable |
Enters privileged EXEC mode on the host router. Enter your password if prompted. |
||||
| Step 2 |
Router# configure terminal |
Enters global configuration mode on the host router. |
||||
| Step 3 |
Router (config)# interface GigabitEthernet 0/0/0 |
Enters interface configuration mode for Gigabit Ethernet interface 0/0/0. |
||||
| Step 4 |
Router (config-if)# ip address ip-address subnet-mask |
Specifies the IP address and subnet mask of the interface. |
||||
| Step 5 |
Router (config-if)# no shut |
Causes the interface to be administratively up. |
||||
| Step 6 |
Router (config-if)# exit |
Exits interface configuration mode. |
||||
| Step 7 |
Router (config)# interface ucse slot/0/1 |
Enters ucse interface configuration mode for the slot, subslot, and port where the E-Series Server is installed. |
||||
| Step 8 |
Router (config-if)# ip unnumbered type number |
The ip unnumbered command enables IP processing on an interface without assigning an explicit IP address to that interface.
When you use the ip unnumbered command, you must use the ip route command to create a static route.
|
||||
| Step 9 |
Router (config-if)# no shut |
Causes the interface to be administratively up. |
||||
| Step 10 |
Router (config-if)# exit |
Exits interface configuration mode. |
||||
| Step 11 |
Router (config)# ucse subslot slot/subslot |
Enters ucse interface configuration mode for the slot and subslot where the E-Series Server is installed. |
||||
| Step 12 |
Router (config-ucse)# imc ip address cimc-ip-address subnet-mask default-gateway cimc-gateway-ip-address |
Specifies the IP address of CIMC and the IP address of the default gateway that CIMC must use.
|
||||
| Step 13 |
Enter one of the following commands:
|
Configures CIMC access using the E-Series Server's internal GE1 interface. See # 3 in Understanding the Interfaces in an E-Series Server and the Cisco ISR 4000 Series.
|
||||
| Step 14 |
Router (config-ucse)# exit |
Exits ucse interface configuration mode. |
||||
| Step 15 |
Router (config)# ip route cimc-ip-address subnet-mask ucse slot/subslot/port |
Creates a static route.
|
||||
| Step 16 |
Router (config)# end |
Exits configuration mode. |
||||
| Step 17 |
Router# ping cimc-ip-address |
Verifies the connection from the router to CIMC through the ucse slot/0/1 interface. |
Example
This example shows how to configure CIMC access using the E-Series Server's internal GE1 interface and the router's ucse slot/0/1 interface—Applicable only with Cisco IOS XE Release 3.9S:
Router> enable
Router> password
Router# configure terminal

Router(config)# interface GigabitEthernet0/0/0
Router(config-if)# ip address 10.0.0.1 255.0.0.0
Router(config-if)# no shut
Router(config-if)# exit

Router(config)# interface ucse 1/0/1
Router(config-if)# ip unnumbered GigabitEthernet0/0/0
Router(config-if)# no shut
Router(config-if)# exit

Router(config)# ucse subslot 1/0
Router(config-ucse)# imc ip address 10.0.0.2 255.0.0.0 default-gateway 10.0.0.1
Router(config-ucse)# imc access-port ge1
Router(config-ucse)# exit

Router(config)# ip route 10.0.0.2 255.255.255.255 ucse 1/0/1
Router(config)# end

Router# ping 10.0.0.2
Type escape sequence to abort.
Sending 5, 100-byte ICMP Echos to 10.0.0.2, timeout is 2 seconds:
!!!!!
Success rate is 100 percent (5/5), round-trip min/avg/max = 1/2/4 ms
This example shows how to configure CIMC access using the E-Series Server's internal GE1 interface and the router's ucse slot/0/1 interface—Applicable with Cisco IOS XE Release 3.10S and later releases:
Router> enable
Router> password
Router# configure terminal

Router(config)# interface GigabitEthernet0/0/0
Router(config-if)# ip address 10.0.0.1 255.0.0.0
Router(config-if)# no shut
Router(config-if)# exit

Router(config)# interface ucse 1/0/1
Router(config-if)# ip unnumbered GigabitEthernet0/0/0
Router(config-if)# no shut
Router(config-if)# exit

Router(config)# ucse subslot 1/0
Router(config-ucse)# imc ip address 10.0.0.2 255.0.0.0 default-gateway 10.0.0.1
Router(config-ucse)# imc access-port shared-lom ge1
Router(config-ucse)# exit

Router(config)# ip route 10.0.0.2 255.255.255.255 ucse 1/0/1
Router(config)# end

Router# ping 10.0.0.2
Type escape sequence to abort.
Sending 5, 100-byte ICMP Echos to 10.0.0.2, timeout is 2 seconds:
!!!!!
Success rate is 100 percent (5/5), round-trip min/avg/max = 1/2/4 ms
Configuring CIMC Access Using the E-Series Server's External GE2 or GE3 Interface—Cisco ISR 4000 Series
See the following figure and the procedure that follows to configure CIMC access using the E-Series Server's external GE2 or GE3 interface.
Note |
This figure shows how to configure CIMC access using the E-Series Server's external GE2 interface. |

Before you begin
Make sure that you have the following information:
-
IP address of CIMC.
-
Username and password for logging in to the router.
-
Slot and port number of the E-Series Server.
Procedure
| Command or Action | Purpose | |
|---|---|---|
| Step 1 |
Router> enable |
Enters privileged EXEC mode on the host router. Enter your password if prompted. |
| Step 2 |
Router# configure terminal |
Enters global configuration mode on the host router. |
| Step 3 |
Router (config)# ucse subslot slot/subslot |
Enters ucse interface configuration mode for the slot and subslot where the E-Series Server is installed. |
| Step 4 |
Router (config-ucse)# imc ip address cimc-ip-address subnet-mask default-gateway cimc-gateway-ip-address |
Specifies the IP address of CIMC and the IP address of the default gateway that CIMC must use.
|
| Step 5 |
Router (config-ucse)# imc access-port {GE2 | GE3} or Router (config-ucse)# imc access-port shared-lom {GE2 | GE3} |
Configures CIMC access through the E-Series Server's external GE2 or GE3 interface. See # 5 and 6 in Understanding the Interfaces in an E-Series Server and the Cisco ISR 4000 Series.
|
| Step 6 |
Router (config-ucse)# end |
Returns to privileged EXEC mode on the host router. |
Example
This example shows how to configure CIMC access using the server's external GE2 interface—Applicable only with Cisco IOS XE Release 3.9S:
Router> enable
Router> password
Router# configure terminal

Router(config)# ucse subslot 1/0
Router(config-ucse)# imc ip address 10.0.0.1 255.0.0.0 default-gateway 10.0.0.2
Router(config-ucse)# imc access-port GE2
Router(config-ucse)# no shut
Router(config-ucse)# end
This example shows how to configure CIMC access using the server's external GE2 interface—Applicable with Cisco IOS XE Release 3.10S and later releases:
Router> enable
Router> password
Router# configure terminal

Router(config)# ucse subslot 1/0
Router(config-ucse)# imc ip address 10.0.0.1 255.0.0.0 default-gateway 10.0.0.2
Router(config-ucse)# imc access-port shared-lom GE2
Router(config-ucse)# no shut
Router(config-ucse)# end
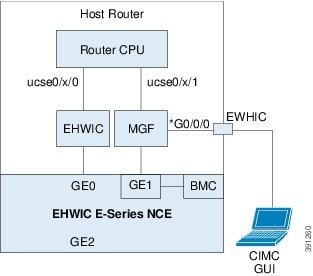
Configuring CIMC Access Using the E-Series Server's External TE2 or TE3 Interface—Cisco ISR 4000 Series
See the following figure and the procedure that follows to configure CIMC access using the E-Series Server's external TE2 or TE3 interface.
Note |
This figure shows how to configure CIMC access using the E-Series Server's external TE2 interface. |
Before you begin
Make sure that you have the following information:
-
IP address of CIMC.
-
Username and password for logging in to the router.
-
Slot and port number of the E-Series Server.
Procedure
| Command or Action | Purpose | |
|---|---|---|
| Step 1 |
Router> enable |
Enters privileged EXEC mode on the host router. Enter your password if prompted. |
| Step 2 |
Router# configure terminal |
Enters global configuration mode on the host router. |
| Step 3 |
Router (config)# ucse subslot slot/subslot |
Enters ucse interface configuration mode for the slot and subslot where the E-Series Server is installed. |
| Step 4 |
Router (config-ucse)# imc ip address cimc-ip-address subnet-mask default-gateway cimc-gateway-ip-address |
Specifies the IP address of CIMC and the IP address of the default gateway that CIMC must use.
|
| Step 5 |
Router (config-ucse)# imc access-port shared-lom {TE2 | TE3} |
Configures CIMC access through the E-Series Server's external TE2 or TE3 interface. |
| Step 6 |
Router (config-ucse)# end |
Returns to privileged EXEC mode on the host router. |
Example
This example shows how to configure CIMC access using the server's external TE2 interface—Applicable with Cisco IOS XE Release 3.10S and later releases:
Router> enable
Router> password
Router# configure terminal

Router(config)# ucse subslot 1/0
Router(config-ucse)# imc ip address 10.0.0.1 255.0.0.0 default-gateway 10.0.0.2
Router(config-ucse)# imc access-port shared-lom TE2
Router(config-ucse)# no shut
Router(config-ucse)# end
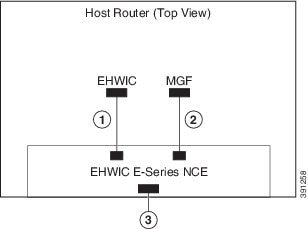
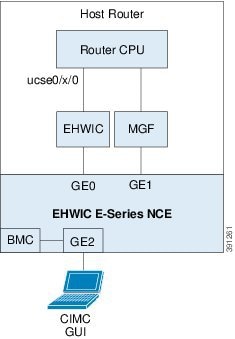
Understanding the Interfaces in the EHWIC E-Series NCE and the Cisco ISR G2
Note |
This section is applicable to the EHWIC E-Series NCE. This section is not applicable to the SM E-Series NCE. |
The following figure shows the interfaces in the EHWIC E-Series NCE and the Cisco ISR G2 host router.
|
Interface |
Interface Location |
Description |
|||
|
1 |
Router’s EHWIC 0/subslot/0 Interface |
Internal Interface |
Also called Console interface. This interface connects the router’s EHWIC interface to the EHWIC E-Series NCE. The EHWIC interface provides an internal Layer 3 GE link between the router and the EHWIC E-Series NCE. It can be used both for CIMC configuration and for host operating system configuration. |
||
|
2 |
Router’s MGF 0/subslot/1 VLAN Interface |
Internal Interface |
Used to access CIMC over a high-speed backplane switch. The MGF VLAN interface provides an internal Layer 2 GE link between the router and the EHWIC E-Series NCE. This interface can be used both for CIMC configuration and for host operating system configuration.
|
||
|
3 |
GE2 Interface |
External Interface |
Used as a primary interface or as a backup interface. This interface can be used both for CIMC configuration and for host operating system configuration. |
CIMC Access Configuration Options—EHWIC E-Series NCE
Do one of the following to configure CIMC access.
-
Use one of the following shared LOM interfaces to configure CIMC access:
-
Router’s internal EHWIC 0/subslot/0 Console interface
-
Router's internal MGF 0/subslot/1 VLAN interface
Note
This interface is not applicable to the Cisco ISR 1921.
-
NCE’s external GE2 interface
-
-
Use the Cisco IOS CLI to configure CIMC access.
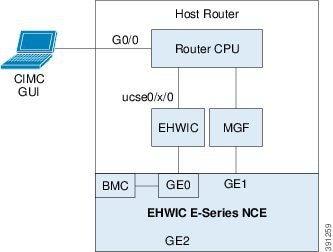
Configuring CIMC Access Using the Router's Internal EHWIC 0/subslot/0 Console Interface—EHWIC E-Series NCE
See the following figure and the procedure that follows to configure CIMC access using the router's internal EHWIC 0/subslot/0 console interface.
Before you begin
Make sure that you have the following information:
-
IP address of CIMC.
-
Username and password for logging in to the router.
-
Slot or subslot and port number of the E-Series Server or NCE.
Procedure
| Command or Action | Purpose | |||||
|---|---|---|---|---|---|---|
| Step 1 |
Router> enable |
Enters privileged EXEC mode on the host router. Enter your password if prompted. |
||||
| Step 2 |
Router# configure terminal |
Enters global configuration mode on the host router. |
||||
| Step 3 |
Router (config)# interface GigabitEthernet0/0 |
Enters interface configuration mode for Gigabit Ethernet 0/0. |
||||
| Step 4 |
Router (config-if)# ip address ip-address subnet-mask |
Specifies the IP address and subnet mask of the interface. |
||||
| Step 5 |
Router (config-if)# no shut |
Causes the interface to be administratively up. |
||||
| Step 6 |
Router (config-if)# end |
Exits interface configuration mode. |
||||
| Step 7 |
Router# configure terminal |
Enters global configuration mode on the host router. |
||||
| Step 8 |
Router (config)# interface ucse 0/subslot/port |
Enters interface configuration mode for the subslot and port where the NCE is installed. |
||||
| Step 9 |
Router (config-if)# ip unnumbered type number |
The ip unnumbered command enables IP processing on an interface without assigning an explicit IP address to that interface.
When you use the ip unnumbered command, you must use the ip route command to create a static route.
|
||||
| Step 10 |
Router (config-if)# imc ip address cimc-ip-address subnet-mask default-gateway cimc-gateway-ip-address |
Specifies the IP address of CIMC and the IP address of the default gateway that CIMC must use.
|
||||
| Step 11 |
Router (config-if)# imc access-port shared-lom console |
Configures CIMC access using the router's EHWIC 0/slot/0 (console) interface. See # 1 in Understanding the Interfaces in the EHWIC E-Series NCE and the Cisco ISR G2. |
||||
| Step 12 |
Router (config-if)# no shut |
Causes the interface to be administratively up. |
||||
| Step 13 |
Router (config-if)# end |
Exits interface configuration mode. |
||||
| Step 14 |
Router# configure terminal |
Enters global configuration mode on the host router. |
||||
| Step 15 |
Router (config)# ip route cimc-ip-address subnet-mask ucse 0/subslot/port |
Creates a static route.
|
||||
| Step 16 |
Router (config-if)# end |
Exits interface configuration mode. |
||||
| Step 17 |
Router# ping cimc-ip-address |
Verifies connection from the router to CIMC through the router's internal EHWIC 0/subslot/0 console interface. |
Example
This example shows how to configure CIMC access using the server’s internal EHWIC 0/subslot/0 console interface:
Router> enable
Router> password
Router# configure terminal

Router(config)# interface GigabitEthernet0/0
Router(config-if)# ip address 10.0.0.1 255.0.0.0
Router(config-if)# no shut
Router(config-if)# end

Router# configure terminal
Router(config)# interface ucse 0/3/0
Router(config)# ip unnumbered GigabitEthernet0/0
Router(config-if)# imc ip address 10.0.0.2 255.0.0.0 default-gateway 10.0.0.1
Router(config-if)# imc access-port shared-lom console
Router(config-if)# no shut
Router(config)# end

Router# configure terminal
Router(config)# ip route 10.0.0.2 255.255.255.255 ucse 0/3/0
Router(config)# end

Router# ping 10.0.0.2
Type escape sequence to abort.
Sending 5, 100-byte ICMP Echos to 10.0.0.2, timeout is 2 seconds:
!!!!!
Success rate is 100 percent (5/5), round-trip min/avg/max = 1/2/4 ms
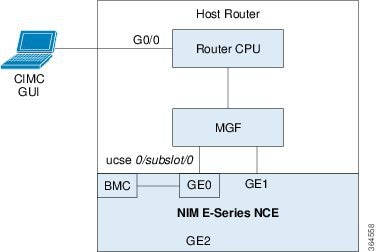
Configuring CIMC Access Using the Router's Internal MGF 0/subslot/1 VLAN Interface—EHWIC E-Series NCE
Important |
This procedure is not applicable to the Cisco 1921 ISR G2. |
See the following figure and the procedure that follows to configure CIMC access using the router's internal MGF 0/subslot/1 VLAN interface.
Before you begin
Make sure that you have the following information:
-
IP address of CIMC.
-
Username and password for logging in to the router.
-
Slot or subslot and port number of the E-Series Server or NCE.
Procedure
| Command or Action | Purpose | |
|---|---|---|
| Step 1 |
Router> enable |
Enters privileged EXEC mode on the host router. Enter your password if prompted. |
| Step 2 |
Router# show vlan-switch |
Displays VLANs. |
| Step 3 |
Router# configure terminal |
Enters global configuration mode on the host router. |
| Step 4 |
Router (config)# interface vlan vlan-number |
Enters interface configuration mode for the specified VLAN number. |
| Step 5 |
Router (config-if)# ip address vlan-ip-address subnet-mask |
Specifies the IP address for the VLAN.
|
| Step 6 |
Router (config-if)# end |
Exits interface configuration mode. |
| Step 7 |
Router# configure terminal |
Enters global configuration mode on the host router. |
| Step 8 |
Router (config)# interface ucse 0/subslot/0 |
Enters ucse interface configuration mode for the subslot and port where the NCE is installed. |
| Step 9 |
Router (config-if)# imc ip address cimc-ip-address subnet-mask default-gateway cimc-gateway-ip-address |
Specifies the IP address of CIMC and the IP address of the default gateway that CIMC must use.
|
| Step 10 |
Router (config-if)# imc access-port shared-lom GE1 |
Configures CIMC access using the router’s internal 0/subslot/1 MGF VLAN interface. See # 2 in Understanding the Interfaces in the EHWIC E-Series NCE and the Cisco ISR G2. |
| Step 11 |
Router (config-if)# no shut |
Causes the interface to be administratively up. |
| Step 12 |
Router (config-if)# end |
Exits interface configuration mode. |
| Step 13 |
Router# configure terminal |
Enters global configuration mode on the host router. |
| Step 14 |
Router (config)# interface ucse 0/subslot/1 |
Enters ucse interface configuration mode for the subslot and port where the NCE is installed. |
| Step 15 |
Router (config-if)# no shut |
Causes the interface to be administratively up. |
| Step 16 |
Router (config-if)# end |
Exits interface configuration mode. |
| Step 17 |
Router# ping cimc-ip-address |
Verifies connection from the router to CIMC through the router's internal MGF 0/subslot/1 VLAN interface. |
Example
This example shows how to configure CIMC access using the router's internal MGF 0/subslot/1 VLAN interface:
Router> enable
Router> password
Router> show vlan-switch
VLAN Name                             Status    Ports
---- -------------------------------- --------- -------------------------------
1    default                          active    Gi0/0/0, Gi0/0/1, Gi0/0/2
                                                            Gi0/0/3, uc0/3/1
Router# configure terminal
Router(config)# interface vlan 1
Router(config-if)# ip address 10.0.0.1 255.0.0.0
Router(config-if)# end

Router# configure terminal
Router(config)# interface ucse 0/3/0
Router(config-if)# imc ip address 10.0.0.2 255.0.0.0 default-gateway 10.0.0.1
Router(config-if)# imc access-port shared-lom GE1
Router(config-if)# no shut
Router(config-if)# end

Router# configure terminal
Router(config)# interface ucse 0/3/1
Router(config-if)# no shut
Router(config-if)# end

Router# ping 10.0.0.2
Type escape sequence to abort.
Sending 5, 100-byte ICMP Echos to 10.0.0.2, timeout is 2 seconds:
!!!!!
Success rate is 100 percent (5/5), round-trip min/avg/max = 1/2/4 ms
Configuring CIMC Access Using the EHWIC E-Series NCE's External GE2 Interface
Important |
If you are using the external GE2 interface on an EHWIC E-Series NCE or the NIM E-Series NCE to configure CIMC access, to configure CIMC access, you might lose connectivity with CIMC during server reboot. This is expected behavior. If you must maintain connectivity with CIMC during a reboot, we recommend that you use one of the other network interfaces to configure CIMC access. See CIMC Access Configuration Options—EHWIC E-Series NCE. If you want to use the external GE2 interface to configure CIMC access, we recommend that you use the spanning-tree portfast command. For details, see the CSCup50049 caveat in the Release Notes for Cisco UCS E-Series Servers and the Cisco UCS E-Series Network Compute Engine |
See the following figure and the procedure that follows to configure CIMC access using the EHWIC E-Series NCE's external GE2 interface.
Note |
This figure shows how to configure CIMC access using the EHWIC E-Series NCE's external GE2 interface. |
Before you begin
Make sure that you have the following information:
-
IP address of CIMC.
-
Username and password for logging in to the router.
-
Slot or subslot and port number of the E-Series Server or NCE.
Procedure
| Command or Action | Purpose | |
|---|---|---|
| Step 1 |
Router> enable |
Enters privileged EXEC mode on the host router. Enter your password if prompted. |
| Step 2 |
Router# configure terminal |
Enters global configuration mode on the host router. |
| Step 3 |
Router (config)# interface ucse 0/subslot/port |
Enters ucse interface configuration mode for the subslot and port where the NCE is installed. |
| Step 4 |
Router (config-if)# imc ip address cimc-ip-address subnet-mask default-gateway cimc-gateway-ip-address |
Specifies the IP address of CIMC and the IP address of the default gateway that CIMC must use.
|
| Step 5 |
Router (config-if)# imc access-port shared-lom GE2 |
Configures CIMC access through the EHWIC E-Series NCE's external GE2 interface. See # 3 in Understanding the Interfaces in the EHWIC E-Series NCE and the Cisco ISR G2. |
| Step 6 |
Router (config-if)# no shut |
Causes the interface to be administratively up. |
| Step 7 |
Router (config-if)# end |
Exits interface configuration mode. |
Example
This example shows how to configure CIMC access using the EHWIC E-Series NCE external GE2 interface:
Router> enable
Router> password
Router# configure terminal

Router(config)# interface ucse 0/3/0
Router(config-if)# imc ip address 10.0.0.1 255.0.0.0 default-gateway 10.0.0.2
Router(config-if)# imc access-port shared-lom GE2
Router(config-if)# no shut
Router(config-if)# end
Understanding the Interfaces in the NIM E-Series NCE and the Cisco ISR 4000 Series
The following figure shows the interfaces in a NIM E-Series NCE and the Cisco ISR 4000 series host router.
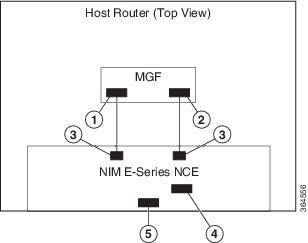
|
Interface |
Interface Location |
Description |
|||
|
1 |
Router’s ucse 0/subslot/0 Interface |
Internal Interface |
Used to access CIMC over a high-speed backplane switch. The MGF interface provides an internal Layer 2 GE link between the router and the NIM E-Series NCE. This interface can be used both for CIMC configuration and for host operating system configuration.
|
||
|
2 |
Router’s ucse 0/subslot/1 Interface |
Internal Interface |
Used to access CIMC over a high-speed backplane switch. The MGF interface provides an internal Layer 2 GE link between the router and the NIM E-Series NCE. This interface can be used both for CIMC configuration and for host operating system configuration.
|
||
|
3 |
GE0 and GE1 Interfaces |
Internal Interfaces |
NIM E-Series NCE's internal NIC interfaces. |
||
|
4 |
Management (Dedicated) Interface |
External Interface |
Used for CIMC configuration and management. |
||
|
5 |
GE2 Interface |
External Interface |
Can be used both for CIMC configuration and for host operating system configuration. |
CIMC Access Configuration Options—NIM E-Series NCE
Depending on whether you are a remote user or a local user, do one of the following to configure CIMC access.
-
If you are a remote user, use the Cisco IOS CLI to configure CIMC access by using one of the following interfaces:
-
CIMC Management (dedicated) interface
-
NIM E-Series NCE’s internal GE0 and the router's ucse 0/subslot/0 interface
-
NIM E-Series NCE’s internal GE1 interface and the router's ucse 0/subslot/1 interface
-
NIM E-Series NCE’s external GE2 interface
-
-
If you are a local user, use the CIMC Configuration Utility or the Cisco IOS CLI (mentioned above) to configure CIMC access.
Configuring CIMC Access Using the NIM E-Series NCE's External Management (Dedicated) Interface—Cisco ISR 4000 Series
See the following figure and the procedure that follows to configure CIMC access using the NIM E-Series NCE's external Management (dedicated) interface.

Before you begin
Make sure that you have the following information:
-
IP address of CIMC.
-
Username and password for logging in to the router.
-
Slot or subslot and port number of the E-Series Server or NCE.
Procedure
| Command or Action | Purpose | |
|---|---|---|
| Step 1 |
Router> enable |
Enters privileged EXEC mode on the host router. Enter your password if prompted. |
| Step 2 |
Router# configure terminal |
Enters global configuration mode on the host router. |
| Step 3 |
Router (config)# ucse subslot slot/subslot |
Enters ucse interface configuration mode for the slot and subslot where the NIM E-Series NCE is installed. |
| Step 4 |
Router (config-ucse)# imc ip address cimc-ip-address subnet-mask default-gateway cimc-gateway-ip-address |
Specifies the IP address of CIMC and the IP address of the default gateway that CIMC must use.
|
| Step 5 |
Router (config-ucse)# imc access-port dedicated |
Configures CIMC access through the server’s external Management (dedicated) interface. See # 4 in Understanding the Interfaces in the NIM E-Series NCE and the Cisco ISR 4000 Series. |
| Step 6 |
Router (config-ucse)# end |
Returns to privileged EXEC mode on the host router. |
Example
This example shows how to configure CIMC access using the server’s external dedicated interface:
Router> enable
Router> password
Router# configure terminal

Router(config)# ucse subslot 0/1
Router(config-ucse)# imc ip address 10.0.0.1 255.0.0.0 default-gateway 10.0.0.2
Router(config-ucse)# imc access-port dedicated
Router(config-ucse)# end
Configuring CIMC Access Using the NIM E-Series NCE's NIC Interfaces—Cisco ISR 4000 Series
-
NIM E-Series NCE’s internal GE0 and the router's ucse 0/subslot/0 Interface interface
-
NIM E-Series NCE’s internal GE1 interface and the router's ucse 0/subslot/1 interface
-
NIM E-Series NCE’s external GE2 interface
Configuring CIMC Access Using the NIM E-Series NCE's Internal GE0 Interface and the Cisco ISR 4000 Series ucse 0/subslot/0 Interface
See the following figure and the procedure that follows to configure CIMC access using the NIM E-Series NCE's internal GE0 interface and the router's ucse 0/subslot/0 interface.
Before you begin
Make sure that you have the following information:
-
IP address of CIMC.
-
Username and password for logging in to the router.
-
Slot or subslot and port number of the E-Series Server or NCE.
Procedure
| Command or Action | Purpose | |||||
|---|---|---|---|---|---|---|
| Step 1 |
Router> enable |
Enters privileged EXEC mode on the host router. Enter your password if prompted. |
||||
| Step 2 |
Router# configure terminal |
Enters global configuration mode on the host router. |
||||
| Step 3 |
Router (config)# interface GigabitEthernet 0/0/0 |
Enters interface configuration mode for Gigabit Ethernet interface 0/0/0. |
||||
| Step 4 |
Router (config-if)# ip address ip-address subnet-mask |
Specifies the IP address and subnet mask of the interface. |
||||
| Step 5 |
Router (config-if)# no shut |
Causes the interface to be administratively up. |
||||
| Step 6 |
Router (config-if)# exit |
Exits interface configuration mode. |
||||
| Step 7 |
Router (config)# interface ucse 0/subslot/0 |
Enters ucse interface configuration mode for the slot, subslot, and port where the NIM E-Series NCE is installed. |
||||
| Step 8 |
Router (config-if)# ip unnumbered type number |
The ip unnumbered command enables IP processing on an interface without assigning an explicit IP address to that interface.
When you use the ip unnumbered command, you must use the ip route command to create a static route.
|
||||
| Step 9 |
Router (config-if)# no shut |
Causes the interface to be administratively up. |
||||
| Step 10 |
Router (config-if)# exit |
Exits interface configuration mode. |
||||
| Step 11 |
Router (config)# ucse subslot slot/subslot |
Enters ucse interface configuration mode for the slot and subslot where the NIM E-Series NCE is installed. |
||||
| Step 12 |
Router (config-ucse)# imc ip address cimc-ip-address subnet-mask default-gateway cimc-gateway-ip-address |
Specifies the IP address of CIMC and the IP address of the default gateway that CIMC must use.
|
||||
| Step 13 |
Router (config-ucse)# imc access-port shared-lom console |
Configures CIMC access using the NIM E-Series NCE's internal GE0 interface. See # 3 in Understanding the Interfaces in the NIM E-Series NCE and the Cisco ISR 4000 Series. |
||||
| Step 14 |
Router (config-ucse)# exit |
Exits ucse interface configuration mode. |
||||
| Step 15 |
Router (config)# ip route cimc-ip-address subnet-mask ucse slot/subslot/port |
Creates a static route.
|
||||
| Step 16 |
Router (config)# end |
Exits configuration mode. |
||||
| Step 17 |
Router# ping cimc-ip-address |
Verifies the connection from the router to CIMC through the ucse 0/subslot/0 interface. |
Example
This example shows how to configure CIMC access using the NIM E-Series NCE's internal console interface and the router's ucse 0/subslot/0 interface:
Router> enable
Router> password
Router# configure terminal

Router(config)# interface GigabitEthernet0/0/0
Router(config-if)# ip address 10.0.0.1 255.0.0.0
Router(config-if)# no shut
Router(config-if)# exit

Router(config)# interface ucse 0/1/0
Router(config-if)# ip unnumbered GigabitEthernet0/0/0
Router(config-if)# no shut
Router(config-if)# exit

Router(config)# ucse subslot 0/1
Router(config-ucse)# imc ip address 10.0.0.2 255.0.0.0 default-gateway 10.0.0.1
Router(config-ucse)# imc access-port shared-lom console
Router(config-ucse)# exit

Router(config)# ip route 10.0.0.2 255.255.255.255 ucse 0/1/0
Router(config)# end

Router# ping 10.0.0.2
Type escape sequence to abort.
Sending 5, 100-byte ICMP Echos to 10.0.0.2, timeout is 2 seconds:
!!!!!
Success rate is 100 percent (5/5), round-trip min/avg/max = 1/2/4 ms
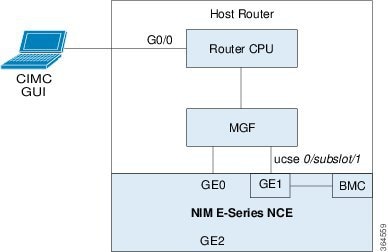
Configuring CIMC Access Using the NIM E-Series NCE's Internal GE1 Interface and the Cisco ISR 4000 Series ucse 0/subslot/1 Interface
See the following figure and the procedure that follows to configure CIMC access using the NIM E-Series NCE's internal GE1 interface and the router's ucse 0/subslot/1 interface.
Before you begin
Make sure that you have the following information:
-
IP address of CIMC.
-
Username and password for logging in to the router.
-
Slot or subslot and port number of the E-Series Server or NCE.
Procedure
| Command or Action | Purpose | |||||
|---|---|---|---|---|---|---|
| Step 1 |
Router> enable |
Enters privileged EXEC mode on the host router. Enter your password if prompted. |
||||
| Step 2 |
Router# configure terminal |
Enters global configuration mode on the host router. |
||||
| Step 3 |
Router (config)# interface GigabitEthernet 0/0/0 |
Enters interface configuration mode for Gigabit Ethernet interface 0/0/0. |
||||
| Step 4 |
Router (config-if)# ip address ip-address subnet-mask |
Specifies the IP address and subnet mask of the interface. |
||||
| Step 5 |
Router (config-if)# no shut |
Causes the interface to be administratively up. |
||||
| Step 6 |
Router (config-if)# exit |
Exits interface configuration mode. |
||||
| Step 7 |
Router (config)# interface ucse 0/subslot/1 |
Enters ucse interface configuration mode for the slot, subslot, and port where the NIM E-Series NCE is installed. |
||||
| Step 8 |
Router (config-if)# ip unnumbered type number |
The ip unnumbered command enables IP processing on an interface without assigning an explicit IP address to that interface.
When you use the ip unnumbered command, you must use the ip route command to create a static route.
|
||||
| Step 9 |
Router (config-if)# no shut |
Causes the interface to be administratively up. |
||||
| Step 10 |
Router (config-if)# exit |
Exits interface configuration mode. |
||||
| Step 11 |
Router (config)# ucse subslot slot/subslot |
Enters ucse interface configuration mode for the slot and subslot where the NIM E-Series NCE is installed. |
||||
| Step 12 |
Router (config-ucse)# imc ip address cimc-ip-address subnet-mask default-gateway cimc-gateway-ip-address |
Specifies the IP address of CIMC and the IP address of the default gateway that CIMC must use.
|
||||
| Step 13 |
Router (config-ucse)# imc access-port shared-lom ge1 |
Configures CIMC access using the NIM E-Series NCE's internal GE1 interface. See # 3 in Understanding the Interfaces in the NIM E-Series NCE and the Cisco ISR 4000 Series. |
||||
| Step 14 |
Router (config-ucse)# exit |
Exits ucse interface configuration mode. |
||||
| Step 15 |
Router (config)# ip route cimc-ip-address subnet-mask ucse slot/subslot/port |
Creates a static route.
|
||||
| Step 16 |
Router (config)# end |
Exits configuration mode. |
||||
| Step 17 |
Router# ping cimc-ip-address |
Verifies the connection from the router to CIMC through the ucse 0/subslot/1 interface. |
Example
This example shows how to configure CIMC access using the NIM E-Series NCE's internal GE1 interface and the router's ucse 0/subslot/1 interface:
Router> enable
Router> password
Router# configure terminal

Router(config)# interface GigabitEthernet0/0/0
Router(config-if)# ip address 10.0.0.1 255.0.0.0
Router(config-if)# no shut
Router(config-if)# exit

Router(config)# interface ucse 0/1/1
Router(config-if)# ip unnumbered GigabitEthernet0/0/0
Router(config-if)# no shut
Router(config-if)# exit

Router(config)# ucse subslot 0/1
Router(config-ucse)# imc ip address 10.0.0.2 255.0.0.0 default-gateway 10.0.0.1
Router(config-ucse)# imc access-port shared-lom ge1
Router(config-ucse)# exit

Router(config)# ip route 10.0.0.2 255.255.255.255 ucse 0/1/1
Router(config)# end

Router# ping 10.0.0.2
Type escape sequence to abort.
Sending 5, 100-byte ICMP Echos to 10.0.0.2, timeout is 2 seconds:
!!!!!
Success rate is 100 percent (5/5), round-trip min/avg/max = 1/2/4 ms
Configuring CIMC Access Using the NIM E-Series NCE's External GE2 Interface—Cisco ISR 4000 Series
See the following figure and the procedure that follows to configure CIMC access using the NIM E-Series NCE's external GE2 interface.
Note |
This figure shows how to configure CIMC access using the NIM E-Series NCE's external GE2 interface. |
Before you begin
Make sure that you have the following information:
-
IP address of CIMC.
-
Username and password for logging in to the router.
-
Slot or subslot and port number of the E-Series Server or NCE.
Procedure
| Command or Action | Purpose | |
|---|---|---|
| Step 1 |
Router> enable |
Enters privileged EXEC mode on the host router. Enter your password if prompted. |
| Step 2 |
Router# configure terminal |
Enters global configuration mode on the host router. |
| Step 3 |
Router (config)# ucse subslot slot/subslot |
Enters ucse interface configuration mode for the slot and subslot where the NIM E-Series NCE is installed. |
| Step 4 |
Router (config-ucse)# imc ip address cimc-ip-address subnet-mask default-gateway cimc-gateway-ip-address |
Specifies the IP address of CIMC and the IP address of the default gateway that CIMC must use.
|
| Step 5 |
Router (config-ucse)# imc access-port shared-lom {GE2} |
Configures CIMC access through the NIM E-Series NCE's external GE2 interface. See # 5 and 6 in Understanding the Interfaces in the NIM E-Series NCE and the Cisco ISR 4000 Series. |
| Step 6 |
Router (config-ucse)# end |
Returns to privileged EXEC mode on the host router. |
Example
This example shows how to configure CIMC access using the server's external GE2 interface:
Router> enable
Router> password
Router# configure terminal

Router(config)# ucse subslot 0/1
Router(config-ucse)# imc ip address 10.0.0.1 255.0.0.0 default-gateway 10.0.0.2
Router(config-ucse)# imc access-port shared-lom GE2
Router(config-ucse)# no shut
Router(config-ucse)# end
 Feedback