Red Hat OpenShift Container Platform with OpenShift Data Foundation on Cisco UCS X-Series
Available Languages
Bias-Free Language
The documentation set for this product strives to use bias-free language. For the purposes of this documentation set, bias-free is defined as language that does not imply discrimination based on age, disability, gender, racial identity, ethnic identity, sexual orientation, socioeconomic status, and intersectionality. Exceptions may be present in the documentation due to language that is hardcoded in the user interfaces of the product software, language used based on RFP documentation, or language that is used by a referenced third-party product. Learn more about how Cisco is using Inclusive Language.
- US/Canada 800-553-2447
- Worldwide Support Phone Numbers
- All Tools
 Feedback
 Feedback

In partnership with:
![]()
Document Organization
This document is organized into the following chapters:
| Chapter |
Description |
| High-level overview of the solution, benefits, and conclusion. |
|
| Provides the solution overview, intended audience, and new features |
|
| Provides the details about the components used in this solution |
|
| Provides the requirements, considerations, and performance details for the solution design |
|
| Provides the details about the hardware and software used in this solution |
|
| Red Hat OpenShift Data Foundation and Red Hat Ceph Storage Performance Testing |
Provides the performance testing results |
| Summarizes the solution and its benefits |
|
| Provides details about the authors of this CVD |
|
| Additional configuration information and resources |
|
| Provide links for feedback and CVD Program information |
About the Cisco Validated Design Program
The Cisco Validated Design (CVD) program consists of systems and solutions designed, tested, and documented to facilitate faster, more reliable, and more predictable customer deployments. For more information, go to: http://www.cisco.com/go/designzone.
Icons Used in this Document
To help organizations with their digital transformation and to enhance their cloud-native and application modernization practices, Cisco and Red Hat have partnered to produce this Cisco Validated Design (CVD) for Red Hat OpenShift Container Platform with Red Hat OpenShift Data Foundation on vSphere, delivered as Infrastructure as Code (IaC).
Cisco UCS X-Series adapts to the unpredictable requirements of modern applications. The platform is consolidated onto a single modular system that combines the density and efficiency of blade servers with the expandability of rack servers for better performance, automation, and efficiency. This modularity enables the system to adapt and support new technologies as they become available. Cisco UCS X-Series delivered as IaC with Intersight Ansible eliminates error-prone manual tasks, allowing quicker and more consistent solution deployments.
Red Hat OpenShift is a leading enterprise Kubernetes platform that enables a cloud-like experience everywhere it's deployed. Whether it’s in the cloud, on-premises or at the edge, Red Hat OpenShift gives you the ability to choose where you build, deploy, and run applications through a consistent experience. Red Hat OpenShift’s full-stack automated operations and self-service provisioning for developers lets teams work together more efficiently to move ideas from development to production.
Red Hat OpenShift Data Foundation is persistent software-defined storage integrated with and optimized for Red Hat OpenShift. Based on leading industry technologies that provide petabyte-scale persistent Ceph cloud storage, the Rook Kubernetes storage operator, and NooBaa multicloud object gateway technology, OpenShift Data Foundation runs anywhere that Red Hat OpenShift does—on-premises or in cloud environments. OpenShift Data foundation is completely integrated with Red Hat OpenShift Container Platform for deployment, management, and monitoring from a single interface.
Combining Cisco UCS X-Series with Red Hat OpenShift Container Platform and OpenShift Data Foundation lets organizations simplify the deployment and the management of their container infrastructure. IaC automates the deployment of the Cisco UCS X-Series infrastructure along with the Red Hat OpenShift Container Platform and OpenShift Data Foundation installations. Organizations can take advantage of programming and automating the infrastructure at scale with agility, extending the benefits of automation to the entire stack.
With the combined power of Cisco and Red Hat, the solution is cost effective to deploy and manage, enabling next-generation cloud deployments that drive business agility, lower operational costs, and avoid vendor lock-in.
This chapter is organized into the following subjects:
| Chapter |
Subject |
| Solution Overview |
Cisco UCS X-Series with Red Hat OpenShift Container Platform and OpenShift Data Foundation delivered as IaC is a pre-designed, integrated, and validated architecture for the data center. It combines Cisco UCS X-Series, Cisco Intersight™, Red Hat OpenShift and OpenShift Data Foundation into a single, flexible architecture. The Ceph Storage solution described in this document is for a vSphere implementation of Red Hat OpenShift Container Platform installer-provisioned infrastructure (IPI), built on Enterprise Kubernetes for an on-premises deployment.
Integration between OpenShift Container Platform and the storage and data management services occur at several levels, all of which are captured in the design aspects of this document. The main storage integration is based on OpenShift Data Foundation, which enables Red Hat OpenShift to manage the persistent storage lifecycle.
For this testing, Red Hat OpenShift Container Platform was installed on a VMware vSphere cluster with the nodes running Red Hat Enterprise Linux CoreOS on Cisco UCS X-Series. In this case, OpenShift Data Foundation was used to integrate with an external Red Hat Ceph Storage cluster running on Red Hat Enterprise Linux, also on Cisco UCS X-Series in the same chassis. Though outside the scope of this testing, different configurations are possible depending on the needs of the application:
● Red Hat OpenShift can also be deployed on bare-metal Cisco UCS X-series servers, negating the need for an underlying virtualization layer, and potentially saving in software licensing costs.
● OpenShift Data Foundation can support internal-mode storage that runs on the same systems that host the Red Hat OpenShift cluster.
Red Hat OpenShift Platform Plus includes both Red Hat OpenShift Container Platform and OpenShift Data Foundation Essentials as well as advanced cluster management, security, and a container registry. More information on these options is provided in the sections on Red Hat OpenShift and OpenShift data foundation
Audience
The intended audience for this document includes, but is not limited to, sales engineers, field consultants, professional services, IT managers, partner engineering, and customers who want to deploy Red Hat OpenShift on Cisco UCS X-Series with OpenShift Data Foundation and Intersight Ansible.
This document describes how to deploy Red Hat OpenShift on VMware vSphere with Red Hat OpenShift Data Foundation running on Cisco UCS X-Series. The deployment and configuration of Cisco UCS X-Series was done through Intersight Ansible. The preparation of vSphere and Red Hat Enterprise Linux 8 was done through Ansible. The document presents a tested and validated solution.
This is a completely new document and contains the following:
● Cisco UCS X-Series with Cisco Intersight in Intersight Managed Mode (IMM)
● Red Hat OpenShift Container Platform on VMware vSphere
● Red Hat OpenShift Data Foundation accessing a Ceph storage cluster on Red Hat Enterprise Linux
● Intersight Ansible
This revision of the CVD focuses on the design and automated deployment and configuration of the latest release of Red Hat OpenShift Container Platform and OpenShift Data Foundation on Cisco UCS X-Series
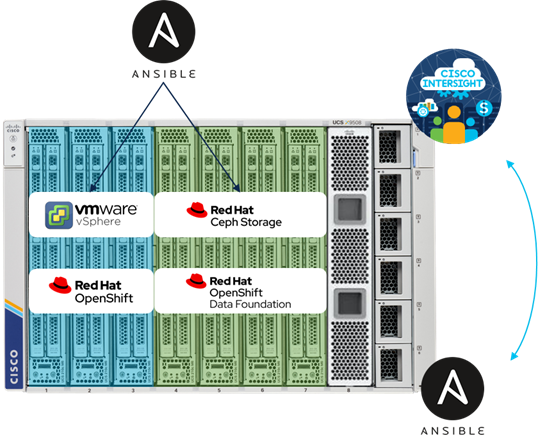
In this architecture we have deployed Red Hat OpenShift on VMware vSphere on three Cisco UCS X210c M6 blades and Red Hat Ceph Storage for Red Hat OpenShift Data Foundation on four Cisco UCS X210c M6 blades (Figure 1). The deployment and configuration of all seven blades were done through Intersight Ansible. The configuration of vSphere, the preparation of Red Hat Enterprise Linux and the deployment of Red Hat Ceph Storage were done through Ansible.
The configuration uses the following architecture for deployment:
● 1 x Cisco UCS X9508 Modular Chassis
● 7 x Cisco UCS X210c Compute Node
● 2 x Cisco UCS 6454 Fabric Interconnect
In addition, a virtual machine with Red Hat Enterprise Linux 8 was used for deploying the Ansible playbooks and administrating the Red Hat Ceph Storage cluster.

This joint solution offers the following benefits:
● Simplified cloud-operated infrastructure: With this configuration, management moves from network into the cloud, helping you manage all infrastructure and respond at the speed and scale of the business. IaC drives agility and consistency, helping to reduce time to market while lowering both cost and risk.
● Adaptable solution designed for modern applications: Cloud-native, hybrid applications can be consolidated onto a single platform that combines the density and efficiency of blade servers with the expandability of rack servers. The result: better performance, automation, and efficiency.
● Support a broader range of workloads: With the Cisco UCS X210c M6 Blade supporting a broader range of workloads means fewer different products to support, reduced training costs, and increased flexibility.
● Full-stack automated operations: With Intersight Ansible and Red Hat Ansible you can easily deploy the full environment and be still flexible in what you do. Enhanced Ansible playbooks give you the option to change the deployment any time. Either on-premises or hybrid cloud.
● Consistent foundation for on-premises and public cloud workloads: Red Hat OpenShift Container Platform together with Cisco Intersight and Cisco UCS X-Series delivers a single solution anywhere Cisco UCS and Red Hat Enterprise Linux runs. With user-friendly management through the Red Hat OpenShift console and Cisco Intersight you can view and manage all clusters for enhanced visibility across multiple deployments.
● High performance for various storage classes and use cases: With Cisco UCS X-Series delivering high performance and Red Hat Ceph Storage providing block storage, a shared and distributed file system, and on-premises object storage, the solution provides various storage classes for on-premises or hybrid cloud workloads.
This chapter is organized into the following subjects:
| Chapter |
Subject |
| Technology Overview |
Cisco UCS X-Series Modular System Cisco UCS X210c M6 Compute Node Cisco UCS 6454 Fabric Interconnect |
Cisco Unified Computing System (Cisco UCS) is a state-of-the-art data center platform that unites computing, network, storage access, and virtualization into a single cohesive system.
The main components of Cisco Unified Computing System are:
● Computing—The system is based on an entirely new class of computing system that incorporates rackmount and blade servers based on Intel Xeon Scalable processors. Cisco UCS servers offer the patented Cisco Extended Memory Technology to support applications with large datasets and allow more virtual machines (VM) per server.
● Network—The system is integrated onto a low-latency, lossless, 10/25/40/100-Gbps unified network fabric. This network foundation consolidates LANs, SANs, and high-performance computing networks which are separate networks today. The unified fabric lowers costs by reducing the number of network adapters, switches, and cables, and by decreasing the power and cooling requirements.
● Virtualization—The system unleashes the full potential of virtualization by enhancing the scalability, performance, and operational control of virtual environments. Cisco security, policy enforcement, and diagnostic features are now extended into virtualized environments to better support changing business and IT requirements.
● Storage access—The system provides consolidated access to both storage area network (SAN) and network attached storage (NAS) over the unified fabric. By unifying the storage access, the Cisco Unified Computing System can access storage over Ethernet (NFS or iSCSI), Fibre Channel, and Fibre Channel over Ethernet (FCoE). This flexibility provides organizations with choice for storage access and adds investment protection. In addition, server administrators can preassign storage-access policies for system connectivity to storage resources, simplifying storage access and management for increased productivity.
Cisco Unified Computing System is designed to deliver:
● A reduced Total Cost of Ownership (TCO) and increased business agility
● Increased IT staff productivity through just-in-time provisioning and mobility support
● A cohesive, integrated system, which unifies the technology in the data center
● Industry standards supported by a partner ecosystem of industry leaders
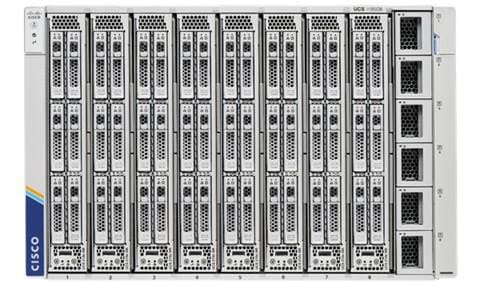
Cisco UCS X-Series Modular System
The Cisco UCS® X-Series with Cisco Intersight™ is a modular system managed from the cloud. It is designed to be shaped to meet the needs of modern applications and improve operational efficiency, agility, and scale through an adaptable, future-ready, modular design. The system comprises modular components that can be assembled into systems through the Cisco Intersight cloud-operations platform. Intersight brings the power of Software as a Service (SaaS) to deliver proactive monitoring, automation, and optimization of workloads across hybrid cloud environments. The Cisco UCS X-Series provides functionalities of both blade and rack servers by offering compute density, storage capacity, and expandability in a single system, embracing a greater range of workloads in your data center.
The Cisco UCS X-Series Modular System begins with the Cisco UCS X9508 Chassis. Engineered to be adaptable and future-ready, the chassis has a unified Ethernet fabric with Cisco UCS Intelligent Fabric Modules. These modules provide the ability to add future fabrics (for example, CXL, PCIe Gen 5, and so on) with Cisco UCS X-Fabric Technology. With the chassis’ midplane-free design, either fabric can be independently upgraded.
The Cisco UCS X210c M6 Compute Node features 3rd Gen Intel® Xeon® Scalable processors, providing the functionality of both blade and rack servers by offering compute density, storage capacity, and expandability in a single form factor. Additional nodes supporting accelerators (GPUs/FPGA), storage, and non-volatile memory are planned. They will be combined with compute nodes over the X-Fabric Technology.
The Cisco UCS X-Series Modular System (Figure 2) provides:
● Cisco UCS X9508 Chassis
◦ Seven Rack Unit (7RU) form factor
◦ Eight front-facing flexible slots for compute nodes and future upgrades
◦ Two Cisco UCS 9108 Intelligent Fabric Modules (IFMs) for unified Ethernet fabric
◦ Cisco UCS X-Fabric Technology for future fabric upgrades
● Cisco UCS X210c M6 Compute Node
◦ Up to two 3rd Gen Intel Xeon Scalable processors
◦ Up to 12 TB of memory
◦ Up to two Cisco UCS Virtual Interface Cards (VICs)
◦ Up to six SAS/SATA/NVMe disk drives plus up to two M.2 drives
Cisco UCS X210c M6 Compute Node
With more than 10 years of experience with software-defined stateless servers, the new Cisco UCS® X210c M6 Compute Node (Figure 3) is designed to be managed from the cloud with Cisco Intersight. Cisco Intersight is a cloud-operations platform that uses analytics to deliver proactive monitoring, automation, and optimization of workloads across hybrid cloud environments. Cisco Intersight Managed Mode (IMM) delivers policy-based configuration and accelerates the deployment of both physical and virtual workloads.
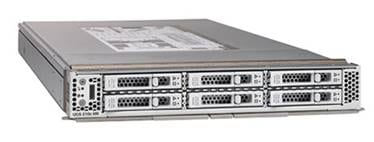
The new Cisco UCS X210c M6 server form factor offers more I/O, more storage, and better cooling than previous iterations and seamless upgrades to connectivity technologies. Its features include the following:
● The new Cisco UCS 14000 Series VICs supply more aggregate bandwidth (200 Gbps) per server.
● With six large-capacity drives, the Cisco UCS X210c M6 can be used for many workloads that used to require a rack server simply because of the storage requirements.
● Its vertical orientation and design allow for better airflow, increasing cooling for better reliability.
● The server is upgradable to support future Cisco UCS X-Fabric Technology.
Benefits:
● Simplify administration of your hybrid cloud infrastructure with Cisco Intersight™ freeing your IT staff to focus on mission-critical and value-added projects.
● Decrease Operating Expenses (OpEx) for power, cooling, management, and maintenance by consolidating older servers onto the newest generation of modular servers.
● Improve application performance with 3rd Gen Intel® Xeon® Scalable Processors and increased memory bandwidth.
What it provides:
● Up to two 3rd Gen Intel Xeon Scalable Processors (with up to 40 cores per socket)
Memory:
● 32 DIMM slots (16 DIMMs per CPU socket)
● 3200 MHz DDR4 memory plus other speeds, depending on the CPU installed.
● 32 x DDR4 DIMMs for up to 8 TB of capacity using 256 GB DIMMs, or
● 16x DDR4 DIMMs + 16x Intel Optane™ persistent memory modules, for up to 12 TB of memory.
● Cisco UCS VIC 14425 modular LAN on Motherboard (mLOM), four-port, 4x25Gbps.
● One rear mezzanine slot for the four-port, 4x25Gbps Cisco UCS VIC 14825.
● One front mezzanine slot initially for a Cisco FlexStorage RAID controller or Cisco FlexStorage passthrough with additional future options.
● Up to six SAS/SATA/NVMe disk drives plus up to two M.2 drives with hardware RAID support.
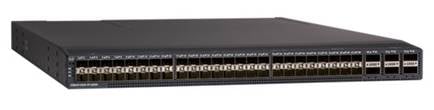
Cisco UCS 6454 Fabric Interconnect
The Cisco UCS 6454 Fabric Interconnect is a core part of the Cisco Unified Computing System, providing both network connectivity and management capabilities for the system (Figure 4). The Cisco UCS 6454 offers line-rate, low-latency, lossless 10/25/40/100 Gigabit Ethernet, Fibre Channel over Ethernet (FCoE), and Fibre Channel functions.
The Cisco UCS 6454 provides the management and communication backbone for the Cisco UCS B-Series and X-Series Blade Servers, Cisco UCS 5108 B-Series and Cisco UCS X9508 X-Series Server Chassis, Cisco UCS Managed C-Series Rack Servers, and Cisco UCS S-Series Storage Servers. All servers attached to the Cisco UCS 6454 Fabric Interconnect become part of a single, highly available management domain. In addition, by supporting a unified fabric, the Cisco UCS 6454 provides both the LAN and SAN connectivity for all servers within its domain.
From a networking perspective, the Cisco UCS 6454 uses a cut-through architecture, supporting deterministic, low-latency, line-rate 10/25/40/100 Gigabit Ethernet ports, switching capacity of 3.82 Tbps, and 160 Gbps bandwidth between FI 6454 and IOM 2208 per 5108 blade chassis, independent of packet size and enabled services. The product family supports Cisco® low-latency, lossless 10/25/40/100 Gigabit Ethernet unified network fabric capabilities, which increase the reliability, efficiency, and scalability of Ethernet networks. The Fabric Interconnect supports multiple traffic classes over a lossless Ethernet fabric from the server through the Fabric Interconnect. Significant total cost of ownership (TCO) savings come from an FCoE optimized server design in which Network Interface Cards (NICs), Host Bus Adapters (HBAs), cables, and switches can be consolidated.
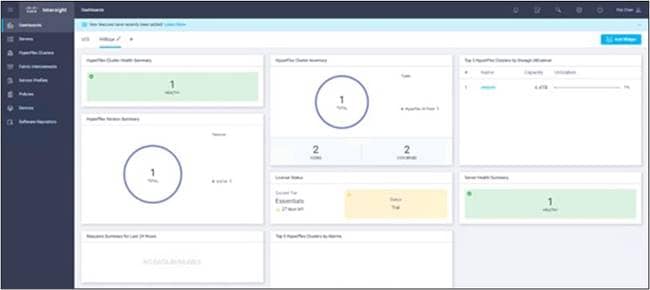
Cisco Intersight (Figure 5 and https://intersight.com) is an API driven, cloud-based system management platform. It is designed to help organizations to achieve their IT management and operations with a higher level of automation, simplicity, and operational efficiency. As a new global management tool for the Cisco UCS and Cisco HyperFlex systems, it provides a holistic and unified approach to managing distributed and virtualized environments. Cisco Intersight simplifies the installation, monitoring, troubleshooting, upgrade, and support for your infrastructure with the following benefits:
● Cloud Based Management: The ability to manage Cisco UCS and HyperFlex from the cloud provides the speed, simplicity, and easy scaling in the infrastructure management, whether in the datacenter or in remote and branch office locations.
● Automation: A unified application programming interface (API) in Cisco UCS and Cisco HyperFlex systems enables policy driven configuration and management of the infrastructure. The API makes Cisco Intersight and the devices connected to it fully programmable and DevOps friendly.
● Analytics and Telemetry: Cisco Intersight monitors the health and relationships of all the physical and virtual infrastructure components in the system. It also collects telemetry and configuration information for developing the intelligence of the platform in the way in accordance with Cisco information security requirements.
● Connected TAC: Solid integration with Cisco TAC enables more efficient and proactive technical support. Cisco Intersight provides enhanced operations automation by expediting sending files to speed troubleshooting.
● Recommendation Engine: Driven by analytics and machine learning, the Cisco Intersight recommendation engine provides actionable intelligence for IT operations management using a constantly evolving knowledge base and practical insights learned within the entire system.
● Management as A Service: Cisco Intersight provides management as a service and is designed to be infinitely scalable and easy to implement. It relieves administrators of the burden of maintaining systems management software and hardware.
Red Hat OpenShift Container Platform
Red Hat OpenShift Container Platform is a consistent hybrid cloud foundation for building and scaling containerized applications. Backed by a 9-year enterprise support cycle, it offers a streamlined platform installation and upgrades from Red Hat—one of the leading Kubernetes contributors. Red Hat OpenShift Container Platform offers:
● Cloud-like operation. Red Hat OpenShift Container Platform comes with an automatic installation process that gets organizations up and running with Kubernetes as quickly as possible. Once installed, Red Hat OpenShift uses Kubernetes operators for push-button, automatic platform updates for the container host, Kubernetes cluster, and application services running on the cluster.
● A consistent foundation. Red Hat OpenShift Container Platform delivers a consistent Kubernetes platform anywhere Red Hat Enterprise Linux runs. The platform ships with a user-friendly console to view and manage all your clusters, yielding enhanced visibility across multiple deployments.
● Rapid development. Red Hat OpenShift Container Platform comes with developer-friendly workflows including built-in continuous innovation / continuous delivery (CI/CD) pipelines and Red Hat’s source-to-image capabilities that let developers go straight from application code to container. The platform eases the process of extending to new technologies, including serverless applications with Knative, cloud services, and service communications with Istio and service mesh.
OpenShift Data Foundation is persistent software-defined storage integrated with and optimized for Red Hat OpenShift. Deployed, consumed, and managed through the Red Hat OpenShift administrator console, the platform is built on Ceph petabyte-scale persistent cloud storage, the Rook Kubernetes storage operator, and NooBaa multicloud object gateway technology. OpenShift Data Foundation runs anywhere that Red Hat OpenShift does—on-premises or in hybrid cloud environments. Dynamic, stateful, and highly available container-native storage can be provisioned and deprovisioned on demand with OpenShift Data Foundation.
Running as a Kubernetes service, OpenShift Data Foundation is engineered, tested, and qualified to provide data services for Red Hat OpenShift Container Platform on any infrastructure. It offers:
● Simplified access and hybrid cloud data management for faster innovation
● A consistent experience for both users and developers across clouds for faster insights
● Dynamic scale, allowing organizations to start small while automating rapid data services growth
Red Hat OpenShift Platform Plus
Red Hat OpenShift Platform Plus is the easiest way to deploy both Red Hat OpenShift Container Platform and OpenShift Data Foundation. This complete platform lets you build, deploy, run, and manage fully modern containerized applications with comprehensive security at scale to support your digital transformation journey. Red Hat OpenShift Platform Plus includes Red Hat OpenShift Container Platform as well as the following advanced components:
● Red Hat Advanced Cluster Management for Kubernetes. Red Hat Advanced Cluster Management for Kubernetes offers end-to-end management visibility and control with a single view to manage your Kubernetes clusters.
● Red Hat Advanced Cluster Security for Kubernetes. Red Hat Advanced Cluster Security for Kubernetes is a Kubernetes-native container security solution that lets you more securely build, deploy, and run cloud-native enterprise applications.
● Red Hat OpenShift Data Foundation Essentials. OpenShift Data Foundation Essentials provides full support for internal-mode data services that run on the same servers as Red Hat OpenShift Container Platform.
● Red Hat Quay. Red Hat Quay is a private container registry that stores, builds, and deploys container images while analyzing container images for security vulnerabilities.
This particular Cisco Certified Validated Design employed OpenShift Data Foundation Advanced edition to access an external Red Hat Ceph Storage Cluster. OpenShift Data Foundation Advanced Edition external-mode storage clusters decouple storage resources from compute resources, allowing the two to scale independently. External mode storage clusters can be massively scaled, support mixed media types, and expand tuning options for diverse workloads. Multiple Red Hat OpenShift clusters can also consume storage from an external cluster, easing data sharing between Red Hat OpenShift clusters and applications.
This flexibility also allows individual data nodes to be customized and optimized for specific workloads using the most appropriate technology. With enhanced volume-level security, key management system support, and additional cluster resiliency options, the powerful combination of OpenShift Platform Plus with OpenShift Data Foundation Advanced edition helps solution architects address their specific workload needs while preserving a common, consistent storage services interface.
This chapter is organized into the following subjects:
| Chapter |
Subject |
| Solution Design |
In the tested architecture (Figure 6), Red Hat OpenShift Container Platform with OpenShift Data Foundation was deployed on Cisco UCS X-Series with Cisco Intersight and Intersight Ansible. Engineers automatically configured seven Cisco UCS X210c M6 blades with Intersight Ansible, simplifying the process of orchestrating a cloud native environment. Three blades were deployed with vSphere 7, running Red Hat OpenShift Container Platform. Four blades were deployed with Red Hat Enterprise Linux 8 and Red Hat Ceph Storage 4[1], connecting via ODF to OCP as persistent block storage.
The full deployment of Cisco UCS X-Series was done through Intersight Ansible automation, including an installation of vSphere and Red Hat Enterprise Linux with preconfigured kickstart files. This process shows the simplicity of the deployment from day 1 and integrates the configuration of vSphere as preparation for Red Hat OpenShift Container Platform and the configuration of Red Hat Enterprise Linux as preparation for Ceph. The further deployment of Red Hat OpenShift Container Platform and Ceph including OpenShift Data Foundation was done through the Red Hat OpenShift Container Platform installer and the Ceph Ansible installer.
The solution can scale in various dimensions. The Red Hat OpenShift Container Platform installation can grow in the same Cisco X-Series chassis by adding a fourth node. It can also grow outside of the Cisco X-Series chassis by adding more compute power with Cisco UCS X-Series or C-Series. The current Red Hat OpenShift Container Platform configuration can start with the default deployment of three workers. In our test environment, we deployed nine workers with more compute power in order to run a performance benchmark on the whole configuration.
The four-node Red Hat Ceph Storage solution used as persistent storage has various options to scale capacity. The tested configuration uses a replication factor or two (RF=2) for the installed NVMe drives, configured per Ceph pool. A base capacity summary for the tested solution and various other NVMe options is listed in Table 1. The usable capacity assumes that 100% of your data is stored either with replication (RF=2) or with erasure coding (4+2).
The tested solution is marked in green in Table 1.
Note: For other capacity options please check the Cisco UCS X210c Compute Node Spec Sheet.
Table 1. Storage Capacity for a 4-node Cisco UCS X210c M6 blade solution with NVMe
| NVMe Type |
Number of NVMe |
Usable Capacity RF=2 |
Usable Capacity EC 4+2 |
| 1.6TB 2.5in U.2 Intel P5600 NVMe High Perf High Endurance |
16 |
12 TB |
17 TB |
| 1.6 TB NVMe |
24 |
19 TB |
25 TB |
| 3.2 TB NVMe |
38 TB |
51 TB |
|
| 6.4 TB NVMe |
76 TB |
102 TB |
|
| 7.6 TB NVMe |
91 TB |
121 TB |
|
| 15.3 TB NVMe |
183 TB |
244 TB |
The solution can be also expanded further. OpenShift Data Foundation supports file, block, and object storage and gives you more options to store content.
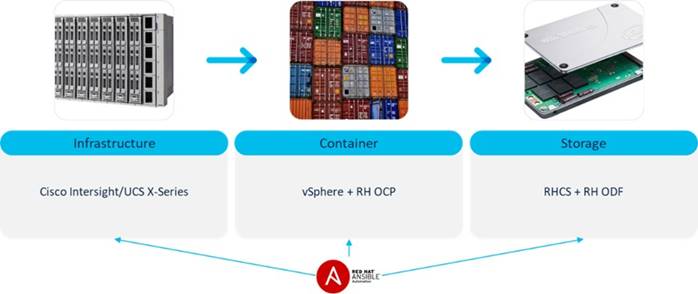
The solution setup consists of multiple parts (Figure 7). The high-level flow of the solution setup is as follows:
1. Deploy Cisco UCS X-Series with Cisco Intersight and Intersight Ansible.
2. Configure vSphere 7 with Ansible and deploy Red Hat OpenShift Container Platform.
3. Configure Red Hat Enterprise Linux 8 with Ansible, deploy Red Hat Ceph Storage and connect it with OpenShift Data Foundation.
Requirements
This subject is organized into the following sections:
| Subject |
Section |
| Requirements |
Table 2 lists the hardware used in this solution.
Table 2. Hardware Components used in this solution
| Component |
Model |
Quantity |
Comments |
| Fabric Interconnect |
Cisco UCS 6454 |
2 |
|
| Cisco UCS |
Cisco UCS X9508 Modular Chassis |
1 |
|
| Cisco UCS |
Cisco UCS X210c M6 Blade |
3 |
Used for vSphere: 2 x Intel Xeon Gold 6346 512 GB Memory 2 x 240 GB M.2 SATA SSD for Boot/OS 1 x UCSX-V4-Q25GML |
| Cisco UCS |
Cisco UCS X210c M6 Blade |
4 |
Used for RHCS: 2 x Intel Xeon Platinum 8358P 2048 GB Memory 2 x 240 GB M.2 SATA SSD for Boot/OS 4 x 1.6 TB Intel P5600 NVMe for OSD 1 x UCSX-V4-Q25GML |
The required software distribution versions are listed in Table 3.
| Layer |
Component |
Version or Release |
| Cisco UCS 6454 Fabric Interconnect |
Firmware Version |
9.3(5)I42(1f) |
| Cisco UCS X9508 Modular Chassis |
Firmware Version |
4.2(1g) |
| Cisco UCS X210c M6 Blade |
Firmware Version |
5.0(1b) |
| Software |
vSphere |
7.0 U2 |
| Software |
Red Hat OpenShift Container Platform |
4.9.11 |
| Software |
Red Hat OpenShift Data Foundation |
4.9 |
| Software |
Red Hat Enterprise Linux |
8.5 |
| Software |
Red Hat Ceph Storage |
4.2z4 - 4.2.4 / 14.2.11-208.el8cp |
| Software |
Python2 |
Python 2.7.18 |
| Software |
Python3 |
Python 3.6.8 |
| Software |
Ansible |
Ansible 2.9.27 |
This solution requires a few hardware and software configurations, which are listed below:
● The Fabric Interconnects and the required domain policies for both Fabric Interconnects are already configured and deployed as well as all VLANs for the solution.
● The connected ports on both Fabric Interconnect are already configured, either as server or as network.
● The Cisco UCS X-Series chassis is already claimed by Intersight and discovered as well as all blades are already discovered.
● The used Intersight Organization in this solution is already created.
● A physical or virtual HTTP server for downloading all required boot images is already configured.
● A physical or virtual Red Hat Enterprise Linux administration host for Red Hat OpenShift Container Platform installation/configuration/administration and Ceph installation/configuration/administration is already configured and runs Ansible.
● A vCenter is already available.
● A shared storage solution is required to be used by the configured vSphere cluster. In our case, we used NetApp shared storage.
● A DHCP and DNS server is already configured.
This subject is organized into the following sections:
| Subject |
Section |
| Physical Topology |
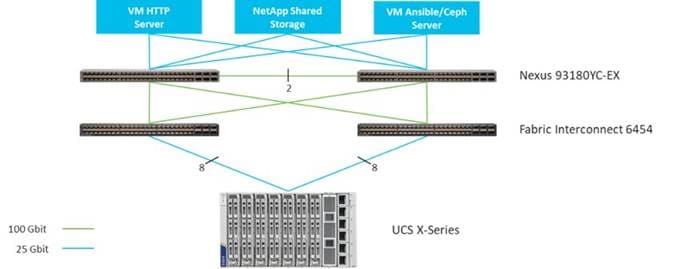
Figure 8 shows the topology configuration. There is one Cisco UCS X-Series chassis connected to a pair of Cisco UCS Fabric Interconnects. The chassis is connected with 8 x 25-Gbps cables from each IO-Module to one Fabric Interconnect. Each Fabric Interconnect has 2 x 100-Gbps cables as uplink to the above Cisco Nexus switches.
Both VM machines for providing HTTP and for Red Hat OpenShift Container Platform installation/configuration/administration and Ceph installation/configuration/administration as well as the shared storage are connected with 25-Gbps cables to the Cisco Nexus switches.
Figure 8 illustrates the topology overview.
VLANs and Subnets
For the base configuration, multiple VLANs need to be carried to the Cisco UCS domain and these VLANs are also defined in the Cisco UCS configuration. Table 4 lists the VLANs created by Cisco Intersight used in this CVD and their functions:
| VLAN Name |
VLAN ID |
Subnet |
Purpose |
| IB_Management |
16 |
192.168.16.0/24 GW 192.168.16.254 |
Inband Management |
| OCP_Traffic |
172 |
10.1.72.0/24 GW 10.1.72.254 |
OCP Traffic Ceph Client |
| Ceph_Storage |
202 |
172.16.2.0/24 GW 172.16.2.1 |
Storage network for Red Hat Ceph Storage |
| NetApp |
3000 |
192.168.30.0/24 GW 192.168.16.254 |
NetApp shared storage |
| vMotion |
3030 |
192.168.33.0/24 GW 192.168.33.254 |
vMotion |
| OOB_Management |
3072 |
10.81.72.0/24 GW 10.81.72.254 |
Cisco UCS KVM |
Jumbo Frames
All traffic traversing the OCP_Traffic, Ceph_Storage, NetApp, and vMotion VLAN and subnet is configured by default to use jumbo frames. To be precise, all communication is configured to send IP packets with a Maximum Transmission Unit (MTU) size of 9000 bytes. Using a larger MTU value means that each IP packet sent carries a larger payload, therefore transmitting more data per packet, and consequently sending and receiving data faster.
Naming Scheme and DNS
DNS servers are highly recommended to be configured for querying Fully Qualified Domain Names (FQDN). DNS records need to be created prior to beginning the installation. At a minimum, it is highly recommended to create A records and reverse PTR records.
Use Table 5 to gather the required DNS information for the installation and list the information required for this CVD:
Table 5. DNS Server Information
| Item |
Name |
| DNS Server |
10.81.72.228 |
| DNS Domain |
ocpceph.local |
| DHCP Server |
10.81.72.229 |
| vCenter Server Name |
ocpceph-vc7 |
| vSphere host #1 |
aa16-ocpesxi1 |
| vSphere host #2 |
aa16-ocpesxi2 |
| vSphere host #3 |
aa16-ocpesxi3 |
| Ceph host #1 |
cephosd1 |
| Ceph host #2 |
cephosd2 |
| Ceph host #3 |
cephosd3 |
| Ceph host #4 |
cephosd4 |
| VM HTTP host |
owalsdor-linux |
| VM Ansible/Ceph admin host |
cephadm |
| OCP API VIP |
api.rtp-ocp |
| Ingress VIP |
*.apps.rtp-ocp |
Cabling
The physical layout of the solution was previously described in section Physical Topology. The Cisco UCS Fabric Interconnects, and the Cisco UCS X-Series need to be cabled properly before beginning the installation activities. Table 6 provides the cabling map for installation of the whole solution.
| Device |
Port |
Connected To |
Port |
Note |
| Cisco UCS X-Series IO Module 1 |
1 |
Cisco UCS Fabric Interconnect A |
Port 17 |
|
| Cisco UCS X-Series IO Module 1 |
2 |
Cisco UCS Fabric Interconnect A |
Port 18 |
|
| Cisco UCS X-Series IO Module 1 |
3 |
Cisco UCS Fabric Interconnect A |
Port 19 |
|
| Cisco UCS X-Series IO Module 1 |
4 |
Cisco UCS Fabric Interconnect A |
Port 20 |
|
| Cisco UCS X-Series IO Module 1 |
5 |
Cisco UCS Fabric Interconnect A |
Port 21 |
|
| Cisco UCS X-Series IO Module 1 |
6 |
Cisco UCS Fabric Interconnect A |
Port 22 |
|
| Cisco UCS X-Series IO Module 1 |
7 |
Cisco UCS Fabric Interconnect A |
Port 23 |
|
| Cisco UCS X-Series IO Module 1 |
8 |
Cisco UCS Fabric Interconnect A |
Port 24 |
|
| Cisco UCS X-Series IO Module 2 |
1 |
Cisco UCS Fabric Interconnect B |
Port 17 |
|
| Cisco UCS X-Series IO Module 2 |
2 |
Cisco UCS Fabric Interconnect B |
Port 18 |
|
| Cisco UCS X-Series IO Module 2 |
3 |
Cisco UCS Fabric Interconnect B |
Port 19 |
|
| Cisco UCS X-Series IO Module 2 |
4 |
Cisco UCS Fabric Interconnect B |
Port 20 |
|
| Cisco UCS X-Series IO Module 2 |
5 |
Cisco UCS Fabric Interconnect B |
Port 21 |
|
| Cisco UCS X-Series IO Module 2 |
6 |
Cisco UCS Fabric Interconnect B |
Port 22 |
|
| Cisco UCS X-Series IO Module 2 |
7 |
Cisco UCS Fabric Interconnect B |
Port 23 |
|
| Cisco UCS X-Series IO Module 2 |
8 |
Cisco UCS Fabric Interconnect B |
Port 24 |
|
| Cisco UCS Fabric Interconnect A |
49 |
Cisco Nexus 93180YC-EX A |
Port 49 |
Po 11 |
| Cisco UCS Fabric Interconnect A |
50 |
Cisco Nexus 93180YC-EX B |
Port 49 |
Po 11 |
| Cisco UCS Fabric Interconnect B |
49 |
Cisco Nexus 93180YC-EX A |
Port 50 |
Po 12 |
| Cisco UCS Fabric Interconnect B |
50 |
Cisco Nexus 93180YC-EX B |
Port 50 |
Po 12 |
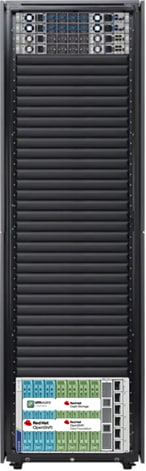
The core solution with the Cisco UCS X-Series takes seven rack units (7 RU) of space in a standard rack. Figure 9 shows the rack layout.
Deployment Hardware and Software
This chapter is organized into the following subjects:
| Chapter |
Subject |
| Deployment Hardware and Software |
Deploy Cisco UCS X-Series with Intersight Ansible Configure vCenter and Deploy Red Hat OpenShift Container Platform |
The deployment of the solution contains various steps as seen in Figure 11. The infrastructure deployment of the Cisco UCS X-Series is based on Intersight Ansible. The configuration of VMware vSphere, the preparation of the Ceph nodes, and the installation of RHCS is based on Ansible as well. The repository with all the Ansible playbooks for this solution can be found at https://github.com/ucs-compute-solutions/UCSX_IMM_OCP_ODF.
The repository has the following structure:
inventory
# Inventory file for deployment
Setup_UCS.yml # Playbook for setting up chassis and blades
Setup_UCS_Chassis.yml # Playbook for setting up chassis only
Setup_UCS_Server.yml # Playbook for setting up blades only
Setup_VMware.yml
# Playbook for preparing vCenter and vSphere
Setup_Ceph_Hosts.yml # Playbook for preparing Ceph nodes
Purge_vCenter.yml
# Playbook for deleting vCenter configura-tion
Purge_UCS_Server.yml # Playbook for deleting blades setup
Purge_UCS_Chassis.yml # Playbook for deleting chassis setup
files/
aa16-6454-1-1_vsphere7.cfg
# Kickstart file for ESXi host 1
aa16-6454-1-2_vsphere7.cfg
# Kickstart file for ESXi host 2
aa16-6454-1-3_vsphere7.cfg
# Kickstart file for ESXi host 3
all.yml # Variable file used for Ceph Setup
config
# Config file for Ceph
hosts
# Inventory file for Ceph deployment
osds.yml
# OSD variable file used for Ceph Setup
site-container.yml
# Ceph Playbook for container setup
group_vars/
all.yml # Variables for all playbooks
roles/
common/ # This hierarchy represents a "role"
tasks/
main.yml
# Tasks file including smaller tasks
defaults/
main.yml
# Lower priority variables where needed
vars/
main.yml
# Variables associated with this role
Note: The following information must be modified based on your environment; more information needs to be modified specific to each device automation which is explained later in this document in the device automation sections:
● inventory - contains the variables such as device names and authentication details:
● group_vars/all.yml – contains all information for the solution deployment, update this file based on your environment
The flow of the repository is:
1. Deploy the Cisco UCS Infrastructure by running:
◦ Setup_UCS_Chassis.yml + Setup_UCS_Server.yml or
◦ Setup_UCS.yml
2. Configure VMware environment by running:
◦ Setup_VMware.yml
3. After deploying Red Hat OpenShift Container Platform, the next step is to prepare the Ceph nodes by running:
◦ Setup_Ceph_Hosts.yml
4. The final step is to deploy Red Hat Ceph Storage and to integrate Ceph into Red Hat OpenShift Container Platform with OpenShift Data Foundation.
Note: Before starting the deployment, Intersight Ansible has to be installed and the API key for accessing Cisco Intersight has to be created.
Install Intersight Ansible
Prior to installing Intersight Ansible, make sure that you have already installed Ansible on your administration host, then install Intersight Ansible by typing the following:
[root@cephadm ~]# ansible-galaxy collection install cisco.intersight
Process install dependency map
Starting collection install process
Installing 'cisco.intersight:1.0.18' to '/root/.ansible/collections/ansible_collections/cisco/intersight'
To run the Intersight playbooks, add the following variable in the defaults section of /etc/ansible/ansible.cfg:
[defaults]
jinja2_native = True
This option preserves variable types like VLAN numbers during template operations.
Procedure 1. Generate Intersight API Keys
Note: To start using the provider the API Key, Secret Key, and Intersight endpoint URL are required.
Step 1. Log into Cisco Intersight.
Step 2. Go to Settings, API Keys and click on Generate API Keys.
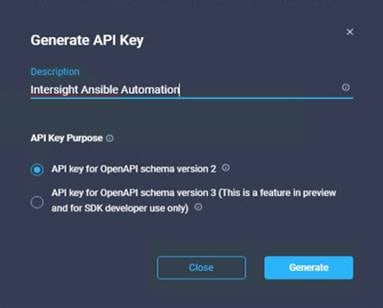
Step 3. Enter a description and click Generate (Figure 10).
Step 4. Copy the API Key in your Ansible inventory file and store the secret/private key into a file on your Ansible administration host:
[all:vars]
api_private_key=/root/intersight_rtp.pem
api_key_id=<API Key ID>
Deploy Cisco UCS X-Series with Intersight Ansible
As described previously, there are two ways to deploy the Cisco UCS X-Series Chassis and the Cisco X-Series Blades. One way is to run each role independently by calling at first Setup_UCS_Chassis.yml and then Setup_UCS_Server.yml or by running the playbook Setup_UCS.yml, which runs both roles together.
Either running each role individually or both together, the result of that step is a fully deployed and pre-configured node with either vSphere 7 or Red Hat Enterprise Linux 8. Each step of the individual role is explained in the next sections.
Procedure 1. Deploy Cisco UCS X-Series Chassis
By running the playbook Setup_UCS_Chassis.yml, the role UCSchassis is called, and the following tasks are involved:
1. uuid_pool.yml -> Creates a UUID pool for all blades
2. mac_pool.yml -> Creates a MAC pool for all blades
3. ip_pool.yml -> Creates an IP pool for KVM access to all blades
4. imc_access -> Creates the IMC access with a VLAN
5. power_policy.yml -> Creates a specific power policy for Cisco UCS X-Series chassis
6. gather_moids.yml -> Gathers the specific chassis MOID and writes it into a temporary file
7. chassis_profile_assign.yml -> Creates the chassis profile and assigns it to the specific chassis with the chassis MOID gathered from the task before
8. chassis_profile_deploy.yml -> Deploys the profile on the chassis
The result is a fully deployed chassis profile on the specific chassis (Figure 11).

Prepare Custom ISO Images for vSphere and RHEL
Before installing the OS, custom images for all vSphere and Ceph hosts need to be created. The process is similar for both Operating Systems and contains specific kickstart files for each host.
Procedure 2. Create a custom image for vSphere 7 ISO Image for automated installation
Step 1. Install openssl11 to create an encrypted password for user root:
[root@owalsdor-linux ~]# yum install openssl11
[root@owalsdor-linux ~]# openssl11 passwd -6
Password:
Verifying - Password:
$6$qDuL3IZX2.97BUFu$kwhPrU9GWFdU/2F8JjLi7Mr4Vo7ryATnnR9YxYVp.dcQyKqT90.6G3x2KYjviR5ANl5e0DrUneYSB2y8YDjhM0
Step 2. Create a kickstart file like the following and use the above created encrypted password in the kickstart file:
# Accept the VMware End User License Agreement
vmaccepteula
# Set the root password for the DCUI and Tech Support Mode
rootpw --iscrypted $6$qDuL3IZX2.97BUFu$kwhPrU9GWFdU/2F8JjLi7Mr4Vo7ryATnnR9YxYVp.dcQyKqT90.6G3x2KYjviR5ANl5e0DrUneYSB2y8YDjhM0
# clear paritions and install
clearpart --firstdisk --overwritevmfs
install --firstdisk --overwritevmfs
# Set the network to static on the first network adapater
network --bootproto=static --addvmportgroup=1 --device=vmnic0 --ip=192.168.16.97 --netmask=255.255.255.0 --gateway=192.168.16.254 --hostname=aa16-ocpesxi1.ocpceph.local --nameserver=10.81.72.228
reboot
%firstboot --interpreter=busybox
sleep 30
#Enter Maintenance mode
vim-cmd hostsvc/maintenance_mode_enter
#suppress Shell Warning
esxcli system settings advanced set -o /UserVars/SuppressShellWarning -i 1
esxcli system settings advanced set -o /UserVars/ESXiShellTimeOut -i 1
###############################
# enable & start remote ESXi Shell (SSH)
###############################
vim-cmd hostsvc/enable_ssh
vim-cmd hostsvc/start_ssh
###############################
# enable & start ESXi Shell (TSM)
###############################
vim-cmd hostsvc/enable_esx_shell
vim-cmd hostsvc/start_esx_shell
#VSwitch Configurations
esxcli network ip dns search add --domain=ocpceph.local
esxcli network vswitch standard add --vswitch-name=vSwitch0 --ports=24
esxcli network vswitch standard uplink add --uplink-name=vmnic0 --vswitch-name=vSwitch0
esxcli network vswitch standard uplink add --uplink-name=vmnic1 --vswitch-name=vSwitch0
esxcli network vswitch standard portgroup remove --portgroup-name="VM Network" --vswitch-name=vSwitch0
%firstboot --interpreter=busybox
#Disable IPv6
esxcli network ip set --ipv6-enabled=false
# Exit Maintenance Mode
vim-cmd hostsvc/maintenance_mode_exit
# Let us poweroff/shutdown our selves.
sleep 30
reboot
Step 3. Create a new directory on the HTTP server and copy the kickstart file to it:
[root@owalsdor-linux ~]# mkdir /var/www/html/vsphere
[root@owalsdor-linux ~]# cp aa16-6454-1-1_vsphere7.cfg /var/www/html/vsphere
Step 4. Mount the Cisco Custom ISO for vSphere:
[root@owalsdor-linux ~]# mount -o loop VMware_ESXi_7.0.2_17867351_Custom_Cisco_4.1.3_a.iso /mnt
mount: /mnt: WARNING: device write-protected, mounted read-only.
Step 5. Create a directory and copy all the content of the ISO:
[root@owalsdor-linux ~]# mkdir /tmp/vsphere7
[root@owalsdor-linux ~]# cp -r /mnt/* /tmp/vsphere7
Step 6. Add the following part in /tmp/vsphere7/efi/boot/boot.cfg file as follows:
kernelopt=ks=http://10.81.72.229/vmware/aa16-6454-1-1_vsphere7.cfg netdevice=vmnic0 bootproto=dhcp
Step 7. Save the file and create the ISO as follows:
[root@owalsdor-linux ~]# genisoimage -relaxed-filenames -J -R -o /tmp/vmware7_ocpesxi1.iso -b isolinux.bin -c boot.cat -no-emul-boot -boot-load-size 4 -boot-info-table -eltorito-alt-boot -e efiboot.img -no-emul-boot .
Step 8. Move the ISO image to the download directory:
[root@owalsdor-linux ~]# mv ../vmware7_ocpesxi1.iso /var/www/html/vsphere/
Step 9. Repeat steps 1 – 8 for all vSphere hosts. Your directory should contain the following files:
[root@owalsdor-linux vsphere]# ll
total 2010384
-rw-r--r--. 1 root root 2018 Jan 19 07:26 aa16-6454-1-1_vsphere7.cfg
-rw-r--r--. 1 root root 2018 Jan 19 07:27 aa16-6454-1-2_vsphere7.cfg
-rw-r--r--. 1 root root 2018 Jan 19 07:27 aa16-6454-1-3_vsphere7.cfg
-rw-r--r--. 1 root root 418009088 Dec 6 10:49 vmware7_ocpesxi1.iso
-rw-r--r--. 1 root root 418009088 Dec 6 10:49 vmware7_ocpesxi2.iso
-rw-r--r--. 1 root root 418009088 Dec 6 10:48 vmware7_ocpesxi3.iso
Procedure 3. Create a custom image for Red Hat Enterprise Linux 8 for automated installation
Step 1. Create an encrypted password for user root:
[root@owalsdor-linux ~]# openssl11 passwd -6
Password:
Verifying - Password:
$6$dA8apVZJJhncljrS$IuVqcdAuHQVijluX6S6vw88FYteyogl2ZZczrFDRhIROitEIWdI4lSjPSsgNgIoVGb3YanQGm.lyWsK7v48P81
Step 2. Create a kickstart file, shown below, and use the previously created encrypted password in the kickstart file:
lang en_US.UTF-8
keyboard --vckeymap=us --xlayouts='us'
timezone --isUtc America/Los_Angeles --ntpservers=10.81.72.16
# System services
services --enabled="chronyd"
rootpw $6$dA8apVZJJhncljrS$IuVqcdAuHQVijluX6S6vw88FYteyogl2ZZczrFDRhIROitEIWdI4lSjPSsgNgIoVGb3YanQGm.lyWsK7v48P81 --iscrypted
#platform x86, AMD64, or Intel EM64T
url --url=http://10.81.72.229/rhel-repo
reboot
#Network Information
network --bootproto=static --device=eth0 --ip=192.168.16.107 --netmask=255.255.255.0 --gateway=192.168.16.254 --hostname=cephosd1 --nameserver=10.81.72.228 --noipv6 --mtu=9000 --onboot=on --activate
network --bootproto=static --device=team1 --ip=10.1.172.107 --netmask=255.255.255.0 --gateway=1910.1.172.254 --noipv6 --mtu=9000 --onboot=on --activate --teamslaves="eth1,eth2" --teamconfig="{\"runner\": {\"name\": \"loadbalance\"}}"
network --bootproto=static --device=team2 --ip=172.16.22.101 --netmask=255.255.255.0 --noipv6 --mtu=9000 --onboot=on --activate --teamslaves="eth3,eth4" --teamconfig="{\"runner\": {\"name\": \"loadbalance\"}}"
bootloader --location=mbr --append="rhgb quiet crashkernel=auto" --boot-drive=/dev/disk/by-path/pci-0000:05:00.0-ata-1
clearpart --all --initlabel
zerombr
# Disk partitioning information
part pv.1 --fstype="lvmpv" --ondisk=/dev/disk/by-path/pci-0000:05:00.0-ata-1 --size=220000
part /boot --fstype="xfs" --ondisk=/dev/disk/by-path/pci-0000:05:00.0-ata-1 --size=1024
part /boot/efi --fstype="xfs" --ondisk=/dev/disk/by-path/pci-0000:05:00.0-ata-1 --size=1024
volgroup ceph --pesize=4096 pv.1
logvol /home --fstype="xfs" --size=10240 --name=home --vgname=ceph
logvol swap --fstype="swap" --size=4096 --name=swap --vgname=ceph
logvol / --fstype="xfs" --size=102400 --name=root --vgname=ceph
logvol /var --fstype="xfs" --size=51200 --name=var --vgname=ceph
logvol /tmp --fstype="xfs" --size=20480 --name=tmp --vgname=ceph
auth --passalgo=sha512 --useshadow
selinux --enabled
firewall --disabled
firstboot --disable
ignoredisk --only-use=/dev/disk/by-path/pci-0000:05:00.0-ata-1
%packages
@^minimal-environment
chrony
kexec-tools
%end
%addon com_redhat_kdump --enable --reserve-mb='auto'
%end
Step 3. Create a new directory on the HTTP server and copy the kickstart file to it:
[root@owalsdor-linux ~]# mkdir /var/www/html/rhel8
[root@owalsdor-linux ~]# cp aa16-6454-1-4_cephosd1.cfg /var/www/html/rhel8
Step 4. Mount the Cisco Custom ISO for vSphere:
[root@owalsdor-linux ~]# mount -o loop rhel-8.2-x86_64-dvd.iso /mnt
mount: /mnt: WARNING: device write-protected, mounted read-only.
Step 5. Create a directory and copy all the content of the ISO:
[root@owalsdor-linux ~]# shopt -s dotglob
[root@owalsdor-linux ~]# mkdir /tmp/rhel8
[root@owalsdor-linux ~]# cp -avRf /mnt/* /tmp/rhel8
Step 6. Change the following part in /tmp/rhel8/EFI/BOOT/grub.cfg file as follows:
### BEGIN /etc/grub.d/10_linux ###
menuentry 'Install Red Hat Enterprise Linux 8.4' --class fedora --class gnu-linux --class gnu --class os {
linuxefi /images/pxeboot/vmlinuz inst.stage2=hd:LABEL=RHEL-8-4-0-BaseOS-x86_64 inst.ks=http://10.81.72.229/rhel8/aa16-6454-1-4_cephosd1.cfg net.ifnames=0 biosdevname=0 ip=dhcp
initrdefi /images/pxeboot/initrd.img
Step 7. Save the file and create the ISO as follows:
[root@owalsdor-linux ~]# mkisofs -o /tmp/rhel-8.4-x86_64-boot-cephosd1.iso -b isolinux/isolinux.bin -J -R -l -c isolinux/boot.cat -no-emul-boot -boot-load-size 4 -boot-info-table -eltorito-alt-boot -e images/efiboot.img -no-emul-boot -graft-points -V "RHEL-8.4 Server.x86_64".
Step 8. Move the ISO image to the download directory:
[root@owalsdor-linux ~]# isohybrid --uefi ../ rhel-8.4-x86_64-boot-cephosd1.iso
[root@owalsdor-linux ~]# mv ../rhel-8.4-x86_64-boot-cephosd1.iso /var/www/html/rhel8/
Step 9. Repeat steps 1 – 8 for all RHEL hosts. Your directory should contain the following files:
total 3283936
-rw-r--r--. 1 root root 1986 Jan 3 04:04 aa16-6454-1-4_cephosd1.cfg
-rw-r--r--. 1 root root 1986 Jan 3 04:03 aa16-6454-1-5_cephosd2.cfg
-rw-r--r--. 1 root root 1986 Jan 3 04:03 aa16-6454-1-6_cephosd3.cfg
-rw-r--r--. 1 root root 1986 Jan 3 04:01 aa16-6454-1-7_cephosd4.cfg
-rw-r--r--. 1 root root 840957952 Jan 3 08:48 rhel-8.4-x86_64-boot-cephosd1.iso
-rw-r--r--. 1 root root 840957952 Jan 3 08:49 rhel-8.4-x86_64-boot-cephosd2.iso
-rw-r--r--. 1 root root 840957952 Jan 3 08:50 rhel-8.4-x86_64-boot-cephosd3.iso
-rw-r--r--. 1 root root 840957952 Dec 30 11:47 rhel-8.4-x86_64-boot-cephosd4.iso
Step 10. Create a repo directory for the installation:
[root@owalsdor-linux ~]# mkdir /var/www/html/rhel8-repo
[root@owalsdor-linux ~]# cp -avRf /mnt/* /var/www/html/rhel8-repo
[root@owalsdor-linux ~]# cd /var/www/html/rhel8-repo
[root@owalsdor-linux ~]# dnf install -y createrepo
[root@owalsdor-linux ~]# createrepo -v .
Next, install the Cisco UCS X210c M6 blade servers with Intersight Ansible.
Procedure 4. Deploy Cisco UCS X-Series Blades
Note: By running the playbook Setup_UCS_Server.yml, the role UCSserver is called, and the following tasks are involved:
1. gather_facts.yml -> Collects MOID for MAC, IP, and UUID Pool and deletes a temporary file
2. qos_policy.yml -> Creates QoS policies for MTU 1500 and 9000
3. eth_adapter_policy.yml -> Sets the network interface mode to CL91
4. eth_network_control.yml -> Sets the ethernet network control
5. eth_network_group_policy.yml -> Creates the VLAN policies
6. vnic_adapter_policy.yml -> Sets the vNIC specific settings for vSphere and Ceph
7. storage_policy.yml -> Creates the storage policy for the boot drives
8. boot_policy.yml -> Sets the boot policy for all nodes
9. vmedia_ceph_policy.yml -> Creates the vMedia policy for Ceph nodes and writes the MOID together with the server MOID into a temporary file
10. vmedia_ocp_policy.yml -> Creates the vMedia policy for the vSphere nodes and writes the MOID together with the server MOID into a temporary file
11. lan_connectivity_policy.yml -> Creates the LAN connectivity policy for vSphere and Ceph nodes
12. eth_if_ceph.yml -> Creates the vNIC interfaces for Ceph nodes
13. eth_if_ocp.yml -> Creates the vNIC interfaces for vSphere nodes
14. server_profile_assign_ceph.yml -> Builds the profiles for Ceph nodes and assigns them
15. server_profile_assign_ocp.yml -> Builds the profiles for vSphere nodes and assigns them
16. server_profile_deploy_ceph.yml -> Deploys the profiles to Ceph nodes
17. server_profile_deploy_ocp.yml -> Deploys the profiles to OCP nodes
18. server_poweron.yml -> Powers on all servers to boot them from CIMC vMedia
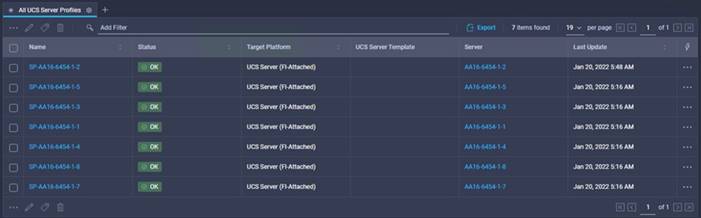
After the last step, all nodes boot up and get automatically installed with either vSphere 7 or Red Hat Enterprise Linux 8 through the preconfigured kickstart files (Figure 12).
Configure vCenter and Deploy Red Hat OpenShift Container Platform
After automatically installing vSphere on all three nodes, the virtual environment needs to be prepared for Red Hat OpenShift Container. The Ansible playbook performs all the necessary steps and configures vSphere. After finishing the preparation, the Red Hat OpenShift Container Platform cluster can be installed on the vSphere hosts.
Procedure 1. Configure vCenter
Step 1. Before the Ansible playbook for VMware runs, the password for vCenter and the vSphere hosts needs to be encrypted and added to the all.yml file:
[root@cephadm ucs_imm_ocp_ceph]# ansible-vault encrypt_string --ask-vault-pass --stdin-name 'vcenter_password'
New Vault password:
Confirm New Vault password:
Reading plaintext input from stdin. (ctrl-d to end input)
Test1234!vcenter_password: !vault |
$ANSIBLE_VAULT;1.1;AES256
66633864303261323463386461363331613163613232333162623835386436663765373534353339
3062363935653636626563333334333064343162303930610a386664643231333639616135633764
32616330636534323137623563313366636265373030323464376530373131653132396130323536
3134666233323463380a366261653164663230346464613637376466663136343839386139623832
3564
Encryption successful
Step 2. Put the variable with the vault encrypted password in all.yml:
vcenter_password: !vault |
$ANSIBLE_VAULT;1.1;AES256
66633864303261323463386461363331613163613232333162623835386436663765373534353339
3062363935653636626563333334333064343162303930610a386664643231333639616135633764
32616330636534323137623563313366636265373030323464376530373131653132396130323536
3134666233323463380a366261653164663230346464613637376466663136343839386139623832
3564
Step 3. Run the playbook and enter the vault password you used before:
[root@cephadm ucs_imm_ocp_ceph]# ansible-playbook Setup_VMware.yml -i inventory_rtp --ask-vault-pass
Vault password:
Step 4. By running the playbook Setup_VMware.yml, the role vsphere7 is called, and the following tasks are involved:
1. create_dc.yml -> Creates a datacenter in vCenter
2. create_cluster.yml -> Creates a cluster for all three nodes with HA/DRS
3. create_dvs.yml -> Creates a Distributed Virtual Switch (DVS) for vMotion
4. create_dvs_pg.yml -> Creates a Portgroup for the DVS
5. add_esxi_ntp.yml -> Adds a NTP server to all vSphere hosts
6. set_esxi_powermgmt_policy.yml -> Sets power management policy to High Performance on each vSphere host
7. add_esxi_hosts_to_VC.yml -> Adds all vSphere hosts to vCenter
8. add_esxi_vswitch_ocp.yml -> Creates a vSwitch for the OCP traffic
9. add_esxi_vswitch_netapp.yml -> Creates a vSwitch for the shared storage NetApp
10. add_esxi_vmk_ocp.yml -> Adds a VMkernel port for the vSwitch OCP on each host
11. add_esxi_vmk_netapp.yml -> Adds a VMkernel port for the vSwitch NetApp on each host
12. add_esxi_hosts_to_dvs.yml -> Adds each vSphere host to the DVS
13. add_esxi_dvs_vmk.yml -> Adds a DVS VMkernel for vMotion on each host
14. add_esxi_nfs_datastore.yml -> Adds the NetApp NFS datastore to each host
15. update_esxi.yml -> Optional: If no Cisco custom image is used then update the network driver
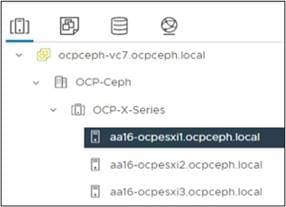
The result is a fully configured and prepared VMware environment (Figure 13).
Procedure 2. Deploy Red Hat OpenShift Container Platform
Note: You can install Red Hat OpenShift Container Platform on vSphere by using installer-provisioned or user-provisioned infra-structure. The default installation type uses installer-provisioned infrastructure, where the installation program provisions the underlying infrastructure for the cluster. In this solution the installer-provisioned infrastructure with customizations was used.
The full installation is described in the Red Hat OpenShift Container Platform 4.9 guide here: https://docs.openshift.com/container-platform/4.9/installing/installing_vsphere/installing-vsphere-installer-provisioned-customizations.html.
Step 1. Provide 1 TB of shared storage to all vSphere hosts. This is done through the connected NetApp storage.
Step 2. Provide two static IP address (Table 7) for API and Ingress together with DNS records for the vCenter instance that hosts your Red Hat OpenShift Container Platform cluster.
| Component |
DNS Record |
IP Address |
| API VIP |
api.rtp-ocp.ocpceph.local |
10.1.72.104 |
| Ingress VIP |
*.apps.rtp-ocp.ocpceph.local |
10.1.72.105 |
Step 3. Generate a key and add it to the SSH agent:
[root@cephadm ~]# ssh-keygen -t ed25519 -N '' -f .ssh/ssh-id
Generating public/private ed25519 key pair.
Your identification has been saved in .ssh/ssh-id.
Your public key has been saved in .ssh/ssh-id.pub.
The key fingerprint is:
SHA256:npQMNGZLH2hs3h0UcnRSZ586TStl+bk/0Ejrj/VFyyU root@cephadm
The key's randomart image is:
+--[ED25519 256]--+
| .*.oo*oo o |
| ==+ +.o .o|
| +o... . *.|
| .o... .* +|
| S .+E++|
| o . ++++|
| o . .=.|
| .o.+|
| ...+|
+----[SHA256]-----+
[root@cephadm]# ssh-add ~/.ssh/ssh-id
Identity added: ssh-id (root@cephadm)
Step 4. Download the installation program from https://console.redhat.com/openshift/install
Step 5. Go to Clusters -> Datacenter and select vSphere.
Step 6. Select Installer-provisioned infrastructure.
Step 7. Download the installer for Linux, the Pull secret, and the Command line interface for Linux.
Step 8. Extract the installation program:
[root@cephadm ~]# tar -xvf openshift-install-linux.tar.gz
Step 9. Add vCenter root CA certificates to your system trust.
Step 10. From the vCenter home page, download the vCenter’s root CA certificates. Click Download trusted root CA certificates in the vSphere Web Services SDK section. The <vCenter>/certs/download.zip file downloads.
Step 11. Extract the compressed file.
Step 12. Add the files for the operating system to the system trust and update the system trust:
[root@cephadm ~]# cp certs/lin/* /etc/pki/ca-trust/source/anchors
[root@cephadm ~]# update-ca-trust extract
Step 13. Build the installation configuration file by running the following command:
[root@cephadm ~]# ./openshift-install create install-config --dir <installation_directory>
or edit the below install-config.yaml per your requirements:
apiVersion: v1
baseDomain: ocpceph.local <- Set the domain
compute:
- architecture: amd64
hyperthreading: Enabled
name: worker
platform:
vsphere: <- Define the OCP workers
cpus: 24
coresPerSocket: 12
memoryMB: 65536
replicas: 9 <- Define the number of workers
controlPlane:
architecture: amd64
hyperthreading: Enabled
name: master
platform:
vsphere: <- Define the OCP masters
cpus: 8
coresPerSocket: 4
memoryMB: 16384
replicas: 3 <- Define the number of masters
metadata:
creationTimestamp: null
name: rtp-ocp <- Name of the OCP cluster
networking: <- Predefined but can be changed per your needs
clusterNetwork:
- cidr: 10.128.0.0/14
hostPrefix: 23
machineNetwork:
- cidr: 10.0.0.0/16
networkType: OpenShiftSDN
serviceNetwork:
- 172.30.0.0/16
platform:
vsphere:
apiVIP: 10.1.72.104 <- API VIP IP address
cluster: OCP-X-Series <- vCenter cluster name
datacenter: OCP-Ceph <- vCenter datacenter name
defaultDatastore: NetApp_NFS <- Shared storage datastore to use
ingressVIP: 10.1.72.105 <- Ingress VIP IP address
network: OCP_Traffic <- vSphere network to use
password: Test1234! <- Password for below vCenter user name
username: mailto:administrator@vsphere.local <- User for below vCenter
vCenter: ocpceph-vc7.ocpceph.local <- vCenter FQDN
proxy: <- Proxy information in case the environment needs it
httpProxy: http://proxy.esl.cisco.com:80
httpsProxy: http://proxy.esl.cisco.com:80
noProxy: .cisco.com,.cluster.local,.ocpceph.local,.rtp-ocp.ocpceph.local,.svc,10.0.0.0/16,10.1.72.0/24,10.128.0.0/14,127.0.0.1,172.30.0.0/16,192.168.16.0/24,api-int.rtp-ocp.ocpceph.local,localaddress,localhost
publish: External
pullSecret: <- Pull secret from download section before '{"auths":{"cloud.openshift.com":{"auth":"b3BlbnNoaWZ0LXJlbGVhc2UtZGV2K29jbV9hY2Nlc3NfZjBmZmQ2ODVmZmI0NDE4OWIzZGM1ZTZkYWIzMjljZTI6SkNESk9VNEVWOE45M0ZFNjAzVkQ4U0VYU0FDNU1KMldEUzNFUzNYWEhDOVpINDVZNjJVMlNJ-MEhNSjJHSEg4OA==","email":"owalsdor@cisco.com"},"quay.io":{"auth":"b3BlbnNoaWZ0LXJlbGVhc2UtZGV2K29jbV9hY2Nlc3NfZjBmZmQ2ODVmZmI0NDE4OWIzZGM1ZTZkYWIzMjljZTI6SkNESk9VNEVWOE45M0ZFNjAzVkQ4U0VYU0FDNU1KMldEUzNFUzNYWEhDOVpINDVZNjJVMlNJMEhNSjJHSEg4OA==","email":"owalsdor@cisco.com"},"registry.connect.redhat.com":{"auth":"fHVoYy1wb29sLTA4Njg3MTA3LTM5NGUtNGIy-Mi05NDc1LWVmYmU0ZDU2OWQzNTpleUpoYkdjaU9pSlNVelV4TWlKOS5leUp6ZFdJaU9pSmtPRGt5WVRreU9XTmpPRFUwWmpOaFlUUT-Jaak5tWmpRMU5qWTVPRFJtT1NKOS5IemFWY0pMQW84Y1ZENU42Nlk2bzMyaVdUWEM5djcySDJKV3FFeXJ3aTBDb3BmZlQzcXpSN0ZTcUJOcWVWRTlORF9qMmltdnpsTVFsX3Z2NEN4T1hhZ05WOFl0RXRybTlGalJsakxNanR6YTBLOXdDZ3JhODNuYzJhNWMtVXl4WWRZemgyVUhnNzlTRVh5cGpadklQclJlMzRIQjN3SVlfcEJYbW8wU2x0b2gtbHZlWW0tbEd2aFl4TVJuSUVtRW1OQ2tnV3VXaGtwU1FhOUJXc2hhT2w1X0F6V0kxNmp2SVM0eGxpM3NMLVpLSkZ5YUxfdm1rY1hQZzBON3dfMU1nQ3RRNFlfVlp1Yy1wV0JkdXJjdWJ5anBLc1pNUDhrdTFOaktOY3REcVBPRmFWZXJpZUot-MVY3Q3Y0ODRrTzMyNUpKN0FBVXAtX3FQQ0VXUkJCd1NGX2w0Vkw1aVE1UEd4dmdHOU5CYlRHakJpQUVjemNVQWlaT19PSTh1djBYV1BEaHplTGFja0d2cmFkdWR3c3NORnE2RzJ6YzZwYVNyYWJFWDhZaG9OMDFYVFR4bDlLeGM5MHB6ejBGTi14VmVTNlV5YXBpZVJuNzQ0cWsxcTVIZGNkTnhIM0lsUFF3V282Y1ZNUXRDUmxkZkMtWXpyTVlHeDZPc3kwNlBPbFQ1VkJGWUotc293S0pZZmtWTmliTUFxYVVtTWdCaFhlV3Vwc1JwdGFya2ZFQjcyWURGLURfeS1QMU44QVFMbFlyQVRVX3c5V3BVdzFOZlF0ZEcybUdqczRhQ2RiQ2k2UTAtWmNHVXljeVdXSlpkOFptMC1aVGdzbW9Zekt2T1N6QzBiU2stNUZ3NTQyc3dWM3U5aGRJdk1iR2d5cklyYnhaMkpGV0JkWWpYYWtacw==","email":"owal-sdor@cisco.com"},"registry.redhat.io":{"auth":"fHVoYy1wb29sLTA4Njg3MTA3LTM5NGUtNGIyMi05NDc1LWVmYmU0ZDU2OWQzNTpleUpoYkdjaU9pSlNVelV4TWlKOS5leUp6ZFdJaU9pSmtPRGt5WVRreU9XTmpPRFUwWmpOaFlUUT-Jaak5tWmpRMU5qWTVPRFJtT1NKOS5IemFWY0pMQW84Y1ZENU42Nlk2bzMyaVdUWEM5djcySDJKV3FFeXJ3aTBDb3BmZlQzcXpSN0ZTcUJOcWVWRTlORF9qMmltdnpsTVFsX3Z2NEN4T1hhZ05WOFl0RXRybTlGalJsakxNanR6YTBLOXdDZ3JhODNuYzJhNWMtVXl4WWRZemgyVUhnNzlTRVh5cGpadklQclJlMzRIQjN3SVlfcEJYbW8wU2x0b2gtbHZlWW0tbEd2aFl4TVJuSUVtRW1OQ2tnV3VXaGtwU1FhOUJXc2hhT2w1X0F6V0kxNmp2SVM0eGxpM3NMLVpLSkZ5YUxfdm1rY1hQZzBON3dfMU1nQ3RRNFlfVlp1Yy1wV0JkdXJjdWJ5anBLc1pNUDhrdTFOaktOY3REcVBPRmFWZXJpZUot-MVY3Q3Y0ODRrTzMyNUpKN0FBVXAtX3FQQ0VXUkJCd1NGX2w0Vkw1aVE1UEd4dmdHOU5CYlRHakJpQUVjemNVQWlaT19PSTh1djBYV1BEaHplTGFja0d2cmFkdWR3c3NORnE2RzJ6YzZwYVNyYWJFWDhZaG9OMDFYVFR4bDlLeGM5MHB6ejBGTi14VmVTNlV5YXBpZVJuNzQ0cWsxcTVIZGNkTnhIM0lsUFF3V282Y1ZNUXRDUmxkZkMtWXpyTVlHeDZPc3kwNlBPbFQ1VkJGWUotc293S0pZZmtWTmliTUFxYVVtTWdCaFhlV3Vwc1JwdGFya2ZFQjcyWURGLURfeS1QMU44QVFMbFlyQVRVX3c5V3BVdzFOZlF0ZEcybUdqczRhQ2RiQ2k2UTAtWmNHVXljeVdXSlpkOFptMC1aVGdzbW9Zekt2T1N6QzBiU2stNUZ3NTQyc3dWM3U5aGRJdk1iR2d5cklyYnhaMkpGV0JkWWpYYWtacw==","email":"owalsdor@cisco.com"}}}'
sshKey: | <- Generated ssh key for ssh access
ssh-rsa AAAAB3NzaC1yc2EAAAADAQABAAABgQDRjWVSwrF3OfTD90tr4P5szWlKF3U+Pkx3mBKqouSPHilKOF8ynKD+JSjDq/FARuAEdAwn1Qq1xj0h8vRmfJtMg3kJpkpDNywRsw+53pH/D76aVVHjjVaez17/5FLM86e2eeCdqk5Jaja1Yp4bk0EnPnB/UuYdxUSHYHp6XSPmZ+d+MojAJUB+5NbRqT0WSFMCfJhrrgXrAVOJipPhpM3WVsLNvyB3rL70k8/dNgNjPNq25olPSzQ0axoSvVfHWeSgoYeXyV2x6AYsXmt+UEYn2aJr8HoaMw8hxUj5BtHMaDYuiyfq7SJsNTXaaPk5FhgWBo6xUnJvY7vp/CBu9AdxPciNTsWAlaDVjgFa2DXt8yColOJsJ8VYOz9G2lNQMXiaUpNgLrlIlJZjXJBh3gXQJhMQa3zrJjBrJwfzXT8gjpZIHg+aUixyqEWtAfJKm/u2tI1op5kTrDPaHRXp2s644Q/1ZUFpgVtEO2LfEYHM4x9fARcQ1l/DuI6qMnn5d+s= root@cephadm
Step 14. Install Red Hat OpenShift Container Platform by copying the install-config.yaml file to the target directory:
[root@cephadm ~]# cp install-config.yaml ./ocpceph/
Step 15. Start the installation:
[root@cephadm ~]# ./openshift-install create cluster --dir=./ocpceph --log-level=info
INFO Consuming Install Config from target directory
INFO Obtaining RHCOS image file from 'https://rhcos-redirector.apps.art.xq1c.p1.openshiftapps.com/art/storage/releases/rhcos-4.9/49.84.202110081407-0/x86_64/rhcos-49.84.202110081407-0-vmware.x86_64.ova?sha256='
INFO The file was found in cache: /root/.cache/openshift-installer/image_cache/rhcos-49.84.202110081407-0-vmware.x86_64.ova. Reusing...
INFO Creating infrastructure resources...
INFO Waiting up to 20m0s for the Kubernetes API at https://api.rtp-ocp.ocpceph.local:6443...
INFO API v1.22.3+e790d7f up
INFO Waiting up to 30m0s for bootstrapping to complete...
INFO Destroying the bootstrap resources...
INFO Waiting up to 40m0s for the cluster at https://api.rtp-ocp.ocpceph.local:6443 to initialize...
INFO Waiting up to 10m0s for the openshift-console route to be created...
INFO Install complete!
INFO To access the cluster as the system:admin user when using 'oc', run 'export KUBECON-FIG=/root/ocpceph/auth/kubeconfig'
INFO Access the OpenShift web-console here: https://console-openshift-console.apps.rtp-ocp.ocpceph.local
INFO Login to the console with user: "kubeadmin", and password: "pAAoh-8K3XW-ckVSA-cCesT"
INFO Time elapsed: 42m26s
Step 16. When the installation finishes, login to the graphical user interface (GUI). Go to https://console-openshift-console.apps.rtp-ocp.ocpceph.local.
Step 17. Use kubeadmin and password from above pAAoh-8K3XW-ckVSA-cCesT
Step 18. Go to the top right kube:admin and click “Copy login command” and click “Display token.”
Step 19. Copy the token login to a CLI window and verify the status of the VMs:
[root@cephadm ~]# oc login --token=sha256~2mojbHDpf23xo0467jwSnuEwz7DX9IVx9FMGDWUM7M0 --server=https://api.rtp-ocp.ocpceph.local:6443
Logged into "https://api.rtp-ocp.ocpceph.local:6443" as "kube:admin" using the token provided.
You have access to 65 projects, the list has been suppressed. You can list all projects with 'oc projects'
Using project "default".
[root@cephadm ~]# oc get nodes
NAME STATUS ROLES AGE VERSION
rtp-ocp-f8gwv-master-0 Ready master 44m v1.22.3+e790d7f
rtp-ocp-f8gwv-master-1 Ready master 44m v1.22.3+e790d7f
rtp-ocp-f8gwv-master-2 Ready master 44m v1.22.3+e790d7f
rtp-ocp-f8gwv-worker-7j2x5 Ready worker 35m v1.22.3+e790d7f
rtp-ocp-f8gwv-worker-88bmt Ready worker 35m v1.22.3+e790d7f
rtp-ocp-f8gwv-worker-8lqcc Ready worker 35m v1.22.3+e790d7f
rtp-ocp-f8gwv-worker-dclxm Ready worker 35m v1.22.3+e790d7f
rtp-ocp-f8gwv-worker-tz8b5 Ready worker 35m v1.22.3+e790d7f
rtp-ocp-f8gwv-worker-w729b Ready worker 35m v1.22.3+e790d7f
rtp-ocp-f8gwv-worker-wsf8d Ready worker 35m v1.22.3+e790d7f
rtp-ocp-f8gwv-worker-xqnvv Ready worker 35m v1.22.3+e790d7f
rtp-ocp-f8gwv-worker-xqvxm Ready worker 35m v1.22.3+e790d7f
Step 20. Check the status in vCenter (Figure 14).

The Red Hat OpenShift Container Platform cluster is now deployed. The next step is the preparation of the Ceph nodes and the installation of Red Hat Ceph Storage.
Configure Ceph Nodes and Deploy Red Hat Ceph Storage
This section describes the usage of Ansible to deploy a Red Hat Ceph Storage cluster and other components such as Ceph Monitor and Ceph Manager. The cluster is deployed with colocation of containerized Ceph daemons. Colocation helps improve total cost of ownership with easier upgrades and better resource isolation.
The cluster as tested was configured for Reliable Autonomic Distributed Object Store (RADOS) block storage only but can be easily expanded to include file and object storage as well.
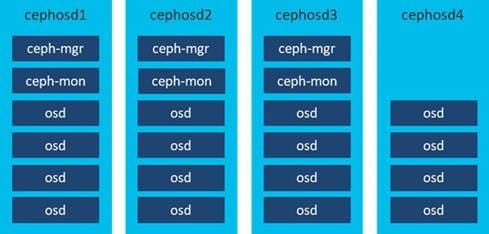
Together with the Ceph Object Storage Daemons (OSDs), deploy the Ceph Monitor and Ceph Manager on the Ceph OSD nodes. Figure 15 shows the colocation of the tested environment.
The Grafana and Prometheus daemons were run on the Ceph administration node.
Note: Before you start the configuration, update roles/CephHosts/vars/main.yml per your requirements. By running the playbook Setup_Ceph_Hosts.yml, the role CephHosts is called, and the following tasks are involved:
1. ssh_root.yml -> Asks for the user to use for the following tasks, generate a SSH key and distributes it to all Ceph nodes
2. copy_proxy.yml -> Copies an environment file for proxy to all hosts
3. rh_subscribe.yml -> Subscribes all nodes to Red Hat Subscription
4. rh_repository.yml -> Enables the specific repositories on all nodes
5. os_update.yml -> Update of the OS to the latest version
6. add_ceph_user.yml -> Adds a Ceph user on all nodes
7. add_ceph_sudoers.yml -> Adds the Ceph user to sudoers to let it run as root
8. sshkey_ceph_user -> Generates a SSH key on the Ceph administration host
9. add_sshkey_ceph_osd.yml -> Adds the Ceph user SSH key to all OSD nodes
10. copy_config_file.yml -> Copies a predefined config file from Github ~/files to the Ceph administration host
11. install_ceph_ansible.yml -> Installs Ceph Ansible on the Ceph administration node
12. create_ceph_directory.yml -> Creates a specific key directory on the Ceph administration host
13. ping_ceph_hosts.yml -> Tests the connectivity from the Ceph administration host to all Ceph OSD nodes
14. copy_ceph_files.yml -> Copies predefined all.yml, osds.yml, and site-container.yml from Github ~/files to the Ceph administration host
15. Switch to the Ceph user on the Ceph administration node, change to the directory /usr/share/ceph-ansible and run the ceph-ansible playbook to do a container deployment.
[admin@cephadm ceph-ansible]$ ansible-playbook site-container.yml -i hosts
16. After ~20 minutes the cluster is deployed and the final Ansible messages will look like the following.
TASK [show ceph status for cluster ceph] ************************************************************************************
Tuesday 25 January 2022 11:01:04 -0500 (0:00:00.748) 0:19:10.254 *******
ok: [cephosd1 -> cephosd1] =>
msg:
- ' cluster:'
- ' id: 7dbdb6d8-29b2-49e6-a2e9-6e56a1484caf'
- ' health: HEALTH_WARN'
- ' mons are allowing insecure global_id reclaim'
- ' '
- ' services:'
- ' mon: 3 daemons, quorum cephosd1,cephosd2,cephosd3 (age 9m)'
- ' mgr: cephosd1(active, since 22s), standbys: cephosd2, cephosd3'
- ' osd: 64 osds: 64 up (since 6m), 64 in (since 6m)'
- ' '
- ' data:'
- ' pools: 0 pools, 0 pgs'
- ' objects: 0 objects, 0 B'
- ' usage: 64 GiB used, 23 TiB / 23 TiB avail'
- ' pgs: '
- ' '
PLAY RECAP ******************************************************************************************************************
cephadm : ok=133 changed=5 unreachable=0 failed=0 skipped=282 rescued=0 ignored=0
cephosd1 : ok=445 changed=49 unreachable=0 failed=0 skipped=627 rescued=0 ignored=0
cephosd2 : ok=361 changed=36 unreachable=0 failed=0 skipped=533 rescued=0 ignored=0
cephosd3 : ok=368 changed=38 unreachable=0 failed=0 skipped=532 rescued=0 ignored=0
cephosd4 : ok=182 changed=22 unreachable=0 failed=0 skipped=358 rescued=0 ignored=0
INSTALLER STATUS ************************************************************************************************************
Install Ceph Monitor : Complete (0:01:03)
Install Ceph Manager : Complete (0:00:54)
Install Ceph OSD : Complete (0:02:21)
Install Ceph Dashboard : Complete (0:01:33)
Install Ceph Grafana : Complete (0:00:34)
Install Ceph Node Exporter : Complete (0:03:14)
Install Ceph Crash : Complete (0:00:28)
Tuesday 25 January 2022 11:01:04 -0500 (0:00:00.054) 0:19:10.309 *******
===============================================================================
ceph-infra : install chrony ---------------------------------------------------------------------------------------- 266.17s
ceph-container-engine : install container packages ----------------------------------------------------------------- 132.61s
ceph-container-engine : install container packages ----------------------------------------------------------------- 124.19s
ceph-osd : use ceph-volume lvm batch to create bluestore osds ------------------------------------------------------- 58.26s
ceph-dashboard : check if dashboard admin user exists --------------------------------------------------------------- 40.35s
ceph-container-engine : install lvm2 package ------------------------------------------------------------------------ 40.12s
ceph-container-common : pulling registry.redhat.io/rhceph/rhceph-4-rhel8:latest image ------------------------------- 21.65s
ceph-mon : waiting for the monitor(s) to form the quorum... --------------------------------------------------------- 14.96s
ceph-osd : systemd start osd ---------------------------------------------------------------------------------------- 14.85s
ceph-osd : wait for all osd to be up -------------------------------------------------------------------------------- 11.41s
ceph-handler : restart the ceph-crash service ----------------------------------------------------------------------- 11.10s
ceph-node-exporter : start the node_exporter service ---------------------------------------------------------------- 10.16s
ceph-mgr : wait for all mgr to be up --------------------------------------------------------------------------------- 6.34s
gather and delegate facts -------------------------------------------------------------------------------------------- 5.87s
ceph-mgr : create ceph mgr keyring(s) on a mon node ------------------------------------------------------------------ 4.97s
ceph-mon : fetch ceph initial keys ----------------------------------------------------------------------------------- 4.85s
ceph-facts : set_fact devices generate device list when osd_auto_discovery ------------------------------------------- 4.84s
ceph-osd : ensure "/var/lib/ceph/osd/{{ cluster }}-{{ item }}" is present -------------------------------------------- 4.74s
ceph-container-common : get ceph version ----------------------------------------------------------------------------- 4.05s
ceph-config : create ceph initial directories ------------------------------------------------------------------------ 3.77s
17. Install the Ceph tools on the Ceph administration host, copy the Ceph config files from one of the OSD nodes run the follow-ing command to check the status of the cluster:
[root@cephadm ~]# dnf -y ceph-common
[root@cephadm ~]# scp root@cephosd1:/etc/ceph/* /etc/ceph/
[root@cephadm ~]# ceph -s
cluster:
id: 7dbdb6d8-29b2-49e6-a2e9-6e56a1484caf
health: HEALTH_OK
services:
mon: 3 daemons, quorum cephosd1,cephosd2,cephosd3 (age 8d)
mgr: cephosd1(active, since 8d), standbys: cephosd2, cephosd3
osd: 64 osds: 64 up (since 8d), 64 in (since 8d)
data:
pools: 0 pools, 0 pgs
objects: 0 objects, 0 B
usage: 64 GiB used, 23 TiB / 23 TiB avail
pgs:
18. Create a Block pool for persistent storage for Red Hat OpenShift Container Platform:
[root@cephadm ~]# ceph osd pool create ocp-rbd 1024
pool 'ocp-rbd' created
[root@cephadm ~]# ceph osd pool application enable ocp-rbd rbd
enabled application 'rbd' on pool 'ocp-rbd'
[root@cephadm ~]# ceph osd pool set ocp-rbd size 2
set pool 1 size to 2
[root@cephadm ~]# rbd pool init ocp-rbd
The base setup of Red Hat Ceph Storage is now finished, and the cluster can now be integrated by OpenShift Data Foundation into Red Hat OpenShift Container Platform.
To integrate Red Hat Ceph Storage into Red Hat OpenShift Container Platform, OpenShift Data Foundation must be installed first, then the Ceph cluster can be integrated into Red Hat OpenShift Container Platform.
Procedure 1. Install OpenShift Data Foundation
Step 1. Log into the Red Hat OpenShift Container Platform GUI.
Step 2. Click the site on Operator > OperatorHub and select then storage on the left site of the main window. Scroll down until you find “OpenShift Data Foundation” click it and then click Install (Figure 16).
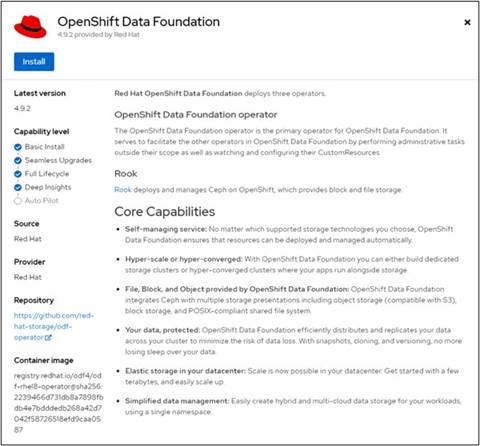
Step 3. Leave everything as default and click Install. When it’s finished, click Create Storage System.
Step 4. Select Connect an external storage platform and click Red Hat Ceph Storage. Leave everything else as default and click Next.
Step 5. Download the Python script and run it on the Ceph administration host:
[root@cephadm ~]# python3 ceph-external-cluster-details-exporter.py --rbd-data-pool-name ocp-rbd --format json --output ceph.json
[{"name": "rook-ceph-mon-endpoints", "kind": "ConfigMap", "data": {"data": "cephosd1=192.168.16.107:6789", "maxMonId": "0", "mapping": "{}"}}, {"name": "rook-ceph-mon", "kind": "Secret", "data": {"admin-secret": "admin-secret", "fsid": "7dbdb6d8-29b2-49e6-a2e9-6e56a1484caf", "mon-secret": "mon-secret"}}, {"name": "rook-ceph-operator-creds", "kind": "Se-cret", "data": {"userID": "client.healthchecker", "userKey": "AQDi6/thN00fCRAAeASMdbHG93DInWLmCEh9Hw=="}}, {"name": "rook-csi-rbd-node", "kind": "Secret", "data": {"userID": "csi-rbd-node", "userKey": "AQDi6/thGMh9CRAA7SNbRgPi8Jt7mLJ5RLo/2A=="}}, {"name": "ceph-rbd", "kind": "StorageClass", "data": {"pool": "ocp-rbd"}}, {"name": "monitoring-endpoint", "kind": "CephCluster", "data": {"MonitoringEndpoint": "192.168.16.107,192.168.16.108,192.168.16.109", "MonitoringPort": "9283"}}, {"name": "rook-csi-rbd-provisioner", "kind": "Se-cret", "data": {"userID": "csi-rbd-provisioner", "userKey": "AQDi6/thJyDGCRAAWHTBobiXIorl+vLhQhkilw=="}}]
Step 6. Upload the file ceph.json to the Red Hat OpenShift Container Platform window and click Next and then click Next again (Figure 17).
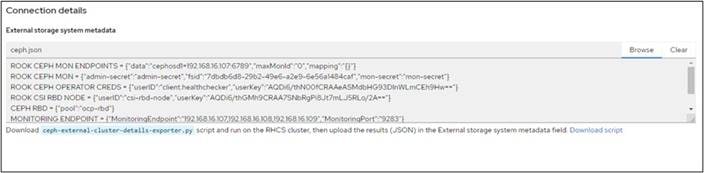
Step 7. Verify the integration:
[root@cephadm ~]# oc get storagecluster -n openshift-storage
NAME AGE PHASE EXTERNAL CREATED AT VERSION
ocs-external-storagecluster 2m Ready true 2022-02-03T14:56:00Z 4.9.0 [root@cephadm ~]# oc get cephcluster -n openshift-storage
NAME DATADIRHOSTPATH MONCOUNT AGE PHASE MESSAGE HEALTH EX-TERNAL
ocs-external-storagecluster-cephcluster 46s Connected Cluster connected successfully HEALTH_WARN true
Red Hat Ceph Storage is now fully integrated into Red Hat OpenShift Container Platform using OpenShift Data Foundation, and the solution works as expected. A performance benchmark in the next chapter proves the connectivity and the overall performance of the solution.
Red Hat OpenShift Data Foundation and Red Hat Ceph Storage Performance Testing
This chapter is organized into the following subjects:
| Chapter |
Subject |
| Red Hat OpenShift Data Foundation and Red Hat Ceph Storage Performance Testing |
Performance was evaluated on Red Hat Ceph Storage 4 running on Cisco UCS X-Series hardware. The goal of the performance testing was to evaluate peak block performance under ideal conditions. The team worked with default configurations and there was no tuning of Cisco UCS, vSphere, Red Hat OpenShift Container Platform, or the Ceph environment.
To evaluate the base performance, we used the tool fioloadgen, which is available here: https://github.com/pcuzner/fioloadgen. The tool runs a fio workload on as many pods as are configured. The number of pods are defined during the installation on Red Hat OpenShift Container Platform along with the workloads you want to run. When you kick off the workload, all pods run the same workload against the storageclass ocs-external-storagecluster-ceph-rbd, that was defined in the previous section.
In our testing, we wanted both the maximum IOPS and the maximum throughput. IOPS testing was done with fio workload patterns of 4 KB block size. Throughput testing was done using workload patterns of 4 MB block size.
The testing was not performed on fully populated Cisco UCS X210c M6 Blades. Only four NVMe were installed per blade. As such, the results below don’t show the maximum IOPS and throughput that be achieved with a fully populated Cisco UCS X-Series chassis and Cisco UCS X210c M6 Blades.
RADOS Block Device Performance Tests
In our tests, we wanted to see the scalability to reach the maximum performance and the absolute IOPS number. In our first test we ran a block size of 4 KB, 100% random workload, with 16 threads per pod (Figure 18).
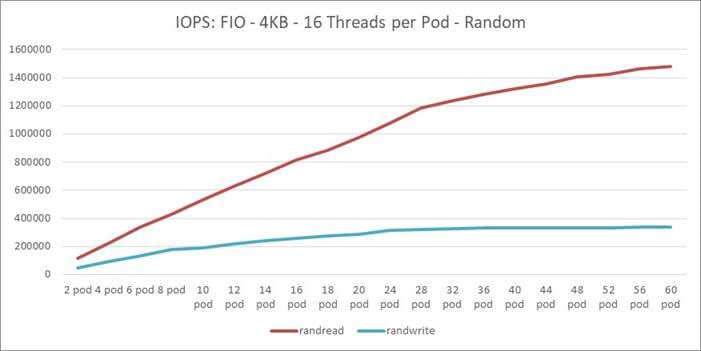
● Read bandwidth peaked at ~1.5M IOPS. The latency was below 1 ms.
● Write bandwidth peaked at ~340k IOPS. The latency stayed below 2ms up to 320k IOPS.
The read bandwidth didn’t reach the maximum with 60 pods whereas the write maximum didn’t change a lot beyond 24 pods.
The numbers for 100% sequential workloads look a bit different (Figure 19).
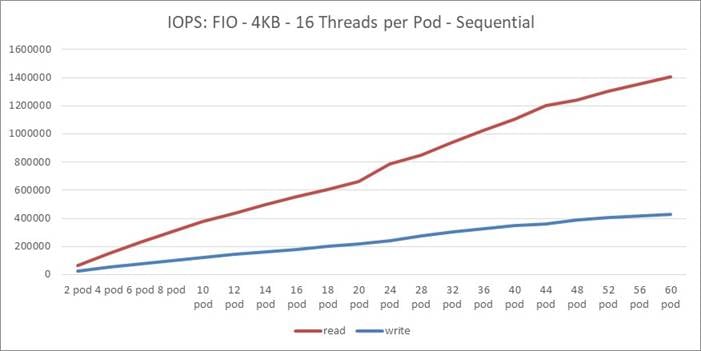
● Read bandwidth peaked at ~1.4M IOPS. The latency was ~1 ms.
● Write bandwidth peaked at ~430k IOPS. The latency stayed below 2ms up to 180k IOPS.
The read bandwidth didn’t reach the maximum with 60 pods, whereas the write maximum became flat beyond 52 pods.
In our last test we wanted to see the maximum throughput with large blocks. To that end we tested a random and sequential workload with a 4 MB block size (Figure 20).
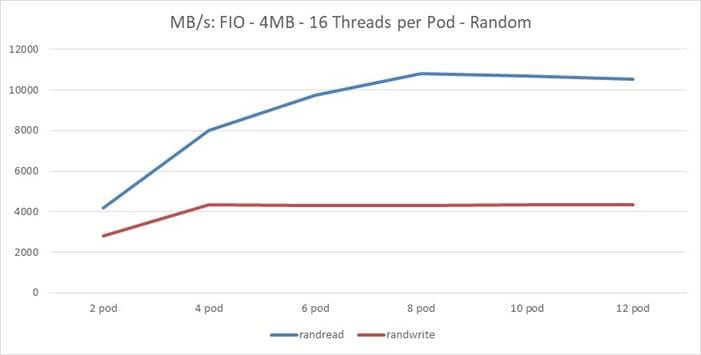
● Read bandwidth peaked at 10.8 GB/s. The latency was ~60 ms.
● Write bandwidth peaked at 4.3 GB/s. The latency was ~180 ms.
The read bandwidth reached the maximum at eight pods, while the write maximum reached the maximum with four pods (Figure 21).
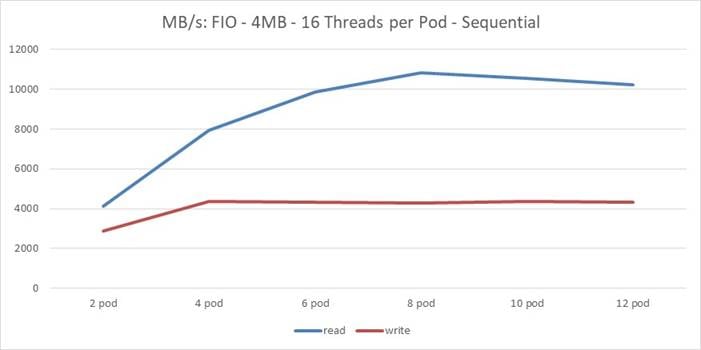
● Read bandwidth peaked at 10.8 GB/s. The latency was ~60 ms.
● Write bandwidth peaked at 4.3 GB/s. The latency was ~230 ms.
The read bandwidth reached the maximum at eight pods, whereas the write maximum reached the maximum with four pods.
The Cisco UCS X-Series Modular System simplifies the data center, adapting to the unpredictable needs of modern applications while also providing for traditional scale-out and enterprise workloads. It reduces the number of server types organizations have to maintain, helping to improve operational efficiency and agility while it helps reduce complexity. The combination of Cisco UCS X-Series with Red Hat OpenShift Container Platform and OpenShift Data Foundation provides developers and IT organizations with a complete hybrid cloud application platform. Both new and existing applications can be deployed on secure, scalable resources with minimal configuration and management overhead resulting in better performance, automation, and efficiency.
Cisco Intersight Infrastructure Service (IIS) is the infrastructure management service for monitoring, provisioning, trouble-shooting, and proactive maintenance of X-Series modular computing. With an extensible API that ties into a full automation with Intersight Ansible, the deployment and configuration of Cisco UCS X-Series for Red Hat OpenShift has never been easier.
Oliver Walsdorf, Technical Marketing Engineer for Software Defined Storage, Computer Systems Product Group, Cisco Systems, Inc.
Oliver has more than 20 years of storage experience, working in different roles at different storage vendors, and is an expert in software-defined storage at Cisco. For the past four years Oliver was focused on developing storage solutions at Cisco. He now works on Red Hat Ceph Storage, develops co-solutions with Red Hat for the overall storage market and published several Cisco documents. With his focus on scale-out storage, he drives the overall attention in the market for new technologies. In his leisure time, Oliver enjoys hiking with his dogs and motorcycling.
Acknowledgements
For their support and contribution to the design, validation, and creation of this Cisco Validated Design, we would like to acknowledge the following for their significant contribution and expertise that resulted in developing this document:
● Michael St-Jean, Red Hat, Inc.
This chapter is organized into the following subjects:
| Chapter |
Subject |
| Glossary of Terms |
|
| Glossary of Acronyms |
Appendix A—Glossary of Terms
This glossary addresses some terms used in this document, for the purposes of aiding understanding. This is not a complete list of all multicloud terminology. Some Cisco product links are supplied here also, where considered useful for the purposes of clarity, but this is by no means intended to be a complete list of all applicable Cisco products.
| AD |
Active Directory. A distributed directory service. |
| adapter port channel |
A channel that groups all the physical links from a Cisco UCS Virtual Interface Card (VIC) to an IOM into one logical link. |
| Ansible |
An infrastructure automation tool, used to implement processes for instantiating and configuring IT service components, such as VMs on an IaaS platform. Supports the consistent execution of processes defined in YAML “playbooks” at scale, across multiple targets. Because the Ansible artefacts (playbooks) are text-based, they can be stored in a Source Code Management (SCM) system, such as GitHub. This allows for software development like processes to be applied to infrastructure automation, such as Infrastructure-as-code (see IaC below). |
| BIOS |
Basic Input Output System. In a computer system, it performs the power up self-test procedure, searches, and loads to the Master Boot Record in the system booting process. |
| DNS |
Domain Name System. An application layer protocol used throughout the Internet for translating hostnames into their associated IP addresses. |
| Dynamic FCoE |
The ability to overlay FCoE traffic across Spine-Leaf data center switching architecture. In its first instantiation, Dynamic FCoE allows running FCoE on top of Cisco FabricPath network in a converged fashion. |
| Ethernet Port |
A generic term for the opening on the side of any Ethernet node, typically in an Ethernet NIC or LAN switch, into which an Ethernet cable can be connected. |
| Fabric port channel |
Fibre Channel uplinks defined in a Cisco UCS Fabric Interconnect, bundled together and configured as a port channel, allowing increased bandwidth and redundancy. |
| FCoE |
Fibre Channel over Ethernet. A computer network technology that encapsulates Fibre Channel frames over Ethernet networks. This allows Fibre Channel to use 10 Gigabit Ethernet networks (or higher speeds) while preserving the Fibre Channel protocol characteristics. The specification is part of the International Committee for Information Technology Standards T11 FC-BB-5 standard published in 2009. FCoE maps Fibre Channel directly over Ethernet while being independent of the Ethernet forwarding scheme. |
| Hypervisor |
A software allowing multiple operating systems, known as guest operating systems, to share a single physical server. Guest operating systems run inside virtual machines and have fair scheduled access to underlying server physical resources. |
| IAC (Infrastructure-as-Code) |
Given the ability to automate aaS via APIs, the implementation of the automation is typically via Python code, Ansible playbooks, and similar. These automation artefacts are programming code that define how the services are consumed. As such, they can be subject to the same code management and software development regimes as any other body of code. This means that infrastructure automation can be subject to all of the quality and consistency benefits, CI/CD, traceability, automated testing, compliance checking, and so on, that could be applied to any coding project. |
| IP address (IP version 4) |
IP version 4 (IPv4), a 32-bit address assigned to hosts using TCP/IP. Each address consists of a network number, an optional subnetwork number, and a host number. The network and subnetwork numbers together are used for routing, and the host number is used to address an individual host within the network or subnetwork. |
| IP address (IP version 6) |
In IP version 6 (IPv6), a 128-bit address assigned to hosts using TCP/IP. Addresses use different formats, commonly using a routing prefix, subnet, and interface ID, corresponding to the IPv4 network, subnet, and host parts of an address. |
| KVM |
Keyboard, video, and mouse |
| LAN |
Logical Area Network. A computer network that interconnects computers within a limited area, such as a home, school, computer laboratory, or office building, using network media. The defining characteristics of LANs, in contrast to Wide-Area Networks (WANs), include their smaller geographic area and non-inclusion of leased telecommunication lines. |
| LUN |
Logical unit number. In computer storage, a number used to identify a logical unit, which is a device addressed by the SCSI protocol or protocols that encapsulate SCSI, such as Fibre Channel or iSCSI. A LUN may be used with any device that supports read/write operations, such as a tape drive, but is most often used to refer to a logical disk as created on a SAN. |
| MAC address |
A standardized data link layer address that is required for every device that connects to a LAN. Ethernet MAC addresses are6 bytes long and are controlled by the IEEE. |
| out-of-band |
A storage virtualization method that provides separate paths for data and control, presenting an image of virtual storage to the host by one link and allowing the host to directly retrieve data blocks from physical storage on another. |
Appendix B –Glossary of Acronyms
AAA—Authentication, Authorization, and Accounting
ACP—Access-Control Policy
ACI—Cisco Application Centric Infrastructure
ACK—Acknowledge or Acknowledgement
ACL—Access-Control List
AD—Microsoft Active Directory
AFI—Address Family Identifier
AMP—Cisco Advanced Malware Protection
AP—Access Point
API—Application Programming Interface
APIC— Cisco Application Policy Infrastructure Controller (ACI)
ASA—Cisco Adaptative Security Appliance
ASM—Any-Source Multicast (PIM)
ASR—Aggregation Services Router
Auto-RP—Cisco Automatic Rendezvous Point protocol (multicast)
AVC—Application Visibility and Control
BFD—Bidirectional Forwarding Detection
BGP—Border Gateway Protocol
BMS—Building Management System
BSR—Bootstrap Router (multicast)
BYOD—Bring Your Own Device
CAPWAP—Control and Provisioning of Wireless Access Points Protocol
CDP—Cisco Discovery Protocol
CEF—Cisco Express Forwarding
CMD—Cisco Meta Data
CPU—Central Processing Unit
CSR—Cloud Services Routers
CTA—Cognitive Threat Analytics
CUWN—Cisco Unified Wireless Network
CVD—Cisco Validated Design
CYOD—Choose Your Own Device
DC—Data Center
DHCP—Dynamic Host Configuration Protocol
DM—Dense-Mode (multicast)
DMVPN—Dynamic Multipoint Virtual Private Network
DMZ—Demilitarized Zone (firewall/networking construct)
DNA—Cisco Digital Network Architecture
DNS—Domain Name System
DORA—Discover, Offer, Request, ACK (DHCP Process)
DWDM—Dense Wavelength Division Multiplexing
ECMP—Equal Cost Multi Path
EID—Endpoint Identifier
EIGRP—Enhanced Interior Gateway Routing Protocol
EMI—Electromagnetic Interference
ETR—Egress Tunnel Router (LISP)
EVPN—Ethernet Virtual Private Network (BGP EVPN with VXLAN data plane)
FHR—First-Hop Router (multicast)
FHRP—First-Hop Redundancy Protocol
FMC—Cisco Firepower Management Center
FTD—Cisco Firepower Threat Defense
GBAC—Group-Based Access Control
GbE—Gigabit Ethernet
Gbit/s—Gigabits Per Second (interface/port speed reference)
GRE—Generic Routing Encapsulation
GRT—Global Routing Table
HA—High-Availability
HQ—Headquarters
HSRP—Cisco Hot-Standby Routing Protocol
HTDB—Host-tracking Database (SD-Access control plane node construct)
IBNS—Identity-Based Networking Services (IBNS 2.0 is the current version)
ICMP— Internet Control Message Protocol
IDF—Intermediate Distribution Frame; essentially a wiring closet.
IEEE—Institute of Electrical and Electronics Engineers
IETF—Internet Engineering Task Force
IGP—Interior Gateway Protocol
IID—Instance-ID (LISP)
IOE—Internet of Everything
IoT—Internet of Things
IP—Internet Protocol
IPAM—IP Address Management
IPS—Intrusion Prevention System
IPSec—Internet Protocol Security
ISE—Cisco Identity Services Engine
ISR—Integrated Services Router
IS-IS—Intermediate System to Intermediate System routing protocol
ITR—Ingress Tunnel Router (LISP)
LACP—Link Aggregation Control Protocol
LAG—Link Aggregation Group
LAN—Local Area Network
L2 VNI—Layer 2 Virtual Network Identifier; as used in SD-Access Fabric, a VLAN.
L3 VNI— Layer 3 Virtual Network Identifier; as used in SD-Access Fabric, a VRF.
LHR—Last-Hop Router (multicast)
LISP—Location Identifier Separation Protocol
MAC—Media Access Control Address (OSI Layer 2 Address)
MAN—Metro Area Network
MEC—Multichassis EtherChannel, sometimes referenced as MCEC
MDF—Main Distribution Frame; essentially the central wiring point of the network.
MnT—Monitoring and Troubleshooting Node (Cisco ISE persona)
MOH—Music on Hold
MPLS—Multiprotocol Label Switching
MR—Map-resolver (LISP)
MS—Map-server (LISP)
MSDP—Multicast Source Discovery Protocol (multicast)
MTU—Maximum Transmission Unit
NAC—Network Access Control
NAD—Network Access Device
NAT—Network Address Translation
NBAR—Cisco Network-Based Application Recognition (NBAR2 is the current version).
NFV—Network Functions Virtualization
NSF—Non-Stop Forwarding
OSI—Open Systems Interconnection model
OSPF—Open Shortest Path First routing protocol
OT—Operational Technology
PAgP—Port Aggregation Protocol
PAN—Primary Administration Node (Cisco ISE persona)
PCI DSS—Payment Card Industry Data Security Standard
PD—Powered Devices (PoE)
PETR—Proxy-Egress Tunnel Router (LISP)
PIM—Protocol-Independent Multicast
PITR—Proxy-Ingress Tunnel Router (LISP)
PnP—Plug-n-Play
PoE—Power over Ethernet (Generic term, may also refer to IEEE 802.3af, 15.4W at PSE)
PoE+—Power over Ethernet Plus (IEEE 802.3at, 30W at PSE)
PSE—Power Sourcing Equipment (PoE)
PSN—Policy Service Node (Cisco ISE persona)
pxGrid—Platform Exchange Grid (Cisco ISE persona and publisher/subscriber service)
PxTR—Proxy-Tunnel Router (LISP – device operating as both a PETR and PITR)
QoS—Quality of Service
RADIUS—Remote Authentication Dial-In User Service
REST—Representational State Transfer
RFC—Request for Comments Document (IETF)
RIB—Routing Information Base
RLOC—Routing Locator (LISP)
RP—Rendezvous Point (multicast)
RP—Redundancy Port (WLC)
RP—Route Processer
RPF—Reverse Path Forwarding
RR—Route Reflector (BGP)
RTT—Round-Trip Time
SA—Source Active (multicast)
SAFI—Subsequent Address Family Identifiers (BGP)
SD—Software-Defined
SDA—Cisco Software Defined-Access
SDN—Software-Defined Networking
SFP—Small Form-Factor Pluggable (1 GbE transceiver)
SFP+— Small Form-Factor Pluggable (10 GbE transceiver)
SGACL—Security-Group ACL
SGT—Scalable Group Tag, sometimes reference as Security Group Tag
SM—Spare-mode (multicast)
SNMP—Simple Network Management Protocol
SSID—Service Set Identifier (wireless)
SSM—Source-Specific Multicast (PIM)
SSO—Stateful Switchover
STP—Spanning-tree protocol
SVI—Switched Virtual Interface
SVL—Cisco StackWise Virtual
SWIM—Software Image Management
SXP—Scalable Group Tag Exchange Protocol
Syslog—System Logging Protocol
TACACS+—Terminal Access Controller Access-Control System Plus
TCP—Transmission Control Protocol (OSI Layer 4)
UCS— Cisco Unified Computing System (Cisco UCS)
UCSM—Cisco UCS Manager
UDP—User Datagram Protocol (OSI Layer 4)
UPoE—Cisco Universal Power Over Ethernet (60W at PSE)
UPoE+— Cisco Universal Power Over Ethernet Plus (90W at PSE)
URL—Uniform Resource Locator
VLAN—Virtual Local Area Network
VM—Virtual Machine
VN—Virtual Network, analogous to a VRF in SD-Access
VNI—Virtual Network Identifier (VXLAN)
vPC—virtual Port Channel (Cisco Nexus)
VPLS—Virtual Private LAN Service
VPN—Virtual Private Network
VPNv4—BGP address family that consists of a Route-Distinguisher (RD) prepended to an IPv4 prefix
VPWS—Virtual Private Wire Service
VRF—Virtual Routing and Forwarding
VSL—Virtual Switch Link (Cisco VSS component)
VSS—Cisco Virtual Switching System
VXLAN—Virtual Extensible LAN
WAN—Wide-Area Network
WLAN—Wireless Local Area Network (generally synonymous with IEEE 802.11-based networks)
WoL—Wake-on-LAN
xTR—Tunnel Router (LISP – device operating as both an ETR and ITR)
For comments and suggestions about this guide and related guides, join the discussion on Cisco Community at https://cs.co/en-cvds.
CVD Program
ALL DESIGNS, SPECIFICATIONS, STATEMENTS, INFORMATION, AND RECOMMENDATIONS (COLLECTIVELY, "DE-SIGNS") IN THIS MANUAL ARE PRESENTED "AS IS," WITH ALL FAULTS. CISCO AND ITS SUPPLIERS DISCLAIM ALL WAR-RANTIES, INCLUDING, WITHOUT LIMITATION, THE WARRANTY OF MERCHANTABILITY, FITNESS FOR A PARTICULAR PURPOSE AND NONINFRINGEMENT OR ARISING FROM A COURSE OF DEALING, USAGE, OR TRADE PRACTICE. IN NO EVENT SHALL CISCO OR ITS SUPPLIERS BE LIABLE FOR ANY INDIRECT, SPECIAL, CONSEQUENTIAL, OR INCIDENTAL DAMAGES, INCLUDING, WITHOUT LIMITATION, LOST PROFITS OR LOSS OR DAMAGE TO DATA ARISING OUT OF THE USE OR INABILITY TO USE THE DESIGNS, EVEN IF CISCO OR ITS SUPPLIERS HAVE BEEN ADVISED OF THE POSSIBILITY OF SUCH DAMAGES.
THE DESIGNS ARE SUBJECT TO CHANGE WITHOUT NOTICE. USERS ARE SOLELY RESPONSIBLE FOR THEIR APPLICA-TION OF THE DESIGNS. THE DESIGNS DO NOT CONSTITUTE THE TECHNICAL OR OTHER PROFESSIONAL ADVICE OF CISCO, ITS SUPPLIERS OR PARTNERS. USERS SHOULD CONSULT THEIR OWN TECHNICAL ADVISORS BEFORE IMPLE-MENTING THE DESIGNS. RESULTS MAY VARY DEPENDING ON FACTORS NOT TESTED BY CISCO.
CCDE, CCENT, Cisco Eos, Cisco Lumin, Cisco Nexus, Cisco StadiumVision, Cisco TelePresence, Cisco WebEx, the Cisco logo, DCE, and Welcome to the Human Network are trademarks; Changing the Way We Work, Live, Play, and Learn and Cisco Store are service marks; and Access Registrar, Aironet, AsyncOS, Bringing the Meeting To You, Catalyst, CCDA, CCDP, CCIE, CCIP, CCNA, CCNP, CCSP, CCVP, Cisco, the Cisco Certified Internetwork Expert logo, Cisco IOS, Cisco Press, Cisco Systems, Cisco Systems Capital, the Cisco Systems logo, Cisco Unified Computing System (Cisco UCS), Cisco UCS B-Series Blade Servers, Cisco UCS C-Series Rack Servers, Cisco UCS S-Series Storage Servers, Cisco UCS Manager, Cisco UCS Management Software, Cisco Unified Fabric, Cisco Application Centric Infrastructure, Cisco Nexus 9000 Series, Cisco Nexus 7000 Series. Cisco Prime Data Center Network Manager, Cisco NX-OS Software, Cis-co MDS Series, Cisco Unity, Collaboration Without Limitation, EtherFast, EtherSwitch, Event Center, Fast Step, Follow Me Browsing, FormShare, GigaDrive, HomeLink, Internet Quotient, IOS, iPhone, iQuick Study, LightStream, Linksys, MediaTone, MeetingPlace, MeetingPlace Chime Sound, MGX, Networkers, Networking Academy, Network Registrar, PCNow, PIX, PowerPanels, ProConnect, ScriptShare, SenderBase, SMARTnet, Spectrum Expert, StackWise, The Fastest Way to Increase Your Internet Quotient, TransPath, WebEx, and the WebEx logo are registered trade-marks of Cisco Systems, Inc. and/or its affiliates in the United States and certain other countries. (LDW_P3)
All other trademarks mentioned in this document or website are the property of their respective owners. The use of the word partner does not imply a partnership relationship between Cisco and any other company. (0809R)