- Preface
- Introduction to Cisco EnergyWise Orchestrator
- Preparing for the Orchestrator Server Installation
- Installing Orchestrator Server Components
- Configuring Orchestrator for EnergyWise Devices
- Orchestrator Client Distribution
- Licensing Devices
- Gathering Data for and Creating Initial Power Management Policies
- Important Notice
Cisco EnergyWise Orchestrator Installation Guide
Bias-Free Language
The documentation set for this product strives to use bias-free language. For the purposes of this documentation set, bias-free is defined as language that does not imply discrimination based on age, disability, gender, racial identity, ethnic identity, sexual orientation, socioeconomic status, and intersectionality. Exceptions may be present in the documentation due to language that is hardcoded in the user interfaces of the product software, language used based on RFP documentation, or language that is used by a referenced third-party product. Learn more about how Cisco is using Inclusive Language.
- Updated:
- April 9, 2014
Chapter: Preparing for the Orchestrator Server Installation
Preparing for the Orchestrator Server Installation
•![]() Server Installation Options and Prerequisites
Server Installation Options and Prerequisites
•![]() Users and Permissions Required for Installation and Deployment
Users and Permissions Required for Installation and Deployment
•![]() Preparing the Server Installation Environment
Preparing the Server Installation Environment
•![]() Setting Up the Database Environment
Setting Up the Database Environment
Power Management Server Component Requirements
Database Requirements
The power management server and Sustainability Dashboard communicate with a Microsoft SQL Server database to store and retrieve client and power-state transition data for reporting.
System Size and Scalability
Best practice is to dedicate the power management server to Orchestrator and not to any additional critical services.
With sufficient hardware, a single power management server can manage up to 70,000 clients.
Orchestrator Client Agent Supported Operating Systems
All operating systems must have the latest patches installed.
•![]() Windows 7 RTM (x86 and x64)
Windows 7 RTM (x86 and x64)
•![]() Microsoft Windows Vista SP2 (x86)
Microsoft Windows Vista SP2 (x86)
•![]() Windows XP with SP3 (x86)
Windows XP with SP3 (x86)
Server Installation Options and Prerequisites
When you run the Orchestrator setup program, you can select a typical or an advanced installation option.
•![]() The typical installation installs all components in the Table 2-3. It assumes the computer you use to run the setup program hosts both the power management and web services. You are prompted for database credentials.
The typical installation installs all components in the Table 2-3. It assumes the computer you use to run the setup program hosts both the power management and web services. You are prompted for database credentials.
Components are installed in standard default locations, for example, Program Files and Inetpub\wwwroot on the local computer. It assigns default port 80 for HTTP communications.
The typical installation suits typical small to medium-sized networks with centralized administration.
•![]() You can use the advanced installation to select components to install. For some components, you are prompted to provide or confirm location and port details.
You can use the advanced installation to select components to install. For some components, you are prompted to provide or confirm location and port details.
The advanced installation gives more flexibility in enterprise-level networks so that you can host any of the Orchestrator components on separate computers. For example, you can host the queueing service on one computer, the power management service on another, and the power management processor on a third.
Installing components on separate computers takes some manual post-installation configuration. See the "Installing and Setting Server Components" section on page 3-1 for information on where this configuration is needed.
Prerequisite Software
Some Orchestrator server components require the additional software included on the distribution disk.
•![]() The .NET 3.5 framework and Java 6 update 17 must be installed before you run the Orchestrator installer.
The .NET 3.5 framework and Java 6 update 17 must be installed before you run the Orchestrator installer.
•![]() ActiveMQ 5.3 is requires for the power management service processor component.
ActiveMQ 5.3 is requires for the power management service processor component.
If you plan to run all of the server components on the same computer, install ActiveMQ before you run the Orchestrator installation.
•![]() Adobe Flash Player 10 must be installed on the computer that will run the Administrator console.
Adobe Flash Player 10 must be installed on the computer that will run the Administrator console.
Server Configuration Requirements
If Windows Firewall is enabled on the Orchestrator server computer and you will use web-based Orchestrator components, such as the Sustainability Dashboard and Wake for Remote Access, you need to configure the firewall to allow those components access.
For information, see the "Configuring Windows Firewall to Allow Web Components to Access the Server" section on page 7-9.
Server Installation Components
|
|
|
|
|---|---|---|
Power management service |
PMPService (web) |
Communicates power management activity between managed devices and the database, and between devices and server. |
Power management database |
SQL server database (outside of Orchestrator) |
Stores power-state and user-activity data. Requires SQL Server 2005 or 2008. During installation you are prompted for the database server, name, instance, and authentication method. For other database requirements, see the "Setting Up the Database Environment" section. |
Administrator |
Admin (web) |
Web server API and administrator console that runs on top. Requires .NET 3.5 and IIS 6.0 running on Windows Server 2003. During installation, you are prompted to confirm the web site and HTP port. The browser-based user interface requires Adobe Flash Player 10. |
EnergyWise provisioning service |
EWProvService (web) |
Facilitates communication between the power management server and the EnergyWise protocol, which enables managing and measuring power use on non-PC EnergyWise devices. |
Enterprise power management processor |
Enterprise power management service (Windows) |
Windows service that performs critical power management server functions. Required if you install the PMP. |
Power management queue service |
ActiveMQ service (Windows) |
Enables asynchronous messaging between the administrator API and the PMP (between server and clients). Requires ActiveMQ 5.3, which comes with the Orchestrator distribution and is installed if it is not detected. |
Web Site Files and Virtual Directories
The installer creates these IIS virtual directories for the components that you install:
•![]() Admin: Administrator API and Administrator console.
Admin: Administrator API and Administrator console.
•![]() EWProvService: Cisco EnergyWise provisioning
EWProvService: Cisco EnergyWise provisioning
•![]() PMPService
PMPService

Note ![]() You install the Cisco EnergyWise Proxy Server through a separate setup program. For information, see the "Installing the EnergyWise Proxy Server" section on page 3-6.
You install the Cisco EnergyWise Proxy Server through a separate setup program. For information, see the "Installing the EnergyWise Proxy Server" section on page 3-6.
Users and Permissions Required for Installation and Deployment
Creating User Accounts for Orchestrator and EnergyWise Services
Each service installed with Orchestrator runs under a corresponding user account. You must configure the permissions for the user account to allow the service to access other components of Orchestrator.
In general the Orchestrator services require administrator permissions on the computer where the services are installed. However, instead of using the local system account or an administrator account that is also a personal account, it is more secure and useful for troubleshooting if you create a user specifically for running Orchestrator components.
Services Installed with Orchestrator Server Setup Program
The Orchestrator setup program installs a number of services. Two are Windows services that run on the power management server. The others are web services that run through IIS. Often the power management and web servers are hosted on the same computer as is the case if you choose the Typical installation path in the Orchestrator setup program.
For the Typical installation path, default options are used, and all components are installed on the same computer. The Orchestrator IIS application pool runs under the network account, the Enterprise Power Management Processor runs under the local system account, and the IIS default web site is used with all of its default settings. The web services (PMPService, Admin, and EWProvService) run under the identity of the application pool.
If you select the Advanced path, you can install individual components and specify users that run the services.
Permissions Required For Sustainability Dashboard
Users and Services
User that runs the Wake for Remote Access service
•![]() Must be a member of the Windows group IIS_WPG on the IIS server.
Must be a member of the Windows group IIS_WPG on the IIS server.
•![]() Must be a member of a Orchestrator security role that has Change Device State permissions on all relevant security groups that are set up in the Administrator console.
Must be a member of a Orchestrator security role that has Change Device State permissions on all relevant security groups that are set up in the Administrator console.
Preparing the Server Installation Environment
By default, Internet Explorer Enhanced Security is enabled Windows 2003 server. To avoid security-related errors during installation, you can disable this component. You do this in the Control Panel in the Add/Remove Windows Components section under Add/Remove Programs.
Step 1 ![]() Log in as domain administrator on the server on which you want to install the Orchestrator services.
Log in as domain administrator on the server on which you want to install the Orchestrator services.
Step 2 ![]() In the Windows Control Panel, go to Add/Remove programs / Windows Components / Application server, and click Details. Select ASP.NET and IIS if they are not already enabled.
In the Windows Control Panel, go to Add/Remove programs / Windows Components / Application server, and click Details. Select ASP.NET and IIS if they are not already enabled.
Step 3 ![]() Prepare the database:
Prepare the database:
a. ![]() Make sure the SQL Server is updated to the latest service pack or patch.
Make sure the SQL Server is updated to the latest service pack or patch.
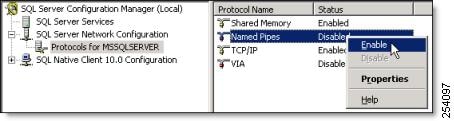
b. ![]() Open SQL Server Configuration Manager, navigate to Protocols for MSSQLSERVER, and enable Named Pipes.
Open SQL Server Configuration Manager, navigate to Protocols for MSSQLSERVER, and enable Named Pipes.
Figure 2-1 Named Pipes
c. ![]() Restart the SQL Server from the Services console or the command line. From the command line use:
Restart the SQL Server from the Services console or the command line. From the command line use:
net stop mssqlserver and net start mssqlserver.
Step 4 ![]() Install the .NET 3.5 and Java 6 update 17 pre-requisite software if it is not already on the computer.
Install the .NET 3.5 and Java 6 update 17 pre-requisite software if it is not already on the computer.
•![]() In the Orchestrator distribution, open the pre-reqs folder, and run dotnetfx35setup.exe and JavaSetup6u17.exe, following the wizard instructions.
In the Orchestrator distribution, open the pre-reqs folder, and run dotnetfx35setup.exe and JavaSetup6u17.exe, following the wizard instructions.
Step 5 ![]() Register Windows Communication Foundation (WCF) with IIS:
Register Windows Communication Foundation (WCF) with IIS:
•![]() Open a command window and run this command: "C:\Windows\Microsoft.NET\Framework\v3.0\Windows Communication Foundation\ServiceModelReg.exe" -i -x
Open a command window and run this command: "C:\Windows\Microsoft.NET\Framework\v3.0\Windows Communication Foundation\ServiceModelReg.exe" -i -x
Setting Up the Database Environment
You need to decide where to host the database. If your overall implementation is relatively compact, you might put it on the same computer as the server. Usually the database resides on a separate server maintained by a database administrator.
Using a Local Database
If the server will host both the database and the Orchestrator server, log in as a local administrator, and create the Orchestrator database during installation.
If you decide to create a user for Orchestrator, make sure it has the appropriate database permissions. See the Using a Remote Database section for more information.
Using a Remote Database
You can host the power management database on a separate computer, either in the same domain or across domains. If you use a remote database, you can create and configure the database before or after you install Orchestrator, or the installer can create the database.
•![]() Creating the database during installation
Creating the database during installation
The database administrator (DBA) grants permission on the SQL server to allow the user running the Orchestrator installation program to create a new database. After installation, the DBA can reduce permissions for that user for administration.
Required permissions—The Orchestrator user must be a member of the dbcreator role during installation. After installation, the minimum permissions required are db_datareader and db_datawriter.
•![]() Creating the database independently of Orchestrator installation
Creating the database independently of Orchestrator installation
If the DBA creates the database separately use either of these options to configure it:
–![]() Create it before installation. The user installing Orchestrator points to it during installation. The setup program then creates and configures the database tables.
Create it before installation. The user installing Orchestrator points to it during installation. The setup program then creates and configures the database tables.
Required permissions—The user running the Orchestrator installer and service must have db_datareader anddb_datawriter permission on the database.
–![]() The DBA creates and configures the database before or after the installation so that the installer does not use the database server. During installation, database credentials are entered so that the installation program can write the proper settings to the configuration files.
The DBA creates and configures the database before or after the installation so that the installer does not use the database server. During installation, database credentials are entered so that the installation program can write the proper settings to the configuration files.
The SQL scripts for creating the tables for Orchestrator are in the distribution package.
To set up the remote database environment:
1. ![]() See the "Enabling SQL Remote Connections" section.
See the "Enabling SQL Remote Connections" section.
2. ![]() Configure database or permissions for your process:
Configure database or permissions for your process:
–![]() Go to Setting Database Permissions for the Orchestrator Installation, if you want the installer to configure the database tables.
Go to Setting Database Permissions for the Orchestrator Installation, if you want the installer to configure the database tables.
–![]() Go to Creating and Configuring the Database Manually, if your organization has specific database processes and you do not want the installer to access the database server.
Go to Creating and Configuring the Database Manually, if your organization has specific database processes and you do not want the installer to access the database server.
Enabling SQL Remote Connections
Assumptions:
•![]() You want to use Orchestrator with a remote database.
You want to use Orchestrator with a remote database.
•![]() You created or designated the Windows user that will install and run Orchestrator.
You created or designated the Windows user that will install and run Orchestrator.
•![]() SQL Server is installed on the computer that will host the database.
SQL Server is installed on the computer that will host the database.
The steps are based on SQL Server 2005. If you are using a different version, some settings might vary.
To enable remote database connections:
Step 1 ![]() On the Windows Start menu, choose Microsoft SQL Server 2005 / Configuration Tools / SQL Server Surface Area Configuration.
On the Windows Start menu, choose Microsoft SQL Server 2005 / Configuration Tools / SQL Server Surface Area Configuration.
Step 2 ![]() Verify that the correct database server is listed, change it if necessary, and click Surface Area Configuration for Services and Connections.
Verify that the correct database server is listed, change it if necessary, and click Surface Area Configuration for Services and Connections.
Step 3 ![]() Expand the item that represents the appropriate instance of SQL Server.
Expand the item that represents the appropriate instance of SQL Server.
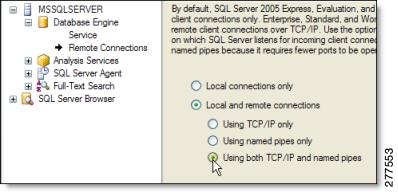
Step 4 ![]() Under Database Engine (see Figure 2-2), open Remote Connections, and under Local and Remote Connections, select Using TCP/IP and named pipes and click OK.
Under Database Engine (see Figure 2-2), open Remote Connections, and under Local and Remote Connections, select Using TCP/IP and named pipes and click OK.
Figure 2-2 Database Engine
After completing this procedure:
Allowing communications through the database port
The default port used by SQL Server is 1433. If you run a firewall application on the SQL Server host computer, make sure that network requests to SQL Server are allowed to pass through the firewall on this port. Refer to your SQL Server documentation for more information.
Setting Database Permissions for the Orchestrator Installation
Step 1 ![]() On the Windows Start menu, choose All Programs / Microsoft SQL Server / SQL Server Management Studio.
On the Windows Start menu, choose All Programs / Microsoft SQL Server / SQL Server Management Studio.
Step 2 ![]() In the Connect to Server dialog box, specify the SQL Server name and instance, and click Connect.
In the Connect to Server dialog box, specify the SQL Server name and instance, and click Connect.
Step 3 ![]() Under the Security folder, right-click Logins, and choose New Login.
Under the Security folder, right-click Logins, and choose New Login.
Step 4 ![]() In the Login - New dialog box, under Login name:
In the Login - New dialog box, under Login name:
•![]() In the format [domain name]\[user name], enter the Orchestrator server domain and the Windows user you created for installing Orchestrator.
In the format [domain name]\[user name], enter the Orchestrator server domain and the Windows user you created for installing Orchestrator.
•![]() Select Windows authentication.
Select Windows authentication.
Step 5 ![]() Select Server Roles (see Figure 2-3), and check the dbcreator check box.
Select Server Roles (see Figure 2-3), and check the dbcreator check box.
Figure 2-3 Server Roles
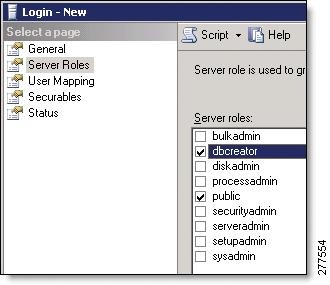
After the installation, you can assign a role to the Orchestrator user to reduce permission levels. The minimum post-installation permissions are db_datareader and db_datawriter.
Creating and Configuring the Database Manually
You can configure the Orchestrator database independently of installation so the installer does not need to access the database server.
You can do this manual process before or after installation.
Step 1 ![]() In the Orchestrator distribution folder, go to the pre-reqs\Database folder, which contains this script.
In the Orchestrator distribution folder, go to the pre-reqs\Database folder, which contains this script.
•![]() EnterprisePowerManagementDb.sql
EnterprisePowerManagementDb.sql
Note ![]() Other scripts might exist in the folder. You need only the one specified here.
Other scripts might exist in the folder. You need only the one specified here.
Step 2 ![]() Use the process to make the script file available from the database server, for example, copy it to a shared network location.
Use the process to make the script file available from the database server, for example, copy it to a shared network location.
Step 3 ![]() In SQL Server Management Studio, create a new database and name it Enterprise Power Management Server.
In SQL Server Management Studio, create a new database and name it Enterprise Power Management Server.
Step 4 ![]() Right-click the Users folder for the database, and choose Add Log in.
Right-click the Users folder for the database, and choose Add Log in.
Step 5 ![]() Add the user that you designated to run the Orchestrator services.
Add the user that you designated to run the Orchestrator services.
Step 6 ![]() Add the user to the appropriate role, or configure permissions manually.
Add the user to the appropriate role, or configure permissions manually.
The required permissions are db_datareader and db_datawriter.
Step 7 ![]() Click New Query, and in the list of available databases, select the EnterprisePowerManagementDB.
Click New Query, and in the list of available databases, select the EnterprisePowerManagementDB.
Step 8 ![]() In Windows Explorer, navigate to the location of the script file listed in step 1, drag it to the empty new query tab in SQL Server Management Studio, and click the Execute button to run it.
In Windows Explorer, navigate to the location of the script file listed in step 1, drag it to the empty new query tab in SQL Server Management Studio, and click the Execute button to run it.
 Feedback